

Page 1
DO NOT RETURN THIS
PRODUCT TO THE STORE!
Please contact
Great Plains Industries, Inc.
before returning any product.
If you are missing parts, or
experience problems with
your installation, contact our
Customer Support
Department. We will be
happy to assist you.
M-3020 FUEL PUMP
OWNER’S MANUAL
800-835-0113,
316-686-7361
or
email: gpisales@gplains.com
TABLE OF CONTENTS
General Information ......................................................
Installation ....................................................................
Operation ......................................................................
Maintenance .................................................................
Troubleshooting ............................................................
Illustrated Parts Drawing ..............................................
Specications ...............................................................
Parts and Service .........................................................
To the owner...
Congratulations on receiving your GPI fuel pump. We are
pleased to provide you with a system designed to give
you maximum reliability and efciency.
Your fuel pump is designed, tested, and approved for use
with gasoline (up to 15% alcohol blends such as E15),
diesel fuel (up to 20% biodiesel blends such as B20) and
kerosene. Please take all due precautions when handling
these ammable liquids. Your safety is important to us.
Also, to assure the longest possible service life, it is important that you follow the operation and maintenance
procedures outlined in this manual. We are proud to
provide you with a quality product and dedicated support. Together with your conscientious use, we are sure
that you will obtain years of safe, dependable service.
02/2017
Great Plains Industries, Inc. is a member of
the Petroleum Equipment Institute.
Victor Lukic, President
Great Plains Industries, Inc.
922125-01 Rev A
Page 2
GENERAL INFORMATION
The purpose of this manual is to assist you in installing,
operating and maintaining your GPI pump. This manual
covers 12-volt DC model M-3020.
M-3020 must be connected to a 12-volt DC power source
only.
Do not attempt connection of any pump to a 115-volt AC
or 230-volt AC power source.
An automatic bypass valve prevents pressure build
up when the pump is on with the nozzle closed. To
avoid damage, do not run the pump more than 10
minutes with the nozzle closed.
The duty cycle of this pump is 30 minutes ON and 30
minutes OFF. Allow the pump to cool for 30 minutes.
This pump is designed for use only with gasoline (up
to 15% alcohol blends such as E15), diesel fuel (up to
20% biodiesel blends such as B20) and kerosene. Do
not use this pump for dispensing any uids other than
those for which it was designed. To do so may damage
pump components and will void the warranty.
This pump is designed to operate on a typical DC automotive electrical system. The pump is designed to operate
with the appropriate DC voltage at the motor leads and
the ratings are determined at this voltage. Performance
may vary due to length of power cord, battery condition
or output from the vehicle charging system that will affect
system voltage.
Do not leave the system running with uids. “Dry running”
can damage the pump.
Do not pump the tank completely dry, as contaminants
from the bottom of the tank may enter the pump.
• Know and follow all safety precautions when handling
petroleum fuels.
• Ensure that all equipment operators have access to
adequate instructions concerning safe operating and
maintenance procedures.
Observe all safety precautions concerning safe handling
of petroleum fuels.
To ensure safe operation, all fuel transfer systems must
be properly grounded. Proper grounding means a continuous metal-to-metal contact from one component to the
next, including tank, bung, pump, meter, lter, hose and
nozzle. Care should be taken to ensure proper grounding
during initial installation and after any service or repair
procedures. For your safety, please take a moment to
review the warnings below.
To prevent physical injury, observe precautions against
re or explosion when dispensing fuel. Do not operate
the system in the presence of any source of ignition
including running or hot engines, lighted cigarettes, or
gas or electric heaters.
Observe precautions against electrical shock when operating the system. Serious or fatal shock can result from
operating electrical equipment in damp or wet locations.
Inspect external pump wiring regularly to make sure it is
correctly attached to the battery. To avoid electrical shock,
use extra care when connecting the pump to power.
Avoid prolonged skin contact with petroleum fuels. Use
protective goggles, gloves and aprons in case of splashing or spills. Change saturated clothing and wash skin
promptly with soap and water.
Observe precautions against electrical shock when
servicing the pump. Always disconnect power before
repairing or servicing. Never apply electrical power to
the system when any of the coverplates are removed.
If using solvent to clean pump components or tank, observe the solvent manufacturer’s recommendations for
safe use and disposal.
SAFETY INSTRUCTIONS
The following safety alert symbols are used in this
manual.
DANGER
WARNING
CAUTION
It is your responsibility to:
• Know and follow applicable national, state and local
safety codes pertaining to installing and operating
electrical equipment for use with ammable liquids.
2
2
DANGER indicates a hazardous
situation which, if not avoided, will
result in serious injury or death.
WARNING indicates a hazardous
situation which, if not avoided,
could result in serious injury or
death.
CAUTION indicates a hazardous
situation which, if not avoided,
may result in minor or moderate
injury.
INSTALLATION
Install Suction Pipe
Your pump is designed to mount directly to a standard
2-inch NPT tank tting. Apply thread tape to the suction
pipe thread and securely tighten the suction pipe to the
pump inlet port.
Make sure any check valve or foot valves used are
equipped with proper pressure relief valves.
Install Pump on Tank
• Clean the tank interior of all dirt and foreign material.
• Place the pump with suction pipe installed on the tank
tting and tighten securely. Make sure the pump is
not cross-threaded.
• To prevent pressure build-up and possible fuel leaks
through the nozzle, make sure the tank is vented. A
vent cap rated at 3 psi or less is recommended.
Page 3
Connect to a Power Source
Please consult the Owner’s Manual for your vehicle
before proceeding.
NOTE: The M-3020 must be connected to a 12-volt
DC power source only.
Do not attempt connection of any pump to a 115-volt
AC or 230-volt AC power source
WARNING: Do not attempt to power the pump
from vehicle wiring smaller than 12 gauge, such as
the cigarette lighter wire, as these thin wires could
overheat and cause a re.
NOTE: This pump is pre-wired for installation in
CLASS I, DIVISION 2 locations such as portable fuel
tanks, trailers, etc. Connection to a battery will depend
upon the application.
WARNING: If pump is to be installed in
a CLASS I, DIVISION I location please
contact GPI for the appropriate product.
Verify switch is in OFF position, then route the electrical wires to the source of the vehicle power system.
Be sure to support the wires as necessary and protect
them from sharp edges, heat or anything that could
damage the wires.
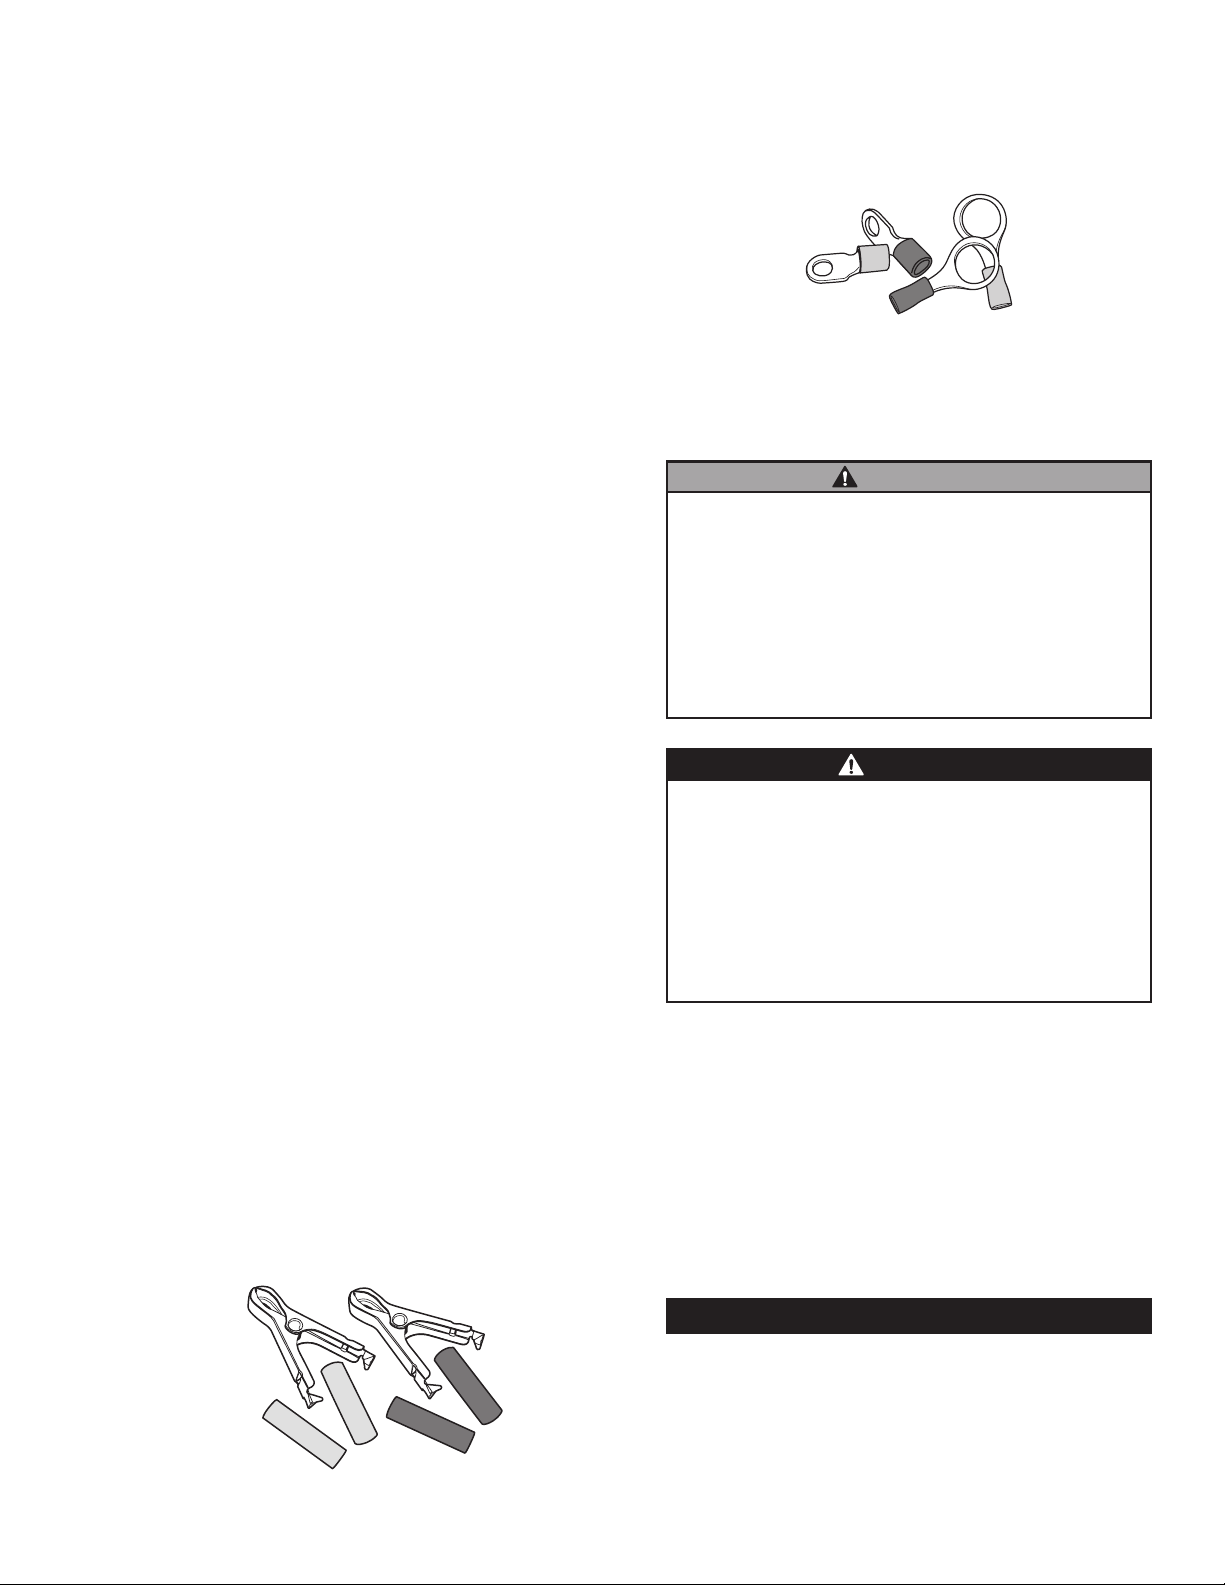
Step 4
For permanent wiring:
Connect the red and black power cords to terminal
post rings (not included) (Figure 7).
Figure 7
Step 5
Check all connections to make sure they are connected per instructions and all electrical codes. The
installation is now complete.
WARNING
Carefully route the power cord to the battery, protecting the
power cord from hot surfaces, sharp edges or anything that could
damage the power cord, resulting in a short circuit.
A fuse is provided to protect the power cord and motor. Install
fuse in the white (or red) wire of the power cord as close as
possible to the battery. Connect the red wire of the fuse to the
positive (ungrounded) side of battery. Connect black wire to the
negative (grounded) side of the battery.
Failure to follow these instruction could result in death, serious
injury or loss of equipment due to short circuit, re or explosion.
Step 1
If the power cord provided is too long cut to desired
length. Carefully strip 3 to 4 inches (7.5 to 10 cm) of
outer insulation from end of power cord. DO NOT
CUT INNER WIRES. Next, strip ¼ inch (0.6 cm) of
insulation from the black and red power cord wires.
Step 2
For a negative ground system, rst disconnect the
vehicle’s ground wire, and then wire as follows: Insert
one end of the fuse (J) into the wire connector (H) and
crimp. Insert the red power cord wire into the other
end of the wire connector and crimp. Make sure the
fuse is positioned outside of hazardous areas and as
close to the battery as possible. Make a solid electrical connection to the grounded side of the battery
with the remaining black wire. Connecting directly to
the battery terminal or the end of the battery cable is
recommended.
Step 3
For temporary wiring: Connect the red and black power
cords to alligator clamps (not included) (Figure 6).
DANGER
If the pump is to be installed in a Hazardous (Classied) location,
it must be installed by a licensed electrician and conform to
National Fire Protection Association (NFPA) codes 30 and 70.
You, as the owner, are responsible for seeing that the installation
and operation of your pump complies with NFPA codes as well
as any applicable state and local codes. Rigid conduit must be
used to install wiring. Note that the lead wires are factory-sealed
isolating the motor from the junction box.
Failure to follow these wiring instructions may result in death or
serious injury from shock, re or explosion.
Install Hose and Nozzle
All threaded fuel connections must be sealed with thread
tape or a pipe thread sealing compound approved for
use with petroleum fuels.
After sealing the threads, tighten the hose into the pump
outlet and the nozzle on the hose. The nozzle can be
placed in the nozzle holder only when the pump is off.
The nozzle holder allows the pump to be locked when
the nozzle is in place.
OPERATION
Figure 6
ALWAYS FOLLOW SAFETY PRECAUTIONS WHEN
OPERATING THIS EQUIPMENT. REVIEW THE SAFETY
INSTRUCTIONS. Before each use, repair leaks around
seals or connections. Make sure hoses are in good condition and connections are tight. Make sure the work area
is dry. Make sure the pump is properly grounded. Repair
3
3
Page 4

any corroded or damaged wiring before use. Ensure
the tank contains enough fuel. Make sure the fuel is not
contaminated with debris.
Dispense Fuel
Do not use this pump for water, chemicals or herbicides.
Dispensing any uid other than those listed in this manual
will damage the pump. Use of the pump with unauthor-
ized uids will void the warranty.
Turn the pump on by removing the nozzle from its holder
and pulling back on the switch lever. Insert the nozzle
into the receiving tank and squeeze the handle to start
fuel ow. When done, release the nozzle handle.
After dispensing fuel, push the switch lever forward to
turn the pump off and return the nozzle to the holder. The
nozzle may be locked in place to prevent unauthorized
use by installing a padlock (not provided) through the
hole in the top of the nozzle cover.
The pump is designed to be self-priming. If fuel is not
delivered within 15 to 20 seconds, turn the pump off and
refer to the priming information in the Troubleshooting
Section.
An automatic bypass valve prevents pressure buildup
when the pump is on with the nozzle closed. To avoid
pump damage, do not run the pump for more than 10
minutes with the nozzle closed.
Motor Protector
To Clean or Replace Strainer
All pump models have an inlet strainer. If owrate is
reduced, clean or replace strainer (see below).
This pump is equipped with a motor protective device
that also serves as the ON / OFF switch.
NOTE: The motor protective device is not intended to
provide branch circuit protection.
• If motor is overloaded, the protective device
trips and opens the circuit. This feature protects
the motor from damage and must be reset
manually.
• To reset, turn the switch lever off and then back
on.
• If the protective device trips again quickly, turn
the power off at the source before attempting to
troubleshoot the problem. Follow instructions
as described in the Troubleshooting Section
of this manual.
• Make sure the switch lever is off before restoring power.
• Turn the switch lever on and restart.
MAINTENANCE
This pump is designed for minimum maintenance. Motor
bearings are sealed and require no lubrication. Inspect
the pump and components regularly for fuel leaks and
make sure the hose and power cord are in good condition. Keep the pump exterior clean to help identify leaks.
Turn the pump off and disconnect from power. Remove
and clean the strainer with a soft-bristled brush and
solvent. If the strainer is very dirty, compressed air may
be used. If damaged, replace the strainer.
Replace components making sure that they are seated
and fasteners are tightened securely.
REPAIR
Carefully inspect all parts for wear or damage. Replace
components as necessary. The Illustrated Parts List gives
information on replacement parts and kits.
Review the Safety Instructions before proceeding.
WARNING
Observe precautions against electrical shock when servicing the
pump. Always disconnect power before repairing or servicing.
Never apply electrical power to the system when any of the
coverplates are removed..
CAUTION
Avoid prolonged skin contact with petroleum fuels. Use protective
goggles, gloves and aprons in case of splashing or spills. Change
saturated clothing and wash skin promptly with soap and water.
4
Page 5

TROUBLESHOOTING
SYMPTOM PROBABLE CAUSE CORRECTIVE ACTION
A. MOTOR DOES
NOT RUN
B. MOTOR RUNS
BUT DOES NOT
PUMP FLUID
C. PUMP FAILS TO
PRIME
D. LOW FLOWRATE
E. MOTOR STALLS
WHEN NOZZLE
IS CLOSED
F. FUEL LEAKAGE
G. MOTOR
OVERHEATS
1. Wiring problem Conrm all connections are tight and correct voltage is getting
to the pump.
2. Fuse blown Inspect fuse in fuse holder on power cord. If blown, replace.
3. Rotor or vanes jammed Remove coverplate to expose rotor. Remove any obstructions.
Check for excessive vane and slot wear. If damaged, replace.
4. Circuit breaker switch defective Replace switch.
5. Motor bad Contact the factory.
1. Tank level low Add fuel to tank.
2. Clogged lter assembly Remove and clean lter assembly or replace.
3. Suction line problem Remove suction pipe and remove any obstructions.
4. Broken motor shaft key Replace shaft key in end of shaft. Check slot and vane for
excessive wear. Remove any obstructions.
5. Bypass poppet stuck open Remove bypass poppet and clean. If damaged, replace.
6. Motor running backwards Check wiring to conrm correct polarity.
1. Air leak in system Check for air leaks at all joints. Reseal and tighten.
2. Bypass poppet stuck open Remove bypass poppet and clean. If damaged, replace.
3. Vanes worn or sticking Check slots and vanes for excessive wear or damage.
If damaged, replace.
4. Motor runs backwards Check wiring to conrm correct polarity
1. Low voltage Check battery voltage. Conrm voltage is correct.
2. Wiring problem Conrm correct polarity and all connections are tight. Conrm
wire size is correct and not too small.
3. Clogged lter assembly Remove and clean lter assembly or replace.
4. Air leak in system Check for air leaks at all joints. Reseal and tighten.
5. Bypass poppet stuck open Remove bypass poppet and clean. If damaged, replace.
6. Vanes worn or sticking Remove any obstructions. Check rotor slots and vanes for
excessive wear. Replace if damaged.
7. Outlet is blocked Check all accessories for blockage. Remove any obstructions.
8. Clogged or broken suction pipe Remove pump and clear suction pipe, replace as needed.
9. Fuel level low Fill tank.
10. Using off-the-shelf automatic nozzle Factory-supplied automatic nozzle is recommended.
11. Hose damaged Replace hose.
1. Bypass poppet stuck closed Remove bypass poppet and clean or replace as needed.
2. Rotor or vanes worn Check rotor and vanes for excessive wear. Replace as needed.
3. Low voltage Check incoming battery voltage and tighten wiring connections.
4. Motor defective UL Listing requires specic treatment for motor replacement,
contact factory.
1. Threaded joints loose Check and reseal threaded joints.
2. Insufcient bolt torque Retighten bolts.
3. Lost or damaged O-rings Check O-rings for damage. Replace as needed.
4. Shaft seal worn or damaged Fuel leaking from drain hole indicates shaft seal needs to be
replaced.
5. Hose damaged Replace hose.
1. Pumping high viscosity uids Pump only low viscosity uids.
2. Clogged lter assembly Clean lter assembly.
3. Clogged or broken suction pipe Remove pump and clear suction pipe, replace as needed.
4. Duty cycle too long Duty cycle is 30 minutes ON and 30 minutes OFF.
5. Motor failure Ball bearings damaged. UL Listing requires specic treatment
for motor replacement, contact factory.
6. Bypass poppet clogged Remove bypass poppet and clean.
5
Page 6

SPECIFICATIONS
APPLICATION: Designed to safely transfer low viscosity petroleum fuels such as gasoline (up to 15% alcohol
PUMP HOUSING: Cast Iron
PERFORMANCE: Pump Rate: Up to 20 GPM (76 LPM)
OPERATING TEMPERATURE: -20°F to +125°F (-29°C to +52°C)
BYPASS PRESSURE 20 PSI
ELECTRICAL SPECIFICATIONS:
MECHANICAL CONNECTION: Bung 2 inch NPT
ACCESSORIES:
WEIGHT: M-3020-AD 41.5 lbs. (18.8 kg)
blends such as E15), diesel fuel (up to 20% biodiesel blends such as B20) and kerosene. Pump
is designed for permanent mounting on vented storage tanks.
Duty Cycle: 30 min. ON, 30 min. OFF
Suction Lift: Up to 15 feet (4.6 meters)
Pumps are capable of operation down to -40°F. Any pump operation below -20°F has not been
evaluated by UL.
Input: 12-volt DC
Current Draw: 27 A
Motor: 2350 RPM, 3/10 hp (220 watts)
Motor Approval:
Motor Protection: 40 amp circuit breaker
Cord: 18 ft., 12 gauge (5.5 meters)
Fuse: 40 amp
Inlet: 1 inch NPT
Outlet: 1 inch NPT
Hose Type: Buna-N Electrically Conductive Discharge Hose
Hose Size: 1 NPT x 12 ft. (3.7 m)
Manual Nozzle: 1 inch Leaded
Automatic Nozzle: 1 inch Diesel
M-3020-ML 39.5 lbs. (19.9 kg)
Class 1, Division 2, Group D
PARTS AND SERVICE
In order to preserve the UL Listing for the motor, do not
attempt to service the motor. For products serviced outside
the factory, the UL nameplate must be defaced to indicate
that the equipment may no longer meet the requirements
for UL Listing. This does not apply to products serviced
outside the factory under the UL program for Rebuilt
Motors for Use in Hazardous Locations.
For warranty consideration, parts, or other service information, please contact your local distributor. If you need
further assistance, contact the GPI Customer Service
Department in Wichita, Kansas, during normal business
hours. A toll-free number is provided for your convenience.
1-800-835-0113
To obtain prompt, efcient service, always be prepared
with the following information:
1. The model number of your pump.
2. The serial number or manufacturing date code of your
pump. For the M-3020 series pumps, the date code
is located on the motor nameplate.
6
3. Part descriptions and numbers.
Part information can be obtained from the Illustrated
Parts Drawing.
For warranty work, always be prepared with your original
sales slip or other evidence of purchase date.
Please contact GPI before returning any parts. It may
be possible to diagnose the trouble and identify needed
parts in a telephone call. GPI can also inform you of any
special requirements you will need to follow for shipping
fuel dispensing equipment.
CAUTION
Do not return the pump or parts without authority from the
Customer Service Department. Due to strict government regula
tions, GPI cannot accept parts unless they have been drained
and cleaned.
-
SAVE THESE INSTRUCTIONS
Page 7

ILLUSTRATED PARTS DRAWING
included with M-3020-PO
26
16
22
14
15
29
26
21
38
28
12
11
10
13
31
17
26
20
25
23
37
30
33
24
7
35
27
9
8
6
5
19
34
18
36
32
1
Not included with
M-3020-PO
Not included with
3
M-3020-PO
Item
No. Part No. Description No. Req’d.
1 110241-01 Telescoping Suction Pipe ............................. 1
2 110155-24 Manual Leaded Nozzle, 1 NPT ..................... 1
3 110188-1 Fuel Hose, 1 NPT x 1 x 12' ...........................1
4 110265-02 Power Cord, 12-2, 18' .................................. 1
5 133086-1 Switch Actuator Assembly ...........................1
6 144125-01 Switch Bracket ............................................1
7 902006-55 Circuit Breaker Switch ..................................1
8 904002-25 Screw, Truss HD Machine, #10-32 X 1/2" .... 1
9 904005-56 Screw, Machine #6-32 X 3/16 ......................2
10 144102-01 Bypass Valve Cap ........................................1
11 144103-02 Bypass Valve Spring ..................................... 1
12 144104-01 Bypass Valve Poppet ...................................1
13 144105-01 Bypass Valve Orice Seal ............................. 1
14 144110-01 5-Vane Rotor ................................................1
15 144111-01 Carbon Sliding Vane 1.50" ...........................5
16 144112-01 Drive Key ...................................................... 1
17 144124-01 Terminal Box Cover ...................................... 1
18 144126-01 Switch Box Cover ......................................... 1
19 144127-01 Switch Bushing ............................................ 1
20 144140-01 Inlet Screen ..................................................1
21 901002-50 O-Ring, -916, 1.171 ID X .116, NBR ............ 1
22 901004-10 O-Ring, -143, 2.425 ID X .103, NBR ............ 1
23 901004-12 O-Ring, -148, 2.737 ID X .103, NBR ............ 1
24 901004-13 O-Ring, -156, 4.237 ID X .103, NBR ............ 1
4
Included with
39
M-3020-AD Only
No nozzles are
Included with
2
M-3020-ML Only
Item
No. Part No. Description No. Req’d.
25 901004-26 O-Ring, -135, 1.925 ID X .103, NBR ............ 1
26 904002-23 SEMS, Screw & Washer Assembly.............11
27 904007-15 Socket Head Cap Screw .............................. 4
28 904008-53 Washer, .416, .750 x .063, Aluminum ........... 1
29 904008-54 Retaining Ring, 10mm .................................. 1
30 904008-57 Screw, HSHC, 1/4-20 X 1 1/2 ......................4
31 906010-01 Shaft Seal, 10mm, NBR ............................... 1
32 144129-01 Switch Lever ................................................. 1
33 144132-01 Closed Nozzle Cover .................................... 1
34 904006-62 Lock Nut, .375-16 ......................................... 1
35 904006-86 Tapping Screw .............................................. 2
36 904008-52 Wave Overlap Spring .................................... 1
37 902008-13 Strain Relief .................................................. 1
38 904004-43 Street Elbow, 1" NPT ...................................1
39
906008-570
Automatic Diesel Nozzle, 1" NPT, UL ........... 1
133242-1 Nozzle Hook Only ......................................... 1
904001-88 Set Screw Only ............................................. 2
Kits and Accessories
501500-03 Vane Kit, O-Ring, Vanes, Shaft Key
501500-04 Shaft Seal Kit, Retaining Ring, Shaft Seal, Spacer
Washer
7
Page 8

Limited Warranty Policy
Great Plains Industries, Inc. 5252 E. 36th Street North, Wichita, KS USA 67220-3205, hereby provides a limited warranty against defects
in material and workmanship on all products manufactured by Great Plains Industries, Inc. This product includes a 2 year warranty
from date of purchase as evidenced by the original sales receipt. A 30 month warranty from product date of manufacture will apply in
cases where the original sales receipt is not available. Reference product labeling for the warranty expiration date based on 30 months
from date of manufacture. Manufacturer’s sole obligation under the foregoing warranties will be limited to either, at Manufacturer’s
option, replacing or repairing defective Goods (subject to limitations hereinafter provided) or refunding the purchase price for such
Goods theretofore paid by the Buyer, and Buyer’s exclusive remedy for breach of any such warranties will be enforcement of such
obligations of Manufacturer. The warranty shall extend to the purchaser of this product and to any person to whom such product is
transferred during the warranty period.
This warranty shall not apply if:
A. the product has been altered or modied outside the warrantor’s duly appointed representative;
B. the product has been subjected to neglect, misuse, abuse or damage or has been installed or operated other than in
accordance with the manufacturer’s operating instructions.
To make a claim against this warranty, contact the GPI Customer Service Department at 316-686-7361 or 800-835-0113. Or by mail at:
Great Plains Industries, Inc.
5252 E. 36
Wichita, KS, USA 67220-3205
GPI will step you through a product troubleshooting process to determine appropriate corrective actions.
GREAT PLAINS INDUSTRIES, INC., EXCLUDES LIABILITY UNDER THIS WARRANTY FOR DIRECT, INDIRECT, INCIDENTAL
AND CONSEQUENTIAL DAMAGES INCURRED IN THE USE OR LOSS OF USE OF THE PRODUCT WARRANTED HEREUNDER.
The company herewith expressly disclaims any warranty of merchantability or tness for any particular purpose other than for which
it was designed.
This warranty gives you specic rights and you may also have other rights which vary from U.S. state to U.S. state.
Note: In compliance with MAGNUSON MOSS CONSUMER WARRANTY ACT – Part 702 (governs the resale availability of the warranty
terms).
th
St. North
02/2017
M-3020 Motor for
Hazardous Locations
© 2017 Great Plains Industries, Inc., All Rights Reserved.
Great Plains Industries, Inc. / 800-835-0113 / GPI.net
922125-01 Rev A
 Loading...