

Page 1
1
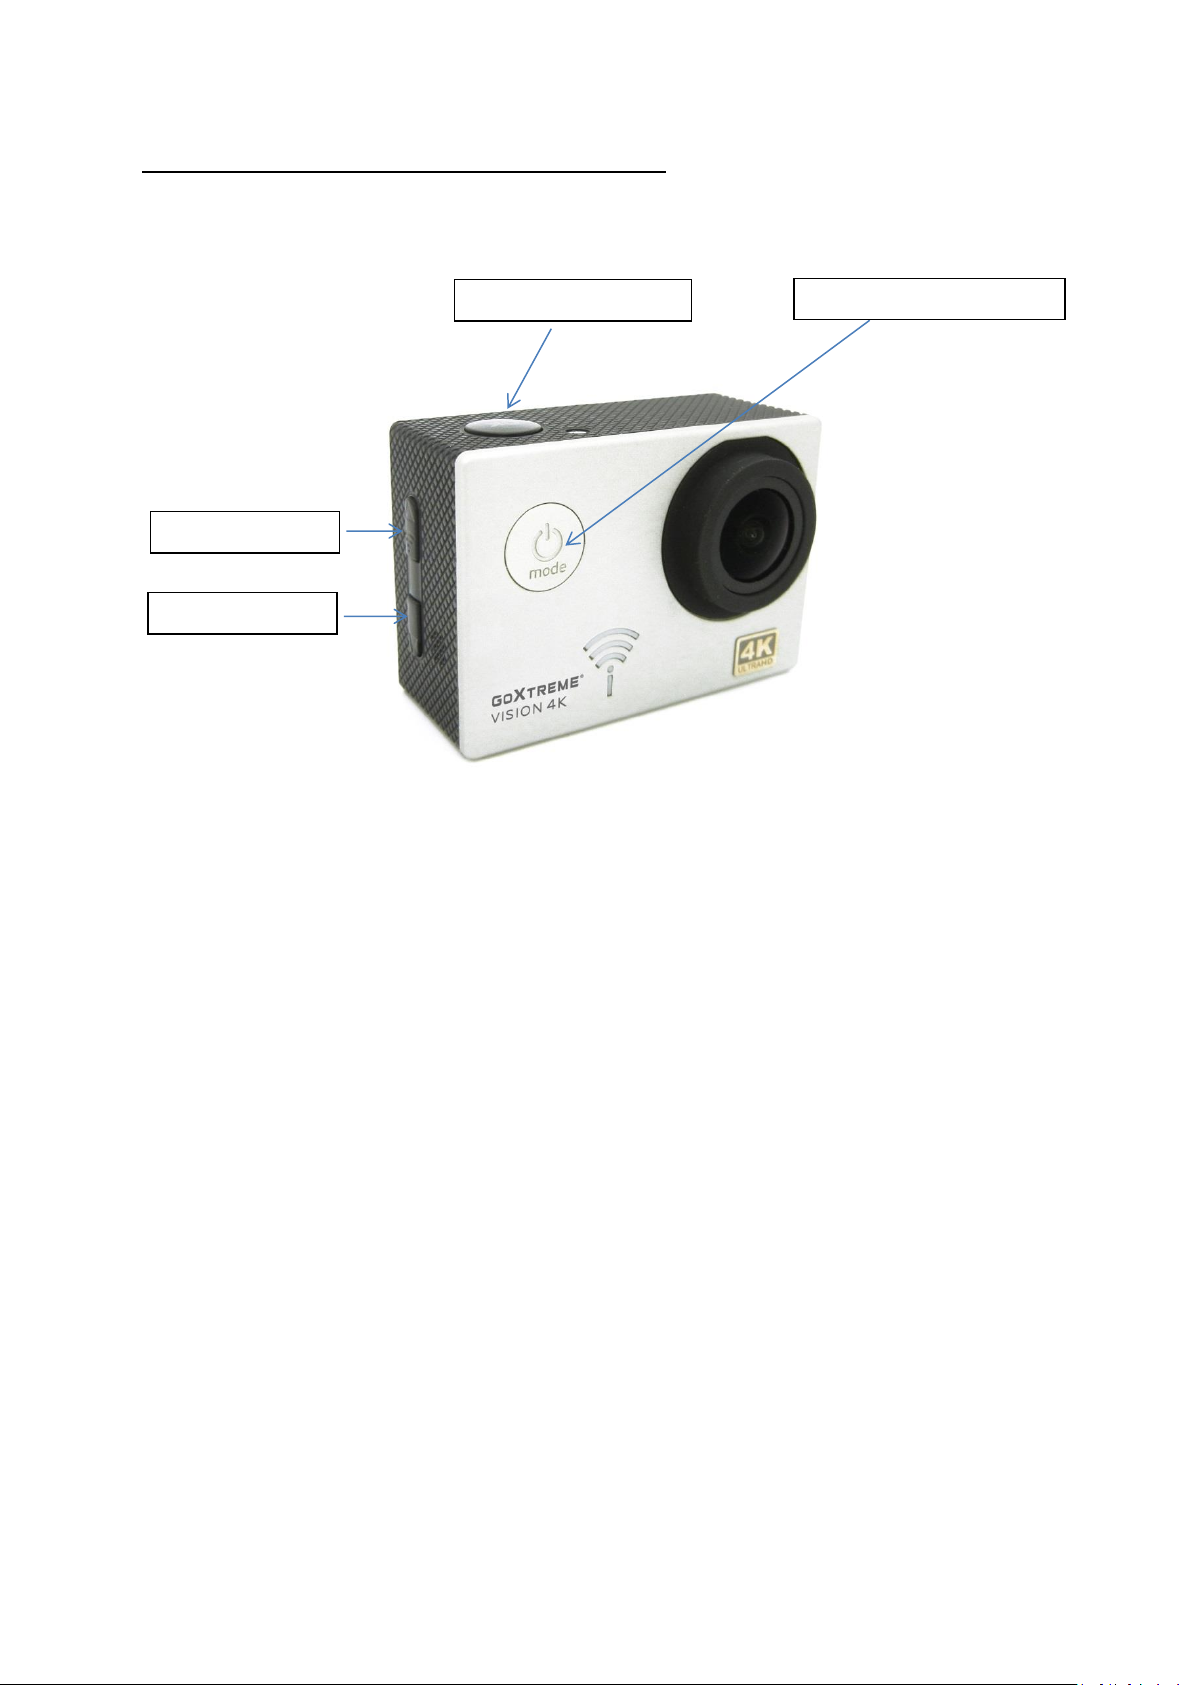
GET STARTED WITH YOUR NEW ACTION CAM
OK-Button & Shutter
Power- & Mode-Button
Arrow Up
Arrow Down
GoXtreme Vision 4K - exemplary
Step 1: CHARGING THE BATTERY
Please first charge the battery for 5-6 hours. Note that the camera must be switched off manually
during charging and must remain switched off. Only then will the battery be charged correctly.
Step 2: SWITCHING THE CAMERA ON AND OFF
Press and hold the power-button on the front of the camera for about 3 seconds to turn on the
camera.
To turn the camera off, press and hold the power-button again for about 3 seconds.
Step 3: GENERAL OPERATING INSTRUCTIONS
The power-button is also the mode button.
Pressing this button toggles between the different modes
Video Capture > Photo Capture > Playback > Setup.
When the camera is turned on, it will first be in video capture mode. To enter the setup, press the
mode button 3 times in succession (Video Capture > Photo Capture > Playback > Setup).
Page 2

2
In the setup, you can use the arrow keys on the side of the camera to navigate to the various
submenus.
To select a sub-item, press the OK button at the top of the camera to confirm.
Each time you want to change a setting, you must confirm the change with the OK button at the top
of the camera.
Confirming a setting automatically returns you to the setup.
Pressing the power button will return you to the video recording mode at any time.
Note: If the screen saver turns on and the screen turns black, simply press any button
(OK, Power, Arrow buttons) to turn the screen back on.
Step 4: LANGUAGE SETTINGS
When delivered, the menu of your GoXtreme Cam is displayed in English by default.
In this way you can set your desired language:
The power-button is also the mode button.
Pressing this button toggles between the different modes
Video Capture > Photo Capture > Playback > Setup.
When the camera is turned on, it will first be in video capture mode. To enter the setup, press the
mode button 3 times in succession (Video Capture > Photo Capture > Playback > Setup).
In the setup, use the 'Arrow Down' key on the side of the camera to navigate to the 'Language'
submenu.
Confirm the selection of the language menu with the OK button at the top of the camera.
Use the arrow keys on the side of the camera to select the desired language.
Confirm your selection with the OK button. You will automatically return to the setup.
Step 5: FORMATTING THE SD CARD
Caution! Formatting the SD card deletes all files.
Therefore, save your files on a PC, an external hard disk or a similar device BEFORE formatting.
The power-button is also the mode button.
Pressing this button toggles between the different modes
Video Capture > Photo Capture > Playback > Setup.
When the camera is turned on, it will first be in video capture mode. To enter the setup, press the
mode button 3 times in succession (Video Capture > Photo Capture > Playback > Setup).
Page 3

3
In the setup, use the arrow keys to navigate to the 'Format' submenu.
Confirm the selection with the OK button.
Use the arrow keys to select 'SD card'. Confirm the selection with OK.
To format the SD card, use the arrow buttons to select 'OK' on the camera screen.
Confirm the formatting with the OK button at the top of the camera.
The SD card will now be formatted. You will then automatically return to the setup.
Step 6: DATE AND TIME SETTINGS
The power-button is also the mode button. Pressing this button toggles between the different modes
Video Capture > Photo Capture > Playback > Setup.
When the camera is turned on, it will first be in video capture mode. To enter the setup, press the
mode button 3 times in succession (Video Capture > Photo Capture > Playback > Setup).
You can also set the date and time in the setting menu.
Use the arrow keys to navigate to the 'Date/Time' sub-item and confirm your selection with the OK
key.
Now you can set the year first.
Use the arrow keys to select the correct year and confirm with the OK key.
When you confirm, the display automatically jumps to the month.
You can also set this using the arrow keys and confirm with OK; the same applies to the day and time.
Finally, you can use the arrow keys to select a date format.
You also confirm this with OK.
The display then automatically returns to the year.
To return to the setup, press the On/Off key.
Step 7: RESOLUTION SETTINGS
The power-button is also the mode button.
Pressing this button toggles between the different modes
Video Capture > Photo Capture > Playback > Setup.
When the camera is turned on, it will first be in video capture mode. To enter the setup, press the
mode button 3 times in succession (Video Capture > Photo Capture > Playback > Setup).
In the setup, you can set different video resolutions.
Use the arrow keys to navigate to the submenu item 'Resolutions' and confirm your selection with
the OK key.
Page 4

4
Now you can choose between different resolutions.
The highest resolution is at the top of the list, the lowest at the bottom.
Use the arrow keys to select the desired resolution and confirm your selection with the OK key.
You will then automatically return to the setup.
Step 8: CONNECTING YOUR CAMERA TO YOUR SMARTPHONE VIA WIFI
1) Download the app (reinstall it).
2) Switch off the wireless network (WIFI) on your smartphone.
3) Turn on the camera.
4) Switch on the wireless network (WIFI) on your smartphone.
5) Search the camera in the list of available WIFI networks of your smartphone.
6) Connect the camera to your smartphone by entering the password.
Sometimes being close to the router, the smartphone prioritizes a connection to the router’s
network (of which you have the password saved), instead of connecting to the camera.
Please try to connect the camera and smartphone far from the router, or else delete the router
password on your smartphone, so it doesn’t prioritizes the router network. Alternatively, you can
also switch off the router while connecting the camera to your smartphone for the first time.
FURTHER SETTINGS
In the setting menu, you can navigate with the arrow keys on the side of the camera and confirm the
desired settings with the OK key. You can adjust the following settings:
Resolution
Time-lapse record
HDR
(High Dynamic Range
Image)
Record audio
Slow motion
Date stamp
Motion detection
Gyro RSC
(image stabilization)
Image Size
Sequence
Capture mode
Quality
Sharpness
Anti-Shaking
Exposure
White balance
Color
ISO
Delete
Protect
Date/Time
Auto power off
Beep sound
Language
Frequency
Image rotation
TV Mode
TV out
Screensaver
Field of view
Fish eye adjust
Aqua mode
WiFi
WIFI SSID
WIFI Password
Format
Default settings
Version
 Loading...