


MANUAL
English

IMPORTANT INFORMATION
To ensure the optimal functioning of your camera, please note the
following important information:
MicroSD card:
• Please ensure your memory card is formatted in the camera before first
using the card for the first time (Settings > Format).
• The maximum capacity memory card supported is 32GB.
Use of memory cards exceeding the maximum recommended capacity
may result in file errors.
• For best results, we recommend using high quality Micro SD cards Class
10 with U3 High Speed or higher.
• The recording time depends on the selected resolution.
• After reaching a max. video recording time of approx. 22 minutes,
the camera will stop recording automatically. A new recording must
be restarted manually.
Charging:
• Ensure the camera is charged completely before first use.
• Keep the device away from children while charging.
• Ensure the camera is switched off when charging. If the camera turns on
automatically when connected to a power source please turn it off to
complete charging. A camera plugged into power and switched on will not
charge.
• The camera should only be charged via the USB port of a computer or a
USB power adapter with a maximum capacity of 1000mAh.

• Unplug the USB cable connected to the camera before using the
camera.
• The battery life is - depending on the settings and outside temperature up to 80 minutes under optimal conditions.
WiFi connection:
• Ensure you have downloaded the correct companion app for your
camera model.
Safety instructions:
WARNING:
The camera is not suitable for children under 36 months because
of choking hazard.
• Always protect your camera from falls, blows and bumps.
• Keep a sufficient distance from objects that generate strong magnetic
fields or radio waves, such as electrical appliances to prevent them from
damaging the product or affecting the sound and image quality.
• Store the device cool (at room temperature) in a dry and dust-free
location and never expose the product to high temperatures or
permanently direct sunlight.
• In the unlikely event of overheating, smokes or unpleasant odors coming
out of the unit, disconnect it immediately from the charging cable and
remove the battery to avoid a fire.
• !!!! WARNING: Before using the camera in the water, make sure that all
lids and closures on the camera are closed and sealed.
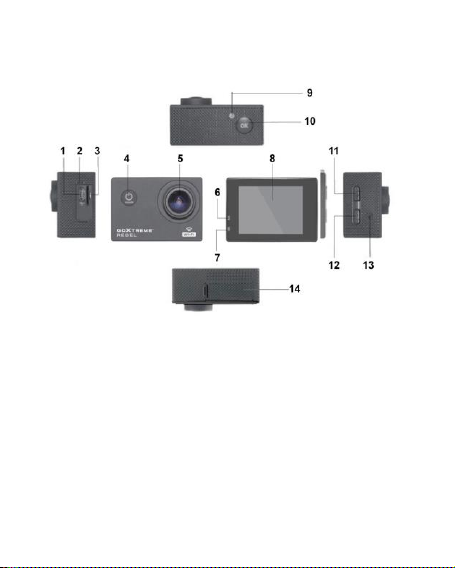
Camera
1.
USB
2.
Microphone
3.
TF card
4.
Power button/Mode key
5.
Lens
6.
Work indicator light
7.
Charging indicator light
8.
Display
9.
WIFI light
10. Enter/OK
11. Up key/WIFI key
12.Down key
13.Speaker
14.Battery compartment

Housing
1.
Enter
2.
Up key/WIFI key
3.
Down key
4.
Housing lock mechanism
5.
Lens
6.
Power button/Mode key
7.
Base

Introduction
1.
Insert MicroSD card
Note: Please use brand MicroSD card and format the card inside the camera using
the settings menu under “format SD card” before using. Ordinary neutral cards
cannot be guaranteed to work properly.
2.
Installing and removing the battery
A.
Open the battery compartment cover.
B.
Insert the battery so that the contacts on the battery match the contacts inside
the camera.
C.
To remove, open the battery compartment and remove the battery.
3.
Charging the battery
A.
Connect the camera to the USB-slot of a computer or to a power adapter for
charging.
B.
You can use a car charger to charge the battery in a car.
C.
When charging, the red indicator light is on. If the device is fully charged, the
red light turns off.
D.
The charging process is faster while the camera is powered off.
4.
Turn camera On and Off
A.
Starting: Press the “Power button/Mode key” for about 3 seconds. The blue light
turns on and the display shows the start screen.
B.
Shutdown: Press “Power button/Mode key” for about 3-5 seconds, the blue light
turns off and the display will show the end screen.
5.
Mode switch
A.
Press the mode key to open the mode. Press the button repeatedly to cycle
through the different modes (video / camera / playback / setup mode).
B.
The top left indicates the video mode indicates the photo mode,
indicates the playback mode and the indicates the setup mode.
6.
Video
A. Insert a memory card and press the “Power button/Mode key” to turn the camera on.
B. After the camera is started, press the “Enter/OK key” to start video recording.
During recording, the indicator dot at the top left hand of the screen will flash
Yellow/Red and show the recording time counter(Red).

C. To stop the recording press again the “Enter/OK key”
7.
Photo
Turn the camera on and press the “Power button/Mode key” to change to photo
mode.
B. Press the “Enter/OK key” to take the picture.
8.
Playback mode
Press the “Power button/Mode key” to switch to the Playback mode. Use the up and
down keys to select an image and press OK to show the file.
9.
Menu settings
A.
Press the “Power button/Mode key” to switch to the menu settings.
B.
Use the up and down keys to select the menu, press the Enter key to enter the
sub-menu, and select the setting item. Press OK to confirm.
10.
USB cable to the computer
Connect the camera with an USB cable to the computer and the screen will display
“Mass Storage”, “PC Camera”. Selected with the up and down keys the desired
mode and press the “Enter/OK key” to choose the mode.
A. After entering “Mass Storage”, the computer will display a removable disk.
B. After entering “PC Camera”, the device can be used as PC camera for video
communication.
11.
WIFI connection
The action camera can be connected via WiFi to a smartphone or tablet with
Android or iOS system.
A. Install the App "GoPlus Cam" on your smartphone or tablet. The app can be
downloaded in the Google Playstore or in the Apple store.
B. Turn on the camera and press the camera up key. The camera screen will show
a WiFi logo and the SSID (WiFi account): GoXtreme_xxxxxxxx (xxx is a placeholder
for the individual serial number of the device) appears and the PW (initial password)
is: 12345. During this time, the yellow WiFi indicator always on.
C. Turn on the WiFi function at your smartphone or tablet. Search for the camera’s
WiFi name and connect both devices with each other. After the connection has
been successful, the yellow indicator is lit.
D. Start the App "GoPlus Cam" on your smartphone or tablet. The live picture of
the camera is displayed on your screen. The App can record videos, take pictures,
and download it to your smartphone or tablet.

12. WEB CAM
Your action cam also features a webcam function.
To use your cam as a webcam please follow the following steps:
1. Remove the battery and memory card.
2. Connect the camera to your computer using the USB cable provided.
3. If prompted, select the PC-Cam or Web Cam option.
4. If you are using Windows, driver installation will be automatic and complete
within 2 minutes.
PLEASE NOTE:
Please note that the web cam function provides video only and does not include
audio.
A headset or earphones with in-line mic as provided with many smartphones is
required for audio.
Please note you may need to enter the settings of any app or program you use
(e.g. Skype) so you can select your action cam as the preferred web cam option.

Specifications
LCD Screen
2.0“
Lens
140°
Video Resolution
720P/30fps; WVGA/30fps; VGA/30fps
Interpolated: 1080P/30fps
Video Format AVI
Video compression formats
MJPG
Photo resolution
Interpolated: 16M/12M/10M/8M
Storage card
MicroSD, max. 32 GB
Camera mode
Single shot / self-timer (3 seconds / 5
seconds / 10 seconds / 20 seconds)
USB USB2.0
Battery capacity
900mAh,3.7V, 3.33Wh
Wifi Frwquency
2,4 GHZ
Recording time
1080P/ about 80minutes
Charging time About 3 hours
Operating system
Win7/Win8/Win10/Mac OS
Dimension 60 x 41.8 x 30.36
Note: Specifications are subject to technical changes.

FAQ
1.
Crash, black and white phenomenon occurred during use
If the camera freezes during normal use, please remove and re-install the battery.
The camera returns to normal operating after turning it on again.
2.
In case, the camera will not turn on or operate
Please check, if the battery is fully charged. Otherwise pull out and reinsert the
battery and turn the camera on.
3.
Machine heating phenomenon occurs during use
Because this camera is a precision digital device with a better sealing, the machine
will have a certain amount of heat during use. This is a normal phenomenon.
4.
Record a video without sound, or play video with a lower sound
First make sure the device is not inside the waterproof case, because the waterproof
case belongs to seal parts. The sound cannot be played, if the sound is turned off
inside the menu.
5.
Video is not running smooth, red and green blocks appear at the recording
Please format the memory card inside the camera using the settings menu
under “format SD card” and make sure to use genuine high-speed memory card
for recording.
6.
WiFi signal instability
The WiFi signal susceptible to interference. Make sure that no barrier is around the
unit to facilitate signal transmission and hold the smartphone not too far away from
the camera unit.
7.
WIFI Unable to connect
First, check that the WiFi is turned on the camera. Then re-connect the camera and
the smartphone / tablet again with each other.

All product specifications are correct at time of print and are subject to change
without prior notice.
Easypix GmbH reserve the right for errors or omissions.
For technical help please visit our support area on www.easypix.eu.
CONFORMITY
The manufacturer hereby declares that the CE marking was applied to the product
GoXtreme Rebel in accordance with the basic requirements and other relevant provisions
of the following CE Directives:
2014/53/EU
2011/65/EC RoHs
2014/30/EU EMV
2012/19/EC WEEE
The EC Declaration of Conformity can be downloaded here:
http://www.easypix.info/download/pdf/doc_goxtreme_rebel.pdf

DISPOSAL
Dispose of packaging
For disposal, separate packaging into different types. Cardboard and board must be
disposed of as paper and foil must be recycled.
Disposal of Waste Electrical and Electronic Equipment and/or
Battery by users in private households in the European Union.
This symbol on the product or on the packaging indicates that this cannot be disposed of
as a household waste. You must dispose of your waste equipment and/or battery by
handling it over to the applicable take-back scheme for the recycling of electrical and
electronic equipment and/or battery. For more information about recycling of this
equipment and/or battery, please contact your city office, the shop where you purchased
the equipment or your household waste disposal service. The recycling of materials will
help to conserve natural resources and ensure that it is recycled in a manner that
protects human health and environment.
Battery warning
• Never dismantle, crush, or pierce the battery, or allow the battery to short-circuit. Do not
expose battery being placed in high temperature environment, if battery leaks or bulges,

stop continue to use.
• Always charge using the charger. Risk of explosion if battery is replaced by an incorrect
type.
• Keep the battery out of reach of children.
• Batteries may explode if exposed to naked fire. Never dispose of batteries in a fire.
• Disposed of used batteries observing local regulations.
• Before disposing the device, please remove the battery.
The camera is not suitable for children under 3 years because of
choking hazard.
 Loading...