

Page 1

Page 2

IMPORTANT INFORMATION
To ensure the optimal operation of your camera, please note the following
important information:
MicroSD card
• Please ensure your memory card is formatted in the camera before using the
card for the first time (Settings > Format). Before formatting, make sure that all
the files in your memory card have been backed up as formatted and erased files
can not be restored.
• The maximum capacity memory card supported is 64GB.
Use of memory cards exceeding the maximum recommended capacity may result in
file errors.
• For best results, we recommend using high quality Micro SD cards rated
Class 10 with U3 High Speed or higher.
Ensure a U3 rated memory card is used when recording 4K video. Using a lower
rated card may present data transfer speed issues due to the large file size a 4K
video produces.
• The recording time depends on the selected resolution.
Page 3

Charging
• Ensure the camera is charged completely before first use.
• Keep the device away from children while charging.
• Ensure the camera is switched off when charging. If the camera turns on
automatically when connected to a power source please turn it off to complete
charging. A camera plugged into power and switched on will not charge.
• The camera should only be charged via the USB port of a computer or a USB power
adapter with a maximum capacity of 1100mAh.
• Unplug the USB cable connected to the camera before using the camera.
• The battery life is dependent on the resolution and other settings used as well as
outside temperature - up to 90 minutes under optimal conditions.
Page 4

Safety instructions
WARNING: The camera is not suitable for children under 36 months because of
choking hazard.
WARNING: Always protect your camera from falls, blows and bumps.
• Keep a sufficient distance from objects that generate strong magnetic fields or
radio waves, such as electrical appliances to prevent them from damaging the
product or affecting the sound and image quality.
• Store the device cool (at room temperature) in a dry and dust-free location and
never expose the product to high temperatures or permanent direct sunlight.
• In the unlikely event of overheating, smoke or unpleasant odors coming from the
unit, disconnect it immediately from the charging cable and remove the battery to
avoid a fire.
WARNING: Before using the camera in the water, make sure that all lids and
closures on the camera and underwater housing are closed and sealed.
• After using it in salty or chlorinated water, clean the case under running tap water
and let it dry.
• In order to prevent condensation inside the case or behind the lens, the camera
should not be exposed to high temperature and humidity differences
• After use under water, the housing must be left open to avoid condensation or
rusting.
Page 5
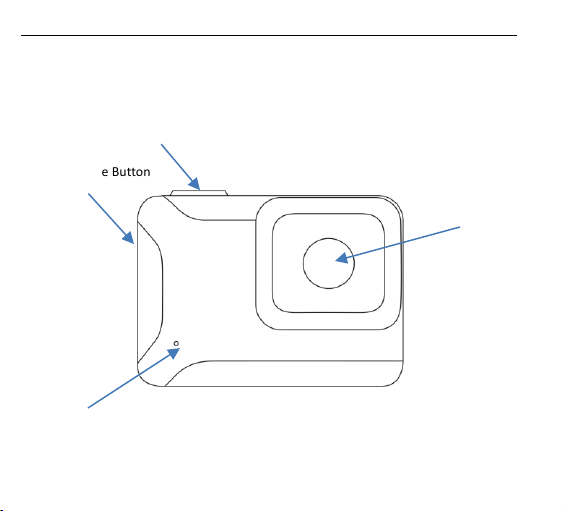
CAMERA DESCRIPTION
Power / Mode Button
Lens
Microphone
Shutter / Select Button
Micro SD Card Slot
Page 6
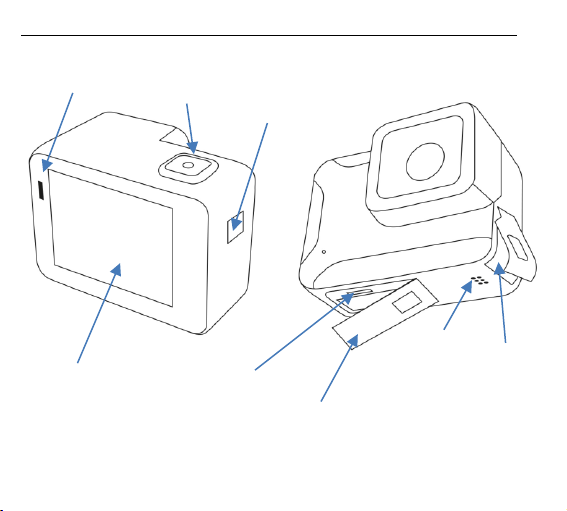
Touch screen
Power/
Mode Button
Speaker
HDMI &
USB Type C
Slot
Battery Cover
Press and hold the button
on the cover. Then slide
the cover to open.
Shutter/
Select Button
Indicator light
Page 7

CAMERA OPERATION
Installing and removing battery
1. Correctly install the battery into the camera as suggested by the ‘pins’ in the
battery compartment and ‘slots’ in the battery itself.
2. For battery power:
Please refer to the symbol: Full power mode “ ” low power mode “ ”.
3. Remove battery: Open the battery compartment cover and remove the battery by
pulling on the tag attached.
Please charge the battery when using the cam for the first time
When using the action camera for the first time, please make sure the battery is fully
charged.
To charge the battery: Connect the camera to a computer or a TYPE C power adapter
with the TYPE C data cable (supplied with the package). During charging, the status
indicator LED remains red. When the battery is full, the indicator switches off.
Page 8
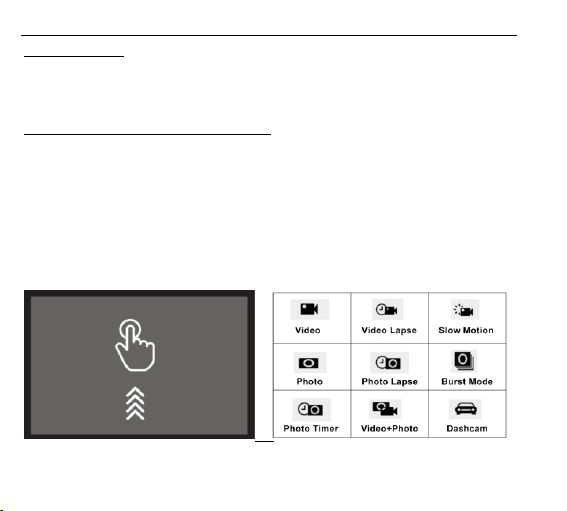
Power on/off
Press and hold power button for 3-5 seconds to turn the camera on/off.
Video and Photo mode switching
There are 2 options to switch between video and photo modes:
1. To select your video or photo mode, short press the power/mode button.
Tap your preferred mode to enter.
2. Swipe up on the touchscreen to show the mode selection.
Tap your preferred mode to enter or tap ‘X’ to return.
Page 9
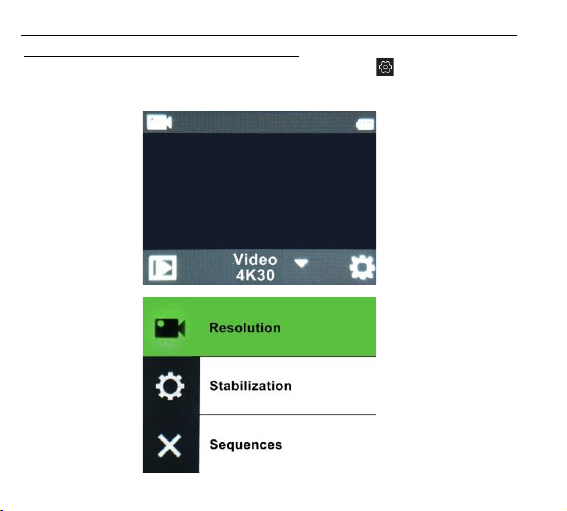
Video/Photo General Settings Menu
While in either video or photo standby mode, click setup icon , to enter the
video/photo settings interface.
Page 10

Video Mode
After the camera is powered on, the camera's default mode is video standby mode.
The last used video function mode will also be active.
Tapping the video settings button will allow you to change the current resolution
and other video settings.
Pressing the "shutter / select" button starts the video recording.
While recording, the status indicator LED flashes blue.
Press the shutter button again to stop the video recording.
When the battery is exhausted, the camera will stop working and shut down
automatically. However before shutting down, the video currently being recorded by
the camera will be saved automatically.
Time-Lapse Video
Enter the function mode menu and select the "Time Lapse Video" option. When
selected, the camera will return to the video preview screen automatically. Tap the
“Settings” icon and scroll down to the "Timelapse Video" menu option to select
your preferred time-lapse setting.
Page 11

Slow Motion
Enter the function mode menu and tap the "Slow Motion" mode icon. When selected,
the camera will return to the video preview screen automatically. Tap the “Settings”
icon and tap the "Video Resolution" option to select the slow motion resolution.
Photo Mode
There are 2 options to enter the Photo Mode:
1. Touch operation:
Swipe up to enter the function mode menu where you can choose your photo mode.
2. Button operation: Short press the Power / Mode button to enter the function
mode menu.
After choosing the photo mode, enter the photo settings menu and select your
preferred resolution etc.
Time-Lapse Photo
Enter into the function mode menu and touch the "Time Lapse Photo" mode icon, the
camera will return to the Photo preview interface automatically. Click the “Settings ”
icon to enter the photo setting menu and then click "Photo Lapse" option to set
the time-lapse photo interval.
Page 12
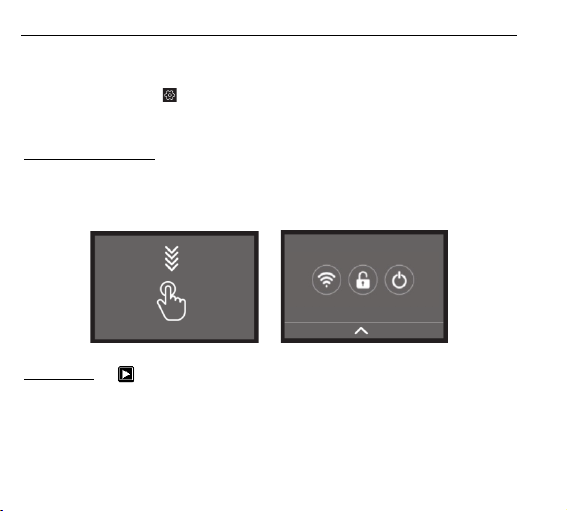
Photo Burst
Enter the function mode menu and tap the "Photo Burst" mode icon. When selected
the camera will return to the Photo preview screen automatically.
Click the “Settings” icon to enter the photo settings menu and tap "Burst Settings"
to select the number of burst photos per shutter press.
Control Shortcuts
Swipe DOWN to display a control panel that allows you to easily turn on WiFi , lock
the screen or turn off the camera.
Playback
If you want to browse video and photo files on the camera, please switch to playback
mode: In the video / photo preview screen, click the Playback icon to enter the main
interface of the playback menu where you can choose video files or photo files to
playback.
Page 13

WIFI Connection
Before using the WIFI Control function, please install the YUTUPro APP on your
smartphone or tablet.
Please note that wireless transfer of files using the app is not possible for video with
resolution higher than 1080p. Files using any resolution higher then 1080p can only
be accessed via your computer using a card reader.
Connection steps:
Step 1. On the camera:
• In the video / photo mode, swipe DOWN to enter the control shortcuts screen.
• Tap on the WiFi icon to activate the camera’s WiFi function.
The WiFi icon will change from white to green to confirm the WiFi is activated.
• The screen will display the following:
SSID: Manta_XXXXXX and Password: 12345678
Leave the camera like this and complete the following steps on your smartphone.
Page 14

Step 2. On your smartphone/tablet:
• Open the WiFi settings on your mobile phone to search for the camera device:
Manta_xxxxxx from the available wireless networks.
The password to complete the connection is 12345678.
• Exit your WiFi settings menu on your smartphone and open the YUTUPRO APP.
• Tap ‘Enter Camera’ on the app to connect your camera and smartphone.
The camera screen will display an orange WiFi icon to confirm an active WiFi
connection and your phone will now display a live view from your camera.
Please note: To prolong battery life, please remember to de-activate
the WiFi function after use.
Simply swipe down on the camera touchscreen and tap the WiFi icon to de-activate
the connection.
Page 15
Note:
Should the camera crash for any reason, please reset the camera by removing and
re-installing the battery.
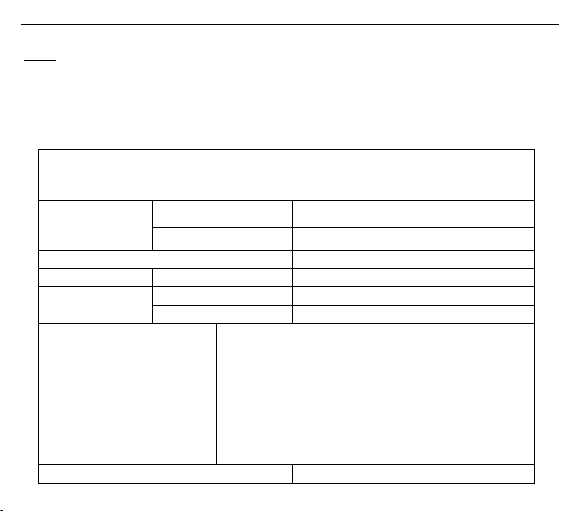
TECHNICAL SPECIFICATIONS
Image
Sensor
Type
CMOS 12MP
Effective Pixels
Approx. 12 Mega Pixels
LCD Display
2.0”/ 5cm Touchscreen
Focusing
Type
Fixed
Exposure
Control
Programmed AE
ISO
Auto, 100, 200, 400, 800, 1600
Video resolution
4K (3840x2160) 30fps
2.7K (2704x1520) 30fps
1440P (1920x1440) 60fps/30fps
1080P (1920x1080) 60fps/30fps
720P (1280x720) 120fps/60fps/30fps
Audio
Mic and Speaker built-in
Page 16

Stabilization
Minimizes small movements that
traditional tech can’t detect.
On/Off
Memory
No internal memory
External memory: supports
Micro SD Cards up to 64GB
(U3)
HDMI OUT
Supports 4K
Image Size
12M (4000x3000)
8M (3840x2160)
5M (2560x1920)
3M (2048x1536)
Field of view (FOV):
Indicates the width of the field of view captured
by the camera sensor.
Wide/Medium/Narrow
Scene Mode:
Applies pre-set exposure modes that are
optimized for specific scenes
Multiple scenes
Metering:
Captures better visuals more consistently by
adjusting for light sensitivity from different
sources.
Page 17

Time-lapse Photo:
The camera will take still pictures at designated
intervals.
OFF / 1 Sec. / 2 Sec. /
5 Sec. / 10 Sec. /
30 Sec. / 60 Sec.
Photo Timer / Self-timer:
Sets a delay timer for selfie or group photos.
OFF / 1 Sec. / 3 Sec. / 5 Sec. /
10 Sec.
ISO:Adjusts your camera’s level of sensitivity to
available light. The lower the ISO the less
sensitive, the higher the ISO the greater the
sensitivity of the camera.
Auto, 100, 200, 400, 800,
1600
Distortion Correction:
Also known as fish eye adjustment. Mitigates the
fish eye effect and adjusts wide-angle distortion.
On/Off
Image Rotate:
Turns the screen will 180 degrees.
On/Off
Auto Power Off:
Sets a timer allowing the camera to turn off
automatically.
OFF / 1 / 3 / 5 / 10Min
Screensaver:
Set a time interval to automatically turn off the
camera’s screen to save battery.
OFF / 1 Min / 3Min / 5Min
Beep:
Turns on or off the beep sound made by the
buttons.
ON / OFF
WiFi SSID
Manta
WiFi Password
12345678
Page 18

WiFi Frequency
2,4 GHZ
Interface
USB TYPE C 3.0:
Recharging/File Transfer
Battery
Li-ion rechargeable Battery
1100mAH
Dimensions (WxHxD)
61x45x36mm
Page 19
All product specifications are correct at time of print
and are subject to change without prior notice.
Easypix GmbH reserve the right for errors or omissions.
For technical help please visit our support area on www.easypix.eu.
CONFORMITY
The manufacturer hereby declares that the CE marking was applied to the product
GoXtreme Manta 4K in accordance with the basic requirements and other relevant provisions of the
following CE Directives:
2014/53/EU
2011/65/EC RoHs
2014/30/EU EMV
2012/19/EC WEEE
The EC Declaration of Conformity can be downloaded here:
http://www.easypix.info/download/pdf/doc_goxtreme_Manta.pdf
Page 20

DISPOSAL
Dispose of packaging
For disposal, separate packaging into different types. Cardboard and board must be disposed of as
paper and foil must be recycled.
Disposal of Waste Electrical and Electronic Equipment and/or Battery by users in
private households in the European Union. This symbol on the product or on the packaging
indicates that this cannot be disposed of as a household waste. You must dispose of your waste
equipment and/or battery by handling it over to the applicable take-back scheme for the recycling of
electrical and electronic equipment and/or battery. For more information about recycling of this
equipment and/or battery, please contact your city office, the shop where you purchased the
equipment or your household waste disposal service. The recycling of materials will help to conserve
natural resources and ensure that it is recycled in a manner that protects human health and
environment.
Page 21
Battery warning
• Never dismantle, crush, or pierce the battery, or allow the battery to short-circuit. Do not expose
battery being placed in high temperature environment, if battery leaks or bulges, stop continue to
use.
• Always charge using the charger. Risk of explosion if battery is replaced by an incorrect type.
• Keep the battery out of reach of children.
• Batteries may explode if exposed to naked fire. Never dispose of batteries in a fire.
• Disposed of used batteries observing local regulations.
• Before disposing the device, please remove the battery.
The camera is not suitable for children under 3 years because of choking hazard.
 Loading...