

Page 1

T1530
Introduction ⋯⋯⋯⋯⋯⋯⋯⋯⋯⋯⋯⋯⋯⋯⋯⋯⋯⋯1~10
WARNING & CAUTION ⋯⋯⋯⋯⋯⋯⋯⋯⋯⋯⋯⋯⋯⋯⋯1
Important Safety Instructions ⋯⋯⋯⋯⋯⋯⋯⋯⋯⋯⋯⋯2
Packing List ⋯⋯⋯⋯⋯⋯⋯⋯⋯⋯⋯⋯⋯⋯⋯⋯⋯⋯⋯⋯7
Front Panel Overview ⋯⋯⋯⋯⋯⋯⋯⋯⋯⋯⋯⋯⋯⋯⋯⋯8
Rear Panel Overview ⋯⋯⋯⋯⋯⋯⋯⋯⋯⋯⋯⋯⋯⋯⋯⋯9
Remote Control Overview ⋯⋯⋯⋯⋯⋯⋯⋯⋯⋯⋯⋯⋯10
Getting Started ⋯⋯⋯⋯⋯⋯⋯⋯⋯⋯⋯⋯⋯⋯⋯⋯11~15
Using the Remote Control ⋯⋯⋯⋯⋯⋯⋯⋯⋯⋯⋯⋯⋯11
Connecting the Power Adapter ⋯⋯⋯⋯⋯⋯⋯⋯⋯⋯⋯12
Connecting Antenna/Cable ⋯⋯⋯⋯⋯⋯⋯⋯⋯⋯⋯⋯⋯13
Basic Operations ⋯⋯⋯⋯⋯⋯⋯⋯⋯⋯⋯⋯⋯⋯⋯⋯⋯14
Sleep Mode ⋯⋯⋯⋯⋯⋯⋯⋯⋯⋯⋯⋯⋯⋯⋯⋯⋯⋯⋯⋯15
Advanced Settings⋯⋯⋯⋯⋯⋯⋯⋯⋯⋯⋯⋯⋯⋯⋯16~30
About the Setup Menu⋯⋯⋯⋯⋯⋯⋯⋯⋯⋯⋯⋯⋯⋯⋯16
Setup Menu Overview ⋯⋯⋯⋯⋯⋯⋯⋯⋯⋯⋯⋯⋯⋯⋯17
Channel Settings ⋯⋯⋯⋯⋯⋯⋯⋯⋯⋯⋯⋯⋯⋯⋯⋯⋯19
Picture Settings ⋯⋯⋯⋯⋯⋯⋯⋯⋯⋯⋯⋯⋯⋯⋯⋯⋯⋯21
V-Chip Settings ⋯⋯⋯⋯⋯⋯⋯⋯⋯⋯⋯⋯⋯⋯⋯⋯⋯⋯23
TV Guide & MPAA Ratings ⋯⋯⋯⋯⋯⋯⋯⋯⋯⋯⋯⋯⋯25
Closed Caption Settings ⋯⋯⋯⋯⋯⋯⋯⋯⋯⋯⋯⋯⋯⋯26
Sound Settings ⋯⋯⋯⋯⋯⋯⋯⋯⋯⋯⋯⋯⋯⋯⋯⋯⋯⋯27
Other Settings⋯⋯⋯⋯⋯⋯⋯⋯⋯⋯⋯⋯⋯⋯⋯⋯⋯⋯⋯28
Power Saving Mode ⋯⋯⋯⋯⋯⋯⋯⋯⋯⋯⋯⋯⋯⋯⋯⋯30
Advanced Connections ⋯⋯⋯⋯⋯⋯⋯⋯⋯⋯⋯⋯⋯31~33
DVD Player/VCR Connections⋯⋯⋯⋯⋯⋯⋯⋯⋯⋯⋯⋯31
Audio Connections ⋯⋯⋯⋯⋯⋯⋯⋯⋯⋯⋯⋯⋯⋯⋯⋯32
External Device Connections ⋯⋯⋯⋯⋯⋯⋯⋯⋯⋯⋯⋯33
Help ⋯⋯⋯⋯⋯⋯⋯⋯⋯⋯⋯⋯⋯⋯⋯⋯⋯⋯⋯⋯⋯34~38
Troubleshooting⋯⋯⋯⋯⋯⋯⋯⋯⋯⋯⋯⋯⋯⋯⋯⋯⋯⋯34
Care & Maintenance ⋯⋯⋯⋯⋯⋯⋯⋯⋯⋯⋯⋯⋯⋯⋯⋯35
Customer Support⋯⋯⋯⋯⋯⋯⋯⋯⋯⋯⋯⋯⋯⋯⋯⋯⋯36
Technical Specifications ⋯⋯⋯⋯⋯⋯⋯⋯⋯⋯⋯⋯⋯⋯38
Page 2
T1530
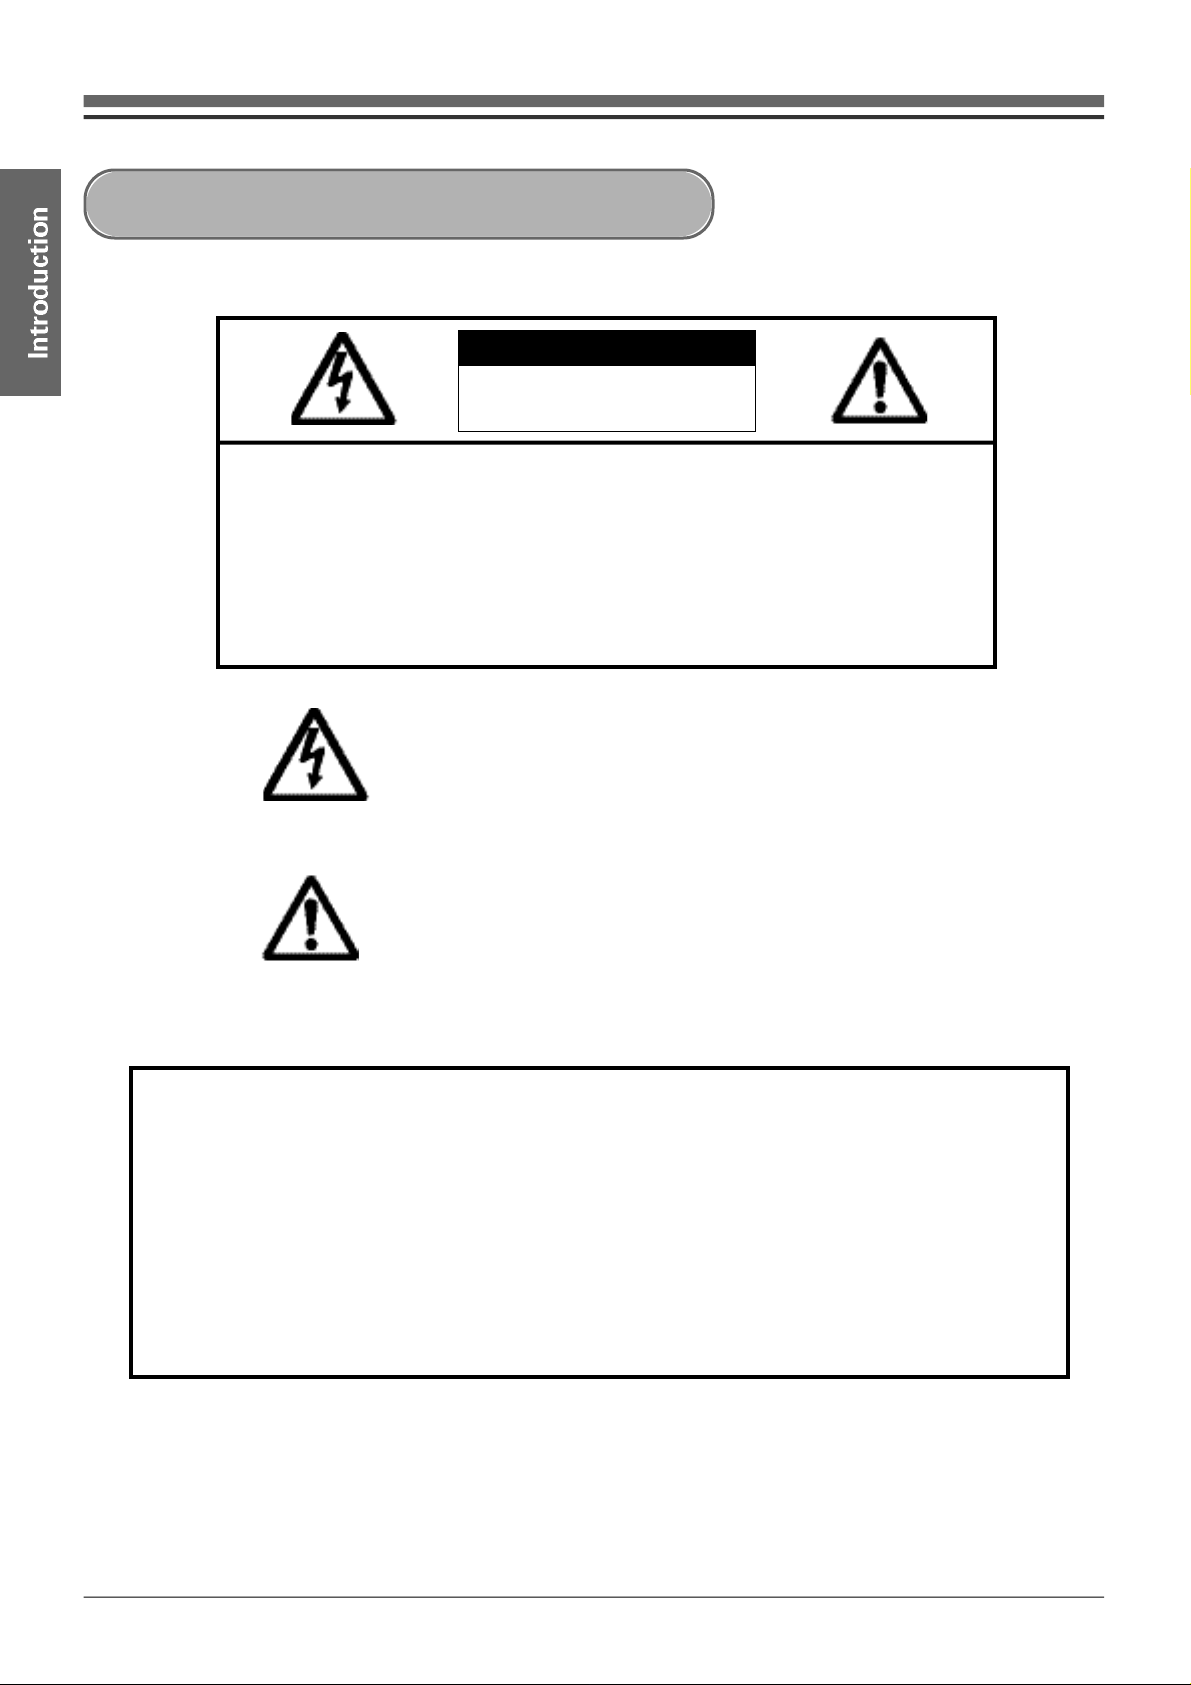
WARNING & CAUTION
RISK OF ELECTRIC SHOCK
DO NOT OPEN
CAUTION : TO REDUCE THE RISK OF
ELECTRIC SHOCK, DO NOT
REMOVE COVER (OR BACK).
NO USER-SERVICEABLE PARTS
INSIDE. REFER SERVICING TO
QUALIFIED SERVICE PERSONNEL.
CAUTION
This symbol is intended to alert the user to the
presence of uninsulated “dangerous voltage”within
the product’s enclosure that may be of sufficient
magnitude to constitute a risk of electric shock to
persons.
This symbol is intended to alert the user to the
presence of important operating and maintenance
(servicing) instructions in the literature
accompanying the appliance.
“WARNING - To Reduce The Risk Of Fire Or Electric Shock, Do Not Expose This
Apparatus To Rain Or Moisture.”
“Apparatus shall not be exposed to dripping or splashing and no objects filled with
liquids, such as vases, shall be placed on the apparatus.”
“CAUTION - These servicing instructions are for use by qualified service personnel
only. To reduce the risk of electric shock, do not perform any servicing other than that
contained in the operating instructions unless you are qualified to do so.”
1
Page 3

Important Safety Instructions
1) Read these instructions.
2) Keep these instructions.
3) Heed all warnings.
4) Follow all instructions.
5) Do not use this apparatus near water.
6) Clean only with a dry cloth.
7) Do not block any of the ventilation openings. Install in accordance with the
manufacturer's instructions.
8) Do not install near any heat sources such as radiators, heat registers, stoves, or other
apparatus (including amplifiers) that produce heat.
9) Do not defeat the safety purpose of the polarized or grounding type plug. A polarized
plug has two blades with one wider than the other. A grounding type plug has two
blades and a third grounding prong. The wide blade or the third prong is provided for
your safety. When the provided plug does not fit into your outlet, consult an electrician
for replacement of the obsolete outlet.
10) Protect the power cord from being walked on or pinched particularly at plugs,
convenience receptacles, and the point where they exit from the apparatus.
11) Only use the attachments/accessories specified by the manufacturer.
12) Use only with a cart, stand, tripod, bracket, or table specified by the manufacturer, or
sold with the apparatus. When a cart is used, use caution when moving the
cart/apparatus combination to avoid injury from tip-over.
13) Unplug this apparatus during lightning storms or when unused for long periods of time.
14) Refer all servicing to qualified service personnel. Servicing is required when the
apparatus has been damaged in any way, such as power supply cord or plug is damaged,
liquid has been spilled or objects have fallen into the apparatus, the apparatus has been
exposed to rain or moisture, does not operate normally, or has been dropped.
2
Page 4
T1530
Please read the following safety instructions as they are designed to prevent damage to property
and harm to the user.
After reading this, please keep the manual handy.
Failure to follow directions noted by this symbol could result in severe injury or death.
Failure to follow directions noted by this symbol could result in bodily harm or damage to
equipment.
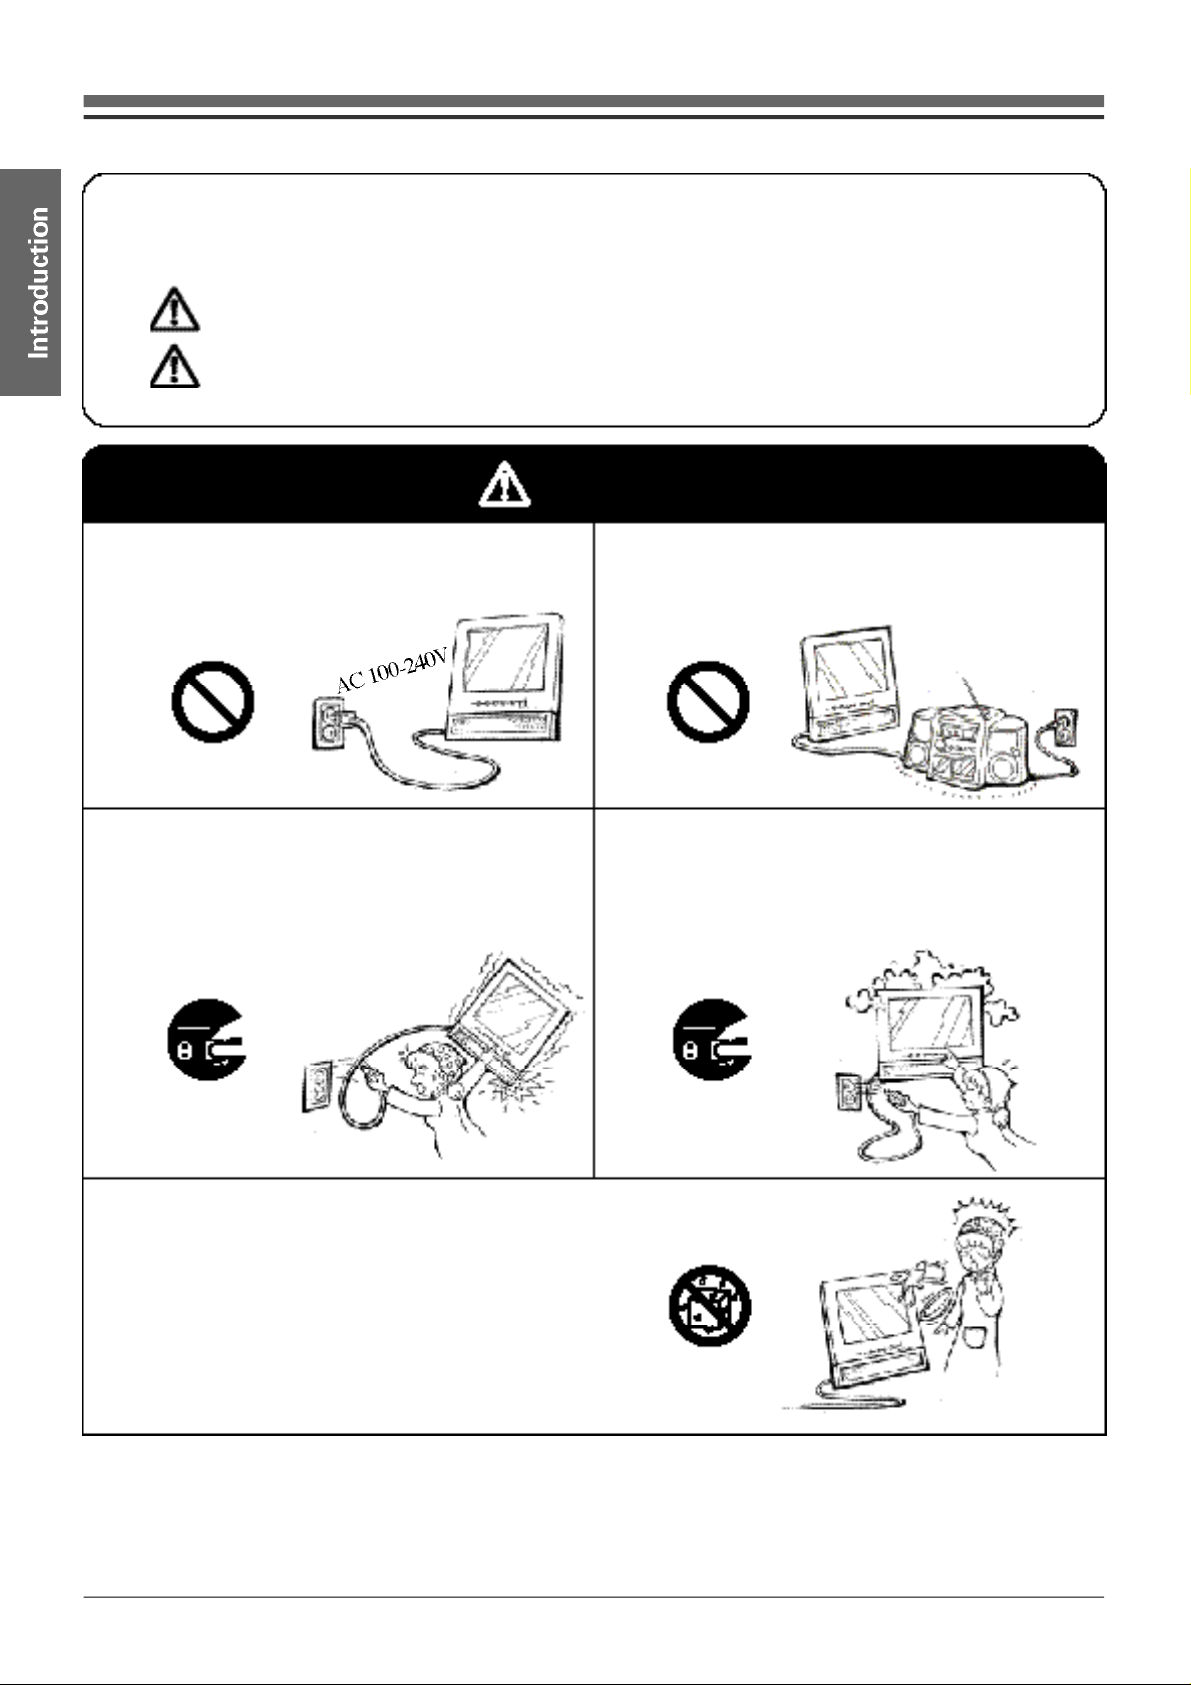
Warning
This TV is for domestic use only.
-Use proper receptacle with AC 100-240V.
Improper voltage may cause electric shock
or fire.
Use only AC 100-240V
If the TV has been dropped or the cabinet
cracked, turn off the power and unplug
immediately.
-Failure to do so may cause an electric shock
or fire. Contact the retail store or nearest
service center.
Unplug from the wall
Do NOT excessively bend the plug and wire nor
place heavy objects upon them, which may
cause damage.
-
Failure to do so may cause an electric shock or fire.
Prohibited
If your TV does not operate normally (in
p a r t i c u l a r, any unusual sounds or smells) it unplug it immediately and contact the retail
store or nearest service center.
Unplug from the wall
Do NOT pull the plug out by the wire or touch the plug with wet hands.
Do NOT use wet cloth or hands
3
Page 5
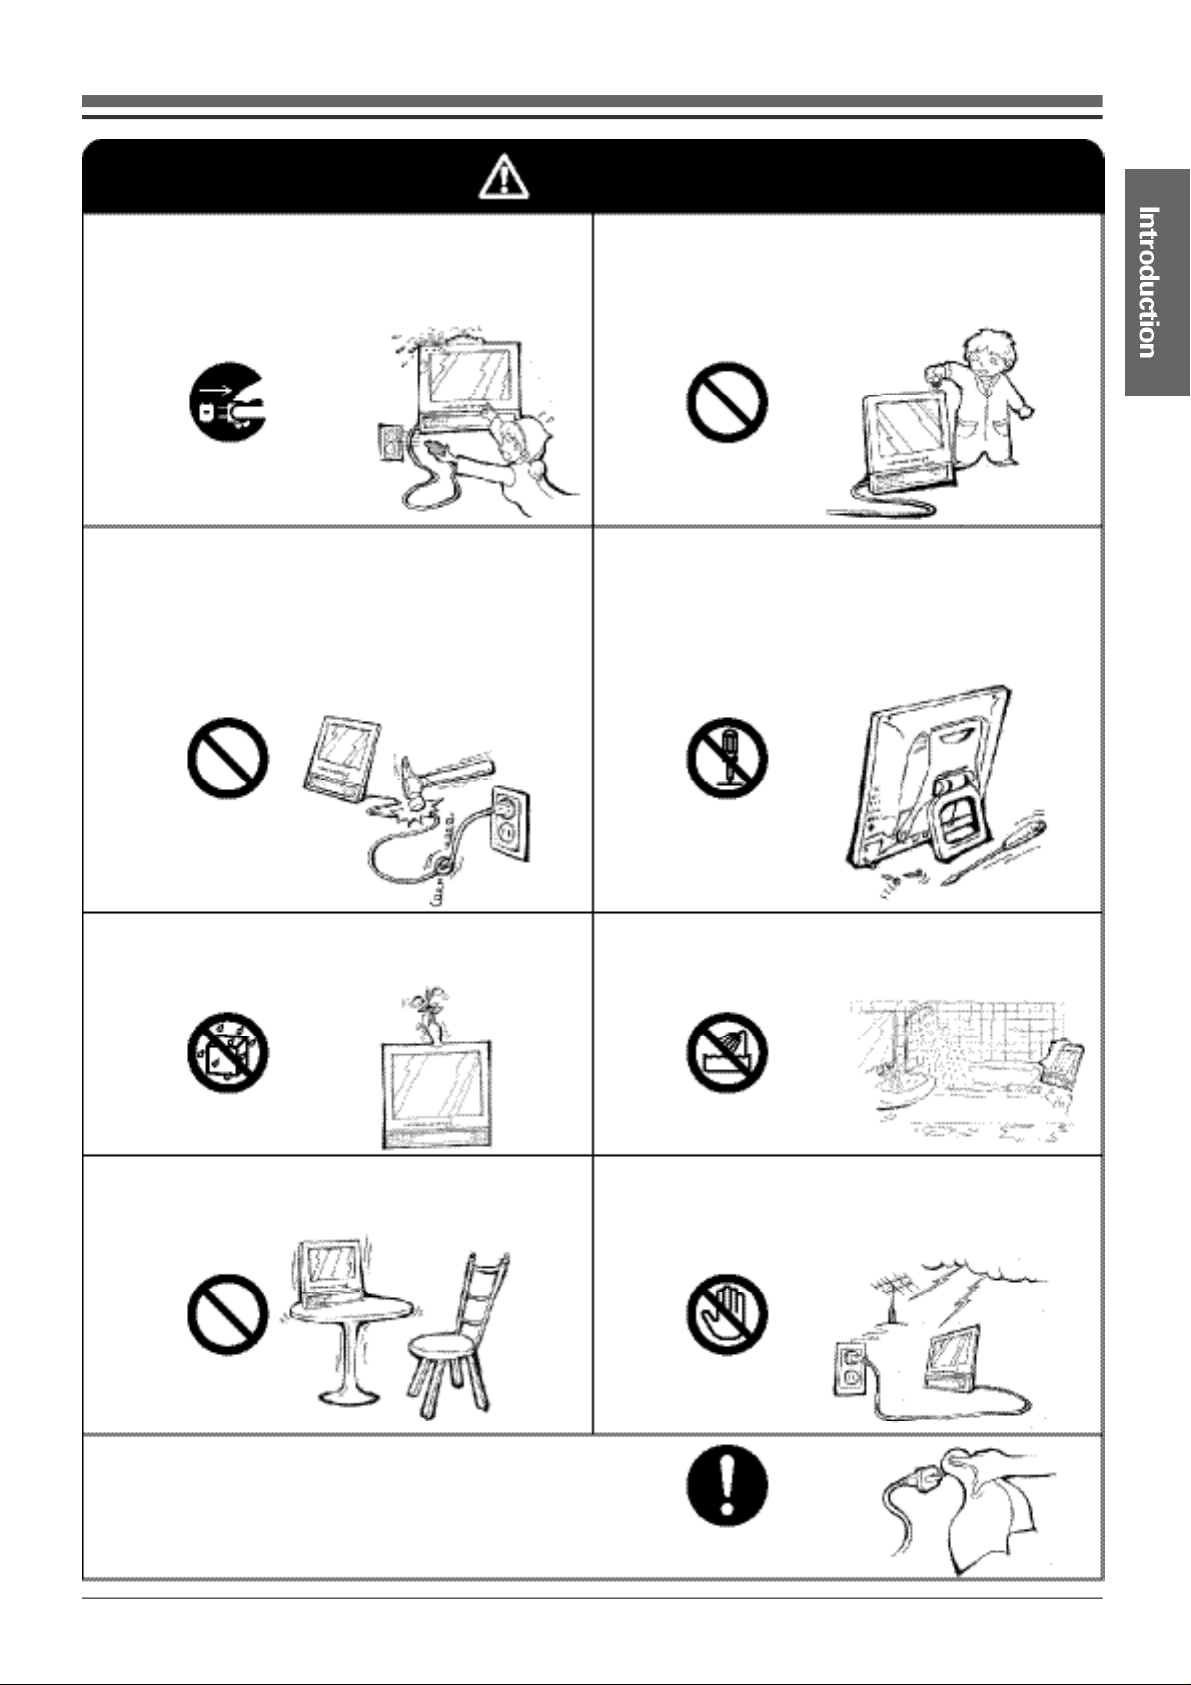
Warning
If water or any foreign object is inserted into
T V, turn off power and unplug to prevent
electric shock, fire or injury. Contact the retail
store or nearest service center.
Unplug from the wall
Do NOT try to modify the wire or the signal
cable.
-If the power cord has been damaged,
replace it to prevent electric shock, fire or
injury.
Never insert anything metallic into the TV
openings.
-This may cause an electric shock, fire or injury.
Keep the TV away from children.
Prohibited
Do NOT remove cover (or back). No user
serviceable parts inside.
-This may cause electric shock or fire. Refer
servicing to qualified service personnel.
Prohibited
Do NOT set a glass of water, chemicals or any
small metal objects on the TV.
-This may cause damage, electric shock or fire.
Prohibited
Place the TV on a flat and stable surface.
-The TV may cause injury if allowed to fall.
Prohibited
Do NOT open cover
Do NOT operate TV in place with high humidity
such as a bathroom.
-This may cause electric shock or a fire.
Do NOT use in bathroom
Disconnect power plug and antenna cable from
external connections during storms or lightning, or
if the TV is not in use for a long period of time.
-This may cause electric shock or a fire.
Prohibited
If the connector between the plug and the pin is dusty
or dirty, clean it properly with a dry cloth to prevent
electric shock or fire.
Clean plug with a dry cloth
4
Page 6
T1530
Caution
Do NOT use or store electric stove near the
TV.
-This may cause electric shock or fire.
Prohibited
Do NOT pull or plug in the wire with wet hands.
-This may cause an electric shock.
Prohibited
For antenna installation, refer servicing to
qualified service personnel.
-Excercise extreme caution near power lines.
-
Strong winds may knock down an outdoor
antenna. Make sure it is securely fastened.
Do NOT unplug by pulling the wire or signal
cable.
-This may cause a breakdown, electric shock
or fire due to damage to the cable.
Prohibited
Do NOT connect too many extension cords or
plugs to an outlet.
-This may cause electric shock or fire.
Prohibited
Place TV in a location with low humidity and a
minimum of dust. Do NOT place TV near a
humidifier or cooking stove.
-This may cause electric shock or fire.
Install any antenna securely
to prevent wind damage
Do not cover the vents on the TV cabinet.
-Poor ventilation may cause a malfunction or
fire due to the increased temperature inside the
TV.
Prohibited Prohibited
Make sure the TV plugged in properly. If the TV is plugged in
improperly, it may cause an electric shock or fire.
Make sure TV is plugged properly.
Prohibited
Do NOT place any heavy object on the TV.
This may cause damage to the TV.
Warning: Keep away from children.
5
Page 7

Caution
Do NOT plug the TV into a loose receptacle or
power outlet.
-This may cause heat and/or fire. Refer
servicing to qualified personnel to repair or
replace the outlet.
Prohibited
Disconnect the plug from the outlet when you
are cleaning the room or will be away for a long
period of time.
-This may cause fire.
Disconnect the plug from the outlet when you
relocate the TV.
-Failure to do so may cause an electric shock
or fire.
Prohibited
Use caution when adjusting the position/angle
of the TV or stand to prevent injury. Setting the
stand up at a narrow angle may cause the TV
to fall and cause injury.
Unplug the wire
Do not place the TV face down.
-This may cause electric shock or fire.
Prohibited
Do NOT use old and new batteries together.
-This may cause damage or fire due to
leakage of chemicals from battery inside.
Prohibited
Do not cause any impact on panel surface.
-This may cause damage to the TV.
Prohibited
Make sure to insert batteries in the proper
direction (+/-) to prevent damage or fire.
Prohibited
Insert with proper
polarity
6
Page 8
T1530
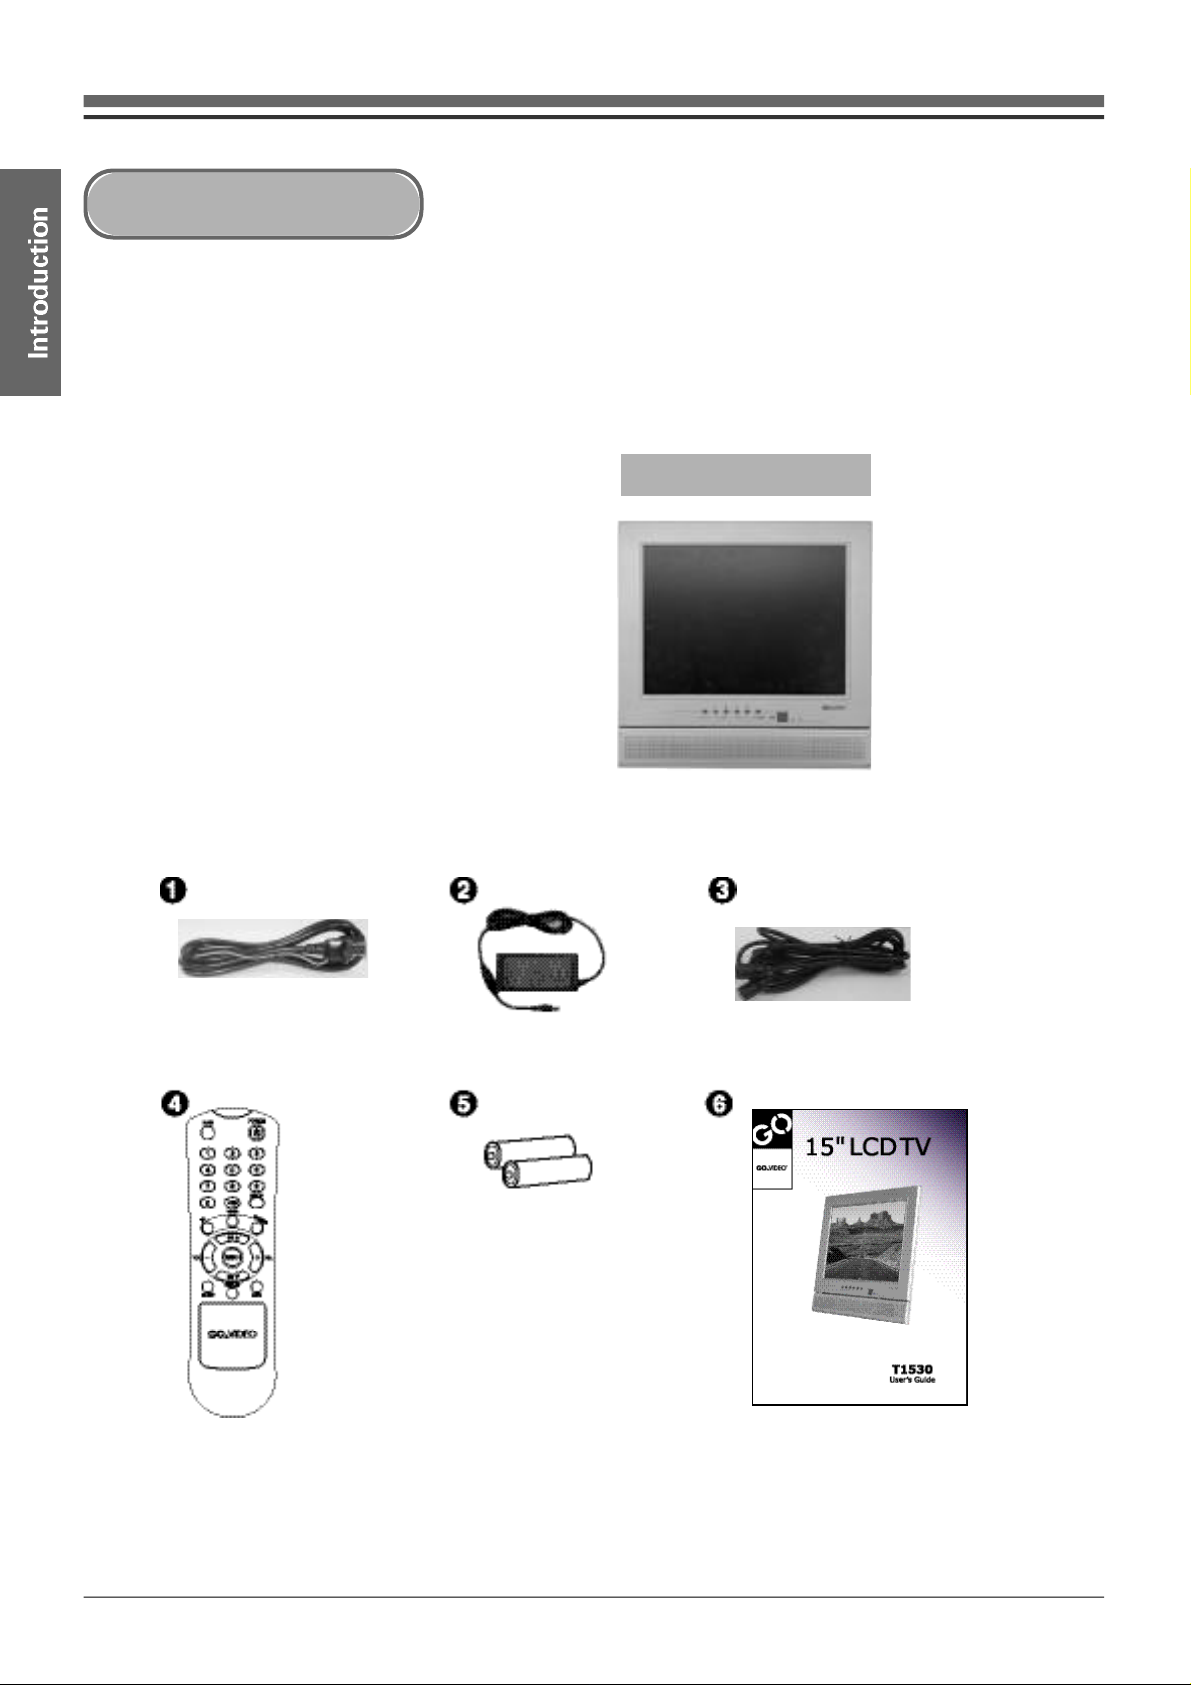
Packing List
Make sure the following items are included with your TV Set.
If any items are missing, contact your dealer.
① Power Cord
② Power Adapter
③ Antenna Cable
④ Remote Control
⑤ AAA Batteries (2)
T1530 LCD TV
⑥ User's Guide
7
Page 9

Front Panel Overview
① MENU button : Press to display and exit the Setup menu.
② ~ ③ CH
④ ~ ⑤ Audio -/+ buttons : Press to adjust the volume level.
⑥ TV/Video button : Press repeatedly to select the desired input (TV, Video, or S-Video).
⑦ Power button : Press to turn the TV on and off.
⑧ Power LED : Displays the current Power Status (Green = On, Red = Standby, None = Off ) .
⑨ Remote Signal Sensor : Point the remote control here to operate the TV.
⑩ Speaker
▼/▲
buttons : Press to select channels when watching TV.
Also use to move up and down in the Setup menu.
Also use to move left and right in the Setup menu.
8
Page 10
T1530
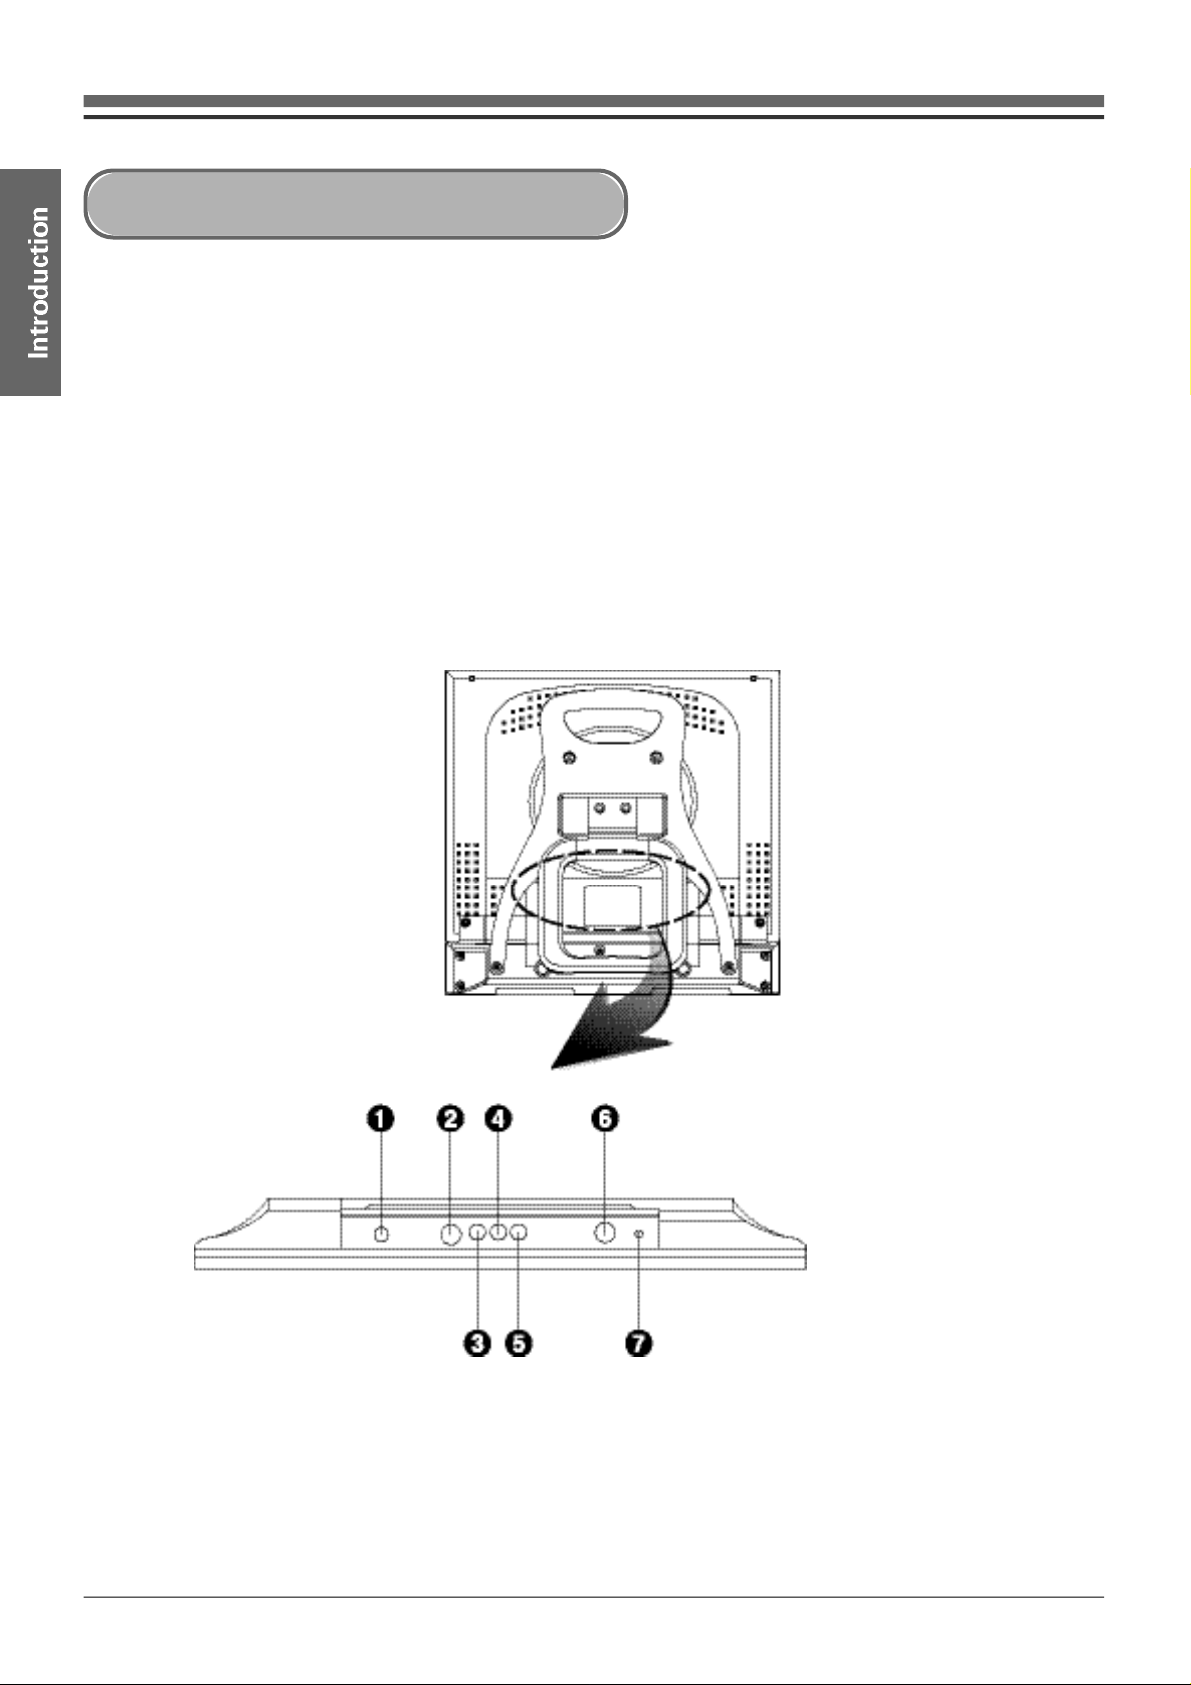
Rear Panel Overview
① Power/DC12V
② S-Video Input
③ Video Input
④ Audio Input (Left)
⑤ Audio Input (Right)
⑥ Antenna Input
⑦ Headphone Output
9
Page 11
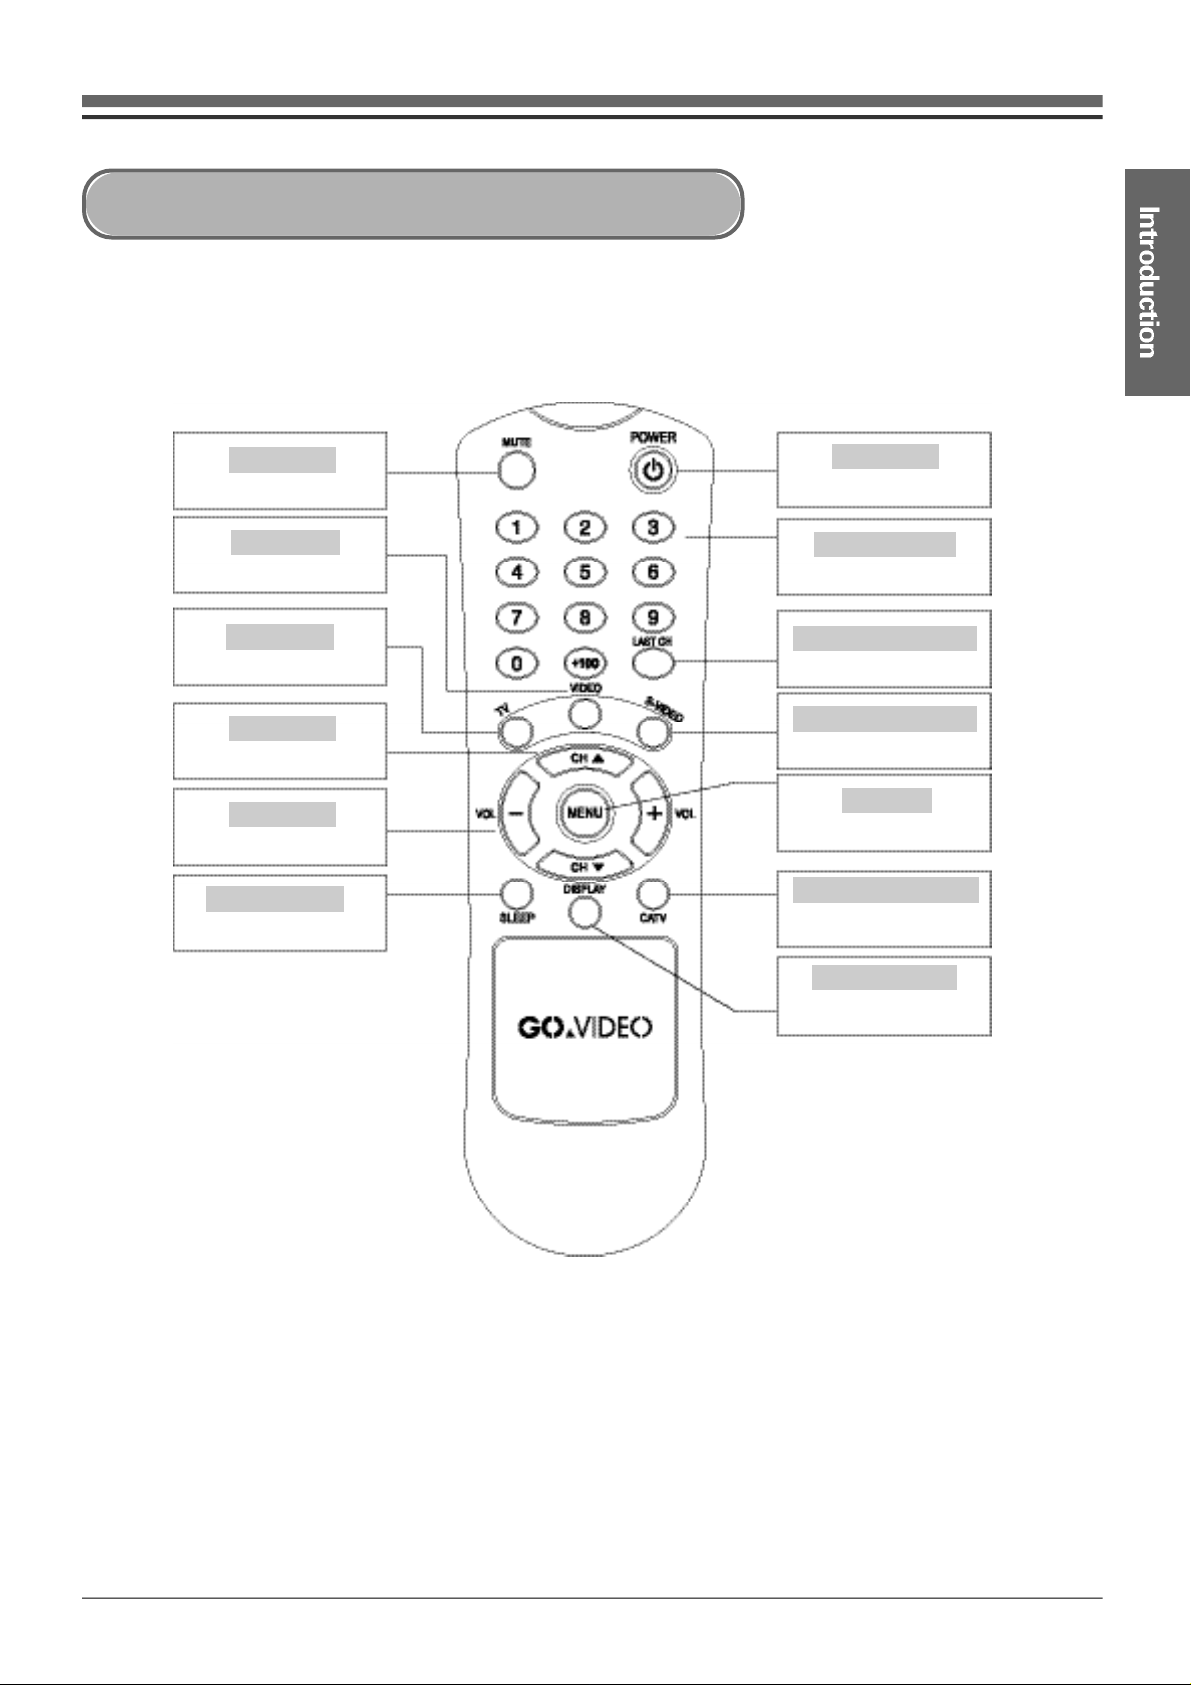
Remote Control Overview
MUTE
Mutes audio.
VIDEO
Selects Video input.
TV
Selects Antenna input.
CH
▼/▲
Selects channels.
VOL -/+
Adjusts volume level.
SLEEP
Adjusts Sleep timer
POWER
Turns TV on and off.
0-9, 100+
Selects channels.
LAST CH.
Displays last viewed channel
S-VIDEO
Selects S-Video input
MENU
Displays Setup menu
CATV
Selects Cable TV or
Antenna input.
DISPLAY
Displays current channel
information
10
Page 12
T1530
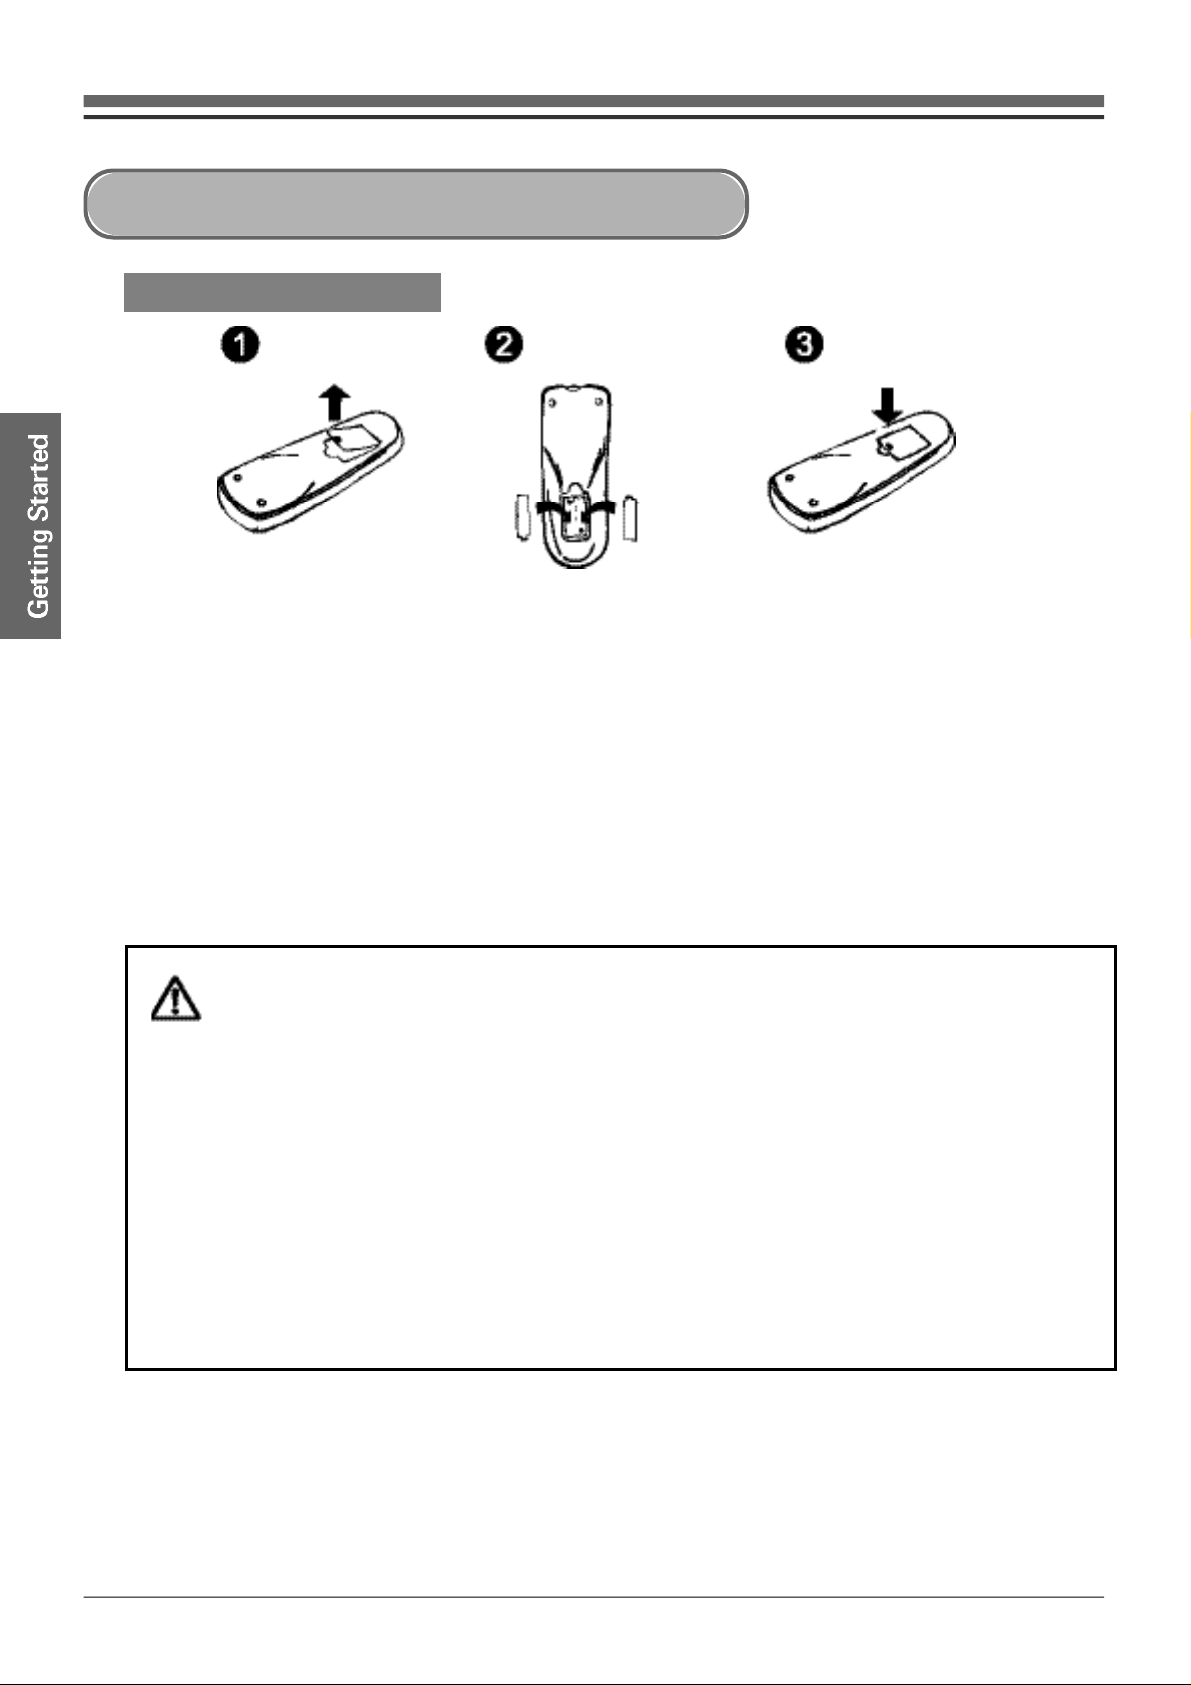
Using the Remote Control
Inserting Batteries
Open cover Insert batteries Close cover
•Point remote control at signal sensor on front panel of TV.
•Do not throw or drop remote control. Do not place on a wet surface or store in a humid
location.
•To prevent damage, do not place remote control in direct sunlight.
•The remote control may not work properly if the remote sensor is exposed to a strong light
or direct sunlight. Use the remote control close to the TV, change the angle of the TV, or
block the light source.
•If the remote control does not work, try changing the batteries.
Caution
Using batteries improperly may cause damage to the remote control.
•Make sure batteries are oriented in the proper direction (+/-).
•Do not mix different kinds of batteries together.
•Do not use old and new batteries together, as it may shorten battery life or cause leaking
from the old battery.
•Remove the batteries if they are dead or if you will not be using the remote for a long
period of time. If the batteries leak clean the surface.
11
Page 13

Connecting the Power Adapter
Connect the supplied power adapter as shown.
Caution
- Unplug the TV when you will not be using it for a long period of time.
- Always turn off the TV before unplugging the adapter.
12
Page 14

T1530
Connecting Antenna/Cable
13
Page 15

Basic Operations
① Turn on TV.
Press POWER on the front panel to turn the TV on and off.
- The green Power LED will light when the TV is on.
- You can now use the POWER button on the remote control to switch between on and
Standby modes. The red Power LED will light in Standby mode.
- Pressing POWER on the front panel effectively disconnects the TV from the power
adapter.
② Select Channels
- Use the 0-9 or CH
- To select CATV channels, first press the CATV button to switch to CATV mode. Then
select the desired channel as described above.
- In CATV mode, channel numbers are preceded by the letter “C”on the on-screen
display. Press CATV again to return to Antenna mode.
③ Adjust Volume
- Use the VOL-/+ buttons to adjust the volume.
- Press MUTE to temporarily mute the audio.
④ Watch VCR or DVD player
Press the TV/VIDEO button repeatedly to select any external devices connected to the
TV's Video & S-Video inputs.
- You can also press TV, Video, or S-Video to directly select any external input.
▼/▲
buttons to select the channel you want to watch.
14
Page 16

T1530
Sleep Mode
About the Sleep Timer
You can use the Sleep Timer feature to set the TV to turn off automatically after 30, 60,
90, or 120 minutes.
Setting the Sleep Timer
1. Press SLEEP once to view the current Sleep Timer setting.
If this is the first time you have used the Sleep Timer, then “SLEEP 0”appears.
2. Press SLEEP repeatedly to set the Sleep Timer duration in 30 minute increments up to
120 minutes.
3. The Sleep Timer is now enabled and the TV will turn off when the specified time has
elapsed.
- Five minutes before the TV shuts off, you will see a countdown on screen to warn
you the TV is about to go into Sleep mode.
Editing the Sleep Timer Setting
1. When the Sleep Timer is enabled, you can check the time remaining by pressing the
SLEEP button.
- If the Sleep Timer is not activated, “SLEEP 0”will appear.
2. Press SLEEP repeatedly to edit the Sleep Timer duration in 30 minute increments up to
120 minutes.
Canceling the Sleep Timer
1. To cancel the Sleep T i m e r, press SLEEP repeatedly until you see the display “SLEEP 0”.
- Note: Pressing POWER on the front panel of the TV also cancels the Sleep Timer.
Auto Power Off
The TV also has an Auto Power Off feature that causes the TV to automatically shut down
when no broadcast signal is detected for five or more minutes.
※ The Sleep Timer has no effect on the Auto Power Off feature.
15
Page 17

About the Setup Menu
The Setup menu allows you to adjust channel, video, audio, V-Chip, and other advanced
settings. Press MENU on the remote control or front panel to display the TV Setup menu.
Setup Menu Navigation
1. MENU : Displays and exits Setup Menu. Also use to return to previous menus.
2. CH
3. VOL- / + : Moves right and left through menu options. Use VOL+ to confirm menu
▼/▲
: Moves up and down through menu options.
selections.
16
Page 18

T1530
Setup Menu Overview
Icon Menu
tv setup
video adjust
Sub-menu Description
autoset
edit channels
auto fine tune
fine tune
source
brightness
contrast
color
tint
sharpness
color temp
tv blocking
Searches for channels automatically.
Allows manual setup of channels.
Turns auto fine tune on/off.
Allows manual fine tuning.
Select input signal (Antenna/Cable STD/Cable HRC/Cable IRC)
Adjusts brightness with VOL-/+ buttons.
Adjusts contrast with VOL-/+ buttons.
Adjusts color depth with VOL-/+ buttons.
Adjusts hue with VOL-/+ buttons.
Adjusts sharpness with VOL-/+ buttons.
Adjusts RGB ratio with VOL-/+ buttons.
v-chip block
closed
caption
audio
options
movie blocking
change password
cc mode
cc background
mute
volume
osd
osd h pos
osd v pos
osd timeout
video format
factory reset
See page 23.
Sets the closed caption mode.
Sets background of closed captions.
Mutes the sound temporarily.
Adjusts the volume level.
Adjusts position of Setup Menu on the OSD.
Moves position of Setup Menu left/right.
Moves position of Setup Menu up/down.
Sets time before Setup menu disappears.
Selects video standard of external device.
Restores factory default settings.
17
Page 19

Icon
Main Menu
Sub-Menu2Sub-Menu1 Description
v-chip block
tv blocking
m o v i e
b l o c k i n g
tv-y
tv-y7
tv-g
tv-pg
tv-14
tv-ma
mpaa g
mpaa pg
mpaa pg-13
mpaa r
mpaa nc-17
mpaa x
mpaa nr
Setup for blocking TV-Y rated TV programs.
Setup for blocking TV-Y7 rated TV programs.
Setup for blocking TV-G rated TV programs.
Setup for blocking TV-PG rated TV programs.
Setup for blocking TV-14 rated TV programs.
Setup for blocking TV-MA rated TV programs.
Setup for blocking MPAA-G rated movies.
Setup for blocking MPAA-PG rated movies.
Setup for blocking MPAA-PG-13 rated movies.
Setup for blocking MPAA-R rated movies.
Setup for blocking MPAA-NC-17 rated movies.
Setup for blocking MPAA-X rated movies.
Setup for blocking MPAA-NR rated movies.
change
password
Change
Password
Changes your V-Chip password.
18
Page 20

T1530
Channel Settings
Auto Set
•Searches for channels automatically.
1. Press MENU.
2. Highlight “tv setup”then press VOL+.
3. Highlight “autoset”then press VOL+.
4. The TV will automatically search for all available channels. This may take a few
minutes. When finished, the TV will tune to the lowest channel found.
Edit Channels
•Allows you to manually set or skip channels.
1. Press MENU.
2. Highlight “tv setup”then press VOL+.
3. Highlight “edit channels”then press VOL+.
4. Use the CH
the VOL-/+ buttons to choose “saved”or “skipped”.
5. When finished, press MENU repeatedly to save your settings and exit.
▼/▲
buttons to select the channel(s) you wish to add or delete. Then use
Auto fine tune
•Turns the auto fine tune feature on or off.
1. Press MENU.
2. Highlight “tv setup ”then press VOL+.
3. Highlight “auto fine tune”.
4. Use the VOL+/- buttons to turn auto fine tune on or off.
5. Press MENU repeatedly to save your settings and exit.
19
Page 21

Fine Tune
•Allows you to fine tune TV reception manually. Note: The “auto fine tune”f e a t u r e
must be turned off before you can use the “fine tune”feature.
1. Press MENU.
2. Highlight “tv setup”then press VOL+.
3. Use the CH
4. Use the VOL+/- buttons to manually adjust fine tuning from 0-100.
5. Press MENU repeatedly to save your settings and exit.
▼/▲
buttons to highlight “fine tune”.
Source
•Sets the source of incoming channels to Antenna or Cable (Standard, HRC, or IRC).
1. Press MENU.
2. Highlight “tv setup”then press VOL+.
3. Highlight “source”.
4. Use the VOL+/- buttons to select “antenna”,“cable STD”,“cable HRC”, or “cable
IRC”(check with your cable company for the correct setting).
5. Press MENU repeatedly to save your settings and exit.
20
Page 22

T1530
Picture Settings
Brightness
•Adjusts the brightness of the picture.
1. Press MENU.
2. Highlight “video adjust”then press VOL+.
3. Highlight “brightness”.
4. Use the VOL+/- buttons to adjust the brightness from 0-100.
5. Press MENU repeatedly to save your settings and exit.
Contrast
•Adjusts the contrast of the picture.
1. Press MENU.
2. Highlight “video adjust”then press VOL+.
3. Highlight “contrast”.
4. Use the VOL+/- buttons to adjust the contrast from 0-100.
5. Press MENU repeatedly to save your settings and exit.
Color
•Adjusts the color balance of the picture.
1. Press MENU.
2. Highlight “video adjust”then press VOL+.
3. Highlight “color”.
4. Use the VOL+/- buttons to adjust the color intensity from 0-100.
5. Press MENU repeatedly to save your settings and exit.
Tint
•Adjusts the tint color of the picture.
1. Press MENU.
2. Highlight “video adjust”then press VOL+.
3. Highlight “tint”.
4. Use the VOL+ / -buttons to adjust the tint from 0 (toward purple) - 100 (toward green).
5. Press MENU repeatedly to save your settings and exit.
21
Page 23

Sharpness
•Adjusts the sharpness of the picture.
1. Press MENU.
2. Highlight “video adjust”then press VOL+.
3. Highlight “sharpness”.
4. Use the VOL+ / -buttons to adjust the sharpness from 0 (softer picture) - 100 (harder picture).
5. Press MENU repeatedly to save your settings and exit.
Color Temp
•Adjusts the color temperature ratio of the picture.
1. Press MENU.
2. Highlight “video adjust”then press VOL+.
3. Highlight “color temp”.
4. Use the VOL+/- buttons to select the desired color temperature:
5000, 6500, 9300, or user (see details below).
5. Press MENU repeatedly to save your settings and exit.
※ About the User Setting
Highlight “user red”
Use the VOL+/- buttons to adjust from 0 (light red) - 100 (strong red).
Highlight “user green”
Use the VOL+/- buttons to adjust from 0 (light green) - 100 (strong green).
Highlight “user blue”
Use the VOL+/- buttons to adjust from 0 (light blue) - 100 (strong blue).
22
Page 24

T1530
V-Chip Settings
TV Blocking
• Sets the V-Chip to block shows with specific TV ratings. See page 25 for detailed
descriptions of each rating.
1. Press MENU.
2. Highlight “v-chip block”then press VOL+.
3. Highlight “tv blocking”then press VOL+.
4. Press VOL+ to select “enter blocking password...”.
5. Use the VOL+ / - buttons to highlight each digit of your password, and use the CH
buttons to set each digit from 0-9.
6. When finished, highlight “ok”or “cancel”and press MENU.
7. Highlight the desired TV rating, then use the VOL+ / - buttons to set the desired
subrating according to the table on page 25.
8. Highlight the desired TV rating, then use the VOL+ / - buttons to set the desired
subrating according to the table on page 25.
▼/▲
Movie Blocking
• Sets the V-Chip to block movies with specific MPAA ratings. See page 25 for detailed
descriptions of each rating.
1. Press MENU.
2. Highlight “v-chip block”then press VOL+.
3. Highlight “movie blocking”then press VOL+.
4. Press VOL+ to select “enter blocking password...”.
5. Use the VOL+ / - buttons to highlight each digit of your password, and use the CH
▼/▲
buttons to set each digit from 0-9.
6. When finished, highlight “ok”or “cancel”and press MENU.
7. Highlight the desired MPAA rating, then use the VOL+/- buttons to block or show
each rating according to the table on page 25.
8. Press MENU repeatedly to save your settings and exit.
23
Page 25

Change Password
• Allows you to change your V-Chip password.
1. Press MENU.
2. Highlight “v-chip block”then press VOL+.
3. Highlight “change password”then press VOL+.
4. Use the VOL+/- buttons to highlight each digit of your old and new passwords, and
use the CH
5. When finished, highlight “ok”or “cancel”and press MENU.
6. “Password Change Successfully”will appear for ~3 seconds then disappear.
7. Press MENU repeatedly to save your settings and exit.
✽ To Reset the Password
1. Press MENU.
2. Highlight “v-chip block”and press VOL+.
3. Highlight “tv blocking”and press VOL+.
4. Press VOL+ to select “enter blocking password...”
5. On the “Enter Password”screen, press and hold the TV/VIDEO button on the front
panel of the TV for about 3 seconds.
6. “Password Reset Completed”appears on the screen for about 2 seconds.
▼/▲
buttons to set each digit from 0-9.
24
Page 26

T1530
TV Guide & MPAA Ratings
■
TV PARENTAL GUIDELINES
TV-Y
TV-Y7
TV-G
TV-PG
TV-14
TV-MA
FV
V
S
L
D
V
S
L
D
V
S
L
All Children - This program is designed to be appropriate for all
children.
Directed to Older Children - This program is designed for children
age 7 and above.
Program Contains Fantasy Violence
General Audience - Most parents would find this program suitable
for all ages.
Parental Guidance - This program may contain some material that
some parents would find unsuitable for younger children.
Program Contains Moderate Violence
Program Contains Some Sexual Situations
Program Contains Infrequent Coarse Language
Program Contains Suggestive Dialogue
Parents Strongly Cautioned - This program is specifically designed to be
viewed by adults and therefore may be unsuitable for children under 14.
Program Contains Intense Violence
Program Contains Intense Sexual Situations
Program Contains Strong Coarse Language
Program Contains Intensely Suggestive Dialogue
Mature Audience Only - This program is specifically designed to be
view by adults and therefore may be unsuitable for children under 17.
Program Contains Graphic Violence
Program Contains Explicit Sexual Situations
Program Contains Crude Indecent Language
■
MPAA RATING
RATING
AGE BASE
G
PG
PG-13
R
NR
NC-17
X
GENERAL AUDIENCES. All ages admitted.
PARENTAL GUIDANCE SUGGESTED. Some material may not be
suitable for children
PARENTAL STRONGLY CAUTIONED. Some material may be
inappropriate for children under 13.
RESTRICTED. Under 17 requires accompanying parent or adult
guardian.
NOT RATED
NO ONE 17 AND UNDER ADMITTED.
X is an older rating that is unified with NC-17, but may be
encoded in the data of older movies.
25
Page 27

Closed Caption Settings
CC Mode (Closed Caption Mode)
•Allows you to set the desired closed caption mode.
1. Press MENU.
2. Highlight “closed caption”then press VOL+.
3. Highlight
4. Use the VOL+/- buttons to select the desired closed caption mode:
TV, CC1, CC2, T1, T2, or XDS.
5. Press MENU repeatedly to save your settings and exit.
“
cc mode”.
CC Background (Closed Caption Background)
•Allows you to set the background of closed captions to transparent or opaque.
1. Press MENU.
2. Highlight “closed caption”then press VOL+.
3. Highlight
4. Use the VOL+ / - buttons to set the closed caption background to “t r a n s p a r e n t”o r
“
opaque”.
5. Press MENU repeatedly to save your settings and exit.
“
cc background”.
26
Page 28

T1530
Sound Settings
Mute
•Mutes the sound temporarily.
1. Press MENU.
2. Highlight “audio”then press VOL+.
3. Highlight “mute”.
4. Use the VOL+/- buttons to turn mute on or off.
5. Press MENU repeatedly to save your settings and exit.
Volume
•Adjusts the volume level.
1. Press MENU.
2. Highlight “audio”then press VOL+.
3. Highlight “volume”.
4. Use the VOL+/- buttons to adjust the volume level from 0-100.
5. Press MENU repeatedly to save your settings and exit.
27
Page 29

Other Settings
OSD
•Adjusts the position of the Setup Menu on the OSD (On-Screen Display).
1. Press MENU.
2. Highlight “options”then press VOL+.
3. Highlight “osd”.
4. Use the VOL+ / - buttons to move the Setup menu to one of 9 preset positions on the
s c r e e n .
5. Press MENU repeatedly to save your settings and exit.
OSD H. Pos
•Adjusts the horizontal (left/right) position of the Setup Menu on the OSD.
1. Press MENU.
2. Highlight “options”then press VOL+.
3. Highlight “osd h pos”.
4. Use the VOL+/- buttons to adjust the horizontal position of the Setup menu from 0 (far
left) to 100 (far right).
5. Press MENU repeatedly to save your settings and exit.
OSD V. Pos
•Adjusts the vertical (up/down) position of the Setup Menu on the OSD.
1. Press MENU.
2. Highlight “options”then press VOL+.
3. Highlight “osd v pos”.
4. Use the VOL+ / - buttons to adjust the vertical position of the Setup menu from 0
(bottom) to 100 (top).
5. Press MENU repeatedly to save your settings and exit.
28
Page 30

T1530
OSD Timeout
•Sets the length of time before the Setup menu disappears from the OSD.
1. Press MENU.
2. Highlight “options”then press VOL+.
3. Highlight “osd timeout”.
4. Use the VOL+ / - buttons to set the Setup menu to time out (disappear) after 5-60
seconds.
5. Press MENU repeatedly to save your settings and exit.
Video Format
•Selects the video standard of an externally connected device, such as a VCR.
1. Press MENU.
2. Highlight “options”then press VOL+.
3. Highlight “video format”.
4. Use the VOL+/- buttons to set the Video Format of your external source (e.g., VCR) to
Auto, NTSC (the broadcast standard used in North America), or PAL (the standard widely
used in Europe).
Factory Reset
•Restores all TV settings to the factory defaults.
1. Press MENU.
2. Highlight “options”then press VOL+.
3. Highlight “factory reset”.
4. Press VOL+ to restore all settings to the factory defaults.
29
Page 31

Power Saving Mode
● To conserve electricity, the T1530 includes a Power Saving feature that automatically
switches to Standby mode if no broadcast signal is detected for 5 minutes.
About Power Saving Mode
■ The LCD-TV will automatically switch to Standby mode if no signal is detected within 5
minutes.
•For example, if you fall asleep with the TV on, your TV will automatically power off 5
minutes after broadcasting has ended.
•The TV will switch to Standby mode automatically after any sustained interruption of
the incoming signal.
■ Press POWER to resume normal viewing. The red Standby light will change to green.
30
Page 32

T1530
DVD Player/VCR Connections
31
Page 33

Audio Connections
32
Page 34

T1530
External Device Connections
33
Page 35

Troubleshooting
The Troubleshooting section below will help you solve common issues with your
LCD TV. If you don’t find the answers you need here, you can contact our
Customer Service Department as follows:
Phone : (800) 736-7679
E-Mail : customersupport@govideo.com
Web : www.govideo.com
Symptoms
No power.
Power LED off.
No display.
No sound.
Sound not loud enough.
Poor picture quality.
No TV signal.
Image shakes. Make sure all cables are securely connected.
Image too bright or dark.
Poor color or black and white
image.
Make sure power cord and adapter are securely
connected.
Make sure all cables are securely connected.
Adjust the volume with the VOL+/- buttons.
Make sure antenna cable is securely connected.
Also, check the condition of your outdoor antenna.
Make sure the channel “source”is set correctly in
the Setup menu (antenna vs. cable).
Use the “autoset”feature to search for channels
automatically.
Adjust the “brightness”or “contrast”settings
in the Setup menu.
Adjust the “color”setting in the Setup menu.
Solutions Note
Red Power LED
Bright or dark dot on the
screen.
The TV is in Power Save Mode. Press POWER
on the remote control to turn the TV on.
There may be a few bright or dark pixels on the
display panel.
This is normal and will not effect the product's
performance.
34
Page 36

T1530
Care & Maintenance
■
Cleaning the Cabinet
●Unplug the TV and clean the cabinet with a dry cloth.
■
Cleaning the Screen
●Gently wipe the screen with a soft, dry cloth.
- Do NOT use polish, benzol, or thinner, which may damage the screen.
- ONLY use anti-static cleaners recommended for LCD-TVs and Monitors.
- Clean the metal ends of the power plug frequently with a DRY cloth only!
※ Failure to do so may cause electric shock or fire.
- GoVideo is not responsible for damage to the TV if the unit falls, is dropped, or is
otherwise misused.
Caution
Power Supply Voltage
■
Do NOT use this product EXCEPT with the proper voltage.
■
Failure to do so may cause damage to the product. Use only the power
supply provided by the manufacturer.
■
This product is for domestic use only. It cannot be used outside of the
country due to variations in voltage.
35
Page 37

Customer Support
■Questions about product or Repair Service
✽If you have any questions about this product or repair service, please refer to the
troubleshooting section (see page 34), or contact our Customer Service Department as
follows:
Phone : (800) 736-7679
E-Mail : customersupport@govideo.com
Web : www.govideo.com
36
Page 38

T1530
37
Page 39

Technical Specifications
■TFT-LCD Panel 15" Color Active Matrix TFT LCD
■TV ANTENNA : VHF(2~13CH), UHF(14~69CH)
CATV : 1~125CH
■Dot Pitch 0.297mm
■Viewable Angle 70°(L/R), 55°(U)/60°(D)
■Input Antenna, S-Video, Video(Composite), Audio(L/R)
■Output Headphone
■Backlight Life About 35,000 hours(Avg.)
■Power Supply DC12V, AC110 ~ 240V, 50/60Hz
■Power Consumption 35W
■Power Saving 5W
■Dimension 15.2"×14.7"×6.2" (385×374×158mm) (W×H×D)
■Weight Net Weight : 9.4 lbs. (4.3kg)
Gross Weight : 13 lbs. (5.9kg)
■Operating Environment Temp. : 50°~ 95°F (10 ~ 35℃)
Humid : 30 ~ 80%
■Storage Environment Temp. : 23°~113°F (-5 ~ 45℃)
Humid : 5 ~ 90%
38
 Loading...