

Page 1

Dual-Deck
Owner’s Guide
Video Cassette Recorder
Model GV2020
Page 2
Dual-Deck
To get the full benefit of the VCR-2® features, please read this Owner’s Guide carefully.
Record the serial number from the back of your VCR-2 here. Attach your sales receipt for reference.
Model Number: GV2020
Serial Number:
Purchase Date:
It is important that you register your VCR-2 with Go-Video, Inc. so that you can be contacted in the event of a product
modification or recall. To register your VCR-2, complete the warranty registration card and mail it in.
To contact Go-Video, Inc. call (800) 279-1600 for information regarding your VCR-2.
WARNING:
▲ To reduce the risk of fire or electric shock, do not expose this appliance to rain or moisture.
▲ Do not open the cabinet; dangerous high voltage is present. Refer servicing only to qualified personnel.
▲ This video cassette recorder should only be used with 120V, 60Hz (standard U.S. household) current.
CAUTION:
▲ To prevent fire, shock hazard or annoying interference, use only the recommended accessories.
▲ To prevent electric shock do not use this (polarized) plug with an extension cord, receptacle or other outlet unless the
blades can be fully inserted to prevent blade exposure.
ATTENTION:
▲ Pour prévenir les chocs électriques, ne pas utiliser cette fiche polarisée avec un prolongateur, une prise de courant ou
une autre sortie de courant, sauf si les lames peuvent etre insérées à fond sans en laisser aucune partie à découvert.
NOTE TO CATV SYSTEM INSTALLER:
This reminder is provided to call the CATV system installer’s attention to Article 820-22 of the National Electrical Code that
provides guidelines for proper grounding and, in particular, specifies that the cable ground shall be connected to the
grounding system of the building, as close to the point of cable entry as practical.
WARNING:
Federal law provides severe civil and criminal penalties for the unauthorized reproduction, distribution or exhibition of
copyrighted motion pictures and video tapes. (Title 17, United States Code, Sections 501 and 506)
CAUTION
RISK OF ELECTRIC SHOCK
DO NOT OPEN
CAUTION: TO REDUCE THE RISK OF ELECTRIC SHOCK
DO NOT REMOVE COVER
NO USER-SERVICEABLE PARTS INSIDE
REFER SERVICING TO QUALIFIED SERVICE PERSONNEL
This symbol is intended to alert the user to the
presence of uninsulated dangerous voltage within the
product’s enclosure that may be of sufficient magnitude to constitute a risk of fire or electric shock.
This symbol is intended to alert the user to the
presence of important operating and maintenance
instructions in the literature accompanying this
product.
Page 3

Limited
Warranty
WHO PROVIDES THE LIMITED WARRANTY?
During the warranty period, the Go-Video Warranty Administrator will honor service through an
authorized service center for 90 days labor, one (1) year parts, from the original date of consumer
purchase. See below for commercial, industrial or educational use coverage.
WHO IS PROTECTED?
This warranty protects the original consumer owner of this Go-Video product.
WHAT IS COVERED AND HOW LONG?
This warranty covers internal operating parts and service/labor to repair or replace covered
parts in this Go-Video product for 90 days labor, one (1) year parts, from the date of purchase,
defined as follows: (1) Original Consumer Retail Purchase; (2) First Rental Purchase Agreement; or
(3) First Lease Purchase Agreement (the “Warranty Period”). Labor and replacement parts supplied
during the Warranty Period are covered only for the remaining portion of the original Warranty
Period. The Go-Video Warranty Administrator shall have no liability for service under this warranty
if non OEM replacement parts are used in the repair of your Go-Video product.
WHAT MUST THE OWNER DO IF SERVICE IS REQUIRED?
If service under this warranty is required, contact your original Go-Video dealer, or call the GoVideo service number below, to determine the nearest authorized Go-Video service center.
Go-Video’s warranty pays for a new or remanufactured part to replace any part found to be
defective during the Warranty Period as well as reimbursement for approved labor costs to an
authorized service center. The owner will be responsible for any service call charge or trip charge.
OTHER WARRANTY COVERAGE
Commercial, industrial or educational use has the same warranty coverage as stated elsewhere
on this page, except that parts and labor coverage is only for 30 days from original date of purchase.
WHAT ARE THE EXCEPTIONS?
This warranty does not cover 1) Damage from misuse, abuse, neglect or accident, natural
disasters or Acts of God. 2) Cabinetry, decorative parts, batteries, hand-held remotes, cable boxes,
connectors, A/C adapters or accessories, knobs or buttons, or video cassette tape. 3) Cleaning of
video/audio heads, which is routine maintenance, or other routine maintenance. 4) The foreign
country use of this product. 5) Go-Video product which has been electrically or mechanically
modified in any way or incorporated into other products. 6) Signal reception problems caused by
external antenna or cable systems. 7) Installation and set-up service adjustments. 8) Owner instruction. Your Owner’s Guide provides information regarding operating instructions and user controls.
For additional information, contact your authorized Go-Video dealer.
Go-Video is not responsible for any shipping, handling or insurance charges.
Defective unit or parts must be available to send to the Go-Video Warranty Administrator IF
DEMANDED at the time of service or claim processing.
This Exclusive Limited Warranty excludes all incidental and consequential damages. Some states
do not allow the exclusion of incidental and consequential damages so the above exclusion may
not apply to you.
ALL IMPLIED WARRANTIES, INCLUDING IMPLIED WARRANTIES OF MERCHANTABILITY AND
FITNESS FOR A PARTICULAR PURPOSE ARE LIMITED IN DURATION TO THE DURATION OF THIS
WARRANTY PERIOD. Some states do not allow limitations on how long an implied warranty lasts,
so the above limitation may not apply to you.
This Exclusive Limited Warranty gives you specific legal rights and you may also have other
rights which vary from state to state.
For further information contact:
GO-VIDEO WARRANTY ADMINISTRATOR
7835 EAST McCLAIN DRIVE, SCOTTSDALE, ARIZONA 85260
(480) 998-3400
To obtain the location of your nearest service center contact:
GO-VIDEO SERVICE
(800) 992-8777
Page 4

1. READ INSTRUCTIONS - All the safety and operating instructions should be read
before the unit is operated.
2. RETAIN INSTRUCTIONS - The safety and operating instructions should be
retained for future reference.
3. HEED WARNINGS - All warnings on the unit and in the operating instructions
should be adhered to.
4. FOLLOW INSTRUCTIONS - All operating and maintenance instructions should
be followed.
5. CLEANING - Unplug this video unit from the wall outlet before cleaning. Do not
use liquid or aerosol cleaners. Use a dry cloth for dusting cabinet.
6. ATTACHMENTS - Do not use attachments not recommended by the video
product manufacturer, as they may be hazardous.
7. WATER & MOISTURE - Do not use this video unit near water — for example,
near a bathtub, wash bowl, kitchen sink, laundry tub, in a wet basement, near a
swimming pool or the like.
Safety
Instructions
8. ACCESSORIES - Do not place this video unit on an unstable cart, stand, tripod,
bracket or table. The video unit may fall, causing serious injury to a child or
adult, and serious damage to the unit. Use only with a cart, stand, tripod, bracket
or table recommended by the manufacturer or sold with the video unit. Any
mounting of the unit should follow the manufacturer’s instructions and should
use a mounting accessory recommended by the manufacturer.
8A.An appliance and cart combination should be moved with care. Quick stops,
excessive force, and uneven surfaces may cause the appliance and cart combination to overturn.
PORTABLE CART WARNING
(Symbol provided by RETAC)
9. VENTILATION - Slots and openings in the cabinet are provided for ventilation to
ensure reliable operation of the video unit and to protect it from overheating.
These openings must not be blocked or covered. Never place your VCR on a
bed, sofa, rug or other similar surface, on or near a radiator or heat register. This
video unit should not be placed in a built-in installation such as a bookcase or
rack unless proper ventilation is provided or the manufacturer’s instructions
have been adhered to.
10.POWER SOURCES - This video unit should be operated only from the type of
power source indicated on the marking label. If you are not sure of the type of
power supply to your home consult your appliance dealer or local power
company. For video units intended to be operated from battery power, or other
sources, refer to the operating instructions.
11.GROUNDING OR POLARIZATION - This video unit may be equipped with either
a polarized 2-wire AC line plug (a plug having one blade wider than the other) or
a 3-wire grounding plug having a third (grounding) pin.
The 2-wire polarized plug will fit into the power outlet only one way. This is a
safety feature. If you are unable to insert the plug fully into the outlet, try
reversing the plug. If the plug still fails to fit, contact your electrician to replace
your obsolete outlet. Do not defeat the safety purpose of the polarized plug.
1
Page 5
Safety
Instructions
GROUND
CLAMP
ELECTRIC
SERVICE
EQUIPMENT
GROUND
CLAMPS
POWER SERVICE GROUNDING
NEC - NATIONAL ELECTRICAL CODE
ELECTRODE SYSTEM
(NEC ART 250, PART H)
ANTENNA
LEAD-IN
WIRE
ANTENNA
DISCHARGE
UNIT (NEC
SECTION 810-20)
GROUNDING CONDUCTORS
(NEC SECTION 810-21)
12.POWER-CORD PROTECTION - Power-supply cords should be routed so that
they are not likely to be walked on or pinched by items placed upon or against
them, paying particular attention to cords of plugs, convenience receptacles,
and the point where they exit from the unit.
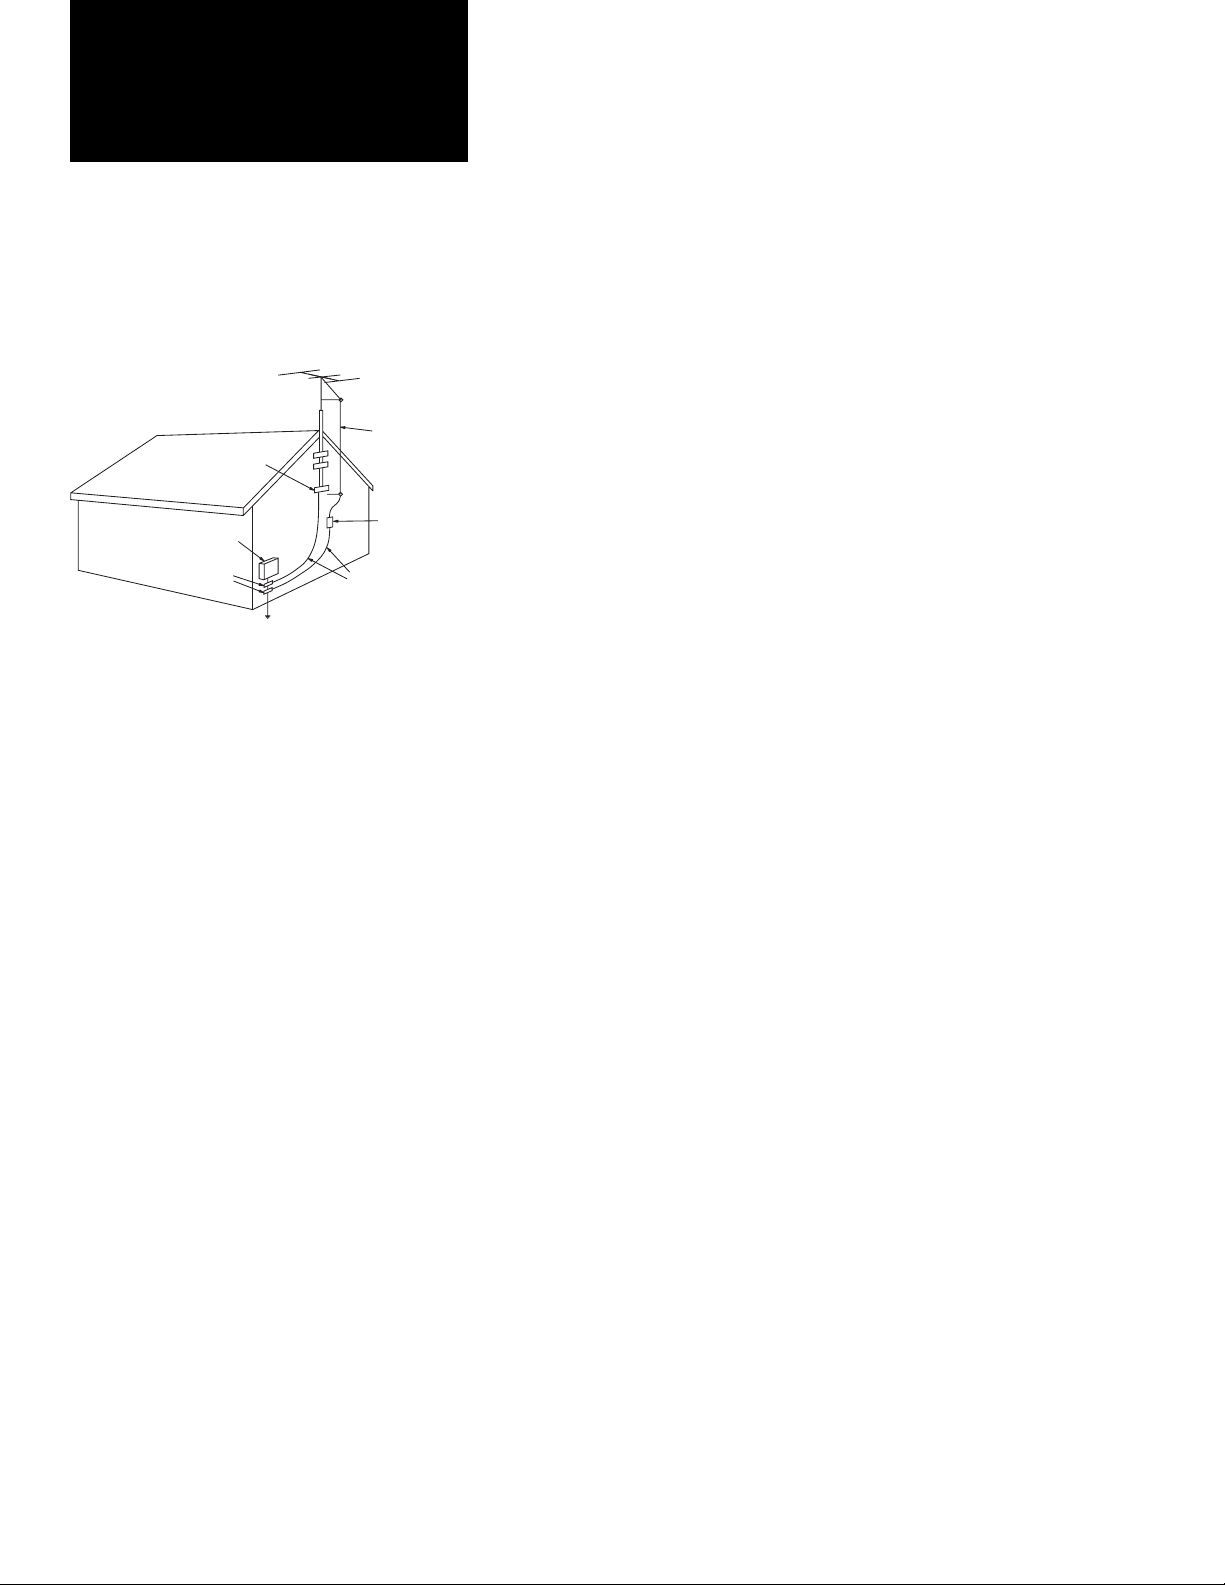
13.OUTDOOR ANTENNA GROUNDING - If an outside antenna or cable system is
connected to the video unit, be sure the antenna or cable system is grounded to
provide some protection against voltage surges and built-up static charges.
Section 810 of the National Electrical Code, ANSI/NFPA No. 70-1984, provides
information with respect to proper grounding of the mast and supporting
structure, grounding of the lead-in wire to an antenna discharge unit, size of
grounding conductors, location of antenna-discharge unit, connection to
grounding electrodes, and requirements for the grounding electrode. See Figure
on this page.
14.LIGHTNING - For added protection of this video unit during a lightning storm, or
when it is left unattended and unused for long periods of time, unplug it from
the wall outlet and disconnect the antenna or cable system. This will prevent
damage to the video unit due to lightning and power line surges.
15.POWER LINES - An outside antenna system should not be located in the vicinity
of overhead power lines or other electric light or power circuits, where it can
fall into such power lines or circuits. When installing an outside antenna system
extreme care should be taken to keep from touching such power lines or
circuits as contact with them might be fatal.
16.OVERLOADING - Do not overload wall outlets and extension cords as this can
result in the risk of fire or electric shock.
17.OBJECTS AND LIQUIDS - Never push objects of any kind into this video unit
through openings as they may touch dangerous voltage points or short out parts
that could result in a fire or electric shock. Never spill liquids of any kind onto
the unit. Should spillage occur, unplug unit and have it checked by a technician
before use.
18.SERVICING - Do not attempt to service this video unit yourself as opening or
removing covers may expose you to a dangerous voltage or other hazards. Refer
all servicing to qualified service personnel.
19.DAMAGE REQUIRING SERVICE - Unplug this video unit from the wall outlet and
refer servicing to qualified service personnel under the following conditions:
a. When the power supply cord or plug is damaged.
b. If any liquid has been spilled onto or objects have fallen into the video unit.
c. If the video unit has been exposed to rain or water.
d. If the video unit does not operate normally by following the operating
instruction. Adjust only those controls that are covered by the operating
instructions. Improper adjustment of other controls may result in damage and
will often require extensive work by a qualified technician to restore the video
unit to its normal operation.
e. If the video unit has been dropped or the cabinet has been damaged.
f. When the video unit exhibits a distinct change in performance — this
indicates a need for service.
20.REPLACEMENT PARTS - When replacement parts are required, be sure the
service technician has used replacement parts specified by the manufacturer or
have the same characteristics as the original part. Unauthorized substitutions
may result in fire, electric shock or other hazards.
21.SAFETY CHECK - Upon completion of any service or repairs to this video unit
ask the service technician to perform safety checks to determine that the video
unit is in safe operating order.
2
Page 6

Initial setup instructions begin on page 5. See page 10 for a list
of included accessories.
Safety Instructions ....................................................................................1 - 2
Features of Your Dual-Deck VCR-2 ............................................................... 4
Exclusive Features of Your VCR-2 ........................................................... 4
Other Key Features of Your VCR-2.......................................................... 4
Quick Connections ....................................................................................... 5
Dual-Deck VCR-2 Front Panel ...................................................................6 - 7
Dual-Deck VCR-2 Remote Control ............................................................8 - 9
Dual-Deck VCR-2 Accessories..................................................................... 10
Using Your Remote Control ....................................................................... 11
Playing a Tape............................................................................................. 12
Duplicating a Tape...................................................................................... 13
Recording from TV ..................................................................................... 14
Playing a Tape While Recording from TV.............................................. 14
Recording Two Programs from TV............................................................. 15
Editing a Single Tape................................................................................... 16
Editing Multiple Scenes Onto One Tape..................................................... 17
One-Two Recording™ ................................................................................ 18
Setting the Timer to Record Later.........................................................19 - 21
On-Screen Programming.......................................................................22 - 27
Main Menu ............................................................................................. 22
Programming from the Remote Control and Front Panel ................ 22
Video Menu (Record Speed, AmeriChrome Copy™, Auto Features).... 23
Audio Menu (Dolby* NR, Audio Source) ............................................... 24
Set Date and Time.................................................................................. 25
Channel/Tuner Menu.......................................................................26 - 27
On-Screen Display....................................................................................... 28
Front Panel Display..................................................................................... 29
Auto Features .............................................................................................. 30
Tape Counter & Memory Stop.................................................................... 31
Antenna Connections ...........................................................................32 - 33
Cable Connections................................................................................34 - 36
Connecting Other Video Equipment .......................................................... 37
Audio Features & Connections ................................................................... 38
Simulcast ................................................................................................ 38
Multichannel TV Sound (MTS) Stereo.................................................... 38
Monitor Connections .................................................................................. 39
Care of Your Dual-Deck VCR-2 ................................................................... 40
Technical Specifications ............................................................................. 41
Index 42 - 43
Troubleshooting ......................................................................................... 44
Limited Warranty ...............................................................Inside Front Cover
Table of
Contents
Go-Video and VCR-2 are registered trademarks of Go-Video, Inc. Copy
Tape, AmeriChrome Copy, One-Two Recording, and Dual-Deck
System are trademarks of Go-Video, Inc.
*Dolby noise reduction manufactured under license from Dolby
Laboratories Licensing Corporation. “Dolby” is a trademark of Dolby
Laboratories Licensing Corporation.
3
Page 7

Features of Your
Dual-Deck VCR-2
Exclusive Features of Your VCR-2
AmeriChrome Copy™ Circuitry. Page 13.
Your VCR-2’s exclusive AmeriChrome Copy circuitry replaces the normal video processing
system to maintain the high quality of your original tape. AmeriChrome Copy also synchronizes
the deck speeds for optimum duplication results.
Copy one tape to another with one-touch simplicity. Page 13.
The Copy Tape™ button enables you to duplicate tapes with unequaled clarity at a single touch
of a button.
View a prerecorded tape while recording a TV program. Page 14.
Only the VCR-2 features the Dual-Deck System™ so that you can watch a prerecorded tape
while recording from TV.
Record two programs from TV at the same time. Page 15.
The exclusive Dual-Deck System lets you record two different programs at the same time. Of
course, the TV doesn’t have to be your only source – you can record from TV while making a
live recording with a video camera or recording from another VCR or laser disc player.
Edit video tapes. Pages 16 - 17.
Copy segments from any number of tapes onto one master tape.
Other Key Features of Your VCR-2
Operate and program your VCR-2 without getting out of your chair. Pages 8 - 9, 11.
You can perform all operations, including setting a Timer Recording, with the advanced Remote
Control.
Search for a favorite segment on a tape with Picture Scan or Jet Search. Page 12.
Picture Scan lets you view the tape at up to 9 times the normal play speed and Jet Search at up
to 21 times the normal play speed, in forward or reverse.
Set a timed recording with a single button. Page 18.
One-Two Recording™ is a simple way to record a TV program.
Set the timer to record up to 16 hours of programs for weeks, months, or even years in advance.
Pages 19 - 21.
The advanced circuitry of Timer Recording will let you program up to 16 events for one-time,
daily, or weekly recording.
View and change VCR-2 settings and Timer Recording settings right on your TV screen. Pages 19
- 27.
On-Screen Programming makes it simple to change tape speed, clock, calendar and timer
settings, and much more.
Memory backup for Speed, Timer and Channel Memory settings.
Your VCR-2 remembers these settings even after power failures. When the power fails, all you
need to reset is the clock.
Play and record tapes with Dolby noise reduction. Page 24.
These special circuits improve sound quality by reducing “tape hiss” during soft passages.
Record from a video camera or other video source. Page 37.
Your VCR-2 makes exceptional recordings from video cameras, laser disc players, and other
VCRs.
Play and record video tapes in stereo. Pages 24, 38.
You can play prerecorded and home video tapes in stereo for improved sound definition. Your
VCR-2 also tunes MTS broadcast stereo programs for recording full stereo sound.
4
Page 8

Quick
Connections
∏
Coaxial
or
Twin-lead
ANTENNA CABLES
To connect your VCR-2 to your TV, follow these four simple steps. More
advanced connection instructions begin on page 32.
Adapter
① Place your VCR-2 next to your TV and plug the VCR-2 power cord into a
wall outlet.
∑ Detach the antenna cable from your TV (it will be either a round coaxial
cable or a flat twin-lead cable). Attach this cable to the In from Antenna/
Cable connection on the back panel of your VCR-2. If your antenna
cable is twin-lead, use the supplied adapter.
π
CH 3
CH 4
OUT TO TV
ANTENNA/
IN FROM:
CABLE
∑
VCR-2 BACK PANEL
VIDEO
IN OUT
VCR-2 Cable
(supplied)
∏
VHF
TV BACK PANEL
UHF
or
∏ A cable is supplied with your VCR-2. Connect the coaxial (round) end of
this cable to the Out to TV connection on your VCR-2 back panel.
Connect the other end of the supplied cable to the antenna connection
on the back of your TV.
Depending on the type of antenna connection your TV has, you will
connect either the round coaxial connector or the twin-lead connectors.
If your TV has both types of connections, use the coaxial connection.
You should not connect both.
π Set the CH 3/CH 4 selector, which is located on the back panel of your
VCR-2. It is preset to channel 3. To avoid interference from a local
station you should choose the channel that is not normally used in your
area.
Use the supplied adapter if your antenna cable is twin-lead.
5
Page 9
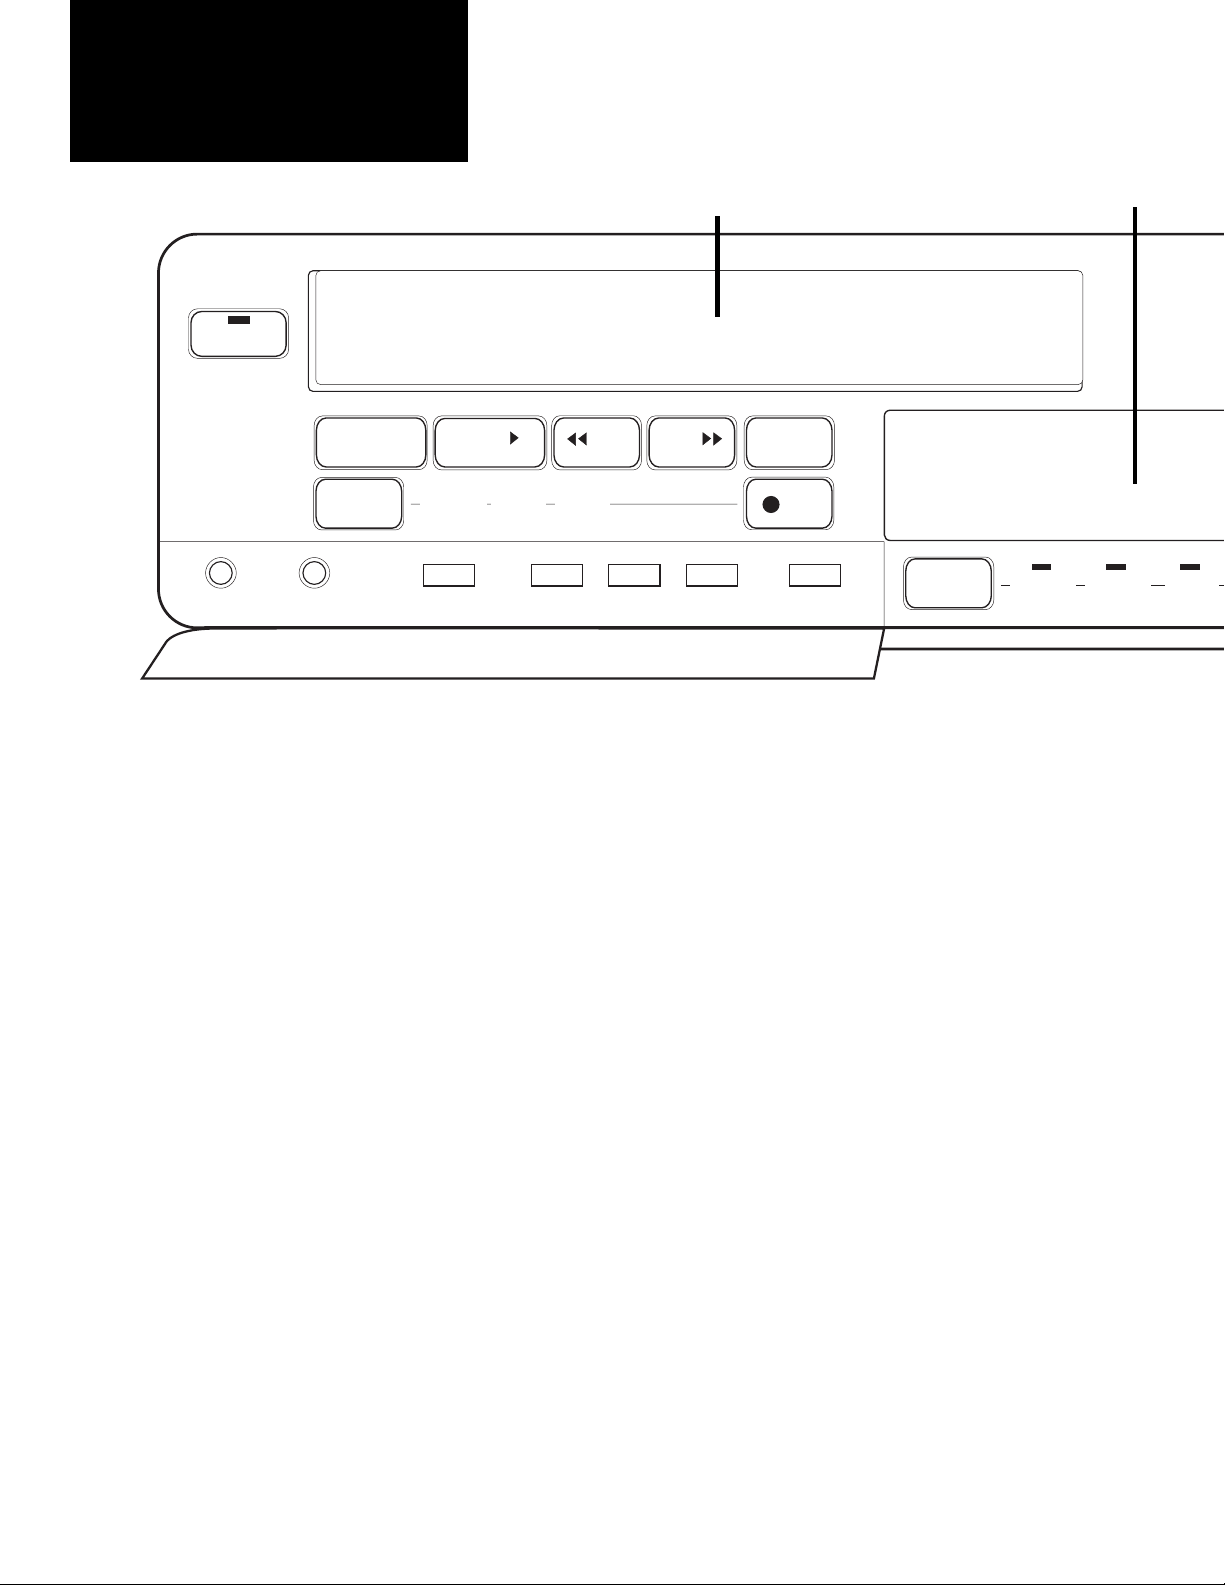
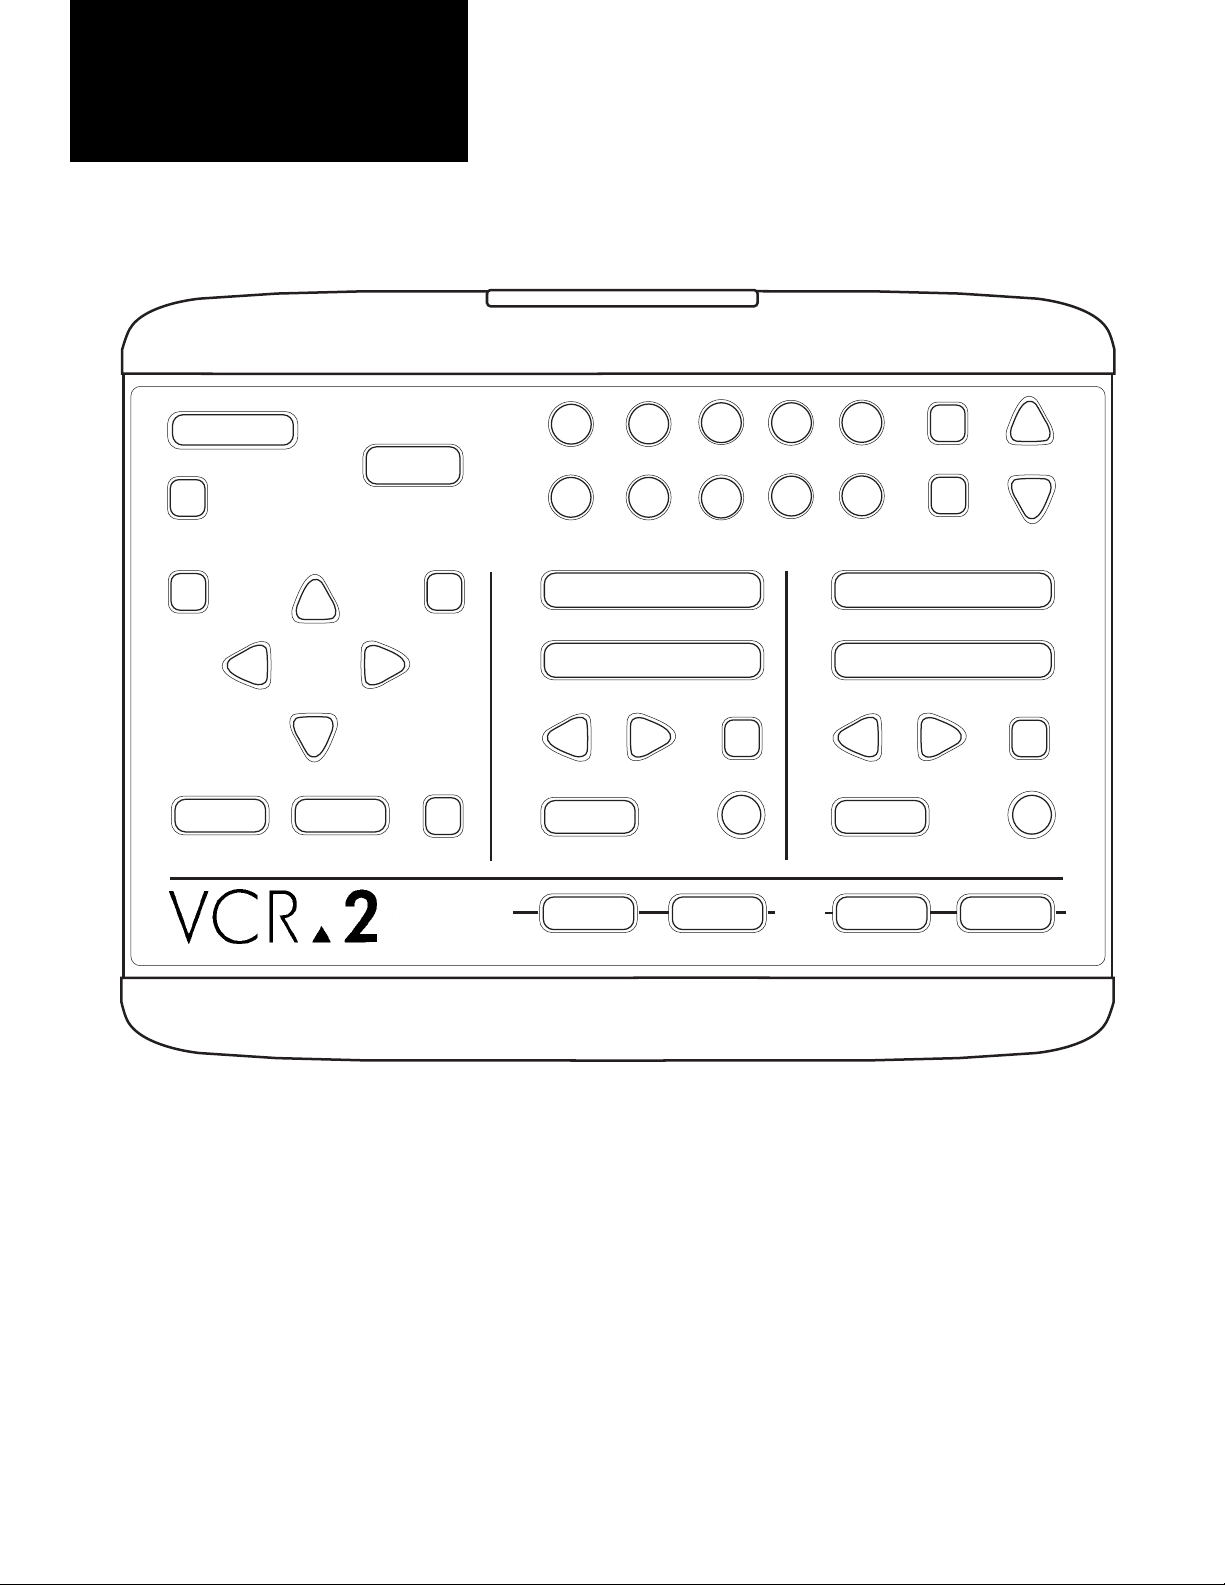
Dual-Deck VCR-2
Front Panel
Tape
Compartment
POWER
STOP
EJECT
SOURCE TUNER
TRACKING SHARPNESS MENU DOWN SAVE NEXT ESCAPE
PLAY
DECK 2
REW
AV•IN
FWD
PAUSE
EDIT
REC
To find a complete description of the features mentioned in this section,
consult the Index, pages 42 - 43.
TV
VIEW
Front Panel
Display
DECK 1 DECK 2
TUNER
Channel Down Button - Press to select the next lower TV channel in
Channel Memory.
Channel Up Button - Press to select the next higher TV channel in Channel
Memory.
Copy Tape™ Button - Press to start and stop AmeriChrome Copy™.
Copy Tape Indicator - Lights when AmeriChrome Copy duplication is in
progress.
CTR/TIME (Counter/Time) Display Button - Press to switch the Front Panel
Display between Clock and Tape Counter. Tape Counter is displayed
for the most recently viewed deck.
Down Button - Press to move down through menu selections during On-
Screen Programming. Press to change settings in the Set Date and Time
Menu or Timer Recording Menu.
Escape Button - Press to exit the current On-Screen Programming menu and
return to the previous menu. Press to erase any changes you have made
in the Set Date and Time Menu or Timer Recording Menu.
Front Panel Display - Displays the status of your VCR-2. See the detailed
explanation on page 29.
FWD (Fast Forward Buttons) - Press to advance the tape when your VCR-2
is stopped. When your VCR-2 is playing, press Fast Forward for forward
Picture Scan; press Fast Forward twice for forward Jet Search.
Menu Button - Press to display the On-Screen Programming Main Menu on
your TV screen. Other menus are accessed through the Main Menu.
Next Button - Press to change the setting of the current menu selection.
Press to move to the next menu selection in the Set Date and Time
Menu or Timer Recording Menu.
Pause/Edit Buttons - Press to temporarily stop the tape while playing or
recording. Should not be used for more than 3 minutes at a time. Your
VCR-2 will Auto Stop after 5 minutes in play still or record pause.
Play Buttons - Press to play a tape. Press to continue playing after pause or
Picture Scan/Jet Search.
Power Button - Press to turn your VCR-2 on and off. Press to change Auto
Power Off mode during rewind or Timer Recording. See page 30.
6
Power Indicator - Lights when power is on. Blinks during Auto Power Off
Page 10
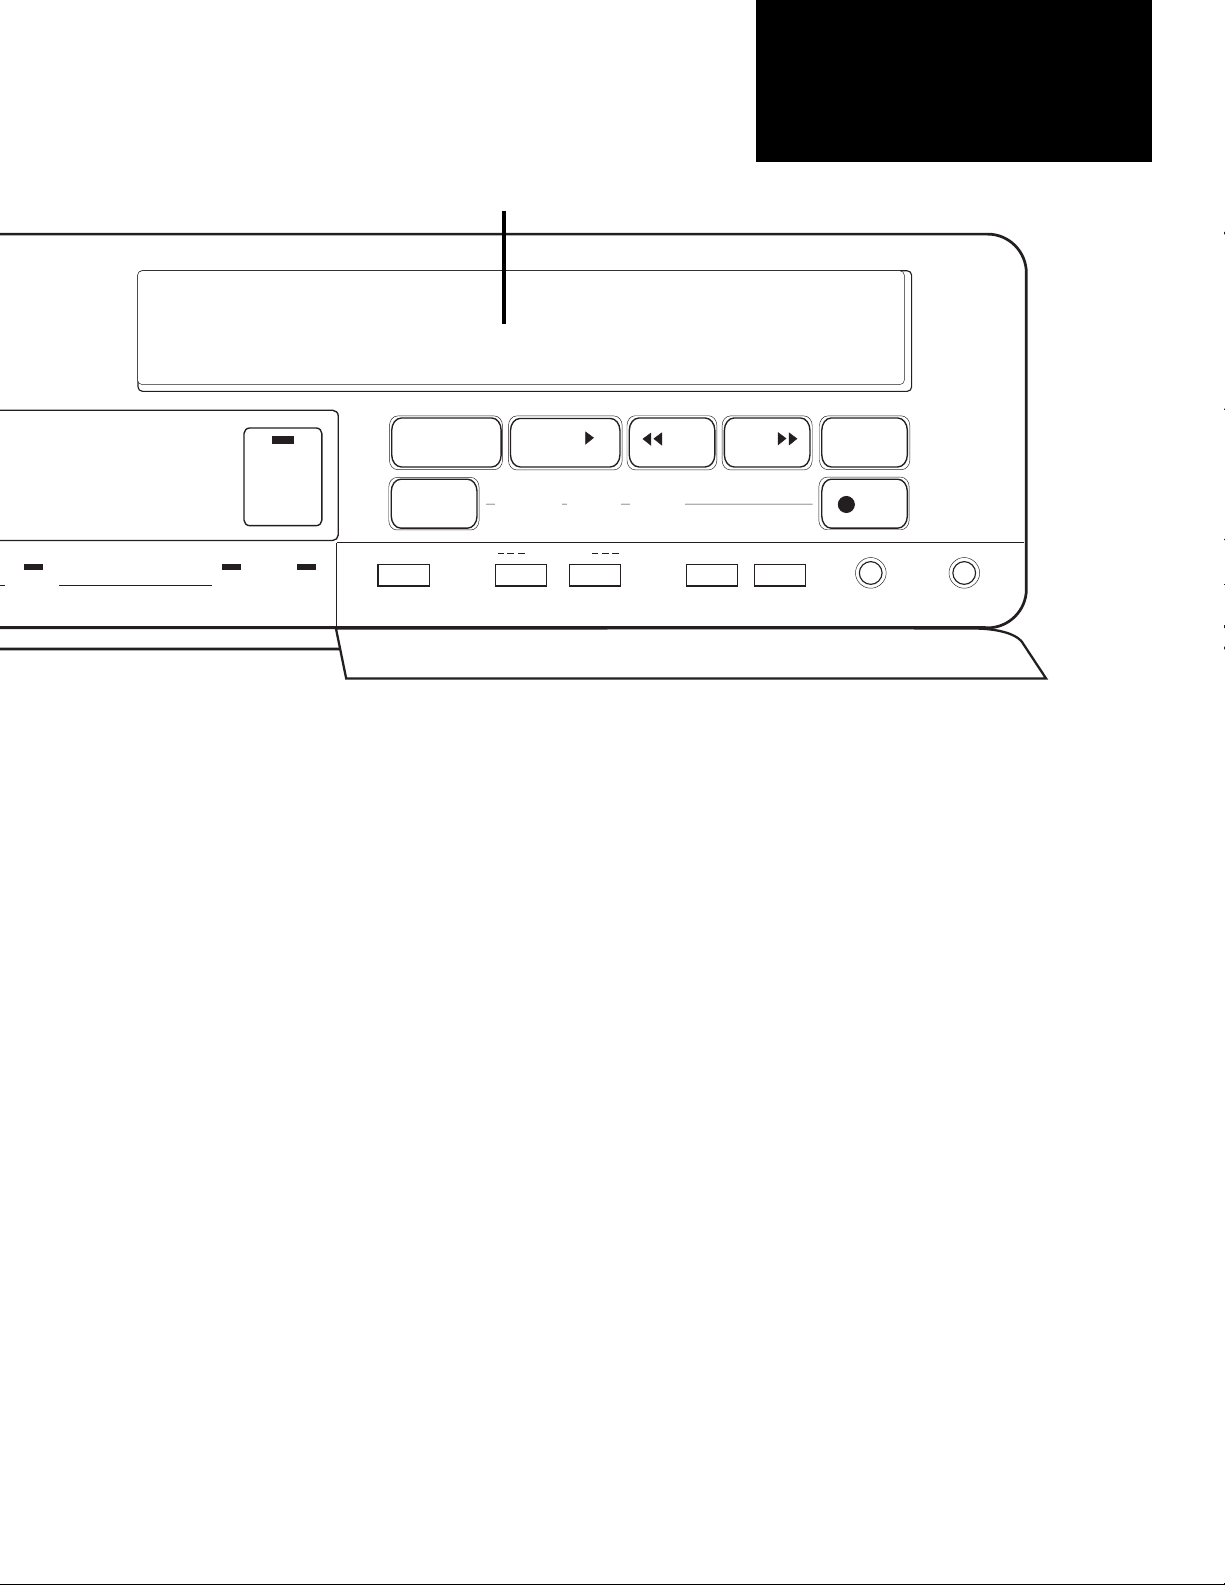
Tape
Compartment
Dual-Deck VCR-2
Front Panel
AV•IN
STOP
EJECT
PLAY
REW
COPY
TAPE
VCR
▲
TV
SOURCE TUNER AV•IN
TV
mode.
REC (Record) Buttons - Press to start recording onto a tape. Press to con-
tinue recording after pause. Press during recording to activate One-Two
Recording™.
Reset Button - Press to reset the Tape Counter to 0000. Press twice to set
Memory Stop mode. Press to reset all settings while in the Set Date and
Time Menu or Timer Recording Menu. Press to clear an event in the
Timer Recording Summary.
REW (Rewind) Buttons - Press to rewind the tape when your VCR-2 is
stopped. When your VCR-2 is playing, press Rewind for reverse Picture
Scan; press Rewind twice for reverse Jet Search.
Save Button - Press to save any changes you have made to the current menu
and return to the previous menu.
Sharpness Controls - Turn to soften or sharpen the picture to your viewing
preference. There are separate controls for Decks 1 and 2.
Source Buttons - Press to select the video source to be recorded on each
deck. Changes the Source indicators.
Source Indicators - Indicate the video source that is being (or will be)
recorded or viewed for each deck. Lights only when a tape is loaded in
that deck.
Stop/Eject Buttons - Press to stop the tape. Press to eject a stopped tape.
Tape Compartments - Insert a tape (window up, tape door facing away)
through the compartment door of either deck. Your VCR-2 will automati-
cally finish loading the tape.
Tracking Controls - Turn to eliminate noise (white streaks across the picture)
during play. There are separate controls for Decks 1 and 2.
TV/VCR Button - Press to select the source of the picture on your TV screen
– TV for your TV tuner, VCR for your VCR-2 TV View.
TV/VCR Indicators - Indicate the source of the picture on your TV screen –
TV for your TV tuner, VCR for your VCR-2 TV View.
TV View Button - Press to select the TV View – Deck 1, Deck 2, Tuner, or
AV-IN – when the TV/VCR button is set to VCR.
TV View Indicators - Indicate the video source that has been selected with
the TV View button.
DECK 1
CHANNEL
CTR
FWD
PAUSE
EDIT
REC
TRACKING SHARPNESSVCR TIME RESETDOWN UP
7
Page 11
Dual-Deck VCR-2
Remote Control
POWER
TV/VCR
CTR
PREV
UP
DOWN
SAVE ESCMENU
COPY
TAPE
NEXT
▲
RESET
1
678
1
STOP/EJECT
PLAY
REW FWD
SOURCE
DECK 1 DECK 2
2
345
9
2
PAUSE
REC
TV
VIEW
0
STOP/EJECT
REW FWD
SOURCE
TUNER
DSP
LCV
PLAY
CH
PAUSE
REC
AV•IN
Follow these instructions to install or replace the Remote Control battery:
① Remove the battery compartment door on the bottom of the Remote
Control.
≠ Install one 9 volt battery as indicated on the battery compartment.
③ Replace the battery compartment door.
To find a complete description of the features mentioned in this section,
consult the Index, pages 42 - 43.
▲ Neon light may disrupt the signal from the Remote Control. Keep neon
lights away from your VCR-2 and Remote Control. ▲
8
Page 12

Dual-Deck VCR-2
Remote Control
AV-IN Button - Press to change the TV View to AV-IN (for input from another VCR, laser disc
player, video camera, etc.).
CH ▼ (Channel Down) Button - Press to select the next lower TV channel in Channel Memory.
CH ▲ (Channel Up) Button - Press to select the next higher TV channel in Channel Memory.
Copy Tape™ Button - Press to start and stop AmeriChrome™ Copy.
CTR (Counter/Time Display) Button - Press to switch the Front Panel Display between Clock
and Tape Counter. Tape Counter is displayed for the most recently viewed deck.
Deck 1 Button - Press to change the TV View to Deck 1.
Deck 2 Button - Press to change the TV View to Deck 2.
Down Button - Press to move down through menu selections during On-Screen Programming.
Press to change settings in the Set Date and Time Menu or Timer Recording Menu.
DSP (Display) Button - Displays or clears the On-Screen Display on your TV screen. See detailed
explanation of OSD on page 28.
ESC (Escape) Button - Press to exit the current On-Screen Programming menu and return to the
previous menu. Press to erase any changes you have made in the Set Date and Time Menu or
Timer Recording Menu.
FWD (Fast Forward) Buttons - Press to advance the tape when your VCR-2 is stopped. When
your VCR-2 is playing, press Fast Forward for forward Picture Scan; press Fast Forward twice
for forward Jet Search.
LCV (Last Channel Viewed) Button - Press to change the channel to the last channel viewed.
Menu Button - Press to display the On-Screen Programming Main Menu on your TV screen.
Other menus are accessed through the Main Menu.
Next Button - Press to change the setting of the current menu selection. Press to move to the
next menu selection in the Set Date and Time Menu or Timer Recording Menu.
Numeric Buttons 0 - 9 - Press for TV channel selection (when the TV/VCR selector is set to
VCR). Press for menu selection and settings during On-Screen Programming.
Pause Buttons - Press to temporarily stop the tape while playing or recording. Should not be
used for more than 3 minutes at a time. Your VCR-2 will Auto Stop after 5 minutes in play
still or record pause.
Play Buttons - Press to play a tape in the deck. Press to continue playing after pause or Picture
Scan/Jet Search. Press to load a tape that is in the ejected position (Remote Load/Eject must
be on).
Power Button - Press to turn your VCR-2 on and off. Press to change Auto Power Off mode
during rewind or Timer Recording. See page 30.
PREV (Previous Button) - Press to change the setting of the current menu selection. Press to
move to the previous menu selection in the Set Date and Time Menu or Timer Recording
Menu.
REC (Record) Buttons - Press to start recording onto a tape. Press to continue recording after
pause. Press during recording to activate One-Two Recording™.
Reset Button - Press to reset the Tape Counter to 0000. Press twice to set Memory Stop mode.
Press to reset all settings while in the Set Date and Time Menu or Timer Recording Menu.
Press to clear an event in the Timer Recording Summary.
REW (Rewind) Buttons - Press to rewind the tape when your VCR-2 is stopped. When your VCR-
2 is playing, press Rewind for reverse Picture Scan; press Rewind twice for reverse Jet
Search.
Save Button - Press to save any changes you have made to the current menu and return to the
previous menu.
Source Buttons - Press to select the video source to be recorded on each deck.
Stop/Eject Buttons - Press to stop the tape. Press to eject a stopped tape (Remote Load/Eject
must be on).
Tuner Button - Press to change the TV View to your VCR-2 tuner.
TV/VCR Button - Press to select the source of the picture on your TV screen – TV for your TV
tuner, VCR for your VCR-2 tuner, tape decks, or AV-IN.
Up Button - Press to move up through menu selections during On-Screen Programming. Press to
change settings in the Set Date and Time Menu or Timer Recording Menu.
9
Page 13

Using Your
Remote Control
345
2
PLAY
PAUSE
REC
Programming
Controls
POWER
TV/VCR
CTR
PREV
UP
DOWN
SAVE ESCMENU
COPY
TAPE
NEXT
▲
RESET
1
678
1
STOP/EJECT
REW FWD
SOURCE
DECK 1 DECK 2
TV View
Your Remote Control makes it simple to operate and program your VCR-2.
Take a moment to learn where the buttons are located on the Remote
Control.
9
2
TV
VIEW
DSP
0
LCV
STOP/EJECT
PLAY
REW FWD
SOURCE
TUNER
Tuner Control &
Menu Selection
CH
Deck 1 & 2
Controls
PAUSE
REC
AV•IN
The Remote Control is divided into five areas. See pages 8 - 9 for detailed
descriptions of the buttons.
Tuner Control & Menu Selection - With the Channel Up and Channel Down,
Last Channel Viewed, and Numeric buttons you can change the channel
on your VCR-2 tuner. The Numeric buttons are also used for setting the
clock, calendar, and timer. The Display button displays the On-Screen
Display on your TV screen.
Deck Controls - There are separate controls for Deck 1 and Deck 2. The
buttons for both decks are laid out the same way.
TV View - These four buttons select the source of the picture you see on your
TV screen when the TV/VCR button is set to VCR.
Programming Controls - These buttons are used to change menus and settings
in On-Screen Programming.
Other Controls - Buttons that do not fit the other categories are found in the
unshaded area.
11
Page 14
Playing
N
a Tape
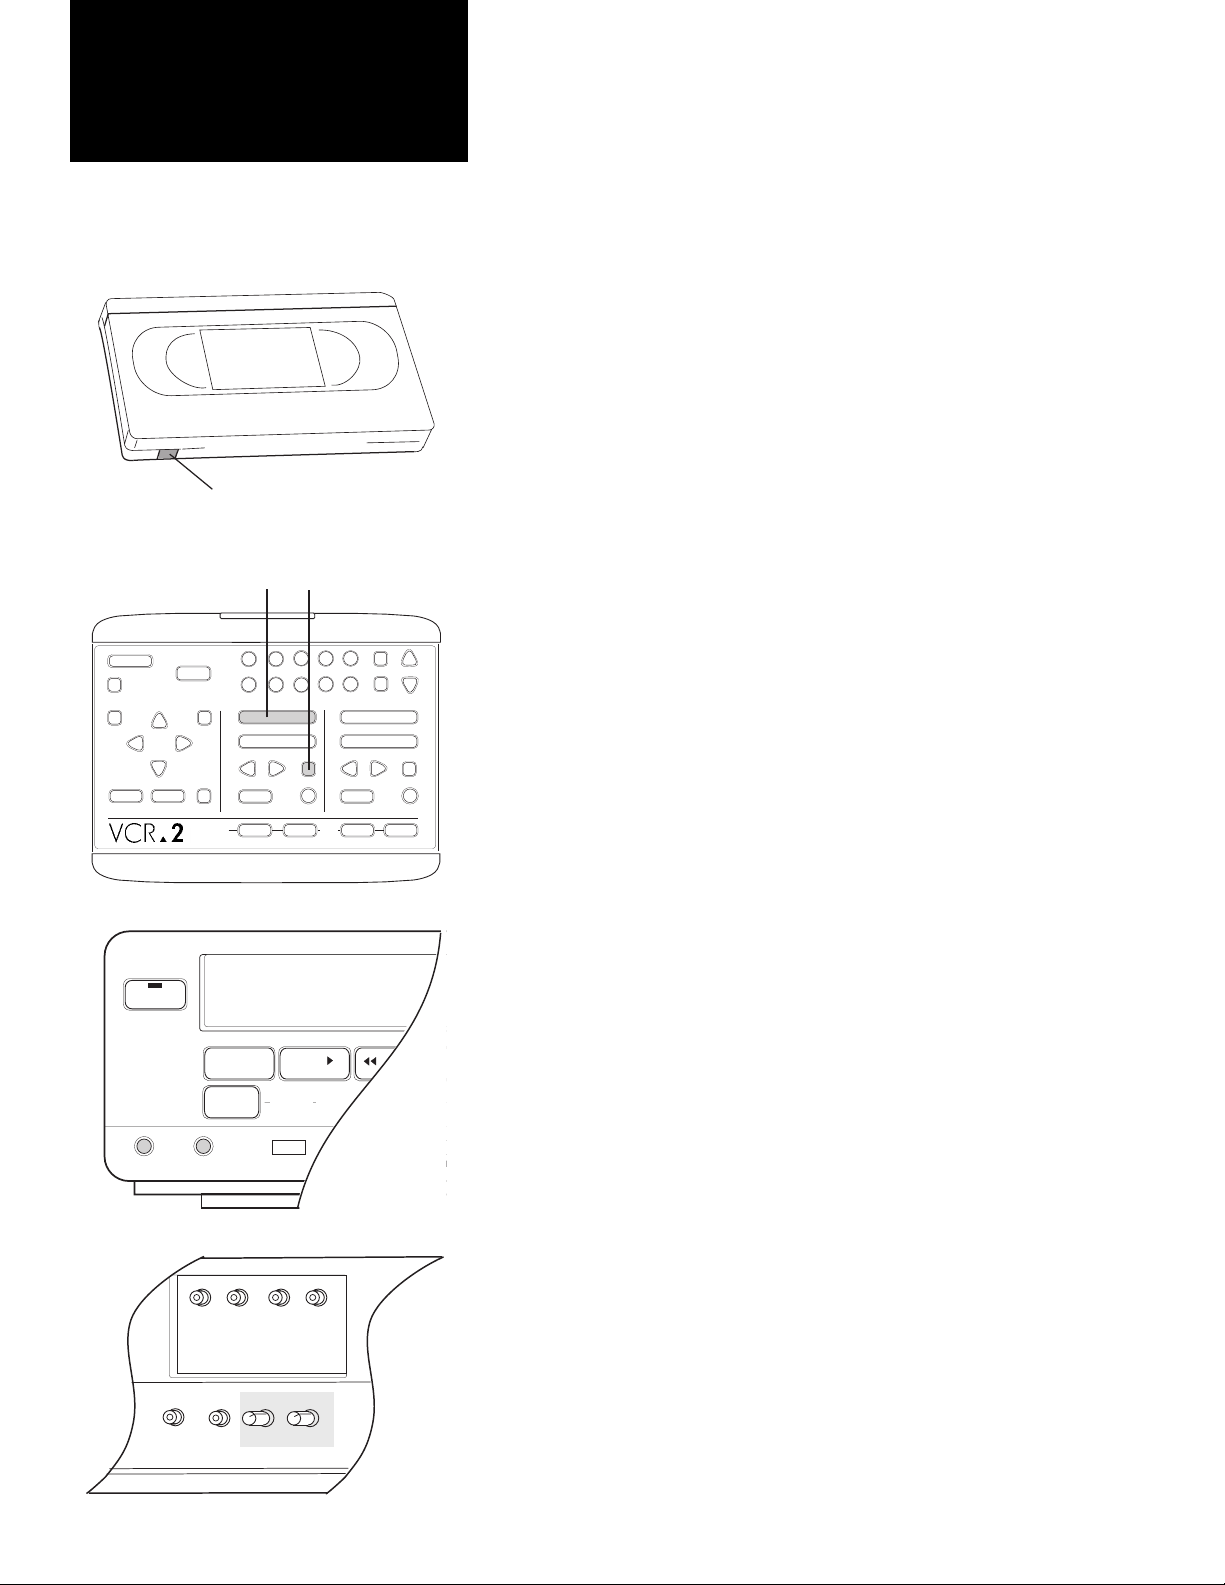
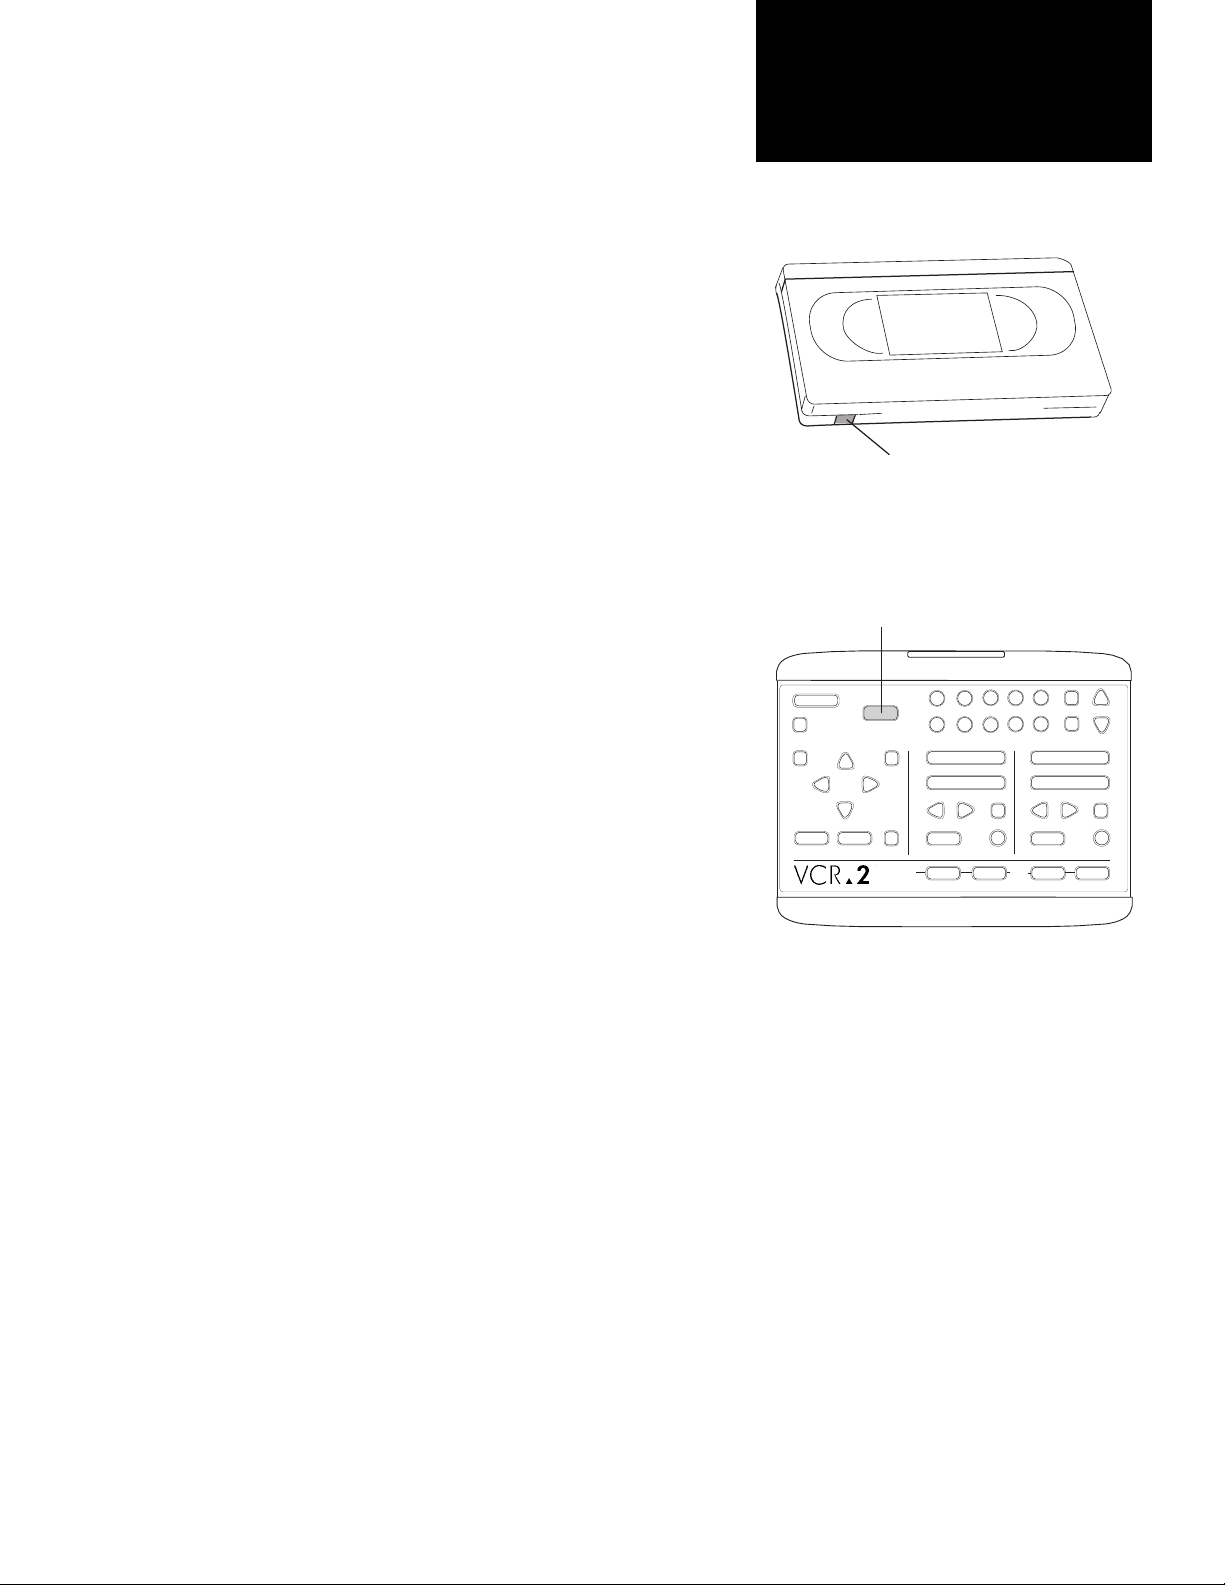
To play a tape on your VCR-2 follow these five simple steps.
① Optionally remove the record safety tab from your prerecorded tape.
≠ Insert this tape into Deck 1 or 2.
If your VCR-2 power is off it will now automatically turn on.
Record Safety Tab
❹
❺
❸
345
1
POWER
TV/VCR
CTR
COPY
TAPE
▲
RESET
UP
NEXT
PREV
DOWN
SAVE ESCMENU
POWER
SOURCE
TRACKING SHARPNESS MENU PREV SAVE
678
1
STOP/EJECT
REW FWD
SOURCE
DECK 1 DECK 2
STOP
EJECT
2
PLAY
DECK 2
PAUSE
REC
PLAY
9
2
TV
VIEW
TUNER
0
STOP/EJECT
REW FWD
SOURCE
TUNER
AV•IN
PLAY
DSP
LCV
REW
AV•IN
CH
PAUSE
REC
FWD
Your VCR-2 has an Auto Play feature which automatically plays tapes
that have the record safety tab removed. If Auto Play is off, press Play for
the deck containing the tape.
The TV/VCR indicator automatically switches to VCR.
∏ Press Pause if you wish to freeze the picture.
PLAY will blink on the Front Panel Display.
Press Play to continue play.
π Press Stop/Eject once to stop the tape.
∫ Press Stop/Eject again to eject the tape from the deck. If using the
Remote Control, the Remote Load/Eject feature must be on. See page
23.
▲ Removing the record safety tab prevents accidental recording over
prerecorded scenes.
See pages 23 and 30 for an explanation of Auto Play.
While in play, press Fast Forward for forward Picture Scan. FF will blink on
the Front Panel Display. Press Rewind for reverse Picture Scan. REW will
blink on the Front Panel Display. Press Play to end forward or reverse
Picture Scan and resume play.
While in play, press Fast Forward twice for forward Jet Search. FF will blink
on the Front Panel Display. Press Rewind twice for reverse Jet Search. REW
will blink on the Front Panel Display. Press Play to end forward or reverse
Jet Search and resume play.
12
RIGHT
LEFT RIGHT
AUDIO IN
VIDEO
IN OUT
LEFT
AUDIO OUT
STILL-TRACKING
DECK 1
DECK 2
A certain amount of noise (white streaks across the picture) may appear
when a tape recorded on one VCR is played on a different one. You can
adjust the Tracking control on your VCR-2 Front Panel to minimize this
noise while playing a tape. There are separate controls for Decks 1 and 2.
You can adjust the Sharpness control on your VCR-2 Front Panel to soften
or sharpen the picture to your viewing preference. There are separate
controls for Decks 1 and 2.
You can adjust the sharpness of the freeze-frame picture while a tape is
paused by turning the Still-Tracking control (on your VCR-2 back panel) for
the deck you are viewing. There are separate controls for Decks 1
and 2. ▲
Page 15
❹
1
2
STOP/EJECT
PLAY
REW FWD
PAUSE
SOURCE
REC
STOP/EJECT
PLAY
REW FWD
PAUSE
SOURCE
REC
DECK 1 DECK 2
TV
VIEW
TUNER
AV•IN
1
2
345
678
9
0
CH
COPY
TAPE
POWER
TV/VCR
RESET
SAVE
ESCMENU
CTR
UP
DOWN
NEXT
PREV
LCV
DSP
❸
▲
To duplicate a tape using AmeriChrome Copy™ follow these four simple
steps.
① Insert into Deck 1 the tape to be duplicated.
Press the Deck 1 Stop/Eject button if the tape begins to Auto Play.
Duplicating
a Tape
≠ Insert into Deck 2 a blank tape of sufficient length to record the tape in
Deck 1. The record safety tab must be intact on the blank tape.
∏ Press the Copy Tape™ button.
The Copy Tape indicator will light on the Front Panel. The On-Screen
Display will indicate “Amer Copy” and the AmeriChrome Copy Mode
being used.
π Press the Copy Tape button a second time to stop the duplication.
▲ During AmeriChrome Copy 2, the recording speed of Deck 2 will
automatically be set to match the play speed of Deck 1. Otherwise the
duplicated tape will be recorded at the preset menu speed for that deck. To
use AmeriChrome Copy 2, the original tape must be in Deck 1, and have
been recorded at SP or LP speed.
When using AmeriChrome Copy 1, you can change the speed of the
recording to fit more programming on a tape. For example, three two-hour
tapes made at SP could be duplicated on one two-hour tape at EP. See page
23 to change the recording speed and AmeriChrome Copy settings, this
may be done during a duplication.
Record Safety Tab
If you wish to record onto a tape with a
missing record safety tab, place a small
piece of adhesive tape over the hole.
If the play speed of the original tape is EP, or the copy is not from Deck 1
to Deck 2, AmeriChrome Copy 1 will automatically be used regardless of
the menu setting.
For best results, duplicate tapes that were recorded in SP or LP. The quality
of your duplicate is directly related to the quality of your original. Go-Video
recommends recording onto high quality tapes (SVHS, HQVHS) to improve
the quality of your copies.
To simplify duplicating a tape, first turn off Auto Play (see page 23). This
prevents tapes from playing each time they are inserted.
You can duplicate tapes with Copy Tape even if your TV is turned off. ▲
13
Page 16

Recording
from TV
To record from your TV onto a tape follow these five simple steps.
① Insert a blank tape into Deck 1 or 2.
The record safety tab must be intact on the cassette. If the tab is missing,
the tape may Auto Play and will be ejected when Record is pressed from
the stop mode.
❻
❸❷
POWER
TV/VCR
CTR
PREV
UP
DOWN
COPY
TAPE
NEXT
SAVE ESCMENU
▲
RESET
❺
1
678
1
STOP/EJECT
REW FWD
SOURCE
DECK 1 DECK 2
2
PLAY
345
PAUSE
REC
VIEW
9
2
TV
❹
0
STOP/EJECT
REW FWD
SOURCE
TUNER
PLAY
❷
DSP
CH
LCV
to record.
Press the appropriate Numeric buttons or use the Channel Up/Down
buttons.
∏ Press Source to select Tuner for the deck containing the tape.
π Press Record for the deck containing the tape to begin recording.
∑ Use the Remote Control or Front Panel to choose the channel you’d like
PAUSE
REC
AV•IN
∫ Press Pause if you wish to pause the recording.
REC will blink on the Front Panel Display.
Press Record again to continue recording.
❻ Press Stop/Eject to end recording.
▲ EP (Extended Play) is the preset tape speed. Change the tape speed if
you want to record at SP (Standard Play) or LP (Long Play). See page 23.
See pages 34 - 36 to record one channel while viewing another and for
recording when your VCR-2 is connected to a cable system.
Neither the Source nor the channel, if you are recording from the tuner,
can be changed during recording. However, they may be changed while
the recording is paused. Be careful not to accidentally change the Source in
the middle of a recording.
14
TV/VCR
CTR
POWER
PREV
UP
DOWN
If you leave a blank tape in Deck 1 or 2, you can immediately begin record-
❸
ing any program you are watching by changing the Source for that deck to
Tuner and pressing the Record button.
See page 19 to set the timer for recording a program later. ▲
345
1
2
▲
RESET
678
1
STOP/EJECT
REW FWD
SOURCE
DECK 1 DECK 2
PLAY
PAUSE
REC
COPY
TAPE
NEXT
SAVE ESCMENU
9
VIEW
2
TV
0
STOP/EJECT
REW FWD
SOURCE
TUNER
PLAY
DSP
CH
LCV
Playing a Tape While Recording from TV
PAUSE
REC
AV•IN
① Follow steps ① - π above to begin recording from your TV onto either
deck.
≠ Insert a prerecorded tape into the other deck.
∏ Press Play if the tape does not begin to Auto Play.
▲ You can switch TV View from Deck 1 to Deck 2 to watch either the TV
program you are recording or the prerecorded tape. ▲
Page 17

Recording two TV programs at the same time requires two tuners – the one
in your VCR-2 and a second one from your TV, another VCR or an accessory
tuner. If your TV does not have a video output connection, you will need a
second tuner (VCR or accessory) with video output connections.
Connect the second tuner to the Audio In and Video In connections on
your VCR-2 back panel (see diagram).
RIGHT
CH 3
CH 4
OUT TO TV
LEFT RIGHT
AUDIO IN
LEFT
AUDIO OUT
Recording Two
Programs from TV
AUDIO OUT
VIDEO OUT
IN FROM:
ANTENNA/
CABLE
VIDEO
IN OUT
STILL TRACKING
DECK 1
DECK 2
VCR-2 BACK PANEL
If your second tuner’s antenna is connected the Out to TV connector on
your VCR-2, you will only be able to watch the program that is being
recorded on Deck 2. Before beginning, decide which program you want to
watch and select it last.
① Turn on your TV and your VCR-2 (and the second tuner if different from
your TV).
≠ Insert blank cassettes into Deck 1 and Deck 2.
∏ Use the Remote Control or Front Panel to choose the channel to be
recorded on Deck 1.
π Press the Deck 1 Source button to select Tuner. The On-Screen Display
will indicate Tuner for the Deck 1 Source.
∫ Press the Deck 1 Record button.
❻ If the second tuner’s antenna is connected to the Out to TV connector
on your VCR-2, set the TV/VCR button to TV and do not change this
during recording. Otherwise, set the TV/VCR button to VCR and you
may switch the TV View to either deck at will.
≤ Use the channel selector on your second tuner to choose the channel to
be recorded on Deck 2.
❻
TV/VCR
CTR
POWER
PREV
UP
DOWN
TV OR VCR
BACK PANEL
VIEW
9
2
TV
❽
0
REW FWD
SOURCE
TUNER
❾
DSP
LCV
STOP/EJECT
PLAY
❸
CH
PAUSE
REC
AV•IN
❺
❹
COPY
TAPE
▲
1
RESET
NEXT
SAVE ESCMENU
❸
1
2
678
STOP/EJECT
PLAY
REW FWD
SOURCE
DECK 1 DECK 2
345
PAUSE
REC
Ω Press the Deck 2 Source button to select AV-IN. The Front Panel Source
Indicators will show AV-IN as the Deck 2 Source.
❾ Press the Deck 2 Record button.
15
Page 18

Editing a
Single Tape
▲ To simplify editing, first turn off Auto Play (see page 23). This prevents
tapes from playing each time they are inserted.
You may also find it easier to edit when the On-Screen Display is on your
TV screen. The OSD shows you the status and Tape Counter of both decks
at all times. Press DSP to see the OSD. The On-Screen Display lettering will
not be recorded on your video tape. ▲
Follow these simple instructions to edit out scenes from a single tape.
TV/VCR
CTR
POWER
PREV
❷
❺ ❸
COPY
TAPE
▲
RESET
UP
NEXT
DOWN
ESCMENU
SAVE
❸
1
678
1
STOP/EJECT
REW FWD
SOURCE
DECK 1 DECK 2
2
PLAY
345
9
2
PAUSE
REC
TV
VIEW
❹
0
STOP/EJECT
PLAY
REW FWD
SOURCE
TUNER
❶
DSP
LCV
① Insert a blank tape into Deck 2 and the prerecorded tape into Deck 1.
∑ Press the Copy Tape™ button.
Just before the unwanted scene begins:
∏ Press the Deck 2 Pause button to pause the recording.
CH
PAUSE
REC
AV•IN
REC will blink on the Front Panel Display.
Avoid leaving the deck in record pause for more than 3 minutes. Your
VCR-2 will Auto Stop after 5 minutes in record pause to prevent excessive tape wear.
If you desire, you can press the Deck 1 Fast Forward button to Picture
Scan to the end of the unwanted segment. Press the Deck 1 Play button
to end Picture Scan.
When the unwanted scene ends:
π Press the Deck 2 Record button to continue recording.
Repeat steps ∏ and π until all the unwanted scenes have been removed.
∫ Press the Copy Tape button to end editing.
▲ The audio track recording may continue for a few seconds after the
video track ends. Practice and experimentation will refine your editing
skills and help you to choose the best edit points to improve your edited
tapes. ▲
❷❹
❸
When performing more advanced editing, it may be necessary to adjust the
position of your record tape to record over unwanted sections.
16
TV/VCR
CTR
POWER
PREV
UP
DOWN
SAVE
COPY
TAPE
NEXT
▲
RESET
ESCMENU
1
678
1
STOP/EJECT
REW FWD
SOURCE
DECK 1 DECK 2
2
PLAY
PAUSE
345
0
9
2
REW FWD
SOURCE
REC
TV
VIEW
TUNER
DSP
LCV
STOP/EJECT
PLAY
AV•IN
CH
PAUSE
REC
During an edit session, follow these instructions to adjust the position of
your record tape.
∂ Press the Deck 2 Stop button. This will stop both decks.
∑ Press the Deck 2 Play button and then use Rewind to locate the point
where you want to resume recording. Play the tape two seconds past
this point and press Pause.
∏ Press the Deck 2 Record button. Deck 2 will enter record pause.
π Press the Deck 1 Play button and you may continue editing at step π
above. Copy Tape will resume when you continue recording.
Page 19

▲ To simplify editing, first turn off Auto Play (see page 23). This prevents
tapes from playing each time they are inserted.
You may also find it easier to edit when the On-Screen Display is on your
TV screen. The OSD shows you the status and Tape Counter of both decks
at all times. Press DSP to see the OSD. The On-Screen Display lettering will
not be recorded on your video tape.
The secret to editing scenes from multiple tapes is planning. You should
review the tapes and take notes. Your notes should describe what you want
to see on the master tape, which tapes contain the scenes you want, and
what the order of scenes will be on the master tape. ▲
When you have taken ample notes, follow these simple instructions to edit.
① Insert a blank tape into Deck 2 and the prerecorded tape containing the
first scene into Deck 1.
Editing Multiple
Scenes Onto One Tape
∑ Fast Forward the prerecorded tape to just before the beginning of the
first scene.
∏ Press the Copy Tape™ button.
When the scene ends:
π Press the Deck 2 Pause button to pause the recording.
REC will blink on the Front Panel Display.
Avoid leaving the deck in record pause for more than 3 minutes. Your
VCR-2 will Auto Stop after 5 minutes in record pause to prevent exces-
sive tape wear.
∫ Press the Deck 1 Stop/Eject button to stop playing.
❻ Press the Deck 1 Stop/Eject button again to eject the tape. If using
Remote Control, the Remote Load/Eject feature must be on. See page
23.
❼ Insert the next prerecorded tape into Deck 1 and Fast Forward to just
before the beginning of the next scene.
Ω Press the Deck 1 Play button.
Just before the next scene begins:
❾ Press the Deck 2 Record button to continue recording.
TV/VCR
CTR
POWER
PREV
UP
DOWN
SAVE
❸
❿
COPY
TAPE
NEXT
▲
RESET
ESCMENU
❷
❺
❼
❻
1
678
1
STOP/EJECT
REW FWD
SOURCE REC
DECK 1 DECK 2
❽
2
PLAY
345
0
9
2
REW FWD
PAUSE
SOURCE REC
TV
VIEW
TUNER
❾
DSP
LCV
STOP/EJECT
PLAY
❹
CH
PAUSE
AV•IN
Repeat steps π through ❾ until all scenes have been duplicated onto the
master tape.
❿ Press the Copy Tape button to end editing.
▲ If your prerecorded tape should end, or you stop it before pausing your
record tape, the record deck will automatically pause to prevent unwanted
recording. ▲
17
Page 20

One-Two
Recording™
One-Two Recording™ is a simple two-step way to record TV programs in
30 minute increments.
To start One-Two Recording (OTR), follow these simple steps.
TV/VCR
CTR
POWER
PREV
DOWN
COPY
▲
TAPE
RESET
UP
NEXT
SAVE ESCMENU
DECK 1
OTR 0:30
2562
SP
1
678
1
STOP/EJECT
REW FWD
SOURCE
DECK 1 DECK 2
❶
❷
345
2
9
2
PLAY
PAUSE
REC
TV
VIEW
TV VIEW
DECK 1
DSP
0
LCV
STOP/EJECT
PLAY
REW FWD
SOURCE
TUNER
DECK 2
CH
PAUSE
REC
AV•IN
STOP
1969
SP
∂ Press Record to begin recording.
∑ Press Record a second time.
The On-Screen Display will appear on your TV screen. The second line
of deck status will display OTR 0:30. ON and OTR will light on the Front
Panel Display.
Continue to press Record until the desired recording duration appears.
You can select up to 9 hours, 30 minutes in 30 minute increments.
MON MAY 14, 1991 12:00PM
The second line of deck status displays
OTR and the recording duration.
18
The On-Screen Display will disappear 3 seconds after you push the last
button.
▲ You can change the duration at any time during OTR by pressing
Record. 30 minutes will be added to the remaining time each time you
press Record.
You can record even if your TV is turned off. The channel indicated on the
Front Panel Display will be recorded.
Your VCR-2 power must remain on during OTR. Turning the power off will
stop your recording.
Refer to page 14 for more information about recording TV programs. ▲
Page 21

❹
❶
1
2
STOP/EJECT
PLAY
REW FWD
PAUSE
SOURCE
REC
STOP/EJECT
PLAY
REW FWD
PAUSE
SOURCE
REC
DECK 1 DECK 2
TV
VIEW
TUNER
AV•IN
1
2
345
678
9
0
CH
POWER
TV/VCR
RESET
SAVE ESCMENU
CTR
UP
DOWN
NEXT
PREV
LCV
DSP
❸
❷
❸
COPY
TAPE
▲
▲ Before programming the timer, the clock must be set. If you try to
1: VIDEO MENU
2: AUDIO MENU
3: SET DATE AND TIME
4: TIMER RECORDING
5: CHANNEL/TUNER MENU
WHEN OK PUSH SAVE
MAIN MENU
1991
1:00 PM
SU MO TU WE TH FR SA
1
2 3 4 5 6 7 8
12 13 14 15
18 19 20 21 22
25 26 27 28 29
9 10 11
16 17
23 24
30
JUNE
0HR 30MIN CH 10 NRM SP--
DECK 2
WHEN OK PUSH SAVE
SET MONTH
:
program the timer when the clock is not set, the Set Date and Time Menu
will appear. See page 25. ▲
To program the timer, follow these simple instructions.
∂ Press Menu. The Main Menu will appear on your TV screen.
∑ Press 4 to choose Timer Recording. You’ll see the Timer Recording
Summary.
Setting the Timer
to Record Later
▲ From this point, you will not be able to change channels until you return
to the Main Menu. ▲
The Summary allows you to review the current timer settings. Four events
are displayed on the screen at one time. Use the Up/Down buttons to
review any event from 1 to 16.
∏ Use the Numeric buttons to choose the event number you wish to
program (or use the Up/Down buttons to highlight your selection and
press Next to choose it). You’ll see the Timer Recording Menu.
π Use Previous and Next to move from one selection to another. Use the
Numeric buttons (or the Up/Down buttons) to change the settings for
each selection. Use a preceding zero (0) before single digit entries or
press Next after the first digit.
Set the Month the event will be recorded. January is 01, October is 10,
etc.
Set the Year the event will be recorded. Enter only the last two digits:
91, 92, 93, etc.
Set the Day the event will be recorded.
(Continued on page 20)
SELECT EVENT #01
EVENT
:
1
MON
JAN
1
[2] CH02
:
2
--- ---
----[-] --
:
--- ---
3
----[-] --
:
4
--- ---
----[-] --
-- :--
--
-- :--
--
-- :--
--
TIMEDATE
12:03PM
NRM-- SP
----
---
----
---
----
---
19
Page 22

Setting the Timer
to Record Later
Set the Hour the event will be recorded.
Set the Minute the event will be recorded.
Set AM/PM. Use the Up/Down buttons or press 1 for AM, 2 for PM.
Set the Deck on which the event will be recorded.
Set the number of Hours of the recording. You can select up to 9 hours
and 59 minutes.
Set the number of Minutes of the recording.
Set the Channel (or AV-IN) to record. For AV-IN, select channel 00.
Set the event Type. NRM (Normal) records one event one time only; use
it for a movie or football game, for example. DLY (Daily) records one
event at the same time every weekday; use it for soap operas or the
news. WKY (Weekly) records one event at the same time every week;
use it for a weekly series. Daily and weekly recordings begin on the date
set.
TV/VCR
CTR
POWER
PREV
❺
UP
DOWN
❺
345
1
2
▲
RESET
678
1
STOP/EJECT
REW FWD
SOURCE
DECK 1 DECK 2
PLAY
PAUSE
REC
COPY
TAPE
NEXT
SAVE ESCMENU
VIEW
9
2
TV
0
STOP/EJECT
REW FWD
SOURCE
TUNER
PLAY
DSP
CH
LCV
PAUSE
REC
AV•IN
Set the recording Speed. Use the Up/Down buttons or press 1 for SP, 2
for LP, 3 for EP. See page 23 for an explanation of speeds.
▲ If desired, press Reset to return all selections in this menu to their
original settings and restart step π . You can do this at any time.
To be able to record Simulcast or SAP broadcasts, use the Audio Menu to
place the tuner in the appropriate mode. See page 24. When Simulcast is
active, “SC” will appear after the channel number in both the Timer
Recording Summary and the Timer Recording Menu. ▲
∫ Press Save to accept your settings and return to the Timer Recording
Summary. You can do this at any time.
OR
Press Escape to cancel any changes to this event and return to the Timer
Recording Summary. You can do this at any time.
You can now review the settings you have just programmed. To change any
settings, repeat steps ∏ through ∫ . You will not be able to change any
event that is in progress.
To erase an event, use the Up/Down buttons to highlight the event and
press Reset. If the event is in progress, it will immediately stop.
❻ Press Save or Escape to leave the Timer Recording Summary then press
Save or Escape again to exit the Main Menu.
20
≤ Insert a tape into Deck 1, Deck 2, or both, whichever the timer is
programmed to record on.
Page 23

▲ If the timer is correctly programmed, PROG will be lighted on the Front
Panel Display.
When the event begins recording, PROG and TIMER will be lighted.
If TIMER is flashing on the Front Panel Display, there is an error. The On-
Screen Display will display TIMER RECORD ERROR, and DECK 1 (or DECK
2): TAPE MISSING or TAPE MISSING TAB. Check that there is a tape in the
proper deck, and that the record safety tab is intact on the tape.
Your VCR-2 can be turned off once steps ∂ through ≤ are completed.
TIMER and PROG will be lighted on the Front Panel Display. Your VCR-2
will automatically turn on when the event begins and will automatically
turn off when the event is complete.
If you have a cable converter connected to the In From Cable connector on
your VCR-2, as on page 35, you will need to make sure the converter is left
ON and set to the proper channel for your Timer Recording.
Setting the Timer
to Record Later
Press Stop to stop an event that is in progress. The recording will stop and
the timer settings will be cleared if the event was a Normal event. Daily and
Weekly events will be updated automatically for the next date that was
programmed.
If an event is not able to start properly, due to an error or because there is a
tape playing in that deck, the event will be held. The On-Screen Display
will display HOLDING EVENT and the event number, each minute until
either the event is over or the problem is corrected. Any events that are
held will stop at their original time.
An asterisk (✱) next to an event number in the Timer Recording Summary
indicates the event is currently recording or holding. ▲
Priorities
With the ability to store settings for up to 16 events, your VCR-2 must
prioritize the events. If two events require different channels, or the same
deck at the same time, priority is given in the following order:
Latest starting time - An event in progress will be interrupted by an
event with a later starting time.
Highest event number - If starting times are the same, event 2 has higher
priority than event 1, event 3 has priority over 2 or 1, etc.
21
Page 24

On-Screen
Programming
Main Menu
Programming from the Remote Control and
VCR-2 Front Panel
You can do On-Screen Programming with the Remote Control or the Front
Panel. The Numeric buttons on the Remote Control offer the ease of direct
entry of menu selections.
If programming from the Front Panel, use Down to highlight your selection.
Use Next to change settings or choose the current (highlighted) selection.
In the Set Date and Time Menu and Timer Recording Menu, use Next to
highlight your selection and Down to change settings.
Main Menu
❷
1
2
678
STOP/EJECT
PLAY
REW FWD
PAUSE
SOURCE
DECK 1 DECK 2
345
0
9
2
STOP/EJECT
REW FWD
SOURCE
REC
TV
VIEW
TUNER
DSP
LCV
PLAY
AV•IN
TV/VCR
CTR
❶
POWER
PREV
❷
UP
DOWN
❸
COPY
TAPE
▲
1
RESET
NEXT
SAVE ESCMENU
MAIN MENU
1: VIDEO MENU
2: AUDIO MENU
3: SET DATE AND TIME
4: TIMER RECORDING
5: CHANNEL/TUNER MENU
All other On-Screen Programming menus are accessed through the Main
Menu.
∂ Press Menu. The Main Menu will appear on your TV screen.
CH
PAUSE
REC
∑ Press the Numeric buttons to choose your selection (or use the Up/
Down buttons to highlight your selection and press Next to choose it).
The Video Menu is explained on the next page.
The Audio Menu is explained on page 24.
Set Date and Time is explained on page 25.
Timer Recording is explained on pages 19 - 21.
22
WHEN OK PUSH SAVE
The Channel/Tuner Menu is explained on pages 26 - 27.
∏ Press Save or Escape to exit the Main Menu.
Page 25

∂ Press Menu. The Main Menu will appear on your TV screen.
❶
1
2
STOP/EJECT
PLAY
REW FWD
PAUSE
SOURCE
REC
STOP/EJECT
PLAY
REW FWD
PAUSE
SOURCE
REC
DECK 1 DECK 2
TV
VIEW
TUNER
AV•IN
1
2
345
678
9
0
CH
POWER
TV/VCR
RESET
SAVE ESCMENU
CTR
UP
DOWN
NEXT
PREV
LCV
DSP
❸❷❸❹
COPY
TAPE
▲
On-Screen
Programming
Video Menu
∑ Press 1 to select Video Menu. The Video Menu will appear on your TV
screen.
∏ Press the number of any selection to change its setting (or use the Up/
Down buttons to highlight your selection and press Previous or Next to
change the setting).
Set the Recording Speed of Deck 1 or Deck 2. See the note below.
Switch between AmeriChrome Copy™ 1 and AmeriChrome Copy 2. See
page 13.
Turn Auto Play on or off. See page 30.
Turn Auto Rewind on or off. See page 30.
Turn Remote Load/Eject on or off. See page 30.
π Press Save or Escape to return to the Main Menu.
MAIN MENU
1: VIDEO MENU
2: AUDIO MENU
3: SET DATE AND TIME
4: TIMER RECORDING
5: CHANNEL/TUNER MENU
WHEN OK PUSH SAVE
VIDEO MENU
1: DECK 1 SPEED
2: DECK 2 SPEED
3: HQ COPY MODE
4: AUTO PLAY
5: AUTO REWIND
6: REMOTE LOAD/EJECT
-
-
-
-
-
-
WHEN OK PUSH SAVE
SP
SP
1
ON
OFF
ON
▲ Your VCR-2 automatically plays prerecorded tapes at the proper speed.
Tapes are recorded at EP (Extended Play) unless you change the recording
speed. SP (Standard Play) provides the best picture. LP (Long Play) provides
twice the recording time of SP. EP provides three times the recording time
of SP and the best effects (still, search, etc.), but the picture quality may not
be as sharp.
The recording speed may be changed during recording to make better use
of your tape without interrupting the program. ▲
23
Page 26

On-Screen
Programming
Audio Menu
UP
DOWN
❹
COPY
▲
TAPE
1
RESET
NEXT
SAVE ESCMENU
❸❸
❷
1
2
678
STOP/EJECT
PLAY
REW FWD
SOURCE
DECK 1 DECK 2
345
0
9
2
REW FWD
PAUSE
SOURCE
REC
TV
VIEW
TUNER
DSP
LCV
STOP/EJECT
PLAY
AV•IN
❶
POWER
TV/VCR
CTR
PREV
MAIN MENU
1: VIDEO MENU
2: AUDIO MENU
3: SET DATE AND TIME
4: TIMER RECORDING
5: CHANNEL/TUNER MENU
WHEN OK PUSH SAVE
∂ Press Menu. The Main Menu will appear on your TV screen.
CH
PAUSE
REC
∑ Press 2 to select Audio Menu. The Audio Menu will appear on your TV
screen.
∏ Press the number of any selection to change its setting (or use the Up/
Down buttons to highlight your selection and press Previous or Next to
change the setting).
Turn Dolby NR on or off for Deck 1 or Deck 2. See the note below.
Select the Audio Source. See the note below.
π Press Save or Escape to return to the Main Menu.
AUDIO MENU
1: DECK 1 DOLBY NR
2: DECK 2 DOLBY NR
3: AUDIO SOURCE
-
WHEN OK PUSH SAVE
-
ON
-
ON
STEREO
▲ Dolby NR (Dolby noise reduction) improves sound quality by reducing
“tape hiss” during soft passages. We recommend that you turn on Dolby NR
if the tape you are playing was recorded with Dolby NR, and turn off Dolby
NR if the tape you are playing was not recorded with Dolby NR. When
duplicating a tape recorded with Dolby NR, turn off Dolby NR for both
decks for the best results.
Audio Source sets the audio output from the VCR-2 tuner: Mono produces
monaural sound for all programs. Stereo produces stereo sound if the
program is broadcast in stereo, otherwise the sound is mono. SAP produces
Second Audio Program sound, usually a second language. All SAP broadcasts are mono. TV + SAP produces normal sound from one speaker and
SAP sound from the other. Simul receives mono or stereo audio input from
the Audio In connections on your VCR-2 back panel. Use Simul to record
Simulcasts (see page 38) or when you have other audio equipment connected to your VCR-2 (see page 37).
When the Audio Source is set to SAP or TV + SAP, SAPSET will be illuminated on the Front Panel Display. When you tune your VCR-2 to a channel
with SAP, SAP will light on the Front Panel Display. If SAP or TV + SAP is
selected and the transmission does not contain SAP then normal stereo
audio will be heard. ▲
24
Page 27

You must set your VCR-2 clock and calendar before using Timer Recording.
1
2
STOP/EJECT
PLAY
REW FWD
PAUSE
SOURCE REC
STOP/EJECT
PLAY
REW FWD
PAUSE
SOURCE REC
DECK 1 DECK 2
TV
VIEW
TUNER
AV•IN
1
2
345
678
9
0
CH
POWER
TV/VCR
RESET
SAVE ESCMENU
CTR
UP
DOWN
NEXT
PREV
LCV
DSP
❹
❸
❶
❷
COPY
TAPE
▲
❸
1: VIDEO MENU
2: AUDIO MENU
3: SET DATE AND TIME
4: TIMER RECORDING
5: CHANNEL/TUNER MENU
WHEN OK PUSH SAVE
MAIN MENU
Your VCR-2 will accurately maintain its calendar up to December 31, 2090
once you have set the date and time, unless power is interrupted. The clock
must be reset after a power interruption.
∂ Press Menu. The Main Menu will appear on your TV screen.
On-Screen
Programming
Set Date and Time
∑ Press 3 to select Set Date and Time. The Set Date and Time Menu will
appear on your TV screen.
▲ From this point, you will not be able to change channels until you return
to the Main Menu. ▲
∏ Use Previous and Next to move from one selection to another. Use the
Numeric buttons (or the Up/Down buttons) to change the setting for
any selection.
Set the Month. January is 01, October is 10, etc.
Set the Year. Enter only the last two digits: 91, 92, 93, etc.
Set the Day.
Set the Hour.
Set the Minute.
Set AM/PM. Use the Up/Down buttons or press 1 for AM, 2 for PM.
▲ If desired, press Reset to return all entries to current time and continue
with step ∏. You can do this at any time. ▲
SET MONTH :
JUNE
1991
1:00 PM
SU MO TU WE TH FR SA
2
9
16
23
3
11
10
18
17
24 25
4
567
12
19
26
13
20
14
21
15
22
27 28 29
30
WHEN OK PUSH SAVE
1
8
π Press Save to accept your settings and return to the Main Menu. You can
Press Escape to ignore any changes you have made and return to the
Main Menu. You can do this at any time.
▲ The current time and day will appear on the Front Panel Display. The
current time and date can also be seen on the On-Screen Display.
Use a preceding zero (0) before single digit entries or press Next after the
first digit. ▲
do this at any time.
OR
25
Page 28

On-Screen
Programming
Channel/Tuner Menu
❶
TV/VCR
CTR
POWER
PREV
❸❹
COPY
TAPE
RESET
UP
NEXT
DOWN
SAVE ESCMENU
▲
1
67
1
STOP/EJECT
REW FWD
SOURCE
DECK 1 DECK 2
2
PLAY
3
8
PAUSE
REC
VIEW
4
9
2
TV
❷
5
0
STOP/EJECT
REW FWD
SOURCE
TUNER
DSP
LCV
PLAY
PAUSE
AV•IN
The Channel/Tuner Menu allows you to select the channels you watch
most frequently and save them in Channel Memory. The Channel Up/Down
buttons will then select only those channels you have programmed. Other
channels can still be selected using the Numeric buttons.
CH
Your VCR-2 keeps two separate memories, one for normal antennas (TV),
and one for cable (CATV). This way, if you regularly switch between your
antenna and cable, you do not have to reset your Channel Memory.
REC
To change the setting for Antenna Source:
∂ Press Menu. The Main Menu will appear on your TV screen.
MAIN MENU
1: VIDEO MENU
2: AUDIO MENU
3: SET DATE AND TIME
4: TIMER RECORDING
5: CHANNEL/TUNER MENU
WHEN OK PUSH SAVE
CHANNEL/TUNER MENU
CH 02
ANTENNA SOURCE - TV
AUTO PROGRAM
ADD
DELETE
ADD ALL
DELETE ALL
WHEN OK PUSH SAVE
∑ Press 5 to select Channel/Tuner Menu. The Channel/Tuner Menu will
appear on your TV screen.
∏ Use the Up/Down buttons to highlight Antenna Source.
Press Previous or Next to choose TV, STD CATV, IRC CATV or HRC
CATV. Choose the setting that gives you the best picture or call your
cable company for the correct CATV setting. If you do not have a cable
system, choose TV.
π Press Save or Escape to return to the Main Menu.
▲ Selecting a different antenna source will also switch to the appropriate
Channel Memory. One memory is for TV, the other for STD CATV, IRC
CATV, and HRC CATV. Any changes made in one memory will not affect
the other. ▲
To automatically program Channel Memory:
① Follow steps ∂ and ∑ above.
≠ Use the Up/Down buttons to highlight Auto Program.
③ Press Next to begin Auto Program.
26
The Auto Program feature scans each channel and assigns those with
signals into Channel Memory. The process takes about 60 seconds.
④ Press Save or Escape to return to the Main Menu.
▲ During Auto Program the TV View will be locked on tuner. Any deck
operations that would change the TV View (pressing Play for example) are
temporarily disabled.
The Auto Program feature will not function while any deck is recording the
tuner. ▲
Page 29

To add a channel to Channel Memory:
① Follow steps ∂ and ∑ on the preceding page.
≠ Use the Numeric buttons to select on the VCR-2 the channel you wish to
add.
③ Use the Up/Down buttons to highlight Add.
④ Press Next to add the channel.
∞ Press Save or Escape to return to the Main Menu.
To delete a channel from Channel Memory:
On-Screen
Programming
Channel/Tuner Menu
① Follow steps ∂ and ∑ on the preceding page.
≠ Use the Numeric buttons (or the Channel Up/Down buttons) to select
on the VCR-2 the channel you wish to delete.
③ Use the Up/Down buttons to highlight Delete.
④ Press Next to delete the channel.
∞ Press Save or Escape to return to the Main Menu.
To add all channels to Channel Memory:
① Follow steps ∂ and ∑ on the preceding page.
≠ Use the Up/Down buttons to highlight Add All.
③ Press Next to add all the channels.
④ Press Save or Escape to return to the Main Menu.
Your Channel Up/Down buttons will now select every channel, whether
a signal is present or not.
To erase all the channels from Channel Memory:
① Follow steps ∂ and ∑ on the preceding page.
≠ Use the Up/Down buttons to highlight Delete All.
③ Press Next to delete all the channels.
④ Press Save or Escape to return to the Main Menu.
Channel memory will now contain no channels. Your Channel Up/
Down buttons will have no effect until channels are added again.
27
Page 30

On-Screen
Display
DECK 1
RECORD
0000
SP M
DECK 2 TUNER
TV VIEW
DECK 1
DECK 2
PLAY
2562
SP M
SOURCESOURCE
TV View
Indicator
Deck Status
AmeriChrome Copy™
Indicator
Source
Indicators
DECK 1
STOP
0000
SP M
TV VIEW
DECK 1
CH 03
HQ COPY
DECK 2
PLAY
2562
SP M
MON MAY 14, 1991 12:00PM
The On-Screen Display (OSD) appears on your TV screen when any button
affecting the tape status, channel setting, Copy Tape™, Source, or TV View
is pressed. Some parts of the OSD will not appear depending on the current
status of your VCR-2. For example, if either deck does not contain a tape,
deck status will not appear for that deck.
Channel
Indicator
Date/Time
The OSD can also be displayed by pressing DSP (Display). The first press
will display the date and time. The second press will clear the screen. Press
a third time to display the source of the deck signals. The OSD will not be
recorded by either VCR-2 deck. You can clear the OSD anytime it is on by
pressing DSP.
Channel Indicator - Displays the current channel selection for your
VCR-2 tuner. Displays SC next to the channel when Simulcast is chosen
as the Audio Source.
Deck Status - Displays the tape status: Eject, Stop, Play, Still, Fast FWD,
Rewind, FPS and RPS (Picture Scan), Jet FPS and Jet RPS (Jet Search),
Pause, Record, Load, or Error. Also displays the current Tape Counter
position, the tape speed, and M if the Memory Stop mode is active. OTR
and duration are displayed when One-Two Recording™ is in progress.
AmeriChrome Copy™ Indicator - Indicates that AmeriChrome Copy
duplication is in progress.
Source Indicators - Indicate the source for recording onto Deck 1 and Deck
2. Press the Deck 1 Source button to select AV-IN, Tuner, or Deck 2
(Deck 1 cannot record itself; Deck 2 cannot record itself). Change the
Deck 2 Source in the same manner.
If Deck 2 is chosen as the Source for Deck 1, then Deck 1 cannot be
selected as Source for Deck 2. The reverse is also true.
28
TV View Indicator - Indicates the source of the picture on your TV screen
when the TV/VCR button is set to VCR. If TV View is set to Deck 1 or
Deck 2 and no tape is playing in that deck, you will instead see that
deck’s Source. For example, if TV View is set to Deck 1 and no tape is
playing in Deck 1, you will see the Deck 1 Source, which may be Deck
2, tuner, or AV-IN.
Page 31

Front Panel
Display
SAP SAPSET
VCR
SUN
MON TUE WED THU FRI
SAT
ON
SP
LP
EP
:
:
:
AM
CH
PM
MONO STEREO TIMER PROG OTR LINE SIMUL CATV
Deck Status TapeSpeed Clock/Tape Counter Channel
This illustration shows all the indicators on the Front Panel Display. The
indicators will not all be displayed at one time.
The Front Panel Display shows the status for one deck at a time. You can
choose the deck that is displayed by pressing Deck 1 or Deck 2 from the
Remote Control. There must be a tape in the compartment for that deck’s
status to display. For your convenience, the On-Screen Display, which
appears on your TV screen, shows the status of both decks.
CATV - Indicates that STD CATV, HRC CATV, or IRC CATV has been chosen
for Antenna Source.
Channel - Displays the number of the channel being received by the VCR-2
tuner.
Clock/Tape Counter - Displays the present time or Tape Counter number.
Day of Week - Displays the current day.
Deck Status - Displays the present status of the last deck viewed, such as
REC when a recording is in progress. Deck Status is blank if that deck
does not contain a tape.
LINE - This indicator reserved for future use.
MONO - Indicates that the Audio Source is set to Mono.
ON - Indicates that One-Two Recording™ is in progress.
OTR - Indicates that One-Two Recording is in progress.
PROG - Indicates that a Timer Recording event has been programmed.
SAP - Indicates that a Second Audio Program (SAP) signal is being received.
SAPSET - Indicates that the Audio Source is set to SAP or SAP + TV.
SIMUL - Indicates that the Audio Source is set to Simulcast.
Speed - Displays the present recording or play speed.
STEREO - Indicates that a stereo signal is being received.
Tape - Indicates that a tape is in one or both of the decks.
TIMER - Indicates that a Timer Recording event is in progress, or a Timer
Recording event has been set and your VCR-2 is off. Blinks for Timer
Record Error.
VCR - Indicates that your VCR-2 is the source of the picture on your TV
screen.
The Front Panel Display is located in the
center of your VCR-2 Front Panel.
29
Page 32

Auto Features
Your VCR-2 has a number of automatic features that simplify tape viewing.
Auto Play - When a tape with no record safety tab is inserted into either
deck, your VCR-2 begins playing the tape. The TV/VCR indicator
switches to VCR and the TV View switches to that deck. If a tape is
already playing in the other deck, it will continue to play. You can view
either deck. You can turn Auto Play on or off, it is preset to OFF. See
page 23.
Auto Power Off - While a tape is rewinding or recording a timer event,
press the Power button and your VCR-2 will turn off when rewind or
event is complete. The Power indicator will blink while this mode is
active. Pressing Power or any tape-related button (e.g.: Play, Stop, etc.)
will cancel Auto Power Off.
Auto Power On - Power turns on when a tape is inserted into either deck.
The TV/VCR indicator switches to VCR.
Auto Rewind - Your VCR-2 will automatically rewind when the end of the
tape is reached during play or fast forward. You can turn Auto Rewind
on or off, it is preset to ON. See page 23.
Auto Stop - Your VCR-2 will stop if a deck is left in play still or record pause
for more than 5 minutes. This prevents damage to the tape.
Memory Stop - If the Counter/Time Display is set to Tape Counter, then
when rewinding or fast forwarding, your VCR-2 will stop when 0000 is
reached on the Tape Counter. See the next page.
Remote Load/Eject - You can load and eject tapes using your Remote
Control. Press Play to load a tape that is in the ejected position. Press
Stop/Eject to eject a tape which is stopped. You can turn Remote Load/
Eject on or off, it is preset to ON. See page 23.
30
Page 33

Your VCR-2 Tape Counter allows you to note the location of specific
sections of your tapes and find them quickly later. The Tape Counter in
your VCR-2 works like those found on audio cassette tape recorders. The
Tape Counter counts four times for each revolution of the take-up (right
side) reel in the video cassette tape. The Tape Counter will count at
different speeds depending on the size of the reels and the position of the
tape.
We recommend you reset the Tape Counter each time you insert a tape.
Resetting the Tape Counter assures you a consistent reading when you
want to write down the Tape Counter position of a specific scene. This is
important when preparing notes for editing.
To reset the Tape Counter, insert a tape into either deck, then select that
deck using the TV View buttons. Press Reset. The Tape Counter will be
reset to 0000 for that deck; the Tape Counter of the other deck will not be
affected. To reset the Tape Counter of the other deck, switch TV View to
that deck, then press Reset.
Tape Counter &
Memory Stop
The Tape Counter position for both decks can be seen on the On-Screen
Display and on the Front Panel Display for the deck that is being viewed.
To see the Tape Counter on the Front Panel Display, press Counter/Time
Display. Press Counter/Time Display again to see the current time. This
must be done separately for each deck.
To set the Memory Stop mode for the last deck viewed, press Reset twice.
The first press resets the Tape Counter to 0000 and the second activates
Memory Stop. You will see an M below the Tape Counter setting on the
OSD. Your VCR-2 will stop at 0000 when rewinding or fast forwarding, if
the Front Panel Display is set to Tape Counter for that deck.
31
Page 34

Antenna
Connections
There are numerous possibilities for connecting your VCR-2, your TV, your
antenna or cable system, your other video equipment, and your stereo
receiver. To choose an installation that fits your needs and your equipment,
follow these steps.
① If you don’t have a cable system, see Antenna Connections on this and
the next page.
≠ If you have a cable system but have no scrambled channels, use Cable
Connection 1, page 34.
③ If you have a cable system with a converter (some or all channels
scrambled), use Cable Connection 2 or Cable Connection 3, or consult
your cable company for advice on other connections (which may
require additional equipment).
Coaxial
or
Twin-lead
ANTENNA CABLES
Adapter
(supplied)
Combined VHF/UHF Antennas, VHF only, UHF
only
∂ Connect your antenna cable to the In from Antenna/Cable connection
(use the supplied adapter if your cable is twin-lead).
∑ A cable is supplied with your VCR-2. Connect the coaxial (round) end of
this cable to the Out to TV connection. Connect the other end of the
supplied cable to the combined VHF/UHF input on your TV.
Use a VHF/UHF splitter (not included) if your TV has separate VHF and
UHF inputs.
Dual-Deck
VCR Cable
(supplied)
∑
VHF/UHF
∑
CH 3
CH 4
∂
DUAL-DECK VCR BACK PANEL
OUT TO TV
IN FROM:
ANTENNA/
CABLE
VIDEO
IN OUT
TV BACK PANEL
32
Page 35

Separate VHF and UHF antennas
∂ If both antennas have twin-lead cables, connect both to the In from
Antenna/Cable connection using the supplied adapter.
OR
If one antenna cable is coaxial and one is twin-lead, use a VHF/UHF
combiner (not included) to connect to the In from Antenna/Cable
connection.
∑ A cable is supplied with your VCR-2. Connect the coaxial (round) end of
this cable to the Out to TV connection. Connect the other end of the
supplied cable to the combined VHF/UHF input on your TV.
Use a VHF/UHF splitter (not included) if your TV has separate VHF and
UHF inputs.
Antenna
Connections
Twin-lead
Coaxial
or
Twin-lead
ANTENNA CABLES
∂
Adapter
Combiner
∑
CH 3
CH 4
OUT TO TV
ANTENNA/
IN FROM:
CABLE
VCR-2 BACK PANEL
IN
VCR-2 Cable
(supplied)
VHF/UHF
∑
VIDEO
TV BACK PANEL
33
Page 36

Cable
Connection 1
Use this connection if your cable system does not require a converter.
You can record any channel while viewing that channel or any other
channel.
❹
TV/VCR
CTR
POWER
PREV
UP
DOWN
❸
❷
❷
Your VCR-2 can be turned off during normal TV viewing.
① Turn on your TV and VCR-2.
345
1
2
▲
RESET
678
1
STOP/EJECT
REW FWD
SOURCE
DECK 1 DECK 2
PLAY
PAUSE
REC
COPY
TAPE
NEXT
SAVE ESCMENU
VIEW
9
2
TV
0
STOP/EJECT
PLAY
REW FWD
SOURCE
TUNER
DSP
CH
LCV
PAUSE
REC
AV•IN
Refer to page 26 to set tuner menu properly.
∑ Press the Numeric buttons or use the Channel Up/Down buttons to
select the channel to view or record.
To record one channel and view another, follow these additional steps.
∏ Begin recording the channel you are viewing (see page 14).
π Switch your TV/VCR button to TV.
∞ Select the viewing channel with your TV channel selector.
Dual-Deck
VCR Cable
(supplied)
34
CABLE
OUTLET
Coaxial Cable
CH 3
CH 4
OUT TO TV
IN FROM:
ANTENNA/
CABLE
VIDEO
IN OUT
DUAL-DECK VCR BACK PANEL
VHF/UHF
TV BACK PANEL
Page 37

You can use this connection if you have a converter with your cable
system.
You can record any scrambled or non-scrambled channel and watch that
channel.
Your VCR-2 can be turned off during normal TV viewing.
To record and view a scrambled or non-scrambled channel, follow these
instructions.
① Turn on your TV, VCR-2, and converter.
≠ Use the Channel Up/Down buttons to set your VCR-2 to channel 2, 3 or
4, whichever is used by your cable system. You may view this channel
selection on the Front Panel Display of your VCR-2.
Cable
Connection 2
③ Set the VCR-2 back panel switch to either channel 3 or 4, choosing the
one that you did not use for your cable system (in ≠ above).
④ Set your TV tuner to the same channel used in ③ above.
▲ The above instructions apply when your VCR-2 is on. If you wish to
view your cable system when your VCR-2 is off, set your TV tuner to
channel 2, 3 or 4, whichever is used by your cable system. ▲
∞ On the cable system converter, select the channel to view or record.
Start the recording (page 14). Make sure the converter is left on during
the recording.
Coaxial Cable
CABLE
OUTLET
CONVERTER
CH 3
CH 4
OUT TO TV
IN FROM:
ANTENNA/
CABLE
VIDEO
IN OUT
Dual-Deck
VCR Cable
(supplied)
VHF/UHF
TV BACK PANEL
DUAL-DECK VCR BACK PANEL
35
Page 38

Cable
Connection 3
You can use this connection if you have a converter with your cable
system.
You can:
view any scrambled or non-scrambled channels.
record and view any non-scrambled channels.
record any non-scrambled channels while viewing any other scrambled
or non-scrambled channels.
Your VCR-2 can be turned off during normal TV viewing.
To view a scrambled or non-scrambled channel, follow these instructions.
① Turn on your TV and converter. Turn the VCR-2 off or set the TV/VCR
selector to TV.
≠ Set the TV to channel 2, 3 or 4, whichever is used by your cable system.
③ On the converter, select the channel to view.
To record and view the same non-scrambled channel, follow these instructions.
① Turn on your TV, VCR-2, and converter.
≠ Set the TV to channel 2, 3 or 4, whichever is used by your cable system.
③ Set the TV/VCR selector to TV.
④ On both the VCR-2 and the converter, select the channel to view and
record. Start the recording (page 14).
To record a non-scrambled channel while viewing any other scrambled or
non-scrambled channel, follow these instructions.
① Turn on your TV, VCR-2, and converter.
≠ Set the TV to channel 2, 3 or 4, whichever is used by your cable system.
③ Set the VCR-2 to the channel to record. Start the recording (page 14).
④ Set the TV/VCR selector to TV.
∞ On the converter, select the channel to view.
CONVERTER
CABLE
OUTLET
Coaxial Cable
36
CH 3
CH 4
DUAL-DECK VCR BACK PANEL
OUT TO TV
IN FROM:
ANTENNA/
CABLE
VIDEO
IN OUT
Dual-Deck
VCR Cable
(supplied)
VHF/UHF
TV BACK PANEL
Page 39

Connect your video equipment – VCRs, laser disc players, video cameras –
to the Video In connection on your VCR-2 back panel. Set TV View to AVIN to see the video input. If the video equipment has separate audio
outputs, connect them to the Audio In connections on your VCR-2 back
panel.
RIGHT
CH 3
CH 4
OUT TO TV
LEFT RIGHT
AUDIO IN
LEFT
AUDIO OUT
Connecting Other
Video Equipment
TO VIDEO EQUIPMENT
AUDIO OUTPUT
IN FROM:
ANTENNA/
CABLE
VIDEO
IN OUT
STILL TRACKING
DECK 1
DECK 2
VCR-2 BACK PANEL
▲ Connect as shown in the figure above to record from external equip-
ment (such as a camcorder). Set camcorder, or similar device, to play. Set
the Source to AV-IN and the VCR-2 to Record. This may be done on both
decks to make two recordings at the same time. ▲
TO VIDEO EQUIPMENT
VIDEO OUTPUT
37
Page 40

Audio Features
& Connections
The Audio In and Audio Out connections can be used to connect audio
equipment to your VCR-2.
Simulcast
This feature allows you to record stereo sound from your stereo amplifier
while recording picture from certain TV broadcasts, such as special concerts, MTV Music Television, HBO, CINEMAX, etc.
∂ Connect your stereo amplifier tape output connections to the Audio In
connections on your VCR-2 back panel.
≠ Turn on your TV, stereo amplifier, and your VCR-2.
③ Set the Audio Source to Simulcast. See page 24.
④ Select the desired TV channel on the VCR-2. Tune the stereo receiver to
the proper frequency to receive the audio transmission.
∞ To record a Simulcast, insert a blank tape into either deck, turn on
Dolby NR for the appropriate deck if desired (page 24), and press
Record.
Multichannel TV Sound (MTS) Stereo
You can enjoy MTS broadcast stereo by connecting your VCR-2 to your
stereo amplifier and speakers. MTS will allow you to enjoy full stereo sound
when your Audio Source is set to Stereo or TV + SAP.
∂ Connect the Audio Out connections on your VCR-2 back panel to the
play or auxiliary input connections on your stereo amplifier.
≠ Turn on your TV, stereo amplifier, and your VCR-2.
③ Set the Audio Source to Stereo or TV + SAP. See page 24.
④ Select the appropriate input (AUX or TAPE) on your stereo amplifier.
TO STEREO AMPLIFIER
RECORD OUTPUT
38
CH 3
CH 4
DUAL-DECK VCR BACK PANEL
OUT TO TV
IN FROM:
ANTENNA/
CABLE
RIGHT
LEFT RIGHT
AUDIO IN
VIDEO
IN OUT
LEFT
AUDIO OUT
STILL TRACKING
DECK 1
∂
TO STEREO AMPLIFIER
PLAY OR AUX INPUT
DECK 2
Page 41

If you have a monitor-style TV, or if your TV has separate video and audio
input connections, you can connect your VCR-2 to these connections for
improved picture and sound quality.
These connections are used instead of the Out to TV connections shown in
Quick Connections, Antenna Connections, and Cable Connections.
▲ To view your VCR-2 on the monitor, it may be necessary to switch the
monitor to “Video”, “AUX” or “AV-IN”. Refer to your monitor’s owners
manual for instructions.
When this connection style is used, the TV/VCR setting on the VCR-2 has
no effect. The monitor will always display the current TV View when it is
switched to the VCR-2. ▲
Monitor
Connections
CH 3
CH 4
OUT TO TV
ANTENNA/
IN FROM:
CABLE
IN OUT
VCR-2 BACK PANEL
RIGHT
LEFT RIGHT
AUDIO IN
VIDEO
LEFT
AUDIO OUT
STILL TRACKING
DECK 1 DECK 2
TO TV/MONITOR
AUDIO IN
TO TV/MONITOR
VIDEO IN
39
Page 42

Care of Your Dual-Deck
VCR-2
Placement of Your VCR-2
Place your VCR-2 within three feet, but not on top of your TV.
Place your VCR-2 in a horizontal position only.
Do not place your VCR-2 in extremely hot, cold, humid or dusty places.
See page 41 for specifications.
Do not place your VCR-2 near appliances with electric motors.
Do not put anything on top of your VCR-2.
Keep liquids and food away from your VCR-2.
Cleaning the VCR-2 Cabinet
Dust the surface using a soft cloth. Use the dusting attachment of your
vacuum occasionally to remove dust from the ventilation holes on the top,
back, sides, and bottom of the cabinet.
Cleaning the Video Heads
Playing poor quality or damaged tapes in your VCR-2 can contaminate the
video heads. Use only high quality tapes in your VCR-2.
Dirt which accumulates on the video heads may cause the picture to blur. If
this happens, the video heads need to be cleaned. Purchase a non-abrasive
head cleaning tape from your video dealer. Be sure to follow the instructions that come with the cleaning tape; excessive use of a cleaning tape can
shorten head life. Cleaning by any means other than a cleaning tape will
void your warranty.
Care of Video Tapes
Do not expose tapes to direct sunlight, extreme heat or extreme cold.
Do not disassemble any cassette. Do not touch the tape.
Rewind tapes after use and store in protective cases.
Remove the record safety tab to prevent recording over previous recordings.
Humidity Requirements
If your VCR-2 is suddenly moved from a cold to a warm place, moisture
may form inside the unit. Before operating, allow at least 2 hours after
plugging in the power cord for your VCR-2 to dry completely. Failure to do
so may cause damage to your VCR-2 and the tape. See page 41 for specifications.
Service and Warranty
Never open your VCR-2 cabinet or touch the inside parts. To do so is
dangerous and may cause damage. Do not try to disassemble your
VCR-2 – there are no user-serviceable parts inside.
Servicing of your VCR-2 should be done by an authorized service center.
For service information, see the inside front cover.
Energy Conservation
Save energy. If you will not be using your VCR-2 for a long period of time,
unplug the electrical cord.
Shipping Your VCR-2
Carefully pack your VCR-2 in the original packing materials and carton for
shipping.
40
Page 43

RECORDING SYSTEM Rotary, azimuth two-head helical scanning
system. Luminance: FM azimuth recording.
Color signal: converted sub-carrier phase shift
recording.
TELEVISION SYSTEM NTSC-type color signal EIA Standard (525
lines, 60 fields).
AUDIO TRACK 2 track linear.
TAPE WIDTH 12.7 mm, 1/2 inch.
RECORDING SPEED SP: 33.35 mm/s, LP: 16.67 mm/s, EP: 11.12
mm/s.
PLAY/RECORD TIME 480 minutes each deck with T-160 used in EP
mode, (16 hours total).
Technical
Specifications
FF/REW TIME Less than 6 minutes with T-120.
HEADS Video: 2 rotary heads.
Audio/Control: 1 stationary head.
Erase: 1 full track, 1 audio (dual track).
VIDEO INPUT: Video In connection (RCA).
1.0 V p-p, 75 ohms unbalanced.
OUTPUT: Video Out connection (RCA).
1.0 V p-p, 75 ohms unbalanced.
HORIZ RES: Color/Monochrome: more than 230 lines.
S/N RATIO: Better than 43 dB.
AUDIO INPUT: Audio In connections (RCA) stereo.
-8 dBu, 50 K ohm unbalanced.
OUTPUT: Audio Out connections (RCA) stereo.
-6 dBu, 10 K ohm unbalanced.
S/N RATIO: Better than 40 dB (Dolby NR OFF).
Better than 45 dB (Dolby NR ON).
FREQUENCY RESPONSE SP -6 dB: 100 Hz-10 KHz.
LP -6 dB: 100 Hz-7 KHz.
EP -6 dB: 100 Hz-5 KHz.
TV TUNER VHF input Ch 2 - Ch 13.
UHF input Ch 14 - Ch 69.
Cable Ch 4A to W+58.
75 ohm unbalanced.
RF MODULATION Channel 3 or 4; 66 dBu.
75 ohm unbalanced.
POWER REQUIREMENT 120V AC, 60 Hz.
ENVIRONMENT 41 - 104 degrees Fahrenheit, 10 - 75 percent
humidity.
SIZE 11.8 kg. 514 mm X 107 mm X 420 mm.
26 lbs. 20 1/4" x 4 1/4" x 16 1/2".
41
Page 44

Index
Adapter 5, 10
AmeriChrome Copy™ 13
AmeriChrome Copy Indicator 28
Antenna Connections 32 - 33
Antenna Source 26
Audio In and Out 15, 37, 38
Audio Menu 24
Audio Source 24
Auto Play 23, 30
Auto Power Off 30
Auto Power On 30
Auto Program 26
Auto Rewind 23, 30
Auto Stop 30
AV-IN Button 9
Cable
Coaxial 5, 10
Twin-lead 5
Cable Connections 34 - 36
Camcorders 37
Care and Cleaning 40
CATV 26
CH 3/CH 4 Selector 5
Channel Down Button 6, 9
Channel Indicator 28
Channel Memory 26 - 27
Channel/Tuner Menu 26 - 27
Channel Up Button 6, 9
Clock 25
Coaxial Connectors 5
Converter 35 - 36
Copy Tape™ 13
Copy Tape Button 6, 9, 13
Copy Tape Indicator 6
Counter/Time Display Button 6, 9
Deck 1 Button 9
Deck 2 Button 9
Deck Status 28
Display Button 9
Dolby Noise Reduction 24
Down Button 6, 9
Duplicating a Tape 13
Duration of Recordings 18, 19
Editing 16 - 17
Eject 7, 9
Error Message 44
Escape Button 6, 9
Event Number 19
Event Type 20
Fast Forward Button 6, 9
Front Panel 6 - 7
Front Panel Display 6, 29
Holding Event 21
HRC CATV 26
IRC CATV 26
Jet Search 12
Laser Disc Players 37
Last Channel Viewed Button 9
Limited Warranty - Inside Front Cover
Main Menu 22
Memory Stop 30, 31
Menu Button 6, 9
42
Page 45

Index
Monitor 39
Mono 24
MTS Stereo 38
Next Button 6, 9
Numeric Buttons 9, 11
One-Two Recording™ 18
On-Screen Display 28
On-Screen Programming 22 - 27
Pause Button 9
Pause/Edit Button 6
Picture Scan 12
Play Button 6, 9
Playing a Tape 12
Power Button 7, 9
Power Indicator 7
Previous Button 9
Programming (See On-Screen Programming
or Setting the Timer)
Record Button 7, 9
Record Safety Tab 12, 13
Recording 14
Recording Two Programs 15
Remote Control 8 - 9, 10
Remote/Load Eject 23, 30
Reset Button 7, 9
Rewind Button 7, 9
Set Date and Time Menu 25
Setting the Timer 19 - 21
Priorities 21
Sharpness Control 7, 12
Simulcast 24, 38
Source 14
Source Button 7, 9
Source Indicators 7, 28
Speed 23
STD CATV 26
Stereo 24
Still-Tracking Control 12
Stop/Eject Button 7, 9
Tape Compartment 6-7
Tape Counter 31
Technical Specifications 41
Temperature 40, 41
Timer Recording 19 - 21
Timer Record Error 21, 44
Timer Recording Menu 19 - 21
Timer Recording Summary 19
Tracking Control 7, 12
Troubleshooting 44
Tuner Button 9
TV + SAP 24
TV/VCR Button 7, 9
TV/VCR Indicators 7
TV View Button 7
TV View Indicators 7, 28
Twin-lead Connectors 5
Up Button 9
Save Button 7, 9
Scrambled Channels 32
Second Audio Program (SAP) 24
Service 44, Back Cover
Video Cameras 37
Video In & Out 15, 37
Video Menu 23
43
Page 46

Troubleshooting
▲ A strong static electricity shock, or other unforeseen circumstance, can cause the control system your VCR-2 to lock up.
To reset the control system, unplug the power cord from the wall outlet for 5 seconds and plug it in again. If this does not
restore all operations to normal, unplug it again for two minutes. You will then need to reset the clock. If this still does not
restore all operations to normal, unplug the cord for two minutes and hold down the Front Panel Reset button while
plugging in the cord. This last step will clear all memories (deck speeds, Timer Recordings and Channel Memory) in your
VCR-2. If these steps do not correct the problem, the VCR-2 must be serviced by an authorized service center. ▲
TROUBLE
No power.
Tape cannot be inserted.
Tape cannot be removed.
TV programs cannot be recorded.
Timer Recording will not function. “Timer
Record Error” message on OSD. TIMER
blinking on Front Panel Display.
Play picture is bad or missing.
Remote Control does not operate.
CHECK THIS
Is the power cord completely plugged into the AC outlet? Page 5.
Is the Power button turned on (Power indicator lighted)? Page 7.
Is the tape window facing up and the record safety tab facing you? Page 12.
Is there already a tape in the deck?
Is the power cord completely plugged into the AC outlet? Page 5.
Is your VCR-2 properly connected to the external antenna or cable system?
Page 5, 32. Is the record safety tab in place on the tape? Page 13. Is your
VCR-2 tuned to the correct channel? Page 14. Is the Antenna Source
selected on the Channel/Tuner Menu the proper one for your TV system?
Page 26.
Are the recording start time and duration correctly set? Page 19.
Is there a tape in the proper deck? Page 20.
Is the record safety tab in place on the tape? Page 13.
Is your TV tuned to the channel that is selected on the CH 3/CH 4 selector
on your VCR-2? Page 5. Is the TV/VCR button set to VCR? Page 7, 9. Is the
Tracking control correctly adjusted? Page 12, 7. Is the fine tuning correctly
adjusted on your TV?
Is the Remote Control aimed directly at your VCR-2? Are there any obstacles
between the Remote Control and your VCR-2? Is the Remote Control
battery fresh and correctly installed? Is there neon light near the Remote
Control? Page 8.
TV programs cannot be viewed.
The tape is ejected when Record is pressed.
Tape does not Auto Play.
The blank tape is ejected when Copy Tape™
is pressed.
CLE blinking on Front Panel Display and OSD
tape status ERROR message.
Can’t turn VCR-2 power off.
Can’t select Timer Recording from Main Menu
or “Eeprom Error” message on OSD.
Other problems?
44
Is the TV/VCR button set to TV? Page 7, 9.
Is the record safety tab in place on the tape? Page 13.
Is Auto Play turned on? Page 23.
Have you removed the record safety tab from the tape? Page 10.
Is the record safety tab in place on the tape in Deck 2? Page 13.
Turn your VCR-2 power off, then on again. If this does not correct the
problem, refer to the resetting instructions at the top of the page.
Is Timer Recording or Rewind in progress? Page 30, Auto Power Off.
The VCR-2 must be serviced by an authorized service center to restore
Timer Recording functions.
Feel free to contact a Go-Video, Inc. field service engineer at (480) 998-
3400 for assistance or authorized service center locations.
Page 47

COPYRIGHT WARNING
Federal copyright law provides severe civil and criminal
penalties for the unauthorized reproduction, distribution, or
exhibition of copyrighted motion pictures and video tapes
(Title 17, United States Code, Sections 501 and 506).
This product is
or playback of copyrighted works, including, without limitation,
unauthorized recording from pre-recorded copyrighted
cassettes.
The purchase or use of this product does
the user authorization, is
invitation to make or playback unlawful copies of copyrighted
movies, rentals or other works.
DO NOT USE THIS PRODUCT TO MAKE UNLAWFUL
RECORDINGS OR UNLAWFUL COPIES OF
VIDEOCASSETTES. OBTAIN
AUTHORIZATION FROM THE COPYRIGHT OWNERS.
not made or sold for unauthorized recording
not grant or give
not a licence, and is not an
PRIOR WRITTEN
GO-VIDEO, INC.
7835 East McClain Drive
Scottsdale, Arizona, USA 85260
Printed in Korea
© 1991 Go-Video, Inc.
For your nearest Go-Video service facility dial (800) 992-8777.
 Loading...