

Page 1
DVS3100/3000
USER’S GUIDE
SSC-DVS3100/3000
Page 2

CAUTIONS
DVD PLAYERS USE AN INVISIBLE LASER BEAM WHICH CAN CAUSE
HAZARDOUS RADIATION EXPOSURE IF DIRECTED. BE SURE TO OPERATE
PLAYER CORRECTLY AS INSTRUCTED.
Caution: To prevent electric shock, match wide blade of plug to wide slot,
fully insert.
Attention: Pour éviter les chocs électriques, introduíre la lame la plus large
de la fiche dans la borne correspondante de la prise et pousser jusqu au fond.
This product satisfies FCC regulations when shielded cables and connectors
are used to connect the unit to other equipment. To prevent electromagnetic
interference with electric appliances, such as radios and televisions, use
shielded cables and connectors for connections.
FCC NOTE (for U.S.A):
This equipment has been tested and found to comply with the limits for a
Class B digital device, pursuant to Part 15 of the FCC rules. These limits are
designed to provide reasonable protection against harmful interference in a
residential installation. This equipment generates, uses and can radiate radio
frequency energy and, if not installed and used in accordance with the
instructions, may cause harmful interference to radio or television reception,
which can be determined by turning the equipment off and on, the user is
encouraged to try to correct the interference by one or more of the following
measures.
• Reorient or relocate the receiving antenna.
• Increase the separation between the equipment and receiver.
• Connect this equipment into an outlet on a circuit different from that to
which the receiver is connected.
• Consult the dealer or an experienced radio/TV technician for help. This class
B digital apparatus meets all requirements of the Canadian Interference -Causing Equipment Regulations.
WARNING:
To reduce the risk of fire or electric shock, do not expose this appliance to
rain or moisture.
CAUTION
THIS PRODUCT UTILIZES A LASER. USE OF CONTROLS OR ADJUSTMENTS OR PERFORMANCE OF PROCEDURES OTHER THAN THOSE
SPECIFIED HEREIN MAY RESULT IN HAZARDOUS RADIATION EXPOSURE.
DO NOT OPEN COVER AND DO NOT REPAIR YOURSELF. REFER SERVICING TO QUALIFIED PERSONNEL.
Note:
• This unit can be used only where the power supply is AC 100 ~ 120V, 60
Hz. It cannot be used elsewhere.
• This DVD player is designed and manufactured to respond to the Region
Management Information. If the Region number of a DVD disc does not
correspond to the Region number of this DVD player, this DVD player
cannot play the disc.
• This device is protected by U.S. Patent numbers 4,631,603 and 4,577,216
and 4,819,098 and other intellectual property rights. The use of
Macrovision’s copy protection technology in the device must be authorized
by Macrovision and is intended for home and other limited pay-per-view
uses only, unless otherwise authorized in writing by Macrovision. Reverse
engineering or disassembly is prohibited.
This symbol is intended to alert the user to
the presence of uninsulated dangerous
voltage within the product’s enclosure that
may be of sufficient magnitude to constitute risk of fire or electric shock.
This symbol is intended to alert the user to
the presence of important operating and
maintenance instructions in the literature
accompanying this product.
Page 3

DVS3100/3000
User’s Guide
Go-Video/Sensory Science
7835 East McClain Drive
Scottsdale, Arizona USA 85260
www.sensoryscience.com
www.govideo.com
Page 4

Go-Video is a registered trademark of Sensory Science Corporation. Dolby, Pro Logic, and the double-D symbol are trademarks of
Dolby Laboratories Licensing Corp. DTS is a trademark of DTS Technology, LLC. All other brand and product names are trademarks or
registered trademarks of their respective companies. Copyright ©1999 Sensory Science Corp. All rights reserved.
Page 5

Table of Contents
Table of Contents
Important Safety Instructions .............................................................................................................................................
Care & Maintenance...........................................................................................................................................................
1 - Setup 1
Accessories.........................................................................................................................................................................1
System Features ..................................................................................................................................................................2
Disc Type & Characteristics ................................................................................................................................................ 4
Front Panel Controls ........................................................................................................................................................... 5
Front Panel Display ............................................................................................................................................................6
Rear Panel Overview.......................................................................................................................................................... 7
Tour of the Remote Control ................................................................................................................................................8
2 - Connections 11
Connecting to a Stereo TV................................................................................................................................................ 11
Connection to an Audio System .......................................................................................................................................12
Connecting a VCR ............................................................................................................................................................ 14
Connecting a TV/Aux Component ....................................................................................................................................15
Connecting Headphones ..................................................................................................................................................16
3 - Basic Functions 17
Operating the System ....................................................................................................................................................... 17
Playing a Disc...................................................................................................................................................................18
Special Playback Options.................................................................................................................................................1 9
Search Features.................................................................................................................................................................20
Skip Features ....................................................................................................................................................................21
Display Feature.................................................................................................................................................................22
Repeat Play.......................................................................................................................................................................23
A-B Repeat .......................................................................................................................................................................24
Program Playback DVD....................................................................................................................................................25
Program Playback CD/VCD........................................................................................................ ...................................... 26
iii
v
TABLE OF CONTENTS i
Page 6

4 - Advanced Functions 27
Disc View .........................................................................................................................................................................27
Audio Selection ................................................................................................................................................................ 28
Subtitle Language .............................................................................................................................................................29
Screen Angle ....................................................................................................................................................................30
Bookmarks........................................................................................................................................................................31
Zoom................................................................................................................................................................................32
5 - Setup Mode 33
Using the Main Menu....................................................................................................................................................... 33
Audio Options ..................................................................................................................................................................34
Speaker Setup ...................................................................................................................................................................35
Channel Delays ................................................................................................................................................................36
Channel Balance ..............................................................................................................................................................37
Display Options................................................................................................................................................................38
Setting/Changing Password...............................................................................................................................................39
Rating Limit ......................................................................................................................................................................40
Setting Default Languages ................................................................................................................................................41
6 - Reference 43
Controlling a TV with the Remote ....................................................................................................................................43
Controlling a VCR with the Remote..................................................................................................................................44
Troubleshooting Guide ..................................................................................................................................................... 45
Technical Specifications ...................................................................................................................................................46
DVS Limited Warranty......................................................................................................................................................47
ii DVS USER’S GUIDE
Page 7

Important Safety Instructions
Safety
PORTABLE CART WARNING
(Symbol provided by RETAC)
1. Read Instructions - All the safety and operating
instructions should be read before the unit is operated.
2. Retain Instructions - The safety and operating instructions should be retained for future reference.
3. Heed Warnings - All warnings on the unit and in the
operating instructions should be adhered to.
4. Follow Instructions - All operating and maintenance
instructions should be followed.
5. Cleaning - Unplug this unit from the wall outlet before
cleaning. Do not use liquid or aerosol cleaners. Use a
dry cloth for dusting cabinet.
6. Attachments - Do not use attachments not recommended by the video product manufacturer, as they
may be hazardous.
7. Water & Moisture - Do not use this unit near water—
for example, near a bathtub, wash bowl, kitchen sink,
laundry tub, in a wet basement, near a swimming
pool or the like.
8. Accessories - Do not place this unit on an unstable
cart, stand, tripod, bracket or table. The unit may fall,
causing serious injury to a child or adult, and serious
damage to the unit. Use only with a cart, stand,
tripod, bracket or table recommended by the manufacturer or sold with the unit. Any mounting of the
unit should follow the manufacturer’s instructions and
should use a mounting accessory recommended by
the manufacturer.
a. An appliance and cart combination should be
moved with care. Quick stops, excessive force, and
uneven surfaces may cause the appliance and cart
combination to overturn.
9. Ventilation - Slots and openings in the cabinet are
provided for ventilation to ensure reliable operation of
the unit and to protect it from overheating. These
openings must not be blocked or covered. Never
place the unit on a bed, sofa, rug or other similar
surface, on or near a radiator or heat register. This unit
should not be placed in a built-in installation such as
a bookcase or rack unless proper ventilation is
provided or the manufacturer’s instructions have been
adhered to.
10. Power Sources - This unit should be operated only
from the type of power source indicated on the
marking label. If you are not sure of the type of power
supply to your home consult your appliance dealer or
local power company. For units intended to be
operated from battery power, or other sources, refer to
the operating instructions.
11. Grounding or Polarization - This unit may be
equipped with either a polarized 2-wire AC line plug
(a plug having one blade wider than the other) or a 3wire grounding plug having a third (grounding) pin.
The 2-wire polarized plug will fit into the power
outlet only one way. This is a safety feature. If you are
unable to insert the plug fully into the outlet try
reversing the plug. If the plug still fails to fit, contact
your electrician to replace your obsolete outlet. Do
not defeat the safety purpose of the polarized plug.
12. Power-cord Protection - Power-supply cords should
be routed so that they are not likely to be walked on
or pinched by items placed upon or against them,
paying particular attention to cords of plugs, convenience receptacles, and the point where they exit
from the unit.
SAFETY iii
Page 8

13. Lightning - For added protection of this unit during a
lightning storm, or when it is left unattended and
unused for long periods of time, unplug it from the
wall outlet.
14. Overloading - Do not overload wall outlets and
extension cords as this can result in the risk of fire or
electric shock.
15. Objects & Liquids - Never push objects of any kind
into this unit through openings as they may touch
dangerous voltage points or short out parts that could
result in a fire or electric shock. Never spill liquids of
any kind onto the unit. Should spillage occur, unplug
unit and have it checked by a technician before use.
16. Servicing - Do not attempt to service this unit yourself
as opening or removing covers may expose you to a
dangerous voltage or other hazards. Refer all servicing
to qualified service personnel.
17. Damage Requiring Service - Unplug this unit from the
wall outlet and refer servicing to qualified service
personnel under the following conditions:
a. When the power supply cord or plug is damaged.
b. If any liquid has been spilled onto or objects have
fallen into the unit.
c. If the unit has been exposed to rain or water.
d. If the unit does not operate normally by following
the operating instructions. Adjust only those
controls that are covered by the operating instructions. Improper adjustment of other controls may
result in damage and will often require extensive
work by a qualified technician to restore the unit
to its normal operation.
e. If the unit has been dropped or the cabinet has
been damaged.
f. When the unit exhibits a distinct change in
performance—this indicates a need for service.
18. Replacement Parts - When replacement parts are
required, be sure the service technician has used
replacement parts specified by the manufacturer or
those having the same characteristics as the original
part. Unauthorized substitutions may result in fire,
electric shock or other hazards.
19. Safety Check - Upon completion of any service or
repairs to this unit ask the service technician to
perform safety checks to determine that the unit is in
safe operating order.
20. Heat - This unit should be situated away from heat
sources such as radiators, stoves, or other products
that produce heat.
iv DVS USER’S GUIDE
Page 9

Care & Maintenance
For trouble free operation, follow these
handling, care and
cleaning instructions.
Handling Precautions
• Before connecting other components to this system, be
certain the system power and component power is off.
• Be certain that speaker connections are secure and not
shorted before turning on the system power.
• Lower the system volume before switching between the
DVD, VCR and AUX inputs and when changing discs.
• Do not move the system while a disc is being played to
prevent the disc from being scratched or broken, and to
prevent damage to the disc player’s internal parts.
• Do not set liquid filled objects or any small metal
objects on top of the system.
• Be careful not to place anything other than a disc in the
disc tray.
• Exterior interference such as lightning and static electricity may affect normal operation of this system. If this
occurs, turn the system off and on again with the
POWER button, or disconnect and then reconnect the
AC power cord to the AC power outlet. The system will
reset and should operate normally again.
• Be sure to remove the disc and put the system in
Standby after use.
• Disconnect the AC power cord from the AC outlet when
you don’t intend to use the system for long periods of
time.
• Clean the disc by wiping in a straight line from the
inside to the outside of the disc.
Disc Storage
• Store all discs properly in their case or protective sleeve
and handle each disc carefully as the discs are susceptible to damage.
• Do not store discs in direct sunlight; keep discs in a cool
ventilated area.
• Do not stack discs. Store discs vertically on a shelf.
Maintenance of Cabinet
For safety reasons, be sure to disconnect the AC power
cord from the AC outlet before cleaning the cabinet.
• Do not use benzene, thinner, or other solvents for
cleaning.
• Wipe the cabinet with a soft cloth.
Formation of Condensation
When the system is exposed to rapid temperature and
humidity changes, condensation may form if warm air
comes in contact with any cold parts inside the system.
• If condensation forms inside the system, the system may
not operate correctly. When this occurs, leave the
system at room temperature until the inside of system
becomes dry and operational.
• If condensation forms on a disc, wipe the disc with a
soft and dry cloth by moving the cloth from the center
hole toward the outer edge.
SAFETY v
Page 10

vi DVS USER’S GUIDE
Page 11

Accessories
1 - Setup
As you unpack, please check
that the following items are
included in your DVS packing
case.
• Remote Control
• 2 AA Batteries (see installation instructions at right)
• User’s Manual
• Audio/Video Connection
Cable
• S-Video Cable
Open the battery cover
1
Turn over the remote control, press down on the arrow
and slide down to remove cover.
Insert two AA batteries
2
Make sure the polarities (+ and -) are aligned correctly.
Replace the battery cover
3
If remote doesn’t operate properly:
• Check the polarity (+ and –) of the batteries.
• Check if the batteries are drained.
• Check if the remote sensor is obstructed.
• Check if there is fluorescent lighting nearby.
• Check that the remote is set to control the system
(DVD), your VCR (VCR) or your TV (AUX/TV); see
page 8.
12 3
CHAPTER 1 - SETUP 1
Page 12
System Features
The DVS3100/3000 is an
all-in-one system that
includes a DVD player,
built-in Surround Sound
decoders and a 5-channel
amplifier.
Digital Versatile Disc Player
Play DVD, Video CD & Audio CD Discs
Video System
• MPEG2 decoding technology
• View both standard (4:3) and widescreen (16:9) movies
• S-Video output for superior video quality when playing
DVDs
• Two Composite Video outputs
• Component Video output for videophile performance
when playing DVDs (DVS3100 only)
Slow Motion - View your favorite scenes in variable speed
slow motion.
Programmed Play - Program DVD titles and chapters (or
CD tracks) to play in any order you wish, including a
random play option for CDs.
Rating Limit - Set a rating level appropriate for your
family, e.g. to prevent children from watching movies with
objectionable content.
On-Screen Menu Functions - Select default languages for
the menu system, disc playback and subtitles. Set up your
speakers with easy to use graphical displays. Quickly
access your favorite settings for display and decoder
options with the remote control. Adjust audio settings,
system status and screen angles while enjoying movies.
Repeat/Repeat A-B - Repeat a song or movie simply by
pressing the Repeat button, or mark your favorite scene for
loop (A-B) playback.
Built-in Surround Sound Decoders
Excellent Sound Quality
Dolby Labs
• The Dolby Digital system provides crystalclear sound reproduction of 5.1 channel
soundtracks. Dolby Digital’s six discrete
channels enable more sharply delineated spatial effects.
With full range Center plus Front and Rear (Left and
Right) surround channels, Dolby Digital results in
precise localization of sounds and a more convincing,
realistic ambiance. The Dolby Digital Low Frequency
Effects “.1” channel makes it possible to reproduce low
bass effects with stunning impact.
• The Dolby Surround Pro Logic system provides lifelike
playback of Dolby Surround-encoded programs utilizing
four encoded sound channels: Center, Front (Left and
Right) and Rear. You can enjoy Dolby Surround Sound
2 DVS USER’S GUIDE
Page 13

on your home theater system from videotapes, CDs and
many TV/Cable programs. With the Dolby Surround Pro
Logic system you can even enhance the sound of nonencoded stereo and mono programs.
Matrix Surround Sound
The Matrix Surround Sound system enhances the sound of
non-encoded stereo and mono programs. With the matrix
system you can enjoy surround sound from all connected
speakers while listening to mono or stereo sources.
•
Natural
a small recital theater.
•
Hall
ance to simulate a large concert hall.
•
Arena
sports arena.
Digital Theater Sound (DVS3100 only)
The DVS3100 model includes DTS Digital
Surround decoding. Digital Theater Systems
is recognized around the world for providing the finest
surround sound digital audio tracks ever developed for
motion pictures. The Digital Theater Systems 5.1 surround-sound system provides six channels of master
quality, 20-bit audio. The DTS master-quality mode for
DVDs and CDs processes the audio data using a unique
state-of-the-art system resulting in audibly superior
performance when compared to other systems.
- Uses natural acoustical properties to simulate
- Creates a wide sound stage with special ambi-
- Produces an open air environment to simulate a
Five Channel Amplifier
Center of your Home Theater System
• Switch easily between the DVD and two other Audio/
Video inputs:
VCR Input
Pro Logic system
AUX Input
Pro Logic System or other mono/stereo source to the
Matrix Surround Sound System.
• Dual Stereo Audio outputs (left/right) for connecting a
TV and other equipment
• Subwoofer output for connecting a self-powered
subwoofer (not included)
• Multi-Brand remote to control the DVS3000/3100 and
most popular VCRs and TVs
• Headphone jack with volume control for private
listening
Hi-Power Amplifier
• 200 watt (5 channels by 40 watts) Class AB amplifier
(DVS3000)
• 375 watt (5 channels by 75 watts) Class T Combinant
Digital amplifier (DVS3100)
— for connecting a Hi-Fi VCR to the Dolby
— for connecting a Stereo TV to the Dolby
CHAPTER 1 - SETUP 3
Page 14

Disc Type & Characteristics
DIGITAL
SOUND
STEREO
• Playback Region Number • NTSC broadcast
system in U.S.A,
Canada, Korea,
Japan, etc.
• Dolby Digital
disc
• Digital Audio
disc
• Stereo disc • DTS disc
*DO NOT play CD-ROM, CD-I, CD-R and DVD-ROM in this player! (CDGs play audio only, not graphics.)
5 inches
3
1
/2
inches
Single-sided
240 min.
Double-sided
480 min.
Single-sided
80 min.
Double-sided
160 min.
Audio
+
Video
Audio
+
Video
Audio
• An LP is recorded as an analog signal with more distortion. CD is
recorded as a Digital Signal with
better audio quality, less distortion
and less deterioration of audio quality over time.
• Video with CD sound, VHS quality
& MPEG1 compression technology.
• Excellent sound and video due to
Dolby Digital and MPEG2 system.
• Various screen and audio functions
can be easily selected through the
on-screen menu.
DVD-VIDEO
VIDEO-CD
AUDIO-CD
5 inches
3
1/2
inches
74 min.
20 min.
5 inches
3
1/2
inches
74 min.
20 min.
Logos
Disc Types
Playback
Types
Disc Size
Max.
Playing
Time
Characteristics
NTSC
The DVS3100/3000 is capable of
playing the following types of discs,
having the corresponding logos.
Playback Region Number
Both the DVD player and the discs are coded by
region. These regional codes must match in
order for the disc to play. If the codes do not
match, the disc will not play. This player is
designed to playback Region 1 discs (U.S.,
Canada, Puerto Rico).
4 DVS USER’S GUIDE
Page 15
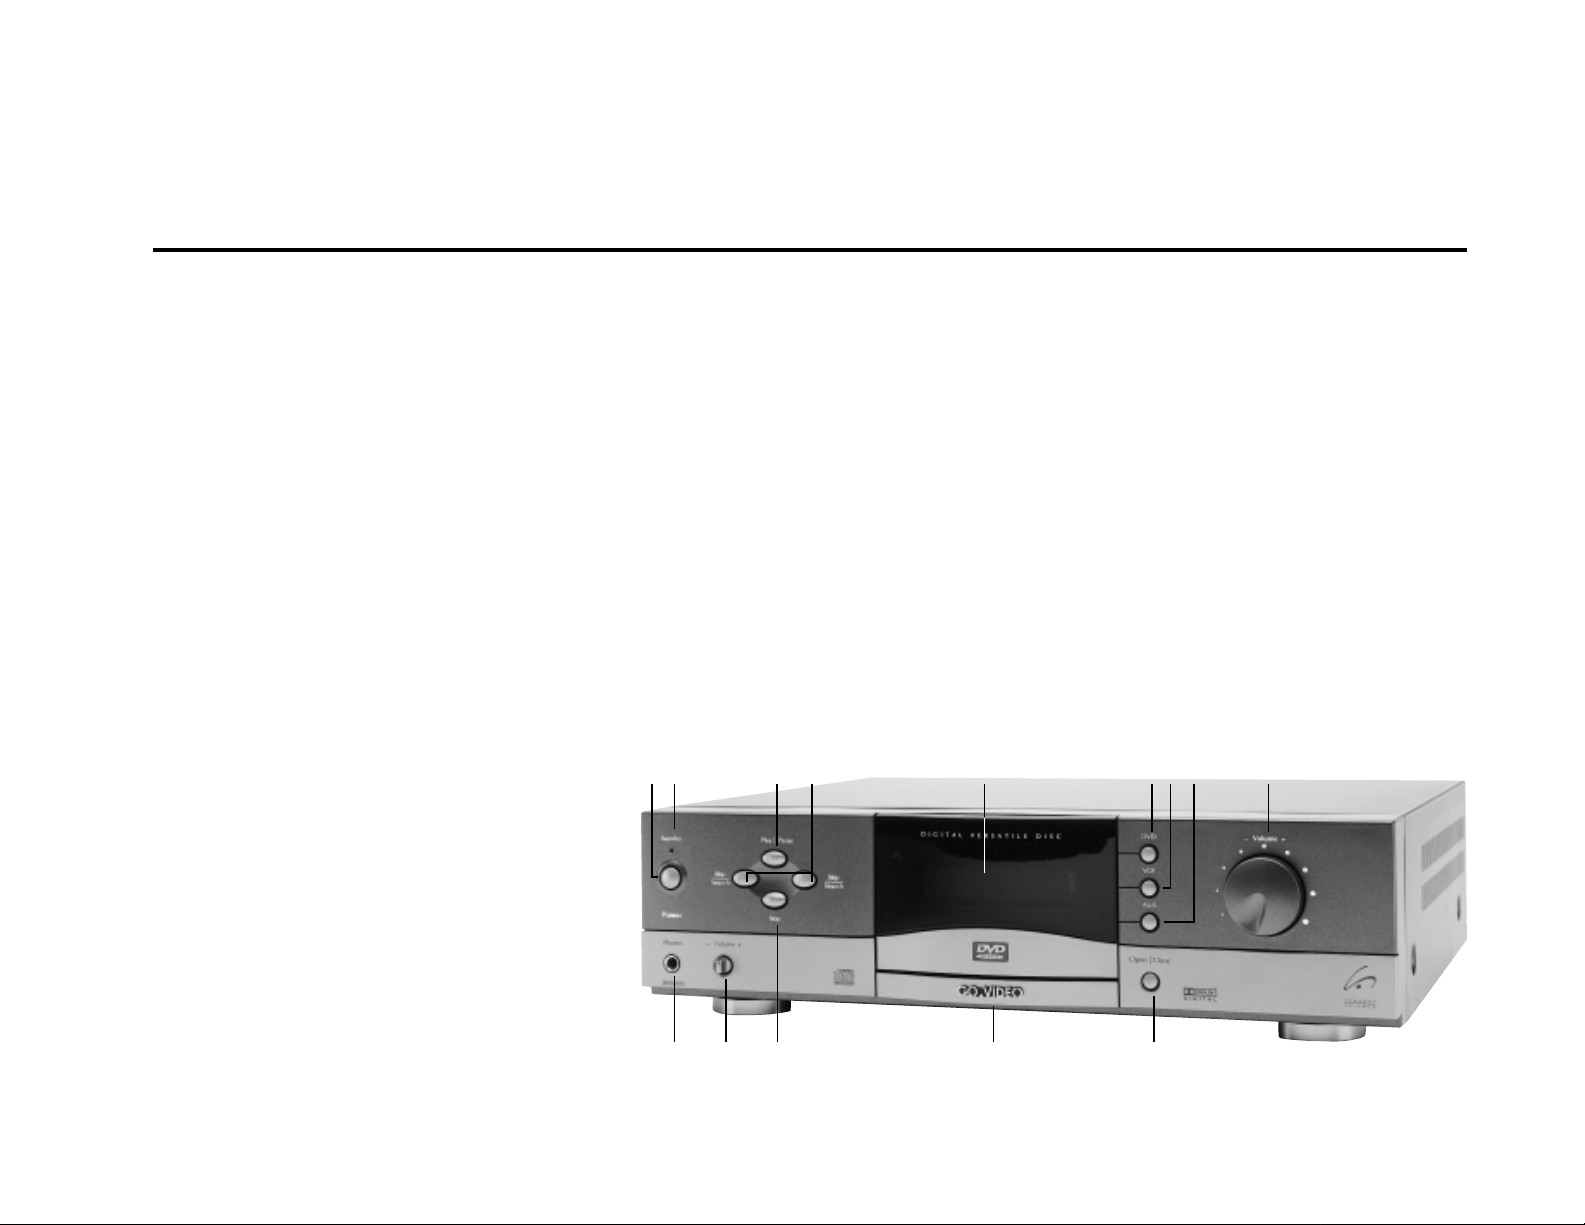
Front Panel Controls
Power On/Off
1
•
Button is IN
(normal operating mode; first time
button is pressed, the system automatically turns on).
•
Button is OUT
system; use for extended off periods
(vacation) or during adverse weather
conditions (lightning). CAUTION: Be
sure unit is in Standby mode (LED lit)
before depressing to prevent loud pop
and possible speaker damage.
Standby Lamp - Functions via the remote
2
control POWER key: LIT - System is in
Standby Mode; NOT LIT - System is on
and operational.
Play/Pause - Begin or pause disc play.
3
Use to power on the system from
Standby mode.
Skip/Search - Press once to skip or
4
press and hold to search a video
chapter or music track. Works in
forward or reverse.
Display - Operational information is
5
displayed here; see page 6.
DVD - Press to view and listen to a
6
DVD, VCD or CD in the built-in disc
player.
- A/C power to system
- No A/C power to
VCR - Press to view and listen to a VCR
7
connected to the rear audio/video
inputs marked VCR IN.
AUX (TV) - Press to view and listen to a
8
TV or other equipment connected to
the rear audio/video inputs marked
AUX IN.
Volume - Turn clockwise to increase
9
volume of attached speakers; turn
counterclockwise to decrease volume.
Note: The volume knob functions as an
“infinite” knob, i.e. there is no set
position for minimum volume or
maximum volume. Typically, two full
revolutions of the volume knob will
move between minimum and maximum volume or vice versa.
Open/Close - Press to open and
10
11
12
13
14
close the disc tray. Use to power
on the system from Standby
mode.
Disc Tray - Press OPEN/CLOSE to
open and close the disc tray to
insert or remove a DVD, VCD or
CD.
Stop - Stops disc play.
Headphone Volume - Use to adjust
headphone volume level.
Headphone Jack - Attach head-
phones here for private listening.
12 3 4 5 67108
9
121314
11
CHAPTER 1 - SETUP 5
Page 16
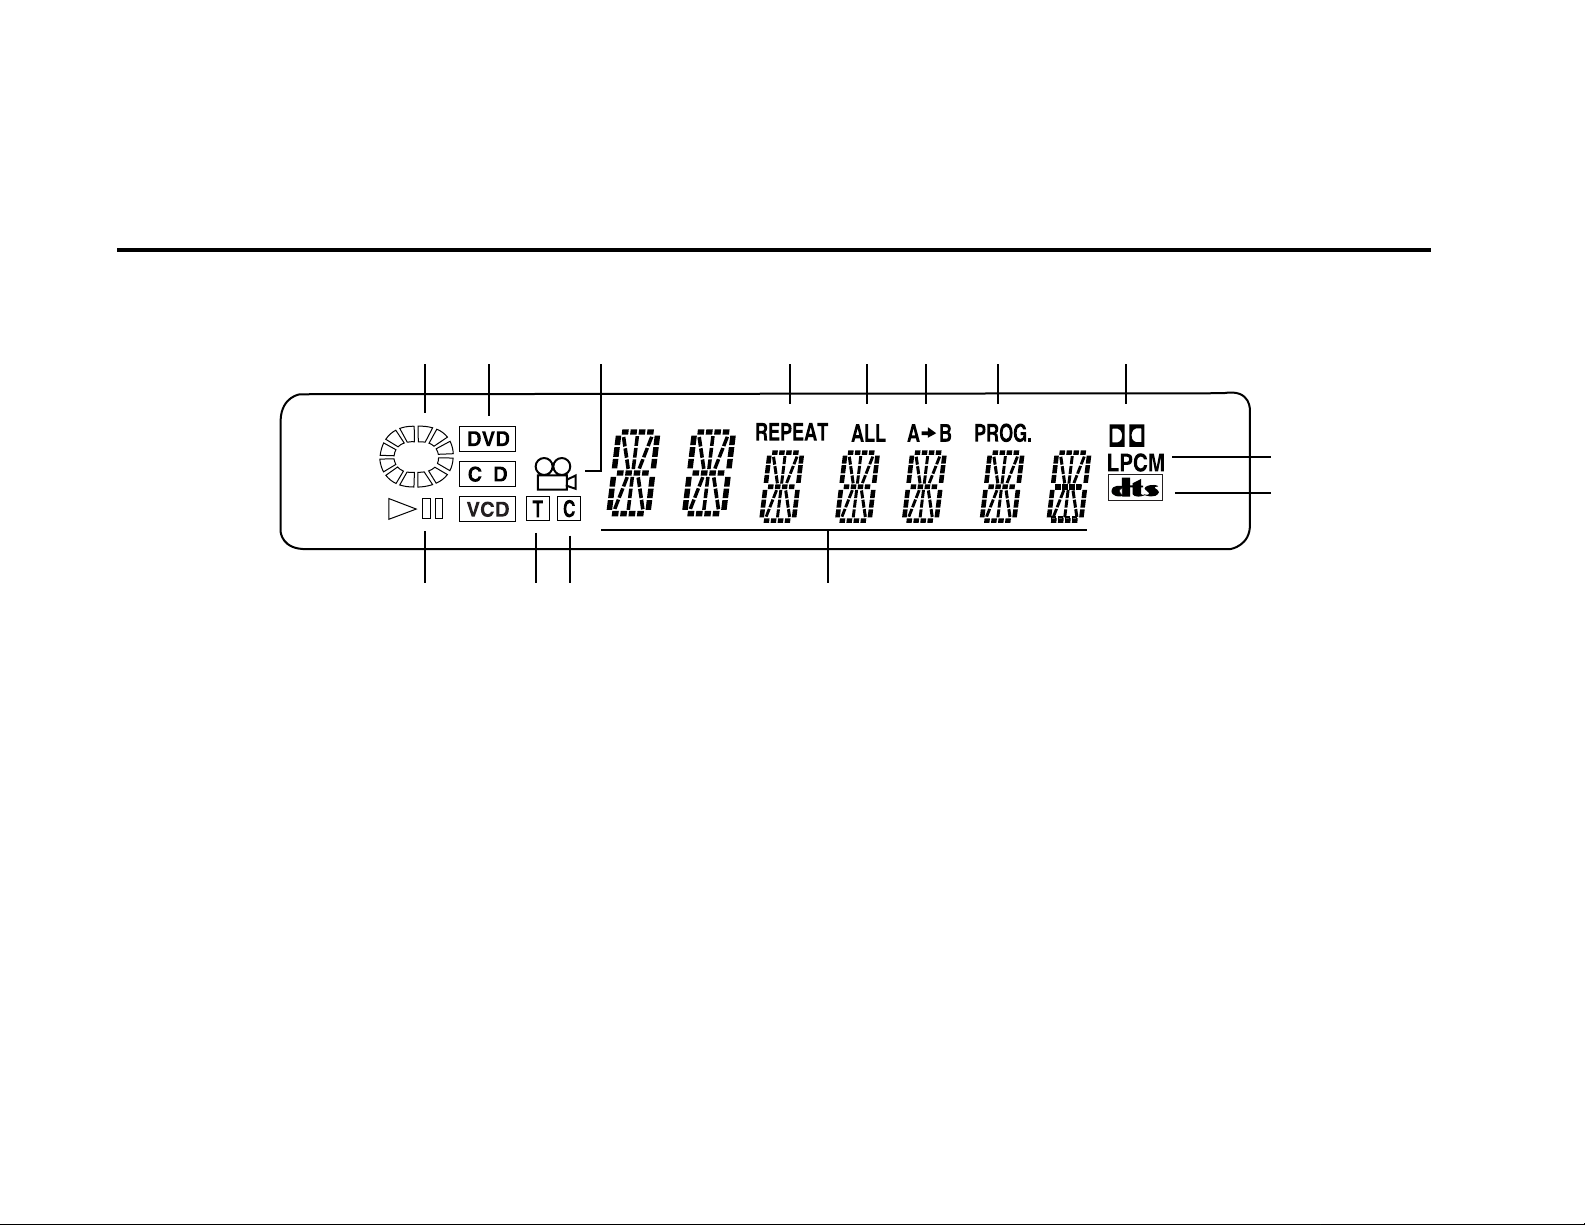
Front Panel Display
12 3 4567 8
14 13 12 11
9
10
6 DVS USER’S GUIDE
1 Disc Operation Rotary Indicator
2 Disc Type Indicator (DVD, CD, VCD)
3 Angle Indicator
4 Repeat Indicator
5 All Repeat Indicator
6 A-B Repeat Indicator
7 Program Play Indicator
8 Dolby Digital Indicator
9 Linear PCM Indicator
10 DTS Indicator (DVS3100 only)
11 Chapter, Title, Track & Message Indicator
12 Chapter Indicator
13 Track Indicator
14 Operation Indicator
Page 17
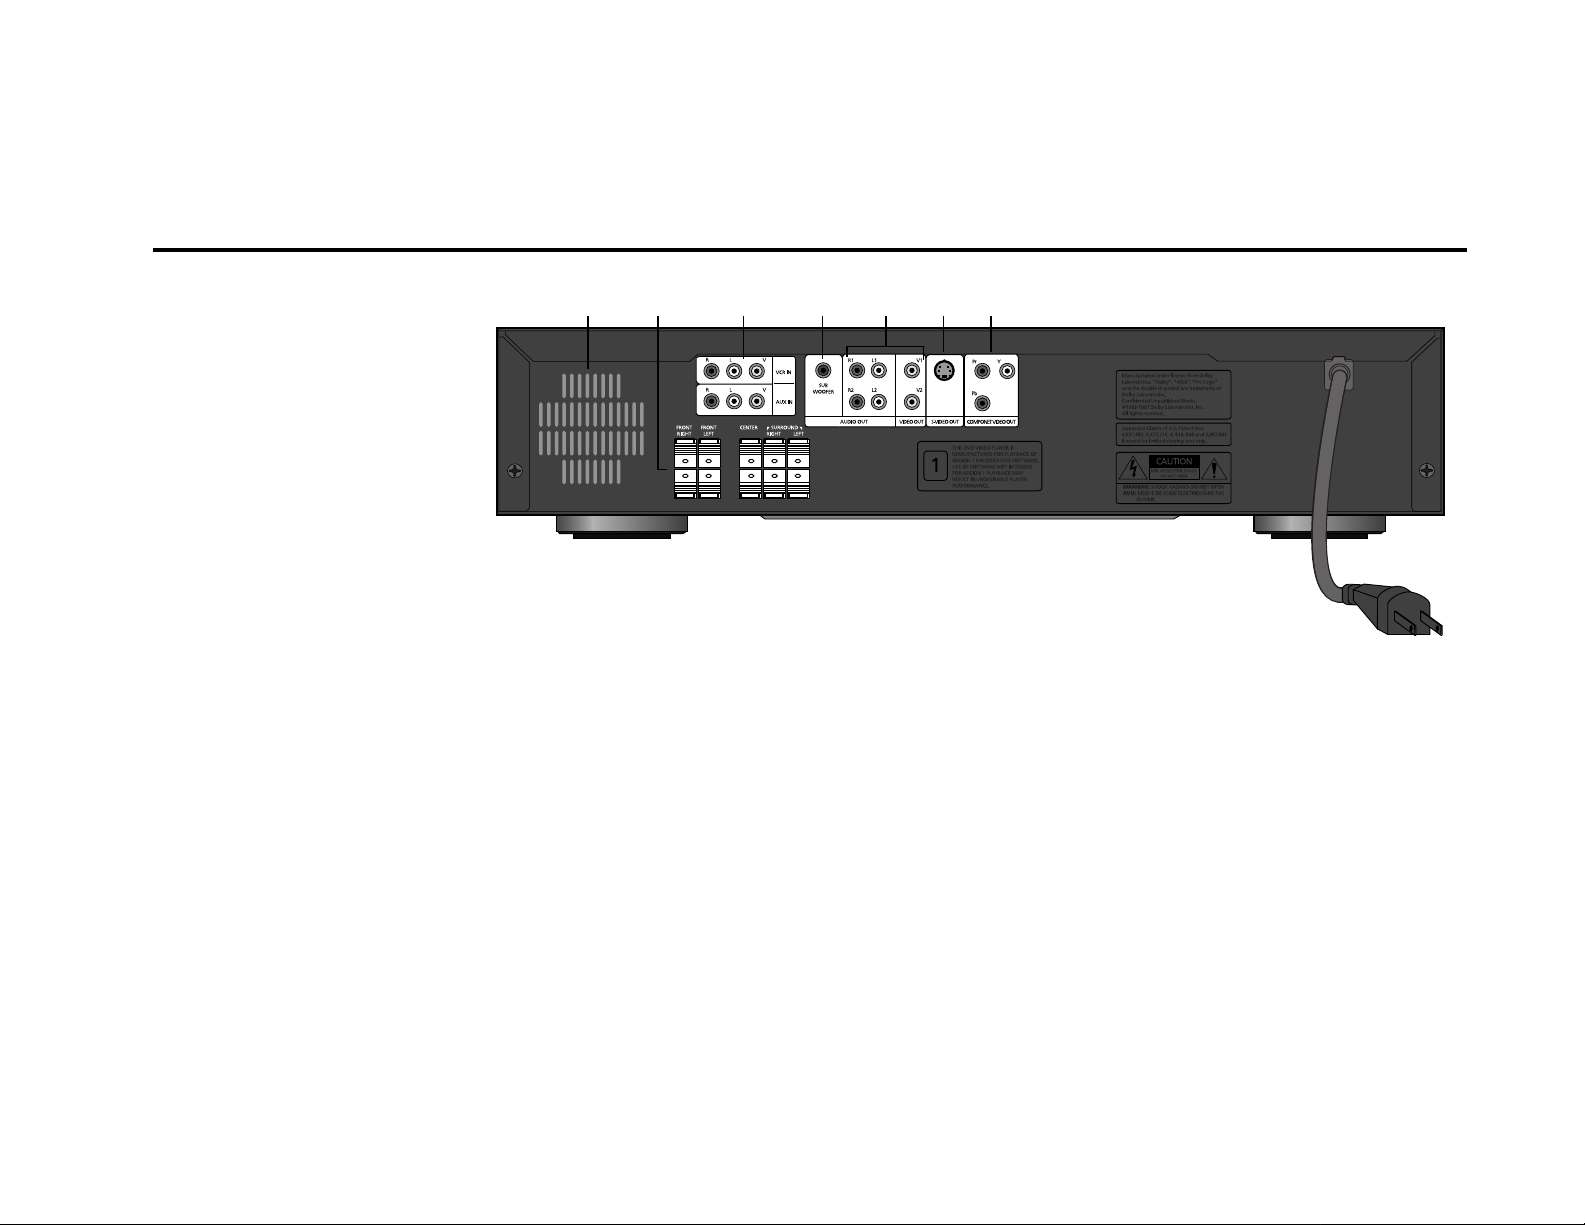
Rear Panel Overview
Cooling Fan
1
The cooling fan will operate automatically as needed to ensure the system
does not overheat. Typically, the fan
may operate during extended operation
at high volume levels. When installing
the system, be sure the fan area is
unobstructed.
Speaker Connectors
2
Connect the “Front Right” and “Front
Left” outputs to your right and left
speakers. Connect the “Center” outputs to
your center speaker. Connect the “Surround Right”
and “Surround Left” outputs to your right and left
surround speakers.
NOTES: Make sure the unit is off when connecting
speakers to prevent speaker damage. Observe
the positive (+, red) and negative (–, black)
polarity and carefully check that the speaker
wires are not shorted together at the system or
speaker connectors.
in the “Audio Options/Speaker Setup” menu to
match your speaker configuration (see page 35).
Audio/Video Input Jacks
VCR IN
3
- Connect to the right (red) and left (white)
audio output and Composite (yellow) video
output jacks of your VCR.
AUX IN
- Connect to the right (red) and left (white)
audio output jacks of your auxiliary equipment
(tuner, television, etc.). If your television has a
video output jack, you may wish to connect it to
the Composite (yellow) video input jack to
simplify switching between sources.
Be sure to adjust the settings
12 3 4567
Subwoofer Output Jack
4
Connect to the audio input jack of your powered
subwoofer.
in the “Audio Options/Speaker Setup” menu to
match your subwoofer (see page 35).
Audio/Video Output Jacks
5
Connect one set of the audio/video output jacks to
the right (red) and left (white) audio input and
Composite (yellow) video input jacks of your
television. Optionally, you may connect the
second set of audio/video output jacks to the right
(red) and left (white) audio input and Composite
(yellow) video input jacks of your audio/video
receiver or VCR.
NOTE: You must make this connection to view the
DVD, VCR and AUX inputs on your television
(cable included).
S-Video Output Jack
6
If your television has an S-Video input, use this
connection for a higher quality picture when
Be sure to adjust the subwoofer settings
viewing the DVD player.
Connect to the S-Video input jack
on your television.
NOTE: If you use the S-Video connection,
be sure to connect one set of the audio output
jacks to the complementary right (red) and left
(white) audio input jacks of your television.
Component Video Output Jacks (DVS3100)
7
If you have a television with Component video
inputs, use this connection for the highest quality
picture when viewing the DVD player. Connect
the Pr, Pb and Y video outputs to the corresponding inputs on your television.
NOTE: If you plan to use the Component video
connection, be sure to connect one set of the
audio output jacks to the complementary right
(red) and left (white) audio input jacks of your
television.
CHAPTER 1 - SETUP 7
Page 18
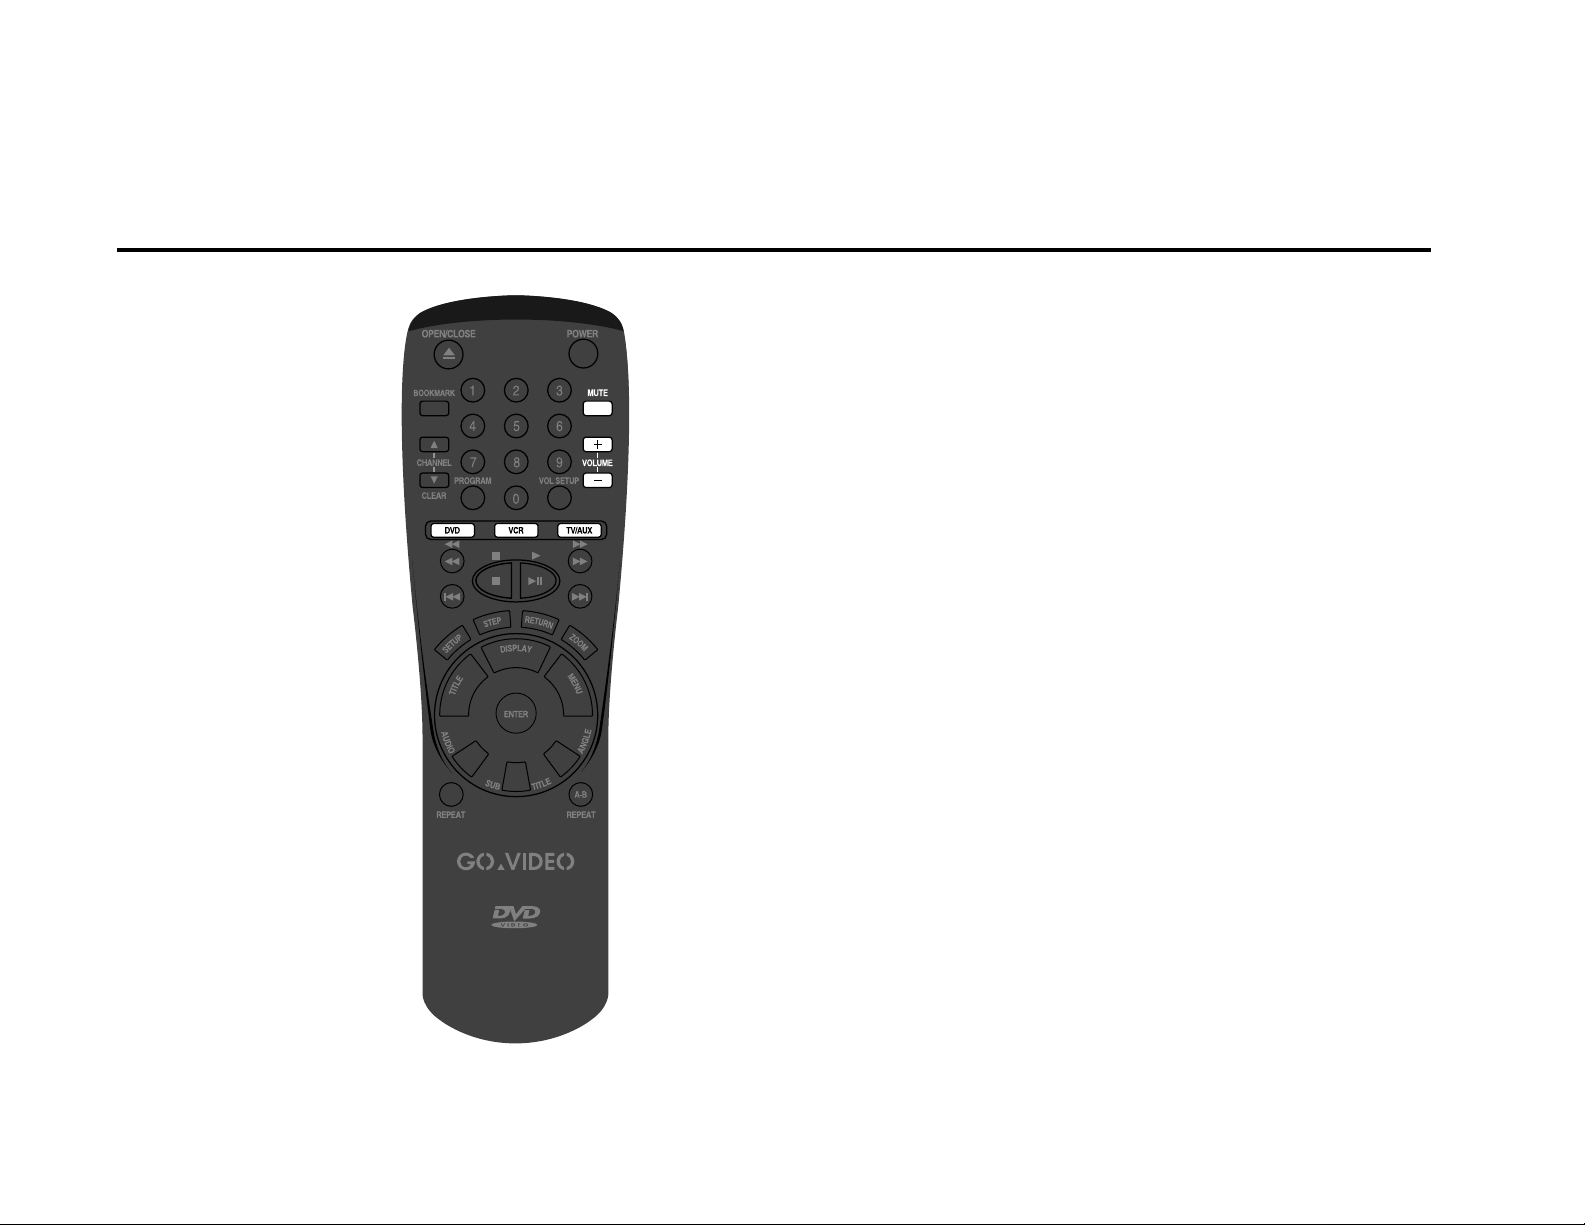
Tour of the Remote Control
The DVS3100/3000 multibrand remote control allows
you to operate the DVD
player, as well as many
popular brands of VCR and
television. This tour demonstrates the buttons in four sets:
System Control, DVD, TV,
and VCR.
System Control Buttons
System Control buttons are used to set the remote control to operate the DVD, VCR or
TV/AUX. The Mute and Volume buttons are mode independent, i.e. they adjust the
system audio regardless of which mode you are in.
DVD - Selects the built-in DVD player as
the TV View and configures the remote
to control DVD functions only (see
DVD Function Buttons
VCR - Selects the rear panel VCR audio/
video inputs as the TV View, and
configures the remote to control VCR
functions only (see
Buttons,
TV/AUX - Selects the rear panel AUX
audio/video inputs as the TV View, and
configures the remote to control TV
functions only (see
Buttons
page 10).
, page 10).
, page 9).
VCR Function
TV Function
Mute - Toggles the system audio output
on and off.
Volume +/–
• Controls the volume of the speakers
attached to the system.
• When DVD is selected as the TV View,
a graphical volume indicator (0-50)
will appear on the
• When VCR or TV/AUX is selected as
the TV View, a graphical volume
indicator (0-50) will appear on the
Front Panel Display
TV display
.
.
8 DVS USER’S GUIDE
Page 19

DVD Function Buttons
A-B Repeat - Use to mark the
beginning (A) and end (B) of a
segment you wish to repeat in a
continuous loop; see page 24.
Angle - Use to watch movies from a
variety of camera angles (not
available on all DVDs); see page
30.
Audio - Use to access various audio
functions on a video disc. Press to
change the Surround Sound mode
when viewing the VCR, AUX/TV or
listening to a CD; see page 28.
Bookmark - Use to insert up to three
“bookmarks,” or placeholders, on a
disc for convenient playback; see
page 31.
Clear - Use to clear on-screen
displays and bookmarks, and to
resume normal playback during
program playback; see pages 22,
25, 26, and 31.
Display - Displays the current title,
chapter or track, time elapsed,
audio and subtitle information; see
page 22.
Enter - Functions as a four-direction
(UP/DOWN and LEFT/RIGHT)
toggle switch to control on-screen
items; press to enter.
Menu - Displays the Disc menu for
the currently loaded disc.
Number Keys - Use to make selec-
tions in the Setup menu.
Open/Close - Press to open or close
the disc tray.
Play/Pause ( ) - Press to playback a
disc. Press to Pause during playback.
Power - Press to turn on the system
from Standby mode. Press to enter
Standby mode when the system is
on.
Program - Allows you to set a custom
playback order for disc titles,
chapters or tracks (including
random playback of CD tracks);
see pages 25-26.
Repeat - Allows you to repeat a title,
chapter or track during playback;
see page 23.
Return - Use to return to the previous
menu while in Setup mode.
Search ( ) - Use to search
forward/backward through a disc at
variable speeds; see page 20.
Setup - Displays the DVS3100/3000
System Setup menu.
Skip ( ) - Use to skip to the
next or previous title, chapter, or
track.
Step - Press to advance playback one
frame at a time.
Stop ( )- Press to Stop a disc in play.
Subtitle - Use to set subtitles on a
DVD or VCD; see page 29.
Title - Press to access a specific
music or video segment directly;
see page 27.
Vol. Setup - Displays the Speaker
Setup menu when playing a DVD.
Zoom - Use to Zoom in during DVD
and VCD playback; see page 32.
NOTE:
If the “Ø” icon appears in the
upper right corner of your television screen when you press a key,
the desired function is not available. Various buttons may not
function depending on the specific
features available on a disc and the
mode of the system; all features are
not available on all discs.
CHAPTER 1 - SETUP 9
Page 20

VCR Function Buttons
Channel +/– - Use to scan the
channel list on a compatible VCR.
Fast Forward ( ) - Press to fast
forward a tape in a compatible
VCR.
Number Keys - Use to select a
channel on a compatible VCR.
Play - Press to begin playback of a
tape in a compatible VCR.
Power - Press to turn a compatible
VCR on and off.
Rewind ( ) - Press to rewind a tape
in a compatible VCR.
Stop ( ) - Press to stop a tape in
playback on a compatible VCR.
TV/AUX Function Buttons
Channel +/– - Use to scan the channel
list on a compatible TV.
Number Keys - Use to select a channel
on a compatible TV.
Power - Press to turn a compatible TV
on and off.
10 DVS USER’S GUIDE
Page 21

Connecting to a Stereo TV
TELEVISION
DVS3100/3000
VIDEO INAUDIO IN S-VIDEO IN COMPONENT VIDEO IN
123 4
2 - Connections
Choose one of three methods—Composite, S-Video, or
Component—to connect the
DVS to your stereo television.
All 3 methods use the same
audio connections. Always
turn off the DVS3100/3000
system, TV, and other components before you connect or
disconnect any cables.
Note: On TV’s with S-Video
and/or Component Video
inputs, use two of the TV
inputs as follows:
1
2
3
4
Audio Connection
Connect the audio/video cables from Audio Out
(R1/L1 or R2/L2) on the back of the DVS3100/3000
to the Audio In jacks on your stereo television.
Composite Video
Composite is the best connection for DVD, VCR
and TV/AUX viewing. Connect the supplied audio/
video cable from Video Out (V1 or V2) on the back
of the unit to the Video In jack on your stereo TV.
S-Video
S-Video provides a better picture than Composite
when viewing DVD only. Connect the supplied SVideo cable from S-Video Out on the back of the
unit to the S-Video In jack on your stereo television.
Note: To view the VCR or AUX Input, you must use
the Alternative TV Connection (see table at left).
Component Video (DVS3100 only)
Component provides the best picture when viewing
DVD only. Connect three audio/video cables from
the Component Video Out jacks on the back of the
DVS to the Component Video In jacks on your
stereo television. Note: To view the VCR or TV/Aux
Input, you must use the Alternative TV Connection
(see table at left).
CHAPTER 2 - CONNECTIONS 11
Page 22

Connection to an Audio System
LF
LR
RF
RR
CENTER
SUB
DVS3100/3000
LF
RF
CENTER
DVS3100/3000
You can connect the DVS3100/
3000 to a variety of home
audio systems. Choose the
method that matches your
speaker configuration:
1 2-Channel (Stereo) Sound
2 3-Channel Sound
3 5-Channel Sound
4 5.1 Channel Sound
5 Dolby Pro Logic Receiver or
Stereo Amplifier
2-Channel (Stereo) Sound
1
Connect the DVS to two front speakers (RF, LF).
RF
DVS3100/3000
LF
5-Channel Sound
3
Connect the DVS to five speakers (RF, C, LF, RR, LR).
RF
CENTER
LF
3-Channel Sound
2
Connect the DVS to three front speakers (RF, C, LF).
5.1-Channel Sound
4
Connect the DVS to five speakers (RF, C, LF, RR,
LR) plus a powered subwoofer.
12 DVS USER’S GUIDE
DVS3100/3000
RR
LR
Page 23

DVS3100/3000
AUDIO IN
DOLBY PROLOGIC RECEIVER
or
2-CHANNEL STEREO AMPLIFIER
LF
LR
RF
RR
CENTER
Dolby Pro Logic Receiver or Stereo Amplifier
5
Connect audio/video cables from the Audio Out
jacks (R1/L1 or R2/L2) on the back of the DVS3100/
3000 to the Audio In jacks on your Dolby Pro Logic
Receiver or 2-channel Stereo Amplifier.
CHAPTER 2 - CONNECTIONS 13
Page 24

Connecting a VCR
Follow these steps to connect
a VCR to your DVS3100/
3000.
Connect Audio
1
Connect audio/video cables from the Audio Out
jack on the back of your VCR to the VCR IN jack (R,
L) on the back of the DVS3100/3000.
Connect Video
2
Connect an audio/video cable from the Video Out
jack on the back of your VCR to the VCR IN jack (V)
on the back of the DVS3100/3000.
Select VCR
3
Press the VCR button on the DVS front panel or
remote control.
VCR
VIDEO OUTAUDIO OUT
12
DVS3100/3000
14 DVS USER’S GUIDE
Page 25

Connecting a TV/Aux Component
Follow these steps to connect
a television or other auxiliary
component, such as a stereo,
to your DVS3100/3000.
Connect Audio
1
Connect audio/video cables from the Audio Out
jack on the back of your television/auxiliary component to the AUX IN jack (R, L) on the back of the
DVS3100/3000.
Connect Video
2
Connect an audio/video cable from the Video Out
jack on the back of your television/auxiliary component to the AUX IN jack (V) on the back of the
DVS3100/3000.
CAUTION: When connecting a TV, be sure the
audio/video output of the TV is the TV’s tuner (i.e.,
Tuner
Out, NOT
feedback loop from occurring, which may damage
your speakers or other equipment. Check your TV
owner’s guide to be sure your TV is equipped with a
Tuner Output before making this connection.
Select TV/Aux
3
Press the AUX button on the DVS front panel or the
TV/AUX button on the remote control.
TV
Out). This will prevent a
TV/Aux
VIDEO OUTAUDIO OUT
12
DVS3100/3000
CHAPTER 2 - CONNECTIONS 15
Page 26

Connecting Headphones
3
Headphones (not included)
are easy to connect and enjoy
with your DVS3100/3000.
Before connecting
1
Set headphone volume at minimum.
Connect headphones
2
Use a standard stereo plug to the headphone jack (stereo
1/4” phone plug).
Adjust volume
3
Adjust to a suitable volume.
2
1,
16 DVS USER’S GUIDE
NOTE:
System speakers will not operate when headphones are connected.
Page 27

Operating the System
3 - Basic Functions
Before you begin, check that
you have properly completed
the Speaker Setup (see page
35) and connected the
DVS3100/3000 to your TV
and other equipment following one of the methods
described in Chapter 2. Now
you are ready to plug in the
unit, turn it on and set the onscreen language.
Plug in Unit
1
If you have not yet plugged in the DVS, connect the AC cord
to a standard 110V outlet observing the polarity of the plug.
If the outlet does not accept the polarized plug, contact a
qualified electrician to replace the obsolete outlet; do not
override or disable the polarized plug safety feature.
Turn on TV and Accessories
2
Power on the television and select the A/V input to which
you connected the DVS. You may also turn on other equipment connected to the system, such as a VCR, Audio System
or other A/V equipment.
Turn on DVS
3
Press the POWER button on the DVS. The system should
turn on. Note: If the Standby indicator is lit, press the
POWER button on the remote control to turn on the system.
Select Menu Language
4
If this is the first time you are turning on the system, “Select
Menu Language” will appear on the screen. To select a
language, press its corresponding number button.
PRESS 1 FOR ENGLISH
PULSAR 2 PARA ESPANOL
PRESSEZ 3 POUR FRANCAIS
DRUCKEN SIE 4 FUR DEUTSCH
PREMERE 5 PER ITALIANO
TRYCK 6 NEDERLANDS
RETURN
The language screen will only appear the
first time you plug in and turn on the system.
To set the DVS menu language at any other
time, please see page 41.
PRESS 1-6
CHAPTER 3 - BASIC FUNCTIONS 17
Page 28

Playing a Disc
Playing your DVDs is a
simple 3 step process.
Open the Disc Tray
1
Press the OPEN/CLOSE button. Note: If the system is in
Standby mode, the Standby indicator light will turn off and
the tray will open.
Insert a Disc
2
Place a DVD, VCD, or CD gently into the tray with the
disc’s label facing up.
Play the Disc
3
Press the PLAY/PAUSE button or OPEN/CLOSE button to
close the disc tray. Playback will begin.
1
3
18 DVS USER’S GUIDE
Page 29

Special Playback Options
While a disc is playing, you
can stop, pause/still, view
frame by frame, slow motion
and resume playback. For
search & skip features, see
pages 20 and 21.
Stop
1
Press the STOP button during playback.
• If the player is left in Stop mode for more than
one minute, a screensaver will appear and the
TV screen will fade in and fade out repeatedly.
Press the PLAY button to resume normal play.
• If the player is left in Stop mode for more than
30 minutes, the power will turn off automatically (DVD mode only).
Pause/Still
2
Press the PLAY/PAUSE or STEP button on the
remote during playback.
• The picture will freeze and the audio will mute.
• To resume playback, press the PLAY/PAUSE
button.
• If the player is left in Pause mode for 5 minutes,
it will stop automatically.
Frame Advance
3
(DVD and VCD only)
Press the STEP button on the remote during
playback.
• Each time the button is pressed, the next frame
will appear.
• Audio is muted during STEP mode.
• Press PLAY/PAUSE to resume normal playback.
Note: Frame Advance operates only in the
forward direction.
Slow Motion
4
(DVD and VCD only)
In Pause or Step mode, press the SEARCH buttons
on the remote or press and hold the SKIP/SEARCH
buttons on the front panel.
• You can select slow motion playback at 1/2,
1/4 or 1/8 normal speed.
• Audio is muted during slow motion playback.
• Press PLAY/PAUSE to resume normal playback.
Note: Reverse slow motion playback is not
available when playing a VCD.
Resume
5
When you stop a disc in play, the DVS remembers where it stopped. When you press PLAY
again, it will pick up where you left off, except
when:
• The disc is removed.
• The STOP button is pressed twice.
• The player is unplugged.
CHAPTER 3 - BASIC FUNCTIONS 19
Page 30

Search Features
During playback, you can
search quickly through a
chapter at variable speeds.
Search a Chapter or Track
1
While a disc is in Play mode, press the SEARCH buttons on
the remote or press and hold the SKIP/SEARCH buttons on
the front panel.
Variable Speed Search (DVD)
2
Press the SEARCH buttons on the remote or press and hold
the SKIP/SEARCH buttons on the front panel again to search
at progressively faster speeds (2X-8X-16X-32X-normal
speed).
Variable Speed Search (VCD or CD)
3
Press the SEARCH buttons on the remote or press and hold
the SKIP/SEARCH buttons on the front panel again to search
at progressively faster speeds (4X-8X-normal speed).
Resume Normal Playback
4
To return to normal speed playback, press the PLAY/ PAUSE
button.
1,2,3
4
20 DVS USER’S GUIDE
NOTE:
While in Search mode on DVD or high-speed playback on VCD, the audio is muted.
Page 31

Skip Features
During playback, you can use
the Skip function to jump
quickly to the beginning of
any chapter or track.
Skip a Track
1
While a disc is in Play mode, press the SKIP buttons on the remote
or press the SKIP/SEARCH buttons on the front panel.
DVD Skip Notes
2
• Press forward SKIP to jump to the next chapter.
• Press back SKIP to jump to the beginning of the chapter.
• Press back SKIP again to jump to the beginning of the previous
chapter.
VCD Skip Notes
3
MENU OFF mode, VCD 1.1 or CD
• Press forward SKIP to jump to the next track.
• Press back SKIP to jump to the beginning of the track.
• Press back SKIP again to jump to the beginning of the previous
track.
• MENU MODE or Track View function
• Press forward SKIP to jump to the next MENU or the next Track
View display.
• Press back SKIP to jump to the previous MENU or the previous
Track View display.
1,2,3
NOTE:
If a track exceeds 15 minutes when playing a VCD or CD and you press forward SKIP, it moves forward 5
minutes. If you press back SKIP, it moves backward 5 minutes.
CHAPTER 3 - BASIC FUNCTIONS 21
Page 32

Display Feature
The Display button serves two
purposes:
1. Shows you the current
status of your DVD, VCD or
CD
2. Provides a shortcut to jump
to any title, chapter, track or
specific time counter position
on the disc. Press Display
twice to view audio and
subtitle information.
T: ▲ 01 ▼ C: ▲ 04 ▼ TIME 0:06:54
ENTER
WHEN PLAYING A DVD
Display Title, Chapter & Time
1
During playback, press the DISPLAY button on
the remote to display the current title number,
chapter number and elapsed time.
• To Change Titles - Use the LEFT/RIGHT button
to highlight the title number, then use the UP/
DOWN button or number buttons to select a
new title number. Press the ENTER button to
jump to the new title.
• To Change Chapters - Use the LEFT/RIGHT
button to highlight the chapter number, then
use the UP/DOWN button or number buttons
to select a new chapter number. Press the
ENTER button to jump to the new chapter.
• To Jump to a Specific Time - Use the LEFT/
RIGHT button to highlight the time counter,
then use the number buttons to enter the time
in hours, minutes and seconds. Press the ENTER
button to jump to the new counter position.
Display Audio & Subtitle Info
2
Press the DISPLAY button on the remote twice to
display the current audio and subtitle information.
• Press the DISPLAY button again to clear the onscreen display.
WHEN PLAYING A CD/VCD
Display Track Number & Time
1
During playback, press the DISPLAY button on
the remote to display the current track number
and elapsed time.
• To Change Tracks - Use the LEFT/RIGHT button
to highlight the track number, then use the UP/
DOWN button or number buttons to select a
new track number. Press the ENTER button to
jump to the new track.
• To Jump to a Specific Time - Use the LEFT/
RIGHT button to highlight the time counter,
then use the number buttons to enter the time
in hours, minutes and seconds. Press the ENTER
button to jump to the new counter position.
Note: The time entered must be within the
duration of the current track.
Display Elapsed Time
2
Press DISPLAY a second time to display the
elapsed time and remaining time.
• Press DISPLAY again to clear the on-screen
display.
NOTE:
• Display screens will automatically clear after a
few seconds. To clear the screen immediately,
press the CLEAR button.
22 DVS USER’S GUIDE
Page 33

Repeat Play
Repeat Play allows you to
repeat a title, chapter, track or
even an entire disc. DVD
repeats playback by chapter
or title, CD and VCD repeat
playback by track or disc.
REPEAT : CHAPTER
REPEAT : TITLE
REPEAT : TRACK
WHEN PLAYING A DVD WHEN PLAYING A CD/VCD
Show Repeat Play Status
1
Press the REPEAT button once to display the
current Repeat Play status.
Repeat Chapter
2
Press the REPEAT button twice to repeat the
currently playing chapter.
Repeat Title
3
Press the REPEAT button a third time to repeat the
currently playing title.
Turn off Repeat Play
4
Press the REPEAT button again to turn off the
Repeat Play feature.
Show Repeat Play Status
1
Press the REPEAT button once to display the
current Repeat Play status.
Repeat Track
2
Press the REPEAT button twice to repeat the
current track.
Repeat All Tracks
3
Press the REPEAT button a third time to repeat all
tracks.
Turn off Repeat Play
4
Press the REPEAT button again to turn off the
repeat feature.
NOTES:
• Depending on the disc, the Repeat function may not work.
• When in VCD 2.0 mode (MENU ON mode), the repeat function is not available.
CHAPTER 3 - BASIC FUNCTIONS 23
Page 34

A-B Repeat
The A-B Repeat function
allows you to repeat any
segment of a movie over and
over again. Simply mark the
beginning (A) and the end (B)
of the segment you want to
review.
REPEAT : A - B
Mark the Starting Point
1
In Play mode, press the A-B REPEAT button at the beginning
of the segment you want to review (Point A).
Mark the Ending Point
2
Press the A-B REPEAT button again at the end of the segment
you want to review (Point B). The segment will begin
repeating in a continuous loop.
Clear the Repeat
3
Press the A-B REPEAT button again to stop repeating and
resume playback.
24 DVS USER’S GUIDE
NOTES:
• The A-B Repeat function will only work on a single title or track.
• If the title or track is completed before marking the end (Point B), the end of the title or track becomes Point
B automatically.
• Depending on the disc, the A-B REPEAT function may not work.
• When in VCD 2.0 mode (MENU ON mode), this function is not available.
Page 35

Program Playback DVD
DVD Program Playback lets
you set a specific order for
playback of titles or chapters
on a DVD.
TITLE CHAPTER
01 02 03 04
05 06 07 08
09 10 11 12
13 14 15
RETURN ENTER
CHAPTER
01 02 03 04
05 06 07 08
09 10 11 12
13 14 15
CLEAR LAST CHAPTER
CLEAR ALL CHAPTERS
PRESS PLAY TO START
RETURN ENTER
-- -- -- --
-- -- -- --
-- -- -- --
-- -- -- --
-- -- -- --
PROGRAM ORDER
03 02 01 --
-- -- -- --
-- -- -- --
-- -- -- --
-- -- -- --
Open Program Menu
1
In Stop mode, press the PROGRAM button. The
Program Menu will appear.
Select Chapter or Title
2
Use the LEFT/RIGHT button to select TITLE or
CHAPTER, then press ENTER.
Program Playback Order
3
Use the LEFT/RIGHT or UP/DOWN button to
highlight desired titles or chapters in the left
window, pressing ENTER after each. They will
appear in the right “PROGRAM ORDER” window.
Continue until all desired titles/chapters are in
order, pressing ENTER after each.
Play Revised Order
4
Press the PLAY/PAUSE button. The disc will play
back in programmed order. To resume normal
playback, press the CLEAR button on the remote
control.
NOTES:
• To clear an entry, use the UP/DOWN button to highlight CLEAR LAST CHAPTER or TITLE then press ENTER.
• To delete a program, use the UP/DOWN button to select CLEAR ALL CHAPTERS or TITLES then press
ENTER.
• All programmed chapters or titles are also deleted when the disc is removed or the DVS is turned off.
• Depending on the disc, the Program Playback function may not work.
CHAPTER 3 - BASIC FUNCTIONS 25
Page 36

Program Playback CD/VCD
CD/VCD Program Playback
lets you set a custom order or
random playback of tracks on
a single disc.
PROGRAM RANDOM
01 02 03 04
05 06 07 08
09
RETURN ENTER
TRACKS
01 02 03 04
05 06 07 08
09 10 11 12
13 14 15
CLEAR LAST TRACK
CLEAR ALL TRACKS
PRESS PLAY TO START
RETURN ENTER
-- -- -- --
-- -- -- --
-- -- -- --
-- -- -- --
-- -- -- --
PROGRAM ORDER
03 02 01 --
-- -- -- --
-- -- -- --
-- -- -- --
-- -- -- --
Open Program Menu
1
In Stop mode, press the PROGRAM button. The
Program Menu will appear.
Select Program or Random
2
Use the LEFT/RIGHT button to select PROGRAM
or RANDOM, then press ENTER.
• If you select RANDOM, the disc will immediately begin playback in random order.
Program Track Order
3
Use the LEFT/RIGHT or UP/DOWN button to
highlight desired tracks in the TRACKS window,
pressing ENTER after each. They will appear in
the PROGRAM ORDER window. Continue until
all desired tracks are in order, pressing ENTER
after each.
Play Revised Order
4
Press the PLAY/PAUSE button. The disc will play
back in programmed order. To resume normal
playback, press the CLEAR button on the remote
control.
26 DVS USER’S GUIDE
NOTES:
• To clear an entry, use the UP/DOWN button to highlight CLEAR LAST TRACK then press ENTER.
• To delete a program, use the UP/DOWN button to select CLEAR ALL TRACKS then press ENTER.
• All programmed tracks are also deleted when the disc is removed or the DVS is turned off.
• Depending on the disc, the Program Playback function may not work.
Page 37

Disc V iew
4 - Advanced Functions
Disc View is a preview
feature activated by pressing
the TITLE button:
• DVD - Displays the DVD’s
Title Menu if the disc has
more than one title.
• CD - Plays the first ten
seconds of every track on
the CD in sequence.
• VCD - Previews the first
few frames of each track.
Also allows you to divide a
track into 9 equal segments
and see a preview of each
segment.
TRACK VIEW
1
4
7
INDEX VIEW
1
4
2
5
8
3
6
9
2
5
TRACK VIEW (VCD)
Displays the first few frames of each track and its
corresponding track number.
Open “Disc View”
1
Press the TITLE button in playback mode.
Select Track View
2
Press the UP/DOWN button to select TRACK
VIEW, then press ENTER.
Choose Desired View
3
Select the desired view by pressing the UP/
DOWN or LEFT/RIGHT buttons, then press
ENTER.
3
6
INDEX VIEW (VCD)
Divides the currently playing track into 9 equal
segments and displays the first few frames of each.
Open “Disc View”
1
Press the TITLE button in playback mode.
Select Index View
2
Press UP/DOWN button to select INDEX VIEW,
then press ENTER.
Choose Desired View
3
Select the desired view by pressing the UP/
DOWN or LEFT/RIGHT buttons, then press
ENTER.
7
8
9
NOTES:
• When in VCD 1.1 & 2.0 mode (MENU OFF mode), the Index View function is available.
• In Stop mode on VCD, press the TITLE button and the TRACK VIEW will be displayed directly.
CHAPTER 4 - ADVANCED FUNCTIONS 27
Page 38

Audio Selection
Many DVDs provide multiple
language and audio setup
options. The AUDIO button
provides a shortcut to view and
select these options. If the disc
has a menu system, you can
also set soundtrack options via
the MENU button.
AUDIO: ▲ ENG ▼ DOLBY DIGITAL 5.1 CH
* Manufactured under license from
* Manufactured under license from
Dolby Laboratories. “Dolby”,
Dolby Laboratories. “Dolby”,
“AC-3”, “Pro Logic” and the
“AC-3”, “Pro Logic” and the
double-D symbol are trademarks
double-D symbol are trademarks
of Dolby Laboratories. Confiden-
of Dolby Laboratories. Confidential unpublished works. ©1992-
tial unpublished works. ©19921997 Dolby Laboratories Inc. All
1997 Dolby Laboratories Inc. All
rights reserved.
rights reserved.
WHEN PLAYING A
DVD/VCD/CD
Open the Audio Menu
1
During playback, press the AUDIO button.
Select DVD Language
2
Use the UP/DOWN button to select the desired
language/audio setup on the DVD.
• Languages are represented by abbreviations; i.e.
“ESP” for “español.”
Set VCD/CD Audio
3
Use the UP/DOWN button to select STEREO,
RIGHT or LEFT.
NOTES:
• When playing a VCD 2.0, the MENU button works
as a conversion switch between MENU ON and
MENU OFF mode. When playing a VCD 1.1 or CD,
the MENU button will not work.
• To have the same audio language come up whenever
you play back a DVD, see page 42.
• Language choices vary by disc. A DVD can contain
up to 8 audio languages.
• This feature may not work with all DVDs.
WHEN VIEWING THE VCR
OR TV/AUX INPUTS
Access the Audio Mode
1
During playback, press the AUDIO button.
Select Audio Mode
2
Each press of the Audio button will select a
different audio mode. The current audio mode
will be displayed on the Front Panel Display:
•
PRO LOGIC*
Logic soundtracks to 4 channel sound (LF, C,
RF, Rear Surround). Displayed as “PLOGIC”.
•
NATURAL
soundtracks to 4 channel surround sound with
natural acoustical properties.
•
HALL
— Converts mono or stereo soundtracks
to 4 channel surround sound in a simulated
concert hall setting.
•
ARENA
to 4 channel surround sound in a simulated
large arena setting.
•
STEREO
channel soundtracks in stereo through the LF
and RF speakers.
— Converts encoded stereo Pro
— Converts mono or stereo
— Converts mono or stereo soundtracks
— Use this setting to listen to 2
28 DVS USER’S GUIDE
Page 39

Subtitle Language
Many DVDs provide subtitles
in one or more languages.
The SUBTITLE button provides a shortcut to view and
select these options. If the
disc has a menu system, you
can also set subtitle options
via the MENU button.
SUBTITLE: ▲ ENG ▼ OFF
▲
▲
USING THE SUBTITLE BUTTON USING THE MENU BUTTON
Open Subtitle Menu
1
During playback, press the SUBTITLE button.
Set Subtitle Language
2
Use the UP/DOWN button to select the desired
subtitle language.
• Subtitle languages are represented by abbreviations; i.e. “ESP” for “español.”
Activate Subtitles
3
Use the LEFT/RIGHT button to turn subtitles ON
or OFF.
• The default subtitle setting is OFF.
Open Subtitle Menu
1
Press the MENU button.
Select Subtitle Information
2
Use the UP/DOWN button to select the disc’s
subtitle option, then press ENTER.
Set Subtitle Language
3
Use the UP/DOWN button to select the desired
subtitle language, then press ENTER.
NOTES:
• When playing a VCD 2.0, the MENU button works as a conversion switch between MENU ON and MENU
OFF mode.
• When playing a VCD 1.1 or CD, the MENU button will not work.
• To have the same subtitle language come up whenever you play back a DVD, see page 42.
• Language choices vary by disc. A DVD can contain up to 32 subtitle languages.
• This feature may not work with all DVDs.
CHAPTER 4 - ADVANCED FUNCTIONS 29
Page 40

Screen Angle
Some DVDs allow you to
view the same scene from
different perspectives, or
angles, while watching a
movie. Press the ANGLE
button to activate this feature.
ANGLE: ▲ 1/6 ▼ MARK: ON
▲
▲
Check for Angle Mark
1
During playback, check to see if the ANGLE mark ( ) is
present at the upper right hand corner of the screen.
Press Angle
2
If is present, press the ANGLE button to view angle
options.
Select Screen Angle
3
Use the UP/DOWN button to select one of the available
screen angles.
Set Angle Mark Options
4
Use the LEFT/RIGHT button to determine whether or not
will be displayed. Set MARK to ON or OFF.
30 DVS USER’S GUIDE
NOTES:
• This feature may not work with all DVDs.
• This feature will only work if the DVD has been recorded with a multi-camera angle system.
• The Angle Mark option in the Main Menu/Display Options Menu must be set to ON for the Angle Mark
indicator to automatically appear on the TV screen; see page 38.
Page 41

Bookmarks
You can insert up to three
Bookmarks on your DVDs or
VCDs (MENU OFF mode), so
you can jump quickly to your
favorite scene or song.
MARKER: - - - MARK
▲
▲
ENTER
Open Bookmark Menu
1
During playback, press the BOOKMARK button
on the remote. The “MARKER” header will appear
on the screen.
Select Placeholder
2
Use the LEFT/RIGHT button to move to one of the
three bookmark placeholders (- - -).
Set the Bookmark
3
Play the DVD or VCD to the scene you want to
mark, then press the ENTER button. The placeholder will change to a number (1, 2 or 3).
Turn off Display
4
Press the BOOKMARK button again to turn off the
display.
Recalling a Marked Scene
During playback, press the BOOKMARK button
1
on the remote.
Use the LEFT/RIGHT button to select a
2
bookmarked scene (1,2 or 3).
Press the PLAY/PAUSE button to jump directly to
3
the marked scene.
Clearing a Bookmark
During playback, press the BOOKMARK button
1
on the remote.
Use the LEFT/RIGHT button to select the book-
2
mark number you want to delete.
Press the CLEAR button to delete a bookmark
3
number.
Press the BOOKMARK button to turn off display.
4
NOTES:
• When in VCD 2.0 mode (MENU ON mode), this function does not work.
• This feature may not work with all DVDs.
CHAPTER 4 - ADVANCED FUNCTIONS 31
Page 42

Zoom
You can Zoom in 2 or 4 times
normal magnification while
watching a DVD or VCD.
Open Zoom Menu
1
During playback or pause mode, press the
ZOOM button on the remote. The “crosshair
icon” will be displayed on screen.
Set Crosshairs
2
Use the UP/DOWN or LEFT/RIGHT button to
move the crosshairs to the position on the screen
you want to magnify.
Zoom In
3
Press the ENTER button as follows:
• During DVD playback or pause mode, press
ENTER repeatedly to zoom in 2X - 4X - normal.
• During VCD playback or pause mode, press
ENTER repeatedly to zoom in 2X - normal.
32 DVS USER’S GUIDE
NOTE:
• This feature may not work with all DVDs.
Page 43

Using the Main Menu
5 - Setup Mode
The Main Menu is used to set
System preferences, such as
audio options, display
options, parental lock levels,
and language preferences. To
access the Main Menu, press
the SETUP button on the
remote control.
MAIN MENU
1 AUDIO OPTIONS
2 DISPLAY OPTIONS
3 RATING LIMIT UNLOCKED
4 PLAYER MENU ENGLISH
5 DISC MENU ENGLISH
6 AUDIO ENGLISH
7 SUBTITLE AUTOMATIC
▲▼
RETURN
Note: The Main Menu is not
to be confused with the Disc
Menu, which is unique to
each DVD/VCD and is in
effect only during playback of
the disc. To access the Disc
Menu, press the MENU
button on the remote control.
ENTER
Open “Main Menu”
1
In play or stop mode, press the SETUP button on the remote.
Highlight Selection
2
Use the UP/DOWN button on the remote to highlight the desired menu option, then press ENTER.
AUDIO OPTIONS
Use to set Dynamic Compression, Surround Mode,
and Speaker Setup; see pages 34-37.
DISPLAY OPTIONS
Use to set TV Aspect, Angle Mark, Still Mode, On
Screen Messages, Display Brightness, and Black
Level; see page 38.
RATING LIMIT (Parental Lock)
Use to set a password-protected rating limit to
control viewing of unsuitable content; see pages 39-
40.
PLAYER MENU
Use to set the default language for all DVS3100/
3000 on-screen displays; see page 41.
DISC MENU
Use to set the default language for all Disc menus
(menus that are unique to each disc); see page 41.
AUDIO
Use to set the default language for all disc audio
soundtracks; see page 42.
SUBTITLE
Use to set the default language for all disc subtitles;
see page 42.
NOTES:
• To turn off the Main Menu, press the SETUP button again.
• To move to the previous Menu, press the RETURN button.
• Some SETUP menu features may not be available depending on the disc.
CHAPTER 5 - SETUP MODE 33
Page 44

Audio Options
The Audio Options menu
allows you to set Dynamic
Compression, Surround
Mode, and Speaker Setup
(see page 35).
AUDIO OPTIONS
1 DYNAMIC COMPRESSION OFF
2 PRO LOGIC/SURROUND NATURAL
3 SPEAKER SETUP
RETURN
* Manufactured under license from
Dolby Laboratories. “Dolby”,
“AC-3”, “Pro Logic” and the
double-D symbol are trademarks
of Dolby Laboratories. Confidential unpublished works. ©19921997 Dolby Laboratories Inc. All
rights reserved.
▲
▲
▲▼
▲
▲
Open “Main Menu”
1
When in play or stop mode, press the SETUP
button.
Select “Audio Options”
2
Use the UP/DOWN button to select AUDIO
OPTIONS, then press ENTER.
Set “Dynamic Compression”
3
Use the UP/DOWN button to select Dynamic
Compression, then use the LEFT/RIGHT buttons
to select:
•
ON
— Compresses the dynamic range, i.e. the
difference between the quietest and loudest
passages of a disc’s soundtrack. This enables
you to limit loud noises, such as explosions, or
raise the volume of quiet passages, such as
whispering, while watching a movie late at
night.
•
OFF
— Selects the standard dynamic range.
NOTE:
• Surround Mode is the default setting for 2-channel and PCM sources only.
• DVDs encoded with Dolby Digital 5.1 Surround Sound* are automatically selected when you play the disc.
• These features may not work with all DVDs.
Set “Surround Mode”
4
Use the UP/DOWN button to select Surround Mode. Then use the LEFT/RIGHT
buttons to set Surround Mode to one of the
following:
•
PRO LOGIC*
Pro Logic soundtracks (such as those found
on VHS tapes and Dolby Digital 2 channel
DVDs) to 4 channel sound (LF, C, RF, Rear
Surround).
•
NATURAL
soundtrack to surround sound with natural
acoustical properties.
•
HALL
— Converts a mono or stereo
soundtrack to surround sound in a simulated concert hall setting.
•
ARENA
soundtrack to surround sound in a simulated large arena setting.
•
OFF
— Surround mode is turned off. Use
this setting to listen to 2 channel
soundtracks in stereo through the LF and
RF speakers.
— Converts encoded stereo
— Converts a mono or stereo
— Converts a mono or stereo
34 DVS USER’S GUIDE
Page 45

Speaker Setup
The Speaker Setup allows you
to customize the DVS3100/
3000 for your surround sound
setup, including speaker size,
channel delays (see page 36)
and channel balance (see
page 37).
The system is preset at the
factory for a five (5) speaker
configuration. For proper
audio performance, you must
setup the system to match
your speaker configuration.
Open “Main Menu”
1
When in play or stop mode, press the SETUP
button.
Select “Audio Options”
2
Press the UP/DOWN button to select AUDIO
OPTIONS, then press ENTER.
Select “Speaker Setup”
3
Use the UP/DOWN button to select SPEAKER
SETUP, then press ENTER. The Speaker Setup
menu will appear.
Select Speaker
4
Use the UP/DOWN or LEFT/RIGHT button to
highlight the speaker you wish to set, then press
ENTER.
Set Speaker Size
5
Use the UP/DOWN arrows to change the speaker
size as follows:
• Front Speakers (L/R) — Small or Large
• Center Speaker— Small, Large, or None
• Subwoofer — Yes or None
• Surround Speakers (L/R) — Small, Large, or
None
NOTES:
• The speaker icon will change size or disappear
to indicate whether the speaker is Small, Large,
or None.
• Select Large if you have connected the DVS to
a speaker with a low frequency of 100Hz or
below.
• Select Small if you have connected the DVS to
a speaker with a low frequency above 100Hz.
• If you do not connect a Subwoofer, always set
the Front Speakers to Large.
• If you do not connect a Center speaker, the
system will simulate a center channel using the
LF & RF speakers. This is referred to as “Phantom Mode.”
• If you do not connect a speaker, be sure to set it
to None.
CHAPTER 5 - SETUP MODE 35
Page 46

Channel Delays
Ideally all of your speakers
will be the same distance
from your primary listening
area. If not, you can set
Channel Delays for your
center and surround speakers
so all audio signals arrive at
the same time.
Open “Speaker Setup”
1
During playback of a DVD with 5.1 channel
sound, press VOL. SETUP on the remote control.
Select Channel Delays
2
Use the UP/DOWN or LEFT/RIGHT buttons to
highlight the center channel delay (to the right of
the Center Speaker icon) or surround channel
delay indicator (bottom center) , then press
ENTER.
Set Center Channel Delay
3
Use the UP/DOWN button to set the center
channel delay from 0-5ms, in 1ms increments,
then press ENTER.
Set Surround Channel Delay
4
Use the UP/DOWN button to set the surround
channel delay from 0-15ms, in 3ms increments
(i.e., 0, 3, 6, 9....15ms), then press ENTER.
NOTE:
The VOL. SETUP key is not active during STOP or
while playing a CD or VCD. To set channel
delays in these modes, follow the steps on page
37 to access the Speaker Setup menu.
10’10’
7’
Sub
4’
Calculating Channel Delays
1 Measure the distance from your primary
listening area to your front speakers; e.g. 10
feet. Use this as your reference distance.
2 Now measure the distance from the primary
listening area to your center speaker; e.g. 7 feet.
3 Calculate the difference; e.g. 10 feet minus 7
feet = 3 feet.
4 Assume 1 ms of delay for each 1 foot of dis-
tance, e.g. set the Center delay to 3ms.
5 Repeat steps 2-4 for the surround speakers; e.g.
10 feet minus 4 feet = 6 feet, or 6 ms delay.
Note: If the center or surround distance is equal
to or greater than the reference distance, set the
delay to 0 ms.
4’
36 DVS USER’S GUIDE
Page 47

Channel Balance
If your center speaker,
surround speakers, or subwoofer are too loud relative
to your front speakers, you
can lower their signal levels
in 1 db increments. Use the
built-in noise generator
(labeled “TEST”) to check the
balance among the six
channels.
Open “Main Menu”
1
When in play or stop mode, press the SETUP
button.
Select “Audio Options”
2
Press the UP/DOWN button to select AUDIO
OPTIONS, then press ENTER.
Select “Speaker Setup”
3
Use the UP/DOWN button to select SPEAKER
SETUP, then press ENTER. The Speaker Setup
menu will appear.
Start Test Signal
4
Use the UP/DOWN or LEFT/RIGHT buttons to
highlight TEST, then press ENTER.
• A “white noise” test signal will be generated in
the left front speaker . It will play for five seconds,
then continue in a clockwise direction through
all active speakers until you press ENTER.
Listen to the Channel Balance
5
As the test signal moves from speaker to speaker,
listen to the level of your center and surround
speakers relative to your front speakers. The
speakers that are closer to you may be too loud.
Press ENTER to stop the test signal.
Select Channel Levels
6
Use the UP/DOWN or LEFT/RIGHT buttons to
highlight the decibel settings for the center
speaker, surround speakers or subwoofer, then
press ENTER.
Adjust Channel Levels
7
Use the UP/DOWN button to set the selected
channel level from 0 to -6 db, in 1 db increments,
then press ENTER.
Repeat
8
Repeat steps 4-7 until you have fine-tuned the
channel balance for your listening area.
NOTES:
• You can adjust the speaker level during playback of a disc by pressing the VOL. SETUP button on the remote
control. You may find this more convenient than using the “white noise” generator in the Main Menu.
• The test output signal of the subwoofer is lower than the other speakers.
• For best results, use a Sound Pressure Level Meter (available at your local electronics retailer) to measure the
strength of the signal from each speaker.
CHAPTER 5 - SETUP MODE 37
Page 48

Display Options
Use the Display Options
menu to set TV Aspect, Angle
Mark, Still Mode, On Screen
Messages, Display Brightness,
and Black Level.
DISPLAY OPTIONS
1 TV ASPECT 4 X 3 PS
▲
2 ANGLE MARK ON
3 STILL MODE AUTO
4 ON SCREEN MESSAGES ON
5 DISPLAY BRIGHTNESS AUTO
6 BLACK LEVEL OFF
RETURN
▲▼
ENTER
Open “Main Menu”
1
Press the SETUP button in play or stop mode.
Select “Display Options”
2
Use the UP/DOWN button to select DISPLAY
OPTIONS. Then press the ENTER button.
Set Display Options
3
Use the UP/DOWN button to select the desired
item. Then press the ENTER button.
TV ASPECT — Sets the aspect ratio (length x
width) of your television screen. Use the UP/
DOWN button to select one of the following and
press ENTER:
•
4x3 PS (PAN-SCAN) -
watching VHS movies, this method selectively
crops (by panning and scanning to keep the
most important part of the picture visible) wide
screen movies to fill a standard 4x3 television
screen.
•
4x3 LB (LETTER BOX) -
the full width of the DVD movie on a standard
4x3 television. Black bars will appear at the top
and bottom of the screen.
•
16x9 WIDE -
the full 16:9 picture on a widescreen television.
This method allows you to view
The familiar way of
This method displays
ANGLE MARK — Determines whether the
icon will appear when a DVD offers multiple
angles of a particular scene. Use the LEFT/RIGHT
button to select one of the following:
•
ON -
Displays in the upper right corner of
screen if additional angles are available.
•
OFF -
Does not display .
Note: The Angle feature will work on discs with
multiple angles regardless of the Angle Mark
menu setting.
STILL MODE — Prevents picture shaking in still
mode and displays small text clearer. Use the
LEFT/RIGHT button to select one of the following:
•
AUTO -
•
FIELD -
•
FRAME -
more clearly than in AUTO mode.
ON SCREEN MESSAGES — Use to turn on-screen
display messages on or off. Use the LEFT/RIGHT
button to select ON or OFF.
DISPLAY BRIGHTNESS— Adjusts the brightness
of the DVS front panel display. Use the LEFT/
RIGHT button to select one of the following:
•
AUTO -
cally when playing a DVD.
•
DIM -
•
BRIGHT -
BLACK LEVEL — Adjusts the screen brightness.
Use the LEFT/RIGHT button to select ON (bright)
or OFF (dim).
Selects Still Mode automatically.
Select if the screen shakes in AUTO mode.
Select if you want to see fine text
Dims the Front Panel Display automati-
Dims the Front Panel Display.
Brightens the Front Panel Display.
38 DVS USER’S GUIDE
Page 49

Setting/Changing Password
Rating Limit is a password
protected parental lock which
allows you to block playback
of individual DVDs based on
their content. This feature is
compatible only with DVDs
encoded with parental level
ratings.
PASSWORD CHECK
ENTER PASSWORD
- - - -
RETURN
PRESS 0-9
SETTING THE PASSWORD
Open “Main Menu”
1
Press the SETUP button when in play or stop
mode.
Select “Rating Limit”
2
Press the UP/DOWN button to select RATING
LIMIT, then press ENTER. The “Password Check”
menu will appear.
Enter Password
3
Enter your 4-digit password using the 0-9 buttons.
• If you enter the correct password, the “Rating
Limit” menu will appear.
• If you enter the wrong password, the message
“INCORRECT PASSWORD” will briefly appear,
then the “Password Check” menu will reappear.
• ‘7777’ is the factory preset password.
• Write down your password and keep it in a safe
place in case you forget it.
CHANGING THE PASSWORD
Enter New Password
5
Enter your new 4-digit password using the 0-9
buttons.
Re-Enter New Password
6
Reenter your new password to ensure you have
entered it correctly.
• Press RETURN to go to the previous menu, or
SETUP to exit the menu system.
Choose “Rating Limit” Option
4
Select one of the following, then press ENTER:
1. Set Rating Limit (see page 40)
2. Change Password (see below)
CHAPTER 5 - SETUP MODE 39
Page 50

Rating Limit
Many DVD’s are encoded
with a rating limit from 1 to 8
to help parents block unwanted content. The
DVS3100/3000 will automatically detect the rating limit
and prevent playback at the
preset level.
SET RATING LIMIT
LOCK LEVEL 8 LEAST RESTRICTIVE
RETURN ENTER
UNLOCK
7
6
5
4
3
2
1 MOST RESTRICTIVE
▲▼
SETTING THE RATING LIMIT
Open “Main Menu”
1
Press the SETUP button when in play or stop
mode.
Select “Rating Limit”
2
Press the UP/DOWN button to select “Rating
Limit,” then press ENTER.
Enter Password
3
Enter your 4-digit password by pressing the 0-9
button.
Select “Set Rating Limit”
4
Use the UP/DOWN button to select “Set Rating
Limit” and press ENTER.
Set Rating Limit
5
Use the UP/DOWN button to select the desired
Rating Limit, then press ENTER.
• Choose from 8 rating limits (1 = most restrictive; i.e. safest for children; 8 = least restrictive;
i.e. mature audiences only)
• All ratings higher than the selected limit will be
locked automatically, e.g. if you select level 6
then discs rated 6, 7 or 8 content will not play.
What happens if you play a DVD that
exceeds the player’s Rating Limit?
• The following message will appear
on screen: “Your selection exceeds
the rating level for this player.”
• Some discs include a Rating Limit
override feature. If so, the following
message will also appear: “Override
the level?” You then select “Override” or “Cancel.” If you choose to
override the rating level, you will
need to enter your 4-digit password
to begin playback.
40 DVS USER’S GUIDE
Page 51

Setting Default Languages
The DVS3100/3000 offers a
wide variety of language
options. You can set default
languages for the unit itself,
the menus specific to each
disc, and the soundtracks and
subtitles of each DVD.
MAIN MENU
1 AUDIO OPTIONS
2 DISPLAY OPTIONS
3 RATING LIMIT UNLOCKED
4 PLAYER MENU ENGLISH
5 DISC MENU ENGLISH
6 AUDIO ENGLISH
7 SUBTITLE AUTOMATIC
▲▼
RETURN
ENTER
PLAYER MENU LANGUAGE DISC MENU LANGUAGE
Open “Main Menu”
1
Press the SETUP button when in play or stop
mode.
Select “Player Menu”
2
Use the UP/DOWN button to select the PLAYER
MENU, then press ENTER.
Set Player Language
3
Use the UP/DOWN button to select the desired
language, then press ENTER.
• All DVS3100/3000 menus will now appear in
the selected language.
• Press RETURN to go to the previous menu, or
SETUP to exit the menu system.
Open “Main Menu”
1
Press the SETUP button when in play or stop
mode.
Select “Disc Menu”
2
Use the UP/DOWN button to select DISC MENU,
then press ENTER.
Set Disc Menu Language
3
Use the UP/DOWN button to select the desired
language, then press ENTER.
• If the language you want is not listed, select
“OTHERS.”
• All disc menus will now appear in the selected
language. Some discs may not contain the
language you select as your default language; in
that case the disc will use its original language
setting.
• Press RETURN to go to the previous menu, or
SETUP to exit the menu system.
CHAPTER 5 - SETUP MODE 41
Page 52

MAIN MENU
1 AUDIO OPTIONS
2 DISPLAY OPTIONS
3 RATING LIMIT UNLOCKED
4 PLAYER MENU ENGLISH
5 DISC MENU ENGLISH
6 AUDIO ENGLISH
7 SUBTITLE AUTOMATIC
▲▼
RETURN
ENTER
AUDIO LANGUAGE SUBTITLE LANGUAGE
Open “Main Menu”
1
Press the SETUP button when in play or stop
mode.
Select “Audio”
2
Use the UP/DOWN button to select AUDIO, then
press ENTER.
Open “Main Menu”
1
Press the SETUP button when in play or stop
mode.
Select “Subtitle”
2
Use the UP/DOWN button to select SUBTITLE,
then press ENTER.
42 DVS USER’S GUIDE
Set Audio Language
3
Use the UP/DOWN button to select the desired
language, then press ENTER.
• Select “ORIGINAL” if you want the default
soundtrack language to be the original language
in which the disc was recorded.
• Select “OTHERS” if the language you want is
not listed.
• All soundtracks will now play in the selected
language when available. Some discs may not
contain the language you select as your default
language; in that case the disc will use its
original language setting.
• Press RETURN to go to the previous menu, or
SETUP to exit the menu system.
Set Subtitle Language
3
Use the UP/DOWN button to select the desired
language, then press ENTER.
• Select “AUTOMATIC” if you want the subtitle
language to automatically match the default
audio language.
• Select “OTHERS” if the language you want is
not listed.
• The language is selected and the screen returns
to the SETUP MENU. Some discs may not
contain the language you select as your default
language; in that case the disc will use its
original language setting.
• Press RETURN to go to the previous menu, or
SETUP to exit the menu system.
Page 53

Controlling a TV with the Remote
TV Codes
CODE
0
1
2
3
4
5
6
7
8
9
SETUP
DISPLAY
BRAND
SAMSUNG 1
SHARP 2
SONY
MAGNAVOX
SANYO 1
LG 2
RCA
LG 1
TOSHIBA
HITACHI
JVC
PANASONIC 1
CODE
OPEN/CLOSE
AUDIO
SUBTITLE
POWER
ANGLE
TITLE
MENU
RETURN
REV SEARCH
REPEAT
FWD SEARCH
BACK SKIP
BRAND
MITSUBISHI
SAMSUNG 2
SAMSUNG 3
SHARP 1
ZENITH
LG 3
DAEWOO
SANYO 2
EMERSON
SHARP 3
SAMSUNG 4
PANASONIC 2
6 - Reference
You can program the remote
control to operate most
brands of television.
Turn on TV
1
Turn on the television and point the DVD remote at the
television.
Program Remote
2
While holding down the POWER button, enter the code for
your brand of television (see table at right).
Verify Programming
3
• If the TV turns off, programming is complete.
• If the first code does not work, enter other codes of the
same brand.
Operate the TV
4
To operate the TV, refer to the “TV/AUX Function Buttons”
on page 10.
NOTE:
The remote may not be able to control every model of the television brands listed.
CHAPTER 6 - REFERENCE 43
Page 54

Controlling a VCR with the Remote
You can use the remote
control to operate the most
often used features of the
Go-Video DDV9xxx Series
Dual-Deck VCR.
Turn on your Dual-Deck VCR
1
Turn on the VCR and point the DVD remote at the VCR.
Select VCR Mode
2
Press the VCR button on the remote control.
Verify Operation
3
• Press the Power button on the remote. If the VCR turns off,
the remote will control the basic functions of the VCR.
• If the VCR does not respond, the remote will not control
the VCR; use the remote supplied with the VCR.
Operate the VCR
4
To operate the VCR, refer to the “VCR Function Buttons” on
page 10.
44 DVS USER’S GUIDE
NOTE:
The remote may not be able to control every model of the Dual-Deck VCR.
Page 55

Troubleshooting Guide
The following are some of the most frequently asked questions about our DVS3100/3000. If you don’t find the answers you need here, you can contact
our Customer Service Department by phone at (480) 922-0896. Office hours are Monday-Friday, 6:00 a.m. to 7:00 p.m. and 8:00 a.m. to 4:00 p.m. MST
on Saturday. You can also contact us anytime at our e-mail address: “custsvc@sensoryscience.com.” Or refer to a listing of authorized Go-Video service
centers on our Web site at “www.govideo.com.”
“The remote control isn’t working.”
• Check the batteries in the remote. They may need replacing.
• Operate the remote control at a distance of no more than 20 feet.
• Remove the batteries and hold down one or more buttons for
several minutes to drain the microprocessor inside the remote to
reset it. Reinstall the batteries and try the remote again.
• Be sure the remote control mode is set to the device you wish to
control; i.e., press DVD, VCR, or TV/AUX and try again.
“The disc doesn’t play.”
• Ensure the disc is installed with the label side facing up.
• Check that the DVD is encoded for region number 1.
• This player cannot play CD-ROMs, DVD-ROMs, CD-R, etc. Insert
a DVD, a VIDEO-CD or a CD.
“I’m not getting 5.1 channel sound.”
• 5.1 channel sound is reproduced only when the following conditions are met:
1. The DVS is connected with 5 speakers (optional subwoofer).
2. The disc is recorded with 5.1 channel sound.
• Check whether the disc being played has the “Dolby 5.1 ch” mark
on the outside.
• Check the settings under “Audio Options/Speaker Setup.”
“The icon appears on screen.”
• The features or action cannot be completed at this time because:
1. The DVD’s software restricts it.
2. The DVD’s software doesn’t support the feature (e.g., Angles).
3. The feature is not available at the moment.
4. You’ve requested a title or chapter number or search time that is
out of range.
“Playback mode differs from the Setup Menu selection.”
• Some of the functions selected in the Setup Menu may not work
properly if the disc is not encoded with the corresponding function.
“I forgot my password.”
• With the power on (not in Standby mode) and DVD selected:
Reset the system by pressing the Stop and Play keys on the DVS
front panel at the same time and holding them until the language
setup menu appears. Note: This will restore all system menu
settings to the factory originals.
“There is no audio.”
• Check the settings under “Audio Options/Speaker Setup.”
• Make sure that Mute has not been pressed.
“I can’t change the screen aspect ratio.”
• The aspect ratio is fixed on your DVD disc.
“The Disc Menu doesn’t appear.”
• The disc may not have a Menu; try another disc.
CHAPTER 6 - REFERENCE 45
Page 56

Technical Specifications
GENERAL
Power Requirements AC 120V, 60 Hz
Power Consumption 19 W min; 310 W max
Weight 21.5 lbs
Dimensions W 17” x D 14.5” x H 4.75”
Operating Temperature Range 41-95°F
Operating Humidity Range 10-75%
DVS3100 COMBINANT DIGITAL AMPLIFIER
F/L, F/R, C/T, R/L, R/R 8 Ω load: 75 watt x 5,
375 watt total (THD 0.7%)
4 Ω load: 100 watt x 5,
500 watt total (THD 2.7%)
THD Max Output <3%;
Half Output <0.02%
S/N Ratio >86 dB
Frequency Response 12 Hz - 55kHz
DVS3000 CLASS AB AMPLIFIER
F/L, F/R, C/T, R/L, R/R 8 Ω load: 40 watt x 5,
200 watt total (THD 0.08%)
6 Ω load: 50 watt x 5,
250 watt total (THD 0.4%)
THD Max Output <0.7%;
Half Output <0.05%
S/N Ratio >75 dB
Frequency Response 10 Hz - 50kHz
DISC
DVD (Digital Versatile Disc) Reading Speed: 11.45 ft/sec.
Approx. Play Time (Single Sided,
Single Layer Disc): 135 min.
CD - 5 inches (Compact Disc) Reading Speed: 3.9 to 4.6 ft/sec.
Maximum Play Time: 74 min.
CD - 31/2 inches (Compact Disc) Reading Speed: 3.9 to 4.6 ft/sec.
Maximum Play Time: 20 min.
VCD - 5 inches Reading Speed: 3.9 to 4.6 ft/sec.
Maximum Play Time: 74 min.
(Video + Audio)
VIDEO OUTPUT
Composite Video 2 channel: 1.0 Vp-p (75 Ω load)
Component Video (DVS3100 only) Y: 1.0 Vp-p (75 Ω load)
Pr: 0.70 Vp-p (75 Ω load)
Pb: 0.70 Vp-p (75 Ω load)
S-Video Luminance Signal: 1.0 Vp-p (75 Ω
load)
Color Signal: 0.286 Vp-p (75 Ω load)
AUDIO OUTPUT
2 channel L (2/L), R (2/R)
5.1 channel S/W
Output Level Analog: 2 Vrms (1 kHz)
*Frequency Response 96/48 kHz Sampling: 4 Hz to 22
kHz
*S/N Ratio 110 dB
*Dynamic Range 96 dB
*Total Harmonic Distortion 0.003 %
VIDEO INPUT
Composite Video 2 channel: 1.0 Vp-p (75 Ωload)
VCR IN/AUX IN
AUDIO INPUT
2 Channel L (2/L), R (2/R)
VCR IN, AUX IN
* NOMINAL SPECIFICATIONS
46 DVS USER’S GUIDE
Page 57

DVS Limited Warranty
Who Provides the Limited Warranty
During the warranty period, the Go-Video Warranty Administrator will honor DVS service for 90 days labor, 1
year parts from the original date of consumer purchase. See below for Commercial, Industrial or Educational
use coverage. DVS remote controls are warranted for 90 days from the date of purchase.
Who is Protected
This warranty protects the original consumer owner of this Go-Video product.
What is Covered and How Long
This warranty covers internal operating parts and service/labor to repair or replace covered parts in this GoVideo product for 90 days labor, 1 year parts, from the date of purchase, defined as follows: (1) Original
Consumer Retail Purchase; (2) First Rental Purchase Agreement; or (3) First Lease Purchase Agreement (the
“Warranty Period”). Labor and replacement parts supplied during the Warranty Period are covered only for the
remaining portion of the original Warranty Period. The Go-Video Warranty Administrator shall have no
liability for service under this warranty if non-OEM (Original Equipment Manufacturer) replacement parts are
used in the repair of your Go-Video product.
What the Owner Must Do If Service is Required
If service under this warranty is required, contact the Go-Video Warranty Administrator at (480) 922-0896 to
determine the nearest authorized Go-Video service center.
CHAPTER 6 - REFERENCE 47
Page 58

Other Warranty Coverage
Commercial, Industrial or Educational use has the same warranty coverage as stated in this warranty.
What are the Exceptions
This warranty does not cover: (1) Normal maintenance service. (2) Damage from misuse, abuse neglect or
accident, natural disasters or Acts of God. (3) Cabinetry, decorative parts, knobs or buttons. (4) The foreign
country use of this product. (5) Go-Video product which has been electronically or mechanically modified in
any way or incorporated into other products. (6) Installation and setup service adjustments. (7) Owner instruction. Your Owner’s Guide provides information regarding operating instructions and user controls. For additional information, contact your authorized Go-Video dealer. Go Video is not responsible for any shipping,
handling or insurance charges.
This Exclusive Limited Warranty excludes all incidental and consequential damages. Some states do not allow
the exclusion of incidental and consequential damages, so the above exclusion may not apply to you.
ALL IMPLIED WARRANTIES, INCLUDING IMPLIED WARRANTIES OF MERCHANTABILITY AND FITNESS
FOR A PARTICULAR PURPOSE ARE LIMITED IN DURATION TO THE DURATION OF THIS WARRANTY
PERIOD. Some states do not allow limitations on how long an implied warranty lasts, so the above limitation
may not apply to you.
This Exclusive Limited Warranty gives you specific legal rights and you may also have other rights which vary
from state to state.
48 DVS USER’S GUIDE
GO-VIDEO WARRANTY ADMINISTRATOR
Sensory Science Corporation
7835 East McClain Drive
Scottsdale, Arizona 85260-1732
(480) 922-0896
custsvc@sensoryscience.com
Page 59

7835 East McClain Drive
Scottsdale, Arizona USA 85260
www.sensoryscience.com
www.govideo.com
Printed in Korea
 Loading...