

Page 1

DHT7100
DIGITAL HOME THEATER SYSTEM
• DVD, CD, VCD and MP3-CD playback
• AM/FM Stereo Receiver
• Five Wall-Mountable Speakers plus Subwoofer
• Built-in 270W Amplifier
• Built-in Dolby Digital 5.1 Decoder
• Dolby Digital 5.1 and DTS Digital Out
• English, French and Spanish
On-Screen Menus
SSC.7100.091101
Page 2
CONGRATULATIONS...
...on your purchase of this Go-Video DVD Home Theater System!
We know you will enjoy this product for many years to come. In case warranty service is required, please take
a moment to attach your receipt to this manual and write down your Serial Number (located on the back
panel of the DVD system):
CLASS 1 LASER PRODUCT
This Compact Disc player is classified as a CLASS
1 LASER product.
Use of controls adjustments or performance of
procedures other than those specified herein may
result in hazardous radiation.
CAUTION
INVISIBLE LASER RADIATION WHEN OPEN AND
INTERLOCK DEFEATED. AVOID EXPOSURE TO
BEAM.
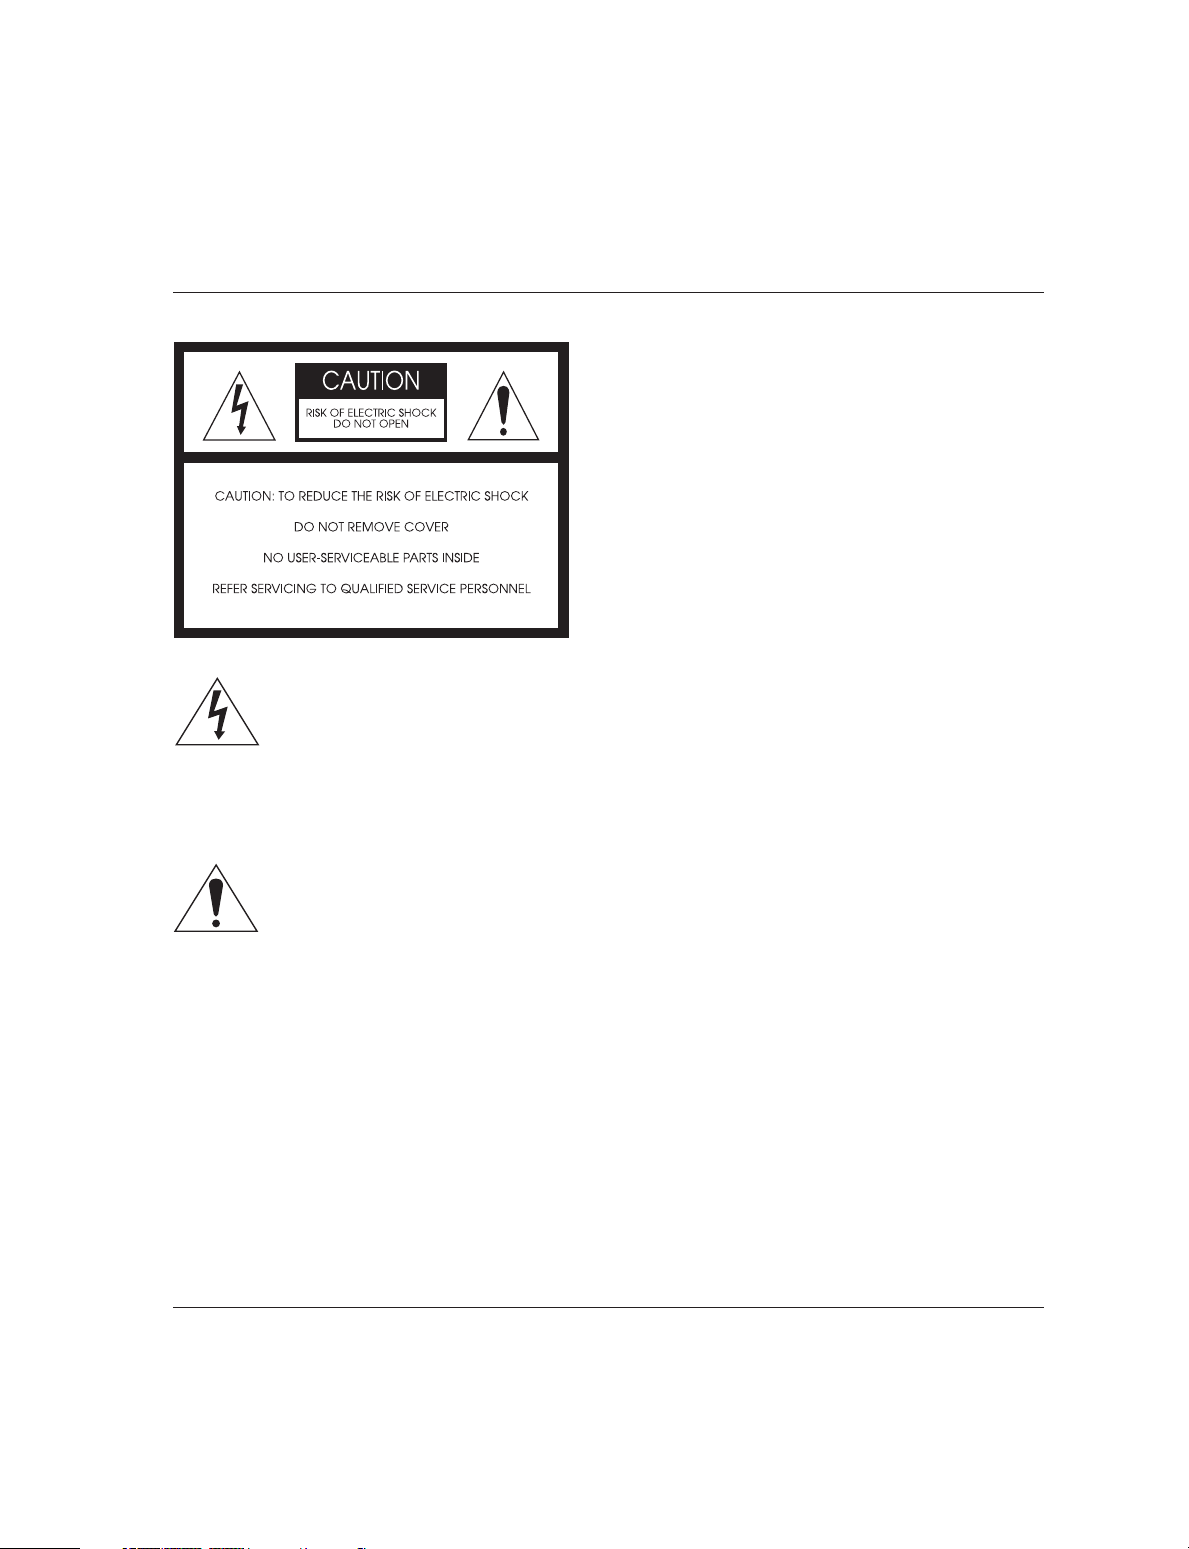
DANGER
This symbol is intended to alert the
user to the presence of uninsulated
dangerous voltage within the
product’s enclosure that may be of sufficient
magnitude to constitute risk of fire or electric
shock.
W ARNING
This symbol is intended to alert the
user to the presence of important
operating and maintenance instructions in the
literature accompanying this product.
W ARNING:
To r educe the risk of fire or electric shock, do not
expose this appliance to rain or moisture.
CAUTION
TO REDUCE THE RISK OF ELECTRIC SHOCK, DO
NOT REMOVE TOP COVER, NO USER
SERVICEABLE PARTS INSIDE, REFER SERVICING
TO QUALIFIED SERVICE PERSONNEL.
WARNING:
This unit contains no user serviceable parts. Never
remove covers unless qualified to do so. This unit
contains dangerous voltages. Always remove main
plug from the socket before any service operation
and when not in use for a long period.
IMPORTANT:
Do not use this unit for commercial use. This unit
is designed for your enjoyment in your home. We
cannot be liable for the quality of the unit if you
use it for commercial use.
NOTE TO CATV SYSTEM INSTALLER
This reminder is provided to call the CATV system
installer’s attention to article 820-40 of the NEC
provides guidelines for proper the cable ground
shall be connected to the grounding system of
the building, as close to the point of cable entry
as practical.
Go-Video is a registered trademark of Sensory Science Corporation. Manufactured under license from Dolby
Laboratories. Dolby, Pro Logic and the double-D symbol are trademarks of Dolby Laboratories Licensing Corp. DTS
and DTS Digital Out are trademarks of DTS Technology, LLC. All other brand and product names are trademarks or
registered trademarks of their respective companies. © Copyright 2001. Sensory Science Corp. All rights reserved.
Page 3

T ABLE OF CONTENTS
This user’s guide is organized to get you started with the DHT7100 as quickly as possible. The first
two chapters present all the basics, including connections and the most commonly used features.
Chapters 3 and 4 cover special playback and setup features. Chapter 5 contains helpful customer
service and troubleshooting info, followed by a visual and topical Index. Enjoy!
SAFETY .......................................................................... iii
1 - GETTING STARTED ................................................... 1
Welcome ........................................................................ 1
Disc Compatibility .......................................................... 1
Step 1 - Unpack .............................................................. 2
Step 2 - Insert Remote Batteries .................................... 2
Step 3 - Connect video to TV ......................................... 2
Step 4 - Place & Connect Speakers ................................ 3
Step 5 - Connect Antenna .............................................. 4
Step 6 - Power On the System ....................................... 4
Step 7 - Program Remote to Operate TV....................... 5
Step 8 - Optional Connections ....................................... 6
2 - BASIC OPERATIONS ................................................. 7
Selecting DVD, Tuner or Aux.......................................... 7
Basic Disc Playback ........................................................ 8
Disc Menu Navigation .................................................... 8
Options During Playback................................................ 9
Volume Settings ........................................................... 10
Listening to the Radio .................................................. 10
Programming Station Presets ....................................... 11
MP3 playback ............................................................... 12
3 - SPECIAL FEATURES ................................................ 13
Display .......................................................................... 13
Go To ............................................................................ 14
Title............................................................................... 14
Angle ............................................................................ 15
Zoom ............................................................................ 15
Subtitle ......................................................................... 15
Audio ............................................................................ 15
Repeat .......................................................................... 16
AB Repeat .................................................................... 16
Program ........................................................................ 16
Remain.......................................................................... 17
DRC (Dynamic Range Compression) ............................ 17
Sleep ............................................................................ 18
Pro logic ....................................................................... 18
DSP mode .................................................................... 19
Effect ............................................................................ 19
Table of Contents
i
Page 4

4 - ADVANCED SETUP ................................................. 20
Setting Speaker Sizes ................................................... 20
Adding Center & Rear Delays ...................................... 20
Setting Speaker Balance and Levels ............................ 21
Calculating Delays ........................................................ 21
Using the Test Tone Generator..................................... 21
Setup Menu Navigation ............................................... 22
Language Preferences .................................................. 22
TV Screen Size .............................................................. 23
Rating Levels ................................................................ 24
Digital Output Format .................................................. 24
5 - HELP........................................................................ 25
Troubleshooting ........................................................... 25
Disc Handling Precautions............................................ 27
System Maintenance .................................................... 27
Technical Specifications................................................ 28
Warranty ....................................................................... 29
INDEX .......................................................................... 30
Front Panel Controls..................................................... 30
Front Panel Display ...................................................... 30
Rear Panel .................................................................... 31
Remote Control (under sliding panel) .......................... 31
Remote Control (top section) ....................................... 32
DVD System User’s Guide
ii
Page 5

SAFETY
Before you begin, be sure to read these special safety precautions.
READ INSTRUCTIONS
All the safety and operating instructions
should be read before the unit is operated.
RETAIN INSTRUCTIONS
The safety and operating instructions should
be retained for future reference.
HEED WARNINGS
All warnings on the unit and in the operating
instructions should be adhered to.
FOLLOW INSTRUCTIONS
All operating and maintenance instructions
should be followed.
CLEANING
Unplug this video unit from the wall outlet
before cleaning. Do not use liquid or aerosol
cleaners. Use a dry cloth for dusting cabinet.
ATTACHMENTS
Do not use attachments not recommended
by the video product manufacturer, as they
may be hazardous.
WATER & MOISTURE
Do not use this video unit near water—for example, near a bathtub, wash bowl, kitchen
sink, laundry tub, in a wet basement, near a
swimming pool or the like.
ACCESSORIES
Do not place this video unit on an unstable
cart, stand, tripod, bracket or table. The video
unit may fall, causing serious injury to a
child or adult, and serious damage to
the unit. Use only with a cart, stand,
tripod, bracket or table recom-
mended by the manufacturer or
sold with the video unit. Any mounting of the unit should follow the
manufacturer’s instructions and
should use a mounting accessory
recommended by the manufacturer.
An appliance and cart combination
should be moved with care. Quick stops,
excessive force, and uneven surfaces may
cause the appliance and cart combination
to overturn.
PORTABLE CART WARNING
(Symbol provided by RETAC)
VENTILATION
Slots and openings in the cabinet are provided for ventilation to ensure reliable operation of the video unit and to protect it from
overheating. These openings must not be
blocked or covered. Never place your DVD
system on a bed, sofa, rug or other similar
surface, on or near a radiator or heat register.
This video unit should not be placed in a builtin installation such as a bookcase or rack unless proper ventilation is provided or the
manufacturer’s instructions have been adhered to.
POWER SOURCES
This video unit should be operated only from
the type of power source indicated on the
marking label. If you are not sure of the type
of power supply to your home consult your
appliance dealer or local power company. For
video units intended to be operated from
battery power, or other sources, refer to the
operating instructions.
GROUNDING OR POLARIZATION
This video unit may be equipped with either
a polarized 2-wire AC line plug (a plug having one blade wider than the other) or a 3wire grounding plug having a third (grounding) pin.
The 2-wire polarized plug will fit into the
power outlet only one way. This is a safety
feature. If you are unable to insert the plug
fully into the outlet try reversing the plug. If
the plug still fails to fit, contact your electrician to replace your obsolete outlet. Do not
defeat the safety purpose of the polarized
plug.
POWER-CORD PROTECTION
Power-supply cords should be routed so that
they are not likely to be walked on or pinched
by items placed upon or against them, paying particular attention to cords of plugs, convenience receptacles, and the point where
they exit from the unit.
OUTDOOR ANTENNA
GROUNDING
If an outside antenna or cable system is connected to the video unit, be sure the antenna
or cable system is grounded to provide some
protection against voltage surges and builtup static charges. Section 810 of the National
Safety
iii
Page 6
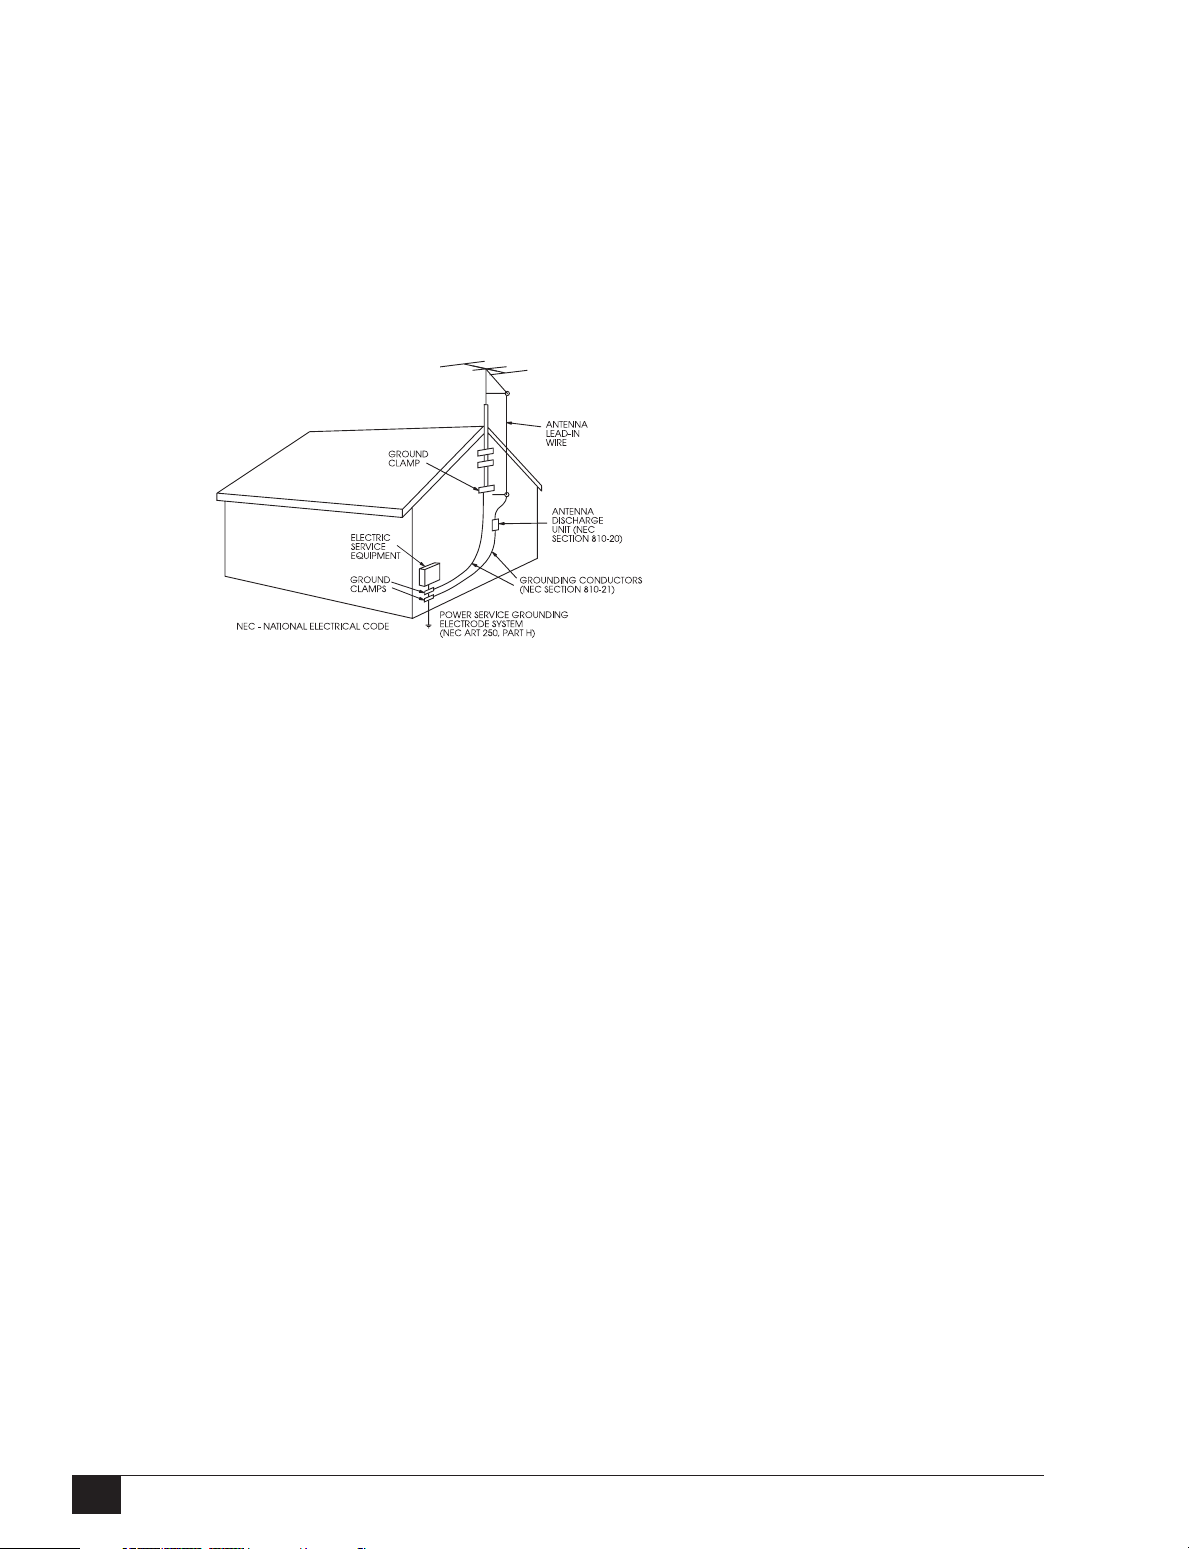
Electrical Code, ANSI/NFPA No. 70-1984,
provides information with respect to proper
grounding of the mast and supporting structure, grounding of the lead-in wire to an antenna discharge unit, size of grounding conductors, location of antenna-discharge unit,
connection to grounding electrodes, and requirements for the grounding electrode. See
figure below.
LIGHTNING
For added protection of this video unit during a lightning storm, or when it is left unattended and unused for long periods of time,
unplug it from the wall outlet and disconnect
the antenna or cable system. This will prevent damage to the video unit due to lightning and power line surges.
POWER LINES
An outside antenna system should not be located in the vicinity of overhead power lines
or other electric light or power circuits, where
it can fall into such power lines or circuits.
When installing an outside antenna system
extreme care should be taken to keep from
touching such power lines or circuits as contact with them might be fatal.
spillage occur, unplug unit and have it
checked by a technician before use.
SERVICING
Do not attempt to service this video unit yourself as opening or removing covers may expose you to a dangerous voltage or other
hazards. Refer all servicing to qualified service personnel.
DAMAGE REQUIRING SERVICE
Unplug this video unit from the wall outlet
and refer servicing to qualified service personnel under the following conditions:
a When the power supply cord or plug is
damaged.
b If any liquid has been spilled onto or ob-
jects have fallen into the video unit.
c If the video unit has been exposed to rain
or water.
d If the video unit does not operate normally
by following the operating instructions.
Adjust only those controls that are covered
by the operating instructions. Improper
adjustment of other controls may result in
damage and will often require extensive
work by a qualified technician to restore
the video unit to its normal operation.
e If the video unit has been dropped or the
cabinet has been damaged.
f When the video unit exhibits a distinct
change in performance—this indicates a
need for service.
REPLACEMENT PARTS
When replacement parts are required, be sure
the service technician has used replacement
parts specified by the manufacturer or those
having the same characteristics as the original part. Unauthorized substitutions may result in fire, electric shock or other hazards.
OVERLOADING
Do not overload wall outlets and extension
cords as this can result in the risk of fire or
electric shock.
OBJECTS AND LIQUIDS
Never push objects of any kind into this video
unit through openings as they may touch dangerous voltage points or short out parts that
could result in a fire or electric shock. Never
spill liquids of any kind onto the unit. Should
DVD System User’s Guide
iv
SAFETY CHECK
Upon completion of any service or repairs to
this video unit ask the service technician to
perform safety checks to determine that the
video unit is in safe operating order.
HEAT
This video unit should be situated away from
heat sources such as radiators, stoves, or
other products (including amplifiers) that produce heat.
Page 7

GETTING STARTED
1
WELCOME
Welcome to the DHT7100, the all-in-one digital home theater system, complete with a DVD
player, AM/FM receiver and built-in amplifier! Now you can enjoy all your favorite home
entertainment media in one integrated package, including:
• DVD movies in Dolby Digital 5.1 surround sound
• Audio and Video CDs
• MP3 audio files burned on CD-R/CD-RW
• Plus all your favorite AM/FM radio stations!
This Chapter shows you everything you need to set up your DHT7100, from
unpacking to connections to powering on the system.
DISC COMPATIBILITY
The DHT7100 can play discs with the
following logos:
• DVD (Digital Versatile Disc) Video
• CD Audio
•Video-CD
• Region 1
• Dolby Digital
• DTS (Digital Theater Sound)
• MP3
• CD-R/CD-RW
Not supported: LD, CD-ROM, DVD-ROM
NOTE
• DVD players and discs are coded by region. This DVD player is
coded Region 1, which includes the U.S., U.S. territories and
Canada. If a disc is not coded for Region 1, it will not play.
1 - Getting Started
1
Page 8
STEP 1 - UNPACK
Before you begin, make sure the following
accessories are included in your DHT7100
packing case:
• Remote Control
• AM Loop Antenna
• FM Antenna
•Video cable
• User’s Guide
•Warranty Card
STEP 2 - INSERT REMOTE
BATTERIES
1. Remove the battery cover on the back of
the remote by pressing down and sliding
the cover in the direction of the arrow.
2. Insert two 1.5V AAA batteries, paying
attention to the correct polarities (+ and
–).
3. Replace the battery cover.
Component
Video
Insert two 1.5V AAA batteries.
S-Video Composite
Video
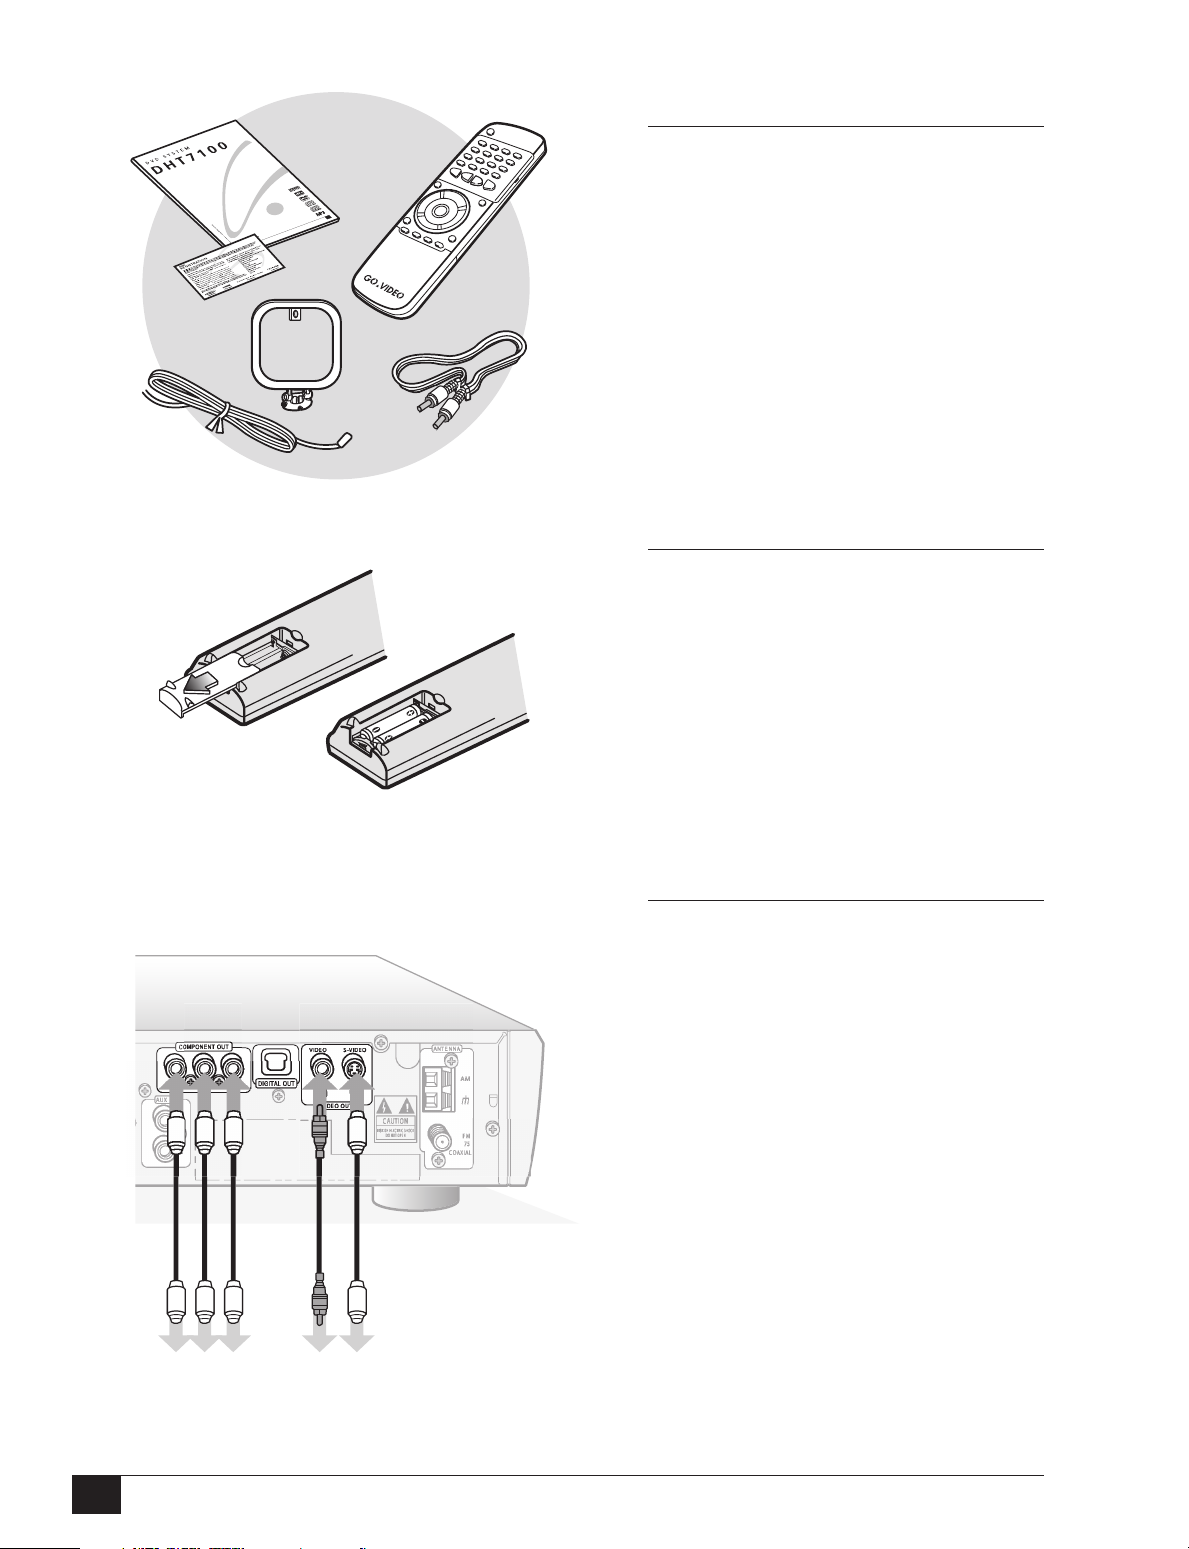
STEP 3 - CONNECT VIDEO TO TV
Composite Video (Good Quality)
Connect the supplied video cable from the
VIDEO OUT jack on the back panel of the
system to the VIDEO IN jack on your
television.
S-Video (Better Quality)
If your television is equipped with an SVideo input, connect an S-Video cable (not
supplied) from the S-VIDEO OUT jack on
the back panel of the system to the SVIDEO IN jack on your television.
Component Video (Best Quality)
If your television is equipped with Component Video inputs, connect a component
video cable (not supplied) from the Pr, Pb
and Y jacks on the back panel of the system
to the corresponding jacks on your television.
DVD System User’s Guide
2
Page 9

C
r
Front
S
Lef
t
Rear
Right
Rear
NENT OUT
DIGITAL OUT
Connect wires for each
speaker as shown.
Left
ente
Right
Front
ubwoofer
STEP 4 - PLACE & CONNECT SPEAKERS
Speaker Placement
Arrange the 6 speakers as shown in your listening area.
•
Front Speakers
(16' cables) - Set the front speakers so that they are aligned at ear
level and at a horizontal angle of 45 degrees to the primary listening area.
•
Rear Speakers
(32' cables) - Set the surround speakers further back, parallel to the
walls, at 2 to 3 feet above the ear level of the primary listening area. If the space
behind the listening area is limited (i.e., close to the wall), place the rear speakers
facing each other on either side.
•
Center Speaker
(16' cable) - The center speaker should be positioned with its top
surface flush with the front speakers. However, you may place the speaker either on
top of or next to your TV set.
•
Subwoofer
(15' cable) - Place the subwoofer at any convenient location within the
vicinity of the listening area.
Speaker Connections
1. Make sure the power is turned off before connecting the speakers to prevent possible damage to the speakers.
2. Connect each red and black speaker wire to the system’s back panel as shown, being
careful to connect each speaker to its correctly labeled output.
3. To insert each color-coded wire, press down on the red and black thumb levers and
then release them to lock the wires in place.
1 - Getting Started
3
Page 10

Connect the
supplied AM
and FM
antennas.
STEP 5 - CONNECT ANTENNA
AM Loop Antenna
1. Complete assembly of the supplied AM
loop antenna by rotating the base and
snapping it into place.
2. Connect the two wires from the AM loop
antenna to the AM ANTENNA connector on the back panel. Press down on
the thumb lever to insert each wire, and
then release to lock the wires in place.
FM Antenna
Connect the supplied FM antenna to the
“FM 75Ω COAXIAL” connector on the back
panel. If noise or interference occurs, use an
external antenna with a 75Ω coaxial cable
(not supplied).
Plug in and
power on the
unit.
STEP 6 - POWER ON THE
SYSTEM
1. Connect the power cord to a standard
120VAC/60Hz electrical outlet.
• The red Standby LED will glow on
the front panel to indicate that the
system is plugged in and in Standby
mode.
2. Press the POWER button on the
front panel or the remote control to
power on the unit.
DVD System User’s Guide
4
Page 11

BRAND TV CODE
0
564
897
231
d
o
MO/ST
e
R
Return
Go To
y
UX
O
Daewoo ............................. 19
Emerson............................. 21
Hitachi................................ 10
JVC .................................... 11
LG .......................... 08, 06, 18
Loewe ................................ 28
Magnavox .......................... 04
Matsushita ......................... 24
Mitsubishi .......................... 13
Newsan .............................. 27
Noblex ............................... 25
Panasonic........................... 12
RCA.............................. 07, 29
Samsung .......... 01, 14, 15, 23
Sanyo ........................... 05, 20
Sharp ........................... 02, 22
Sony ................................... 03
Telefunken ......................... 26
Toshiba .............................. 09
Zenith................................. 17
STEP 7 - PROGRAM REMOTE TO
OPERATE TV
You can program the DHT7100 remote
control to operate many brands of television.
1. Find the TV code(s) for your brand of
television.
• If your brand is not listed, you will not
be able to program the remote.
2. Point the remote at your television.
3. While holding down the TV POWER
button, press the 2-digit number listed
for your brand of television.
TV CodePress and
hold:
TV
+
Locate the TV Code(s) for your
brand of television.
TUNE
A
Ban
Titl
Audi
Displa
TV/VIDE
Use these keys to control your
television.
4. If your TV powers on or off, programming is complete.
• If the TV did not power on or off, try
the other codes for your brand until
you find one that works.
• Not all TV models can be pro-
grammed.
TV Control Keys
Once the remote is programmed, use the
following keys to control your television:
1Press the TV POWER button to
1
2
3
4
power your TV on or off.
2Press the TV CHANNEL +/- buttons to
select the next or previous channel on
your television.
3Press the TV VOLUME +/- buttons to
adjust the volume level on your television.
4Press the TV/VIDEO button to select the
TV’s video input(s).
1 - Getting Started
5
Page 12
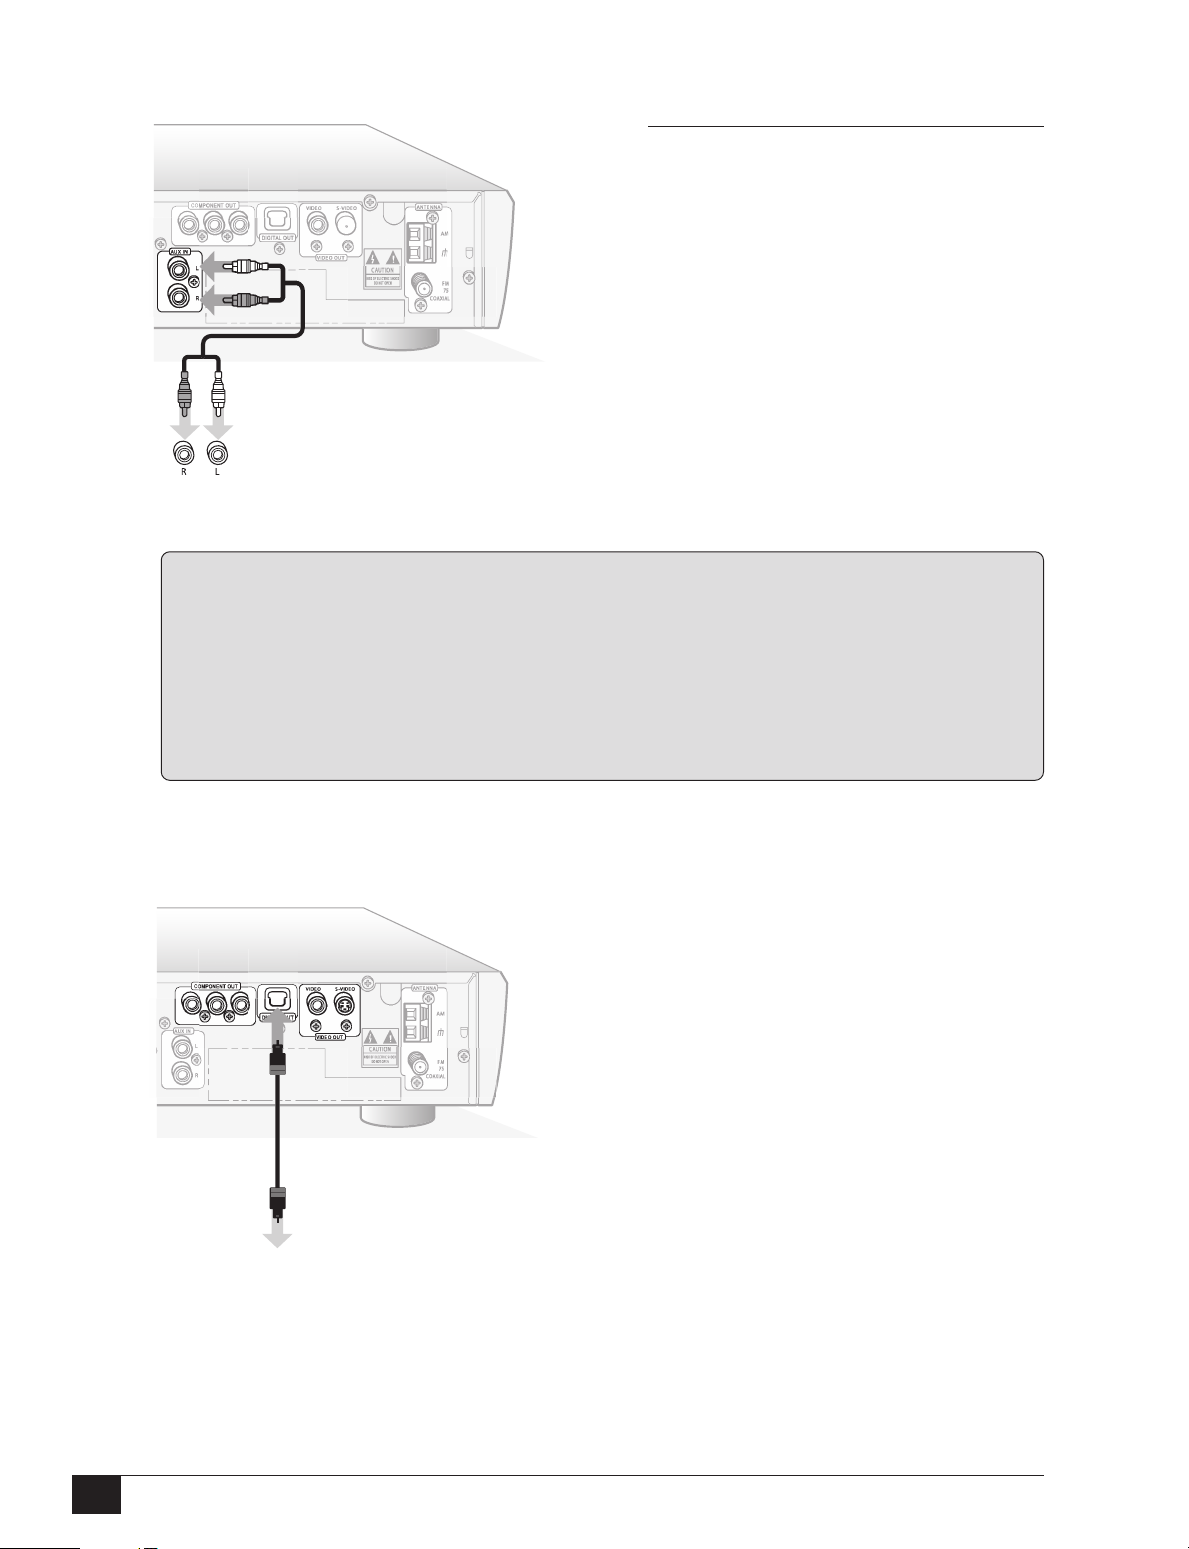
STEP 8 - OPTIONAL
CONNECTIONS
Connect Aux In
You can connect the audio from your VCR or
other audio source to the DHT7100 to enjoy
stereo or Dolby Pro Logic surround sound
playback through the speakers.
• Connect an RCA stereo audio cable from
the Audio Out jacks on your VCR (or
other audio source) to the AUX IN jacks
on the back panel of the system.
Connect the Audio Out from
your VCR or other Audio
Source to the Aux In jacks.
SPECIAL NOTES ON CONNECTING A VCR TO THE DHT7100
1. There is no need to change the video connection you are currently using to connect your
VCR to your television. Simply view the VCR in the same manner you currently do.
2. Connect the audio from your VCR to the Aux In jacks on the back panel of the DHT7100
as mentioned above.
3. Press the AUX button on the DHT7100 and turn down the volume on your TV to listen to
the audio from your VCR through the speakers.
Connect the
Digital Out from
the DHT7100 to
the Digital In on
your A/V receiver.
Connect Digital Out
The optical digital output allows you to
connect the DHT7100 to an audio/video
receiver with a Dolby Digital and/or DTS
decoder.
• Connect a digital optical cable from the
DIGITAL OUT on the back panel of the
DHT7100 to the DIGITAL IN of your A/V
receiver.
• See “Digital Output Format” on page
24 to set the format of the digital output
for your type of audio/video receiver to
bitstream or linear PCM (stereo).
Initial Setup is complete!
Please proceed to Chapter 2 - Basic Operations.
DVD System User’s Guide
6
Page 13
o
MO/ST
e
n
Go To
y
OBand
TUNER
AUX
BASIC OPERATIONS
1
FM
VD
AM
0
2
This chapter shows you how to use basic features of your DHT7100, such as playing
DVDs, navigating disc menus, and using the AM/FM receiver.
2 3
1
Titl
Audi
Retur
Displa
Select DVD, Tuner or Aux.
TV/VIDE
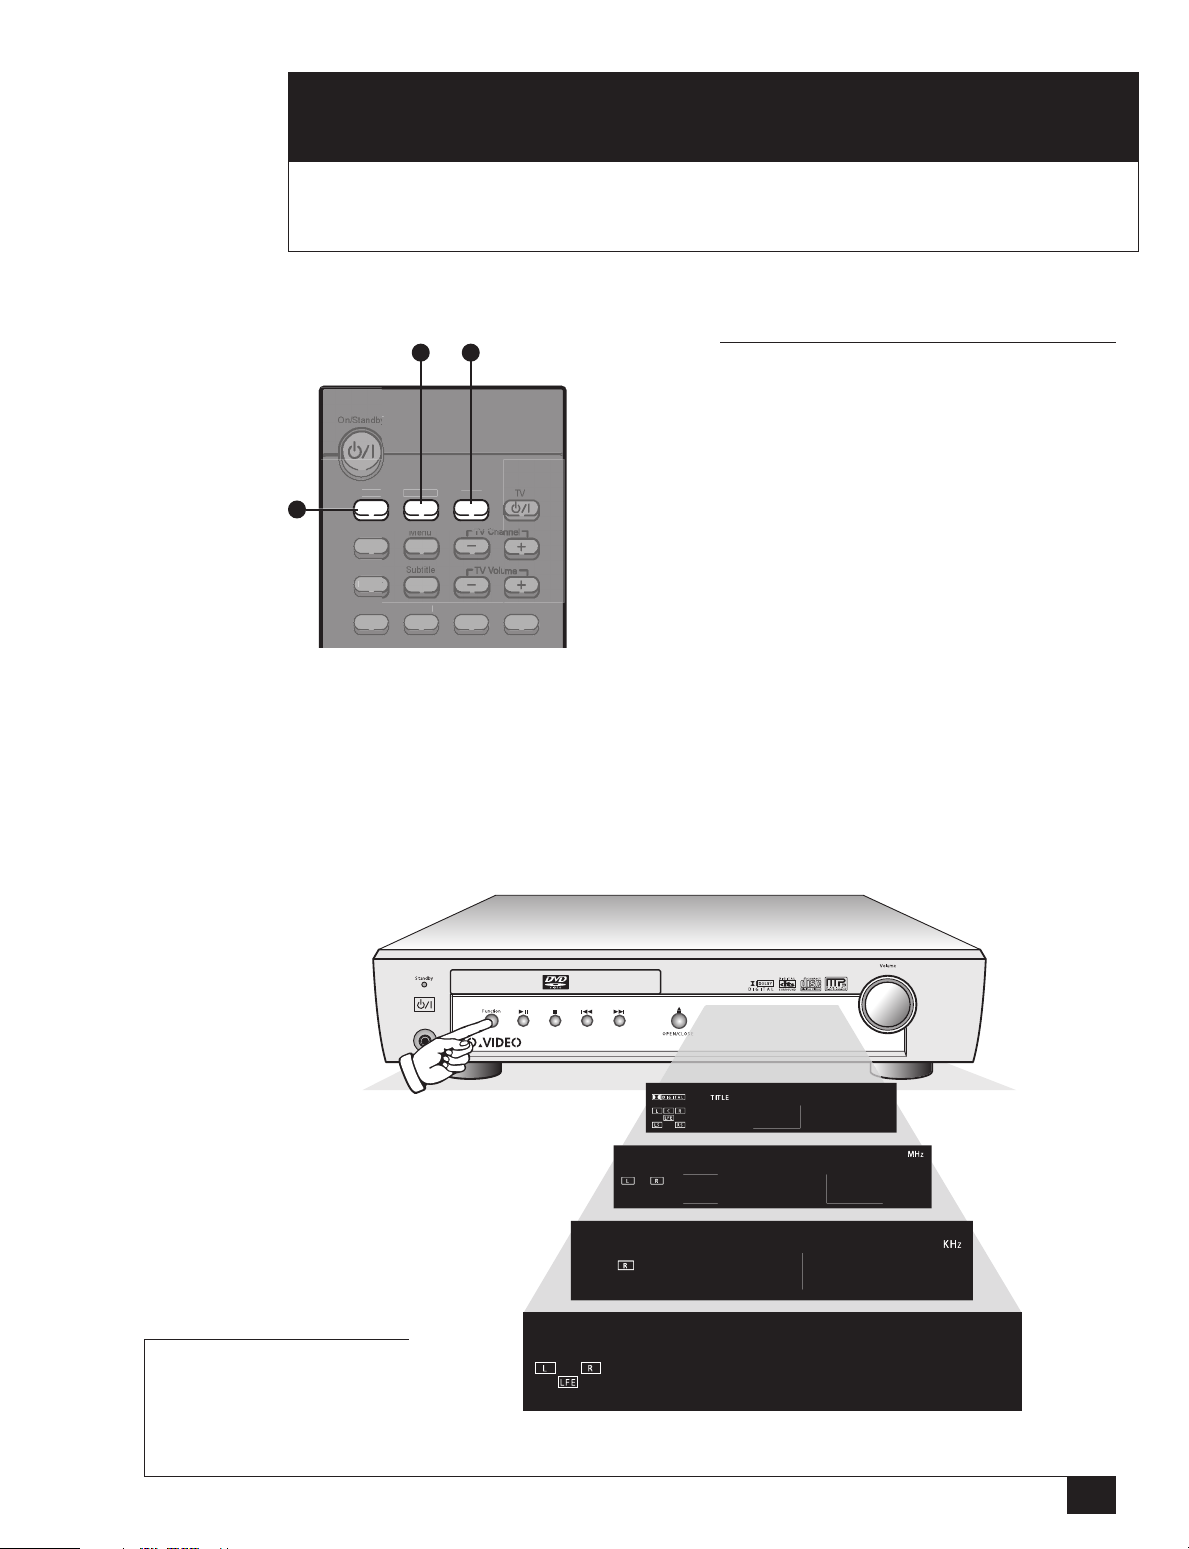
SELECTING DVD, TUNER OR AUX
The first step in using the DHT7100 is to
select one of the three basic functions:
DVD, Tuner or Aux.
1 DVD Function
Press the DVD button to watch movies on
DVD or VCD or listen to music on CD or
MP3-CD.
2 Tuner Function
Press the TUNER/BAND button repeatedly
to switch between the AM and FM receiver.
3 Aux Function
Press the AUX button to listen to an external audio source (such as the audio from
your VCR) connected to the rear AUX IN
jacks.
NOTE
•You can also press the
FUNCTION button on the
front panel repeatedly to
select DVD, AM, FM or
AUX.
D
89.
DVD
62
AUX in
2 - Basic Operations
7
Page 14

BASIC DISC PLAYBACK
,
g
e
o
O/ST
e
Go To
y
O
Follow these steps to playback a DVD, CD, VCD or MP3-CD:
1. Press the OPEN/CLOSE button on the front panel to open the disc tray.
2. Insert the disc with the label side up.
• If your DVD is double-sided, orient the disc with the desired label facing up.
3. Press the OPEN/CLOSE button again to close the disc tray.
4. Press the PLAY/PAUSE button to begin playback.
• Many discs will begin playback automatically when they are inserted.
• If the DVD has a disc menu, or more than one title, the disc menu may appear (see
Disc Menu Navigation below).
Titl
1
Audi
M
Displa
TV/VIDE
4
Tunin
3
2
Volum
Use these keys to navigate
DVD disc menus.
NOTE
•A
Title
is a movie on a DVD disc.
• Each Title on a DVD disc is divided into
several smaller sections called
Chapters
DISC MENU NAVIGATION
Use the following keys to navigate DVD disc
menus, which allow you to select titles,
chapters and special features on the disk.
1 Menu
Press the MENU button to display the disc
menu for the currently loaded DVD.
2 Arrow Keys ,
Press the ARROW keys to move the cursor
up, down, left and right in the disc menu.
3 Enter
Press the ENTER button to confirm settings
in the disc menu.
4 Return
Press the RETURN button to display the
previous menu or to exit the disc menu.
.
DVD System User’s Guide
8
Page 15

OPTIONS DURING PLAYBACK
e
d
o
O/ST
T
e
e
a
ode
e
Go To
D
y
O
R
g
R
Slow
While a disc is playing, you can choose from
a variety of playback options:
TUNE
Ban
itl
1 Freeze
While a disc is playing, press PLAY/PAUSE
to freeze playback. Press PLAY/PAUSE
Audi
M
ispla
3
/TUNE
TV/VIDE
1
4
Tunin
5
again to resume playback.
2 Frame Advance
Press the STEP button to step forward one
frame at a time. Press PLAY/PAUSE
to
resume normal playback.
3 Stop/Resume
Press the STOP button to stop and hold
DVD or CD playback at the current playback
point (“Pre-Stop”). If you press PLAY/PAUSE
the movie will resume at this point.
Press STOP twice to stop fully and reset
the disc at the beginning.
m
Mut
4 Skip Forward/Skip Back
While a DVD or CD is playing, press the
nd Edit
PK M
SKIP FORWARD or SKIP BACK
buttons to skip to the next or previous
chapter or track.
6
Angl
Repe
Use these keys for enhanced
control during playback.
NOTE
• If the player is left in pause for more than 5
minutes, it will stop automatically.
2
5 Scan Forward/Scan Back
While a DVD or CD is playing, press SCAN
FORWARD or SCAN BACK to scan
forward or backward at variable speeds.
6 Slow Motion
While a DVD is playing, press the SLOW
button for slow motion playback at 1/2 and
1/4 speeds.
2 - Basic Operations
9
Page 16

LISTENING TO THE RADIO
e
o
O/ST
e
e
a
ode
e
t
Go To
y
O
Slow
Band
R
g
R
1 Selecting the AM/FM Tuner
•
1
TUNE
Titl
Remote Control
BAND button until the desired tuner
band (AM or FM) appears on the front
- Press the TUNER/
panel display.
Audi
M
Displa
TV/VIDE
•
Front Panel
- Press the FUNCTION
button until the desired tuner band (AM
or FM) appears on the front panel
/TUNE
4
Tunin
2
3
,
display.
2 Manually Selecting Stations
•
Remote Control
- Press the TUNING UP/
DOWN / buttons to manually
tune the desired station.
•
Front Panel
- Press the STOP button
to select MANUAL mode, then press the
/ buttons to manually tune the
desired station.
m
Mut
nd Edi
PK M
Angl
Repe
Use these keys to listen to AM
or FM radio.
VOLUME SETTINGS
3 Auto Searching for Stations
•
Remote Control
- Press and hold the
TUNING UP/DOWN / buttons to
automatically search for the next available station.
•
Front Panel
- Press the STOP button to
select MANUAL mode, then press and
hold the / buttons to automatically search for the next available station.
4 Browsing Preset Stations
•
Remote Control
- Press the SKIP BACK
and SKIP FORWARD buttons to
select the next Preset Station.
•
Front Panel
- Press the STOP button to
select PRESET mode, then press the
buttons to select the next Preset
Station.
See page 11 to program Presets!
1 Adjust the volume by turning the VOLUME control on the front panel or the VOLUME -/
Mute
+ buttons on the remote control. Volume can be set from 0 (MIN) to 70 (MAX).
2Press the MUTE button to mute the audio.
3 For more private listening, you can plug headphones into the 1/4" stereo headphone
Audio
MO/ST
jack located on the front panel. No sound will come from the speakers.
4Press the Audio/MO/ST button repeatedly to choose between Mono or Stereo sound. In
poor reception areas, select Mono for a clear, interference-free broadcast.
DVD System User’s Guide
10
Page 17

PROGRAMMING STATION
e
o
O/ST
T
e
e
a
ode
e
Go To
D
y
O
Slow
d
R
g
R
PRESETS
You can save up to 30 station Presets, 15
TUNE
1
Ban
itl
Audi
M
ispla
TV/VIDE
/TUNE
5
Tunin
3
each for AM and FM:
1 Select the Tuner
Press the TUNER/BAND button on the
remote control or the FUNCTION button on
the front panel until the desired tuner band
(AM or FM) appears on the front panel
display.
2 Select Manual
Press the STOP button on the front panel
until MANUAL appears on the front panel
display.
MANUAL
3 Tune the Desired Station
m
Mut
Press the TUNING UP/DOWN /
buttons to tune in the desired station.
nd Edit
PK M
Angl
Repe
Use these keys to program up
to 30 Preset radio stations.
2
4 Program the Station
Press the PROGRAM button on the remote
control to program the station. PROGRAM
will appear on the front panel display above
the station number.
89.1FM
6
4
,
5 Choose a Preset Number
Press the SKIP BACK and SKIP FORWARD buttons to select one of the 15
Preset position numbers (FM1~FM15, or
AM1~AM15).
6 Program the Preset
Press PROGRAM again to save the Preset.
PROGRAM will disappear from the display.
89.1FM2
2 - Basic Operations
11
Page 18

/CD
g
e
e
2 4
,
2 4
,
DVD
Tunin
3
m
Use these keys to playback
MP3 files.
WHAT IS MP3?
MP3 stands for MPEG1
Layer 3, the global
standard for audio compression, which can
reduce file sizes up to 12
times without degrading
sound quality.
MP3 PLAYBACK
Follow these steps to playback an MP3-CD:
1 Insert MP3-CD
Press the OPEN/CLOSE button on the front
panel to open the disc tray and insert your
MP3-CD. Press the OPEN/CLOSE button
again to close the disc tray.
• The first song in the first folder will begin
playing automatically and the MP3
playback menu will appear.
Mut
• MP3 file names are shortened to 8
characters.
• The total track time and time remaining
appear in the upper right corner of the
screen.
2 Browse MP3 Files
Use the UP/DOWN ARROW keys to browse
up and down the list of MP3 files.
• While browsing, you can quickly jump to
the currently playing selection by pressing the LEFT ARROW key.
3 Play an MP3 File
Press the ENTER key to begin playback of
any highlighted file.
4 Change Folders
Use the UP/DOWN arrow keys to highlight
the folder at the top of the current song list,
then press ENTER. Pick a new folder, and
then press ENTER to open it.
1
DVD System User’s Guide
12
Page 19

SPECIAL FEATURES
3
DISPLAY
Press the DISPLAY button to view the on-screen display, which provides a snapshot
of the currently loaded disc. The first press brings up the first display. The second
press brings up the second display, and the third press turns off the on-screen
display.
This chapter shows you how to use special playback and operations features of your
DHT7100. Each feature is named for the remote control button that activates it.
123 4
1/2 1/2 00:00:00
56 7 8
Display
NOTE
ENG OFF 1/1ENG 1/3
1 Disc Type
Indicates the type of the currently
loaded disc: DVD, CD, VCD, or
MP3-CD.
2 Title
Indicates the current Title number
and the total number of Titles.
3 Chapter/Track
Indicates the current Chapter/Track
number and the total number of
Chapters/Tracks.
4 Time Remaining
Indicates the current counter
position in hours, minutes, and
seconds.
5 Subtitle Language
Indicates the current Subtitle
language and the total number of
Subtitle languages available on the
disk.
6 Audio Language
Indicates the current Audio language/format and the total number
of Audio languages/formats available on the disk.
7 Repeat Mode
Indicates the current Repeat Mode.
8 Angle
Indicates the current Angle and the
total number of Angles available on
the disk.
• If the INVALID symbol appears on the
screen when you press a button, that
feature is not available on the loaded disc.
3 - Special Features
13
Page 20

Go To
GO TO
1. Press the GO TO button repeatedly to
jump to one of the following:
•Title
• Chapter/Track
•Time
2. Use the 0-9 keys or the LEFT/RIGHT
ARROW keys to enter the desired title,
chapter/track or counter position (in
hours, minutes and seconds).
3. Press ENTER to start playback.
Title
TITLE
With DVD loaded
1. Press the TITLE button to display the
Title menu of the currently loaded DVD
(not all DVDs have a multiple Titles and/
or Title menus).
2. Use the 0-9 keys or ARROW keys to
select the desired title.
3. Press ENTER to start playback.
With VCD loaded
1. Press the TITLE button to display the
Disc View menu of the currently loaded
VCD.
2. Press 1 for Track View or 2 for Index
View:
Track View
Shows you nine thumbnail views, representing the first 9 tracks on the disk.
Index View
Shows you nine thumbnail views, representing the complete disc divided into
nine scenes of equal length. This feature
is useful if the VCD is not divided into
tracks.
3. Use the 1-9 keys or ARROW keys to
select the desired scene.
4. Press ENTER to start playback.
DVD System User’s Guide
14
Page 21

ANGLE
While a DVD is playing, press the
ANGLE button to select among all
available angles on the disc (not all
DVDs contain multiple angles).
ZOOM
While a DVD is playing, press the
ZOOM button repeatedly to magnify
the image at two or four times normal
size.
Angle
Zoom
ENG 1/3 OFF 1/1ENG 1/3
SPA 2/3
FRE 3/3
ENG 1/3 OFF 1/1ENG 1/3
SPA 2/3
FRE 3/3
Subtitle
SUBTITLE
While a DVD is playing, press the
SUBTITLE button repeatedly to select
among all available subtitle languages
on the disc.
Audio
MO/ST
AUDIO
While a DVD is playing, press the
AUDIO button repeatedly to select
among all available audio tracks/formats
on the disc.
3 - Special Features
15
Page 22

Repeat
REP. CHAPTER REP. TITLE REP. OFF
REP. A- REP. A-B OFF
REPEAT
Press the REPEAT button to repeat
playback of the current title, chapter or
track.
Repeat
AB REPEAT
Press the REPEAT A B button to
playback a segment of a movie or song
in a continuous loop.
1. Press once to mark point A (the start of
the looping segment).
2. Press again to mark point B (the end of
the looping segment).
• The segment will play from A to B in a
continuous loop.
3. Press a third time to cancel AB Repeat.
AB
Program
NOTE
PROGRAM
You can program a custom order for
playback of a DVD or CD.
1. Insert a DVD or CD and press the PROGRAM button.
2. Press the ENTER button to select the
first Title placeholder.
3. Use the 0-9 keys to enter the desired
Title number, and then press ENTER.
4. Use the 0-9 keys to enter the desired
chapter/track number, and then press
Enter.
•To select ALL, press Enter when the
space is blank (—).
5. Repeat steps 3 and 4 to program each
title/chapter/track number in your
custom playback list.
•To erase a setting, use the UP/DOWN
arrow keys to highlight it, and then
press the CLEAR button.
6. Press PLAY/PAUSE to begin playback.
• The chapters/tracks will playback in
the order you specified.
•To cancel Program play, press the STOP button twice.
•You can also cancel Program Play by pressing the OPEN/
CLOSE button on the front panel to eject the disk.
DVD System User’s Guide
16
Page 23

TITLE REM. TIME
CHAPTER TIME
CHAPTER REM. TIME
TITLE TIME
1/2 1/2 00:00:00
Remain
REMAIN
Press the REMAIN button to see
how much time remains on the
current Title, Chapter or Track. Each
press will change the display to one
of the following:
•Total length of the current Title.
•Time remaining in the current Title.
•Total length of the current Chapter.
•Time remaining in the current Chapter.
D.R.C.
D.R.C. ON
D.R.C. OFF
DRC (DYNAMIC RANGE
COMPRESSION)
With DVD in Stop
While a DVD is loaded, press DRC to
set Dynamic Range Compression to:
• DRC ON - Compresses the dynamic
audio range of the DVD soundtrack for
watching movies late at night or when
you don’t want to disturb others. Loud
passages will be quieter, and soft passages will be louder.
• DRC OFF - Cancels Dynamic Range
Compression.
3 - Special Features
17
Page 24

SLEEP 10
SLEEP 150
OFF
Sleep
SLEEP
You can set the DHT7100 to sleep
(power off and go into Standby mode)
after a predetermined time from 10-150
minutes.
1. Press the SLEEP button on the remote
control repeatedly until the desired
sleep countdown appears on the front
panel display:
• SLEEP 10
• SLEEP 20
• SLEEP 30
• SLEEP 60
• SLEEP 90
• SLEEP 120
• SLEEP 150
• OFF
2. The system will power off after the time
has elapsed.
PRO LOGIC
3 - STEREO
STEREO
Note: To cancel the sleep timer, press
the SLEEP button until OFF appears on
the front panel display.
Pro Logic
PRO LOGIC
You can enjoy Dolby Pro Logic surround
sound while listening to any stereo
audio source, including the FM tuner,
CD playback, MP3 playback, or a stereo
source connected to the Aux Input,
such as a VCR.
1. While a stereo source is playing, press
the PRO LOGIC button on the remote
control repeatedly until the desired
surround format appears on the front
panel display:
• PRO LOGIC - Left, Center, Right,
Subwoofer and Surround Channels
• 3-STEREO - Left, Center, Right and
Subwoofer Channels
• STEREO - Left, Right and Subwoofer
Channels
DVD System User’s Guide
18
Note: The Pro Logic feature is not
applicable with DVDs encoded with
Dolby Digital 5.1 soundtracks.
Page 25

HALL
THEATER
PAVILION
DANCE CLUB
LIVE CLUB
DSP Mode
DSP MODE
While listening to stereo soundtracks,
you can customize the sound to approximate the sound inside a hall,
theater, pavilion, etc.
1. While in one of the 3 Pro Logic modes,
press the DSP MODE button to select
from the following:
• HALL
• THEATER
•PAVILION
• DANCE CLUB
• LIVE CLUB
EFFECT 1
EFFECT 2
EFFECT 3
DEFAULT
Effect
EFFECT
Finally, while listening to a stereo DSP
mode (see above), you can try four
different effects, or “degrees” of each
mode. Each one gradually intensifies
the given DSP effect.
1. While in one of the 5 DSP Modes, press
EFFECT to select from the following:
• EFFECT 1
• EFFECT 2
• EFFECT 3
•DEFAULT
3 - Special Features
19
Page 26

ADVANCED SETUP
4
This chapter shows how to fine tune your speaker settings, including size, delay, balance
and levels. You can also set language preferences, screen size, and digital output.
F - SP SMALL
C - SP SMALL
R - SP SMALL
SW - SP USE
SPEAKER SETUP
SPK Mode
SETTING SPEAKER SIZES
Press the SPK MODE button repeatedly to
set the relative size of each speaker:
Front Speaker Size
Press the LEFT/RIGHT ARROW keys to
select SMALL (default) or LARGE.
Center Speaker Size
Press the LEFT/RIGHT ARROW keys to
select SMALL (default), LARGE or NONE.
Rear Speaker Size
Press the LEFT/RIGHT ARROW keys to
select SMALL (default), LARGE or NONE.
Subwoofer Size
Press the LEFT/RIGHT ARROW keys to
select USE (default) or NONE.
C - DEL 00MS
R - DEL 00MS
NOTE
• It is not necessary to change speaker size
settings unless you are connecting different
speakers to the unit.
• Be sure to use speakers with the same
specifications (see p. 28)
ADDING CENTER & REAR DELAYS
If your center and/or rear speakers are
closer to your primary listening area than
your front speakers, you can add a delay so
that the sound from all five speakers arrives
at approximately the same time. Assume 1
MS (millisecond) of delay for every one foot
of distance; see “Calculating Delays” on
page 21.
Press the SPK MODE button repeatedly to
adjust each of the following:
Center Delay
Press the LEFT/RIGHT ARROW keys to set
the center speaker delay from 0-5MS.
Rear Delay
Press the LEFT/RIGHT ARROW keys to set
the rear speaker level from 0-10MS.
DVD System User’s Guide
20
Page 27

CALCULATING DELAYS
1. Measure the distance from your front
speakers to your primary listening area
(e.g., 10 feet)
2. Measure the distance from your center
speaker to your primary listening area
(e.g., 7 feet) and your rear speakers to
your primary listening area (e.g., 4 feet).
3. Calculate the difference between these
two distances (10-7=3 feet, and 10-4= 6
feet).
4. Assuming 1 MS (millisecond) delay for
every foot of distance, calculate the
proper delay, e.g. 3 MS for the center
delay and 6 MS for the rear delay.
Sound Edit
SETTING SPEAKER BALANCE
AND LEVELS
You can adjust the balance and relative
volume levels for each of the six speakers.
To test your sound levels with a neutral
“white noise” signal, press the Test Tone
button (see “Using the Test Tone Generator” below).
Press the SOUND EDIT button repeatedly
to adjust each of the following:
Front Speaker Balance
Use the LEFT/RIGHT ARROW keys to set
the balance between the left and right front
speakers (from -6dB ~ 0 for each speaker)
Rear Speaker Balance
Use the LEFT/RIGHT ARROW keys to set
the balance between the left and right rear
speakers (from -6dB ~ 0 for each speaker)
Test Tone
USING THE TEST TONE
GENERATOR
To help you fine tune your speakers
levels, a Test Tone generator is provided
which sends a neutral “white noise” for
~5 seconds to each speaker.
1. Press the TEST TONE button.
2. The Test signal will be sent to the Left
Front, Center, Right Front, Right Rear,
Left Rear and Subwoofer, in that
order.
3. While the Test signal is playing, use
the VOLUME +/– keys or VOLUME
knob to fine-tune your levels.
4. Press the TEST TONE button again to
cancel.
Center Speaker Level
Use the LEFT/RIGHT ARROW keys to set
the center speaker level relative to the
front speakers (from -6dB ~ +6dB, or OFF)
Rear Speaker Levels
Use the LEFT/RIGHT ARROW keys to set
the rear speaker levels relative to the front
speakers (from -6dB ~ +6dB, or OFF)
Subwoofer Level
Use the LEFT/RIGHT ARROW keys to set
the subwoofer level relative to the front
speakers (from -2dB ~ +10dB, or OFF)
4 - Advanced Setup
21
Page 28

e
e
p
Slow
t
3
2
SETUP MENU NAVIGATION
The DHT7100 Setup menu allows you to
choose language, screen size, rating level
and digital audio output preferences. Use
the following keys to navigate the Setup
menu:
m
Mut
1 Setup Button
While playback is stopped, press the SETUP
button to display the DHT7100 Setup
nd Edi
Ste
1
menu. Also press the SETUP button to exit
the Setup menu.
2 Arrow Keys ,
Press to move the cursor up, down, left and
right in the Setup menu.
3 Enter Button
Press to confirm selections in the Setup
menu.
LANGUAGE PREFERENCES
1. While the player is in Stop mode, press
the SETUP button.
2. Use the LEFT/RIGHT ARROW keys to
select “Language.”
3. Use the UP/DOWN ARROW keys to
highlight one of the following, then
press the ENTER button to select:
NOTE
• Choose “Original” for Audio, Subtitle and/or
Menu Language if you want the system to
select the disc’s default language.
OSD Language
The language you select will be used in the
Setup Menu and all On-Screen Displays.
Use the UP/DOWN ARROW keys to select
English, French or Spanish, then press
ENTER.
Audio
The language you select will be the default
Audio language for DVD playback (if it is
available on the loaded disc); otherwise, the
disc’s default Audio language will be used.
Use the UP/DOWN ARROW keys to select
one of the languages listed, then press
ENTER.
Subtitle
The language you select will be the default
Subtitle language for DVD playback (if it is
available on the disc); otherwise, the disc’s
default subtitle language will be used. Use
the UP/DOWN ARROW keys to select one
of the languages listed, then press ENTER.
DVD System User’s Guide
22
Page 29

Menu Language
The language you select will be the default
language for DVD disc menus (if it is available on the disc); otherwise, the disc’s
default menu language will be used. Use
the UP/DOWN ARROW keys to select one
of the languages listed, then press ENTER.
4. Press the SETUP button to exit the menu
system.
TV SCREEN SIZE
The TV Screen setting will ensure that the
DHT7100 displays movies appropriately for
the shape of your television screen.
1. While the player is in Stop mode, press
the SETUP button.
2. Use the LEFT/RIGHT ARROW keys to
select “System.”
3. Use the UP/DOWN ARROW keys to
select “TV Screen,” then press the
ENTER button.
4. Use the UP/DOWN ARROW keys to set
the screen size to:
NOTE
• If the DVD movie is recorded in a 4:3 aspect
ratio, you will not be able to view the full 16:9
picture even in 4:3 LB or 16:9 mode.
4:3 LB (Letterbox)
Select if you want DVD movies to display at
their full widescreen width on a standard 4:3
television screen (4:3 refers to the ratio of
the width of the screen to its height). This
will cause black bars to appear above and
below the picture.
4:3 PS (Pan & Scan)
Select if you want DVD movies to fill the
screen on a standard 4:3 television screen.
16:9
Select if you have a widescreen television
with a 16:9 aspect ratio.
5. Press ENTER to confirm your selection.
6. Press the SETUP button to exit the menu
system.
4 - Advanced Setup
23
Page 30

IF YOU FORGET YOUR
PASSWORD:
While the player is in Stop mode, hold the
STOP button down on the front panel for
at least 5 seconds. “INITIAL” will appear
on the front panel display and all default
settings will return to their factory presets.
RATING LEVELS
The DHT7100 features a password-protected rating
system to prevent playback of DVDs with objectionable material.
1. While the player is in Stop mode, press the
SETUP button.
2. Use the LEFT/RIGHT ARROW keys to select
“System.”
3. Use the UP/DOWN ARROW keys to select
“Rating Level,” then press ENTER.
4. Use the 0-9 keys to enter a 4-digit password,
then press ENTER.
• The player’s password is set to “7890” by
default.
5. Use the UP/DOWN ARROW keys to select either
RATING LEVEL or NEW PASSWORD, then press
ENTER.
•1 is most restrictive, and 8 is least restrictive. If
6 is selected, a disc rated 7 or above cannot
be played.
• If you select NEW PASSWORD, the screen
changes and enables you to enter the new
password.
6. Press the SETUP button to exit the menu system.
DIGITAL OUTPUT FORMAT
If you have connected the DHT7100 to an A/V
receiver with a Dolby Digital and/or DTS decoder,
you can specify the format of the outgoing digital
audio signal.
1. While the player is in Stop mode, press the
SETUP button.
2. Use the LEFT/RIGHT ARROW keys to select
“System.”
3. Use the UP/DOWN ARROW keys to select
“Digital Output,” then press ENTER.
4. Use the UP/DOWN ARROW keys to set the
Digital Output to:
DVD System User’s Guide
24
Set the Digital Out to
Bitstream or LPCM
Bitstream
Sends a digital signal that carries the Dolby Digital
5.1 and/or DTS multichannel information to your
external decoder.
LPCM
Sends a linear PCM (Pulse Code Modulation), or 2channel stereo signal, to your A/V receiver.
5. Press ENTER to confirm your selection.
6. Press the SETUP button to exit the menu system.
Page 31

HELP
5
The table below will help you solve common challenges with your DVD system. If
you don’t find the answers you need here, you can contact our Customer Service
Department as follows:
Phone: (480) 922-0896
Office hours: Monday-Friday, 6:00 a.m. to 9:00 p.m. MST
E-Mail: “customerservice@sensoryscience.com”
Web: “www.govideo.com” or
SYMPTOMS SOLUTIONS
This Chapter provides customer support information, as well as a list of frequently
asked questions, technical specifications and the product warranty.
Saturday-Sunday, 8:00 a.m. to 4:00 p.m. MST
“www.sensoryscience.com”
TROUBLESHOOTING
Disc tray does not open. • Is power cord plugged securely into power outlet?
• Turn off power to unit by pressing Power button
and then turn the player back on.
Disc does not play. • Check region number of DVD. DVD discs pur-
chased abroad may not be playable.
• This player cannot play CD-ROMs, DVD-ROMs,
etc.
• Check rating level of DVD.
Playback does not start immediately. • Check whether disc has any scratch marks or is
deformed.
No sound. • Is power cord plugged securely into power outlet?
• It is normal not to have sound during high-speed ,
slow or step playback.
• Are speakers properly connected?
• Is speaker Setup correctly customized?
• Is disc installed with label side facing up?
• Is disc severely damaged?
• Disc may be dirty. Wipe off fingerprints or dirt.
• Press the TEST TONE button to verify that the
Test Tone is working.
No picture and disc tray opens. • Was player moved suddenly from cold to warm
environment? When condensation forms inside
player, remove disc and let player stand for 1 or 2
hours with power on.
5 - Help
25
Page 32

SYMPTOMS SOLUTIONS
Poor sound quality. • Are speaker cables loose?
• Is there any dirt or debris at the end of the
speaker connectors?
Dolby Digital 5.1 not working. • Is disc labeled “Dolby Digital”?
• Are speakers properly connected?
No picture or poor picture quality. • Is TV power turned on?
• Are video cables properly connected?
• Is player in Pause?
• Is there any dirt on disc, or is disc damaged?
• Some DVD discs are not playable due to poor
quality manufacturing.
• When a dark scene changes to a bright scene
during playback, screen may flicker vertically.
Some disturbance is normal.
Remote control does not work. • Is the remote control within 23’ of the remote
sensor and within a 30 degree angle?
• Are there any obstacles between the remote
control and the remote control sensor?
• Are batteries drained or dead?
No audio or subtitle language. • Some DVDs do not include multiple audio or
subtitle languages.
Menu screen does not appear. • Is the remote control within 23’ of the remote
sensor and within a 30 degree angle?
• Are the batteries dead?
• Does disc have a Menu?
Lost password or malfunctioning unit. • While player is in Stop mode, press and hold the
STOP button on the front panel for at least 5
seconds. “INITIAL” will appear on the front panel
display and all settings will return to factory
presets. Do not use this function unless necessary
because it will erase all settings.
Desired radio station cannot be tuned in. • Is antenna installed properly?
• When antenna’s input signal is weak, install
external FM antenna in area with good reception
quality.
Cannot view widescreen movie. • Some DVDs only include standard 4:3 formatting.
Refer to DVD disc jacket.
CD-R/CD-RW discs do not play. • Make sure the CD-R/CD-RW recording session is
properly terminated or discs will not be playable.
• CD-RW has a lower reflection rate than CD-R
media and will take longer to read than CD-R
discs. For best results, set your CD burner to
write discs at low speed.
• If there are multiple sessions on the disc, only
the first session will be recognized.
DVD System User’s Guide
26
Page 33

DISC HANDLING PRECAUTIONS
• Hold the disc by the edges so the surface will not be soiled with fingerprints. Fingerprints, dirt and scratches can cause skipping and distortion.
• Do not write on the label side with a ball-point pen or other writing utensil.
• Do not use record cleaning sprays, benzene, thinner, static electricity prevention
liquids or any other solvent.
• Be careful not to drop or bend the disc.
• Do not install more than one disc on the disc tray.
• Do not try to close the disc tray when the disc is not installed properly.
• Be sure to store the disc in its exclusive case when not in use.
If the surface is soiled
•Wipe gently with a soft, damp (water only) cloth.
• When wiping discs, always move the cloth from the center (if you wipe the discs
using a circular motion, circular scratches are likely to occur, which will cause noise).
• If the disc is brought from a cold to a warm environment, moisture may form on the
disc. Wipe this moisture off with a soft, dry, lint-free cloth before using the disc.
DISC HANDLING & MAINTENANCE
Improper disc storage
You can damage discs if you store them in the following places:
•Areas exposed to direct sunlight
• Humid or dusty areas
•Areas directly exposed to a heat outlet or heating appliance
Discs which can be played with this system:
• CD-DA
•Video-CD
• CD-R/CD-RW
• DVD
• MP3
SYSTEM MAINTENANCE
• Be sure to turn the unit off and disconnect the AC power cord before cleaning the
system.
•Wipe the unit with a dry soft cloth. If the surfaces are extremely dirty, wipe clean with
a cloth that has been dipped in a weak soap-and-water solution and wrung out
thoroughly, and then wipe again with a dry cloth.
• Never use alcohol, benzene, thinner, cleaning fluid or other chemicals. And do not
use compressed air to remove dust.
5 - Help
27
Page 34

GENERAL
Operating Humidity Range 10%~75%
FM TUNER
AM TUNER
VIDEO OUTPUT
AMPLIFIER
Subwoofer speaker Output 40W (3Ω)
SPEAKERS
Output sound pressure level 87dB/W/M (Sub: 86dB/W/M)
TECHNICAL SPECIFICATIONS
Power Supply 120V, 60Hz
Power Consumption 120W
Weight 14.3 lbs (6.5Kg)
Dimensions (WxDxH) 14.6" x 3.1" x 11.8" (370mm x 300mm x 80mm)
Operating Temp Range 41-95° F (5-35° C)
Receiving Frequency 87.5~108MHz
Usable Sensitivity 10dB
S/N Ratio 60dB
Distortion 0.5%
Channel Separation 28dB
Receiving Frequency 522~1611MHz
Usable Sensitivity 54dB
S/N Ratio 40dB
Distortion 2%
Video 1.0 Vp-p (75Ω load)
Component Video Y: 1.0 Vp-p (75Ω load), Pr: 0.70 Vp-p (75Ω load),
Pb: 0.70 Vp-p (75Ω load)
S-Video Luminance: 1.0 Vp-p (75Ω load),
Color: 0.286 Vp-p (75Ω load)
Front speaker Output 20W x 2 (6Ω)
Center speaker Output 20W (6Ω)
Rear speaker Output 20W x 2 (6Ω)
Frequency range 20Hz~25KHz
S/N Ratio 75dB
Channel separation 50dB
Input sensitivity (AUX) 500mV
SPEAKER SYSTEM 5.1ch speaker system
Impedance 6Ω x 5 (Sub: 3Ω)
Frequency range 150Hz~18KHz (Sub: 45Hz~250Hz)
Rated input 40W (Sub: 70W)
Maximum input 80W (Sub: 140W)
Dimensions Front/Rear: 4.1" x 5.9" x 4.7"
(103mm x 150mm x 120mm)
Center 7.8" x 4.1" x 4.7"
(197mm x 103mm x 120mm)
Sub 9.8" x 15.9" x 13.2"
(250mm x 403mm x 335mm)
Weights Front/Rear 1.6 lbs (0.73Kg)
Center 1.8 lbs (0.80Kg)
Sub 15 lbs (6.8Kg)
ANALOG OUTPUT
DVD System User’s Guide
28
2 Channel 48KHz/96KHz Sampling; 44.1KHz Sampling;
44.1KHz Sampling
5.1 Channel 48KHz/96KHz Sampling
Page 35

Who Provides the Limited Warranty
During the warranty period, the Go-Video Warranty Administrator will honor DVD system service for 90 days labor, 1 year parts
from the original date of consumer purchase. See below for
Commercial, Industrial or Educational use coverage. The DVD
system remote control is warranted for 90 days from the date of purchase.
Who is Protected
This warranty protects the original consumer owner of this Go-Video product.
What is Covered and How Long
This warranty covers internal operating parts and service/labor to repair or replace
covered parts in this Go-Video product for 90 days labor, 1 year parts, from the date of
purchase, defined as follows: (1) Original Consumer Retail Purchase; (2) First Rental
Purchase Agreement; or (3) First Lease Purchase Agreement (the “Warranty Period”).
Labor and replacement parts supplied during the Warranty Period are covered only for
the remaining portion of the original Warranty Period. The Go-Video Warranty Administrator shall have no liability for service under this warranty if non-OEM (Original Equipment Manufacturer) replacement parts are used in the repair of your Go-Video product.
What the Owner Must Do If Service is Required
If service under this warranty is required, contact the Go-Video Warranty Administrator at
(480) 922-0896 to determine the nearest authorized Go-Video service center.
W ARRANTY
What are the Exceptions
This warranty does not cover: (1) Normal maintenance service, such as video head
cleaning. (2) Damage from misuse, abuse neglect or accident, natural disasters or Acts of
God. (3) Cabinetry, decorative parts, A/C adapters, knobs or buttons. (4) The foreign
country use of this product. (5) Go-Video product which has been electronically or
mechanically modified in any way or incorporated into other products. (6) Installation
and setup service adjustments. (7) Owner instruction. Your Owner’s Guide provides
information regarding operating instructions and user controls. For additional information, contact your authorized Go-Video dealer.
• Go Video is not responsible for any shipping, handling or insurance charges.
• This Exclusive Limited Warranty excludes all incidental and consequential damages.
Some states do not allow the exclusion of incidental and consequential damages, so
the above exclusion may not apply to you.
• ALL IMPLIED WARRANTIES, INCLUDING IMPLIED WARRANTIES OF MERCHANTABILITY AND FITNESS FOR A PARTICULAR PURPOSE ARE LIMITED IN DURATION
TO THE DURATION OF THIS WARRANTY PERIOD. Some states do not allow limitations on how long an implied warranty lasts, so the above limitation may not apply
to you.
• This Exclusive Limited Warranty gives you specific legal rights and you may also have
other rights which vary from state to state.
Go-Video Warranty Administrator
Sensory Science Corp.
7835 East McClain Drive
Scottsdale, Arizona 85260-1732
(480) 922-0896
customerservice@sensoryscience.com
5 - Help
29
Page 36

INDEX
This Chapter provides a visual index of the front panel, front panel display, rear panel and
remote control. This is followed by a topical index to the contents of this user’s guide.
1
2 3 4
5 6 7 8 9 10 11
FRONT PANEL CONTROLS
1 Power button, p. 4
2 Standby indicator, p. 4
3 Disc tray, p. 8
4Volume control, p. 10
5 Headphone jack, p. 10
6 Function button, p. 7
1 2 3 4 5 6 7 8 9 10
11 12
FRONT PANEL DISPLAY
1 Playback Signal Indicators
• Dolby Pro Logic
• Dolby Digital
• Linear PCM (Pulse Code
Modulation)
• DTS (Digital Theater Sound)
2Title Indicator
3 Radio Station Tuned Indicator
4 Stereo Indicator
5 Surround Indicator
12
7 Play/Pause button, p. 8
8 Stop button, p. 9
9Tuning Down/Skip Back button, p. 9
10 Tuning Up/Skip Forward button, p. 9
11 Open/Close button, p. 8
12 Remote Sensor
6Program Indicator
7 DSP (Digital Signal Processing)
Indicator
8 PBC (Playback Control) Indicator -
Lights if Video CD has a menu
9 FM Station Indicator (MHz)
10 AM Station Indicator (KHz)
11 Speaker Status Indicators (Left,
Center, Right, Low Frequency Effect
(Subwoofer), Left Surround, Sur-
round, Right Surround)
12 System Status Display
DVD System User’s Guide
30
Page 37

1
p
m
n
e
Setup
Slo
3
5
6
COMPONENT OUT
2
DIGITAL OUT
REAR PANEL
1 5.1 Channel Speaker Outputs, p. 3
•Front (Right & Left)
• Rear (Right & Left)
• Center
• Subwoofer
2 Composite and S-Video Outputs, p. 2
On/Standby
DVD
TUNER
SubtitleAudio
MO/ST
Return Go ToDisplay TV/VIDEO
Band
MenuTitle
DVD/CD/TUNER
Tuning
TV
AUX
TV Channel
TV Volume
UpDown
w
Angl
RepeatRepeat
1516
3
6
9
Progra
Remai
7 8
3
54
6
3 Auxiliary Audio Input (Right & Left),
p. 6
4 Component Video Output, p. 2
5 Digital Audio Output (Optical), p. 6
6 Antenna Connectors, p. 4
• AM Loop Antenna
• FM 75Ω Coaxial
REMOTE CONTROL
(UNDER SLIDING PANEL)
1 0-9 keys, p. 5
Sound Edit
SPK Mode
Pro Logic
Test Tone
Clear
Ste
14
13
12
11
10
2 Slow button, p. 9
3 Angle button, p. 15
4 Repeat, p. 16
5 Zoom button, p. 15
6 Repeat A B, p. 16
7 Remain button, p. 17
8Program button, p. 16
9
9 Step button, p. 9
10 Clear button, p. 16
11 Test Tone button, p. 21
12 Pro Logic, p. 18
13 SPK Mode button, p. 20
14 Sound Edit button, p. 21
15 D.R.C. button, p. 17
16 Setup button, p. 22
6 - Reference
31
Page 38

10
11
12
13
14
15
16
17
On/Standby
REMOTE CONTROL (TOP
SECTION)
1
1 Power On/Standby button, p. 4
2
3
4
DVD
TUNER
Band
MenuTitle
AUX
TV
TV Channel
5
6
7
8
SubtitleAudio
MO/ST
Return Go ToDisplay TV/VIDEO
TV Volume
9
DVD/CD/TUNER
18
19
20
21
22
23
24
2 TUNER (Band) button, p. 7
3 DVD button, p. 7
4 Menu button, p. 8
5Title button, p. 14
6 Subtitle button, p. 15
7 Audio (Mono/Stereo) button, p. 15
8 Return button, p. 8
Tuning
UpDown
9 Display button, p. 13
10 Stop button, p. 9
11 Skip Back button, Skip Forward
buttons, p. 9
Enter
12 Tuning Down (Scan Back) button,
Tuning Up (Scan Forward) buttons, p. 9, 10
Volu me
MuteDSP Mode Effect Sleep
Setup
D.R.C.
Remain
Sound Edit
SPK Mode
Pro Logic
Tes t To ne
Step
2 31
5 64
8 97
Slow
0
Angle Clear
Zoom
Repeat Program
Repeat
AB
25
26
13 Enter button, p. 8
14 Arrow / buttons, p. 8
15 Volume +/- buttons, p. 10
16 Effect button, p. 19
17 DSP button, p. 19
18 AUX button, p. 7
19 TV Power button, p. 5
20 TV Channel +/- buttons, p. 5
21 TV Volume +/- buttons, p. 5
22 Go To button, p. 14
23 TV/VIDEO button, p. 5
24 Play/Pause button, p. 8
25 Mute button, p. 10
26 Sleep button, p. 18
DVD System User’s Guide
32
Page 39

SYMBOLS
INDEX
16:9 23
3-Stereo Mode 18
4:3 LB (Letterbox) 23
4:3 PS (Pan & Scan) 23
A
AB Repeat 16
Accessories 2
AM Loop Antenna 2, 4
AM/FM Tuner 10
Angle button 15
Angle indicator 13
Arrow keys 8, 22
Audio Language 13, 22
Audio/MO/ST button 10, 15
AUX button 7
Aux In 6
B
Batteries 2
Bitstream 24
C
CD 1, 8
CD-R 1
CD-RW 1
Center Delay 20
Center Speaker Level 21
Center Speaker Placement 3
Center Speaker Size 20
Chapter 8, 13, 14
Clear button 16
Component Video 2
Composite Video 2
Customer Service 25
D
Dance Club mode 19
Delays, Calculating 21
Delays, Setting 20
Digital Out 6
Digital Output Format 6, 24
Disc Handling & Maintenance 27
Disc Menu Navigation 8
Disc Type 13
Display button 13
Dolby Digital 1, 6
Dolby Pro Logic 6, 18
DRC (Dynamic Range Compression 17
DSP (Digital Signal Processing) 19
DSP MODE button 19
DTS 1, 6
DVD 1, 8
DVD button 7
E
Effects 19
ENTER button 8, 22
F
FM Antenna 2, 4
Frame Advance 9
Freeze 9
Front Speaker Balance 21
Front Speaker Placement 3
Front Speaker Size 20
Function button 7, 10, 11
G
Go To button 14
H
Hall mode 19
Headphones 10
Help 25
I
Index View 14
Invalid symbol 13
L
Language Preferences 22
Listening to the Radio 10
Live Club mode 19
LPCM 24
M
Manual mode 10, 11
Menu button 8
Menu Language 23
Mono 10
MP3 1
MP3, Defined 12
MP3 Playback 12
MP3-CD 8, 12
O
On-Screen Display 13
Open/Close button 8, 12
Original 22
OSD Language 22
6 - Reference
33
Page 40

P
Password 24
Pavilion mode 19
Play/Pause button 8, 9
Playback, Basic 8
Power button 4
Pre-Stop 9
Preset mode 10
Presets, Programming 11
Pro Logic button 18
Program button 11, 16
Program Playback 16
R
Rating Levels 24
Rear Delay 20
Rear Speaker Balance 21
Rear Speaker Levels 21
Rear Speaker Placement 3
Rear Speaker Size 20
Region 1
Remain button 17
Remote Control 2
Programming 5
Repeat AB button 16
Repeat button 16
Repeat Mode 13
Return button 8
S
S-Video 2
Safety iii
Scan Back 9
Scan Forward 9
Setup button 22
Setup menu 22
Skip Back 9
Skip Forward 9
Sleep button 18
Sleep Timer 18
Slow button 9
Sound Edit button 21
Speaker Balance 21
Speaker Connections 3
Speaker Levels 21
Speaker Placement 3
Speaker Setup 20
Speaker Sizes, Setting 20
Spk Mode button 20
Standby mode 4
Step button 9
Stereo 10, 18
STOP button 10, 11
Stop button 9
Stop/Resume 9
Subtitle button 15
Subtitle Language 13, 22
Subwoofer Level 21
Subwoofer Placement 3
Subwoofer Size 20
T
Technical Specifications 28
Test Tone button 21
Test Tone Generator 21
Theater mode 19
Time Remaining 13
Title 8, 13, 14
Title button 14
Track 13, 14
Track View 14
Troubleshooting 25
Tuner/Band button 7, 10, 11
Tuning Up/Down buttons 10
TV Channel +/- buttons 5
TV Control keys 5
TV Power button 5
TV Screen Size 23
TV Volume +/- buttons 5
TV/Video button 5
V
VCD 8, 14
VCR Connections 6
Video cable 2
Video-CD 1
Volume -/+ buttons 10
Volume control 10
W
Warranty 29
Z
Zoom button 15
DVD System User’s Guide
34
Page 41

Page 42

ANY QUESTIONS?
Thank you for purchasing this Sensory Science DVD System!
Sensory Science specializes in developing and marketing innovative digital entertainment products,
including digital televisions, Internet media players, DVD players, and high-end home theater compo-
nents for the digital living room. We take pride in our ability to deliver unparalleled customer support,
and are honored to have received the prestigious Inside Track award for Supplier Loyalty two years
running. Should you have any questions, feel free to contact us using one of the methods listed below:
1-800-SENSORY • www.sensoryscience.com • dvdhelp@sensoryscience.com
7835 East McClain Drive
Scottsdale, AZ 85260 USA
www.sensoryscience.com
 Loading...