


USER MANUAL
Formula Maker
Model# JFM-200

Model: JFM-200
© 2018 Gourmia
www.gourmia.com
The Steelstone Group
Brooklyn, NY
All rights reserved. No portion of this manual may be reproduced by any means
whatsoever without written permission from The Steelstone Group, except for the
inclusion of quotations in a media review.
Although every precaution has been taken in the preparation of this manual, The
Steelstone Group assumes no responsibility for errors or omissions. Nor is any
liability assumed for damages resulting from the use of the information contained
herein. Although every eort has been made to ensure that the information
contained in this manual is complete and accurate, The Steelstone Group is not
engaged in rendering professional advice or services to the individual consumer;
further, The Steelstone Group shall not be held responsible for any loss or damage
allegedly arising from any information or suggestion in this manual.
Read this manual thoroughly
before using and save it for
future reference
2
FOR CUSTOMER SERVICE
QUESTIONS OR COMMENTS
VISIT US @ GOURMIA.COM
INFO@GOURMIA.COM
OR CALL 888.552.0033

Welcome to the Convenient World of
Formula Making from Gourmia
Thank you for purchasing a Gourmia Formula Maker!
The pages of this manual oer comprehensive instructions to guide
you through the functions and features of the Gourmia Formula Maker.
Inside this guide you will also nd information on its modes of operation,
complete step-by-step instructions for the operation, assembly, cleaning,
and maintenance of your appliance.
Please read all safety instructions thoroughly to ensure safe usage at all
times.
Thank you for your purchase. We sincerely hope you will enjoy this as
well as all the many innovative products brought to you by Gourmia.
3

4
IMPORTANT SAFEGUARDS
IMPORTANT SAFEGUARDS
Before using this product please read this manual carefully,
and save for future reference.
ALWAYS TEST THE MILK TEMPERATURE BEFORE FEEDING YOUR BABY.
SAFETY INSTRUCTIONS
When using any electric appliance, basic precautions should
always be followed to reduce the risk of re, electric shock and
injury, including the following:
1
. Read all instructions.
2. To protect against electrical shock do not immerse cord, plugs, or the base of the
machine in water or other liquids.
3. Close supervision is necessary when any appliance is used by or near children.
4. Do not operate any appliance with a damaged cord or plug or after the appliance
malfunctions or has been damaged in any manner. Return appliance to the nearest
authorized service facility for examination, repair, or adjustment.
5. The use of accessory attachments not recommended by the appliance manufacturer
may cause injuries.
6. Do not use outdoors.
7. Do not let cord hang over edge of table or counter, or touch hot surfaces.
8. Do not place on or near a hot gas or electric burner, or in a heated oven.
9. Always attach plug to appliance first, then plug cord into the wall outlet. To
disconnect, turn any control to “off”, then remove plug from wall outlet.
10. Do not use appliance for other than intended use.
11. Before serving be sure food is at safe temperature.
12. This appliance is for adult use only. Persons under the age of 13 should not use this
product.
13. Do not exceed the maximum level of water- the appliance will not work.
14. Always place the formula maker on a dry, flat surface- out of reach of children.
15. Always check the concentration chart when using a formula for the first time.
16. To ensure accurate dispensing, follow recommended cleaning and maintenance
procedures.
Electromagnetic eld (EMF)
This appliance complies with all standards relating to electromagnetic elds (EMFs).
It meets the safety rules established on the basis of current scientic knowledge
provided it is handled correctly and in compliance with these instructions.

TABLE OF CONTENTS
TABLE OF CONTENTS
5
Know Your Formula Maker .............6
Formula Maker Assembly ...............8
Using Your Formula Maker ............11
Cleaning and Maintenance ..........15
Troubleshooting and FAQs ............16
Tips .............................................17
KNOW YOUR FORMULA MAKER
6
Chamber
Plate
Powder
Leveler
Powder Bin
Powder Bin Assembly
Bottle
Rest Cover
Bottle Rest
Lid
Water
Tank

USING YOUR AIR FRYER
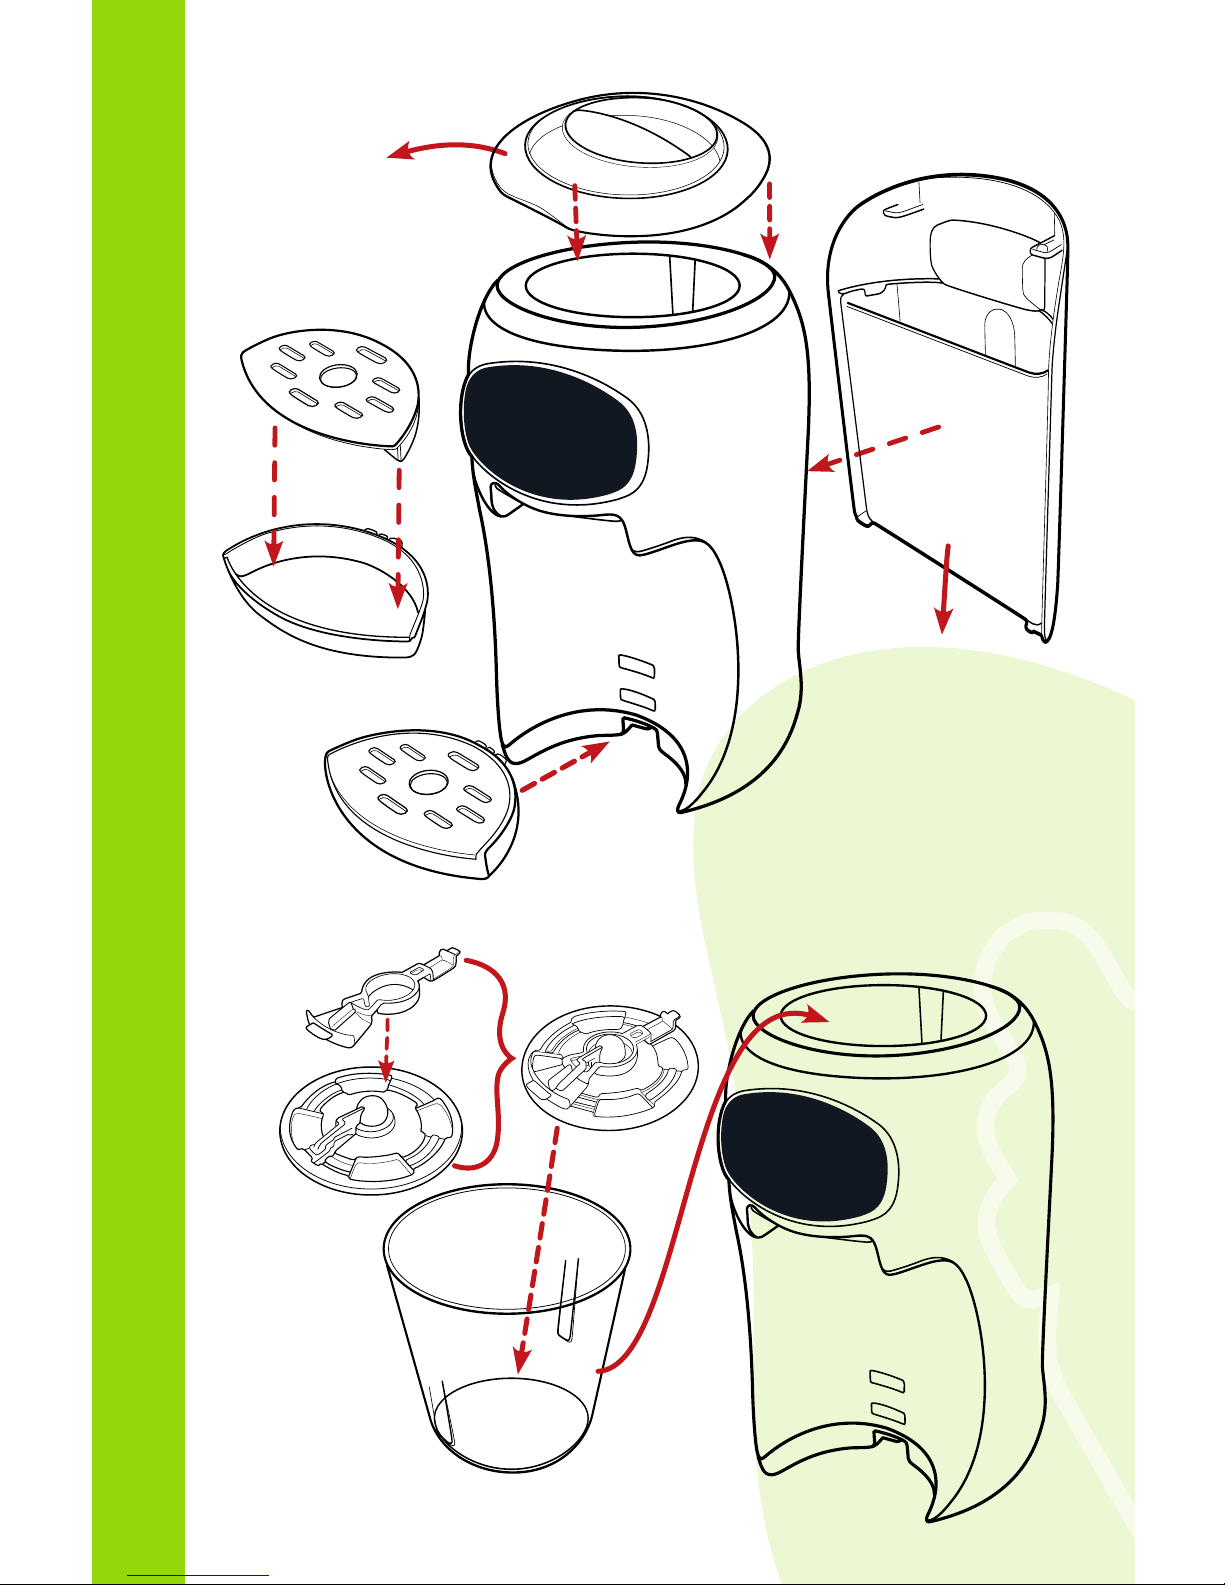
FORMULA MAKER ASSEMBLY
7
Powder Bin Assembly
Before assembly, wash and completely dry the powder bin,
leveler, and the chamber plate.
1. Line up the powder leveler
and chamber plate as shown.
2. Slide it in.
3. Rotate the
chamber plate
as shown below.
4. Insert both components into
the powder bin. Align the tabs
of the powder leveler as
shown below.
5. Place the powder bin into the
base, aligning the slots to
those of the shaft.
6. Press down on the powder bin
lightly and turn the chamber
plate until it locks to the cross
on the base shaft. You will feel
everything drop into place.
Always keep the powder bin
covered. When exposed to the
air, formula may become stale
or moist. This may aect
proper powder dispensing.

FORMULA MAKER ASSEMBLY
8
Funnel Assembly
1. Press the funnel lid
into the funnel as
shown in the image
below. Make sure
that you align the
funnel slots correctly
to ensure a secure t.
2. Slide the funnel into
the formula maker.
Keep it horizontal
and press upwards
while pushing the
funnel in. Press rmly
until it is secure, but
not too hard.

9
FORMULA MAKER ASSEMBLY
9
Installing the Water Tank
1. Fill the water tank to “Max” line inside.
Place the water tank behind the formula maker.
Installing the Bottle Rest
1. Place the bottle rest cover on
the bottle rest.
2. Choose an appropriate height
slot for your bottle. Use a lower
setting for tall bottles and a
higher setting for short bottles.
3. Insert the bottle rest into the
slot of your choice.
4. Be sure to clean the bottle rest
and cover if there is ever a spill.
Bottle Rest
Bottle Rest Cover
COMBINED

FORMULA MAKER ASSEMBLY
10
DISPLAY
Buttons and Indicators
1. Power Button
2. Increase Setting
3. Decrease Setting
4. Clean
5. Set Water Volume
6. Set Formula Concentration
7. Play/Pause Dispensing
8. Rell Water Indicator
9. Clean Funnel Indicator

11
9
USING YOUR FORMULA MAKER
11
First Use
1. Please ensure that the machine
is fully assembled and that the
parts have been cleaned.
After washing parts, it is crucial
that all components are
thoroughly dried.
2. Fill water tank.
3. Plug in the machine and press
the power button to turn it on.
4. The unit must take in water for
the rst time and ush itself.
a. In order to do this, place a
container or bottle beneath
the funnel.
b. Press the “Clean” button
and wait for the water to be
released.
c. Dump the water.
5. Once that is nished, you can
now use your machine!

SETTINGS CHART
12
10
8
12
USING YOUR FORMULA MAKER
BEFORE USING YOUR FORMULA MAKER
Always ensure that the powder bin is more than ¼ full before use.
If this is your rst time using the product,
please see the instructions above in “First Use”.
1. After the initial setup, you must determine the correct
concentration setting for your formula. Every formula brand
recommends a different amount of powder per ounce.
2. Check your formula to see the weight (in grams) required per
2 fl oz of water.
3. See the table below to find your setting. If your number is
between two values on the left column, round up.
The chart below provides approximate values. Please visit
GourmiaJr.com/formulasetting for an easier-to-use, up-to-
date list.
4. If your required powder amount is above or below the range of
the chart, the formula is not compatible with this product.
Close to 6.9g
Close to 8.9g
Close to 10.1g
3
2-10 oz (60- 300ml)
5
2-10 oz (60- 300ml)
6
2-10 oz (60- 300ml)
Close to 4.4g
Close to 8.4g
Close to 9.6g
2
2-10 oz (60- 300ml)
1 2 - 4 oz (60 -120ml)
4
2-10 oz (60- 300ml)
Powder Required per 2 oz (60 ml)
Concentration Setting
Water Volumes Available
For a list of recommended formulas and their formula settings, please visit GourmiaJr.com/formulasetting
Do not use a lower concentration setting to save formula.
Using a setting that is too low can cause health issues.

13
11
AIR FRYING TIPS
9
13
USING YOUR FORMULA MAKER
1. Once you know your
concentration setting,
press the scoop button and
use the + and - buttons to
choose the correct setting.
2. Press the scoop button
again to conrm.
3. Press the OZ button to select
the amount of formula you
would like (Remember, this
setting is the amount of water
that goes with your formula,
so the nal mix will appear to
be a bit more than selected).
4. Press the OZ button again
to conrm.
5. Once you have set your
volume and concentration,
press the start/pause
button to begin releasing
formula.

To ensure proper powder release amounts, the unit must
be cleaned and maintained according to the instructions
below.
CLEANING AND MAINTENANCE
12
CLEANING & MAINTENANCE
14
1. After every four uses, the
funnel must be removed and
rinsed, and the powder
release opening must be wiped
thoroughly with a dry cloth to
prevent powder buildup.
2. If the machine is not going to
be used for an extended period
of time, please empty the
contents of the water and
powder bin and press the
“Clean” button to release all
of the water from inside.
Note: Replace the water in the
tank at least once a day
3. Also, if you will not use the
machine for an extended
period of time, clean around
the powder release opening
to avoid powder buildup and
hardening.
4. Keep the machine clean
and dust free.
5. Some parts, including the
powder leveller, are delicate.
Please handle with care.
BOTTOM VIEW
(Behind Funnel)

13
11
AIR FRYING TIPS
9
15
I plugged in my formula maker and it
won’t let press some of the buttons.
My unit is not releasing enough
formula.
My unit is releasing too much formula.
Globs of formula are falling into the
funnel and causing mixing issues.
If this is the rst time using the powder maker, follow
the directions in the “First Use” section.
If you have recently plugged in the formula maker (even
if it isn’t your rst time using it), go through the steps in
the “First Use” section of this document.
If the “Rell Tank” or “Clean Funnel” indicators are lit,
you must take care of those issues before dispensing
formula.
If making several bottles at a time, the machine may need
a few moments to heat the water before dipensing.
Please ensure that you are following the instructions
under cleaning and maintenance.
Ensure that your concentration setting is correct.
Make sure that the powder bin is more than ¼ full. A
powder bin that is too full or too empty can interfere
with proper powder dispensing.
You may try using a dierent formula, as some may
not be compatible with this product. This product was
designed to work with the most common brands of
baby formula.
If these steps do not solve this problem, discontinue use
and contact customer service.
Please ensure that you are following the instructions
under cleaning and maintenance.
Ensure that your concentration setting is correct.
Make sure that the powder bin is not lled beyond
the maximum amount indicated in the powder bin. A
powder bin that is too full or too empty can interfere
with proper powder dispensing.
You may try using a dierent formula, as some may not
be compatible with this product.
If these steps do not solve this problem, discontinue use
and contact customer service.
Please follow the recommended cleaning instructions. Formula buildup can cause improper powder
dispensing. Also, always keep the powder bin covered
for humidity protection.
PROBLEM POSSIBLE CAUSE
Do not use a lower concentration setting to save formula.
Using a setting that is too low can cause health issues.
TROUBLESHOOTING

TIPS
16
• If you ever want to stop dispensing
formula, you can press the pause/
play button again during formula
release to halt the cycle.
• Please ensure that the unit is being
properly cleaned.
• The “Rell Water” indicator will
activate if there isn’t enough
water in the tank.
• The “Clean Funnel” indicator will
remind you to clean the unit after
several uses.
Tips

13
11
AIR FRYING TIPS
9
17
WARRANTY & SERVICE
This Limited Warranty is for one full year from the date
of purchase. It is applicable to the original purchaser
only and is not transferable to a third party user. Repair
or replacement of defective parts is solely at the seller’s
discretion. In the event that repair isn’t possible, the
seller will replace the product/part. If product repair/
replacement won’t suce, the seller has the option of
refunding the cash value of the product or component
returned.
Product defects not covered under the Warranty
provisions include normal wear and damage incurred
from use or accidental negligence, misuse of instruction
specications or repair by unauthorized parties.
The manufacturing company is not liable for any
incidental or consequential damages incurred by such
circumstances.

FOR CUSTOMER SERVICE
QUESTIONS OR COMMENTS
VISIT US @ GOURMIA.COM
INFO@GOURMIA.COM
OR CALL 888.552.0033
 Loading...