

PASTA PASTA
PastaMazing
POWERED
MACHINE
MODEL# GMP500
USER
MANUAL
Contents
Safety Precautions
Introduction
Components
Disclaimer:
Manual instructions should always be read and
implemented prior to product use. Manufacturer/
importer advisory board are not reliable for
inadequate use due to instruction manual
negligence or failure to follow direction.
Control Panel
Accessories
Installation
Operations
Dismounting and Cleaning
Care and Maintenance
Specifications
Circuit Diagram
Troubleshooting
Note:
The manual guide is intended for instructional purposes and
design specs are subject to change without prior notice.
4
4
5
7
9
10
10
10
11
Safety Precautions
Refrain from touching this device while in use.
This device is intended for indoor household use only, and adaptable to domestic outlet sources.
Always unplug after use, during product assembly, and in preparation for cleaning.
For electric shock precaution: Never immerse cord, plug or any appliance parts in water or other
liquids.
Never leave the appliance unattended while in use.
Never place the power cord near heat or flammable sources, and proceed with caution to prevent
trip and fall accidents.
In the event of cord or appliance malfunction, return the device to an authorized service facility for
examination or repair.
The use of third party product accessories is not recommended by the manufacturer may cause a
risk of injury.
Never immerse the main part of the device in water.
Never touch any moving parts while the device is in use.
Never open the top cover or move the machine when kneading dough or extruding.
Don't insert any external objects into the device.
Neer remove the noodle mold or extrusion knob while the device is in use.
Make sure the device is shut down prior to opening or covering the top cover.
WARNING
Do not change. Except for the
repair technician, do not
disassemble or repair by yourself.
Do not allow children and without
self-care person to use alone. Do
not use in the place where
children can reach.
Do not insert or pull the plug with
wet hands. Plug & wire damage or
socket loose, do not use.
Power cord can not be damaged.
If the power cord is damaged,
it must be replaced by the
manufacturer, its services agent
or similarly qualified persons.
Do not use the power outside
AC220V-240V, otherwise there
is the risk of fire, electric shock
or machine damage.
When installing, disassembling
or changing the noodle molds,
!
be sure to disconnect the power.
Make sure the machine is fully
assembled correctly before
!
operation.
The plug is fully inserted to avoid
!
the risk of electric shock, short
circuit, smoke and fire.
When the front of plug and the
mounting surface of pins have
!
dust, it should be carefully cleaned.
The main part must not be
immersed in water to avoid short
circuit and electric shock.
When the machine connect to the
power, do not touch any moving
parts, specially it should prevent
from children touching.
Do not open the top cover or move
the machine when kneading dough
an extruding, otherwise there is the
risk of injury.
Do not put the pins, wire etc metal
objects, and other strange objects
into the machine. To avoid electric
shock and unusual situations.
Do not open the top cover or take
out the noodle mold, extrusion rob
when the machine is working.
Safety Precautions
CAUTION
Please do not put strange objects
into the kneading chamber when
kneading dough, to avoid the
damage of machine.
Keep the machine away from
!
heat, stove or opening
microwave oven etc.
When unplug the plug, make
sure to hold the plug in hand. Do
not pull the supply cord to avoid
the sparks of electrical shock or
short circuit.
Disconnect the power when
!
moving the machine.
Do not use non-factory provided
parts and accessories to avoid
the damage of machine.
NOTE
Stop the device for a 20 minute
interval after ever 20 minute
operation. Only continue use
once the motor has cooled
down.
Place the machine on a stable
!
and level surface to use.
Do not use the machine in high or
too low temperature environment.
Store the machine in a wellventilated and dry place.
Do not let the supply cord hang
on the table or touch any moving
parts.
Make sure the machine is shut
down before opening or covering
!
the top cover.
Only use this device for kneading
dough or the production of pasta.

Product features
This device utilizes micro technology features for quick pasta
making and fewer flour residues.
This device may knead the dough and produce pasta varieties
for simplified pasta making procedures.
Product Specs:
Control Panel
Timer Control and Display
Fuctional Control and Display
(1)Extrusion Box
(2)Extrusion Rod
(3)Locker
(4)Noodle Mold
(5)Fan
(6)Control Panel
(7)Main Part
(8)Unlock Button
(9)Safety Bracket
(10)Kneading Chamber
(11)Kneading Blade
(12)Top Cover
(13)Slat
Accessories
Six types of
Noodle
Molds
Spanner
Flour
Measuring
Cup
Brush
Water
Measuring
Cup
Kneading
Blade
Cutter
(This diagram is for reference only)
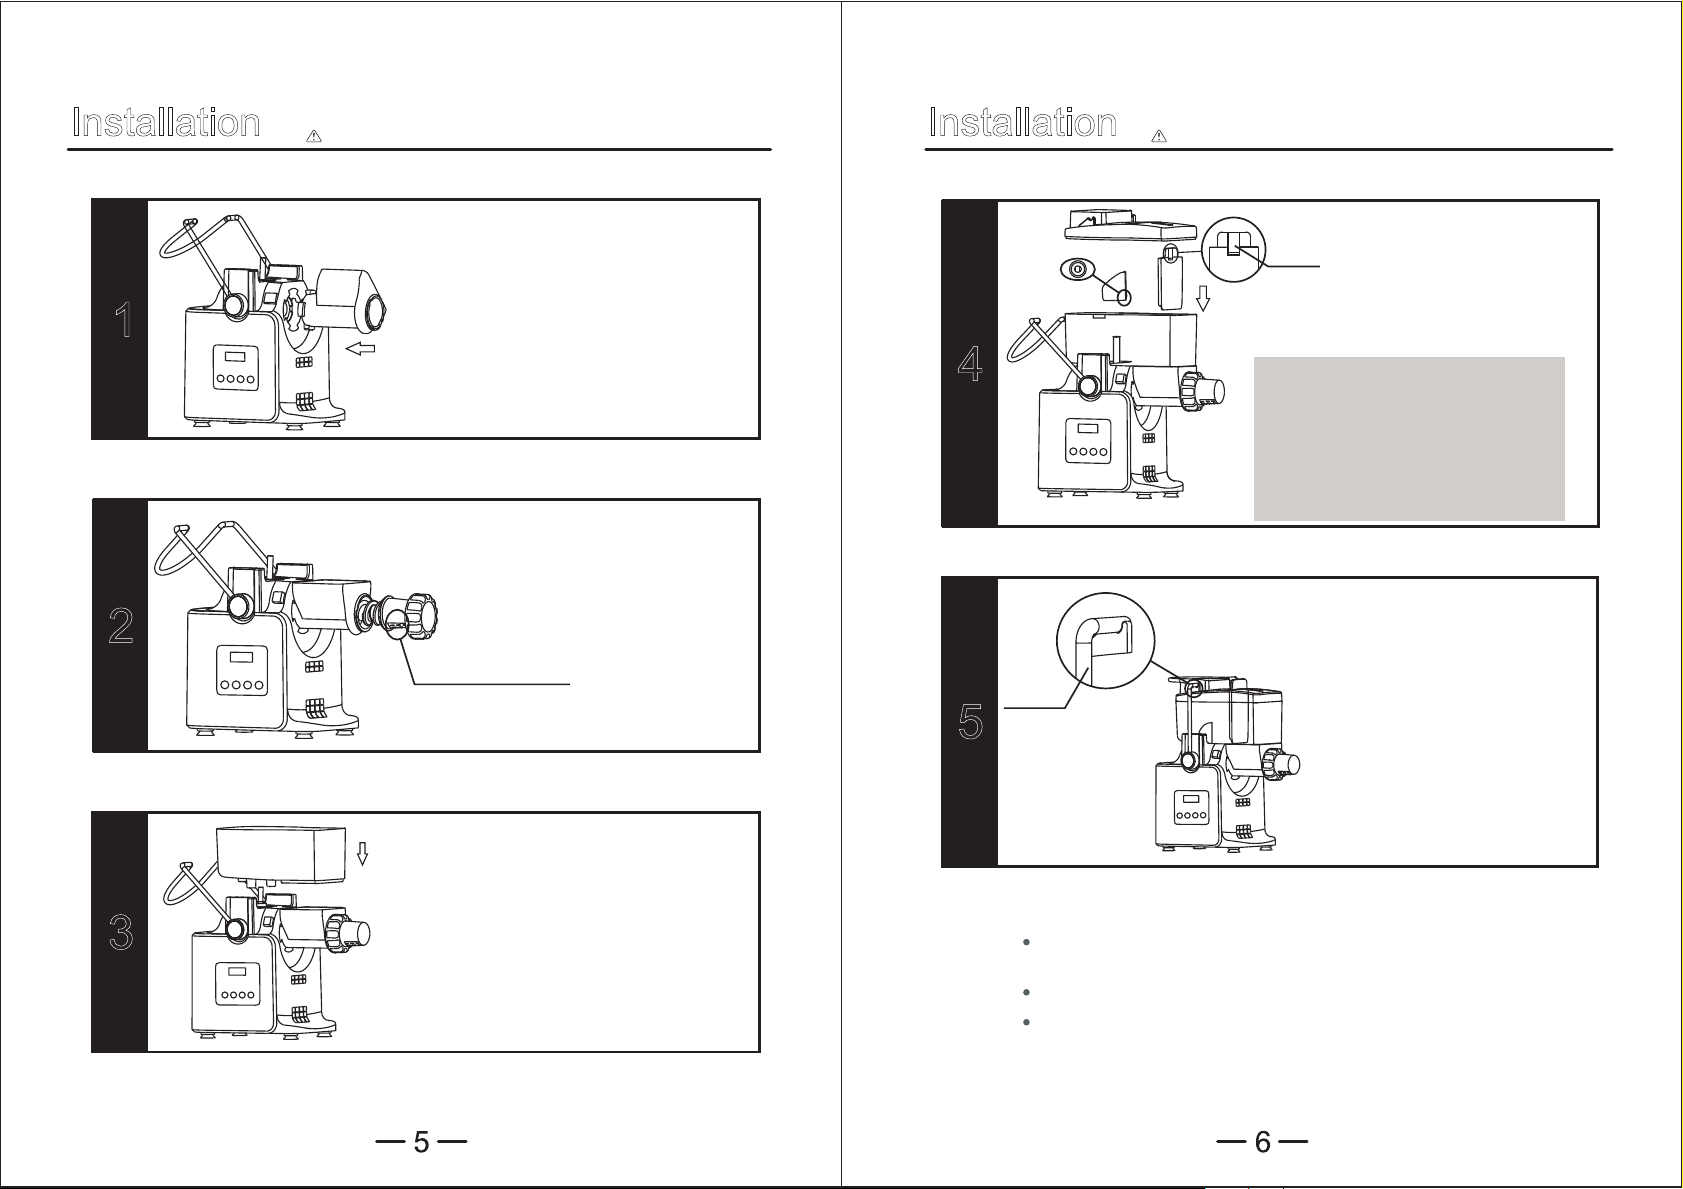
Installation
Make sure the power is disconnected before installation.
Installation
Make sure the power is disconnected before installation.
Press
Button
1
2
Place the device on a leveled surface
and insert the extrusion box, rotating
it to the left at a 45' angle for secure
locking features.
Screw the extrusion rod into the
extrusion box and connect the
noodle mold to the extrusion rod.
Screw the lock on.
Noodle Mold Down
4
5
Safety
Bracket
Insert the kneading blade and slat
within the kneading chamber and
close the top cover.
Note:
Be sure the blade is fully
inserted, shaking it gently
for simple insertion.
Pull the safety bracket into
the middle position to ensure
that the top cover is properly
fastened.
3
The kneading chamber consists
of three bottom protrusions. Align
them to the corresponding positions
on the main part.
Note:
Connect the noodle mold to its extrusion rod according to the
arrow direction.
11111
Secure the lock tightly.
11111
The safety bracket must be securely fastened to the top cover
for proper mechanism function.

Operations
Ingredient: Bread flour, water, edible oil, salt
Operations
Ingredient: Bread flour, water, edible oil, salt
Adding Flour
160g
Kneading Dough
Add
water
1. Once the machine is on a stable surface,
install properly.
2. Open the top cover and add a flat cup of
flour into the kneading chamber.
3. Close the lid and secure it in position
with the use of its safety bracket.
Note:
Disconnect from flour when adding
flour to the device.
4. Power the device on until the
corresponding indicator light
illuminates.
5. Select the 'knead' button until the
corresponding indicator light illuminates.
-The default kneading time is 5 minutes.
-Press + or - to adjust kneading time.
6. Pour a cupful of water into the mixture,
add oil and salt to the kneading
chamber.
-Press the 'knead' button before adding
water to the kneading chamber.
-You may add vegetable juice or eggs into
the water measuring cup to pour within
the kneading chamber.
Extrusion
7. Once a dough is created, press the ' extrusion'
button to push it into the extrusion box.If the
Press down
the dough
Recommended ingredients and proportions
Ingredient
Reference
Ratio
Note:
*The flour measuring cup's capacity is approximately 160g.
*The water measuring cup's capacity is approximately 80ml and it's recommended to add
approximately 70ml water or eggs, 5g salt, and 5ml edible oil to the mixture.
*Add water or flour in increments suitable to the dough consistency in the event that the dough
texture differs from the intended form.
flour doesn't form a proper dough, press +
button to increase kneading time or add water
if needed.
8. Slot the spanner through the specialized hold
on the extrusion box. Gently nudge the dough
forward to make sure the rod is promptly in
contact with the dough.
9. During the extrusion process, the 'fan'
indicator will illuminate to incorporate faster
drying time.
10. Cut the pasta with the designated cutter.
11. After extrusion is complete, press the OFF
button to power off the device.
Note:
Stop the machine for a 20 minute interval after every
20 minute operation and be sure the dough is ready
to use before removing the spanner.
Do not open the top cover during the extrusion process.
Bread
Flour
160g
Water
70ml
Salt
5g
Edible Oil
5ml

Dismounting and Cleaning
Care and Maintenance
Unlock Button
*Be sure the power is disconnected prior to disassembly. Remove each part
separately. To remove the extrusion box, press the unlock button while rotating.
*Clean the main part with a slightly dampened cloth, being cautious never to immerse
it in liquid.
*All other parts may be washed in water.
*Remove flour residue with the brush and dry the device after cleaning.
*Use the cleaning rod from the brush's end to clean flour residue accumulated on the
top of the extrusion rod and within the plastic seal.
*After cleaning the plastic seal, be sure to fit it within the kneading chamber to avoid
losing the part.
Press the unlock button while rotating the extrusion box, otherwise
can not take out the extrusion box.
Do not immerse the main part in the water or other liquids.
1. Disconnect the machine from its power source prior to cleaning and when
not in use.
2. Always keep the device dry.
3. Store the device in a well ventilated area.
4. Clean after each use.
Specifications
Model No.
Voltage
Frequency
Power
Net Weight
Standards
GPM 500
AC220V-240V
AC100V-120V
50Hz-60Hz
180W
4.2kg
GB4706.1-2005
GB4706.30-2008
Plastic
Seal
If there are flour residues on the top of extrusion rod and in the plastic
seal. Use the cleaning rod from the end of brush to clean the flour
residues. Otherwise the extrusion rod is hard to installed to correct
position. Disassemble the plastic seal and clean it.
After cleaning the plastic seal, make sure to fix it to the kneading
chamber again to avoid lost.
Circuit Diagram
Fuse
Motor
Input
Power
Board
Fan Motor
AC220V-240V
AC100V-120V
Control
Board
50Hz-60Hz

TroubleShooting
Problem Analysis
Troubleshooting
Warranty details:
This product is guaranteed under the premise of a 1 year
limited warranty period, applicable to the original purchaser
and not transferable to a third party user.
Product fails to
operate
During initial use an
odor is sensed.
Abnormal vibrations
and noise are
present.
A crackling noise
persists during
operation.
The control panel
displays E0 function.
Note: The above are common troubleshooting features. For other failures,
please contact our customer support center.
Either the plug hasn't been
fully inserted, or the machine
has entered the auto shut
mode due to overheating.
This is a normal aspect of
the device's motor.
The extrusion rod isn't
properly installed, or the
noodle mold may possibly
be installed at the opposite
angle. The locker may not
be screwed on properly.
The plastic seal inside the
kneading chamber isn't
smooth enough.
The dough is too dry or or
contains too much dough.
Double check for proper
power connection and
restart the device after
20-30 minutes in standby.
Contact customer service if
the smell persists after
consequent uses.
Check the extrusion rod,
noodle mold, and locker.
Install the part which isn't
properly implemented within
the device.
Add a drop of edible oil to
the plastic seal.
Reintroduce the dough
within the chamber and add
adequate water amounts.
You may also reduce part
of the dough to reoperate
the device.
Repair or replacement of defective parts are at the seller's
discretion. In the event that repair isn't possible, the seller
will replace the product/ part. If product repair/ replacement
won’t suffice, the seller has the option of refunding the cash
value of the product or component returned.
Product defects not covered under the warranty provisions
include normal wear and damage incurred from use or
accidental negligence, misuse of instruction specifications,
or repair by unauthorized parties. The manufacturing company
is not liable for any incidental or consequential damages
incurred by such circumstances.
For customer service questions or comments, please call:
888-552-0033
GOURMIA
Gourmia.com

 Loading...