

MODEL# GEO3000
ROTISSERIE OVEN

Welcome to the world of Delicious Rotisserie
© 2016 Gourmia
www.Gourmia.com
The Steelstone Group
Brooklyn, NY
All rights reserved. No portion of this manual may be reproduced by any means whatsoever
without written permission from The Steelstone Group, except for the inclusion of quotations in
a media review.
Although every precaution has been taken in the preparation of this manual, The Steelstone
Group assumes no responsibility for errors or omissions. Nor is any liability assumed for damages
resulting from the use of the information contained herein. Although every eort has been made
to ensure that the information contained in this manual is complete and accurate, The Steelstone
Group is not engaged in rendering professional advice or services to the individual consumer;
further, The Steelstone Group shall not be held responsible for any loss or damage allegedly
arising from any information or suggestion in this manual.
10 987654321
Meats, Poultry & More!
With the purchase of the Gourmia® Rotisserie Oven, you’ve opened the door to
amazingly avor-packed meat, poultry, seafood and other savory entrées. The unique
rotisserie system inside this oven creates self-basting cuts of beef, pork, and poultry
that bathe the food in avor while the fat drips away. In fact, you won’t need to add
butter or oil to foods cooked in this Rotisserie Oven; a simple addition of herbs or
spices creates all the added avor you need!
Consider all the foods you can easily prepare using the features of the truly hands-
free Rotisserie Oven: golden roast chicken; thick, juicy beef steaks; delicate sh
llets; hearty pork roasts; lamb chops and steaks; shellsh and much, much more.
The accessories that come with your Gourmia Rotisserie Oven add other options like
Parmesan potato wedges, hot from the barrel cage, seared asparagus with lemon,
grilled to tender-crisp perfection in the at basket and the list goes on and on!
The following pages of this manual give you complete instructions for all the functions
and features of the Rotisserie Oven. Inside these pages, you’ll nd complete step-by-
step instructions for assembly, operating and maintenance of your Rotisserie Oven.
Please read all safety instructions and complete directions carefully for safe usage at
all times.
Thank you for your purchase! We hope you will enjoy all the innovative products
brought to you by our family at Gourmia.
Printed in China

SAFETY INFORMATION p. 6
FEATURES & FUNCTIONS p. 8
QUICK & EASY CONTROL PANEL p. 10
BEFORE FIRST USE & ASSEMBLY p. 12
QUICK & EASY ROTISSERIE GUIDE p. 16
CLASSIC ROTISSERIE SPIT
DUAL ROD ROTISSERIE SPIT
TABLE OF CONTENTS
SEAFOOD & VEGETABLE FLAT BASKET
EXTRA LARGE ROTISSERIE TUMBLER
MAINTENANCE & SERVICE p. 20
WARRANTY p. 22
5
IMPORTANT SAFEGUARDS
When operating this electric appliance, basic safety instructions should
always be followed. Refer to the following for these instructions.
1. READ ALL SAFETY & USAGE INSTRUCTIONS BEFORE USING ROTISSERIE
OVEN.
13. DO NOT add unauthorized accessory attachments. Such use may result in
electric shock, injury or re.
14. Use only factory cord supplied; NEVER add extension cords. When done
using, switch control to OFF then pull plug from outlet.
15. DO NOT operate the Rotisserie Oven when empty.
SAFETY INFORMATION
SAFETY INFORMATION
2. EXERCISE CAUTION: Do not add or pour liquids of any kind inside the
Rotisserie Oven. Spills may cause electrical shock or severe injury.
3. Before using, ALWAYS place the Rotisserie Oven on a heat-resistant glass,
wood or stone surface. Do not place on any counter or table that may be
aected by high heat.
4. AVOID ELECTRICAL SHOCK. DO NOT immerse cord, plugs or the Rotisserie
Oven in water or other liquid.
5. DO NOT touch the surface of the Rotisserie Oven when HOT. Use pot holders
or oven mitts when handling the heated Rotisserie Oven.
6. Allow sucient space around the Rotisserie Oven for proper air ow and
opening of the Glass Door when cooking.
7. UNPLUG the Rotisserie Oven from outlet when not in use or before cleaning.
Do not let cord hang over edge of table or counter or touch hot surfaces,
including the Rotisserie Oven.
8. Children should never use the Rotisserie Oven; close supervision is required
when appliance is used near children.
9. When opening the Glass Door while roasting or cooking, heat and steam
may escape. Stand away from the Door and use pot holders or oven mitts to
handle any hot surfaces of the Door or Rotisserie Oven.
16. Do not use the Rotisserie Oven for any use other than intended.
SAVE THESE INSTRUCTIONS
FOR HOUSEHOLD USE ONLY
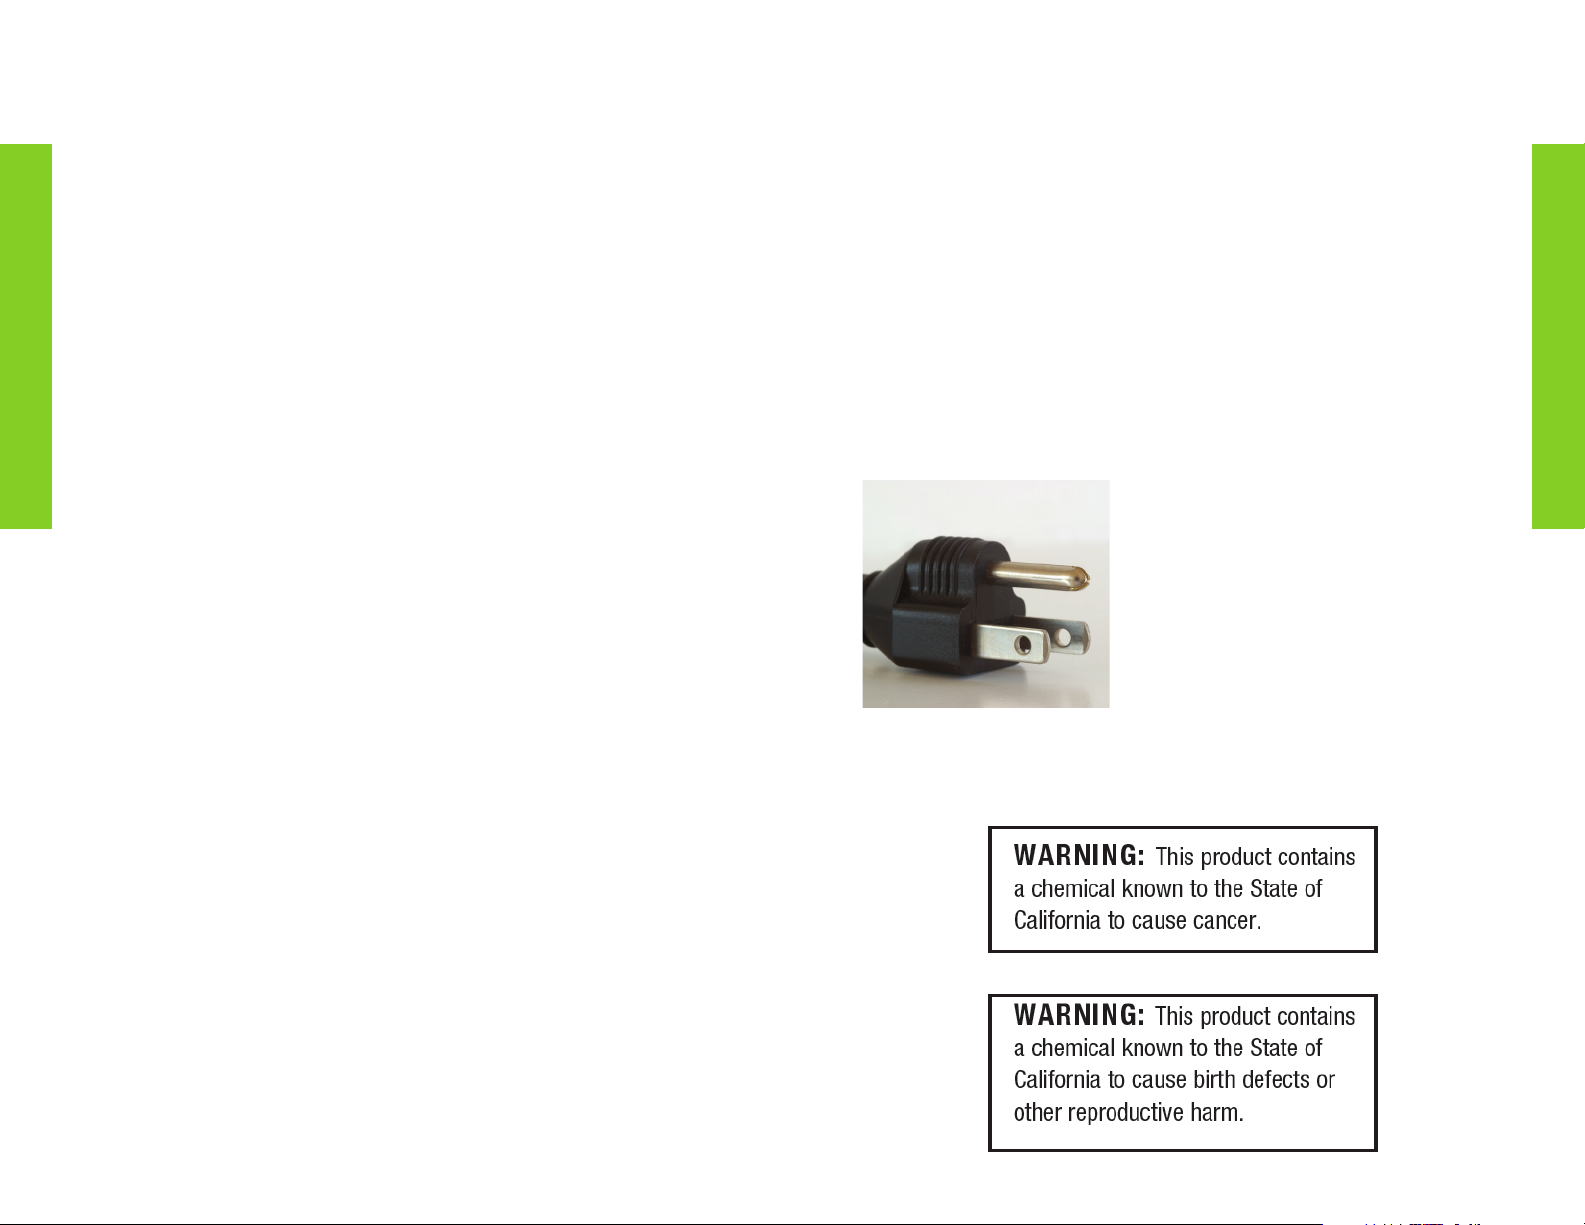
3 Conductor Cord Set: This Rotisserie Oven is
equipped with a 3-conductor cord set that has a 3
prong grounding-type plug. It should be properly
connected to a grounding-type outlet. The plug
is designed to t ONLY a 3-grounding outlet unit,
and as such, the grounding prong should never be
removed. If needed, purchase a 2-prong adaptor
and ground it to the outlet. Consult a qualied
electrician if in doubt. Do not use an adaptor
unless you are condent it is grounded. Do not
modify this plug. If the plug does not t the outlet
securely, call a qualied electrician for assistance.
10. Operate the Rotisserie Oven on a level surface well away from any hot gas or
electrical burner, heat source, combustible spray cans or pressurized items.
11. Do not operate the Rotisserie Oven outdoors.
12. Never operate the Rotisserie Oven with a damaged cord or plug or one
that has malfunctioned or been damaged in any way. Immediately contact
Customer Service for analysis.
76
FEATURES & FUNCTIONS
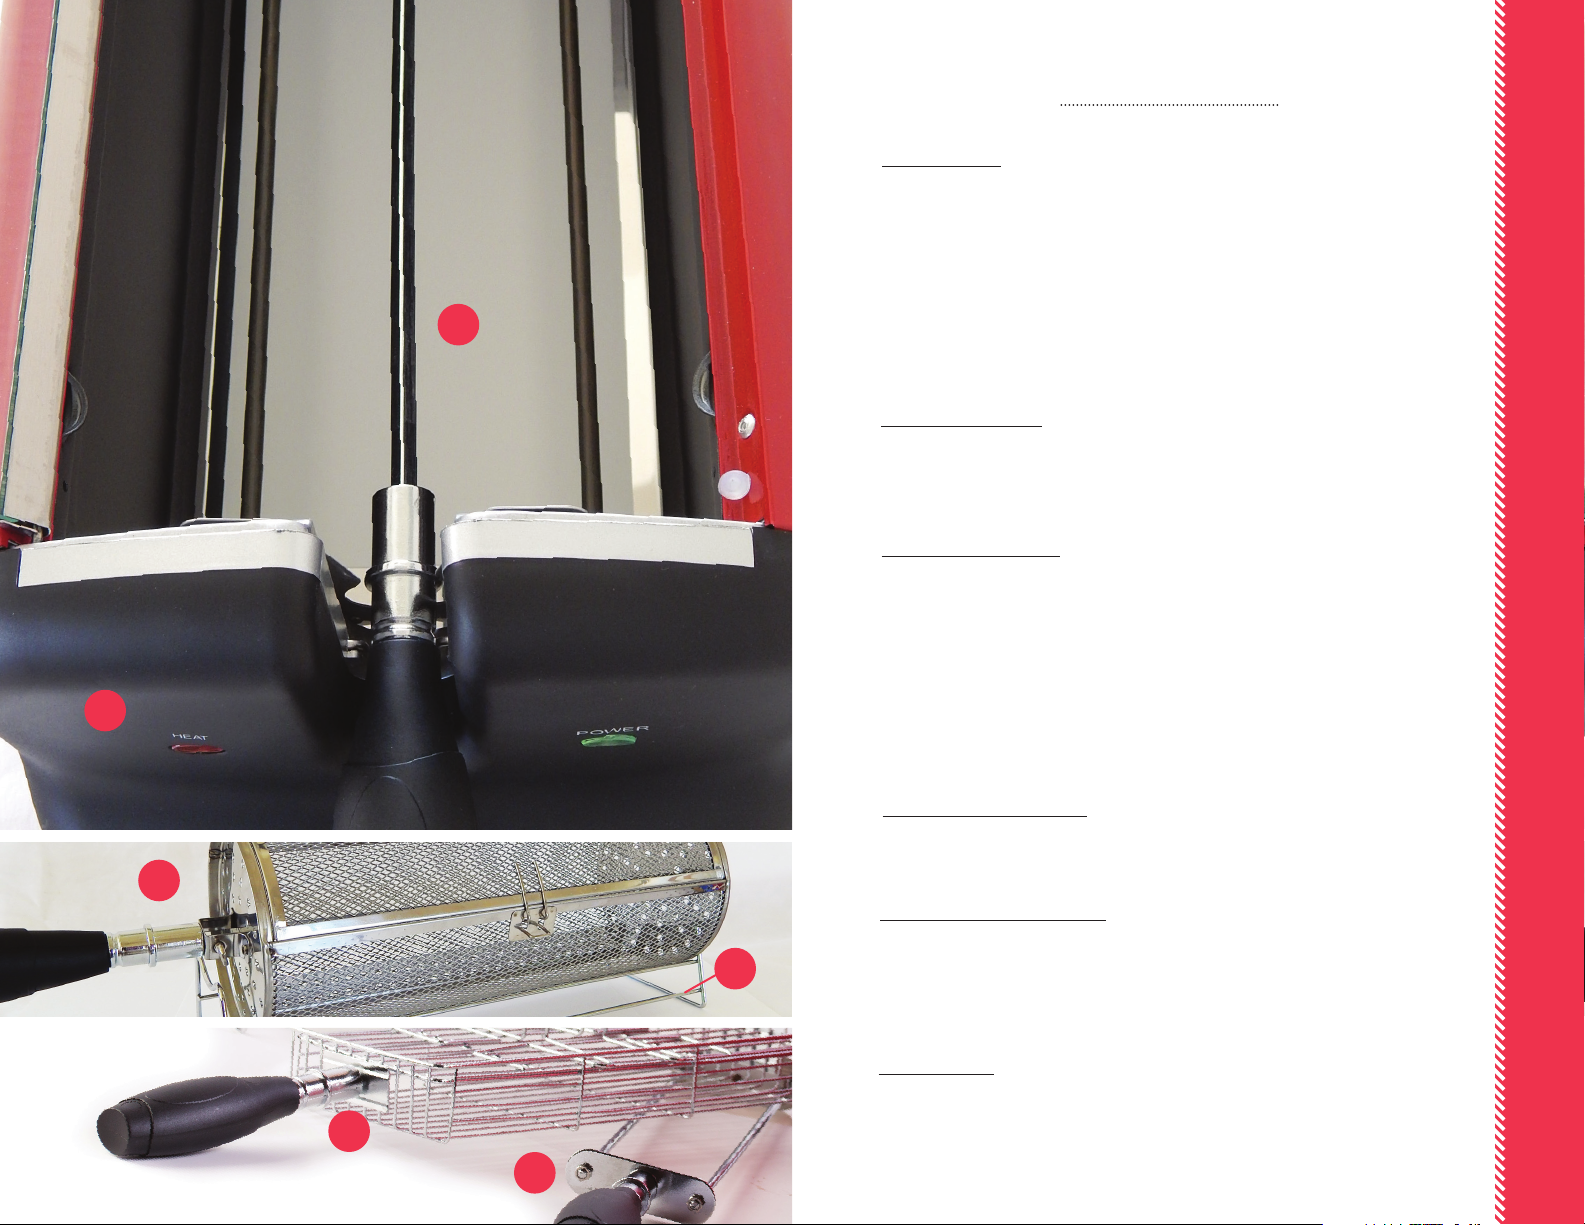
A
A. Rotisserie Oven: The Rotisserie Oven includes the housing for the rotisserie motor,
a Handle Port for the rotisserie Spit handles, a Drive Port for the square end tip of the
Spit, the crumb and drip tray, dual heat shields, EasyLift Glass Door, and easy-to-use
control dials and light indicators.
The EasyLift Glass Door allows convenient viewing of foods while cooking, without
B
stopping the rotisserie process or lowering the oven temperature by opening the
Glass Door. The Glass Door has a convenient heat-resistant handle and can be
removed for easy cleaning. See assembly instructions as needed.
B. Classic Rotisserie Spit: The Classic Rotisserie Spit is the well-balanced stainless steel
rod designed to hold heavy roasts, poultry, and large cuts of meat during the rotisserie
process. The Classic Spit is the traditional tool for rotisserie hams, boneless turkey
breast, leg of lamb and other holiday favorites. See assembly instructions following.
C. Dual Rod Rotisserie Spit: Although the Classic Rotisserie Spit is traditionally used
for chicken and turkey, the Dual Rod Rotisserie Spit makes it even easier and faster
than ever. Two rods support and hold poultry with greater ease, allowing you to
assemble, set the Rotisserie Oven controls and relax until your poultry is deliciously
ready.
The Dual Rod Rotisserie Spit is also the perfect Spit for any foods that are more fragile
and require extra support while rotating in the rotisserie, such as whole seafood or
uneven cuts of lamb, pork or beef.
FEATURES & FUNCTIONS
D. Steak & Chicken Flat Basket: The Flat Basket is your go-to choice when cooking
steaks. Steaks sear perfectly as the Basket rotates, locking in natural juicy tenderness.
Boneless chicken breasts quickly cook to perfection in the Flat Basket, as well.
E
E. Extra Large Rotisserie Tumbler: The Extra Large Rotisserie Tumbler holds cubed or
shoestring potatoes, chicken nuggets, homestyle French fries, battered mushrooms,
F
chicken wings and many other snack and casual foods. Simply ll the Tumbler and
assemble as directed in the Oven. Set the Control Dials and get ready for some
deliciously rotisserie snacks and casual bites.
F. Accessory Rack: Use this handy Rack for prepping food or to support the Basket,
Tumbler or a Rotisserie Spit with cooked food.
D
8
C
9

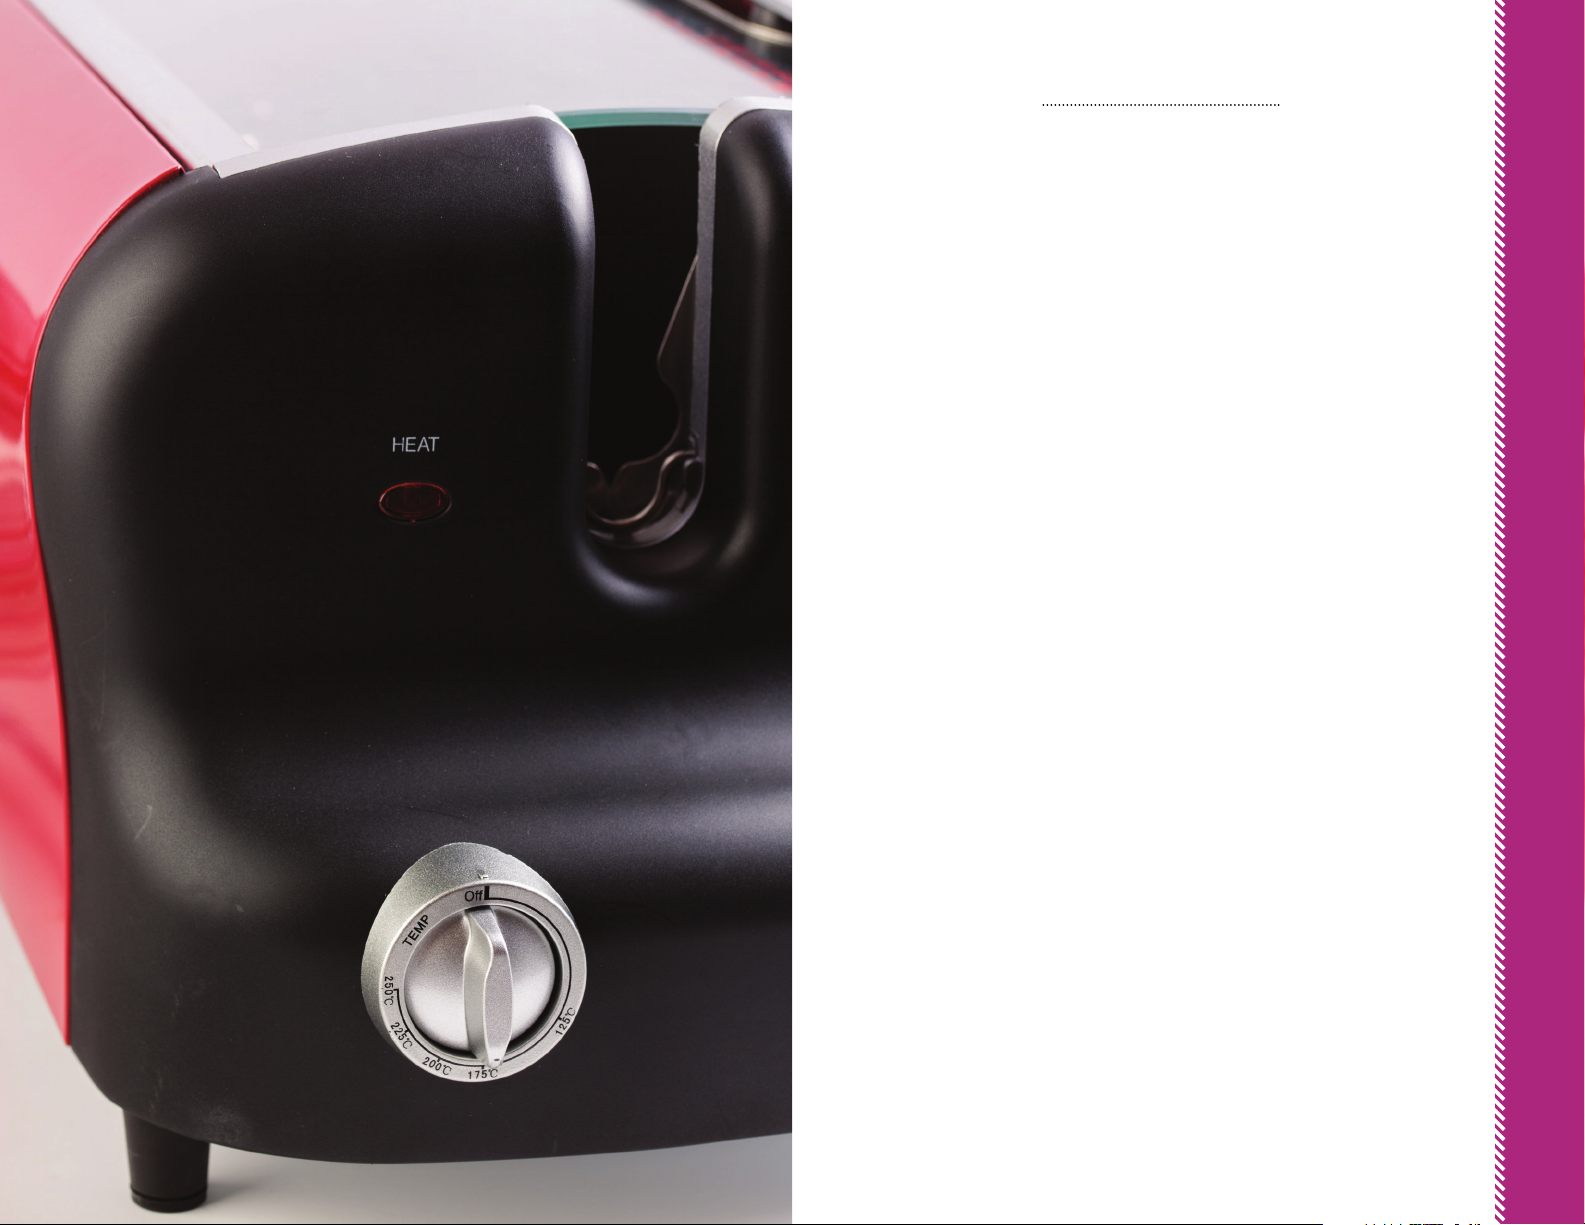
QUICK & EASY CONTROL PANEL
The Control Panel houses the Control Dials and the indicator lights. The
QUICK & EASY CONTROL PANEL
Temperature Control Dial sets the Temperature; the Timer Control Dial sets
the Timer. The indicator lights have dierent functions, as outlined in the
following information.
1. Temperature Control Dial – with heat settings between 250°F and 525°F,
the range of heat settings for every food to be cooked is extensive. Set the
Temperature Control Dial prior to setting the Timer Control Dial.
2. Timer Control Dial – the Timer Control Dial oers a timing range of “0” to
“60 minutes,” which allows timing for everything from small snacks to large
roasts. Set the Temperature Control Dial prior to setting the Timer Control
Dial. The rotisserie will start as soon as the Timer Control Dial is set.
3
4
3. The orange light illuminates when the heating element is on.
4. The green light illuminates to indicate that the temperature setting is
being properly maintained.
1 2
11

g . 1
g . 3
g . 2
g . 4
BEFORE FIRST USE
Install the Glass Door
• If the Glass Door is not attached when unpacked, hold the Door handle with
one hand. ( g 1)
• Place the LEFT door hinge into position at the LEFT corner of the Oven chamber.
• Position the RIGHT hinge into place on the RIGHT corner of the Oven chamber.
• Slide the locking hinge to the RIGHT to secure the Door into position. ( g 2)
The Glass Door may be removed for cleaning as needed:
Open the door; hold the Door by the handle with one hand; slide the lock on the
bottom RIGHT corner of the Door to the LEFT with the other hand. Lift the Door
out from the Oven chamber.
Install the Dual Heat Shields
The heat shields protect the exterior from high heat and help maintain super-fast
rotisserie cooking of foods on the interior. Install the heat shields as follows:
• Hold one heat shield at the top (identi ed by nger holds at each end). ( g 3)
BEFORE FIRST USE & ASSEMBLY
g . 5
• The black side of the shield should be facing inward toward the rotisserie.
• Slide the heat shield down into the inside of the outer wall until fully secured on
the bottom of the Oven chamber. Repeat with the other shield.
The heat shields may be removed for cleaning as needed:
Grasp the top of the heat shield with ngertips, using the nger holds. Tilt the
shield toward the center of the Oven chamber and lift straight up and out. ( g 4)
Repeat with the other heat shield.
Install the Crumb & Drip Tray
Grasp the handle of the Tray; guide the Tray into the slot at the bottom of the
Oven. Slide into the Oven until it is fully inserted and secured in place. ( g 5)
The Crumb & Drip Tray may be removed for cleaning as needed:
Grasp the handle of the Tray and pull out until it clears the bottom of the Oven
chamber. Clean as directed and replace.
13
13

ASSEMBLY
1. Place the Rotisserie Oven on a level surface.
2. Open the Crumb & Drip Tray and add 2-3 tablespoons water to the Tray.
Slide the Tray back into place. The added water helps prevent smoking oil
or fat as it drips onto the Tray.
3. If not already in place, install the heat shields and Glass Door.
4. Plug the Oven into the wall outlet.
5. Choose selected accessory and assemble as follows.
BEFORE FIRST USE & ASSEMBLY
15

QUICK & EASY ROTISSERIE GUIDE
Your rotisserie choices are practically endless when you use your Rotisserie Oven!
The accessories included here will make the process even more enjoyable and free
from complication, which means you get to relax while the Rotisserie Oven works.
Inserting the Rotisserie Spit & Accessories
Your Gourmia Rotisserie Oven chamber has two Ports for insertion of the Classic
Rotisserie Spit, the Dual Rod Rotisserie Spit, Seafood & Flat Basket, and the Extra
Large Rotisserie Tumbler.
Handle Port – note the oversized Port holds the Rotisserie Handle securely on
one end. After inserting the square end tip of the Spit into the Drive Port, press
down securely on the Handle, moving it down until it locks into place.
Drive Port – this small circular stainless steel port is the insertion point for the
square end tip of the Spit.
Classic Rotisserie Spit
Choose the single Spit alone for large boneless cuts of beef, pork, lamb or
poultry. Ensure the food is balanced on the Spit by using the following tips:
QUICK & EASY ROTISSERIE GUIDE
• Position the food to be cooked in the center of the Spit. Secure the food with
cooking string or twine. Tie rmly, as the meat will shrink as it is cooked.
• Place the loaded Rotisserie Spit into the Oven chamber with the square end tip
toward the Drive Port, resting the handle on the Handle Port. Press down into
place until it locks securely.
• Close the Glass Door and set the Temperature and Timer Control Dials.
• When done, remove the Rotisserie Spit with cooked food and place on the
Accessory Rack.
17

Dual Rod Rotisserie Spit
Extra Large Rotisserie Tumbler
• The extended Dual Rods make this the perfect tool for rotisserie chicken and
boneless turkey breasts.
• Remove the lock screws on the Drive end of the Spit and slide the poultry or
meat onto the Spit, centering it in the middle of the Spit.
• Replace the lock screws on the Drive end of the Spit and tighten the screws in
place.
• Place the loaded Dual Rod Rotisserie Spit into the Oven chamber with the Drive
end of the Spit inserted into the Drive Port and the Handle end resting in the
QUICK & EASY ROTISSERIE GUIDE
Handle Port. Press down into place until it locks securely.
• Close the Glass Door and set the Temperature and Timer Control Dials.
• When done, remove the Dual Rod Rotisserie Spit with cooked food and place on
the Accessory Rack.
Steak & Chicken Flat Basket
• Using ngers, press the top of the Basket tabs together to remove the lid and open
the Basket.
• Using the Classic Rotisserie Spit, insert the square end tip into the Tumbler and
through to the other side as far as it will go. Tighten the screw on the Locking bracket
to secure.
• Fill the Tumbler no more than two-thirds full (to allow room for tumbling) and lock
the Tumbler securely.
• Close the Glass Door and set the Temperature and Timer Control Dials.
• When done, remove the Tumbler with cooked food and place on the Accessory Rack.
QUICK & EASY ROTISSERIE GUIDE
18
• This Basket is perfect for cooking your favorite steaks with maximum avor and
tenderness! Position steaks or boneless chicken in the Basket and replace the Lid.
• Place the loaded Flat Basket into the Oven chamber with the square end tip of the
Spit inserted into the Drive Port and the Handle end resting in the Handle Port. Press
down into place until it locks securely.
• Close the Glass Door and set the Temperature and Timer Control Dials.
• When done, remove the Flat Basket with cooked food and place on the Accessory
Rack.
MAINTENANCE & SERVICE
1. ALWAYS allow the Rotisserie Oven to cool completely before cleaning.
2. Unplug the Rotisserie Oven before cleaning.
3. After each use, clean and dry the Rotisserie Oven. Use a damp cloth to
clean the exterior and Glass Door. DO NOT immerse the Oven in water. Use
non-abrasive soap only.
4. After each use, slide out the Crumb & Drip Tray and wash in sudsy water.
Rinse and dry well. Remove the heat shields and Glass Door for cleaning,
if needed. See p. 13 for instructions on removing the Crumb & Drip Tray,
heat shields, or Glass Door.
5. Wash accessories by hand; do not place in dishwasher.
MAINTENANCE & SERVICE
21

WARRANTY
This Limited Warranty is for one full year from the date of purchase. It is
applicable to the original purchaser only and is not transferable to a third party
user. Repair or replacement of defective parts is solely at the seller’s discretion.
In the event that repair isn’t possible, the seller will replace the product/part. If
product repair/replacement won’t suce, the seller has the option of refunding
the cash value of the product or component returned.
Product defects not covered under the Warranty provisions include normal
wear and damage incurred from use or accidental negligence, misuse of
instruction specications or repair by unauthorized parties. The manufacturing
company is not liable for any incidental or consequential damages incurred by
such circumstances.
For Customer Service or Questions, Please call: 888-552-0033
www.gourmia.com
23

www.gourmia.com
 Loading...