

Gourmet Genie Gourmet Smoker, Gourmet Smoker/Cooker Cookery Book & Operating Instructions

GOURMET SMOKER/COOKER
INSTRUCTIONS & RECIPES BOOK
Copyright © 2010
www.buygourmetgenie.com

Table of Contents
Introduction ............................................................................................................................. 3
Description of Operation ......................................................................................................... 4
Control Panel ........................................................................................................................... 4
Up-Down/Time Button ................................................................................................ 4
Hot/Cold Smoke Button .......................................................................................................... 4
Pressure/Delay Button ............................................................................................................. 5
Brown/Warm Button .............................................................................................................. 6
Start/Stop Button ..................................................................................................................... 6
Safety Warnings ...................................................................................................................... 7
Before Using ............................................................................................................................ 8
Instructions on Use .................................................................................................................. 8
Hot Smoke Mode ......................................................................................................... 9
Cold Smoke Mode ........................................................................................................ 9
Pressure Mode ........................................................................................................... 10
Steam Mode ............................................................................................................... 10
Brown Mode............................................................................................................... 10
Warm Mode ............................................................................................................... 10
Cleaning Instructions ............................................................................................................ 10
Recipes ................................................................................................................................... 12
Pork Spareribs ............................................................................................................ 12
Pork Loin (Back) Ribs ............................................................................................... 12
Pork Tenderloin .......................................................................................................... 12
Beef Roast .................................................................................................................. 13
Whole Chicken ........................................................................................................... 13
Chicken Pieces ........................................................................................................... 13
Chicken Breasts ......................................................................................................... 14
Chicken Wings ........................................................................................................... 14
Rock Cornish Game Hens ......................................................................................... 14
Smoked Turkey Breast ............................................................................................... 15
Smoked Salmon Fillets or Steaks .............................................................................. 15
Smoked Salmon Pate ................................................................................................. 15
Smoked Salmon Salad ............................................................................................... 15
Smoked Salmon Cheese Logs ................................................................................... 16
Smoked Salmon Spiral Roll Ups ............................................................................... 16
Polish Sausage .............................................................................................................17
Smoked Eggs ...............................................................................................................17
Smoked Baked Potato ................................................................................................ 17
Smoked Potato Salad ................................................................................................. 18
Potatoes “Maurice” .................................................................................................... 18
Smoked Onions .......................................................................................................... 18
Smoked Cheddar Cheese ........................................................................................... 19
Shrimp Risotto ........................................................................................................... 19
2
New Gourmet Smoker/Cooker
Instructions & Recipes
INTRODUCTION
Your Gourmet Genie™ Gourmet Smoker/Cooker is the most up-to-date, and state-ofthe-art cooking machine introduced since the invention of the pressure cooker. It is the most
modern method of preparing delicious smoked barbeque foods in the home kitchen. This
aromatic woods and avoring may be used. Some of these include; hickory, mesquite, apple
wood, cherry wood, oak wood, sassafras root, wines, rum, brandy extracts and vinegar.
Omit the wood and the Gourmet Genie
cooker; cooking, tenderizing and reducing shrinkage and cooking times of foods. Steaming
vegetables preserves vitamins and avor. Cook delicious uffy rice easily.
opens a new realm of lower calorie avorful foods,
because smoke gives avor and not calories.
Although primarily used as a new method of
cooking barbeque, it will also work as a cold smoker
or an aromatic-cooking machine. It will also work as a
pressure cooker or steamer. These features provide for
many adventures for the palate in delightfully different
and tasty recipes.
As a cold smoker, it will smoke; cheese, seafood,
vegetables and avor meats with smoke to be cooked
later by other methods. As an aromatic cooker, in
both hot and cold smoke modes, various types of
™
Gourmet Smoker/Cooker becomes a pressure
In the conventional dry heat method of barbequing, 40% to 50% of meat is lost in
shrinkage and drippings resulting in a dry and chewy product. Barbequing with the
Gourmet Genie™ method can reduce shrinkage by 50% resulting in a moist and juicy
product. There is a great savings in time when compared to the charcoal method.
All meats cooked by the Gourmet Genie
refrigerated after cooking. The food may be heated later and served on demand, without loss
of the smoke avor.
™
Gourmet Smoker/Cooker may be frozen or
3

DESCRIPTION OF OPERATION
The Gourmet Genie™ Gourmet Smoker/Cooker combines the modern scientic
method of pressure baking with pressure smoking to get that “old-fashioned” smoke
avor. It does this economically, automatically, and in a fraction of the time taken to
prepare barbeque by ordinary methods.
In operation as a barbeque appliance, place a small amount of wood (hickory or other
woods) in the smoke generator cup. Meats or foods to be cooked are prepared according to
the recipes and then placed into the food basket. The capacity of the unit is up to 4 pounds
depending on the size and shape of the product to be cooked. After the cooker is loaded
with the food to be cooked, put the cover in place. Heat is applied and pressure builds in
the appliance. At the same time, the wood chars and creates smoke. The smoke is forced
through the food under pressure. The relief valve releases a small amount of steam from
time to time to control the pressure.
Release pressure manually by removing the weighted knob from the valve stem at
the end of the cooking cycle. The appliance cannot be opened until the steam pressure is
completely exhausted. Then turn the cover clockwise and lift to remove it.
Generally, the more wood chips placed into the cup the stronger the smoke avor
in the food being cooked. Pre-smoking will achieve the same results. Start with a small
amount of chips, such as 5 pieces of wood, until you determine what is enough to satisfy
your taste.
The more time used to cook meat in the appliance, the more tender the meat
becomes.
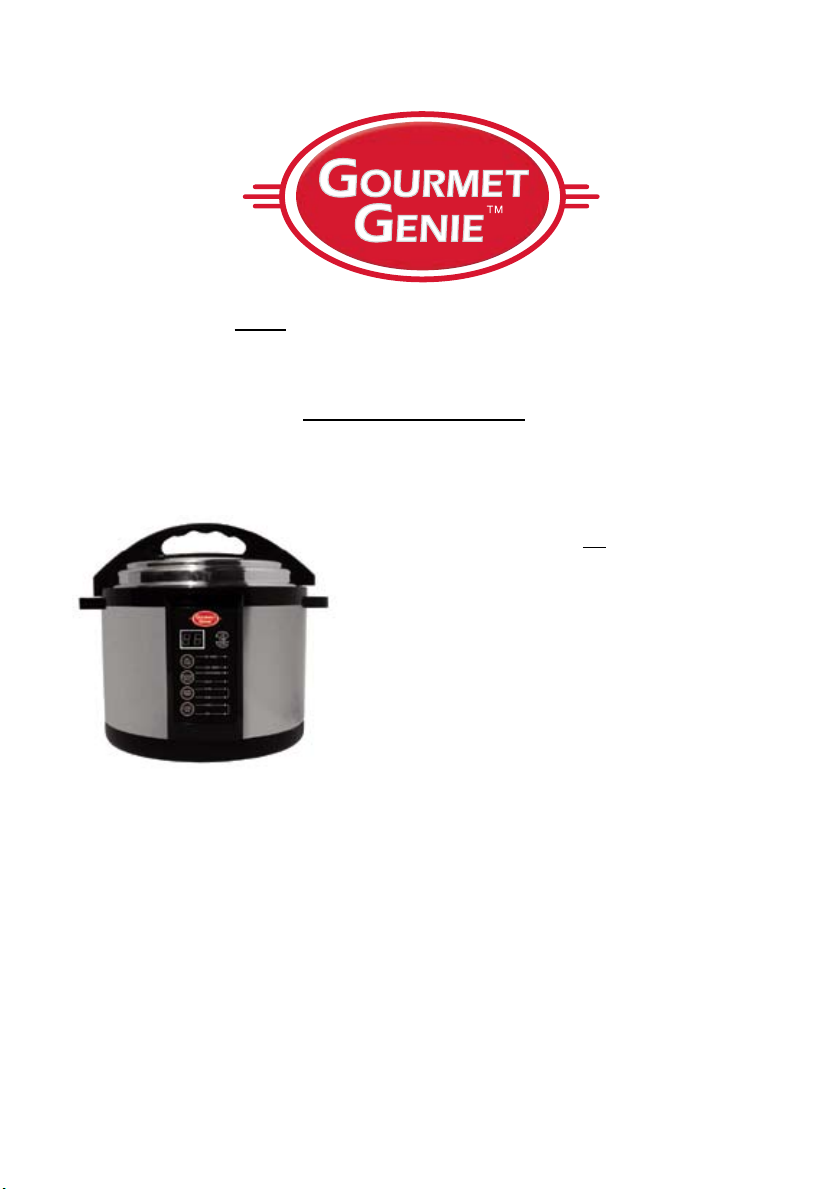
CONTROL PANEL
“UP-DOW N/T IME” Button allows you to control the
amount of time you want to cook a product. This time is
displayed in the “DISPLAY WINDOW”.
“UP” Button
The “UP” button allows you to set and advance the
“Time” setting. The time of cooking will appear
in the display as minutes. If you press and hold the
“UP” button, the time will increase automatically in
increments of 1 minute. The longer you hold the button,
the faster the time will advance. The maximum time
you can set is 99 minutes (1 hour 39 minutes). If you
inadvertently pass the desired time, you may readjust it
by pressing the “DOW N” button (See below).
“DOWN” Button
The “DOWN” button allows you to go backward
with the “Time” setting displayed in the time display
window. Here, again, the longer you hold the button, the
faster the time will decrease.
“HOT/COLD” Smoke Button
This button allows you to cook with pressure and
smoke at the same time (HOT SMOKE) or to smoke
foods only (COLD SMOKE) with no pressure and
4

relatively little heat. The button will alternate the lights from hot smoke to “COLD
SMOKE” by pushing the button more than once.
“HOT SMOKE”: Press the “HOT/COLD” button until the light is lit beside the words
“COLD SMOKE”: Press the “HOT/COLD” button until the light is lit beside the words
NOTE: The “Cold Smoke” mode will emit a small amount of smoke smell into the
“PRESSURE/DELAY” Button
“PRESSURE”: Press the button until the light is lit beside the words “PRESS/STEAM.”
“STEA M”: There is no button named “Steam.” The “Steam” mode is the same as the
“HOT SMOKE.” The unit is now in the “HOT SMOKE” mode. In the hot
smoke mode, both the main element and the char ring element are energized at the
same time. You may now enter the desired time of cooking by pressing the “UP-
DOW N” button. This allows you to impart a delicious smoke avor to food and
cook under pressure at the same time. This is the most popular mode with which to
barbeque.
“COLD SMOKE.” The unit is now in the “COLD SMOKE” mode. In the
“COLD SMOKE” mode, only the charring element is energized. You may now
enter the desired time of smoking by pressing the “UP-DOWN” button. This
allows you to “Cold Smoke”. This will allow you to smoke without cooking. For
example, you can avor steaks to cook the meat on a charcoal grill or in a pan later
on. You may also use this method to smoke nuts and hard cheese such as; Cheddar,
Gouda or Parmesan cheeses.
kitchen. If you object to this smell, you may want to use the unit under a hood
vented to the outside when cooking in this mode.
This mode also allows you to start the unit to smoking (Pre-smoke) in order to give
avor to fast cooking meats, such as; sh and shrimp. Otherwise, the product will
cook before the unit starts to smoke properly. Then you will get very little smoke
avor in the cooked product. You may add extra smoke by pre-smoking before
cooking to get extra strong avor into the food you are cooking. As stated above,
use the “COLD SMOKE” mode in conjunction with the hot smoke mode to presmoke in the cold mode and then begin barbequing in the hot smoke mode. Press
the “HOT/COLD” Smoke Button until the “COLD SMOKE” light is lit. Set
the desired time for cold smoking. Then press the “HOT/COLD” Smoke Button
until the hot smoke light is lit. The cooker will cold smoke for the time set and then
automatically hot smoke for the time set. You can cold smoke before the hot smoke
mode, but not after the hot smoke mode.
In the “PRESSURE” MODE, the “PRESSURE/DELAY” button allows you
to either cook with steam pressure or steam with no pressure. In the “DELAY”
mode the PRESSURE/DELAY” button allows you to delay the start of the above
cooking processes for up to 99 minutes.
To use in the “PRESSURE” mode place the weighted knob on the valve stem.
This will allow the unit to build pressure. You may now enter the desired time of
cooking by pressing the “UP-DOW N” button. This will allow you to cook foods
under pressure quickly and with great tenderness. The charring element is disabled
and no smoke will be impar ted. However, plain pressure-cooked meats, although
delicious in avor, will be lighter in appearance. You may use the “Brown” mode
before pressure-cooking meat to get the desired appearance (See below).
“Pressure” mode except the weighted valve is removed from the valve stem. Press
the button until the light is lit beside the word “PRESS/STEAM.” To use the
cooker in the “Steam” mode, do not place the weighted knob on the valve stem.
5

You may now enter the desired time of cooking by pressing the “UP-DOWN”
button. This allows the unit to continually release steam and not build pressure;
thus allowing you to steam foods such as vegetables and rice.
“DELAY”: Press the button until the light is lit beside the word “DELAY.” This feature
“BROWN/WARM” Button
In the “Brown” mode, leave the top off the cooker and place a small amount of
In the “Wa rm” mode, place the top on the cooker. Do not place the weighted knob
“START/STOP” Button
Start
Stop
LED Indicator Lights
allows you to enter a delay time for any mode except browning or warm. You
may now enter the desired time of delay by pressing the “UP-DOWN” button.
This will allow you to delay the time of a cooking mode, for example, up to 99
minutes before beginning a sequence. Here is an example of a sequence using
the delay mode: Delay up to 99 minutes before the start of “Cold Smoke”;
then cold smoke for 30 minutes; then hot smoke for 30 minutes. The unit will
automatically stop the cooking process after the sequence is completed.
The “BROWN” mode allows you to brown food and then cook by the other
methods after browning. The “WARM” feature allows you to hold food warm
after cooking.
oil in the bottom of the cooking pot insert. The oil will get quite hot. The cooker
must always be attended. As a safety measure, the cooker cannot be timed longer
than 20 minutes. The unit will stop cooking after 20 minutes. If you desire further
browning after this time, you must reset the unit to the “Brown” mode and time
again. As stated above, you may use the “Brown” mode before the “Pressure”
mode to get a brown appearance.
on the valve stem. This allows moisture to escape and it will hold foods warm for
a limited amount of time without further cooking. You must release the pressure
before programming the “Warm” mode. If you do not release the steam pressure,
the food will continue to cook even though it may be in the “Warm” mode
The “Start / Stop” button allows you to start or stop any mode.
The “Start” button allows you to start any mode if the “Stop” light is lit. You
must press the “Start” Button to begin the cooking process. After choosing the
desired mode, and setting the time(s), start the cooking process by pressing and
releasing the “Start” button. The “Start” light will come on.
The “Stop” button allows you to stop any mode if the “Start” light is lit. To
stop any mode after the “Start” button has been pressed, press and immediately
release the “Stop” button and the stop light will light. To clear all modes and star t
again, press the “Stop” button for about 3 seconds.
The LED indicator lights are little red lights to the right of the mode buttons.
Each light will glow red when the mode button is pushed to indicate which mode
is used. When multiple modes are sequenced, the red light that is solid or not
blinking is the current mode that is functioning. The blinking lights indicate
future modes.
6
 Loading...