

Page 1

P2QV23A
User Guide
1
Page 2

I. CAUTIONS ON MOBILE PHONE USE ............................................................................................................... 4
1.1 INTERFERENCE ......................................................................................................................................... 4
1.2 REASONABLE USE .................................................................................................................................... 4
1.3 QUALIFIED MAINTENANCE SERVICE .......................................................................................................... 4
1.4 WATER-RESISTANCE ................................................................................................................................. 4
1.5 EMERGENCY CALLS .................................................................................................................................. 4
2 PRECAUTIONS FOR USE OF BATTERY ........................................................................................................... 4
3 CAUTIONS FOR CHILDREN ............................................................................................................................ 5
II. KEYS AND PARTS ........................................................................................................................................ 6
III. START TO USE ........................................................................................................................................... 7
3.1 TO INSERT SIM CARD(S): ......................................................................................................................... 7
3.2 CHARGE THE BATTERY ............................................................................................................................. 9
IV. BASIC FUNCTIONS ..................................................................................................................................... 9
1. LOCK AND UNLOCK THE SCREEN ................................................................................................................ 9
2. MAKE IT YOURS ........................................................................................................................................ 11
3. SWITCH TO RECENTLY USED APPLICATION .............................................................................................. 17
4. MAKE A CALL ........................................................................................................................................... 18
5. CALL LOG ................................................................................................................................................. 19
Contents
2
Page 3

6. ANSWERING PHONE CALLS AND REJECTION ............................................................................................. 20
7. ADD A CONTACT ....................................................................................................................................... 21
8. SEND AND RECEIVE MESSAGE(S) ............................................................................................................. 22
9. BROWSER THE WEB ................................................................................................................................. 24
10. ENJOY MUSIC ......................................................................................................................................... 24
11. DOWNLOAD APPLICATIONS FROM PLAY STORE ...................................................................................... 25
12. MANAGE APPLICATIONS ......................................................................................................................... 26
13. APPLICATIONS & UTILITIES ............................................................................................................ 27
14. SETTINGS ............................................................................................................................................... 27
V. TECHNICAL INFORMATION......................................................................................................................... 31
3
Page 4

I. Cautions on mobile phone use
1.1 Interference
All phones may be interfered, which affect phone calls.
1.2 Reasonable use
Use only in the normal position. Do not touch the antenna area unnecessarily.
1.3 Qualified maintenance service
Only qualified personnel may install or repair this product.
1.4 Water-resistance
Your device is non water-resistant. Keep it dry.
1.5 Emergency calls
Ensure the phone is switched on and in service. Enter the emergency number and press the
Dialer icon.
2 Precautions for use of battery
2.1 Do not dispose of batteries near or in a fire to avoid dangers.
2.2 Do not dispose of batteries in the garbage. Dispose of batteries to assigned battery recycling
center.
4
Page 5

3 Cautions for children
Keep your device out the reach of children in case of accidental injury caused by incorrect use of
the device as toys.
5
Page 6
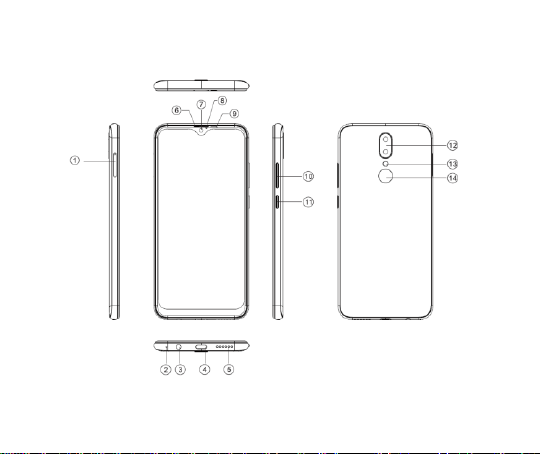
II. Keys and parts
6
Page 7

1. Audio jack
2. USB Connector
3. Front Camera
4. Receiver
5. Light sensor / Proximity sensor
6. LCD
7. Mic
8. Adjust volume key
9. Power key
10. Rear Camera
11. Flashlight
12. Speaker
III. Start to use
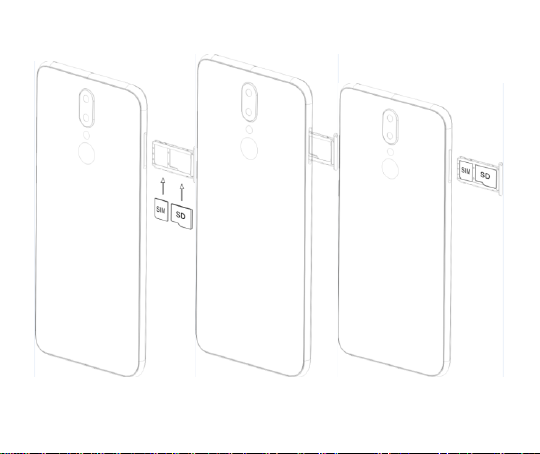
3.1 To insert SIM card(S):
Insert the SIM card correctly in the card slot(s) (See figure below), suggest switch off the phone
when you insert SIM card.
Insert the Micro SD card into the slot with the correct direction (See figure below), suggest switch
off the phone when you insert SIM card.
Note: Use only compatible memory cards with this device. Incompatible memory cards may
damage the card or the device and corrupt the data stored in the card.
7
Page 8
8
Page 9

3.2 Charge the battery
During charging, the battery indicator on the phone is a thunder icon. If the device is switched off
during charging, there will still be a charging indication on the screen that shows the phone is
being charged. If the device is overused when the battery is low, the charging icon might take
some time to appear.
When the battery indicator on the screen display 'Battery is full', thunder icon will disappear,
which means the completion of charging. If the phone is switched off during charging, the screen
will display ' Battery is full '. It generally takes 4 hours to charge the battery. During charging, the
battery, the device and the charger will get hot. This is normal.
Unplug the charger from the AC electrical outlet and disconnect the wiring between the phone and
the charger after charging. .
Cautions: Charge the phone in a well ventilated place in which the temperature is between -10℃
to +55℃. Use the charger provided by the manufacturer only. The use of unconfirmed charger
may lead to dangers and violate the manufacturer's warranty clause. If the temperature is too
high or too low during charging, the device will automatically send a warning and stop charging to
avoid damage to the battery or any danger.
IV. Basic functions
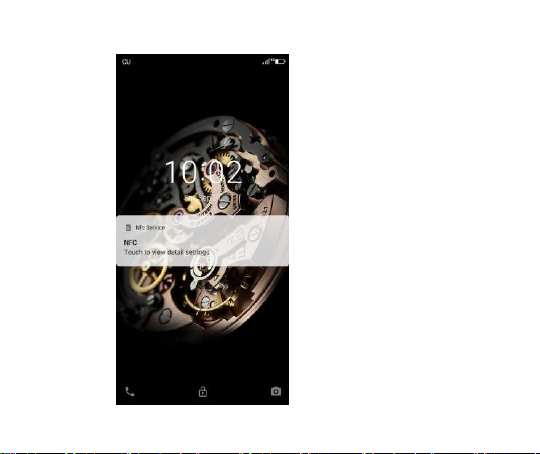
1. Lock and unlock the screen
Press power button to enter Sleep mode and meanwhile the screen will be locked; press power
button again to wake up and then swipe up for unlock.
9
Page 10
10
Page 11
2. Make it yours
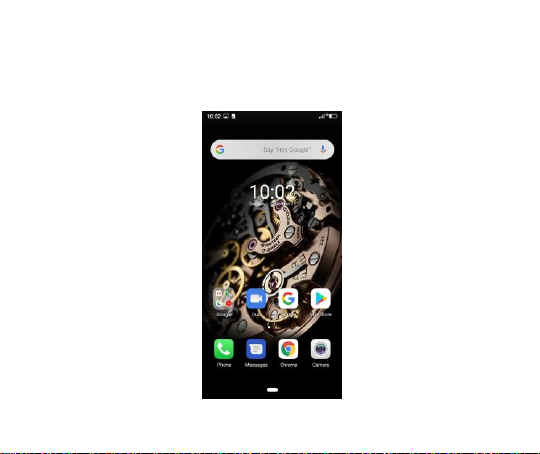
2.1 Home screen: It is your starting point to access all the features on your phone. It displays
application icons, widgets, shortcuts, and other features. Long press home screen and Modify
Wallpaper.
11
Page 12
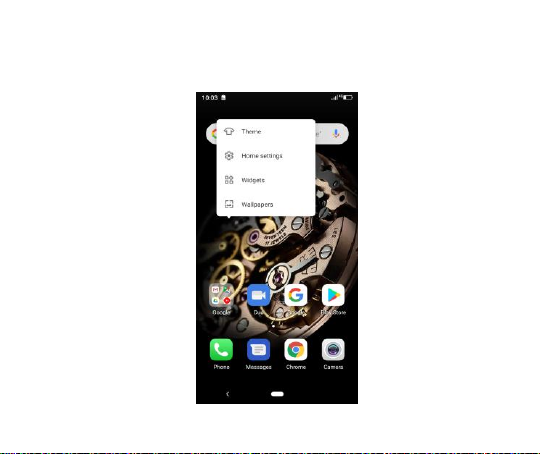
2.2 Long press Home screen, and then you can Modify Wallpaper; or enter Launcher and long
press and hold an application till the screen vibrates, and then loosen your hold finger.
12
Page 13
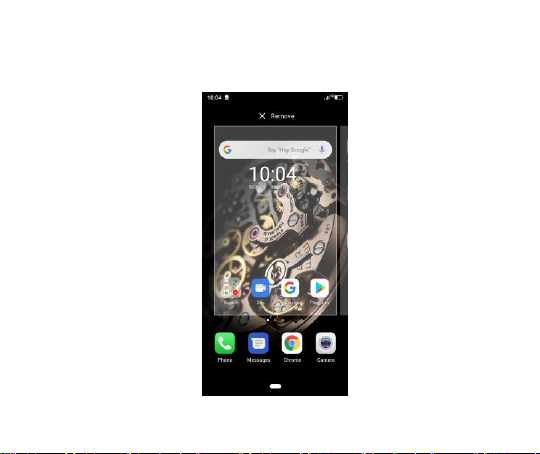
Long press and hold the widget or icon you want to move. Once the phone vibrates, don’t loosen
your hold on the icon. Drag the widget or icon to a new location on the screen Press and hold on
an icon till the phone vibrates, and drag the widgets or icon to the trash for remove!
13
Page 14
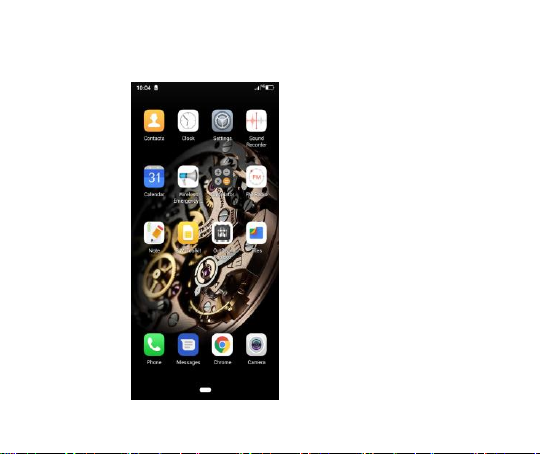
Swipe left and enter to applaction list.
14
Page 15

2.3 Notification Bar: At the top of the screen, the Status Bar displays the time, status, and
notifications. If there is a new message, missed call or something in the notification bar, you can
drag it down to open notification panel and click the desired one to have a view. When you
finished, you can close it by dragging the panel up or pressing “Back”.
15
Page 16

2.4 If you connect your phone to PC via USB, you can find the USB options, choose This Device
- file Transfer option, you can see your phone memory in PC, this is same function like USB
storage.
16
Page 17
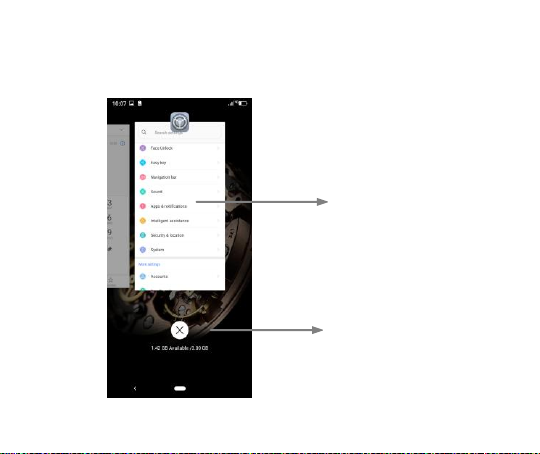
3. Switch to Recently Used Application
Touch and slide this
place can choose to
open the history
application
Touch this icon to
close all history
application
Press menu key.
17
Page 18

4. Make a call
Click and enter a complete phone number to make a call. Your phone supports smart
search.
Swipe to right to view Call history and Contacts.
18
Page 19

5. Call log
Press the number
if you want to see
the details , send
message or call
back, there are
three options for
you.
Press the number, you can view the contact details, send a message or call back.
19
Page 20

6. Answering phone calls and rejection
When there is an incoming call, you can drag the icon up or down to answer or hang up it directly.
20
Page 21

7. Add a contact
Touch to enter contact
Touch to add a new contact
Click here to add new contact and in this page press menu key to enter menu view, setting, etc.
21
Page 22

8. Send and Receive message(s)
Tap this icon to select
desired contact from phone
Touch to switch the digital input and
symbols
Press space or a punctuation mark to enter the highlighted
suggestion
Touch enter to messaging, touch “Start chat”.
When you are composing a new text message, you can select text for cutting or copying. The
selected text is highlighted in blue
22
Page 23

Tap to add “Attach” including Pictures, Videos, Audios, etc to send MMS.SMS
When a new message comes, you can read by dragging notification panel and click the message,
or entering Message to read it directly.
Long press one of the all message threads, you can delete it”.
23
Page 24

9. Browser the Web
9.1 Set up Internet/Data connection
Enter Settings > More…, scroll down to find out Mobile network, and then enter “Access Points
Names, choose the desired WAP account.
9.2 Switch on Data connection or Wi-Fi
To browse the web, you need to switch on Data connection. If there is Wi-Fi around, you can
switch on Wi-Fi to use it browse the web.
10. Enjoy music
When you copy music to your SD card, the Music player searches the card for music files and
builds a catalog of your music, based on information about each file that is stored in the file itself.
24
Page 25

11. Download applications from Play Store
11.1 Add Google™ account
11.2 Enter play store and download apps
25
Page 26

12. Manage Applications
Enter Setting > App.
You can see app info.
26
Page 27

13. APPLICATIONS & UTILITIES
For your entertainment purpose, your device is provided with several interesting games,
applications and utilities, such as Gmail, Email, Play Store.Before accessing the applications,
please turn on the data connection or connect to wifi.
14. Settings
14.1 Wi-Fi
Open Wi-Fi, search nearly Wi-Fi and connect it, then you can use Internet or download apps for
free.
27
Page 28

14.2 Bluetooth
Open Bluetooth, connect to other phone, you can share something like music, photos, movies etc
to other people.
28
Page 29

14.3 Security
Screen lock.
There are four screen lock ways for you to choose :Slide, Pattern, PIN, Password.
29
Page 30

14.4 Face ID
Click Settings - Security and Location - Face Unlock, follow the prompts ,after completing the
face recording, you can use the face unlock function.
30
Page 31

14.5 Fingerprint
Click Settings - Security and Location - fingerprint, follow the prompts ,after completing the
fingerprint recording, you can use the fingerprint unlock function.
V. Technical Information
Model: STG A2 Pro
Size Length: 146.8*71.3*8.5mm
Battery: 3950mAh
Networks: 2G:GSM B2/3/5/8
3G:WCDMA B1/2/5/8
4G:FDD B1/3/5/7/8/20 TDD B38/39/40/41
SAR Value: Head SAR value:
GSM:850/EGSM900/DCS1800/PCS1900
31
Page 32

Weight: 160g
Nominal voltage: 3.8V
Max. Voltage: 4.35V
Capacity rating:2200 mAh(8.36Wh)
Google, Google Play and other marks are trademarks of Google LLC
FCC compliance statement
This device complies with part 15 of the FCC
Rules. Operation is subject to the following two
conditions:
(1) This device may not cause harmful
interference, and
(2) this device must accept any interference
32
Page 33

received, including interference that may cause
undesired operation.
Note: This equipment has been tested and
found to comply with the limits for a Class B
digital device, pursuant to part 15 of the FCC
Rules. These limits are designed to provide
reasonable protection against harmful
interference in a residential installation. This
equipment generates uses and can radiate radio
frequency energy and, if not installed and used
in accordance with the instructions, may cause
harmful interference to radio communications.
However, there is no guarantee that interference
33
Page 34

will not occur in a particular installation. If this
equipment does cause harmful interference to
radio or television reception, which can be
determined by turning the equipment off and on,
the user is encouraged to try to correct the
interference by one or more of the following
measures:
Reorient or relocate the receiving antenna.
Increase the separation between the
equipment and receiver.
Connect the equipment to an outlet on a
circuit different from that to which the
receiver is connected.
34
Page 35

Consult the dealer or an experienced
radio/TV technician for help.
Important: Changes or modifications to this
product not authorized by Shenzhen Gotron
Electronic CO.,LTD. could void the
electromagnetic compatibility (EMC) and
wireless compliance and negate your authority
to operate the product.
This product has demonstrated EMC
compliance under conditions that included the
use of compliant peripheral devices and
shielded cables between system components. It
is important that you use compliant peripheral
35
Page 36

devices and shielded cables between system
components to reduce the possibility of causing
interference to radios, televisions, and other
electronic devices.
SAR Statement:
This Mobile Phone meets the government's
requirements for exposure to radio waves. The
guidelines are based on standards that were
developed by independent scientific
organizations through periodic and thorough
evaluation of scientific studies. The standards
include a substantial safety margin designed to
assure the safety of all persons regardless of
36
Page 37

age or health.
FCC RF Exposure Information and Statement
the SAR limit of USA (FCC) is 1.6 W/kg
averaged over one gram of tissue. Device types:
GQ3082 (FCC ID: 2AOWKGQ3082MH) has
also been tested against this SAR limit. This
device was tested for typical body-worn
operations with the back of the handset kept
10mm from the body. To maintain compliance
with FCC RF exposure requirements, use
accessories that maintain a 10mm separation
distance between the user's body and the back
of the handset. The use of belt clips, holsters
37
Page 38

and similar accessories should not contain
metallic components in its assembly. The use of
accessories that do not satisfy these
requirements may not comply with FCC RF
exposure requirements, and should be avoided.
Body-worn Operation
This device was tested for typical body-worn
operations. To comply with RF exposure
requirements, a minimum separation distance of
10mm must be maintained between the user’s
body and the handset, including the antenna.
Third-party belt-clips, holsters, and similar
accessories used by this device should not
38
Page 39

contain any metallic components. Body-worn
accessories that do not meet these
requirements may not comply with RF exposure
requirements and should be avoided. Use only
the supplied or an approved antenna.
39
 Loading...