

Page 1

Page 2

Safety Instructions
Do not disassemble, or drop the camera from high altitude.
Do not expose the camera to high temperatures and avoid contact with water and other liquid substances.
After long time using, the camera body may become warm. This is a normal situation.
Use only accessories provided by the manufacturer.
Use only the battery provided by the manufacturer.
If not using, remove the batteries; do not put batteries in a fire as they may explode.
Use a high-speed card class 4 or more.
Product information
As we are committed to continually improve the customer's operating experience, design and specifications are subject to change
without notice.
This operation guide is a general reference guide camera.
This Operating Guide, if there are any illustrations or contents inconsistent with the real camera, take real object as the standard.
Page 3

Catalogue
Quick start guide.......................................................................................................................................................................................................................1
1 Device Construction............................................................................................................................... ...............................................................................3
2 Buttons Designing.................................................................................................................................................................................................................4
3 Install the battery................................................................................................................................................................................................................. 5
4 Battery charging....................................................................................................................................................................................................................5
5 AC power supply....................................................................................................................................................................................................................6
6 Insert the memory card............................................................................................................................... .......................................................................6
7 Power on/power off.............................................................................................................................................................................................................. 7
8 Preview mode......................................................................................................................................................................................................................... 7
9 Main menu............................................................................................................................................................................................................................. 10
10 Playback............................................................................................................................... ................................................................................................10
11 Vehicle use ( mode ) and sport use ( mode )............................................................................................................................... .........................14
12 Video recording mode / Photo mode/ Continuous shooting mode................................................................................................................14
13 Emergency video protection............................................................................................................................... ..........................................................15
14 Segment overwritten.......................................................................................................................................................................................................15
15 Motion defection................................................................................................................................................................................................................16
16 GPS function....................................................................................................................................................................................................................... 16
Page 4

17 LCD screen auto shut-off...............................................................................................................................................................................................17
18 Auto shut-off function after power supply cut.......................................................................................................................................................17
19 Cameras connected to a computer............................................................................................................................................................................17
20 Connected to TV............................................................................................................................... .................................................................................18
21 Connected with car bracket (optional).....................................................................................................................................................................18
22 Remote Control Operation (optional)............................................................................................................................... .........................................19
Appendix I Packing list..........................................................................................................................................................................................................20
Appendix II warranty.............................................................................................................................................................................................................21
Page 5

1
Quick start guide
● Power on/power off
Long press [Power] key to turn on the camera.
Press and hold the [Power] key for 3 seconds to turn off the camcorder.
● Camera /photo / Continuous shooting
In preview status, short press [Power] button to convert between different working mode: photo/ video/continuous shooting.
In preview status, short press [Video/Photo] button to begin the recording / stop recording function. In Photo mode, you can
take photos. In Continuous shooting mode, execute 10 continuous shooting mode shooting function. In other status, short press
[Video/Photo] to return directly to preview status.
● Time setting
In preview status, press [Menu/Back] button to enter the main menu, select [
] option, enter the system setup
menu. Select [ ] option, in the time setting interface, press [Up]/[Down] button to make settings, press [OK]
button to confirm the current settings and automatically move to the next one after, until completion of all the settings and return
to the previous menu, press [Menu/Back] key to cancel the current setting and return to the previous menu.
● Watermark setting
In the preview mode, press [Menu/Back] button to access the main menu, select [Shooting Settings] option, enter the shooting
settings interface. Select [
] options, press [Up]/[Down] button to select the watermark switch, press [OK] to confirm.
Page 6

2
Watermark will be superimposed on photographs and videos.
● Night mode
In night or low light environment, this mode is suggested for better photo and video performance. In preview mode, press
[Menu/Back] button to enter main menu, select [
] to enter the next menu. Press [Up]/[Down] button to select
corresponding options and press [OK] button to confirm the setting.
● LCD screen on & off
Without operations in 3seconds (vehicle mode excepted), LCD screen will shut off automatically. You can press any key to activate
it.
When LCD screen is on, you can long press [OK] button to shut off it.
When LCD screen is off, you can long press [OK] button to turn on it and keep it on constantly.
Page 7
3
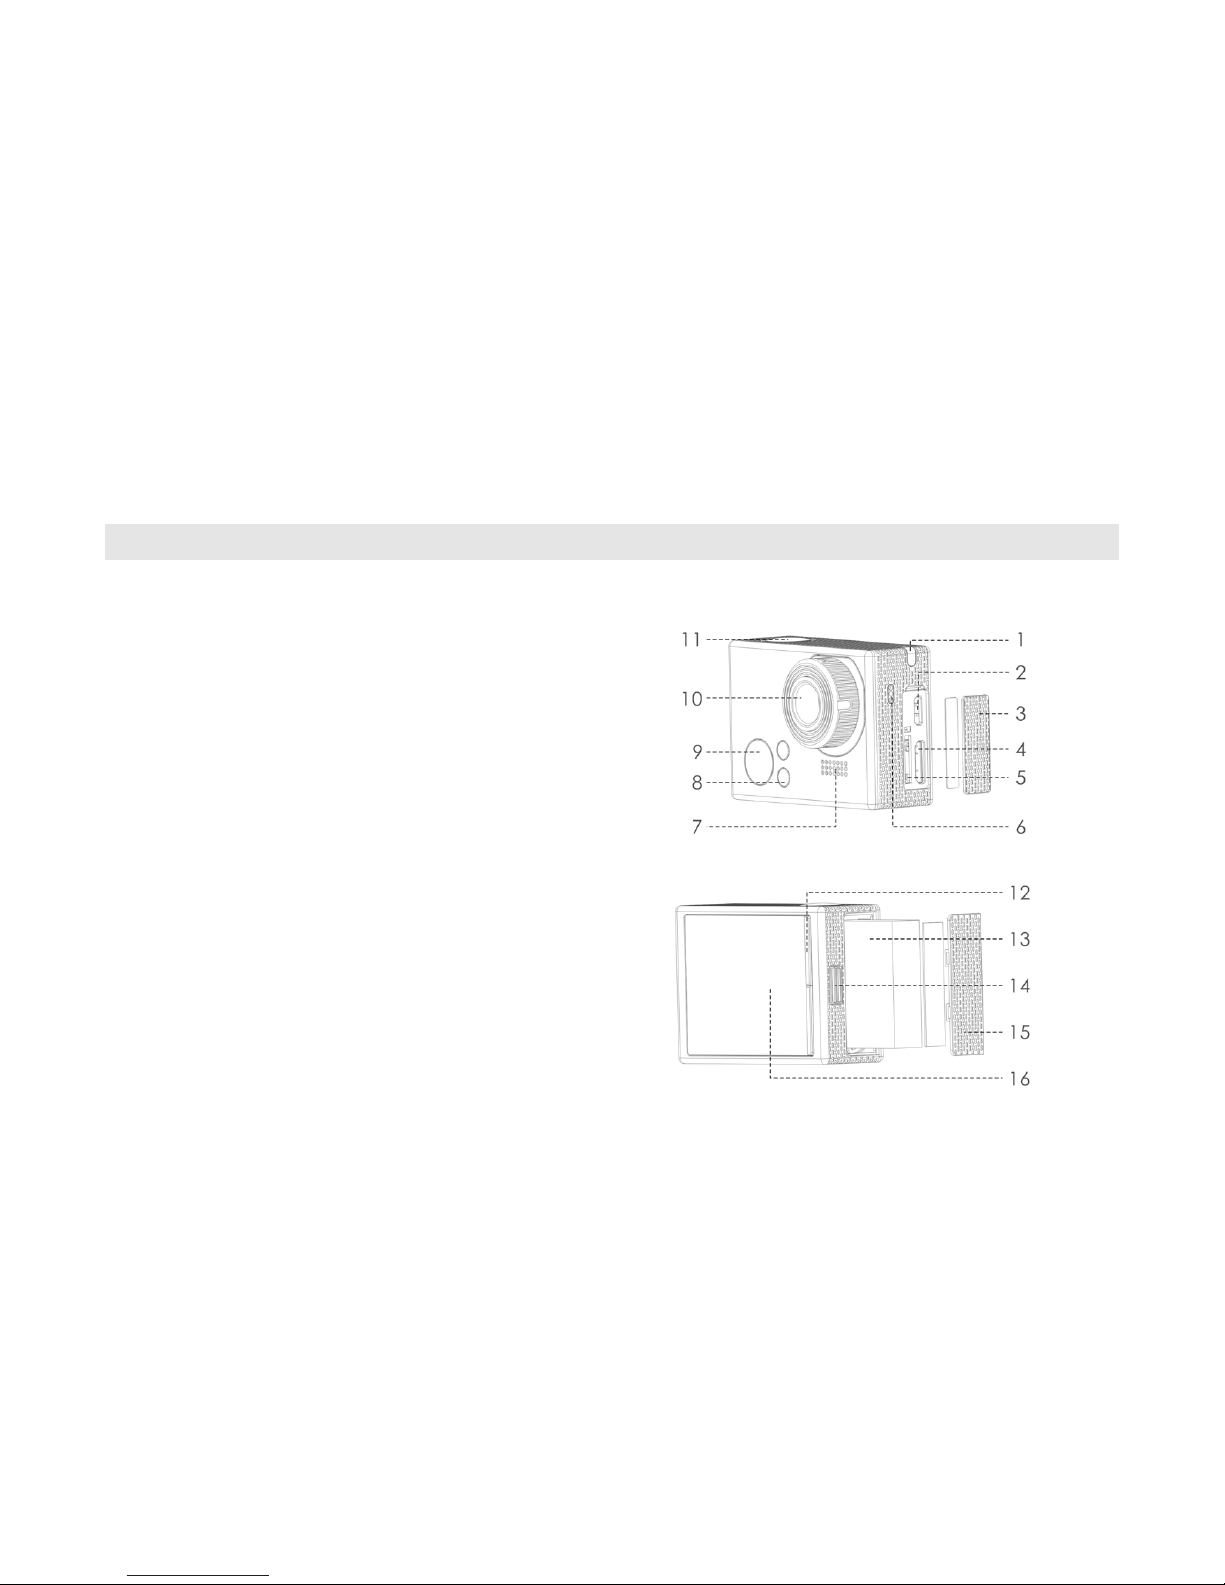
1 Device Construction
1) Video recording LED
2) USB port
3) Connector cover
4) HDMI port
5) Support micro SD card up to 32GB
6) MIC
7) Speaker
8) Video recording(up) / charging(down) LED
9) Power buttons / mode conversion
10) Ultra wide angle aspherical lens
11) Video/photo button
12) Menu/OK button
13)
Rechargeable Li-ion Battery
14) Battery cover switch
15) Battery cover
16) TFT LCD screen
Page 8
4
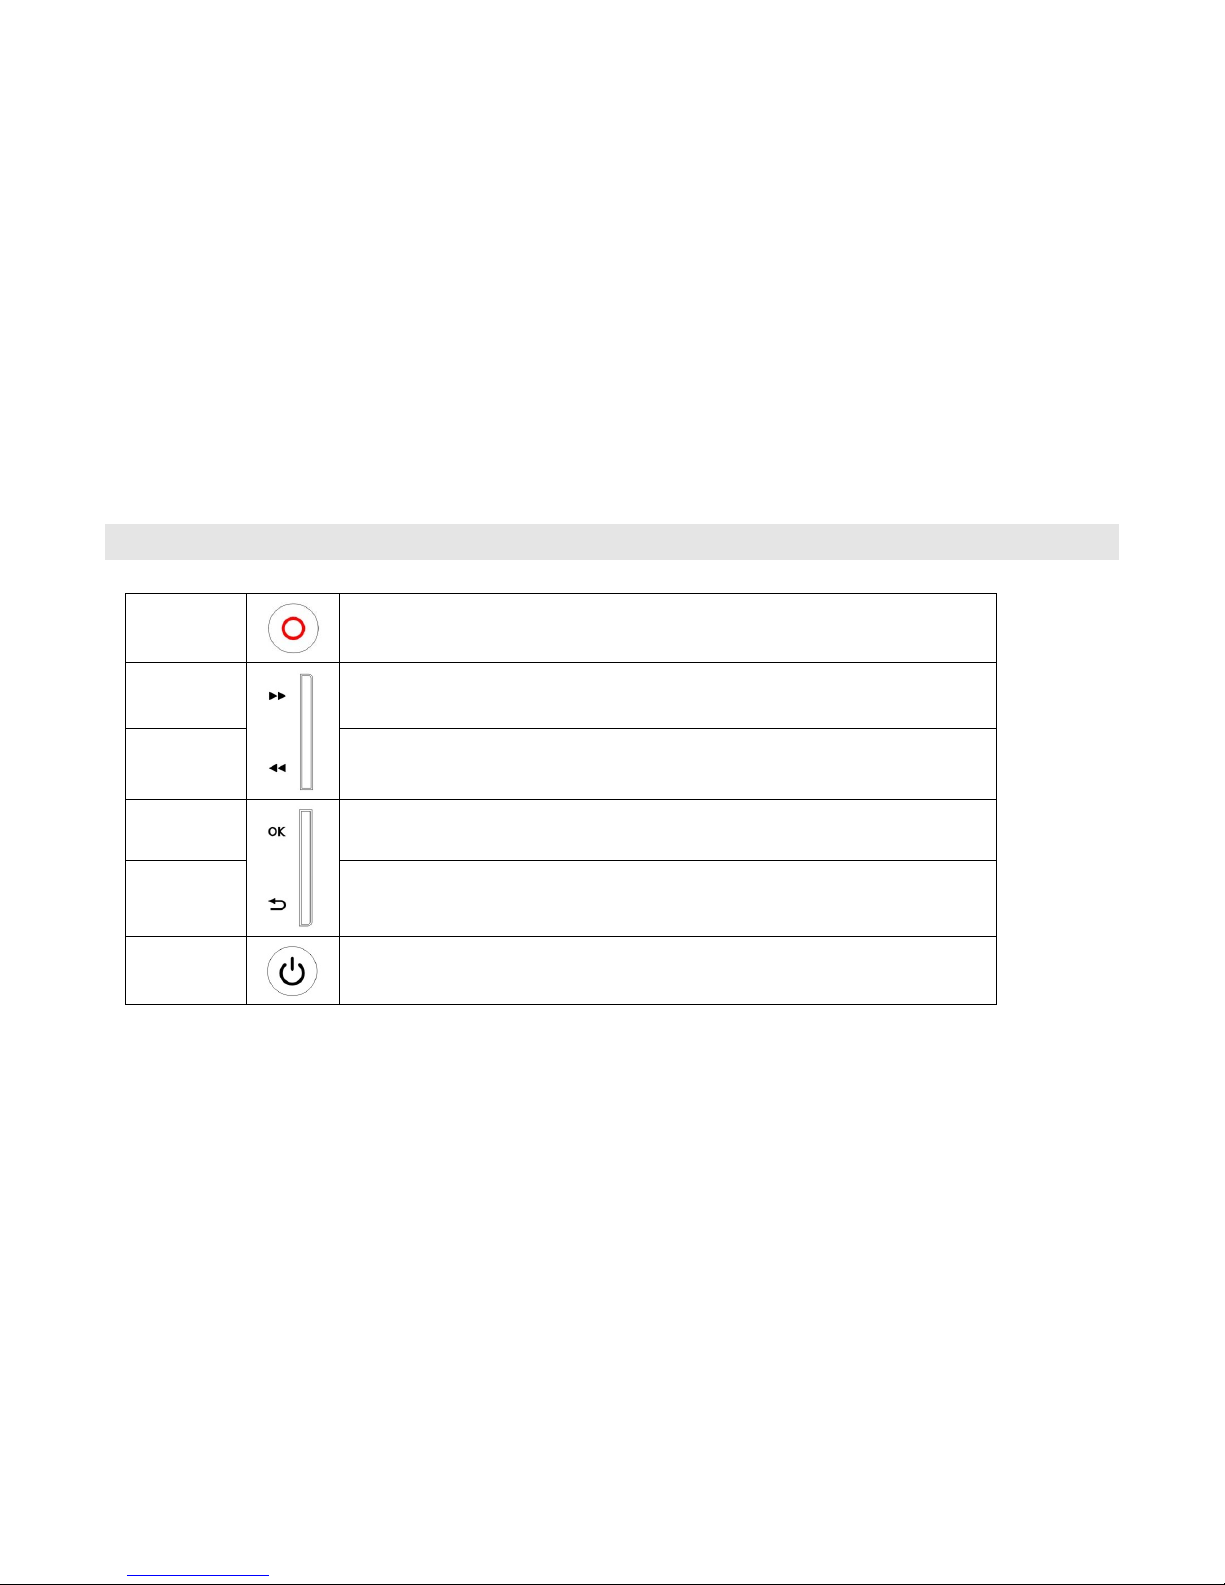
2 Buttons Designing
Video/Photo
button
● start & stop video recording ● take photos/continuous shooting
● return to preview mode
Up button
● select up & right towards ● zoom out ● long press for fast forward
Down button ● select down & left towards ● zoom in ● long press for fast backward
OK button
● confirm current settings ● replay/pause video
● long press for LCD backlight mode convention
Menu/return
button
● enter main menu ● return to last menu/mode
Power button
● power on/power off ● mode convention(photo/video/continuous shooting)
● current & adjacent file protection during video recording
Page 9

5
3 Install the battery
1) Open the battery cover switch, take out the battery cover.
2) As shown in the illustration, put battery into the battery compartment, pay attention to the battery
mounting direction.
3) After installing the batteries, close the battery cover and fasten the battery cover switch.
4 Battery charging
1) Turn off the camera, with one end of the supplied USB cable connected with power adapter or computer, the other end connected
to the camera, after a successful connection charge indicator turns red, charging starts.
2) Turn on the camera, with one end of the supplied USB cable connected the power adapter or a computer and the other end
connected to the camera, select Options on the LCD charge [
], the camera automatically shut down, the charge indicator
turns red, charging starts.
3) When charging is completed, the charging light goes out.
Note: If the battery is not loaded when camera is connected with adapter or computer, the charge indicator flashes red.
Page 10
6
5 AC power supply
The camera is switched on, with one end of the supplied USB cable to connect the power adapter or a computer and the other
end connected to the camera, the LCD screen on the selected power supply options [
], the camcorder using AC power supply,
the battery icon changes to the Power icon.
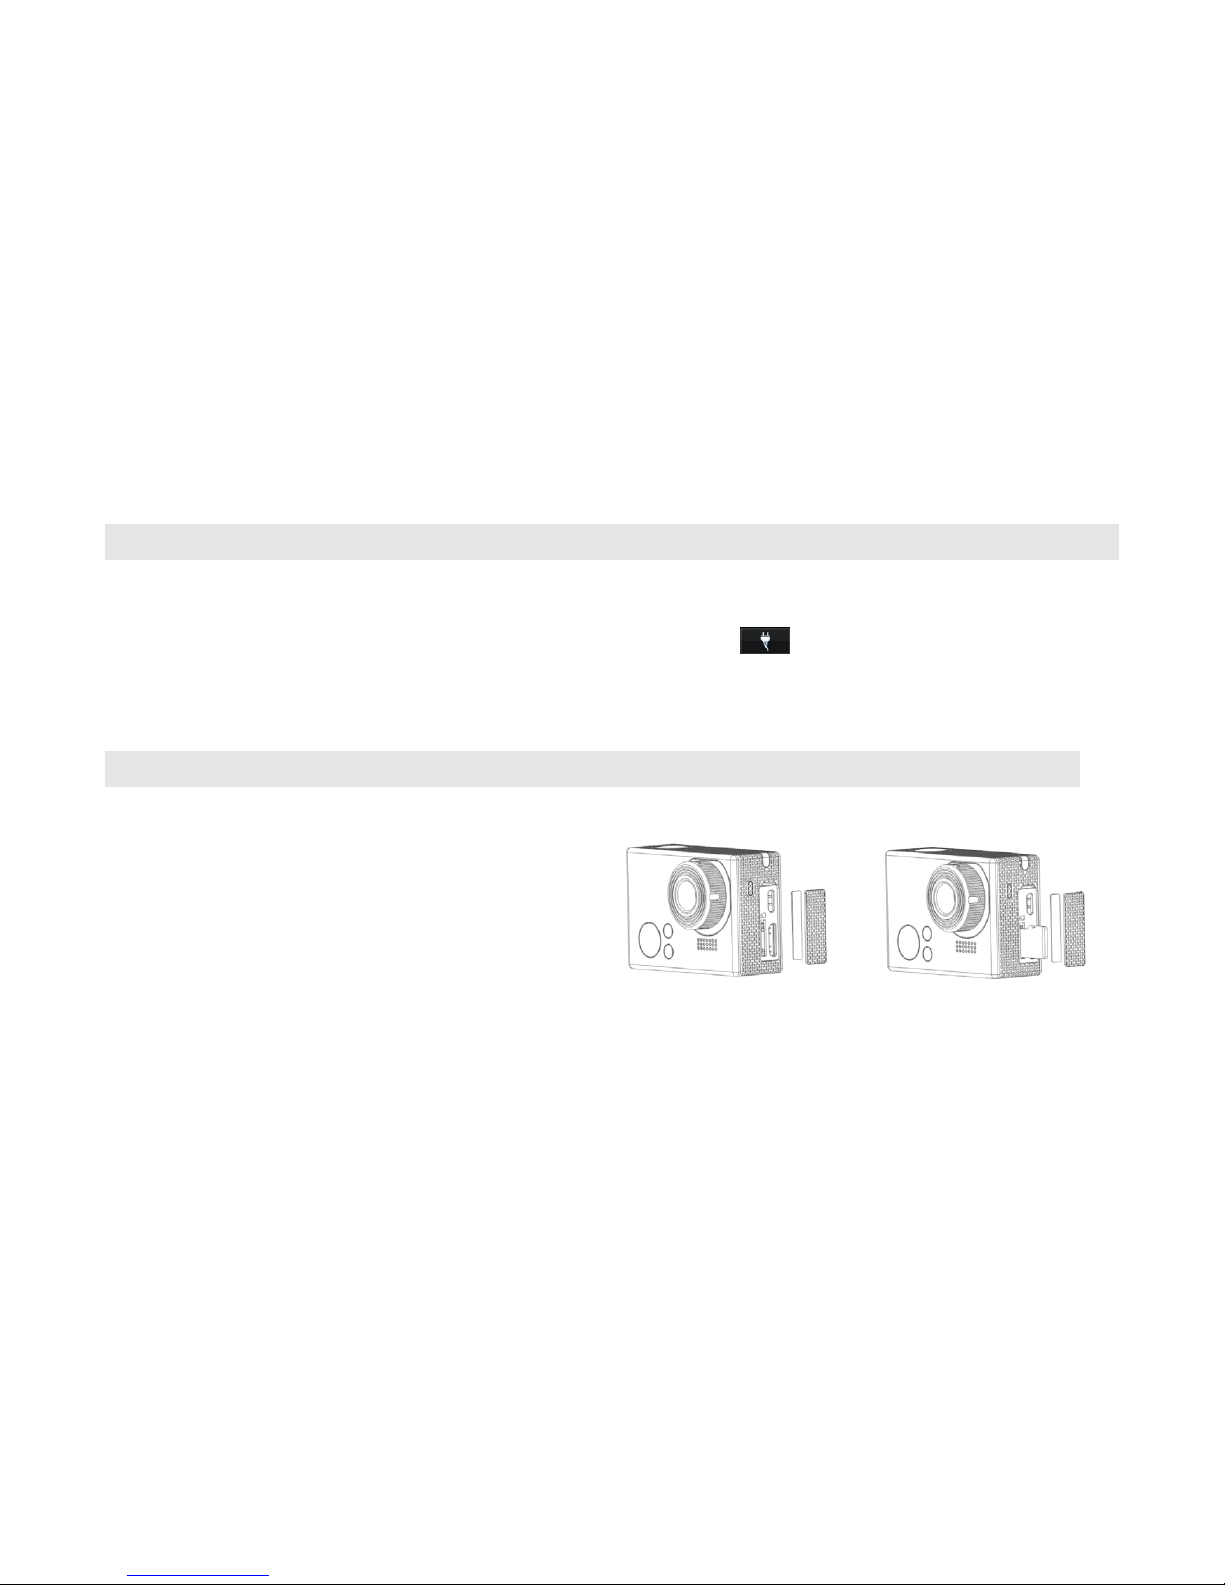
6 Insert the memory card
1) Camera is turned off, open the stopper;
2) Insert the memory card as shown;
3) Close the stopper.
Note: We recommend using class 4 or higher memory cards.
Page 11
7
7 Power on/power off
1) Press [Power] key or connect a USB power cable to turn on the camera.
2) Press [Power] key for 3 seconds or unplug the USB power cable to turn off the camcorder.
Note: :You can set auto shut-off time in setting menus.
8 Preview mode
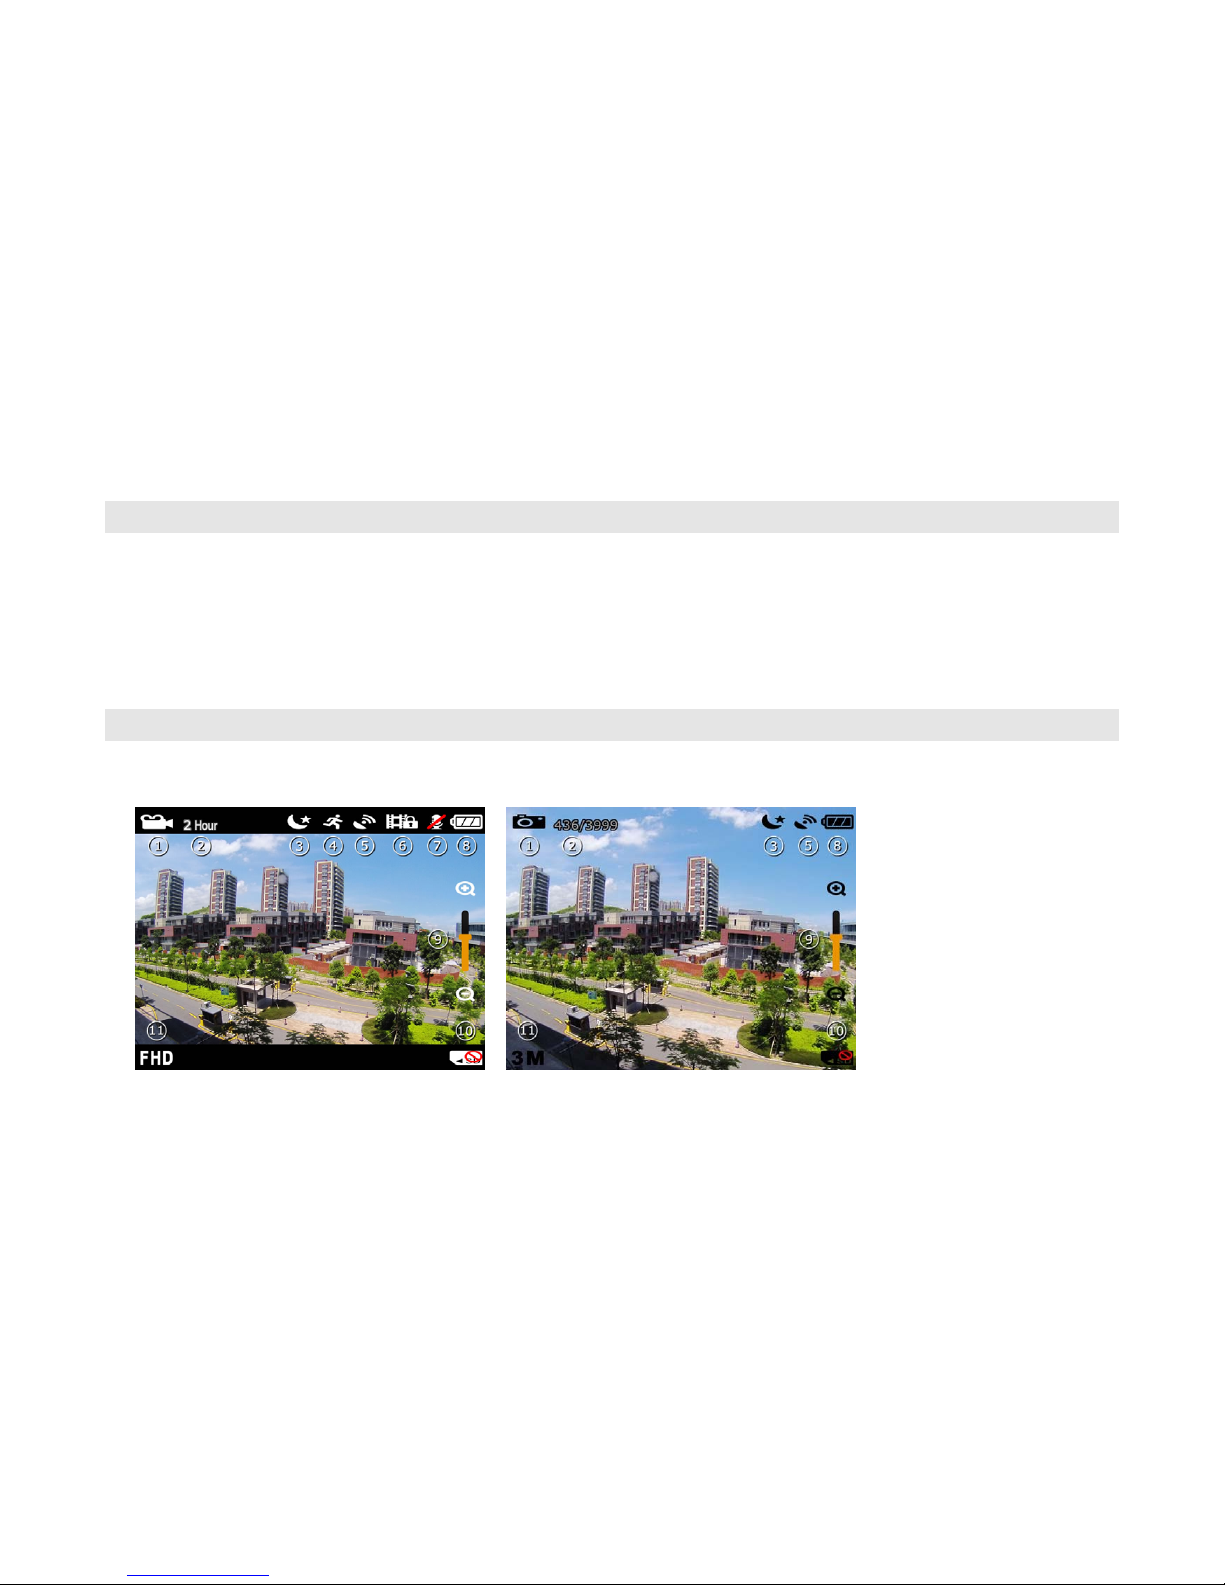
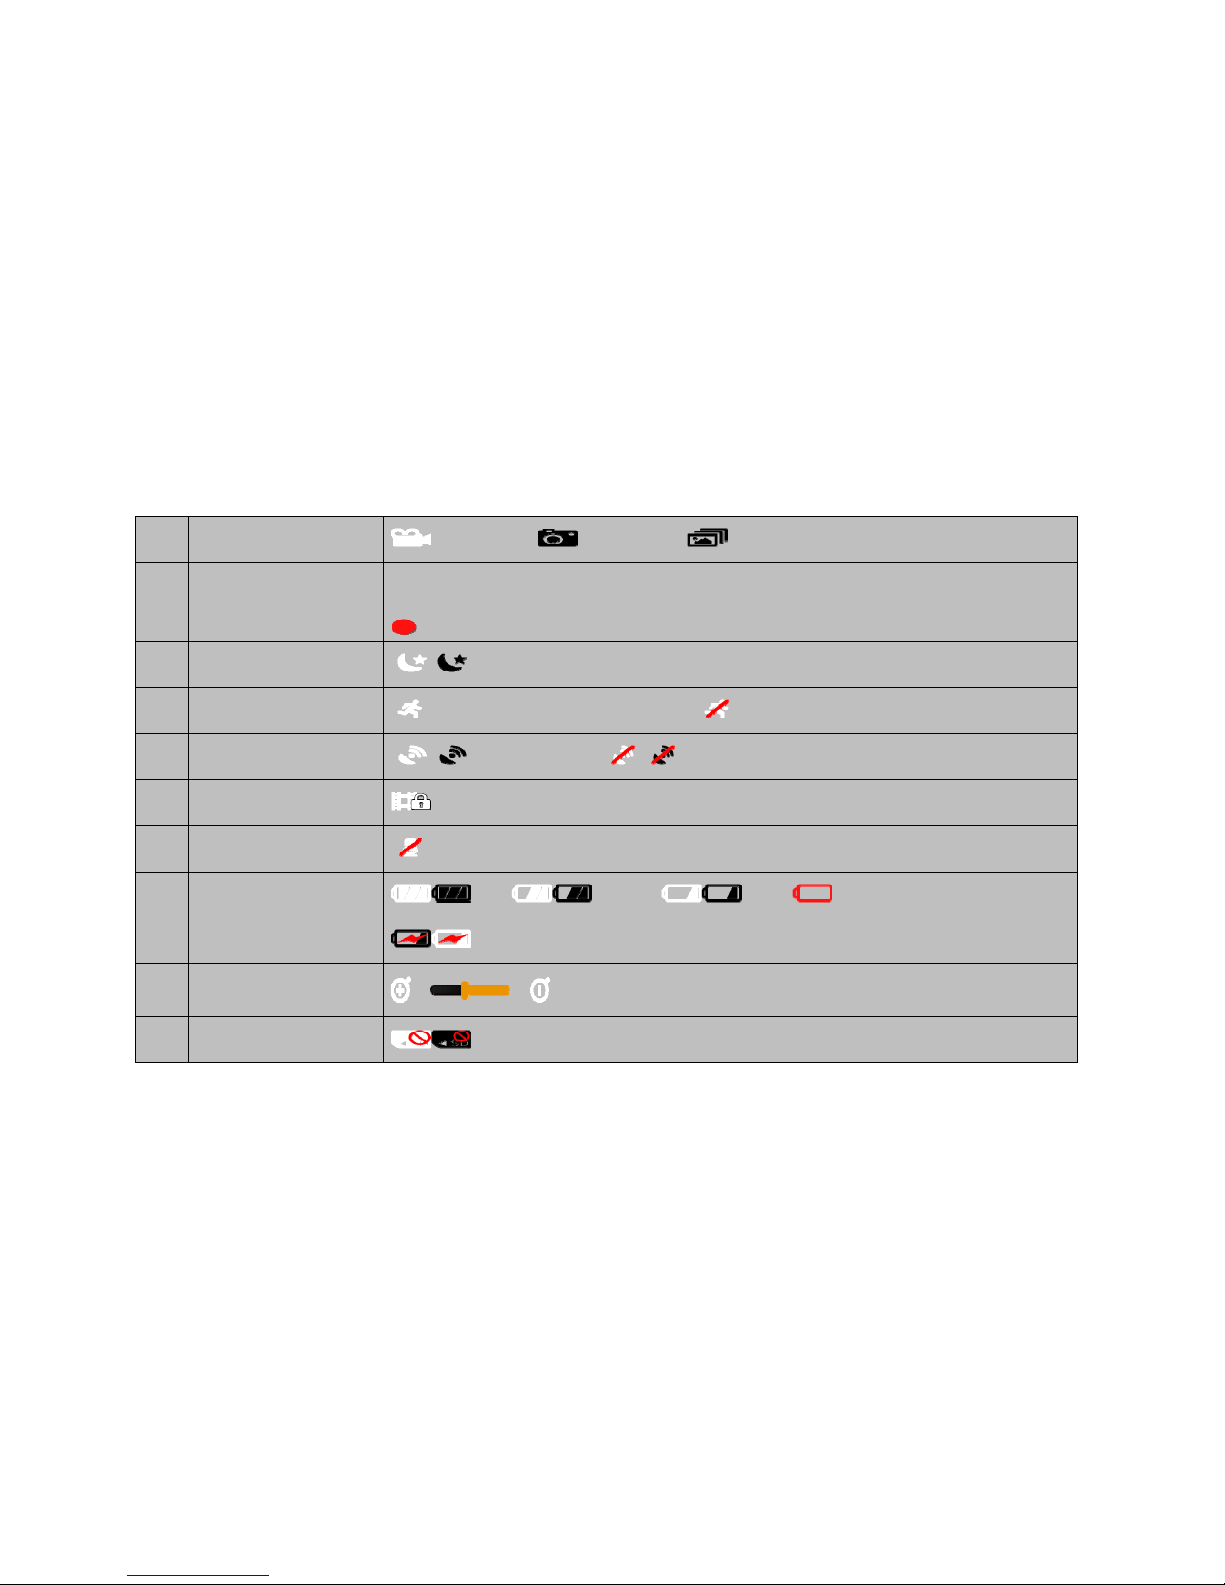
1) preview mode icons illustration
Page 12
8
1
present mode
video mode photo mode continuous shooting mode
2
Recording time
2 Hour: available recording time;
436/3999 : photo quantity/memory capacity
00:00:41: recording time
3
Night mode
Night mode open
4
Motion detection
motion detection opened & started motion detection opened but not started
5
GPS status
GPS connected GPS not connected
6
File protection
Present file protected
7
Mute
MIC mute
8
Battery volume
Full Middle Low Exhausted
AC power supply
9
Digital zoom changing
bar
10
No card warning
Page 13
9
11
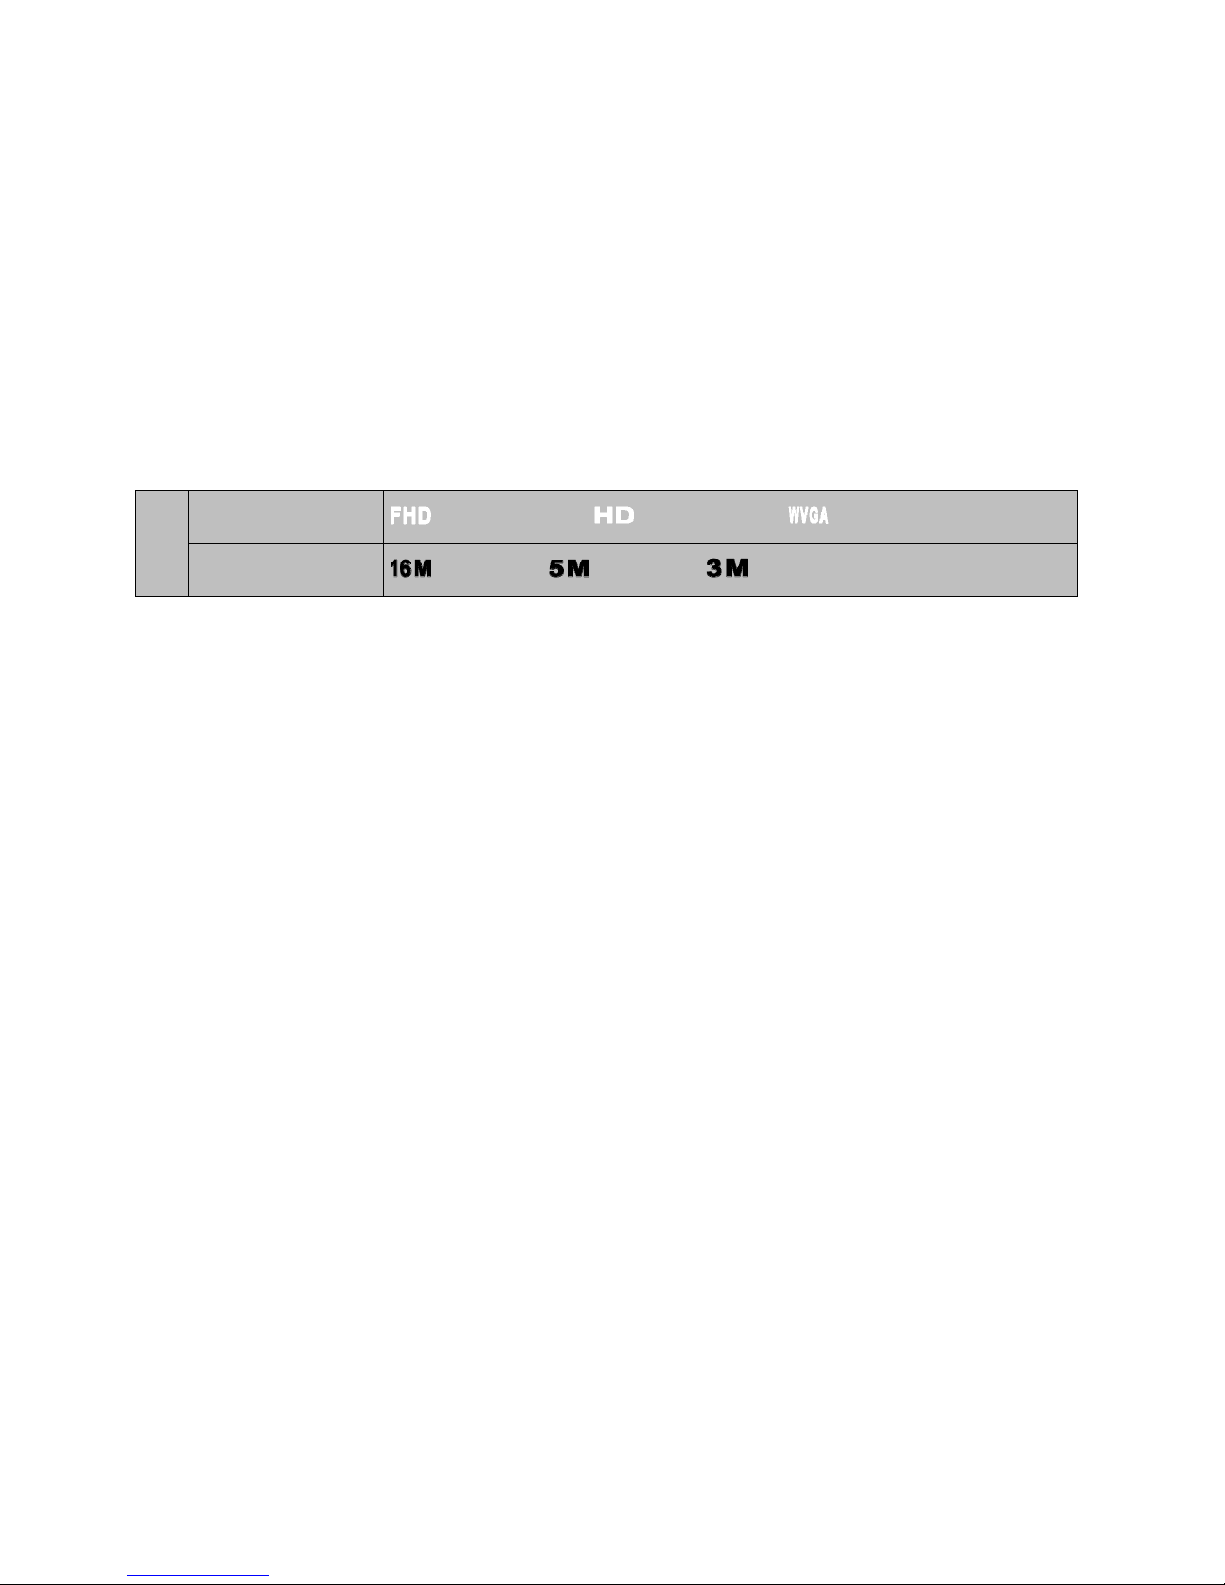
Video resolution
(video mode)
(1920x1080 30fps) (1280x720 60fps) (848x480 120fps)
Photo resolution
(photo mode)
(4608x3456) (2592x1944) (2048x1536)
2) Video recording
Boot directly into the video preview status, short press [photo/video] button to start video recording. During video recording,
short press [Power] key to protect current or adjacent video files, short press [photo/video] button again to stop recording.
3) Photo shootings
In video preview state short press [Power] key to convert to photo mode, press [photo/video] key to take photos. Again short
press [Power] key to
convert to continuous shooting mode, you can make 10 continuous shooting.
Note: except for video recording and continuous shooting under WVGA resolution.
4) Digital Zoom
In preview mode, press [Up]/[Down] keys to zoom in / out the screen. The current state of digital zoom will be remembered
and resumed at the next boot.
Note: except for video recording and continuous shooting mode in WVGA resolution.
5) protect video files
In video recording status, short press [Power] key to protect current or adjacent video file. In 10 seconds before / after video
file segments, short press the power button, both the previous and after files will be protect. Those set as write-protected files are
not automatically overwritten deleted.
Page 14
10
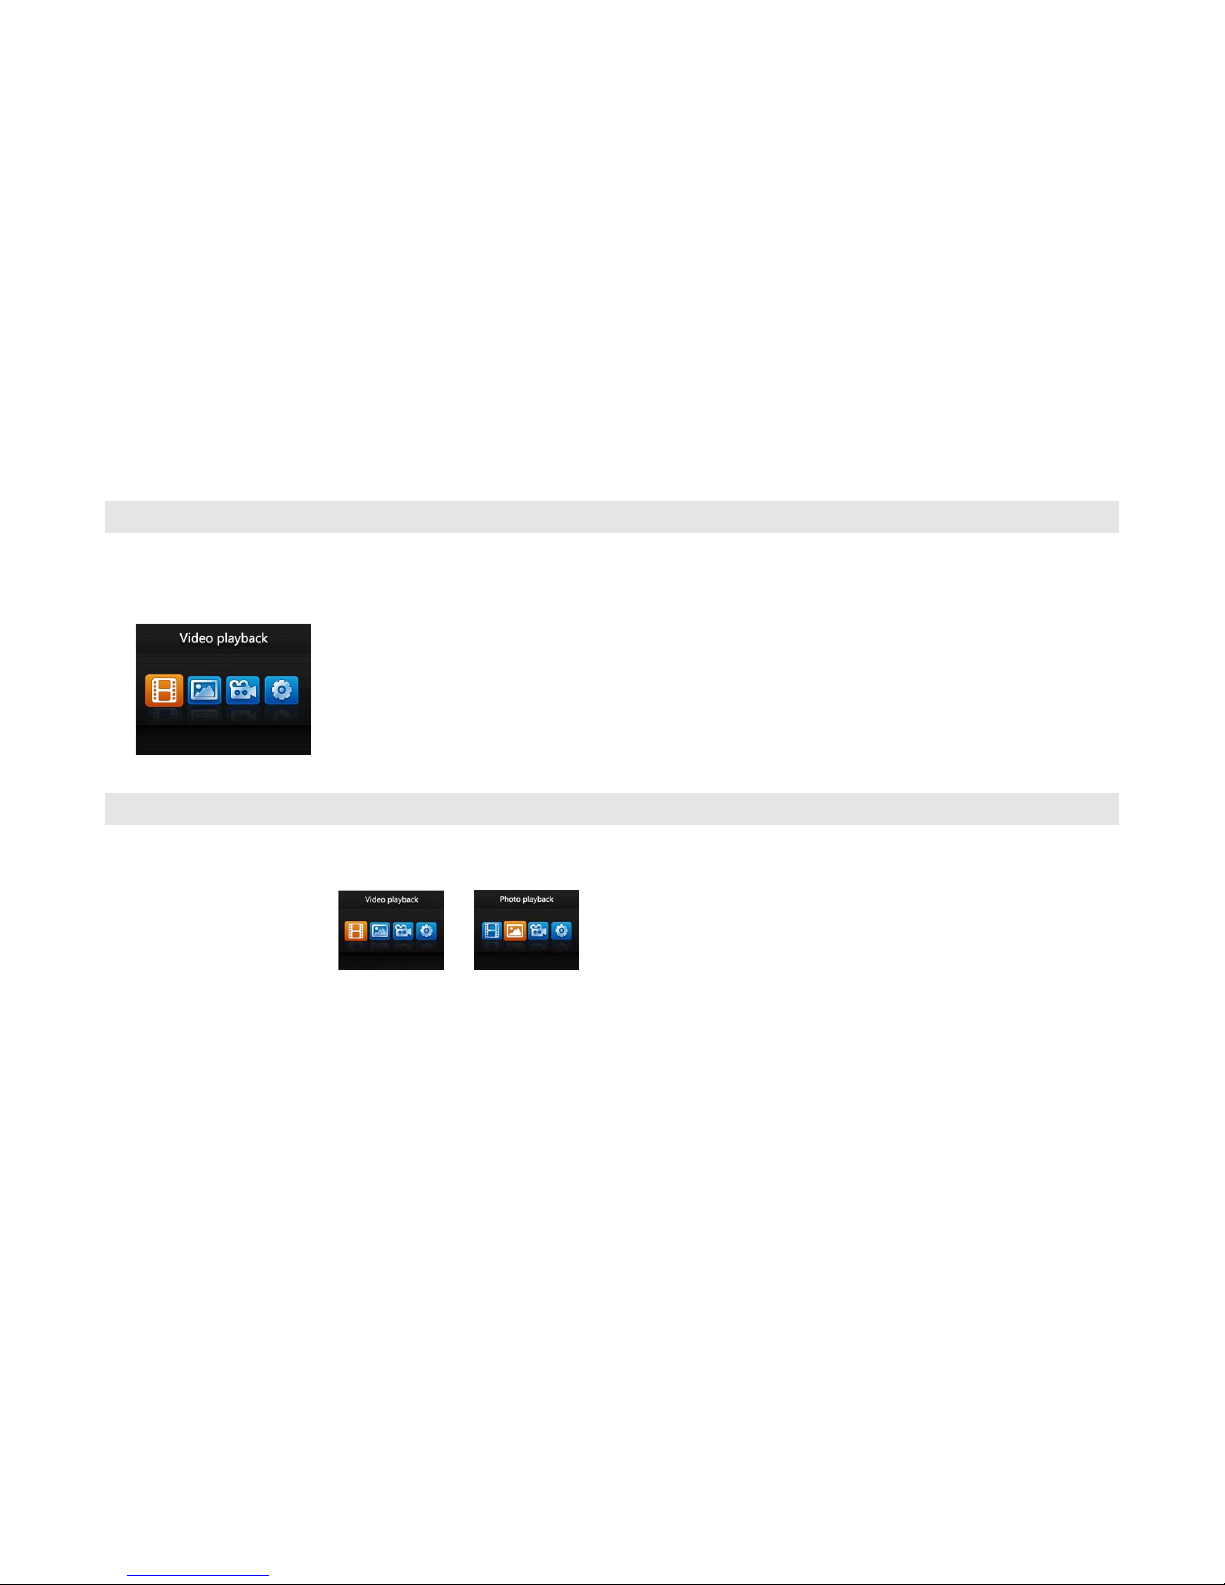
9 Main menu
In preview mode, press [Menu/Back] button to access the main menu. Press [Up]/[Down] keys to select the option to enter, press
the [OK] key to enter the option, press the [Menu/Back] key to exit the main menu.
10 Playback
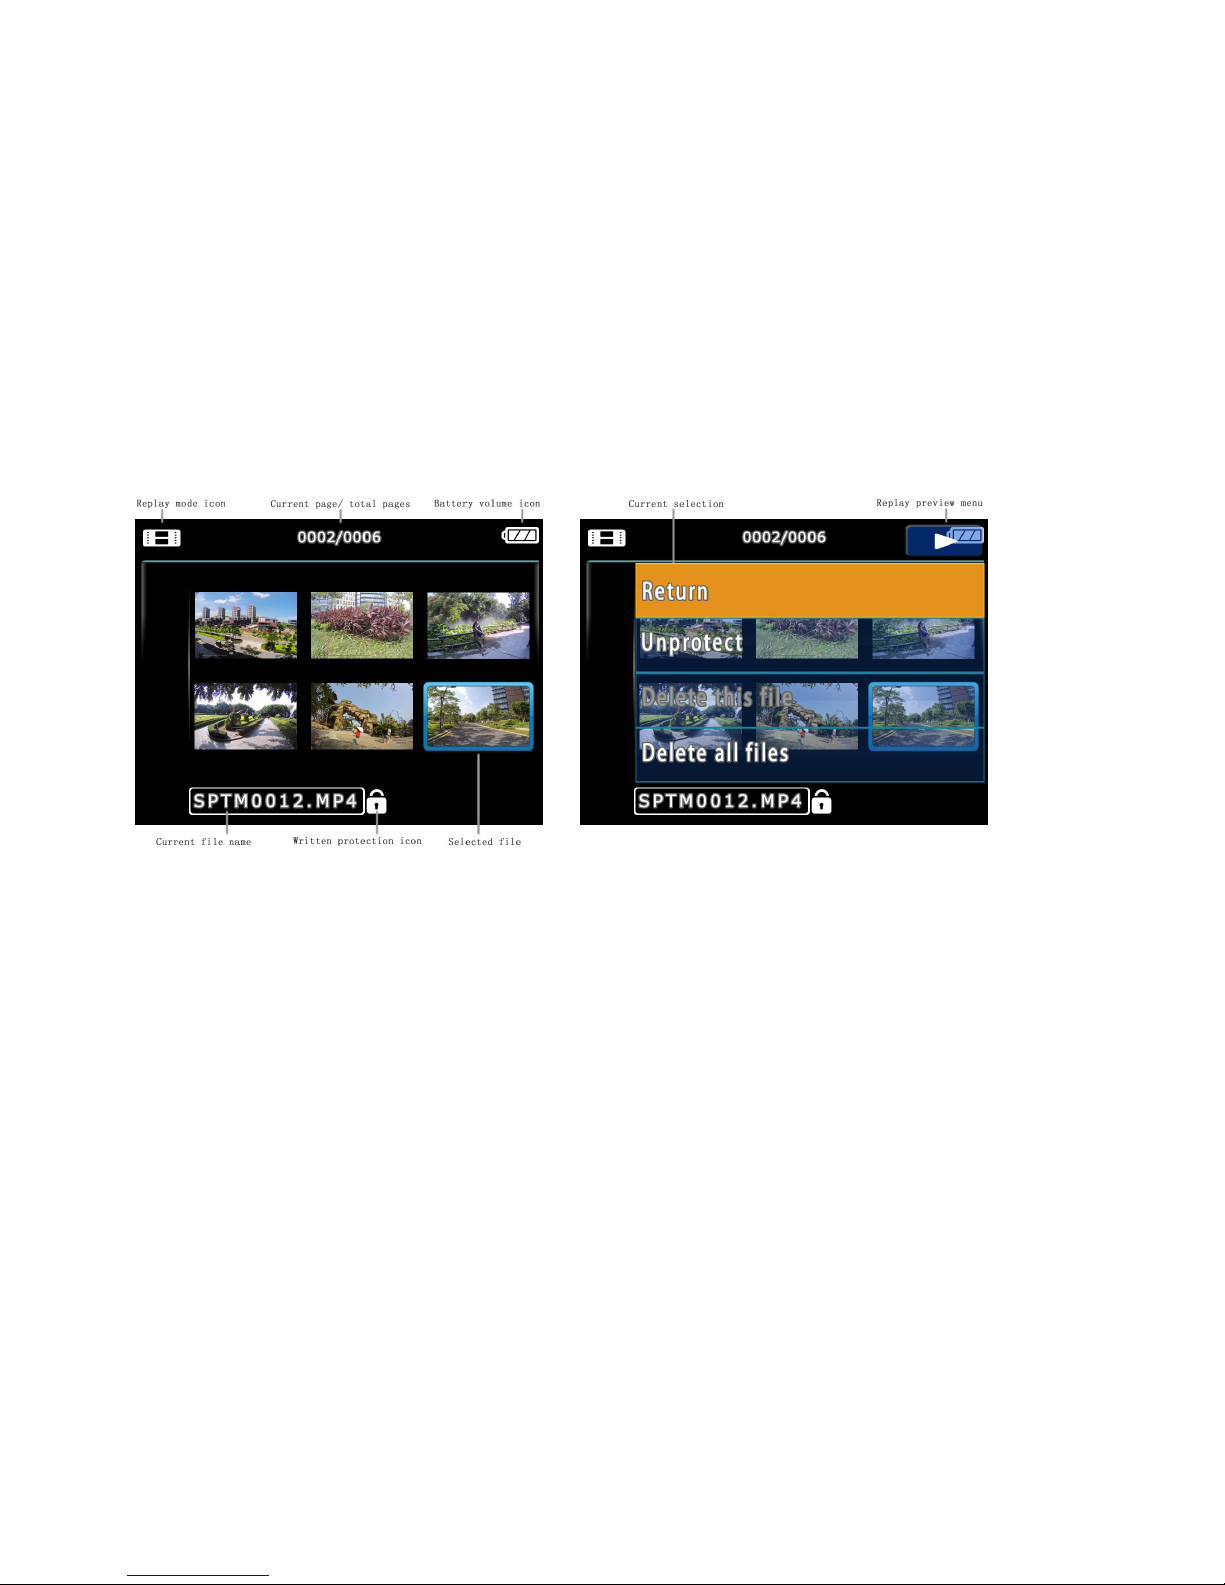
1) playback preview mode
In the main menu, select [
] / [ ] playback options, enter video / photo playback preview mode, as
shown below:
Page 15
11
In playback preview mode, press [Up]/[Down] button to select the file to be replayed, press [OK] button to open the video
/ photo, press [Menu/Return] key to pop up the playback menu.
Page 16
12
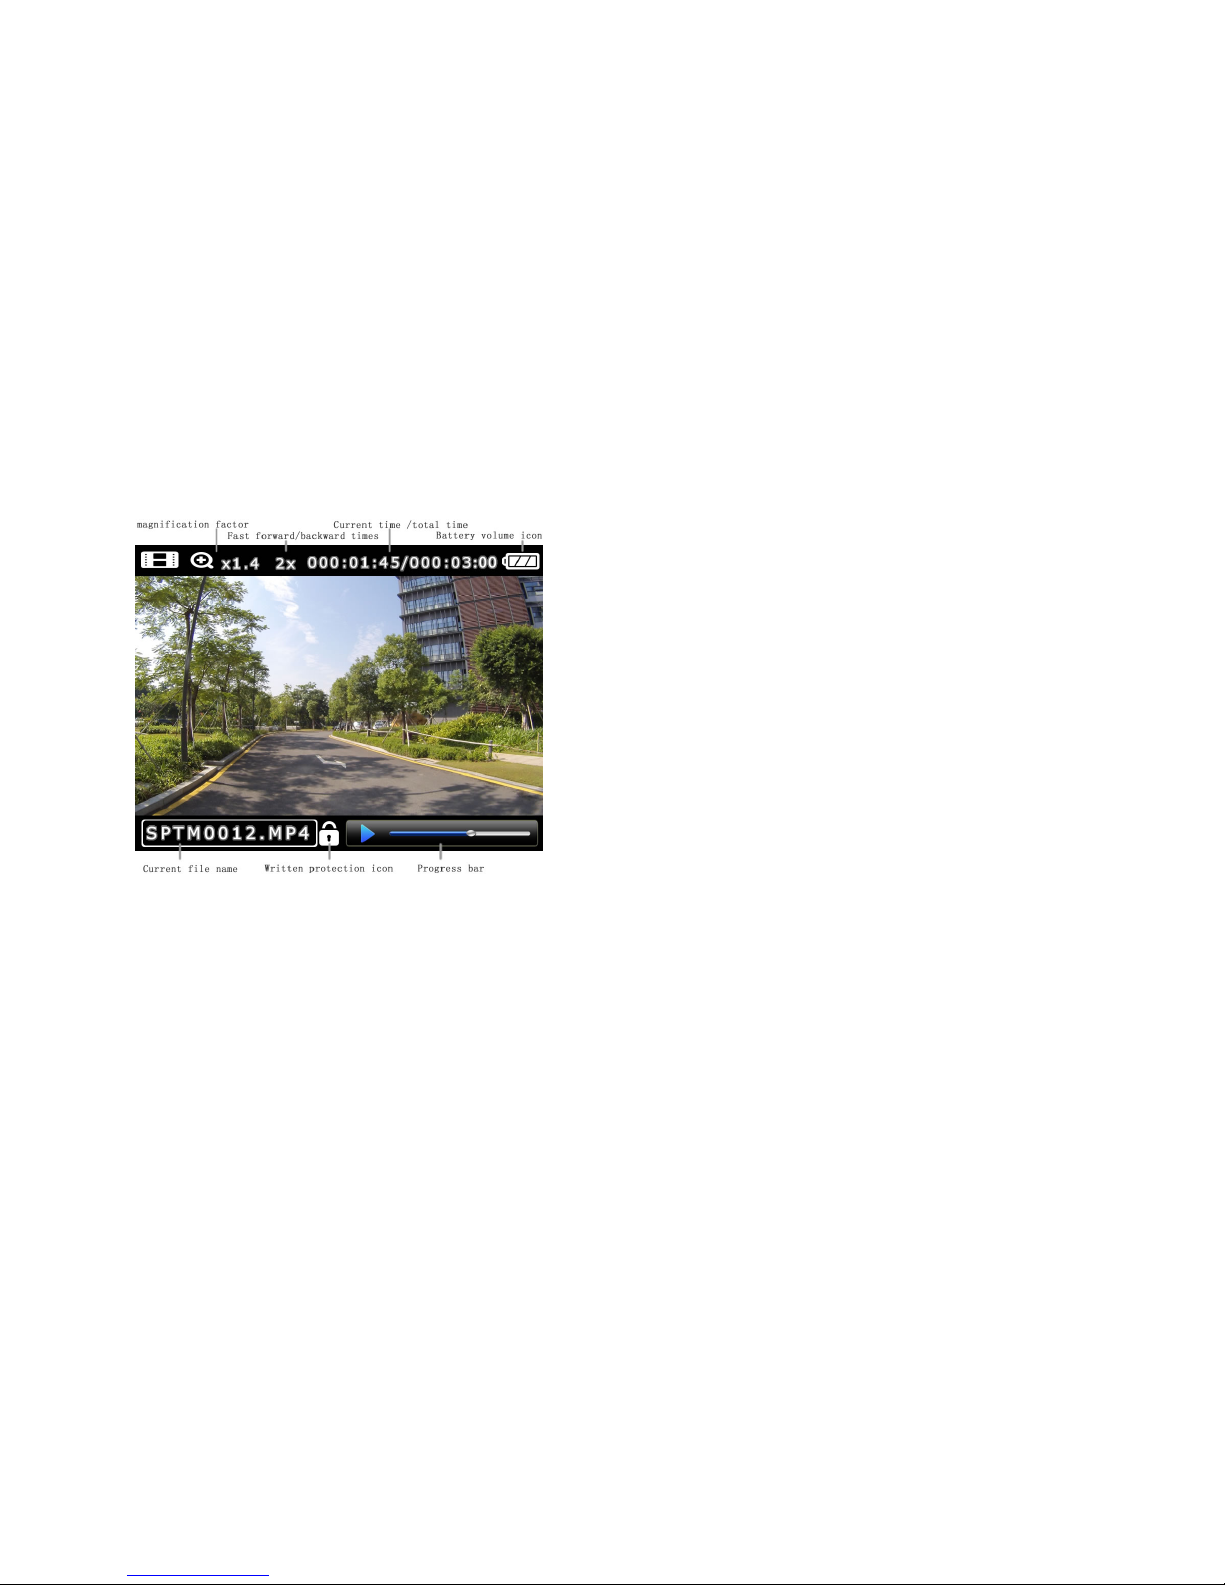
2) Video playback
In video playback mode, short press [UP]/[Down] key to select the previous / next video, press OK button to play / pause the
video file. During video playback, long press [Up] key to fast forward play video files, long press [Down] key to rewind play video
files. During fast forward and rewind, press [OK] or [Menu/Return] key to return to normal speed. When video is paused, press [Up]
key to enlarge the video files, press [Down] key to reduce the video file. Press [OK] key to return to the default size.
When in non-fast forward / rewind playback, press [Menu/Back] button to pop up the playback menu, press [Up]/[Down] keys
to select an action to perform, select "Back" option, press [OK] key to return to the playback Preview mode.
Page 17
13
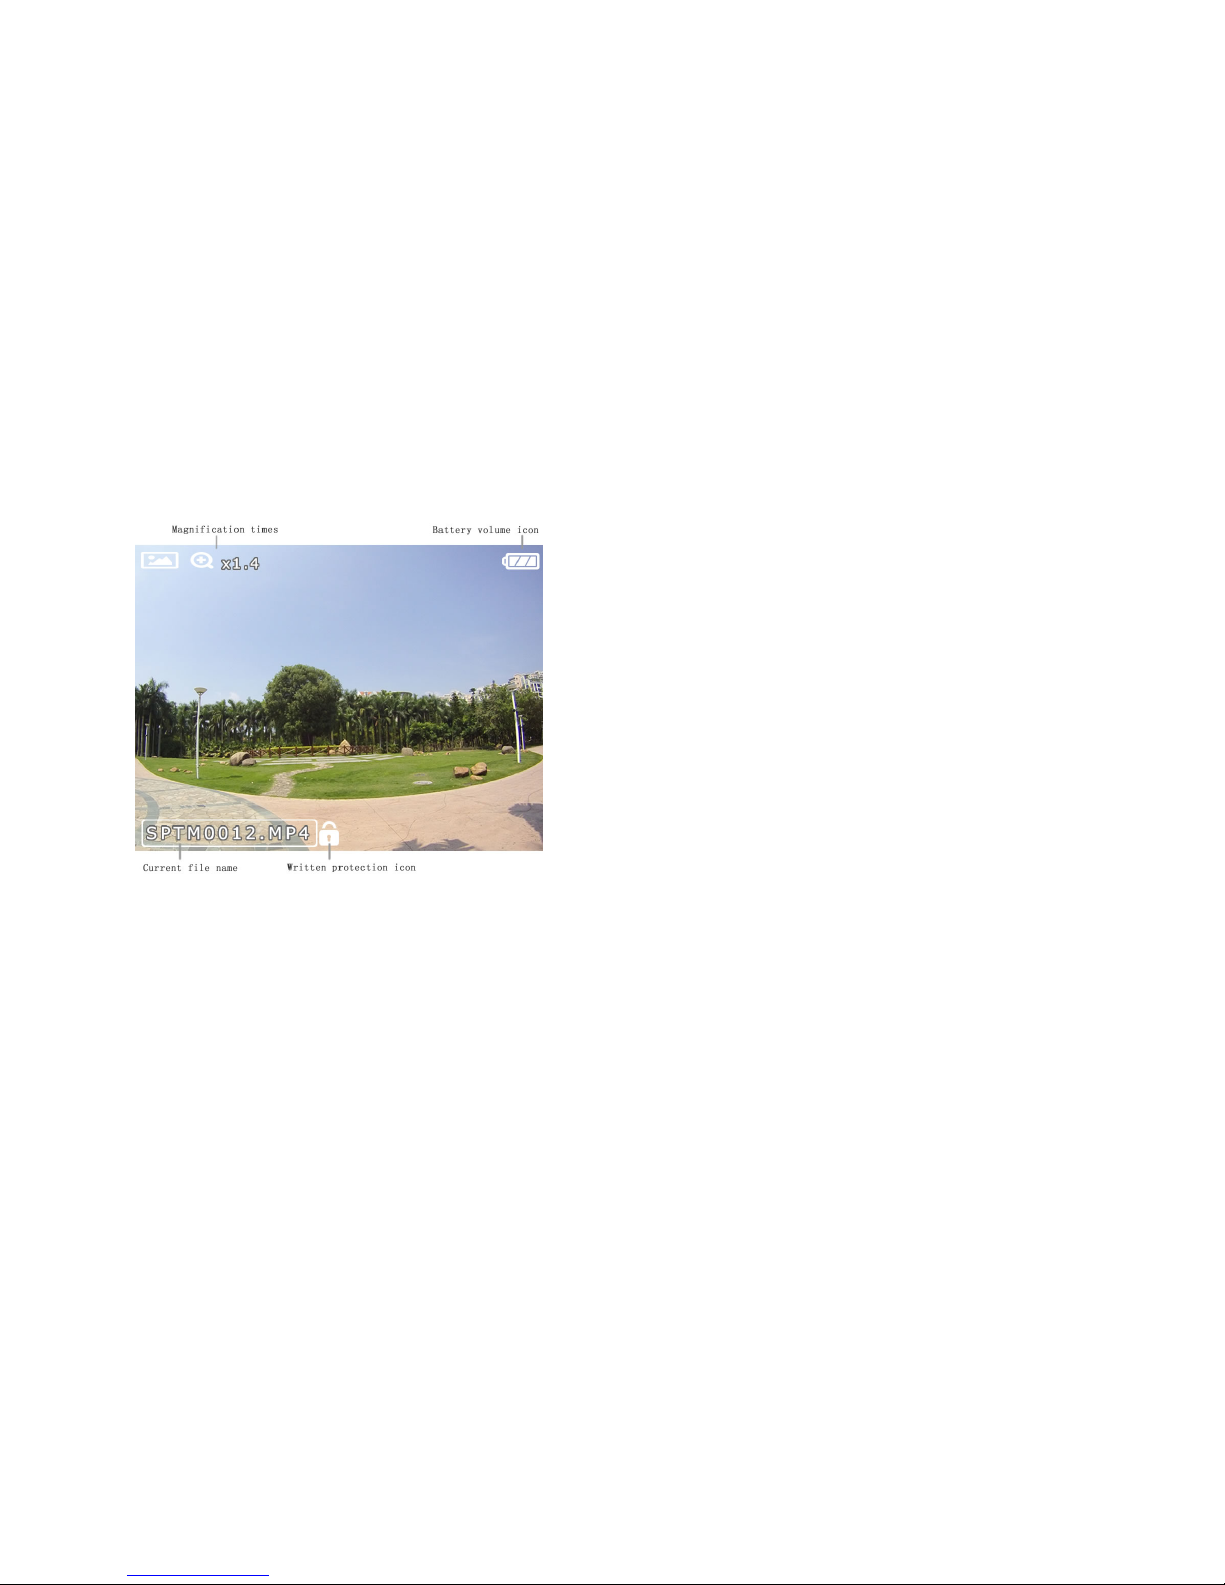
3) Photo playback
In Photo Playback mode, short press [UP]/[Down] button to browse previous / next photo, press [Up]/[Down] keys to zoom in /
out the photo files, press [OK] key to restore normal size.
Press the [Menu/Back] button to pop up the playback menu, press [Up]/[Do w n] k eys to s elec t an act i on t o pe rfor m, s ele ct " B ack "
option, press [OK] key to return to the playback preview mode.
Page 18

14
11 Vehicle use ( mode ) and sport use ( mode )
The default setting is vehicle use when connected with the car bracket, otherwise it is sport use ( mode ) . In two modes, different
file names are applied to distinguish video files. Vehicle use ( mode ) named prefix CARM, sport use ( mode ) named prefix SPTM. The
loop recording function under vehicle use ( mode ) is disabled for sport mode.
In vehicle use ( mode ) , GPS is started automatically, and GPS data is recorded in the video , gravity sensor collision detection
function is started too to protect video files as read-only once there is collision. Video files are automatically segmented for each 3
minutes, and when the card is full, recording automatically overwrite the old file. Before the initial coverage there is screen text and
voice warning to ask whether overwrite or not, in 10 seconds short press video button to turn off the warning and stop recording after
the card is full. If no operations, it would be default overwriting old recordings and continue recording. If the card is full when you turn
on the camcorder, there will be warning to ask whether overwrite or not. If no operations in 5seconds, overwrite will be done default.
In sports use ( mode ) , GPS and gravity sensor collision detection is shut off automatically.
12 Video recordin
g
mode / Photo mode/ Continuous shooting mode
In preview mode, short press [Power] button for convert between different modes: video mode, photo mode and continuous
shooting mode. According to the current mode, [photo/video] button will execute photo or video recording or continuous shooting
recording function. During video recording, mode conversion is prohibited.
Page 19

15
13 Emergency video protection
When the camcorder is connected to car bracket, it will automatically open the gravity sensor. When the machine is subject to
certain acceleration, the camera automatically triggers the emergency recording protection. Camcorder automatically protect the
corresponding files. In the recording process, you can press the power button to manually protect current video file or an adjacent
note.
In the System Settings menu, select [
] options, press [ Up ]/[ Down ] keys to select the sensitivity of gravity
sensors and on/off , press [Enter] key to set.
Note: before / after 10 seconds in the video file segments, press the power button, both the current/ previous video files will be
protected.
14 Se
g
ment overwritten
Connect your camcorder to car bracket, it will automatically start segmented overwritten, video files are automatically segmented
for 3 minutes while the card is full, the camera will automatically overwrite the old video file to ensure that there is enough space to
continue recording. Before the initial coverage there is screen text and voice warning to ask whether overwrite or not. In 10 seconds
short press video button to turn off the warning and stop recording on the card is full , If no operations, default as overwriting old
recordings and continue new recording. If the card is full when you turn on the camcorder, there will be warning to ask whether
overwrite or not. If no operations in 5seconds, overwrite will be done default.
When the camera is not connected to car bracket, segmentation overwritten feature will automatically turn off. When the file size
Page 20

16
reaches 1GB, automatic segmentation is operated. While the card is full, recording stops.
15 Motion defection
When motion detection function is started, the camera will automatically detect whether an object is moving ahead. Recording
will starts automatically when movement begins, and will stop in 10 seconds when the object quit moving.
In setting menu under video recording, select [
], press [Up]/[Down] to select the options, press “OK” button
to confirm the settings. When motion detection is opened, in preview mode, there will be an icon on the screen that means
"motion detection is opened but not started”, at this status camera won’t make recordings automatically. Short press [photo/video]
button, motion detection icon change to "open and enable motion detection icon" , then the camera will automatically record.
16 GPS function
Connect your camcorder to car bracket, GPS function will be started automatically. During recording, GPS data will be saved
in TXT file under the same name; during photo shootings GPS coordinates will be saved to the photo's EXIF information. When GPS
function is started, the LCD screen will display GPS status icon. When GPS is not connected to the satellite, it indicates " ”;
when GPS is connected to satellite, it indicates “ ”, now GPS positioning is successful.
Page 21

17
17 LCD screen auto shut-off
In sport use, when there is no operation, LCD screen LED will automatically be shut off in 3seconds (except for situations during
video& photo replay). Short press any button to recover it. In vehicle use, LCD screen is always on.
When LCD screen is on, long press OK button to shut off the LED; when LCD screen is shut off, long press OK button to turn on
it, and keep it on.
18 Auto shut-off function after power supply cut
Automatic shut off function can set if the camera still run after disconnecting with the USB power, or whether to shut off after 10
seconds, 30 seconds, 1 minute.
In the System Settings menu, select [
] options, press [Up]/[Down] key to select whether to automatically
shutdown and automatic shutdown time, press [Enter] key to set.
19 Cameras connected to a computer
Plug the USB cable into the USB port of the machine, and the other end is connected to the computer. Turn on the camcorder,
select [
] option, when it is connected, the LCD screen displays the middle [ ] icon, the computer displays a
Page 22

18
removable disk drive, in this mode, you can copy files from the camera to your computer.
20 Connected to TV
Using a dedicated high-definition (HDMI) cable to connect the camcorder and HDTV. The TV source is adjusted to HDMI, turn
on the camcorder, the camera image can be displayed on your HDTV.
Note: TV display and LCD display are different, the LCD screen operation.
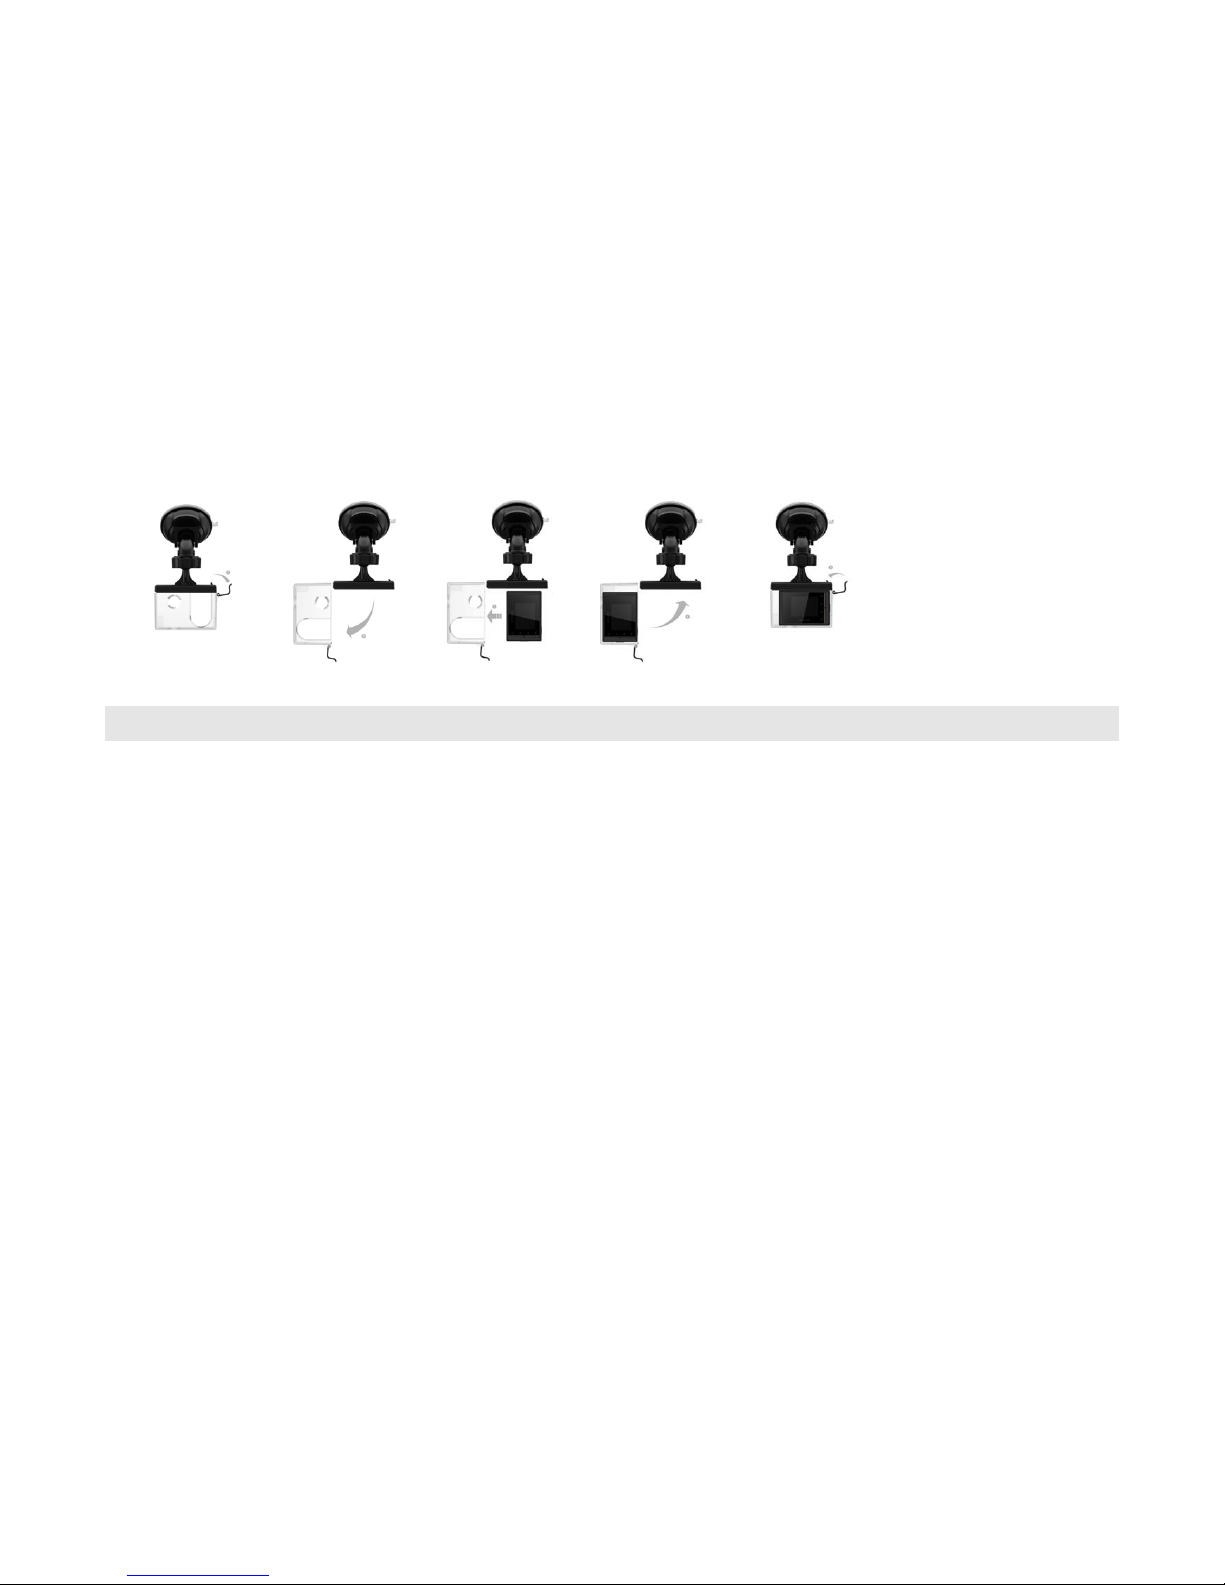
21 Connected with car bracket (optional)
Use the car bracket to fix the camera on a smooth flat surface such as window glass, car holder. can adjust the camera direction
to achieve the best shooting angle
1) Open the hand-clasping
2) Open the transparent enclosure
3) put camcorder into the transparent enclosure
4) Close the transparent enclosure
5) Fasten the transparent enclosure
NOTE: To ensure that you can properly use the car holder, keep the metal contacts and spring pin surface clean.
Page 23
19
22 Remote Control Operation (optional)
Using the remote control to take photos, make recordings.
Remote control panel structure as shown below:
1) Video recording key: Press the remote control [video recording] key to make video recordings .
2) Stop button: Press the remote control [Stop] button to stop recording.
3) Photo button: Press the remote control [Photo] key to take photos.
Page 24

20
Appendix I Packing list
Please open the package and check it according to below accessories table.
No. Item description Qty
1
Gotop: silver edition camera
1
2
197'/ 60m Waterproof Housing*
1
3
Rechargeable Li-ion Battery
1
4
QR Buckle
1
5
J-Hook Buckle
1
6
3-Way Pivot Arm
1
7
1 Curved Adhesive Mount
1
8
1 Flat Adhesive Mount
1
9
USB Charging Cable
1
You can also choose below optional accessories to extend the camcorder functions.
No. Accessories name
1
GPS bracket
2
RF remote controller
3
Car charger
4
HDMI cable
Page 25

21
Appendix II warranty
Dear Customer:
Thank you for purchasing cameras. We will provide you high quality after-sales service in the future to facilitate your using. For
any questions please do not hesitate to contact us.
Our commitment:
From the date of purchase, for defects occurred in normal using of the product, we will provide you sales service according to our
warrantee.
Warranty Information:
1. Please keep this warranty card properly and safely. The warranty card together as purchase invoice will be
necessarily presented for enjoy free warranty during the effective warranty period.
2. In the following cases, the warranty service will be chargeable.
a) Exceeding the warranty period.
b) cannot present a valid purchase invoice and warranty card, or the product information on warrantee card is not in
accordance with the defective item( serial number not match etc)
c) Un-authorized alterations or repairing in other non-authorized service center.
d) The abnormal malfunctions caused by failure to following the user manual.
e) Products not manufactured by our company.
f) Defects and damages caused by drop or improper handling during transportation etc.
g) due to lightning strikes, fires, earthquakes, storms and other natural disasters and abnormal voltage, pollution,
chemical erosion caused by the failure or damage.
Page 26

22
Client stub
The "Warranty Card" is valid only by dealer or manufacturer stamp.
Please keep "Warranty Card" and purchase invoice properly and safely, if unable to present the warranty card or purchase invoice,
the warranty will be deemed a waiver of the right.
User Information
Name:
Phone:
Address:
Sales data
Product Name / Model:
Date of purchase:
Page 27

23
Sales stub
The "Warranty Card" is valid by dealer or manufacturer stamp.
Please keep "Warranty Card" and purchase invoice properly and safely, if unable to present the warranty card or purchase invoice,
the warranty will be deemed a waiver of the right.
User Information
Name:
Phone:
Address:
Sales data
Product Name / Model:
Date of purchase:
Page 28

24
Manufacturers stub
The "Warranty Card" is valid by dealer or manufacturer stamp.
Please keep "Warranty Card" and purchase invoice properly and safely, if unable to present the warranty card or purchase invoice,
the warranty will be deemed a waiver of the right.
User Information
Name:
Phone:
Address:
Sales data
Product Name / Model:
Date of purchase:
 Loading...