

Page 1
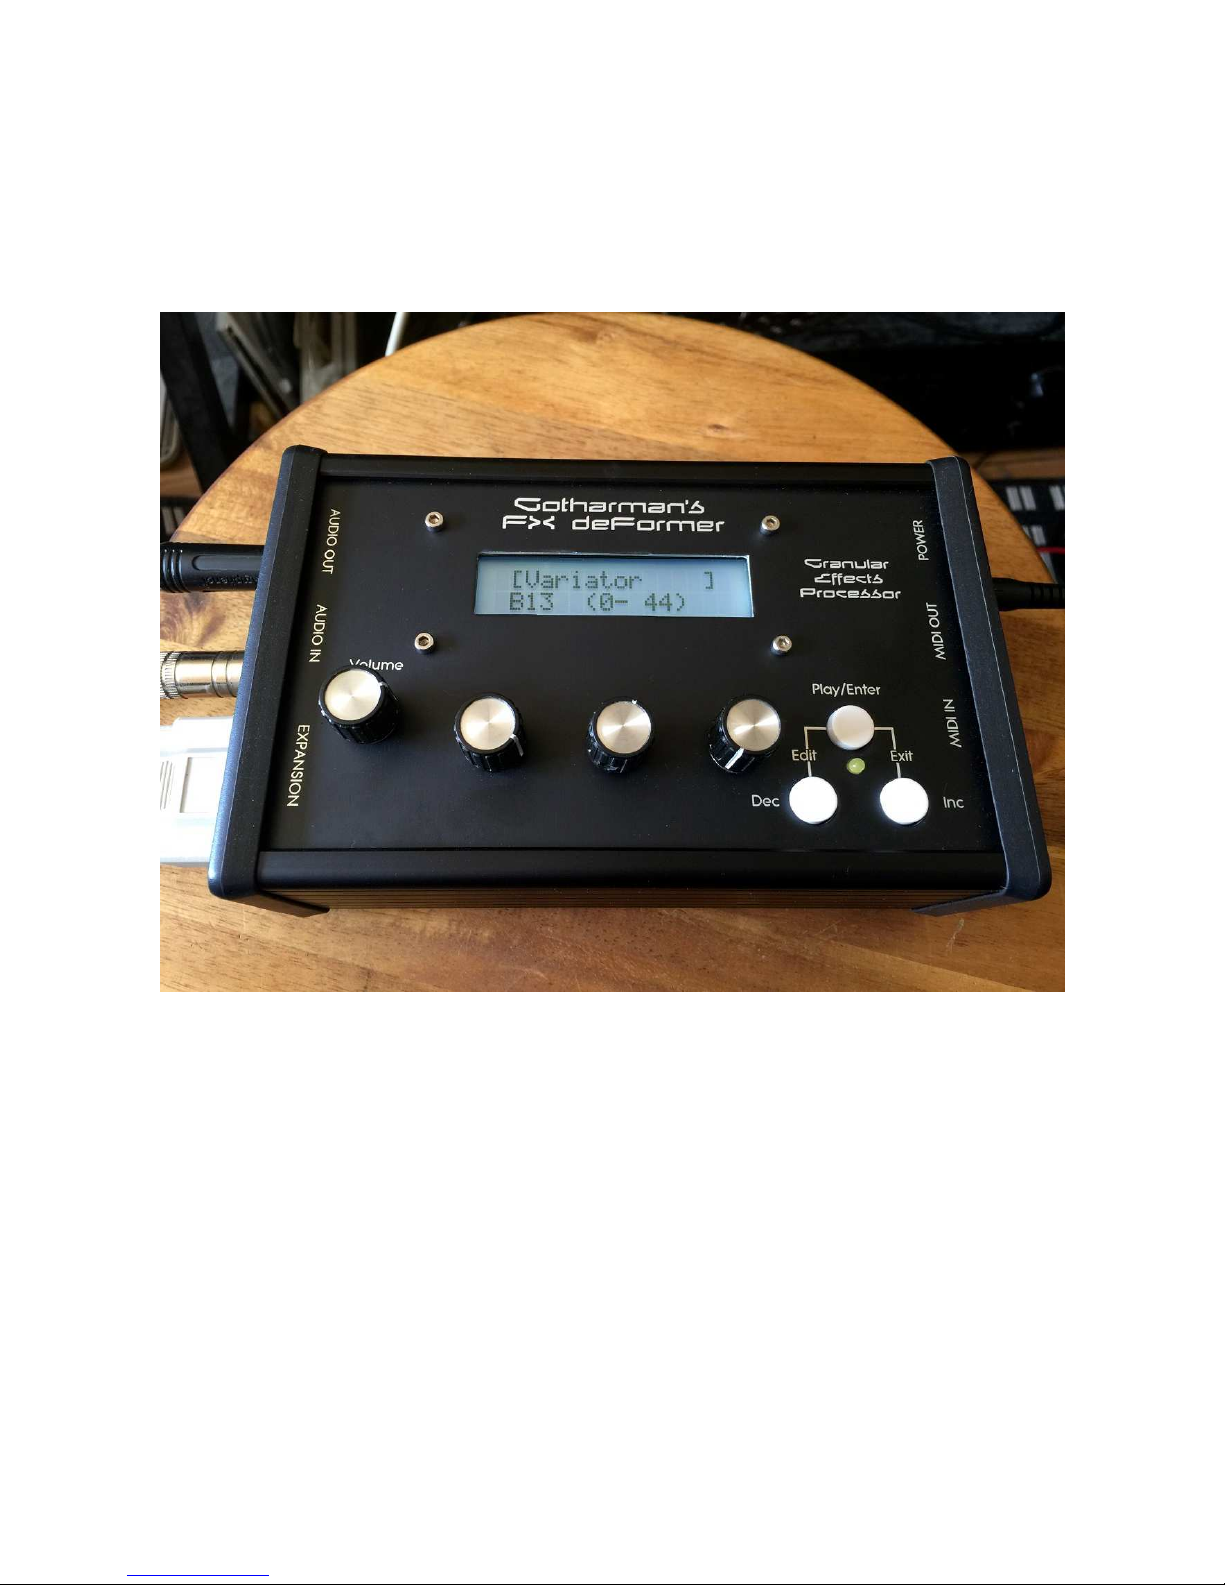
Gotharman’s
FX deFormer
Granular Effects Processor
User Manual V 040
Page 2

Contents Of This Manual
Introduction 4
Structure 7
Getting Started 8
The User Interface 12
Well, Now It’s Time For Some Action 14
Editing Parameters 15
Preset Parameters 17
Setup 17
Modulation Sources 18
Sampler 19
Sequencer Main 21
Sample/Start Seq 22
Tune/Xtra Seq 23
Distortion 24
Filter 25
Granular Effects (EFX) 27
Delay 1 29
Delay 2 31
Reverb 1 32
Reverb 2 33
PitchShaper 34
GlitchShifter 1 and 2 35
Sample Pitch 36
Variator 37
Time Stretcher 38
Abstruct0 39
AnaGran (Granulator) 40
Chorus 42
LFO’s 43
Save Preset 45
Sample Record and Erase 46
Expansion Box 49
Xmit Preset 50
Page 3

Update OS 51
Xmit OS 57
MIDI Implementation 58
Page 4

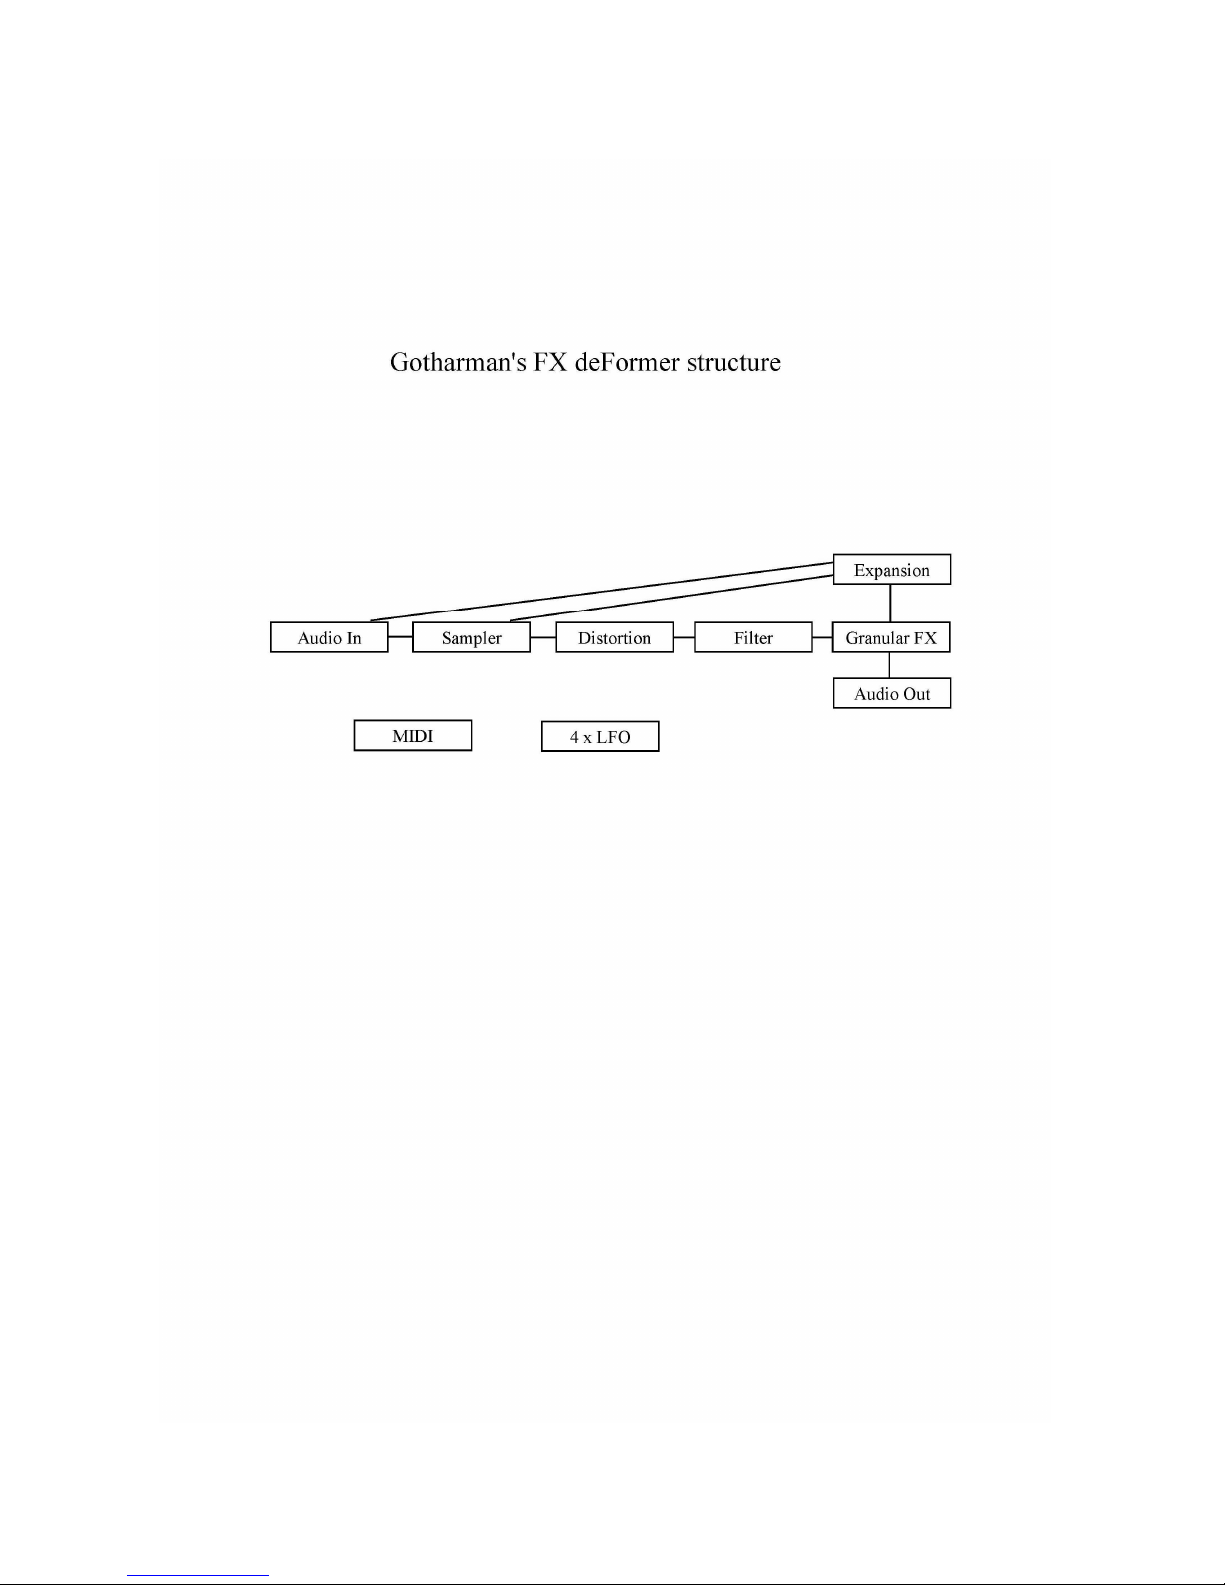
Introduction
Thank you very much for purchasing/consider to purchase an FX deFormer.
FX deFormer is the smallest member of the deFormer family, with most of its features derived from
its bigger brothers.
It has a simple monophonic sampler, a simple step sequencer, a distortion section and a filter, but
the main powers in this box is in its granular effects section. It is updatable via MIDI, so updates
might come now and then.
It has audio in an out, MIDI in and out and one expansion box connector.
It can hold 512 user programmable presets, that holds all settings for the sampler, the sequencer, the
distortion, the filter, an optional expansion box and the granular effects.
The Play/Enter button can trigger a sample playback, start/stop sample playback, start/stop the
sequencer or function as a bypass switch. It is up to the user, what it should do in each preset. It is
also used for confirming a preset change.
The sampler can hold up to 10 minutes of samples, max 127. Sample select, sample start point and
sample pitch can be modulated and controlled by the sequencer.
Samples can be recorded from FX deFormer’s audio input or output, or imported as wav files, using
the optional USB box.
The sequencer has up to 16 steps. It has 4 tracks, and a value can be adjusted for each step of each
track. It can trigger a sampling, select samplings, control the sample start point and pitch, and
modulate almost any parameter.
In the distortion section, you can choose from 4 different types of distortion: Valve, Sine, Fuzz and
soft. The Distortion can process the audio input and the sampler.
In the filter section, you can choose from 8 different filter types: LPF, BPF, BP8, HPF, BEF, ADD,
BASS and LOFI. The filter can be placed on the audio input and sampler, or inside the granular
effect. This also has some special “Filter adjust” parameters, that can change the shape of the filter
completely, and make new filter types.
In the granular effects section, delay 1 and 2, reverb 1 and 2, granulator, chorus, pitch shaper, glitch
shifter 1 and 2, variator, time stretch, sample pitch and abstruct0 are available. The granular effects
can be applied to the audio input and the sampler.
Expansion boxes for analog control (AnaX), for analog filtering (SP box, Tube box or anAmoNo
box) or for import/export of wav files and presets (USB box) can be connected to its expansion port.
Most parameters can be modulated by the sequencer, by 4 LFO’s with variable wave shape and by
MIDI CC’s.
Page 5

It is possible to have one sampling, 4 sequencer tracks, one distortion effect, one filter, one granular
effect, one expansion box and 4 LFO’s running at the same time.
Page 6

I hope you will deForm some great tracks with it.
Page 7
Page 8
Getting Started
Well, now that you got your FX deFormer, you probably can’t wait to get it up and going, so let’s
jump right to it.
Connecting:
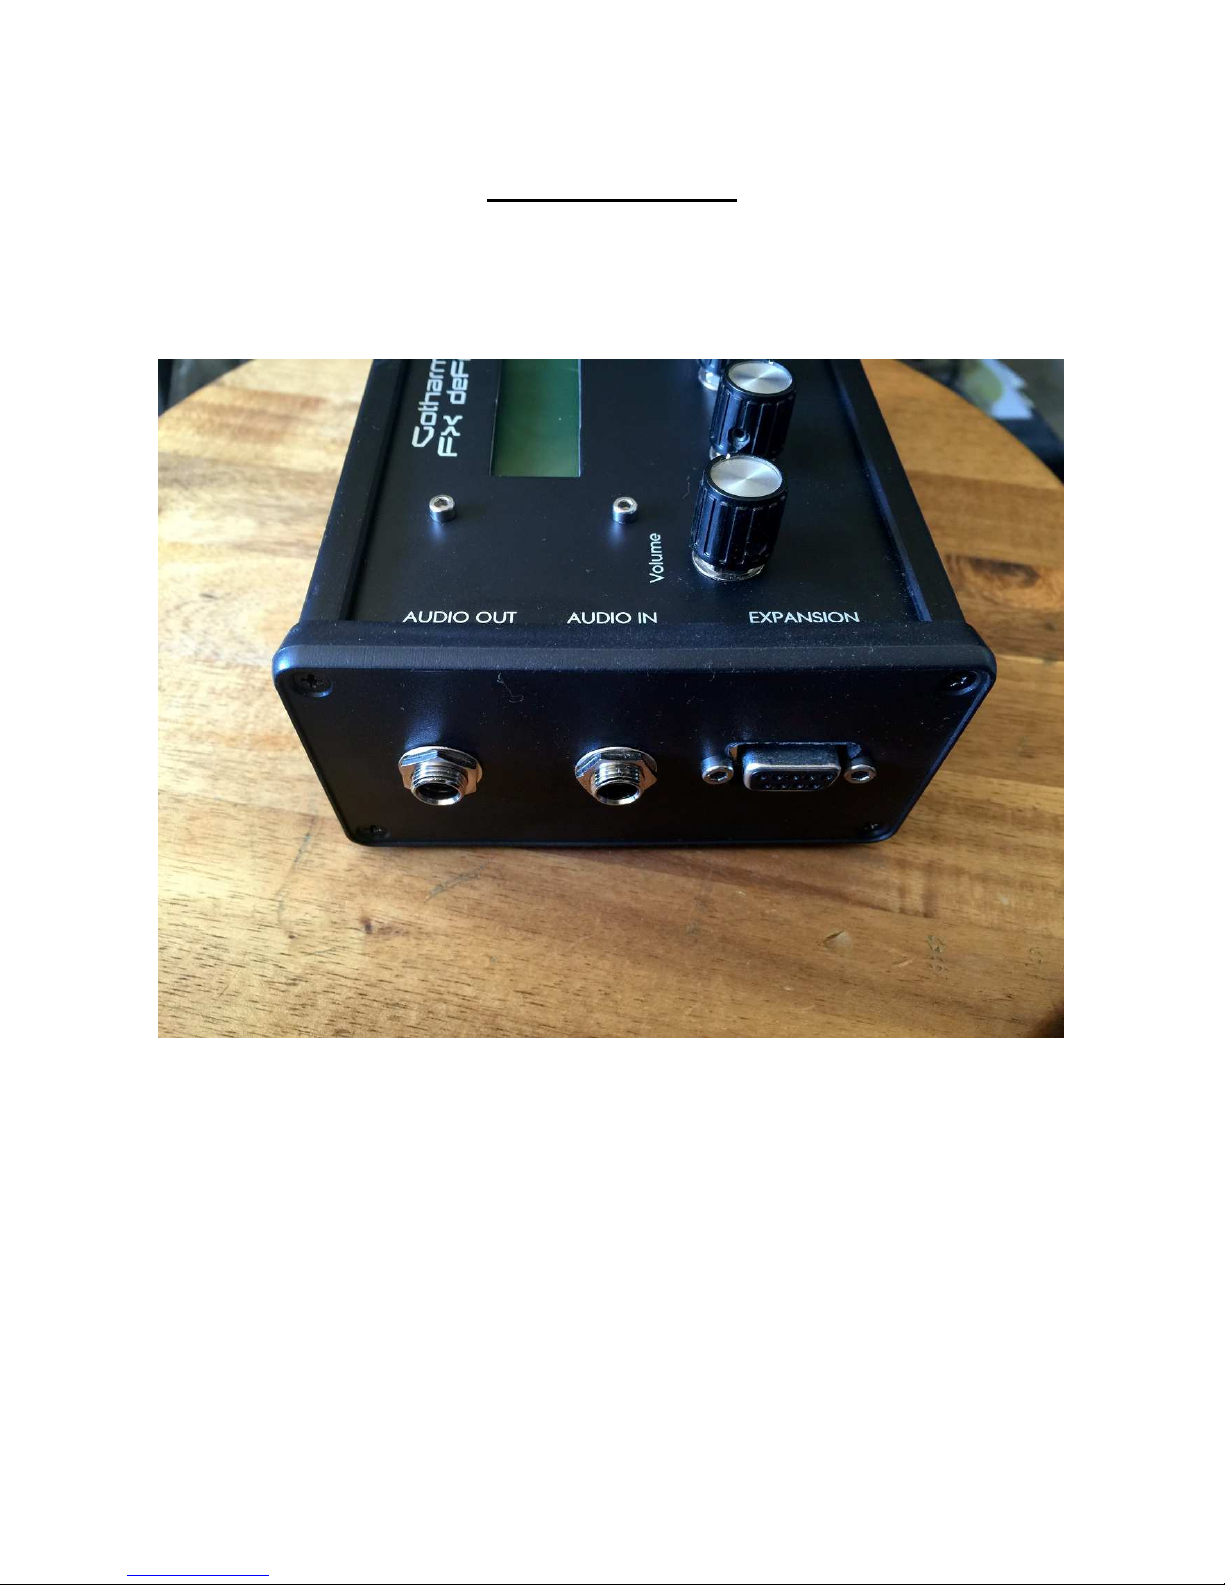
On the left end panel of your FX deFormer, you will find the connections for audio input and output
and for an expansion box.
Connect the audio output to a mixer or an amplifier, or anything else that ends out in a set of
speakers, a single speaker, or even a pair of headphones, if you are in a neighbour friendly mood.
Since it doesn’t have build in speakers, it just needs to be connected to something, that can transfer
its amazing sound to you.
Page 9
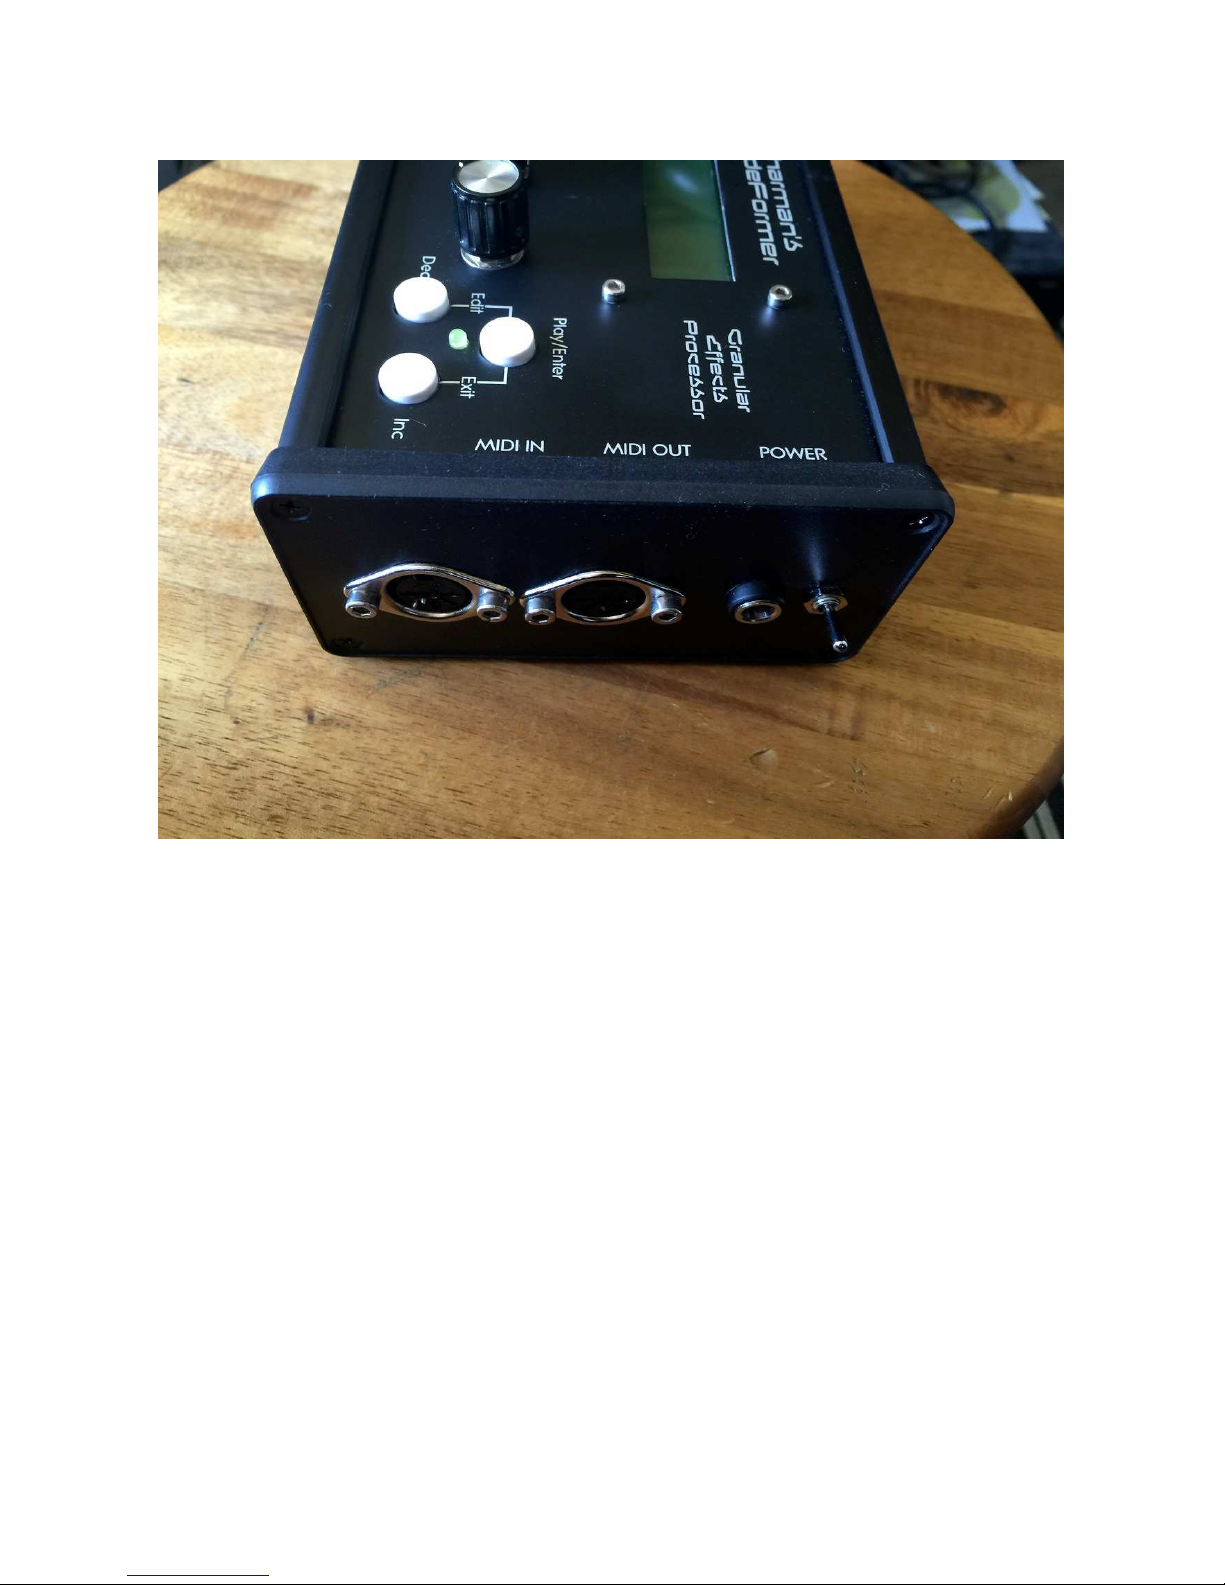
On the right end panel of your FX deFormer, you will find the power switch and connections for
power supply and MIDI in and out.
If you plan to control FX deFormer from a MIDI device, connect that to its MIDI input.
If you would like to effect some other gear through FX deFormer’s filter and effects, connect this to
the Audio Input. The input can be switched to accept standard line level equipment og Hi-Z
equipment like a guitar.
It is also possible to syncronize FX deFormer’s sequencer to another device that transmits MIDI
clock, like it is possible to sync another device to FX deFormers MIDI clock, via MIDI in and out.
If you have also puchased an expansion box, please also connect this to the “Expansion” connector,
before turning your FX deFormer on. Please refer to the specific expansion box manual, for details
about how to connect and use it together with FX deFormer. Using expansion boxes with FX
deFormer might differ a little, from using them with LD. The differences are explained later in this
manual.
Page 10

Several expansion boxes are available, and more might come.
AnaX mkII banana and minijack models
Makes it possible to use your FX deFormer together with analog gear.
SP-Box
Adds an extra Emu SP-1200 audio output stage to your FX deFormer, with 12 bit converter and
analogue filter.
Anamono Box
Adds an extra output stage, derived from my anAmoNo synthesizer, with 2 analogue filters, analog
distortion and a unique G-Ray feedback circuit.
Tube Box
Adds an extra output stage with a real tube bandpass filter with drive.
USB box
Makes it possible to import/export wav files and presets.
Page 11

Connect the supplied power adaptor to the Power input, and to a 100V to 240V power source.
It’s a 9V, 660 mA type with a 2.1 mm DC plug, with positive middle.
Turn it on
Toggle the power switch on the right end panel, so its pin is pointing down. Your FX deFormer
should now turn on.
Page 12
The User Interface
Play/Enter button
The function of this button is settable by the user, for each preset. It can trigger sample playback,
start/stop sample playback, start/stop the sequencer or function as a bypass switch.
When changing preset, this must also be pushed, to confirm.
On various edit pages, it has other functions. This is described in the dedicated sections of this
manual.
Dec and Inc buttons
On the preset select screen, these will select preset. In the edit menu’s they will select among the
different edit pages. Holding one of these buttons down, will cause FX deFormer to auto
increment/decrement.
Dec + Play/Enter - Edit button
Holding the Dec button down, while pushing the Play/Enter button, will enter the edit menu’s.
From the Preset Select screen, it will enter the edit group menu. From the edit group menu, it will
enter the actual parameter edit pages.
Page 13

Inc + Play/Enter - Exit button
Holding the Inc button down, while pushing the Play/Enter button, will exit from any menu to the
level above, with the preset select screen being the highest possible level.
Volume knob
Turns the output level of the FX deFormer up or down, depending on what direction you are turning
it. Clockwise movement will turn the volume up, counterclockwise movement will turn the volume
down.
The 3 Edit Knobs
The 3 edit knobs, placed right under the display, edits up to 3 parameters at a time on the various
edit pages. When on the Preset select page, or the edit group select page (explained later), these
knobs sends MIDI CC’s 1, 2 and 3, both to the MIDI OUT and internally. Parameters assigned to be
controlled by ”cc1-3” will be affected, when turning these.
These are REAL potmeters, NOT jumpy rotary encoders.
Page 14

Well, now it’s time for some action
If you have followed the previous steps, your FX deFormer should now be turned on and connected.
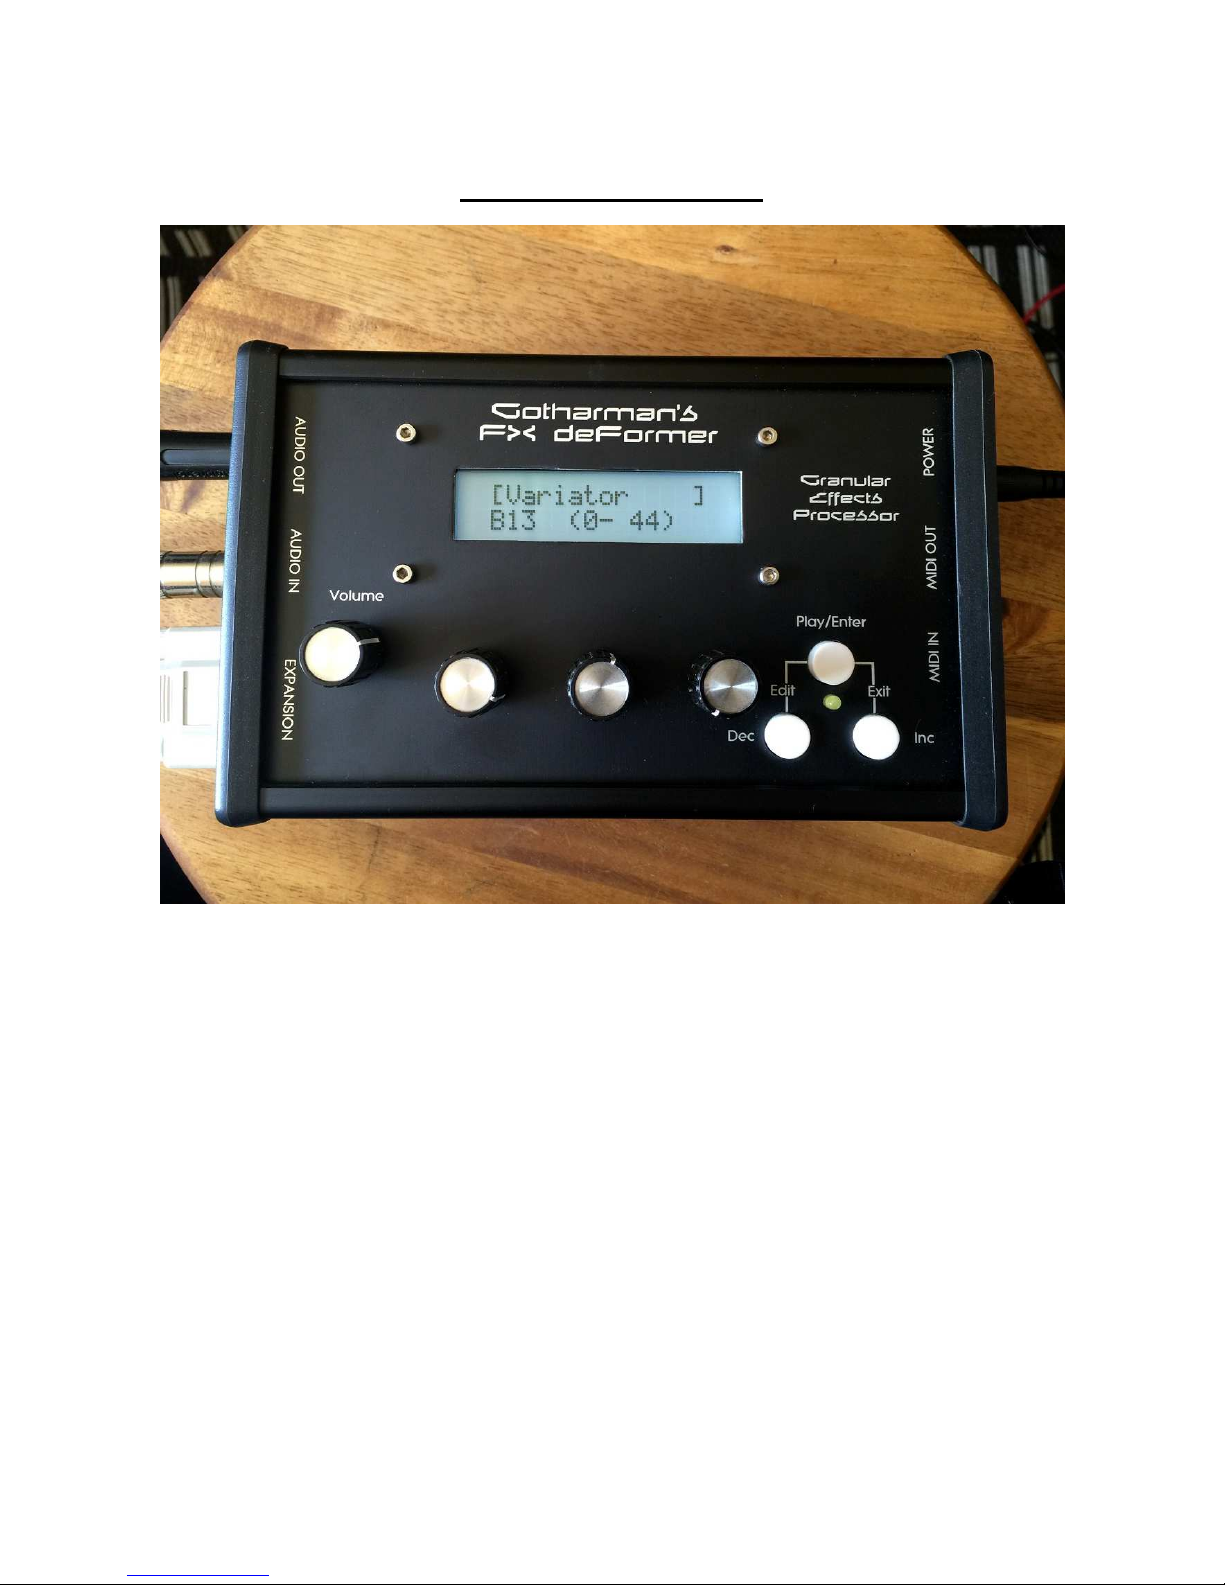
When it is turned on, it starts up on the preset select screen:
This is the FX deFormer main page.
On the top of the display it writes the name of the selected preset. It remembers what preset was
selected, when it was turned off, and goes to that preset when it is turned on again.
On the bottom of the display it writes the selected preset bank and number. FX deFormer has
sixteen banks (A-P) with each 32 presets (512 in all). The number shown in paranthes, are the MIDI
bank select number (MIDI ctrl 32) followed by a slash and the MIDI program change number you
will have to transmit to FX deFormer, for selecting this preset, from an external MIDI-device.
Listening to the pre-programmed presets
-On all the pre-programmed presets, the Play/Enter button is set up to either trigger a sampling,
start/stop a sampling, or start/stop the sequencer.
-Push the ” Play/Enter” button one time.
-The sequencer/sampling will now start to play back.
-To stop it, hit the ” Play/Enter” button again.
Alternatively, you can connect an audio source to the audio input, and just listen to this getting
treated by FX deFormer’s effects. In that case, you do not have to push the Play/Enter button.
Listen to some other presets
Use the ”Inc” and ”Dec” buttons to select another preset.
The ”Play/Enter” LED will start to flash.
Push the ”Play/enter” button to confirm the change to another preset.
If the sequencer is playing back, the ”Play/Enter” LED will now start to flash faster, until it reaches
the sequencer end step. Then the ”Play/Enter” LED will go out, and playback of the newly selected
preset will start.
If the sequencer is stopped, it will change to the new preset, immediately when the ”Play/Enter”
button is pushed.
[MetalVerb1 ]
A01 (0- 0)
Page 15

Editing parameters
From the preset select screen
Hold the “Dec” button, and push the “Play/Enter” button one time, to enter this screen:
This is referred to as an ”Edit Group screen”.
By pushing the ”Inc” and ”Dec” buttons, you can select between various edit group screens:
Setup
Sampler
Sample/Start Seq
Tune/Xtra Seq
Distortion
Filter
EFX
Save Preset
Sample Rec
Expansion Box
-USB box
Seq Main
LFO
[MetalVerb1 ]
A01 (0- 0)
Page 16

To go back to the preset select screen, from the edit group screens, hold the “Inc” button, and push
the ”Play/Enter” button.
To enter the parameters for the selected group, hold the “Dec” button, while hitting the ”Play/Enter”
button.
The first parameter screen of the ”SAMPLER” group of parameters looks like this:
Use the 3 edit knobs right below the display to edit the parameter values.
Push the ”Inc” and ”Dec” buttons to select the various parameters.
Hold the “Inc” button, and push ”Play/Enter” to go back to the edit group select screens.
Samp . Play . Gain
1 Samp + 0
Xmit Preset
Update OS
Xmit OS
Page 17

Preset Parameters
SETUP
The Setup section is where you adjust common settings, like settings for the audio input and MIDI
settings.
The input gain setting is stored separately with each preset, all other settings in this section are
global, and are stored automatically, when changed.
Inp – Line, Hi-Z. Selects the audio input to match a line level audio source, or a hi-z souce, like a
guitar. This parameter is global, and are automatically globally stored, when changed.
Gain – -128 to +127. Adjusts the level of the audio input. Negative values will damp the signal,
positive values will gain the signal. This parameter is stored with each preset.
Used% – 0 to 100. Shows how many percent of the sample memory, that are in use. This is not an
adjustable parameter.
Chan – 1 to 16. Common MIDI channel select. FX deFormer will receive note on’s and off’s, and
will receive and transmit controllers on the channel selected here. This parameter is global, and are
automatically globally stored, when changed.
Sync – Int, Ext. Clock select. Selects whether FX deFormer’s sequencer should sync to its own
internal clock source or to an external MIDI clock source. If ”ext” is selected here, a MIDI clock
transmitting device must be connected to FX deFormers MIDI IN. This parameter is global, and are
automatically globally stored, when changed.
Xmit – Off, On. Selects whether or not FX deFormer should transmit MIDI clock pulses on MIDI
OUT. Unlike most other MIDI gear, FX deFormer is able to re-transmit external MIDI clocks, that
is present on its MIDI IN. This parameter is global, and are automatically globally stored, when
changed.
Page 18

Modulation Sources
Many of FX deFormer’s parameters can be modulated. Here are a complete list of the possible
modulation sources. Modulation destinations are explained in each parameter group section.
Lf1+ - LFO1
Lf1- - LFO1 inverted
Lf2+ - LFO2
Lf2- - LFO2 inverted
Lf3+ - LFO3
Lf3- - LFO3 inverted
Lf4+ - LFO4
Lf4- - LFO4 inverted
StQ+ - Sequencer sample start track
StQ- - Sequencer sample start track inverted
XtQ+ - Sequencer Xtra track
XtQ- - Sequencer Xtra track inverted
Cv1+ - AnaX CV input 1 –Only active with AnaX MkII expansion box connected
Cv1- - AnaX CV input 1 inverted –Only active with AnaX MkII expansion box connected
Cv2+ - AnaX CV input 2 –Only active with AnaX MkII expansion box connected
Cv2- - AnaX CV input 2 inverted –Only active with AnaX MkII expansion box connected
Cv3+ - AnaX CV input 3 –Only active with AnaX MkII expansion box connected
Cv3- - AnaX CV input 3 inverted –Only active with AnaX MkII expansion box connected
Cv4+ - AnaX CV input 4 –Only active with AnaX MkII expansion box connected
Cv4- - AnaX CV input 4 inverted –Only active with AnaX MkII expansion box connected
Cc1+ - MIDI controller 1
Cc1- - MIDI controller 1 inverted
Cc2+ - MIDI controller 1
Cc2- - MIDI controller 1 inverted
Cc3+ - MIDI controller 1
Cc3- - MIDI controller 1 inverted
Cc4+ - MIDI controller 1
Cc4- - MIDI controller 1 inverted
Cc5+ - MIDI controller 1
Cc5- - MIDI controller 1 inverted
Cc6+ - MIDI controller 1
Cc6- - MIDI controller 1 inverted
Page 19

SAMPLER
All parameteres in this section, is stored with each preset.
FX deFormer can hold up to 127 samples, with a total maximum length of 10 minutes, in its sample
FLASH memory.
Samples can be recorded from its audio input, or imported as a wav file, if you have the USB box
connected. How to record a sampling, are explained in the “Sample Rec” section, later in this
manual.
In this section you can edit all the basic parameters of the sample, like sample select, tune, gain, and
start/length, and set up sequencer control and modulation of these.
The function of the “Play/Enter” button, is also set up in this section.
Samp – 1 to 127, Seq. Selects the sample to play back. If set to “Seq”, the steps of the sequencer
sample select track will select the samples to play back.
Play – Samp, Loop, Seq, Byp. Selects the function of the “Play/Enter” button. Settings can be:
-Samp: The “Play/Enter” button will trigger a playback of the selected sampling.
-Loop: The “Play/Enter” button will start/stop looped playback of the selected sampling.
-Seq: The “Play/Enter” button will start/stop sequencer playback.
-Byp: The “Play/Enter” button will function as a bypass switch, that will bypass distortion, filter
and granular effect.
Gain – -128 to +127. Adjusts the level of the selected sampling. Negative values will damp the
sampling output level, positive values will gain it.
Tune - -23 to +7, Seq. Adjusts the pitch of the selected sampling in semitones. Negative values will
pitch the sampling down, positive values will pitch the sampling up. If set to “Seq”, the steps of the
sequencer tune track will set the pitch of the sample.
Fine - -64 to +63. Fine tunes the pitch of the selected sampling. Negative values will pitch the
sampling down, positive values will pitch the sampling up.
Cont – Off, On. Continue. When this is on, the selected sample will continue to play back from the
point where it was stopped, when the “Play/Enter” button is pushed, and if Play mode is “Loop”. If
this is off, it will always start playback from the selected start point.
CoRs – Off, On. Continue Reset. When this is off, a looped sample will still continue, even after
another preset has been selected. This means, that if Continue is on, the same sample will continue
to play back. If you do not wish this to happen, switch this parameter to On.
Page 20

Strt – 0 to 253, Seq. The selected samplings start point. When triggering the sampling, playback
will start from the adjusted point. This parameter is relative to the selected samplings length. . If set
to “Seq”, the steps of the sequencer start track will set the start point of the sample.
Fine – 0 to 255. Fine adjustment of the selected samplings start point. . This parameter is relative to
the selected samplings length.
Lngt – 0 to 255. The selected samplings playback length. When triggering the sampling, it will play
back for the adjusted amount of time. This parameter is relative to the selected samplings length.
Fine – 0 to 255. Fine adjustment of the selected samplings playback length. . This parameter is
relative to the selected samplings length.
TuneMod (2 parameters) – Lf1+ to Cc6-. Sample pitch modulation source.
- 0 to 255. Sample pitch modulation amount.
For a complete list of modulation source, please refer to the “Modulation Sources” list earlier in this
manual.
StartMod (2 parameters) – Lf1+ to Cc6-. Sample start point modulation source.
- 0 to 255. Sample start point modulation amount.
For a complete list of modulation source, please refer to the “Modulation Sources” list earlier in this
manual.
SelectMod (2 parameters) – Lf1+ to Cc6-. Sample select modulation source.
- 0 to 255. Sample select modulation amount.
For a complete list of modulation source, please refer to the “Modulation Sources” list earlier in this
manual.
Page 21

Sequencer Main
All parameteres in this section, is stored with each preset.
FX deFormer’s sequencer has up to 16 steps. It has 4 tracks, and a value can be adjusted for each
step of each track. It can trigger a sampling, select samplings, control the sample start point and
pitch, and modulate almost any parameter.
The sequencer is playing back in a loop, starting with step 1, and then cycling through the next
steps, in the tempo set by the BPM parameter, or synced to an external MIDI device, until it reaches
the adjusted last step. Then it starts over again.
Last – 1 to 16. Selects the length of the sequence, in number of steps.
Scal – 1/32, 1/24, 1/16, 1/12, 1/8, 1/4, 1/2 , 1/1. Selects the time signature for the sequencer.
BPM – 50 to 305. The tempo of the sequence in BPM (Beats Per Minute). This parameter has no
function, if ”sync” in the ”Common” section is set to ”ext”, or if an AnaX mkII expansion box is
connected, and any of the trigger inputs is set to “clk”.
Page 22

Sample/Start Seq
All parameteres in this section, is stored with each preset.
Sample select and sample start point tracks.
Step – 1 to 16. Selects the step for editing.
Smpl – 1 to 127, Off. Selects the sampling to be triggered at the step selected for editing, if sample
select in the Sampler section, is set to “Seq”. When selecting the value “Off” for any of these steps,
the sequencer will not trigger the sampling, at that step.
Start – 0 to 255. Selects the sample start point at the step selected for editing, if sample start in the
Sampler section, is set to “Seq”.
Page 23

Tune/Xtra Seq
All parameteres in this section, is stored with each preset.
Sample tune and Xtra (for modulation) tracks.
Step – 1 to 16. Selects the step for editing.
Tune – -23 to +8. Selects the sample pitch at the step selected for editing, if Tune in the Sampler
section, is set to “Seq”.
Xtra – 0 to 255. Sets a value in the step selected for editing, for modulation.
Page 24

Distortion
All parameteres in this section, is stored with each preset.
FX deFormer has a distortion, that can do anything from giving the sound a bit of grit, to totally
destroy it.
Effect – Distortion effect select. Choices are:
-Valve – A digital simulation of a classic valve distortion.
-Sine – A noisy and warm sine shaping distortion.
-Fuzz – Simulates a classic fuzz distortion.
-Soft – Soft clipping. If the offset parameter is turned up, it will though bite!
Mix – 0 to 255. Mix between the clean sound, and the sound with added distortion.
Driv – 0 to 255. Drive. The higher the value, the more the sound will distort. If this is set to zero, no
sound will pass through the distortion.
Offs – 0 to 255. Distortion offset. The more this is turned up, the more unsymmetric the distortion
will be.
MixMod (2 parameters) – Lf1+ to Cc6-. Clean/distorted sound mix modulation source.
- 0 to 255. Clean/distorted sound mix modulation amount.
For a complete list of modulation source, please refer to the “Modulation Sources” list earlier in this
manual.
DriveMod (2 parameters) – Lf1+ to Cc6-. Drive modulation source.
- 0 to 255. Drive modulation amount.
For a complete list of modulation source, please refer to the “Modulation Sources” list earlier in this
manual.
OffsetMod (2 parameters) – Lf1+ to Cc6-. Offset modulation source.
- 0 to 255. Offset modulation amount.
For a complete list of modulation source, please refer to the “Modulation Sources” list earlier in this
manual.
Page 25

Filter
All parameteres in this section, is stored with each preset.
This filter is placed right after the distortion. The sampler and audio input will go through the filter,
when the “Conn” parameter are at setting “On”.
By other settings of the Conn (connection) parameter, it is possible to use the filter in combination
with the selected granular effect.
Routing it to the feedback connection of a reverb, and modulate the cutoff frequency using an LFO,
can really bring some interesting results.
Mix - -128 to +127. Filter mix. Adjusts the mix between the clean sound and the filter output. At
position zero, you will only hear the output from the filter. At positions +127 and -128, you will
only hear the clean sound. When turning this parameter from zero to +127, the pure sound will be
added more and more to the filter output. When turning it from zero to –128, the pure sound will be
subbed more and more from the filter output.
Conn – Selects where to place the filter. Choices are:
-Off – The filter is shut off.
-On – The filter is placed on the input of the granular effect. Both the clean and the effected sound
will be filtered.
-Efx – The filter is placed on the input of the granular effect. Only the effected sound will be
filtered.
-Feed – The filter is placed in the feedback path of the granular effect.
-Post – The filter is placed right after the feedback path of the granular effect.
-Outp – The filter is placed on the output of the granular effect.
Cut – 0 to 255. This parameter adjusts the cutoff frequency of the filter.
Reso – 0 to 255. Adjusts the resonance of the filter.
Type – The response (type) for the filter. Choices are:
Lpf – Lowpass.
Bpf – 4 pole bandpass.
Bp8 – 8 pole bandpass.
Hpf – Highpass.
Add – This is actually not a filter, since it doesn’t filter out harmonics from the sound, but adds
some.
Bef – Band reject filter.
Bass – Enhances the low frequencies of the sound, and passes the high frequencies through in a
very poor way.
Lofi – A destructive lowpass filter.
Page 26

folr – 0 to 255. An envelope follower is added to this filter. This parameter adjusts the speed of the
envelope follower.
fEnv - -128 to +127. Adjusts how much the envelope follower will affect the filter cutoff
frequency. Negative values will reverse the envelope.
mEnv - -128 to +127. Adjusts how much the envelope follower will affect filter mix. Negative
values will reverse the envelope.
Filter adjust 1, 2 and 3 – 0 to 255. A deFormer speciality. With these 3 parameters you can adjust
the filter response, and create completely new filter types. It’s a bit hard to explain what exactly
they do, and it is also a bit unpredictable. Tweak and listen.
CutMod 1 (2 parameters) – Lf1+ to Cc6-. Cutoff modulation source.
- 0 to 255. Cutoff modulation amount.
For a complete list of modulation source, please refer to the “Modulation Sources” list earlier in this
manual.
CutMod 2 (2 parameters) – Lf1+ to Cc6-. Cutoff modulation source.
- 0 to 255. Cutoff modulation amount.
For a complete list of modulation source, please refer to the “Modulation Sources” list earlier in this
manual.
ResoMod (2 parameters) – Lf1+ to Cc6-. Reso modulation source.
- 0 to 255. Reso modulation amount.
For a complete list of modulation source, please refer to the “Modulation Sources” list earlier in this
manual.
Adj1Mod (2 parameters) – Lf1+ to Cc6-. Filter adjust 1 modulation source.
- 0 to 255. Filter adjust 1 modulation amount.
For a complete list of modulation source, please refer to the “Modulation Sources” list earlier in this
manual.
Adj2Mod (2 parameters) – Lf1+ to Cc6-. Filter adjust 2 modulation source.
- 0 to 255. Filter adjust 2 modulation amount.
For a complete list of modulation source, please refer to the “Modulation Sources” list earlier in this
manual.
Adj3Mod (2 parameters) – Lf1+ to Cc6-. Filter adjust 3 modulation source.
- 0 to 255. Filter adjust 3 modulation amount.
For a complete list of modulation source, please refer to the “Modulation Sources” list earlier in this
manual.
Page 27

Granular effects (EFX)
All parameteres in this section, is stored with each preset.
Here you will find time and pitch based effects, like reverb, delay, granulators and pitch
manipulators, with granular parameters.
Effect – Selects the Granular effect. Choices are, at this moment:
-Delay 1 – A delay effect with special granular parameters like ”Beam” and ”Size”, and with a
feedback that can go higher than infinite. Max delay time 6.4 sec.
-Delay 2 – A bright sounding 2-tap delay. Max delay time 3.2 sec.
-Reverb 1 – A FAT synthesized reverb with a very high resolution.
-Reverb 2 – Like reverb 1 with a bit lower resolution, but more parameters.
-PitchShp – PitchShaper . A one input pitchshaper, that re-pitches the input signal to a new
adjustable pitch. All pitch variations in the sound will be removed, but can be added again, using
the “Vari” parameter. Has a very wide pitch range.
-GlitchShf – GlitchShifter 1. This is not really a pitchshifter, but then again…. It does some weird
stuff!
-GlitchSh2 – GlitchShifter 2. Almost the same as glitchshifter 1, but it sounds different.
-SamplePtc – Sampling Pitch Shifter. Changes the pitch of a sampling, without changing the
length. It will also work on external signals, but it needs to be triggered by a sampling.
-Variator – A granular effect that creates new variations of the input sound, in both pitch and time.
-TimeStrtc – TimeStretch. Able to change the length og the input signal, without changing the
pitch. It is also possible to change the pitch if desired.
-Abstruct0 - This effect constantly records the audio applied to its input, in a time interval
determined by a ”RecT” parameter. It uses 3 ”playback heads” to play back the recorded audio.
Each of these playback heads can be swithed on and off, and the playback length can be adjusted
for each of them. Every time a head has played back the adjusted amount of time, it jumps to a new
random location of the recorded piece, and starts playing back again. The playback pitch of head 2
and 3 can be adjusted. Since there are no feedback path in this effect, when common filter
connection is set to ”Feed”, playhead 2 will be individually filtered.
Page 28

-AnaGran - anAmoNo Granulator. This effect records the input signal and cuts it up into
fragments, which sizes depends on both the Time and the Frgm (number of fragments) parameters.
It is then possible to rearrange the order of these fragments, and to re-pitch or time-stretch them,
using two 8-step granulator sequencers, to get something completely new out of the input signal.
-Chorus - A simple two-tap Chorus, with an added “Deep” parameter, that adjust the depth of a
virtual chorus box. To obtain the classic chorus effect, you must apply LFO modulation to the Time
1 & 2 parameters.
The parameters:
Mix – 0 to 255. The wet/dry mix between the audio signal input and the granular effect.
EfxC – Off, On. Effects buffer clear. When this is set to “On”, the memory buffer of the granular
effect will be cleared every time you change preset or effect.
When it is set to “Off”, FX deFormer will keep its granular memory buffer at any time, and
sometimes it might play back fragments of a previously played back preset.
You will have to switch this on for every preset, where you want the effect buffer to be cleared.
Page 29

Effects parameters
Delay 1
Grp – 0 to 3. Delay time group. This is a very coarse adjustment of the delay time.
Time – 0 to 255. Delay time.
Fine – 0 to 255. Delay time fine adjust.
Feed – 0 to 255. Delay feedback. At settings below 128, the feedback is decreasing. At setting 128
(middle position) the feedback is 1:1. Use this setting, if you want to use delay 1 as a loop recorder.
At settings above 128, the feedback is increasing, and might cause distortion.
Size – 0 to 255. A granular parameter. The more this is turned up, the less space of the delay box is
used, causing some echo’s to repeat, and others not to sound at all.
Xfad – 0 to 255. Crossfade. Makes the delay effect sound smoother, by crossfading the feedback
repeats into each other.
Mode – Crossfade mode.
-nrm – Normal crossfade mode. The repeats crossfades into each other.
-duck – Ducked croosfade mode. One repeat fades out, before the next fades in.
Dir – Delay playback direction.
-Fwd – Forwards.
-Bwd – Backwards
Beam – 0 to 255. A granular parameter, that ”beams” some of the delay sound grains to another
place.
Deep – 0 to 63. Simulates a delay box, with adjustable depth.
MixMod (2 parameters) – Lf1+ to Cc6-. Clean/effected sound mix modulation source.
- 0 to 255. Clean/effected sound mix modulation amount.
For a complete list of modulation source, please refer to the “Modulation Sources” list earlier in this
manual.
TimeMod (2 parameters) – Lf1+ to Cc6-. Delay time modulation source.
- 0 to 255. Delay time modulation amount.
For a complete list of modulation source, please refer to the “Modulation Sources” list earlier in this
manual.
FeedMod (2 parameters) – Lf1+ to Cc6-. Feedback modulation source.
- 0 to 255. Feedback modulation amount.
For a complete list of modulation source, please refer to the “Modulation Sources” list earlier in this
manual.
Page 30

DeepMod (2 parameters) – Lf1+ to Cc6-. Deep modulation source.
- 0 to 255. Deep modulation amount.
For a complete list of modulation source, please refer to the “Modulation Sources” list earlier in this
manual.
Page 31

Delay 2
Grp1 – 0 to 1. Delay time group tap 1. This is a very coarse adjustment of the delay time.
Tim1 – 0 to 255. Delay time tap 1.
Fin1 – 0 to 255. Delay time fine adjust tap 1.
Fed1 – 0 to 255. Delay feedback tap 1.
Size – 0 to 255. A granular parameter. The more this is turned up, the less space of the delay box is
used, causing some echo’s to repeat, and others not to sound at all.
Grp2 – 0 to 1. Delay time group tap 2. This is a very coarse adjustment of the delay time.
Tim2 – 0 to 255. Delay time tap 2.
Fin2 – 0 to 255. Delay time fine adjust tap 2.
Fed2 – 0 to 255. Delay feedback tap 2.
Deep – 0 to 63. Simulates a delay box, with adjustable depth.
Dir – Delay playback direction.
-Fwd – Forwards.
-Bwd – Backwards
MixMod (2 parameters) – Lf1+ to Cc6-. Clean/effected sound mix modulation source.
- 0 to 255. Clean/effected sound mix modulation amount.
For a complete list of modulation source, please refer to the “Modulation Sources” list earlier in this
manual.
Time1Mod (2 parameters) – Lf1+ to Cc6-. Delay time 1 modulation source.
- 0 to 255. Delay time 1 modulation amount.
For a complete list of modulation source, please refer to the “Modulation Sources” list earlier in this
manual.
Time2Mod (2 parameters) – Lf1+ to Cc6-. Delay time 2 modulation source.
- 0 to 255. Delay time 2 modulation amount.
For a complete list of modulation source, please refer to the “Modulation Sources” list earlier in this
manual.
DeepMod (2 parameters) – Lf1+ to Cc6-. Deep modulation source.
- 0 to 255. Deep modulation amount.
For a complete list of modulation source, please refer to the “Modulation Sources” list earlier in this
manual.
Page 32

Reverb 1
Time – 0 to 255. Reverb time. The total reverb time is a combination of time, timeX, feed and
feedX.
Fine – 0 to 255. Reverb time fine adjust.
TimX – 0 to 255. Adjusts how much the following reverb taps will decrease in time. Lower settings
is good for a short reverb, and higher settings for a long reverb.
Feed – 0 to 255. Reverb feedback.
FedX – 0 to 255. Adjusts how much the following reverb taps will decrease in feedback. Lower
settings gives a delay effect. As this is turned up, it goes over in a metallic reverb type, and at
higher settings it gives a more full reverb.
Size – 0 to 255. A granular parameter. The more this is turned up, the less space of the reverb box is
used, causing some echo’s to repeat, and others not to sound at all.
Levl – 0 to 255. Reverb level.
Dir – Reverb playback direction.
-Fwd – Forwards.
-Bwd – Backwards
MixMod (2 parameters) – Lf1+ to Cc6-. Clean/effected sound mix modulation source.
- 0 to 255. Clean/effected sound mix modulation amount.
For a complete list of modulation source, please refer to the “Modulation Sources” list earlier in this
manual.
TimXMod (2 parameters) – Lf1+ to Cc6-. TimeX modulation source.
- 0 to 255. TimeX modulation amount.
For a complete list of modulation source, please refer to the “Modulation Sources” list earlier in this
manual.
FedXMod (2 parameters) – Lf1+ to Cc6-. FeedX modulation source.
- 0 to 255. FeedX modulation amount.
For a complete list of modulation source, please refer to the “Modulation Sources” list earlier in this
manual.
Page 33

Reverb 2
Time – 0 to 255. Reverb time. The total reverb time is a combination of time, timeX, feed and
feedX.
Fine – 0 to 255. Reverb time fine adjust.
TimX – 0 to 255. Adjusts how much the following reverb taps will decrease in time. Lower settings
is good for a short reverb, and higher settings for a long reverb.
Feed – 0 to 255. Reverb feedback.
FedX – 0 to 255. Adjusts how much the following reverb taps will decrease in feedback. Lower
settings gives a delay effect. As this is turned up, it goes over in a metallic reverb type, and at
higher settings it gives a more full reverb.
Xfad – 0 to 255. Crossfade. Makes the reverb effect sound smoother, by crossfading the feedback
repeats into each other.
Deep – 0 to 63. Simulates a reverb box, with adjustable depth.
Levl – 0 to 255. Reverb level.
Dir – Reverb playback direction.
-Fwd – Forwards.
-Bwd – Backwards
MixMod (2 parameters) – Lf1+ to Cc6-. Clean/effected sound mix modulation source.
- 0 to 255. Clean/effected sound mix modulation amount.
For a complete list of modulation source, please refer to the “Modulation Sources” list earlier in this
manual.
TimXMod (2 parameters) – Lf1+ to Cc6-. TimeX modulation source.
- 0 to 255. TimeX modulation amount.
For a complete list of modulation source, please refer to the “Modulation Sources” list earlier in this
manual.
DeepMod (2 parameters) – Lf1+ to Cc6-. Deep modulation source.
- 0 to 255. Deep modulation amount.
For a complete list of modulation source, please refer to the “Modulation Sources” list earlier in this
manual.
Page 34

PitchShaper
Sens – 0 to 255. Pitch tracking sense. At lower settings it will find more pitch tracking points,
which will make the pitch higher on complex sounds, while at higher settings it will find less
pitchtracking points.
Pitc – 0 to 255. Pitch Coarse.
Fine – 0 to 255. Pitch Fine.
Feed – 0 to 255. Feedback.
Smot – 0 to 255. Output smoothing. The more this is turned up, the more it smoothen out the pitch
changes are in the signal
ComX – 0 to 255. Complexity. The more this is turned up, the less complex the sound output will
be.
FM – 0 to 255. The input signal modulates the pitch of the pitchshaper.
Vari – 0 to 255. The more this parameter is turned up, the more the PitchShaper will follow the
pitch of the input sound.
Oct – -4 to +3. Changes the output pitch of the PitchShaper in octaves.
MixMod (2 parameters) – Lf1+ to Cc6-. Clean/effected sound mix modulation source.
- 0 to 255. Clean/effected sound mix modulation amount.
For a complete list of modulation source, please refer to the “Modulation Sources” list earlier in this
manual.
PitcMod (2 parameters) – Lf1+ to Cc6-. Pitch modulation source.
- 0 to 255. Pitch modulation amount.
For a complete list of modulation source, please refer to the “Modulation Sources” list earlier in this
manual.
FeedMod (2 parameters) – Lf1+ to Cc6-. Feedback modulation source.
- 0 to 255. Feedback modulation amount.
For a complete list of modulation source, please refer to the “Modulation Sources” list earlier in this
manual.
FmMod (2 parameters) – Lf1+ to Cc6-. FM amount modulation source.
- 0 to 255. FM amount modulation amount.
For a complete list of modulation source, please refer to the “Modulation Sources” list earlier in this
manual.
Page 35

GlitchShifter 1 and 2
Sens – 0 to 255. Pitch tracking sense. At lower settings it will find more pitch tracking points,
which will make the pitch higher on complex sounds, while at higher settings it will find less
pitchtracking points.
Folr – 0 to 255. Envelope follower speed.
Pitc – -128 to +127. Pitch Coarse.
Feed – 0 to 255. Feedback.
ComX – 0 to 255. Complexity. The more this is turned up, the less complex the sound output will
be.
MixMod (2 parameters) – Lf1+ to Cc6-. Clean/effected sound mix modulation source.
- 0 to 255. Clean/effected sound mix modulation amount.
For a complete list of modulation source, please refer to the “Modulation Sources” list earlier in this
manual.
PitcMod (2 parameters) – Lf1+ to Cc6-. Pitch modulation source.
- 0 to 255. Pitch modulation amount.
For a complete list of modulation source, please refer to the “Modulation Sources” list earlier in this
manual.
SensMod (2 parameters) – Lf1+ to Cc6-. Sense modulation source.
- 0 to 255. Sense modulation amount.
For a complete list of modulation source, please refer to the “Modulation Sources” list earlier in this
manual.
FeedMod (2 parameters) – Lf1+ to Cc6-. Feedback modulation source.
- 0 to 255. Feedback modulation amount.
For a complete list of modulation source, please refer to the “Modulation Sources” list earlier in this
manual.
Page 36

Sample Pitch
Sens – 0 to 255. Pitch tracking sense. At lower settings it will find more pitch tracking points,
which will make the pitch higher on complex sounds, while at higher settings it will find less
pitchtracking points.
Size – 0 to 255. The size of the RAM buffer used for the pitchshifting
Pitc – -128 to +127. Pitch Coarse.
Folr – 0 to 255. Envelope follower speed.
Feed – 0 to 255. Feedback.
MixMod (2 parameters) – Lf1+ to Cc6-. Clean/effected sound mix modulation source.
- 0 to 255. Clean/effected sound mix modulation amount.
For a complete list of modulation source, please refer to the “Modulation Sources” list earlier in this
manual.
PitcMod (2 parameters) – Lf1+ to Cc6-. Pitch modulation source.
- 0 to 255. Pitch modulation amount.
For a complete list of modulation source, please refer to the “Modulation Sources” list earlier in this
manual.
SizeMod (2 parameters) – Lf1+ to Cc6-. Size modulation source.
- 0 to 255. Size modulation amount.
For a complete list of modulation source, please refer to the “Modulation Sources” list earlier in this
manual.
FeedMod (2 parameters) – Lf1+ to Cc6-. Feedback modulation source.
- 0 to 255. Feedback modulation amount.
For a complete list of modulation source, please refer to the “Modulation Sources” list earlier in this
manual.
Page 37

Variator
Time – 0 to 255. The size of the RAM buffer used for the variator
Size – 0 to 255. The size of one grain.
Gran – 0 to 255. Determines the variation pattern.
Pitc – -128 to +127. Pitch Coarse.
Feed – 0 to 255. Feedback.
MixMod (2 parameters) – Lf1+ to Cc6-. Clean/effected sound mix modulation source.
- 0 to 255. Clean/effected sound mix modulation amount.
For a complete list of modulation source, please refer to the “Modulation Sources” list earlier in this
manual.
PitcMod (2 parameters) – Lf1+ to Cc6-. Pitch modulation source.
- 0 to 255. Pitch modulation amount.
For a complete list of modulation source, please refer to the “Modulation Sources” list earlier in this
manual.
GranMod (2 parameters) – Lf1+ to Cc6-. Gran modulation source.
- 0 to 255. Gran modulation amount.
For a complete list of modulation source, please refer to the “Modulation Sources” list earlier in this
manual.
FeedMod (2 parameters) – Lf1+ to Cc6-. Feedback modulation source.
- 0 to 255. Feedback modulation amount.
For a complete list of modulation source, please refer to the “Modulation Sources” list earlier in this
manual.
Page 38

Time Stretcher
Tune – -128 to +127. Pitch Coarse.
Size – 0 to 255. The size of the RAM buffer used for the TimeStretcher
Strc – -128 to +127. Time stretch. A negative value will stretch the sound longer, a positive value
will compress the sound to apper shorter.
MixMod (2 parameters) – Lf1+ to Cc6-. Clean/effected sound mix modulation source.
- 0 to 255. Clean/effected sound mix modulation amount.
For a complete list of modulation source, please refer to the “Modulation Sources” list earlier in this
manual.
TuneMod (2 parameters) – Lf1+ to Cc6-. Pitch modulation source.
- 0 to 255. Pitch modulation amount.
For a complete list of modulation source, please refer to the “Modulation Sources” list earlier in this
manual.
SizeMod (2 parameters) – Lf1+ to Cc6-. Size modulation source.
- 0 to 255. Size modulation amount.
For a complete list of modulation source, please refer to the “Modulation Sources” list earlier in this
manual.
StretchMod (2 parameters) – Lf1+ to Cc6-. Stretch modulation source.
- 0 to 255. Stretch modulation amount.
For a complete list of modulation source, please refer to the “Modulation Sources” list earlier in this
manual.
Page 39

AbstructO
RecT – 0 to 255. Adjusts the record buffer size. Determines for how long time it should record the
input, before it starts over again.
Ply1, Ply2, Ply3 – Off, 1 to 255. Adjusts for how long time each of the playback heads should play
back, until it jumps to a new random location.
Pit2, Pit3 - -128 to +127. Adjusts the pitch of the playback for playhead 2 and 3.
Psiz – Off, 1 to 255. This parameter adjusts the total playback buffer size, independent of the record
buffer size. If this parameter is ”Off”, the RecT parameter determines the playback buffer size, but
if it is at any other value, this parameter determines the playback buffer size. It can be used as a fast
way of adjusting the playback length of all 3 playback heads at the same time. At low settings,
granular effects with very small grains can be obtained. If the value of this is higher than the RecT
parameter, it will play back areas of the record buffer, that is not being recorded, and create a
”Freeze” effect.
MixMod (2 parameters) – Lf1+ to Cc6-. Clean/effected sound mix modulation source.
- 0 to 255. Clean/effected sound mix modulation amount.
For a complete list of modulation source, please refer to the “Modulation Sources” list earlier in this
manual.
Pit2Mod (2 parameters) – Lf1+ to Cc6-. Pitch 2 modulation source.
- 0 to 255. Pitch 2 modulation amount.
For a complete list of modulation source, please refer to the “Modulation Sources” list earlier in this
manual.
Pit3Mod (2 parameters) – Lf1+ to Cc6-. Pitch 3 modulation source.
- 0 to 255. Pitch 3 modulation amount.
For a complete list of modulation source, please refer to the “Modulation Sources” list earlier in this
manual.
PsizeMod (2 parameters) – Lf1+ to Cc6-. Psize modulation source.
- 0 to 255. Psize modulation amount.
For a complete list of modulation source, please refer to the “Modulation Sources” list earlier in this
manual.
Page 40

AnaGran (Granulator)
Last – Value 1 to 16: Sets how many steps the granulator sequencers should go through, until they
starts over again from step one.
Time – Value 0 to 255: Adjust the total size of the Granulator record and play buffer – How long
time it will record the input signal, until it starts over again.
Fine – Value 0 to 255: Fine adjustment of the Time parameter.
FrGm – Values 1 to 8: Adjusts how many fragments (grains) the recorded input signal should be
cutted up in, when played back.
Feed – Value 0 to 255: Adjusts how much of the Granulator output signal should be fed back to its
input.
Dir – Values fwd, bwd: Sets the playback direction of the Granulator output, which can either be
forwards or backwards.
Mode – Values pitc, strc, FusP, FusS: Sets the playback mode of the granulator sequencer.
-pitc: The second granulator sequencer will re-pitch the playback.
-strc: The second granulator sequencer will time stretch the playback.
Xfad – Values 0 to 255: Adjusts how much ducking crossfade that will be added between the
granulator sequencer steps.
Step 1 to 8 Fram – Values 1 to 128: Adjusts which fragment of the sound buffer, that should be
played back at each step of the granulator sequencer. Steps 1 to 8 are accessed turning the Step
parameter.
Step 1 to 8 Pitch – Values -128 to +127: Adjusts how much the fragment of each granulator
sequencer step, should be re-pitched or time-stretched. Steps 1 to 8 are accessed turning the Step
parameter.
MixMod (2 parameters) – Lf1+ to Cc6-. Clean/effected sound mix modulation source.
- 0 to 255. Clean/effected sound mix modulation amount.
For a complete list of modulation source, please refer to the “Modulation Sources” list earlier in this
manual.
LastMod (2 parameters) – Lf1+ to Cc6-. Last step modulation source.
- 0 to 255. Last step modulation amount.
For a complete list of modulation source, please refer to the “Modulation Sources” list earlier in this
manual.
TimeMod (2 parameters) – Lf1+ to Cc6-. Time modulation source.
- 0 to 255. Time modulation amount.
For a complete list of modulation source, please refer to the “Modulation Sources” list earlier in this
manual.
Page 41

FeedMod (2 parameters) – Lf1+ to Cc6-. Feedback modulation source.
- 0 to 255. Feedback modulation amount.
For a complete list of modulation source, please refer to the “Modulation Sources” list earlier in this
manual.
Page 42

Chorus
Time1 – Value 0 to 255: Adjusts the Chorus delay time for tap 1.
Feed1 – Value -128 to +127: Adjusts the Chorus feedback amount, which can be negative or
positive, for tap 1.
Time2 – Value 0 to 255: Adjusts the Chorus delay time for tap 2.
Feed2 – Value -128 to +127: Adjusts the Chorus feedback amount, which can be negative or
positive, for tap 2.
Deep – Value 0 to 255: Adjusts how deep the chorus box should be.
MixMod (2 parameters) – Lf1+ to Cc6-. Clean/effected sound mix modulation source.
- 0 to 255. Clean/effected sound mix modulation amount.
For a complete list of modulation source, please refer to the “Modulation Sources” list earlier in this
manual.
Time1Mod (2 parameters) – Lf1+ to Cc6-. Time 1 modulation source.
- 0 to 255. Time 1 modulation amount.
For a complete list of modulation source, please refer to the “Modulation Sources” list earlier in this
manual.
Time2Mod (2 parameters) – Lf1+ to Cc6-. Time 2 modulation source.
- 0 to 255. Time 2 modulation amount.
For a complete list of modulation source, please refer to the “Modulation Sources” list earlier in this
manual.
DeepMod (2 parameters) – Lf1+ to Cc6-. Deep modulation source.
- 0 to 255. Deep modulation amount.
For a complete list of modulation source, please refer to the “Modulation Sources” list earlier in this
manual.
Page 43

LFO’s
All parameteres in this section, is stored with each preset.
FX deFormer has 4 LFO’s, that are available as modulation sources. These can morph between
triangle, sawtooth, square, pulse and random.
The LFO’s themselves can also be modulated.
Parameters:
Rat1: 0 to 255. Adjusts the rate (or speed) of the LFO 1. From very slow to very fast.
Wav1: tri to saw to squ to puls to rndm. Selects the LFO 1 waveform. The numbers inbetween the
waveform names, indicates that the LFO is morphing between two waveforms.
Rat2: 0 to 255. Adjusts the rate (or speed) of the LFO 2. From very slow to very fast.
Wav2: tri to saw to squ to puls to rndm. Selects the LFO 2 waveform. The numbers inbetween the
waveform names, indicates that the LFO is morphing between two waveforms.
Rat3: 0 to 255. Adjusts the rate (or speed) of the LFO 3. From very slow to very fast.
Wav3: tri to saw to squ to puls to rndm. Selects the LFO 3 waveform. The numbers inbetween the
waveform names, indicates that the LFO is morphing between two waveforms.
Rat4: 0 to 255. Adjusts the rate (or speed) of the LFO 4. From very slow to very fast.
Wav4: tri to saw to squ to puls to rndm. Selects the LFO 4 waveform. The numbers inbetween the
waveform names, indicates that the LFO is morphing between two waveforms.
LFO1RateMod (2 parameters) – Lf1+ to Cc6-. LFO 1 rate modulation source.
- 0 to 255. LFO 1 rate modulation amount.
For a complete list of modulation source, please refer to the “Modulation Sources” list earlier in this
manual.
LFO1WaveMod (2 parameters) – Lf1+ to Cc6-. LFO 1 wave modulation source.
- 0 to 255. LFO 1 wave modulation amount.
For a complete list of modulation source, please refer to the “Modulation Sources” list earlier in this
manual.
LFO2RateMod (2 parameters) – Lf1+ to Cc6-. LFO 2 rate modulation source.
- 0 to 255. LFO 2 rate modulation amount.
For a complete list of modulation source, please refer to the “Modulation Sources” list earlier in this
manual.
Page 44

LFO2WaveMod (2 parameters) – Lf1+ to Cc6-. LFO 2 wave modulation source.
- 0 to 255. LFO 2 wave modulation amount.
For a complete list of modulation source, please refer to the “Modulation Sources” list earlier in this
manual.
LFO3RateMod (2 parameters) – Lf1+ to Cc6-. LFO 3 rate modulation source.
- 0 to 255. LFO 3 rate modulation amount.
For a complete list of modulation source, please refer to the “Modulation Sources” list earlier in this
manual.
LFO3WaveMod (2 parameters) – Lf1+ to Cc6-. LFO 3 wave modulation source.
- 0 to 255. LFO 3 wave modulation amount.
For a complete list of modulation source, please refer to the “Modulation Sources” list earlier in this
manual.
LFO4RateMod (2 parameters) – Lf1+ to Cc6-. LFO 4 rate modulation source.
- 0 to 255. LFO 4 rate modulation amount.
For a complete list of modulation source, please refer to the “Modulation Sources” list earlier in this
manual.
LFO4WaveMod (2 parameters) – Lf1+ to Cc6-. LFO 4 wave modulation source.
- 0 to 255. LFO 4 wave modulation amount.
For a complete list of modulation source, please refer to the “Modulation Sources” list earlier in this
manual.
Page 45

Save Preset
This section will decribe how to save a preset on the FX deFormer.
All parameter settings and sequences will be saved within a preset. Only MIDI channel, sync
options and input mode select are automatically saved as common data, and are not part of the
preset.
From this edit group page:
Hold the “Dec” button, and Push the ”Play/Enter” button, to go to this page:
Here it is possible to select the memory location, on which you would like to save your preset. Push
the ”Inc” and ”Dec” buttons to select. The ”Play/Enter” LED will flash. There are 512 locations to
choose from.
If a location reads this out:
No preset has previously been saved on this location. If you choose a preset, that already has a
name, this will be overwritten by the new preset.
Push the ”Play/Enter” button to proceed. This screen will appear:
Use edit knob 1-3, to select the first 3 letters of the name in your preset.
Push the ” Play/Enter” button to proceed.
Select the last nine letters of the preset name, the same way. When pushing the “Play/Enter” button,
after letter 10-12 has been set, your preset will be stored.
[MetalVerb1 ]
SAVE TO: A02
Save Preset
[ <empty> ]
SAVE TO: A02
Name 1-3 PUSH
Met <Enter>
Page 46

Sample Rec
On these pages, you can record or erase a sampling. Samples can be recorded from FX deFormer
audio input or output, or a mix between these.
With the optional USB box connected, it is also possible to import wav files as samples. For
instructions on how to do this, please consult the separate Usb box manual.
Only the highest numbered sample can be erased. If you wish to arrange samples, this can be done
by tranferring samples between FX deFormer and the optional USB box.
When entering this edit group, by holding the “Dec” button, while pushing “Play/Enter”, the screen
looks like this:
From this screen, push the “Inc” button to record a sample, or the “Dec” button to erase one.
Erase sampling
If you pushed “Dec”, you will now enter this page:
The number of the highest numbered sample is shown. If you would like to erase this, push the
“Play/Enter” button. If not, hold “Inc”, while pushing “Play/Enter”, to exit.
ERASE = <Enter>
Sample 63
Record = <Inc>
Erase = <Dec>
Page 47

Record a sampling
If you pushed “Inc” from the record/erase screen, you will now enter the sample record page.
This lets you record your own samplings. You should listen to FX deFormer’s audio output, and
adjust the level of the device you would like to sample from, which should be connected to FX
deFormer’s audio input, so the sound does not distort.
FX deFormer can record 10 minutes/127 samples.
The maximum length of a single sampling is 10 minutes.
The first page looks like this:
Source: Inp, -127 to +126, outp. Adjust edit knob 1 to select what you want to record. Turn it fully
down to select “Inp” (input), fully up to select “Outp” (output), or set this anywhere inbetween, to
record a mix of the input and output.
Auto: Off, 1 to 255. Adjusting edit knob 2, you can adjust an auto sample offset. If this is not off,
but has a value, sample recording will not start immediately, when you hit the “Dec” button. It will
not start until the level of the signal to be recorded, has reached the adjusted auto offset level.
Now push ”Dec” to activate recording. The display reads:
Activate the source to record it. When you are done recording, push ”Inc” to go to this screen:
If you would like to audition your sampling, push the ”Inc” button. If you would like to save it,
push ”Dec”. If you would not like to keep this sampling, hold “Inc”, while pushing “Play/Enter”, to
exit.
Source. Auto. PUSH
Inp Off <dec>
Recording….
Stop = <inc>
Audition = <inc>
Name = <dec>
Page 48

If you choose to push ”Dec”, you will go to this screen:
Push the “Play/Enter” button, to confirm that you would like to save your sampling, or hold “Inc”,
while pushing “Play/Enter, to exit without saving.
Save = <Enter>
Page 49

Expansion Box
If you have any of the optional expansion boxes connected to your FX deFormer, the name of the
expansion box and its parameters/functions, will be shown on these pages.
All parameter adjustment will be saved within the selected preset, when it is saved.
For operation and parameters of the various expansion boxes, please refer to the specific manuals
for these, except for a few changes:
AnaX mkII:
Trigger inputs can be sequencer clock, sequencer start/stop, or any sample number. When a sample
number is selected, the sample will be selected and trigged, when a trigger is received.
Trigger outputs can be sequencer clock, sequencer start/stop, or LFO 1 to 4.
CV outputs can be any of the modulation sources.
SP box:
Audio BUS can be Output, sample or input.
Trigger input can be sequencer clock, sequencer start/stop, or any sample number. When a sample
number is selected, the sample will be selected and trigged, when a trigger is received.
Tube box and anAmoNo box:
Audio BUS can be Output, sample or input.
USB box:
All functionality is the same. The screen is though smaller.
Page 50

Xmit Preset
Send the currently selected preset as sysex data through MIDI out. Connect a computer or another
MIDI device, that is able to record sysex data, to your FX deFormer’s MIDI out, and use this
function to transmit the preset data, for back-up or for sharing with other FX deFormer’s. Notice
that only the preset parameter data is sent, NOT the sample data. Hold the “Dec” button, while
pushing the “Play/Enter” button to activate this function.
Receive preset:
Connect the MIDI in of your FX deFormer, to MIDI out of a computer, your second FX deFormer,
or any other device that can transmit MIDI sysex (.syx) files.
Select the preset location, on FX deFormers preset select screen, on which you want the preset
transferred to.
Transmit the preset file to your FX deFormer.
The name of the transferred preset will appear as the current preset name.
Listen to the preset.
To keep the transferred preset, you must remember to save it.
Page 51

Update OS
Updating the FX deFormer firmware.
Occasionally there will be firmware updates available at:
http://www.gotharman.dk/fxdefupdates.htm
These will be bug fixes or implementation of additional functions or effects, so it might be a good
idea to get familiar with, how to update the firmware of your FX deFormer.
You will need:
-Your FX deFormer
-A computer with internet connection
-A MIDI interface connected to your computer
-A MIDI cable
1. Go to the abovementioned deFormer website, and download the latest firmware to your
computer. The firmware will usually consist of a file named t.ex:
fxd_068.syx
2. If you haven’t done it already, go to:
http://www.midiox.com/
and download the free MIDI utility program MIDI-OX. And please donate, if you feel like.
It is probably also possible to use other programs that supports .syx files, but the FX deFormer
firmware updates has been created using MIDI-OX, so this program is probably the one that will
work best.
3. Install MIDI-OX on your computer. You shall be very welcome to skip this step, if you have
already done this.
Page 52

4. After installing MIDI-OX, open the program, and click on ”Options” > ”Configure Buffers”:
5. Enter the number ”20000” in the ”Bytes” box under ”Low Level Output Buffers”
6. Click ”OK”.
Page 53

7. Go to ”Options” > ”MIDI devices”, and select the MIDI interface you intend to use for the
updating, as your output device.
8. Connect MIDI out on the selected MIDI interface to MIDI in on your FX deFormer.
9. Click on ”View” > ”Sysex”
12. It now should look like this:
Page 54

13. On your FX deFormer:
-Turn it off.
-Hold down the “Play/Enter” button, while turning it on.
-The display should now read:
OR:
-From the preset select screen, hold the “Dec” button, while pushing “Play/Enter”, to enter the edit
group pages.
Push the “Inc” button to scroll to this page:
-Hold “Dec”, while pushing “Play/Enter”, and the display will read:
Update OS
Waiting for
MIDI data…
Waiting for
MIDI data…
Page 55

14. On MIDI-OX, in the Sysex view: Click ”File” > ”Send sysex file”.
15. A file browser will open. Locate the .syx file you downloaded from the deFormer site, select it,
and click ”Open”.
MIDI-OX will now transfer the file to your computers MIDI out, where you have, hopefully,
connected your FX deFormer.
If you have, its display will now read:
The hex number in the buttom of the display will be constantly incrementing. This indicates, that it
is receiving the MIDI data. If this number stops incrementing, there might be something wrong with
your MIDI connection, and you should turn off your FX deFormer, and check it out. If you are sure
your connections are ok, try to go back to step 5, and put a higher number in the ”Low level output
buffers” box, for instance ”40000”.
When all data is received successfully, the display will change to:
It will stay there for some minutes, and then it will change to:
Receiving…
0A
Programming…
UPDATE SUCCESSFUL
Pls turn me off
Page 56

16. Turn off your FX deFormer, and turn it on again. Your FX deFormer has now been updated.
If your FX deFormer any where in the process reads:
Something has went wrong somewhere. If it does this repeatedly, your MIDI cable might be bad, or
your MIDI interface might not be stable enough to perform an update.
CHECKSUM ERROR!
Page 57

Xmit OS
If you want to keep a backup of your FX deFormer’s firmware, before you update it, you can use
this function. Connect a MIDI device that is capable of recording .syx files (Like a pc with MIDIOX installed), and hold “Dec”, while pushing “Play/Enter” to activate.
Page 58

MIDI Implementation
Notes on/off
It is possible to play back the selected sampling from a MIDI keyboard connected to FX deFormer’s
MIDI in. The accepted notes are from C#2 (note number 37) and 2 and a half octave up, with the
original sample pitch being played back at C4.
This receiving of notes, will always happen on the common midi channel, set in the “Setup”
section.
MIDI controllers (MIDI CC’s)
MIDI controllers 1 to 6 are received and used, if they are assigned as modulation sources to any
parameters.
MIDI controllers 1 to 3 are transmitted, when turning the 3 edit knobs, on the Preset Select screen,
or on any of the edit group select pages.
They are always transmitted and received on the common midi channel, set in the “Setup” section.
MIDI clock, start, continue and stop
Are received if the “Sync” parameter in the “Setup” section is set to “Ext”, and transmitted if the
“Xmit” parameter is set to “On”. Unlike many other MIDI devices, FX deFormer will re-transmit a
clock coming from an external device, if Xmit is on.
When receiving these messages, the internal sequencer will sync to the clock, and start or stop.
Program change
are received on the MIDI channel selected on the Setup page. Note, that it is only possible to select
128 presets via MIDI program change. To select between banks A to D, E to H, I to L or banks L to
P, you must use bank change.
Bank change
(controller number 32) are received on the MIDI channel selected on the MIDI edit pages. A value
of 0 will select preset banks A to D. A value of 1 will select preset banks E to H. A value of 2 will
select preset banks I to L. A value of 3 will select preset banks L to P. All other values will be
ignored. A bank change must be followed by a program change, to become effective.
Page 59

Effect Bypass – MIDI CC 14
If FX deFormer receives a MIDI CC 14, with a value below 64, it will bypass distortion, filter and
granular effect. If it receives the value 64 or above, it wil active these effects.
Page 60

Written by
Flemming Christensen
”Gotharman”
2015
www.gotharman.dk
 Loading...