

Page 1
Gotharman’s deMOON
User Manual
Page 2

2
Index
Main Features 3
What Is The deMOON 4
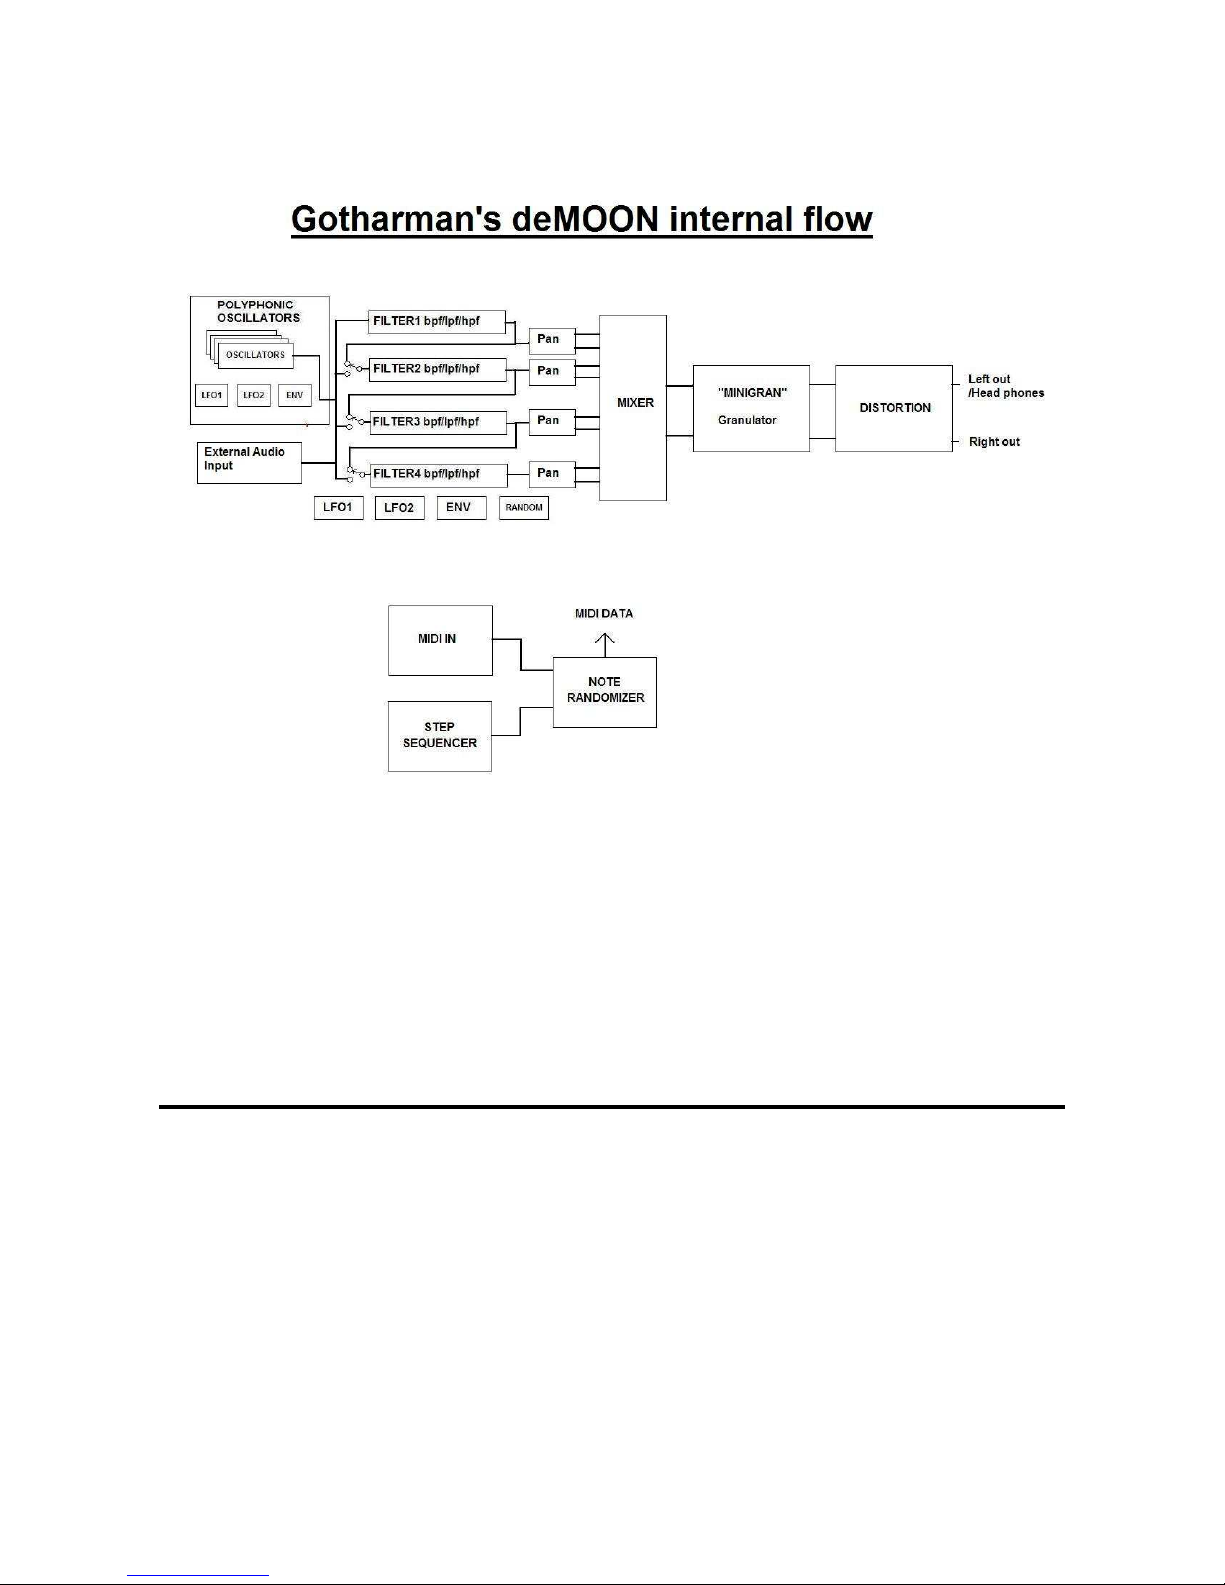
deMOON’s internal flow 5
deMOON front 6
deMOON back 8
How To Get Around On The deMOON 9
The Pattern/Sound select page 10
The Edit pages 11
Overview Of The Edit Group Pages 12
Explanation Of The Edit Pages 13
Sequencer 13
Note Randomizer 16
Oscillators 17
Filters 23
MiniGran 30
Distortion 32
Midi 33
Save Pattern 34
deMOON MIDI implementation 35
Page 3

3
Main Features
• 4-note polyphonic Oscillators with continuously variable waveforms, wave-shape modulation,
fm and pwm which works on all waveforms.
• 4 high quality unique sounding analog-modelled bpf/lpf/hpf filters.
• Granulator effect.
• 5 distortion types.
• 4 LFO’s with continuously variable waveforms, waveshape modulation and rate modulation.
• 2 envelopes.
• Filter random generator.
• Various control sources for every parameter.
• Note randomizer.
• 32-step step sequencer which is MIDI-syncable, has one note track, one velocity track and one
controller track, has realtime transpose, and a keyboard (arpeggiator) mode, in which, you can
gate and transpose the sequence via a connected MIDI-keyboard.
• Storage of 128 sounds and sequences in eeproms. No need to worry about changing back-up
batteries.
• Direct MIDI-control of most parameters.
• Boxed small and compact – easily portable.
Page 4

4
What is the deMOON?
The deMOON are a 4-note polyphonic virtual analogue filterbank synthesizer build on the latest
DSP technology. That it’s a filterbank synthesizer means, that instead of having only one or two
filters to treat the sound, like most synthesizers, it has four filters forming a bank. A filter are an
excellent tool for recreating the reflections that comes from an acoustic box, like a violin box or the
human mouth, but having only one filter limits the number of possible reflection emulations a lot.
Having four fully tweakable good-sounding filters, like on the deMOON, expands the creational
possibilities and the possibility to recreate acoustic instruments a lot.
Combine the filterbank with the same high-quality oscillators, a wicked granulator effect, a
distortion effect, four LFO’s and endless routing possibilities (the oscillators can also be selected as
modulators) and you got the deMOON’s strong sound engine.
Since it is small and very portable, a step-sequencer and a headphone output was added, so you can
let your creativity run loose with it everywhere. It’s even possible to power-supply it from a
standard 9V battery (a special cable is needed).
At top of it all a note-randomizer, that makes sequences unmechanical, was also added.
All of this is stuffed into a small and sturdy metal-box.
Page 5
5
Page 6
6
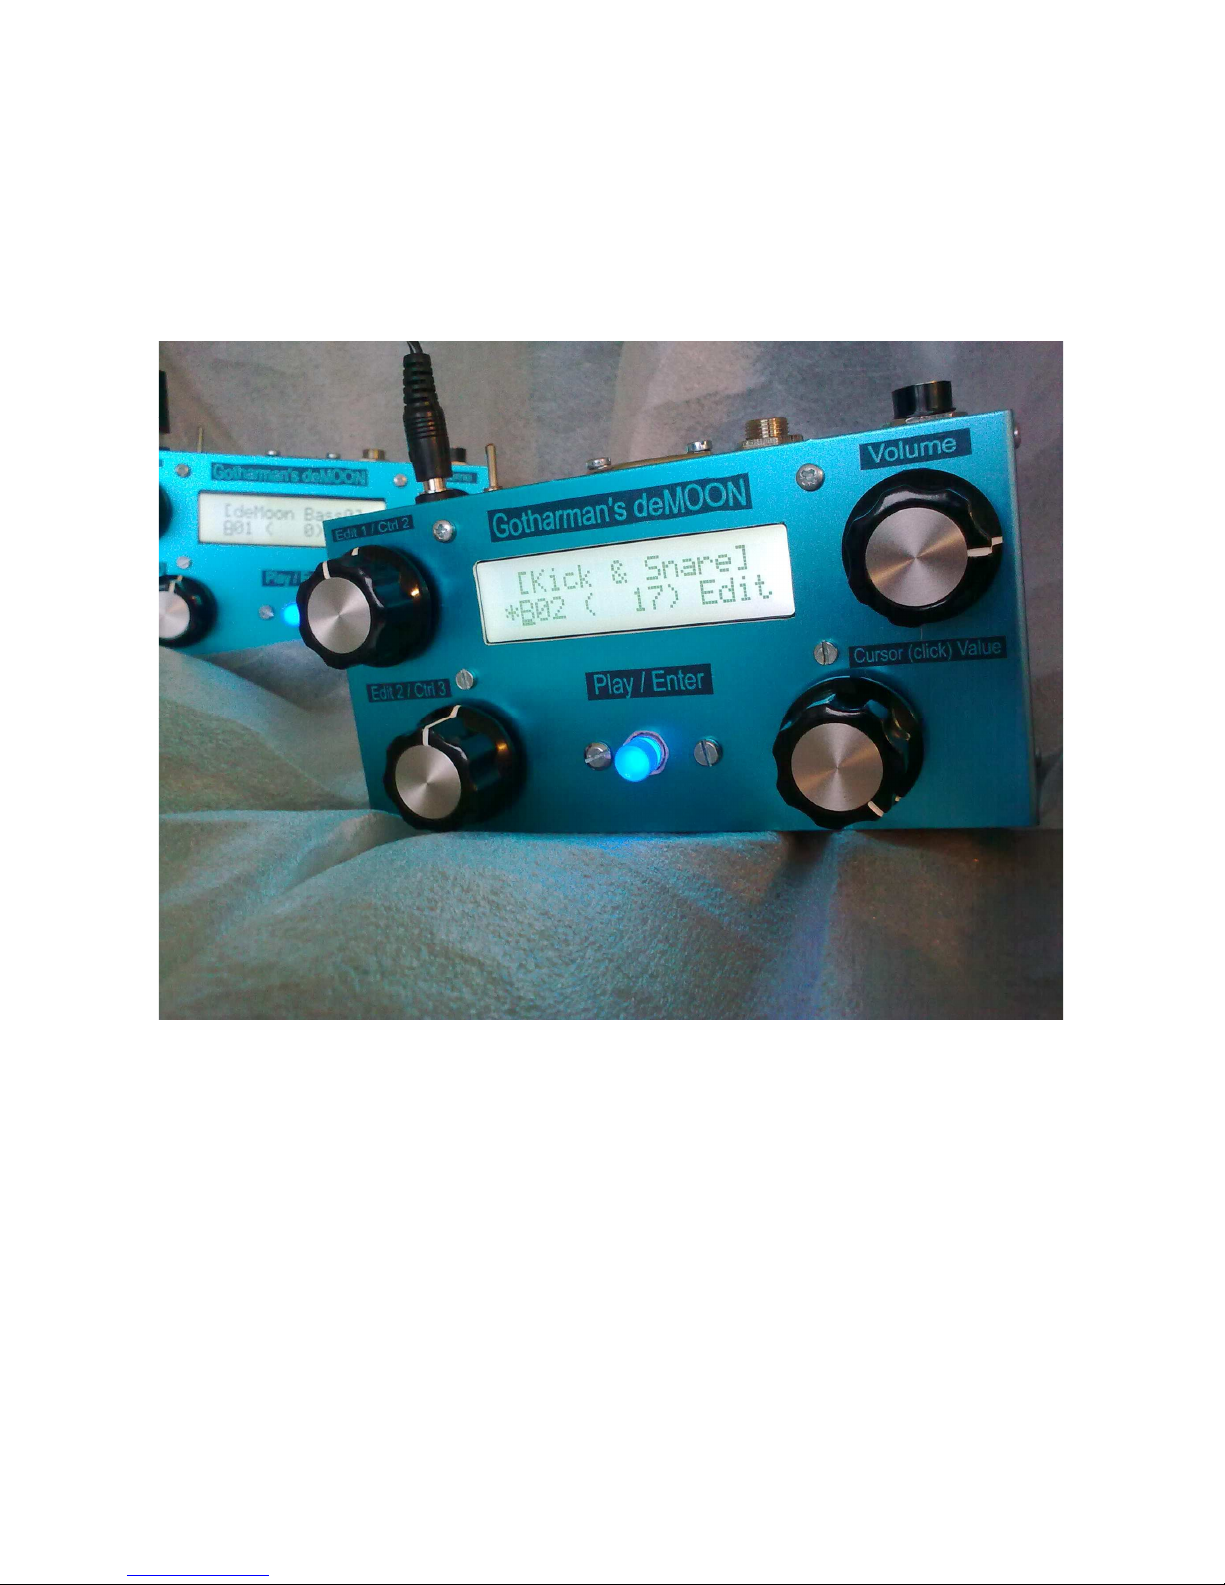
DeMOON front
Edit1 / Ctrl 2: When on the pattern select screen (the screen showing on the picture) and on the edit
page select screen, this knob transmits midi-controller 2 internally, and tweaks all
parameters, which has midi-controller 2 selected as modulation source.
When on a parameter edit screen, this knob adjusts the parameter showing at the left
of the screen.
Edit2 / Ctrl 3: When on the pattern select screen (the screen showing on the picture) and on the edit
page select screen, this knob transmits midi-controller 3 internally, and tweaks all
parameters, which has midi-controller 3 selected as modulation source.
When on a parameter edit screen, this knob adjusts the parameter showing at the
middle of the screen.
Page 7

7
Play / Enter: This knob starts and stops the internal step sequencer. It also works as a midi note on
indicator – every time a midi note on, on the selected midi-channel, are received it
will light up.
When you select a new pattern, change the controller number for the sequencer
controller track or save a pattern, it will start blinking, and you will have to push it to
confirm.
Cursor (click) value: This knob navigates around, changes pattern, and changes various switch
functions on the parameter edit screens.
If the cursor is blinking, turning this knob will move the cursor. Pushing it will stop
the cursor from blinking, to change a value, or entering another screen.
If the cursor is not blinking, turning this knob, will change the value of the parameter,
where the cusor are located. Pushing it will get the cursor blinking to move it, or it
will enter another screen.
Volume: Changes the output volume on the stereo outputs.
Page 8
8
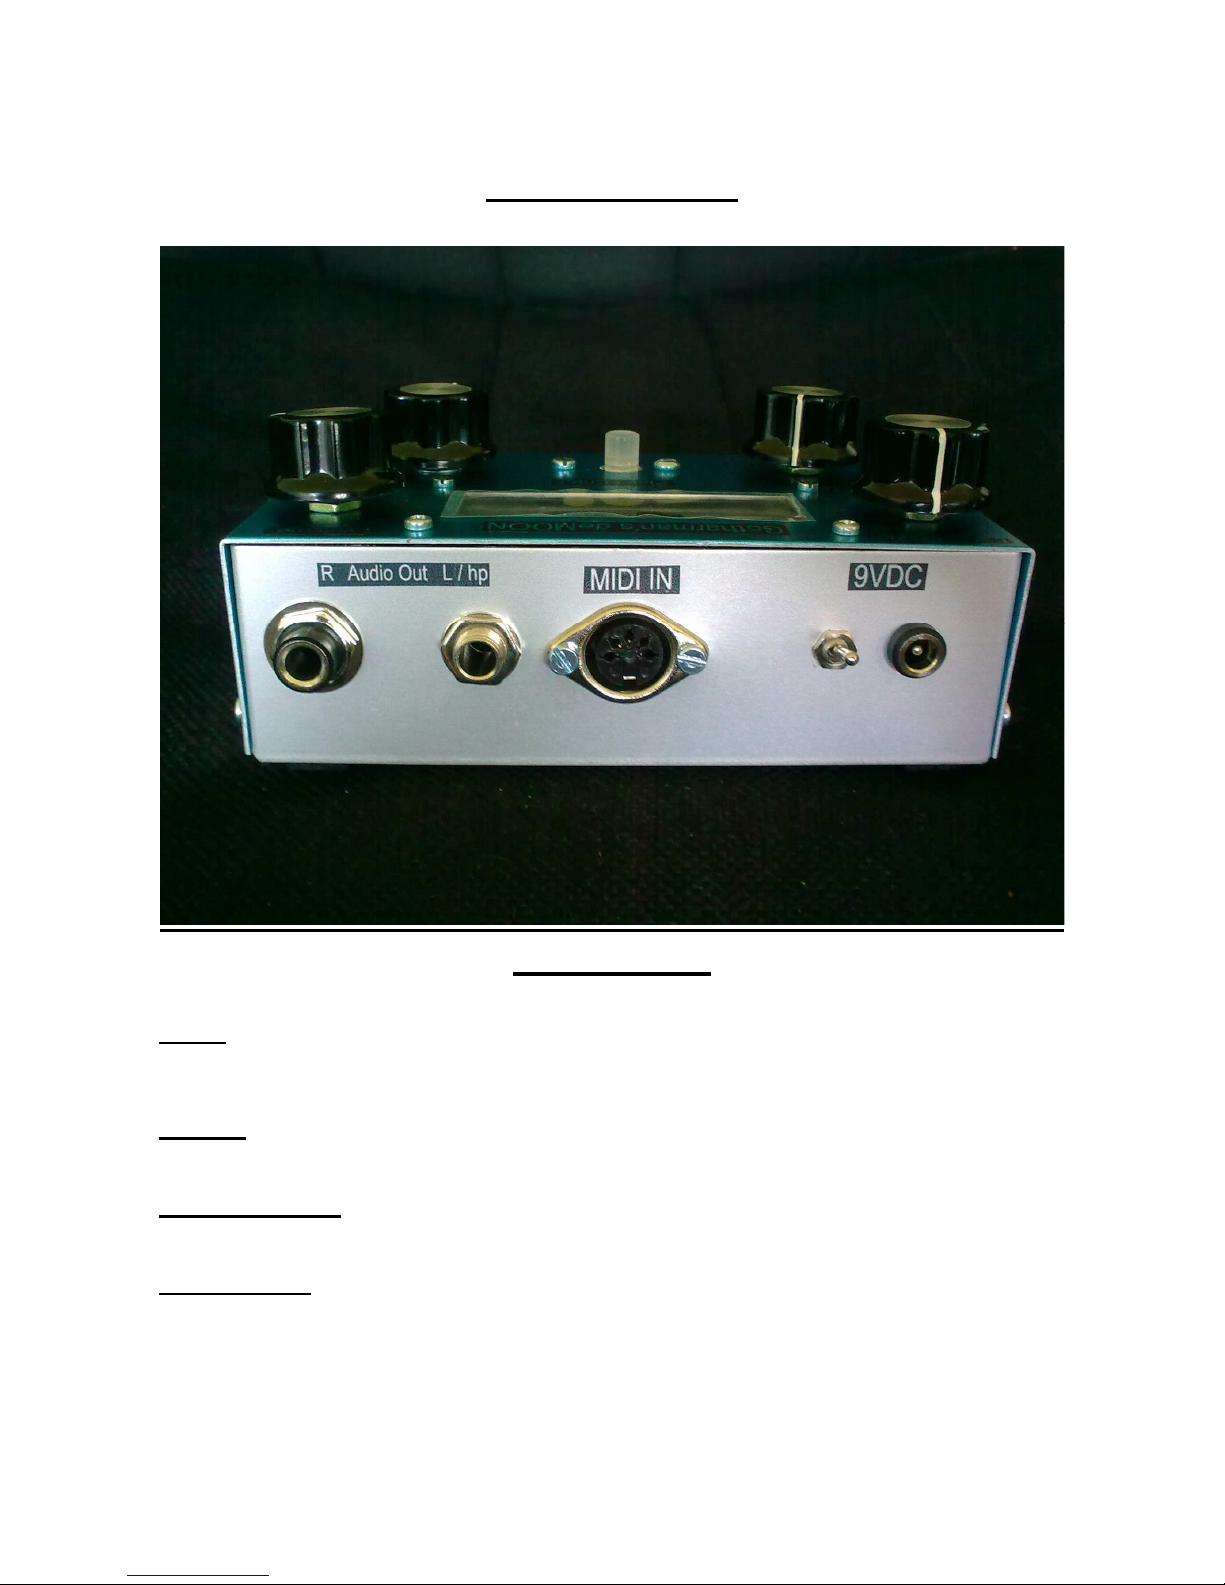
DeMOON back
Connections
9VDC: Connect the supplied power adaptor to the socket. The switch beside it are the power on/off
switch.
MIDI in: Connect this to the MIDI out of a MIDI transmitting device (MIDI keyboard,
sequencer, computer or whatever).
Output L/hp jack: This is the left line output, and needs to be amplified. Connect it to an amplifier
or a mixer. It also doubles as a stereo headphone jack.
Output R jack: This is the right line output, and needs to be amplified. Connect it to an amplifier
or a mixer. LEAVE THIS UNCONNECTED IF YOU CONNECT HEADPHONES
TO THE L/HP JACK.
Page 9

9
How to get around on the DeMOON
Some main rules: If the cursor is blinking, you can move it by turning the cursor(click)value
encoder.
If the cursor is not blinking, you can change the value of the parameter the cursor are located below,
by turning the cursor(click)value encoder.
By pushing the cursor(click)value encoder, you change the cursor from blinking to not-blinking and
vice versa.
Page 10
10
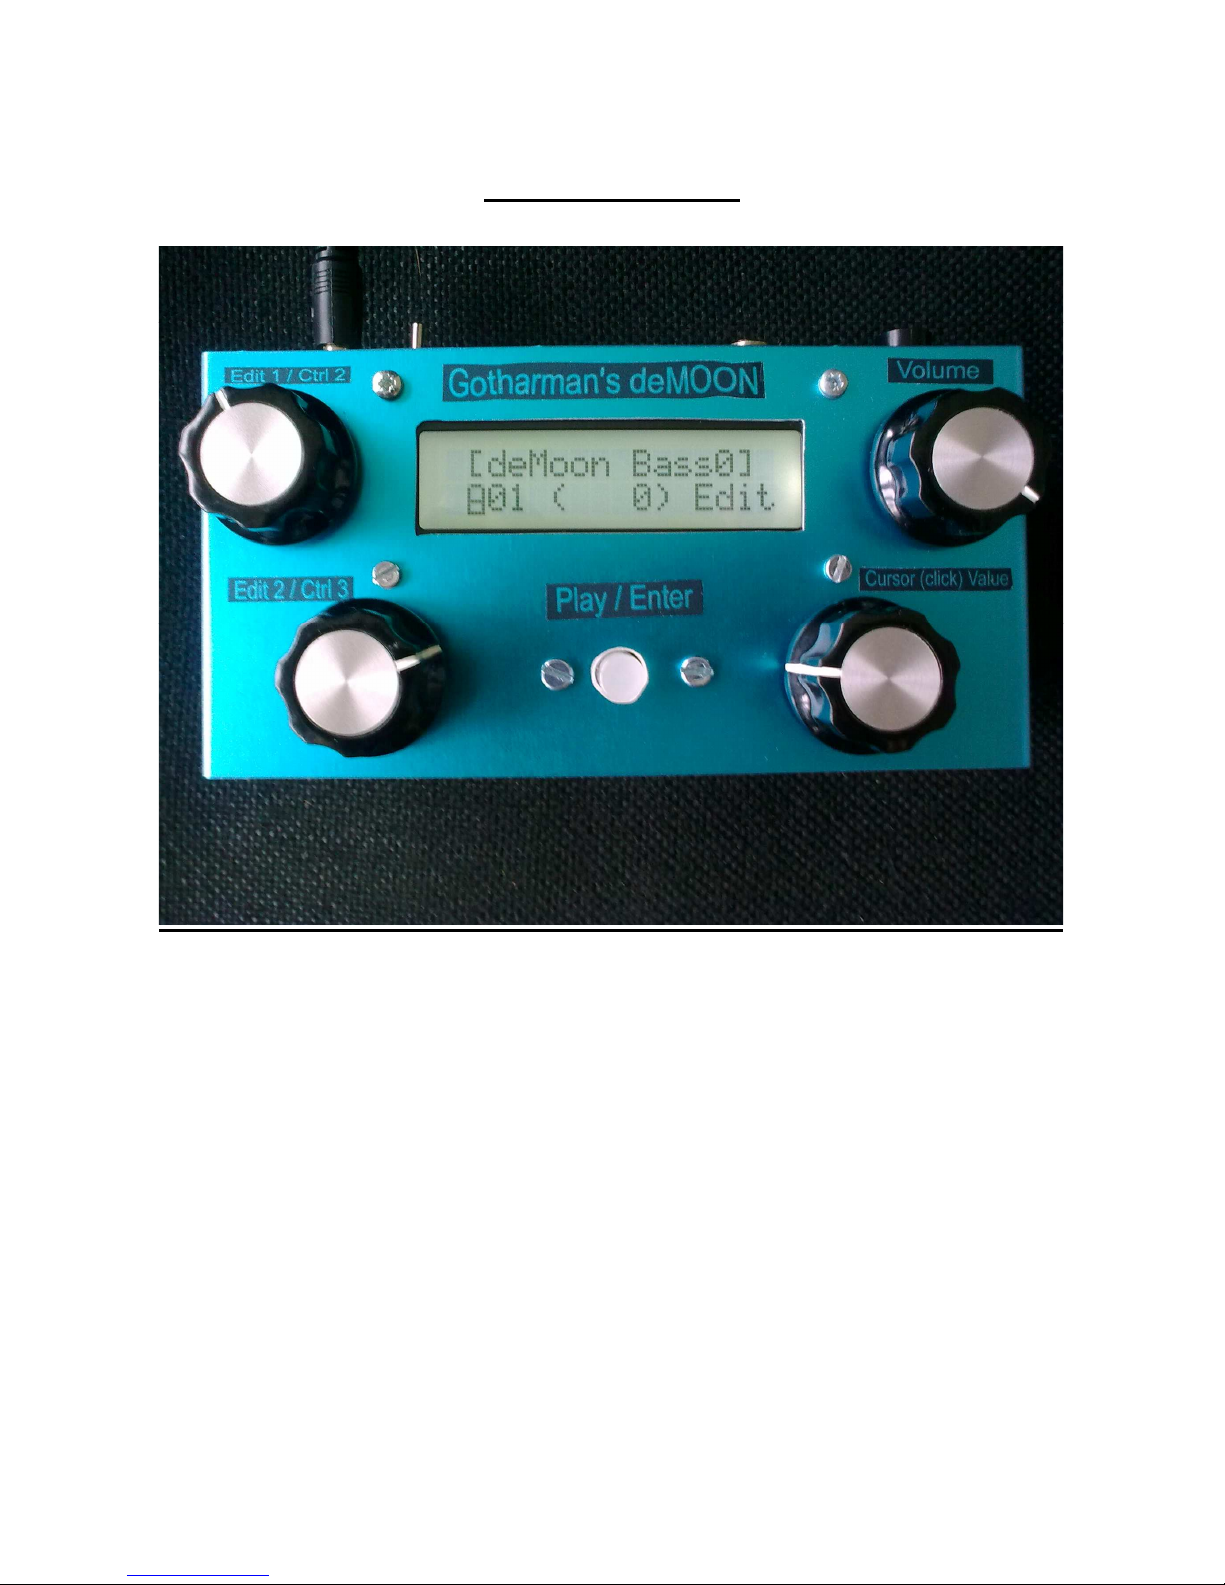
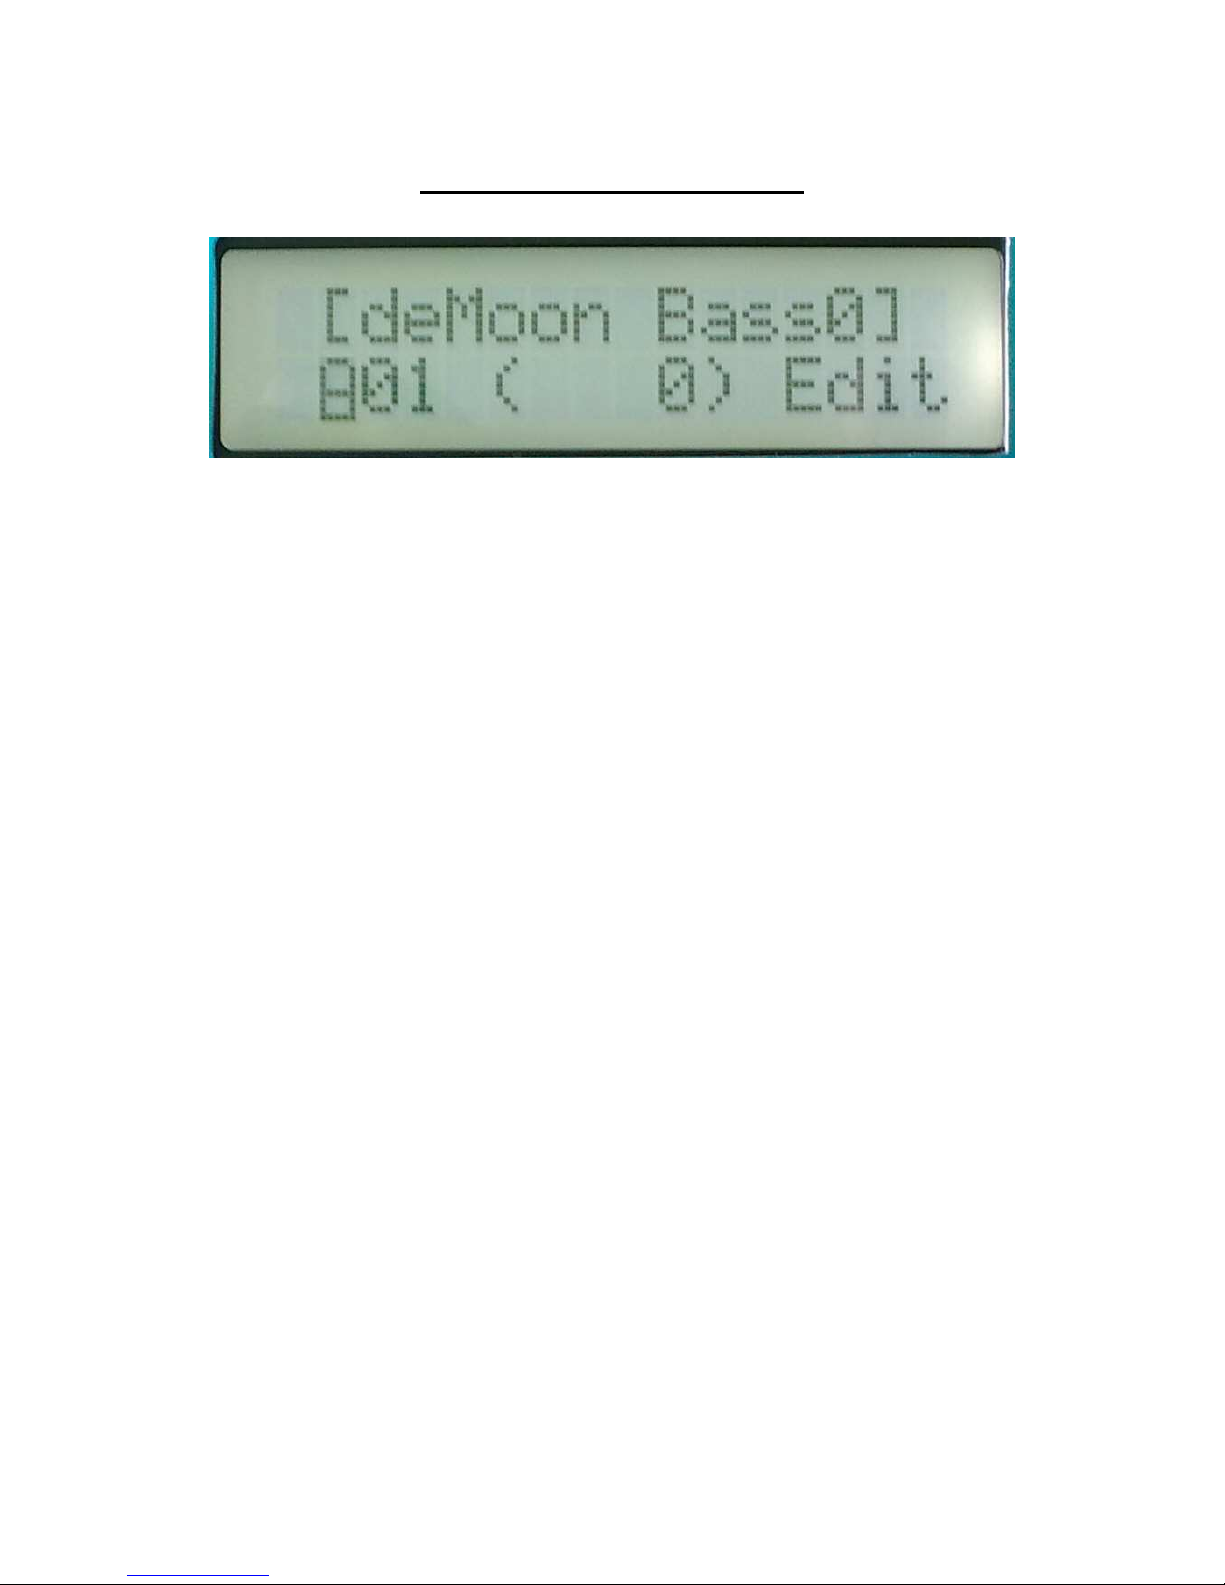
The pattern/sound select page
This is the deMOON main page. Every time you turn on your deMOON, it will for a short while
write: ”Gotharman’s deMoon”, and right after that, it will go to this screen.
On the top of the display it writes the name of the selected pattern/sound. It remembers what pattern
was selected, when it was turned off, and goes to that pattern when it is turned on again.
On the bottom of the display it writes the selected pattern bank and number. The deMOON has
eight banks (A-H) with each 16 sounds (128 in all). The number shown in paranthes, are the midi
program change number you will have to transmit to the deMOON, to select this pattern, from an
external midi-device.
To change pattern: If the cursor is not blinking, push the cursor(click)value encoder, to make the
cursor blink. Rotate the cursor(click)value encoder in either direction to place the cursor under the
letter, if you want to change the bank number, or the number if you want to change the pattern
number. Push the cursor(click)value encoder, so the cursor is not blinking. Rotate the
cursor(click)value encoder to select the pattern you want. It will write the pattern name on the top of
the display. The play/enter knob will now start to blink. Push the play/enter knob to confirm change
to the selected pattern.
Page 11
11
The Edit pages
NOTICE: The edits you do, are not automatically stored in memory. If you would like to keep your
creation, you wil have to SAVE the pattern. How to do that, are explained later in this section.
How to enter the edit pages from the pattern select page:
If the cursor is not blinking, push the cursor(click)value encoder, so the cursor is blinking. Rotate
the cursor(click)value encoder until the cursor is located under ”Edit”. Push the cursor(click)value
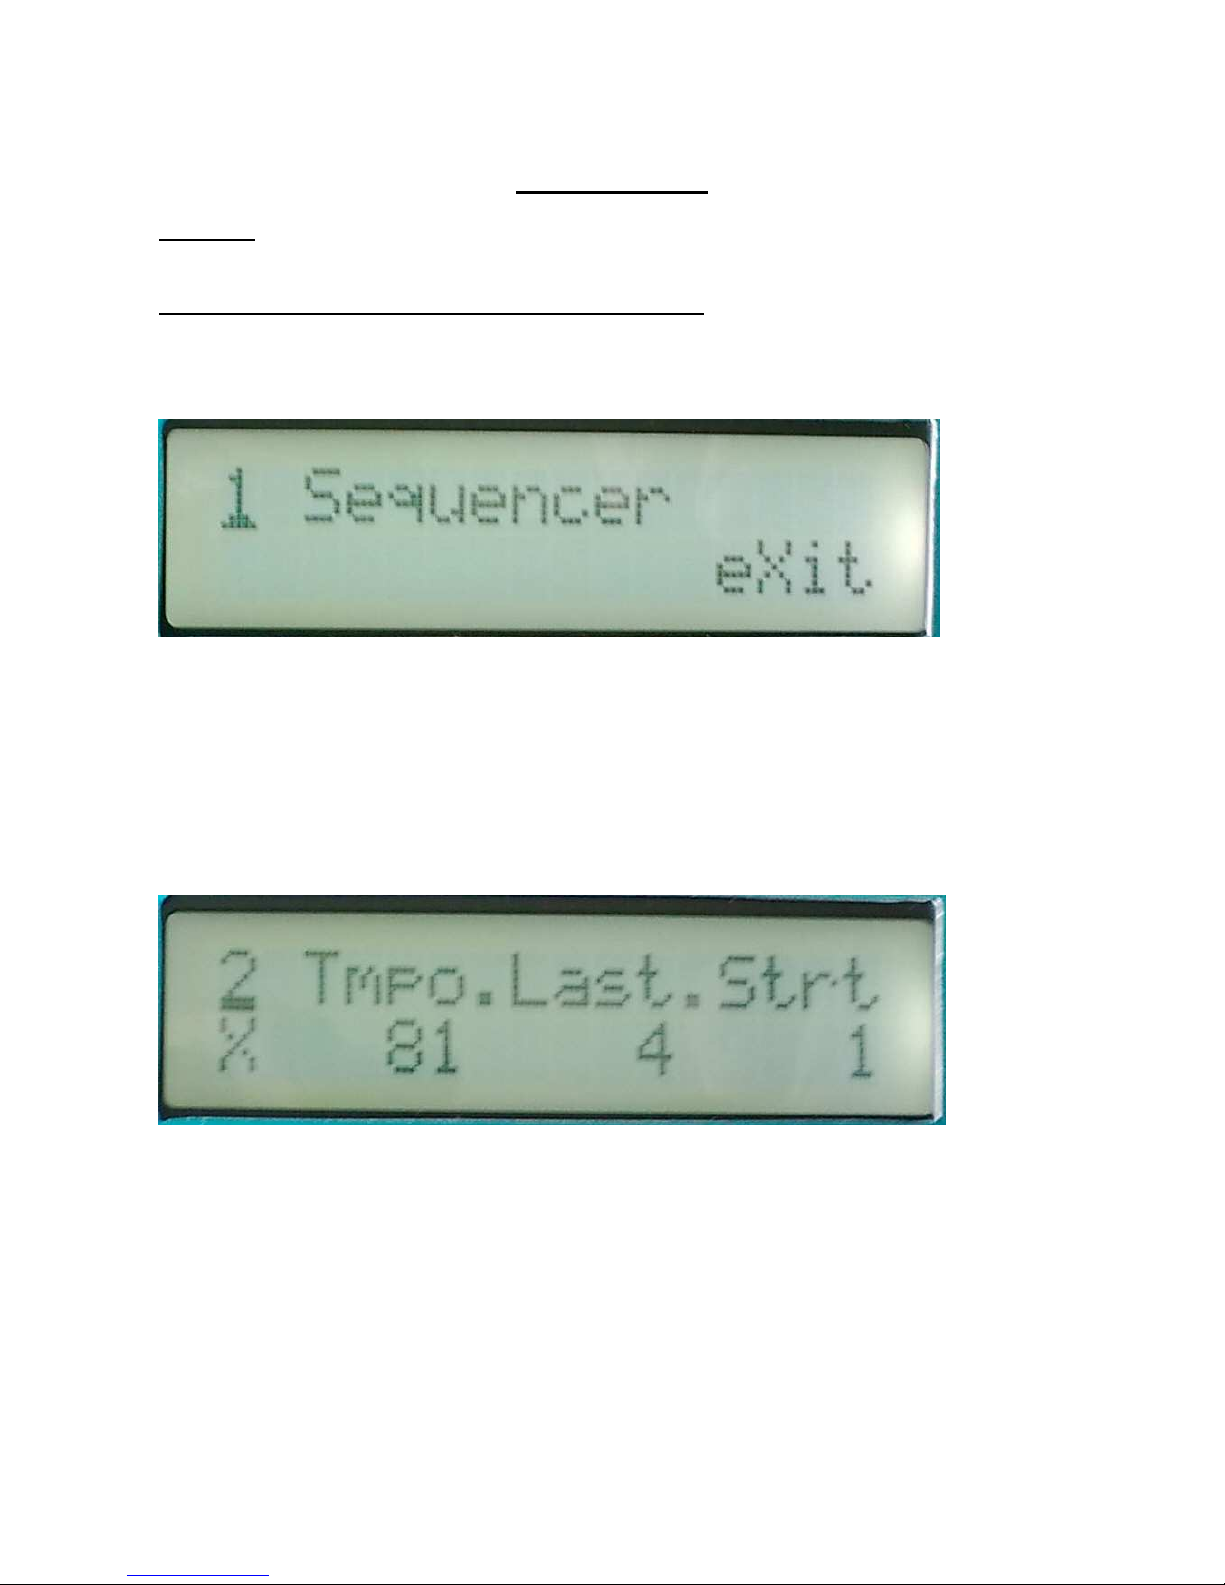
encoder. Now this screen should appear:
and the cursor are blinking. If you want to exit back to the pattern/sound select screen, rotate the
cursor(click)value encoder so the cusor locates under eXit, and push it.
If you, on the other hand, wants to start editing some sounds and/or sequences, make sure that the
cursor is located under the number, and push the cursor(click)value encoder. Now the cursor will
stop blinking, and by rotating the cursor(click)value encoder, you can now select among various
edit pages. Pushing the cursor(click)value encoder again, enters the edit page.
Inside an edit page, it might look like this:
When you enters an edit page, the cursor are blinking. By placing the cursor under the number in
the upper left corner of the display, and pushing the cursor(click)value encoder you can select
among various edit pages in the selected edit group. By placing the cursor under the ”X” and
pushing the cursor(click)value encoder, you will exit to the edit page group select page.
The two parameters shown in the left and in the middle of the display are changed by rotating the
edit1 and edit2 knobs. The parameter to the right is changed by moving the cursor to it, and use the
cursor(click)value encoder.
Page 12
12
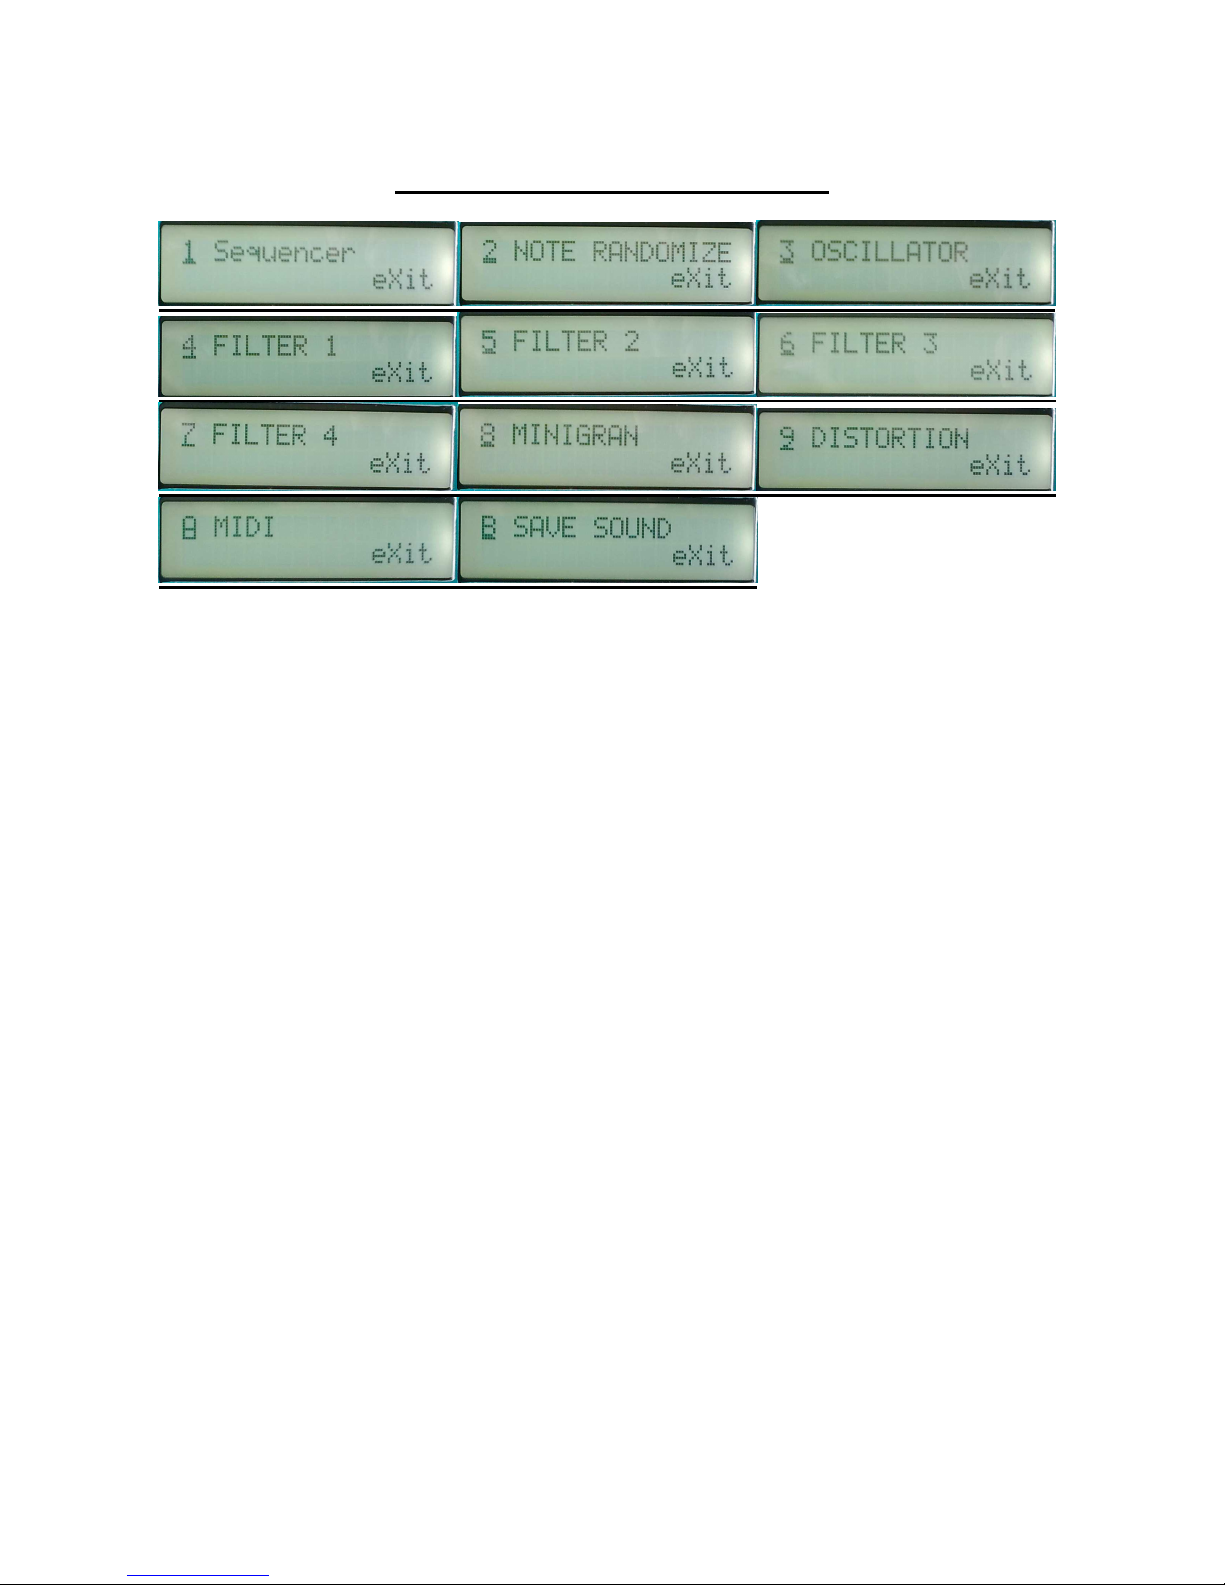
Overview of the edit group pages:
Page 13

13
Explanation of the edit pages
The Sequencer pages
The deMOON sequencer are a one-track monophonic type with a maximum of 32 steps. It has
separate tracks for note, velocity and controller. Tracks are "recorded" by entering values for each
step. It can be controlled from an external midi-keyboard in various ways.
All parameters in both
the sequencer and synth section can be changed, even while the sequencer is running.
Push the cursor(click)value encoder to enter this page:
Edit 1 – Transpose: Transposes the entire sequence in semi-tones in real-time. This can also be
done from a midi-keyboard (explained later).
Edit 2 – Resolution: Adjusts the sequencer resolution. Choices are: 1/8, 1/16 or 1/32.
Page 14

14
Edit 1 – Tempo: Adjusts the tempo of the sequence, unless sync in the midi section is set to ”ext”.
Edit 2 – Last Step: Sets the number steps the sequencer will run thru. Value can be from 1 to 32.
Encoder – Start Step: Selects at what step the sequencer will start, when you hit the Play/enter
knob, or jumps from another sequence to this one.
Edit 2 – Key transpose: If on, received midi note-on’s will transpose the entire sequence in semitones in real-time.
Encoder – Key trigger: Selectable modes:
-Off: The sequencer are in normal mode. When you hit the Play/Enter
knob, it starts running, and when you hit it again, it stops.
-Gate: When you hit the Play/Enter knob, the sequencer starts running,
but you can’t hear it. A midi note-on from an external midi device (on
deMOON’s midi ch) will gate the sequencer, and cause it to output the
track data.
-Rgat: Same as gate, except that every time a midi note-on are received,
the sequence will reset to the start step.
-Key: Every time a midi note-on are received, the sequencer advance to
the next step, and plays that step, until a note-off are received. This
mode ignores the tempo and clock int/ext settings.
Page 15

15
Edit 1 – Note value: Adjusts the note value for the selected step.
Edit 2 – Velocity value: Adjusts the velocity value for the selected step. Value: 0-127. 0: Step off,
1: Hold previous step.
Encoder: Selects step 1-32.
Edit 1 – controller number: Selects the controller number (01-03) you want the controller track to
put out. 00: Controller track off. After you have selected the controller number, the Play/Enter knob
starts to blink, and you will have to push it, to confirm.
Edit 2 – Value: Adjusts the controller value for the selected step.
Encoder: Selects step 1-32.
Page 16

16
The Note Randomizer page
The note randomizer treats incoming MIDI note on and off's and notes generated by the internal
sequencer (if turned on). When it receives note data, it takes a look at a user adjustable probability
parameter, and randomly decides if it will play that note or not. If it decides to play the note, it will
have a look at a user adjustable random velocity parameter, and if this is higher than zero, it will
randomize the note velocity value with the adjusted amount. This effect is very useful for creating
variations in repeating patterns.
Edit 1 – Probability: At high settings more notes will be passed thru, at lower settings less notes
will be passed thru. At 255 all notes will get thru use this setting if you only wants the velocity to be
randomized. At 0 no notes will get thru.
Edit 2 – Velocity amount: Adjusts how much velocity will be randomized.
Encoder: Turns the note randomizer on and off.
Page 17

17
The Oscillator Pages
The deMOON oscillator waveforms are continuously variable from triangle to saw to square or
from triangle to saw to noise. The wave-shaping can be modulated from all sources, including the
oscillator itself. All waveforms can be pulsewidth and pitch-modulated. The noise waveform can be
pitched or unpitched. Unison mode with detune are availible. The oscillator section has it's own two
LFO's and one envelope. The LFO waveforms are continuously variable from triangle to saw to
square to pulse. The LFO's can be both wave and rate-modulated.
On the output of each oscillator are an amplifier. This amplifier is always controlled by the
oscillator envelope, so the oscillator envelope always controls the rise and fall of the output.
Edit 1 – Oscillator wave shape: Value 0 to 255, 0: triangle, 128: saw, 255: Square. If noise (on
oscillator page 5) are any other value than off, 255 will be: noise instead of square.
Edit 2 – Oscillator wave shape modulation: Value –128 to +127. A negative value inverts the
modulator.
Encoder - Oscillator wave shape modulation source: Value: lfo1, lfo2, env(elope), velo(city),
osc(illator), ctr1, ctr2, ctr3.
Page 18

18
Encoder – Wave shape modulation level source: Selects a source, that modulates the level of the
wave shape modulation. Choices are: manu(al) – nothing modulates the modulation level, lfo1, lfo2,
env(elope), velo(city), osc(illator), ctr1, ctr2.
Edit 1 – Waveform pulse width: Value 0 to 255.
Edit 2 – Pulse width modulation: Value –128 to +127. A negative value inverts the modulator.
Encoder – Pulse width modulation source: Value: lfo1, lfo2, env(elope), velo(city), osc(illator),
ctr1, ctr2, ctr3.
Encoder – Pulse width modulation level source: Selects a source, that modulates the level of the
pulse width modulation. Choices are: manu(al) – nothing modulates the modulation level, lfo1, lfo2,
env(elope), velo(city), osc(illator), ctr1, ctr2.
Page 19

19
Edit 1 – tune: Tunes the oscillatots in semitone steps.
Edit 2 – Bend: Adjusts how much incoming midi pitch bend messages will affect the oscillator
pitch. From 0 to 255 (about 12 semitones).
Encoder – Noise: Off: The waveshape parameter on oscillator page 1 will morph between trianglesaw-square. On: The waveshape parameter on oscillator page 1 will morph between triangle-sawnoise. Pitc: The waveshape parameter on oscillator page 1 will morph between triangle-saw-pitched
noise.
Edit 1 – Fine tune/unison detune: If key mode: poly or mono it fine-tunes the oscillators. If key
mode: unison this parameter adjusts the unison detune.
Edit 2 – Pitch modulation: Value –128 to +127. A negative value inverts the modulator.
Encoder – Pitch modulation source: Value: lfo1, lfo2, env(elope), velo(city), osc(illator), ctr1,
ctr2, ctr3.
Page 20

20
Encoder – Pitch modulation level source: Selects a source, that modulates the level of the pitch
modulation. Choices are: manu(al) – nothing modulates the modulation level, lfo1, lfo2, env(elope),
velo(city), osc(illator), ctr1, ctr2.
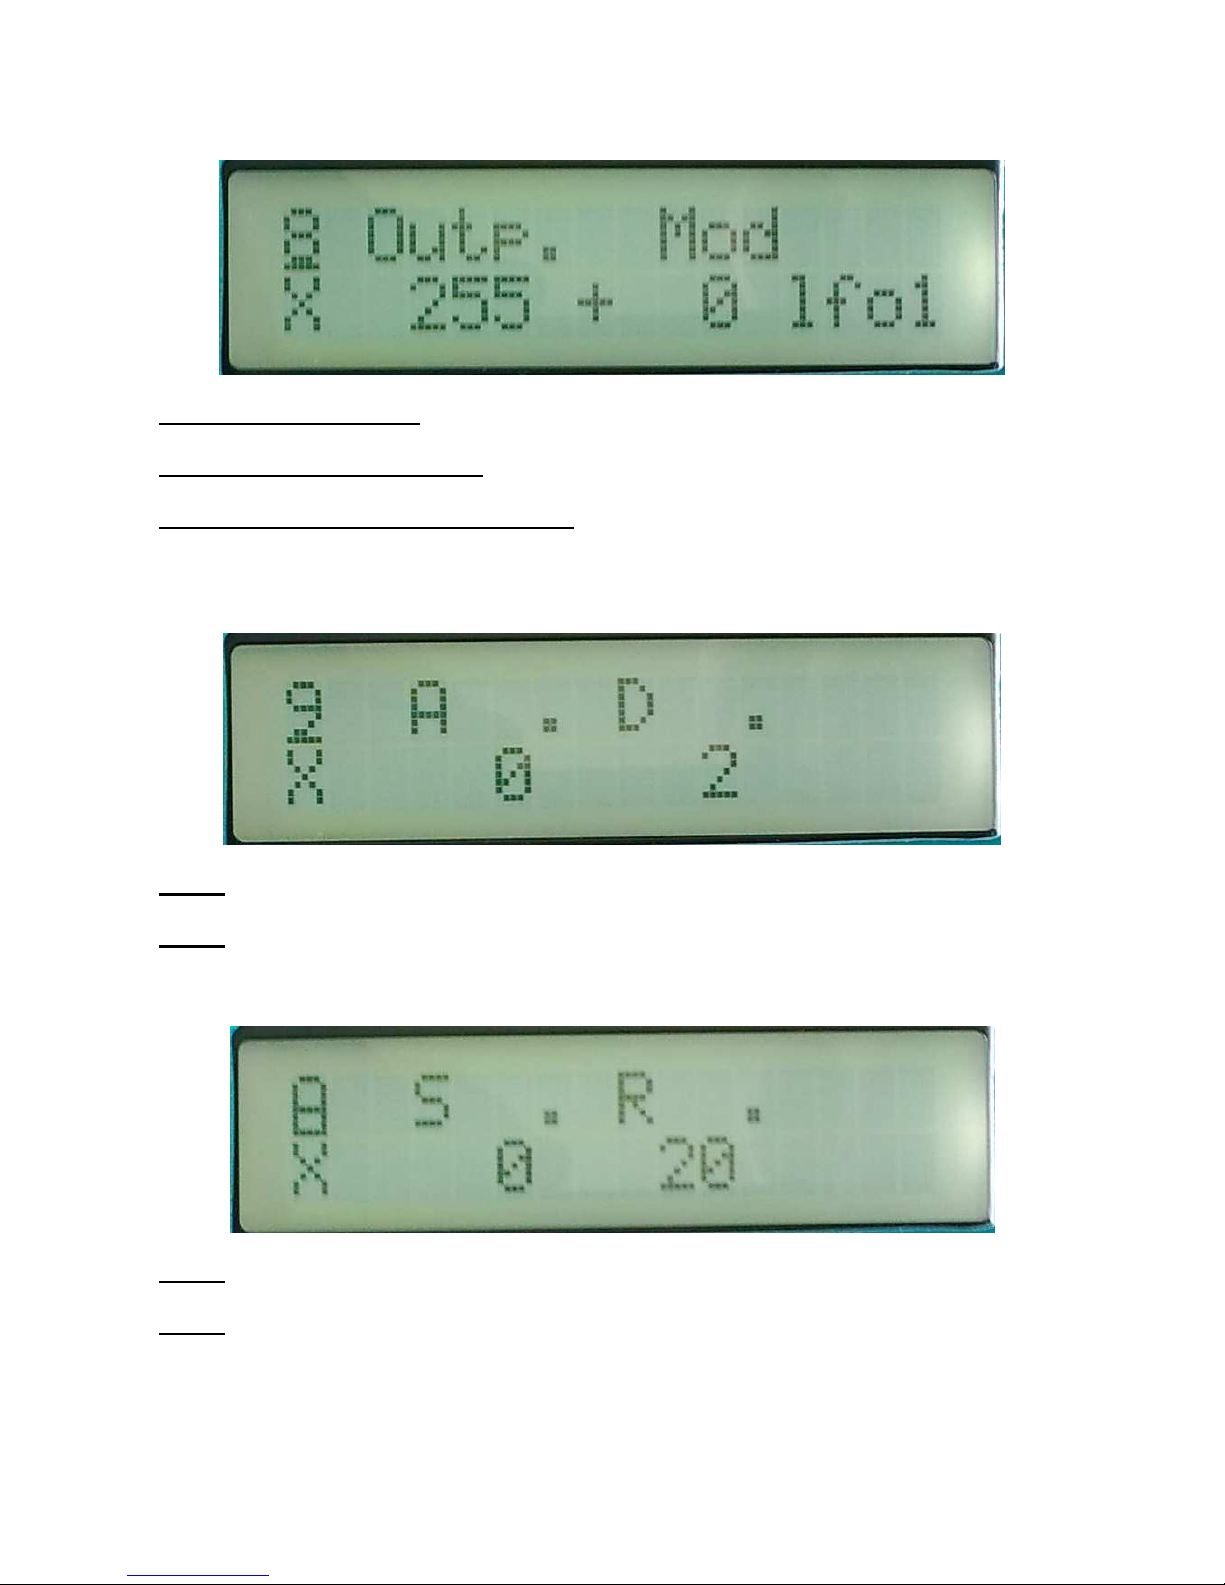
Edit 1: Oscillator output envelope attack time.
Edit 2: Oscillator output envelope decay time.
Encoder: Oscillator output envelope velocity on/off.
Edit 1: Oscillator output envelope sustain level.
Edit 2: Oscillator output envelope release time.
Encoder: Oscillators keyboard mode. Choices are: Mono, Poly, Unison.
Page 21

21
Edit 1: Oscillator LFO 1 frequency.
Edit 2: Oscillator LFO 1 frequency modulation. A negative value inverts the modulator.
Encoder: Oscillator LFO 1 frequency modulation source.Value: lfo1, lfo2, env(elope), velo(city),
osc(illator), ctr1, ctr2, ctr3.
Edit 1: Oscillator LFO 1 waveshape. Value 0-255. 0: triangle, 64: saw, 128: square, 255: pulse.
Edit 2: Oscillator LFO 1 waveshape modulation. A negative value inverts the modulator.
Encoder: Oscillator LFO 1 waveshape modulation source.Value: lfo1, lfo2, env(elope), velo(city),
osc(illator), ctr1, ctr2, ctr3.
Page 22

22
Edit 1: Oscillator LFO 2 frequency.
Edit 2: Oscillator LFO 2 frequency modulation. A negative value inverts the modulator.
Encoder: Oscillator LFO 2 frequency modulation source.Value: lfo1, lfo2, env(elope), velo(city),
osc(illator), ctr1, ctr2, ctr3.
Edit 1: Oscillator LFO 2 waveshape. Value 0-255. 0: triangle, 64: saw, 128: square, 255: pulse.
Edit 2: Oscillator LFO 2 waveshape modulation. A negative value inverts the modulator.
Encoder: Oscillator LFO 2 waveshape modulation source.Value: lfo1, lfo2, env(elope), velo(city),
osc(illator), ctr1, ctr2, ctr3.
Page 23

23
Filter 1-4 edit pages
The deMOON has four filters which are indepenently programable and each can be routed in serial
or parallel to the others. Each filter can be set in lo-pass, band-pass or hi-pass mode. Cut-off,
resonance and output levels can be modulated, and each filters output can be panned separately. The
filter-section has it's own two LFO's , one envelope and a random-generator, that can be trigged
from LFO1, LFO2 or midi note-on's.
Even though the envelope, LFO’s and random-generator can be accessed in all 4 filters, it does not
have separate modulators for each filter. It is the same set of modulators you access in every filter.
Edit1 – Oscillators to filters input level: This adjusts the input of all filters that are in parallel
connection mode at the same time. If this is set too high, digital clipping will occur.
Edit2 – External Audio input to filters input level: This adjusts the input of all filters that are in
parallel connection mode at the same time. If this is set too high, digital clipping will occur.
NOTICE: In order to hear the sound from the external input, the deMOON’s output envelopes
must be trigged either by an external midi note-on message or by the internal sequencer.
Page 24

24
Edit 1 – Filter type: Choices are: BPF: band pass mode, LPF: low pass mode, HPF: high pass
mode.
Edit 2 – Filter pan: Pans the output of the filter. –127: left, 0: center, +128: right.
Encoder – Filter connection: (this parameter does not show in filter 1) par: the filter are
connected in parallel to the other filters. The oscillators output goes straight into the filter.
Ser: The filter are in serial connection with the previous filter.
Edit 1 – Filter cutoff frequency: Value 0 to 255.
Edit 2 – Cutoff modulation 1: Value –128 to +127. A negative value inverts the modulator.
Encoder – Cutoff modulation 1 source: Value: lfo1, lfo2, random, env(elope), osc(illator),
velo(city), ctr1, ctr2.
Page 25

25
Edit 1 – Filter cutoff frequency: Value 0 to 255.
Edit 2 – Cutoff modulation 2: Value –128 to +127. A negative value inverts the modulator.
Encoder – Cutoff modulation 2 source: Value: lfo1, lfo2, random, env(elope), osc(illator),
velo(city), ctr1, ctr2.
Encoder – Cutoff modulation 2 level source: Selects a source, that modulates the level of the
pitch modulation. Choices are: manu(al) – nothing modulates the modulation level, lfo1, lfo2,
random, env(elope), osc(illator), velo(city), ctr1
Page 26

26
.
Edit 1 – Filter resonance: Value 0 to 255.
Edit 2 – Resonance modulation: Value –128 to +127. A negative value inverts the modulator.
Encoder – Resonance modulation source: Value: lfo1, lfo2, random, env(elope), osc(illator),
velo(city), ctr1, ctr2.
Edit 1 – Filter feedback: Value 0 to 255. The filter output can be feed’ed back to its input. That
makes the resonance effect sounding sharper. It is also possible to create a feedback loop from the
distortion effect output to the filter input. That is all the filters outputs running thru the granulator
and the distortion effect, feeded back to a filter input: PURE UNCONTROLLABLE CHAOS!!!
Encoder – Feedback source: Value: flt- single filter, dis- distortion output.
Page 27
27
Edit 1 – Filter output level: Value 0 to 255.
Edit 2 – Output level modulation: Value –128 to +127. A negative value inverts the modulator.
Encoder – Output level modulation source: Value: lfo1, lfo2, random, env(elope), osc(illator),
velo(city), ctr1, ctr2.
Edit 1: Filter modulation envelope attack time.
Edit 2: Filter modulation envelope decay time.
Edit 1: Filter modulation envelope sustain level.
Edit 2: Filter modulation envelope release time.
Page 28

28
Edit 1: Filters LFO 1 frequency.
Edit 2: Filters LFO 1 frequency modulation. A negative value inverts the modulator.
Encoder: Filters LFO 1 frequency modulation source. Value: lfo1, lfo2, random, env(elope),
osc(illator), velo(city), ctr1, ctr2.
Edit 1: Filters LFO 1 waveshape. Value 0-255. 0: triangle, 64: saw, 128: square, 255: pulse.
Edit 2: Filters LFO 1 waveshape modulation. A negative value inverts the modulator.
Encoder: Filters LFO 1 waveshape modulation source. Value: lfo1, lfo2, random, env(elope),
osc(illator), velo(city), ctr1, ctr2.
Page 29

29
Edit 1: Filters LFO 2 frequency.
Edit 2: Filters LFO 2 frequency modulation. A negative value inverts the modulator.
Encoder: Filters LFO 2 frequency modulation source. Value: lfo1, lfo2, random, env(elope),
osc(illator), velo(city), ctr1, ctr2.
Edit 1: Filters LFO 2 waveshape. Value 0-255. 0: triangle, 64: saw, 128: square, 255: pulse.
Edit 2: Filters LFO 2 waveshape modulation. A negative value inverts the modulator.
Encoder: Filters LFO 2 waveshape modulation source. Value: lfo1, lfo2, random, env(elope),
osc(illator), velo(city), ctr1, ctr2.
Encoder: Selects the filter random generator trigger source. Choices are: LFO1, LFO2, keyb (midi
note-on’s).
Page 30

30
The MiniGran pages
The minigran effect are a scaled down version of our deFormer's granulator effect. It cuts the input
up in small fragments, and reorder these fragments to create a totally different sounding output.
While the deFormers granulator works in sizes of 100 seconds, deMOON's minigran only works in
sizes of milliseconds, so it is not very usable for rearranging beats. It's more like that it rearranges
the waveform, and makes it sound glass/bell/voice-like or very strange.
Edit 1 – Time: Adjusts the granulator time. Higher setting makes the fragments longer, lower
settings makes the fragment shorter.
Edit 2 – Mix: The mix between the original signal from the filters and the granulated signal. Value
0-255. 0 – clean orignal signal, 255 - clean granulated signal.
Page 31

31
Edit 1 – ReOrder: Adjusts how much minigran will reorder the fragments randomly. Value 0-255.
At setting 0 it will not reorder the fragments, but repeat fragment 1 a number of times.
Edit 2 – Pitch shift: Adjusts how much minigran will randomly pitch shift the fragments. Value 0-
255. At setting 0 it will not pitch shift at all.
Page 32

32
The Distortion pages
Edit 1 – Drive: Adjusts the gain of the distortion effect.
Edit 2 – Offset: Signals below the offset level will not be distorted. Signals above the offset level
will be distorted.
Encoder – Distortion mode:
-GAIN: Not really a distortion. Just gains the sound. It is possible to gain the sound so it clips.
-VALVE: A digital model of a classic valve distortion.
-SINE: Sine shape distortion. Strange!
-FUZZ: A digital model of a classic fuzz distortion.
-XDIS: INSANE!!! Destroys everything.
Edit 1 – Output level: Adjusts the final output level of the entire sound.
Page 33

33
The MIDI pages
Edit 1 – MIDI ch: The deMOON midi channel. On the channel you select here, the deMOON will
receive midi data. It ts remembered after power off. Value 1-16.
Edit 2 – Sync: Adjusts wheteher the step-sequencer will use its internal clock source or an external
midi clock source. Values: int(ernal), ext(ernal). . It ts remembered after power off.
Page 34

34
The Save pages
Stores a complete pattern, including sound and sequence in deMOON’s
memory.
Use the Cursor(click)value encoder to select the location, where you want to save your sound, or
move it to the ”X” and push it if you regret. It will write the name of the taget location at the top of
the display or write <empty>, if no sound is previously stored in the selected location.
Push the Play/Enter knob to move to the next page:
Move the Cursor(click)value encoder to select the letters you want to change, push it to change, or
move it to the ”X” and push if you regret.
Pushing the Play/Enter knob stores the pattern and exits save mode.
Page 35

35
DeMOON MIDI-implementation
Note-on’s and Note-off’s are received on the selected midi ch by deMOON’s sound engine and
sequencer.
Pitch bend change are received on the selected midi ch by deMOON’s oscillators.
Program change are received on the selected midi ch.
Controllers 1 to 3 are received on the selected midi ch, and routed to the parameters, where these
controllers are selected as a modulation source.
Controllers 4 to 90 are received on the selected midi ch, and routed to the following parameters:
4 – Oscillator waveshape
5 – Oscillator waveshape modulation
6 - Oscillator waveshape modulation source
7 – Oscillator waveshape modulation level source
8 – Oscillator pw
9 – Oscillator pwm
10 – Oscillator pwm source
11 – Oscillator pwm level
12 – Oscillator tune
13 – Oscillator bend range
14 – Oscillator fine tune
15 – Oscillator pitch modulation
16 – Oscillator pitch modulation source
17 – Oscillator pitch modulation level source
18 – Oscillator envelope attack time
19 – Oscillator envelope decay time
20 – Oscillator envelope sustain level
21 – Oscillator envelope release time
22 – Oscillator envelope velocity
23 – Oscillator LFO 1 frequency
24 – Oscillator LFO 1 frequency modulation
25 – Oscillator LFO 1 frequency modulation source
26 – Oscillator LFO 1 waveshape
27 – Oscillator LFO 1 waveshape modulation
28 – Oscillator LFO 1 waveshape modulation source
29 – Oscillator LFO 2 frequency
30 – Oscillator LFO 2 frequency modulation
31 – Oscillator LFO 2 frequency modulation source
32 – NOT USED
33 – Oscillator LFO 2 waveshape
34 – Oscillator LFO 2 waveshape modulation
35 – Oscillator LFO 2 waveshape modulation source
Page 36

36
36 – Filters oscillator input level
37 – Filter 1 type
38 – Filter 2 type
39 – Filter 3 type
40 – Filter 4 type
41 – Filter 1 cutoff frequency
42 – Filter 2 cutoff frequency
43 – Filter 3 cutoff frequency
44 – Filter 4 cutoff frequency
45 – Filter 1 resonance
46 – Filter 2 resonance
47 – Filter 3 resonance
48 – Filter 4 resonance
49 – Filter 1 feedback level
50 – Filter 2 feedback level
51 – Filter 3 feedback level
52 – Filter 4 feedback level
53 – Filter 1 cutoff modulation 1
54 – Filter 2 cutoff modulation 1
55 – Filter 3 cutoff modulation 1
56 – Filter 4 cutoff modulation 1
57 – Filter 1 cutoff modulation 1 source
58 – Filter 2 cutoff modulation 1 source
59 – Filter 3 cutoff modulation 1 source
60 – Filter 4 cutoff modulation 1 source
61 – Filter 1 pan
62 – Filter 2 pan
63 – Filter 3 pan
64 – Filter 4 pan
65 – Filter 1 output
66 – NOT USED
67 – Filter 3 output
68 – Filter 4 output
69 – Filter 2 output
70 – NOT USED
71 – Distortion drive
72 – Minigran time
73 – Minigran Mix
74 – Filters envelope attack time
75 - Filters envelope decay time
76 - Filters envelope sustain level
77 - Filters envelope release time
78 – Filters LFO 1 frequency
79 – Filters LFO 1 frequency modulation
80 – Filters LFO 1 frequency modulation source
81 – Filters LFO 1 waveshape
82 – Filters LFO 1 waveshape modulation
83 – Filters LFO 1 waveshape modulation source
Page 37

37
84 – Filters LFO 2 frequency
85 – Filters LFO 2 frequency modulation
86 – Filters LFO 2 frequency modulation source
87 – Filters LFO 2 waveshape
88 – Filters LFO 2 waveshape modulation
89 – Filters LFO 2 waveshape modulation source
90 – Final output level
Page 38

38
COPYRIGHT GOTHARMUSIC 2009
 Loading...