

Page 1
INSTALLATION INSTRUCTIONS
LGZ Reflectors
Upon receipt, thoroughly inspect for any
freight damage which should be brought to
the attention of the delivery carrier. Compare the catalog description listed on the
packing slip with the label on the carton to
ensure that you have received the correct
merchandise.
SAVE THESE INSTRUCTIONS
New Installation
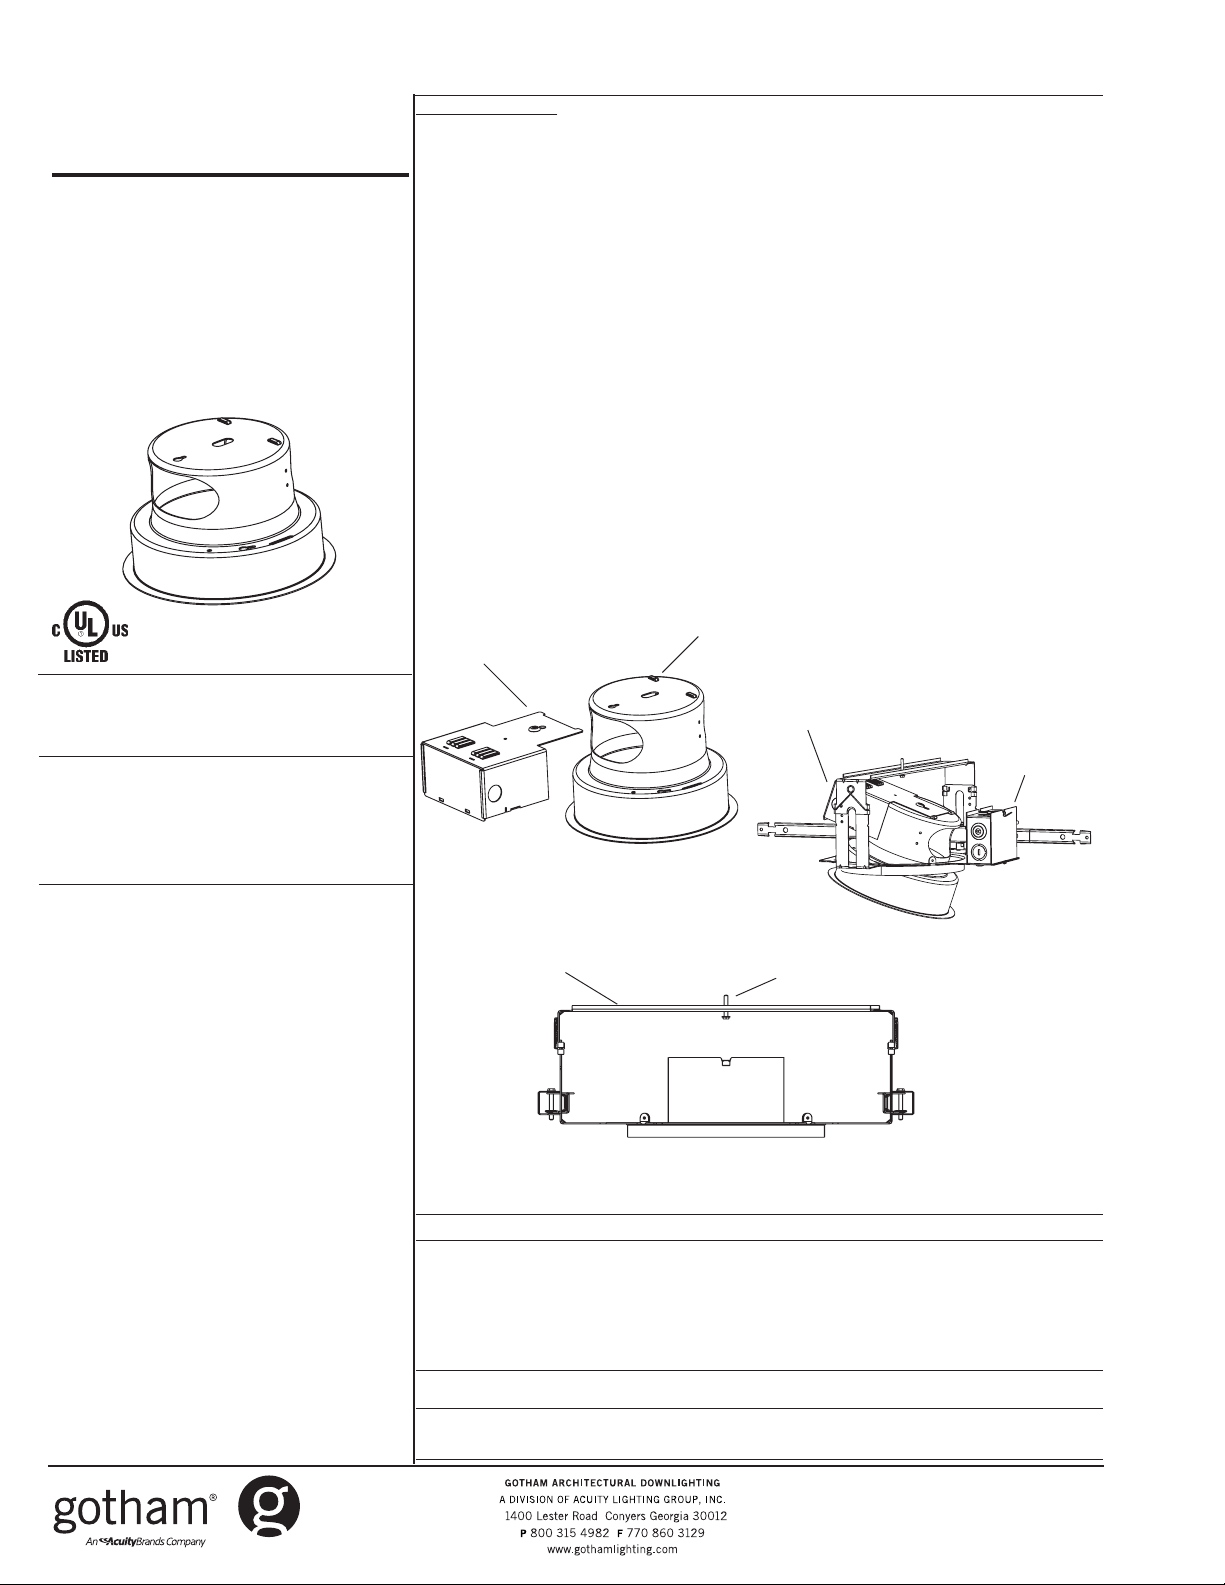
1. Remove door assembly by pulling door assembly out of reflector, compress
torsion springs and slide springs through slots in reflector.
2. Attach socket housing to top of reflector by aligning/inserting corners of socket
housing into raised tabs on top of reflector as shown in Figure 1. Align screw in
socket housing with keyhole slot in reflector, push forward and tighten screw
securely.
3. Push reflector through mounting frame opening, making sure to tilt reflector as
shown in Figure 2. Align keyhole slot in reflector with reflector retaining screw
and tighten securely. NOTE - For best results, position socket housing opposite
of the ballast where applicable.
4. Visually inspect reflector flange, making sure that it is seated properly against
the ceiling.
5. Fixture may now be lamped and is designed for specific wattages. Consult label
on socket housing for the correct wattage/lamp type for the reflector/mounting
frame combination. For fluorescent applications: insert tip of lamp through
opening opposite the socket housing, align base of lamp with socket and snap
into place.
6. Attach door assembly by compressing torsion springs and inserting them into
the slots in the reflector. Push door assembly up into reflector.
7. To remove the reflector: remove door assembly, remove lamp(s), loosen reflector
retaining screw and disengage reflector. Tilt reflector, lower through the
mounting frame opening and loosen screw to disengage reflector from socket
housing.
Socket
Housing
Raised
Tabs
IMPORTANT SAFETY INFORMATION
For Your Protection, Read Carefully
WARNING - Risk of fire. Do not install
insulation within 3 inches of fixture sides
or wiring compartment, nor above the
fixture in such a manner as to entrap
heat.
1. Electric current can cause painful
shock or serious injury unless handled
properly. For your safety, always
remember the following:
• Turn off the power supply.
• Ground the fixture to avoid poten-
tial electrical shocks.
• Do not handle an energized fixture
or energize any fixture with wet
hands, when standing on a wet or
damp surface, or in water.
• Double check all electrical connections
to be sure they are tight and correct.
2. Specific safety information concerning lamps:
• Match wattage of fixture and lamp
exactly.
• Do not remove or insert lamp when
power is on.
• Do not scratch glass or subject lamp
to undue pressure as either may
cause lamp breakage.
• Protect operating lamp from sources
of moisture.
Figure 1
Yoke shown in
upright position
ivynarofkcehC
motpmySesuaCelbissoPnoitcAevitcerroC
OTSLIAFPMAL
THGIL
TUOSEOGPMAL
GNITHGILRETFA
DNA
NOSELCYCPMAL
FFO
TRAHCGNITOOHSELBUORT
omrotiucricnirorregniriW·
pmalytluaF·
tuptuotsallabroeniL·
tsallabytluaF·
pmalytluaF· naht
wolooterutarepmettneibmA·
hgihootegattawpmaL·
wolegatlovtuptuotsallaB·
Socket
Housing
Junction
Box
Figure 2
Reflector
Retaining Screw
Figure 3
.snoitcaevitcerrocdnasesuacelbissopfotsilgniwollofeht
dezigrenetonerutxifehtgnideeftiucriC·
noitcennocelud
.tcerroc
ilotnwonksitahteno
.enowenahtiw
ehC·
erutxifotesolcootsinoitalusnI·
enilkcehC·
.ytiunitnoctiucrickc
.pmalwenaetutitsbuS.thgilotgniliafylpmis
rfnoitalusnievomeR·
.gnisuohnideificepsegattawpmalllatsnI·
nimelborpehtetacol,noitidnocdoognimeesyehtfI.eludomni-emarfropmalehtotegamadelbis
.dezig
renesitiucrictahterusneotesufrorekaerbtiucrickcehC·
erasnoitcennoctahterusneotxobecilpserutxifenimaxE·
ylbareferp,pmalrehtonaetutitsbusdnapmalytluafehtevomeR·
lanigiroehtecalper,sthgilpmalehtfI.thg
.egatlovtiucricnepokcehC.erutxiftaegatlovenilkcehC·
.snoitidnoclatnemnorivnegnitsixetsniagagnitartsallabkcehC·
rehtarmotpmyssihttibihxelliwpmalayllanoisaccO·
)"3tsaelta(eludomdnuoramo
.egatlovtiucricnepokcehC.erutxifehttaegatlov
Part No. CJ520167
©2005 Gotham 12/05
 Loading...