

Page 1
HPEPP INSTALLATION INSTRUCTIONS
READ AND FOLLOW ALL SAFETY INSTRUCTIONS!
WARNING
RISK OF ELECTRIC SHOCK
WARNING
RISK OF BURN or FIRE
installing, servicing or performing maintenance.
March 13, 2013
• To reduce the risk of death, personal injury or property damage from fire, electric shock, falling parts, cuts/abrasions, and other hazards please read
all warnings and instructions included with and on the fixture box and all fixture labels.
• Before installing, servicing, or performing routine maintenance upon this equipment, follow these general precautions.
• Installation and service should be performed by a qualified licensed electrician.
• Maintenance should be performed by qualified person(s) familiar with the products’ construction and operation and any hazards involved. Regular
maintenance programs are recommended.
• DO NOT INSTALL DAMAGED PRODUCT! This product has been properly packed so that no parts should have been damaged during transit. Inspect to
confirm. Any part damaged or broken during or after assembly should be replaced.
• These instructions do not purport to cover all details or variations in equipment nor to provide every possible contingency to meet in connection with
installation, operation, or maintenance. Should further information be desired or should particular problems arise which are not covered sufficiently
for the purchaser’s or owner’s purposes, this matter should be referred to Acuity Brands Lighting, Inc.
Disconnect or turn off power before installation or
servicing.
Verify that supply voltage is correct by comparing it
with the product information.
Make all electrical and grounded connections in
accordance with the National Electrical Code (NEC) and
any applicable local code requirements.
All wiring connections should be capped with UL
approved recognized wire connectors.
All unused connector openings must be capped.
SAVE THESE INSTRUCTIONS AND DELIVER TO OWNER AFTER INSTALLATION
Do not exceed maximum wattage, ratings, or published
operating conditions of product.
Do not overload.
Follow all manufacturer’s warnings, recommendations
and restrictions to ensure proper operation of product.
Wear gloves and safety glasses at all times when
TEL: 800.922.9646 © 2012 Acuity Brands Inc 1
Page 2
CAUTION: RISK OF PRODUCT DAMAGE
Electrostatic Discharge (ESD): ESD can damage product(s). Personal grounding equipment must be worn during all installation or
servicing of the unit.
Do not touch individual electrical components as this can cause ESD and affect product performance.
Do not stretch or use cable sets that are to short or are of insufficient length.
Do not tamper with contacts.
Do not modify the product.
Do not change or alter internal wiring or installation circuitry.
Do not use product for anything other than its intended use.
If installing latching springs: ensure that the springs are fully engaged prior to moving to next connection.
If installing wiring systems: Materials and component parts of a manufacturing wiring system as described in Article 604 of the
National Electric Code and Underwriters Laboratories Standard for Safety #183 MUST BE installed.
Please see product specific installation instructions for additional warnings or any applicable FCC or other regulatory statements.
Failure to follow any of these instructio ns coul d void pro duc t warra nt ie s. For a comple te li s ting of pro d uct Terms an d Co nditio ns, please visit
Our Brands Indoor/Outdoor Indoor Lighting Outdoor Lighting Controls Daylighting
Lithonia Lighting Gotham American Electric Lighting DARK TO LIGHT SunOptics
Carandini Mark Architectural Lighting Antique Street Lamps LC&D
Holophane Peerless Hydrel ROAM
RELOC Renaissance Lighting Tersen Sensor Switch
Light Concepts Winona Lighting SynergySwitch
Acuity Brands Lighting, Inc. assumes no responsibility for claims arising out of improper or careless installation or handling of its products.
www.acuitybrands.com.
ABL LED General Warnings, Form No. 503.203
TEL: 800.922.9646 © 2012 Acuity Brands Inc 2
© 2012 Acuity Brands Lighting, Inc. All rights reserved. 11/01/12
Page 3
HPEPP
DMX Network Cat-5 / Cat-5e / Cat 6 Wiring
Pin (Wire) # Wire Color
DMX512 Function per ANSI E1.11
Used in HPEPP
1 white / orange Data 1 +
2 orange
Data 1 3 white / green Data 2 + (optional)
4
blue Not Assigned
5 white / blue Not Assigned
6 green
Data 2 - (optional)
7 white / brown Data 1 common (0 v)
8 brown Data 2 common ( 0 v)
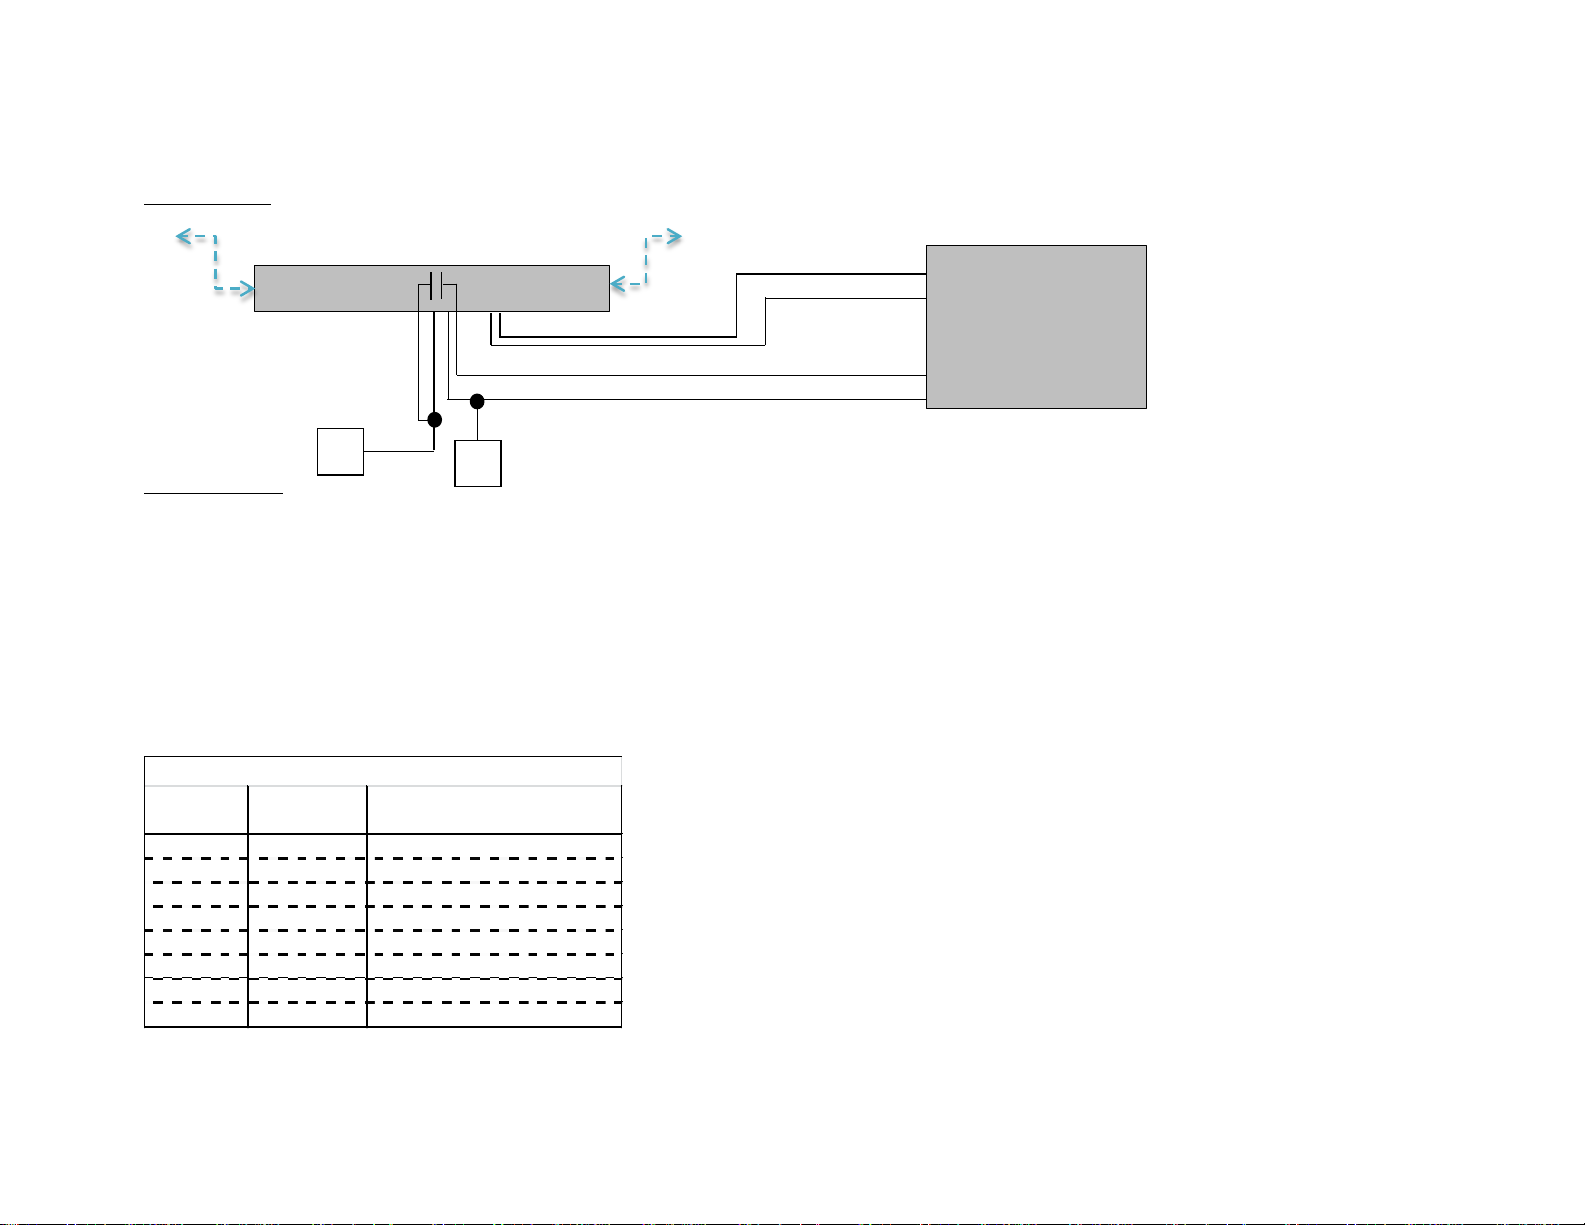
HPEPP
CAT-5 DMX In
CAT-5 DMX
0-10V Driver/Ballast
H
BLACK
BLUE
N
GRAY (-)
VIOLET (+)
WHIT
BLUE
Wiring Diagram
Installation Steps
1. Mount through a ½” KO in luminaire or junction box. Secure with lock nut
2. Connect line voltage wires within enclosure or junction box as shown (120 or 277VAC only)
Relay rated to 800W max @120V, 1200W max @ 277V
3. Connect Class 2 dimming wires (0-10V) to the ballast/driver (maximum 20mA)
4. Connect Class 2 DMX signal via RJ-45 port using CAT-5 cables. DMX CAT-5 Pin Out:
Note: Programming button is located at the end of the HPEPP near the CAT-5 DMX Input.
Note: CAT-5, CAT-5e and CAT-6 cabling are acceptable
TEL: 800.922.9646 © 2012 Acuity Brands Inc 3
Page 4

HPEPP Theory of Operation & Programming Options
Function
Name
Description
Function Settings Available
How it Works
1
Button
Defines how the HPEPP responds
Programming Mode)
Override Enabled
If enabled, a button press during normal
2
Set DMX
The device’s address between 1
Address range is 001 – 512
Assigns the HPEPP to listen to a specific DMX
to DMX Address 1)
3
RDM
Available operating modes for
1 DMX slot Linear Dim (8 bit)
HPEPP dims the attached load using a linear
for the relay to close
4
DMX Signal
HPEPP response when the DMX
Hold last forever
Hold last for 1 minute then fade to 100%
HPEPP is expecting regular intensity updates
The HPEPP is a DMX with RDM controlled device that converts DMX intensity inputs to a 0-10V dimming signal and power relay output.
The HPEPP has several field adjustable configurations which are accessed via a layered menu structure. Adjustments to the factory default settings require an
operator to perform these basic steps:
• Enter Programming Mode
• Select the desired Function & Modify the Setting
• Confirm the Setting & save via Confirmation Mode
• Exit Programming
The table below summarizes all available functions, range of settings & default settings (in bold).
Available HPEPP Functions & Settings (Default setting is bold)
Mode
Address
Personality
Loss
Behavior
to a button press when in normal
operating mode (not in
and 512, in three segments
(hundred, ten and one digits)
the HPEPP
signal is missing or disconnected
Override Disabled
Default is 001
2 DMX slot Linear Dim (16 bit)
1 DMX slot Logarithmic Dim (8 bit)
2 DMX slots Logarithmic Dim (16 bits)
2 DMX slots 8 Bit Linear Dim | Relay
2 DMX slots 8 Bit Logarithmic Dim | Relay
Fade to off over 1 second
Hold last for 1 minute then fade to off
Fade to 100% over 1 second
operation will cycle the device’s output from 0,
to 50% to 100% intensity
channel. If configured for 2 DMX channels (see
Function 3), HPEPP responds to the assigned
channel & the next (e.g. channels 1 and 2 if set
(even step) or logarithmic (human eye
response) curve in response to the DMX signal.
2 Personalities use the second DMX slot for
relay control where the value of the second slot
has to be < 102 for the relay to open, and >153
from the DMX controller, without a stream of
DMX commands the device will respond as
programmed
TEL: 800.922.9646 © 2012 Acuity Brands Inc 4
Page 5

How to Program the HPEPP - Read all 7 steps prior to programming
1. Enter Programming Mode: Press & hold the button until the LED flashes rapidly. Release the button.
Note: in each programming step the LED blinks back the current setting. Make all changes before the LED blink back occurs 10 times. After 10
indications programming mode is automatically exited and no changes are saved.
2. Press the button 1, 2, 3 or 4 times to select the Function to modify (e.g. 3 times to modify the RDM personality) Wait 2 seconds.
3. The LED flashes the current Function setting (e.g. for Function 3, by default the LED blinks 1 time).
4. Press the button the number of times indicated in the Detailed Function Programming Table below to modify the Function Settings
5. Press and holding the button until the LED flashes rapidly to enter Confirmation Mode. Release the button
6. Press the button 1, 2, 3 or 4 times to Confirm the Function Number just programmed to verify the setting, (e.g. 3 presses for RDM personality).
7. The LED blinks 2 times if the Confirmation Presses match the changed Function. If 2 blinks do not occur, repeat steps 1 through 7.
TEL: 800.922.9646 © 2012 Acuity Brands Inc 5
Page 6

Detailed Function Programming Table (Default show in bold)
Function
Name
Indicator
Function Settings Available
How to Modify
1
Button
4 Blinks = override disabled
Override Enabled
When Function 1 is selected, observe the LED
2
Set
LED blinks each digit of the current DMX
Address range is 1 – 512
If changing the hundred digit from “0” to “2”,
3
RDM
1 Blink = 1 DMX slot Linear
1 or 2 channel DMX
When Function 3 is selected the LED blinks the
4
DMX Signal
1 Blink = Hold last Forever
5 Blinks = Hold last for 1 min, fade to 100%
How the HPEPP operates
When Function 4 is selected the LED blinks the
Mode
DMX
Address
Personality
5 Blinks = override enabled
address. (Digits will blink twice per second)
st
Blink 1
1 second pause, blink 3
digit, 1 second pause, blink 2nd digit,
rd
digit, 1 second
pause. Repeat. If the Address digit is zero, it
blinks 10 times. The new address is set by
pressing desired digit change during the
flashing of that digit.
2 Blinks = 2 DMX slots Linear
3 Blinks = 1 DMX slot Logarithmic
4 Blinks = 2 DMX slots Logarithmic
5 Blinks = 2 DMX slots Linear dim | relay
6 Blinks = 2 DMX slots Logarithmic dim | relay
Override Disabled
Default is 001
(10 blinks. Pause
10 blinks. Pause
1 blink. Pause)
assignments with
logarithmic or linear
dimming curves. Also
supports dim outputs with
separate relay control, Slot
1 for intensity, Slot 2 for
relay
blink sequence, to change the mode press the
button, then count the blink sequence to verify
the blink count is either 4 for disabled or 5 for
enabled, waits 3 seconds then repeats
while the HPEPP is flashing 10 times (zero), press
the button twice. Once done entering the first
digit (most significant digit) do not press the
button for 3 seconds. The unit will then confirm
the first digit by blinking the LED twice. Next,
enter the second digit the same way as the first
while the second digit is flashing (if applicable),
then the third digit (if applicable) Once all digits
are entered, press and hold the button to exit
programming mode and confirm the changes.
(See step 5 above).
current RDM personality then waits 3 seconds and
repeats. Press the button 1 to 6 times to select
the preferred Personality
Loss
Behavior
2 Blinks = Fade to off over 1 second
3 Blinks = Hold last for 1 min, fade off
4 Blinks = Fade to 100% over 1 second
TEL: 800.922.9646 © 2012 Acuity Brands Inc 6
upon loss of regular DMX
update signals
current Signal Loss Behavior then waits 3 seconds
and repeats. Press the button 1 to 5 times to
select the preferred behavior
Page 7

Address
Blink Sequence
001
10 Blinks Pause 10 Blinks Pause 1 Blink
501
5 Blinks Pause 10 Blinks Pause 1 Blink
100
1 Blink Pause 10 Blinks Pause 10 Blinks
055
10 Blinks Pause 5 Blinks Pause 5 Blinks
111
1 Blink Pause 1 Blink Pause 1 Blink
511
5 Blinks Pause 1 Blink Pause 1 Blink
Address
Button Press Sequence
002
Press 10x Pause Press 10x Pause Press 2x Pause
502
Press 5x Pause Press 10x Pause Press 2x Pause
100
Press 1x Pause Press 10x Pause Press 10x Pause
055
Press 10x Pause Press 5x Pause Press 5x Pause
111
Press 1x Pause Press 1x Pause Press 1x Pause
511
Press 5x Pause Press 1x Pause Press 1x Pause
Example DMX Address Blink Sequences
Example DMX Address Button Press Sequences
TEL: 800.922.9646 © 2012 Acuity Brands Inc 7
Page 8

Example Programming Sequences
Press & Hold [LED blinks rapidly indicating unit is in Programming Mode] Release the Button Press 1x to change Function 1 [LED blinks 4x] Press 1x to
Press & Hold [LED blinks rapidly indicating unit is in Programming Mode] Release the Button Press 3x to change Function 3 [LED blinks 1x to indicate the
Press & Hold [LED blinks rapidly indicating the unit is in Programming Mode] Release the Button Press 4x to change Function 4 [LED blinks 1x to indicate
Press & Hold [LED blinks rapidly] Release the Button Press 2x to change Function 2 [LED blinks 10x indicating the hundreds digit is currently 0] Press 1x
Press & Hold [LED blinks rapidly] Release the Button Press 2x to change Function 2 [LED blinks 1x indicating the hundreds digit is currently 1] Press 3x to
Set the Button Override Mode to Enabled (from factory default):
change from Button Override Disabled to Button Override Disabled [LED blinks 5x to indicate the new setting is Button Override Enabled] Press & Hold [LED
blinks rapidly] Release the Button Press 1x to confirm Function 1 was changed [LED Blinks 2x to indicate the new setting was stored successfully]
Set the RDM Personality to 2 DMX Slots Logarithmic (from factory default):
current setting is 1 DMX Slot for Linear Dimming] Press 4x [LED blinks 4x to indicate the new setting is 2 DMX slots Logarithmic Dimming] Press & Hold [LED
blinks rapidly] Release the Button Press 3x to confirm Function 3 was changed [LED Blinks 2x to indicate the new setting was stored successfully]
Set the DMX Signal Loss Behavior to Hold Last for 1 minute then fade to 100% (from factory default):
Hold Last Forever is selected] Press 5x [LED blinks 5x to indicate Hold Last for 1 minute then fade to 100% is selected] Press & Hold [LED blinks rapidly]
Release the Button Press 4x to confirm Function 4 was changed [LED Blinks 2x to indicate the new setting was stored successfully]
Set the DMX Address to 123 (from factory default):
to set the hundreds digit to 1 Pause 3 seconds [LED blinks 1x to verify 1 is entered for the hundreds digit] Press 2x to set the tens digit to 2 Pause 3
seconds [LED blinks 2x to confirm the tens digit is set to 2] Press 3x to set the ones digit to 3 Pause 3 seconds [LED blinks 3x to confirm the ones digit is set
to 3] Press & Hold [LED blinks rapidly] Release the Button Press 2x to confirm Function 2 was changed[LED Blinks 2x to indicate the new setting was
stored successfully]
Set the DMX Address to 321 (from Address 123):
set the hundreds digit to 3 Pause 3 seconds [LED blinks 3x to verify the hundreds digit is set to 3] Press 2x to set the tens digit to 2 Pause 3 seconds [LED
blinks 2x to verify the tens digit is set to 2] Press 1x to set the ones digit to 1 Pause 3 seconds [LED blinks 1x to verify the ones digit is set to 1] Press &
Hold [LED blinks rapidly] Release the Button Press 2x to confirm Function 2 was changed [LED Blinks 2x to indicate the new setting was stored successfully]
TEL: 800.922.9646 © 2012 Acuity Brands Inc 8
 Loading...