

Page 1
INSTALLATION INSTRUCTIONS
4" Elevations
Performance Downlight Pendant
Wall Mount - Low Voltage
TM
SAVE THESE INSTRUCTIONS
-
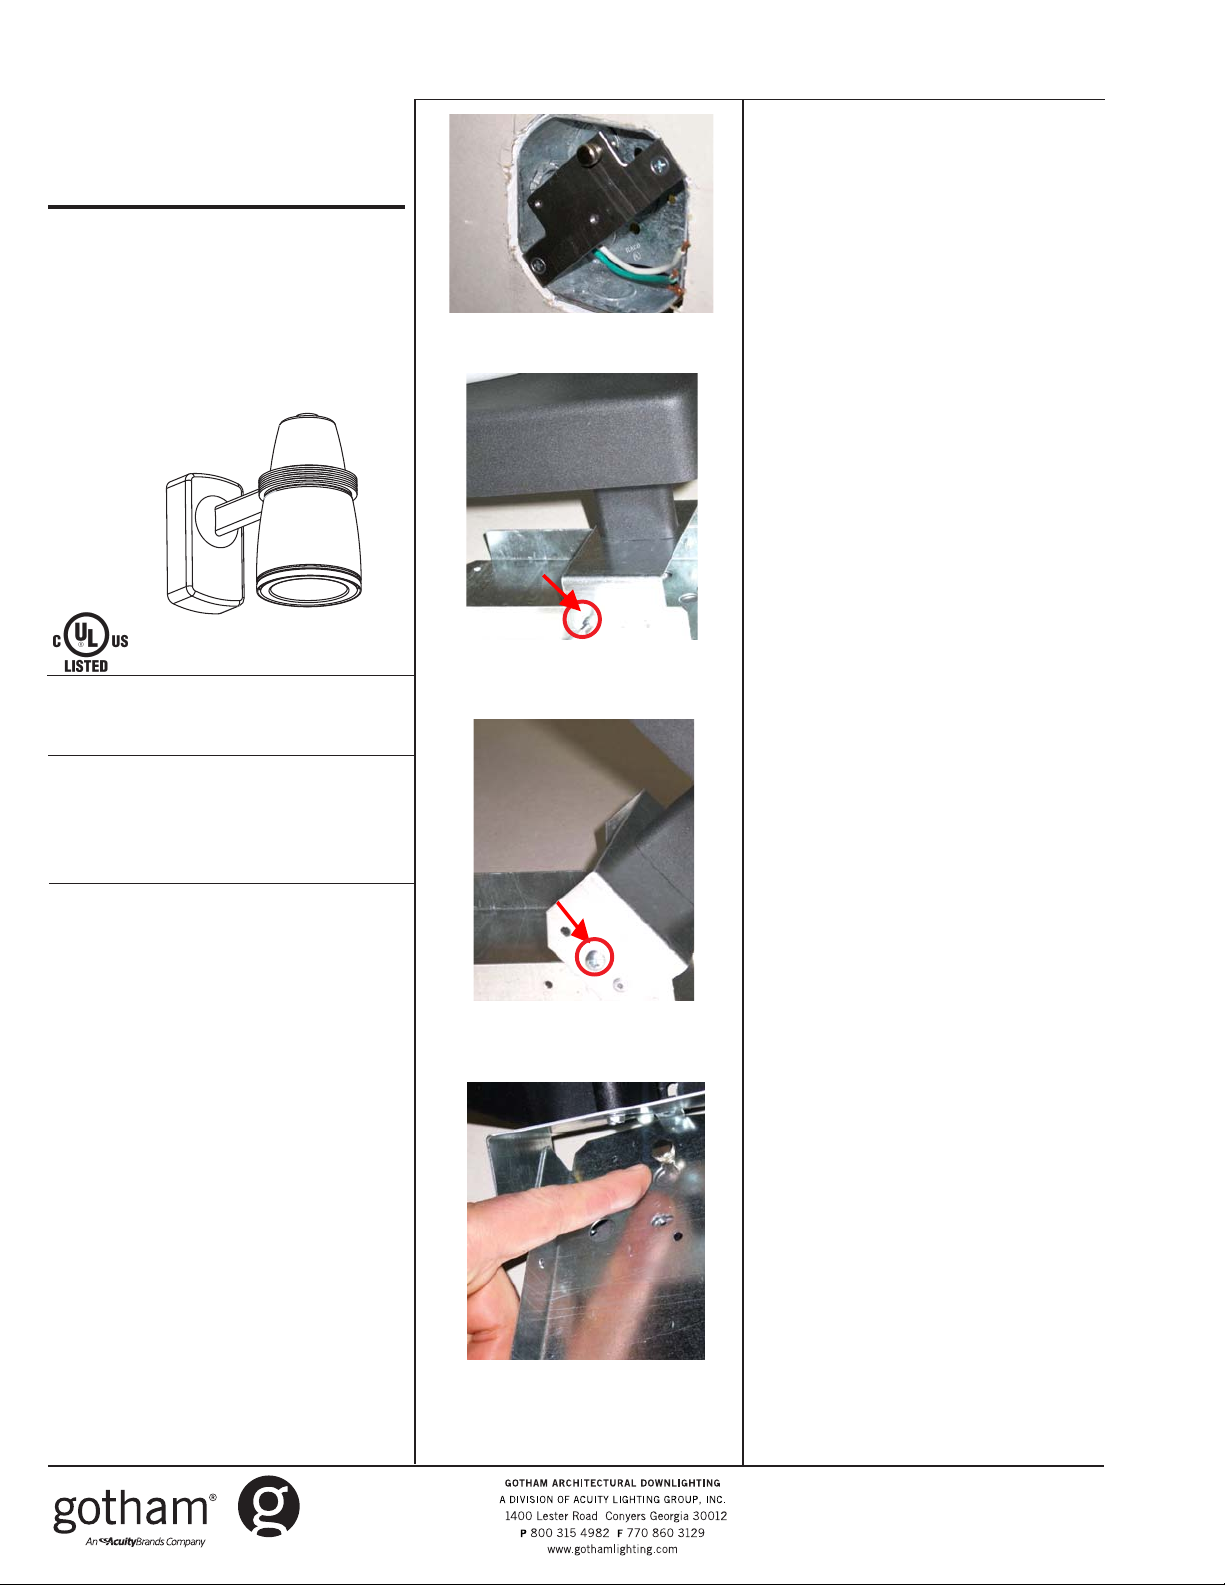
1. Remove J-box mounting bracket from
hardware kit.
Upon receipt, thoroughly inspect for any freight
damage which should be brought to the
attention of the delivery carrier. Compare the
catalog description listed on the packing slip
with the label on the carton to ensure that you
have received the correct merchandise.
For Your Protection, Read Carefully
- Risk of fire. Do not install
insulation within 3 inches of fixture sides
or wiring compartment, nor above the
fixture in such a manner as to entrap
heat.
• Turn off the power supply.
• Ground the fixture to avoid poten-
tial electrical shocks.
• Do not handle an energized fixture
or energize any fixture with wet
hands, when standing on a wet or
damp surface, or in water.
• Double check all electrical connections
to be sure they are tight and correct.
Figure 1
Figure 2
Figure 3
2. Mount the bracket to the J-box using
the flush-head screws provided. Be
sure that the thumbscrew is on top.
FIGURE 1.
3. Once bracket is installed onto J-box
securely, loosen thumbscrew 1/8 inch
from bracket, but be sure not to remove.
BRACKET INSTALLATION COMPLETE.
1. Remove reflector ASM from box.
2. Make connections between socket
leads and housing leads
3. Insert reflector into housing, making
sure to align arrow on socket with
arrow inside housing.
4. Press reflector ASM into housing until
flange is flush.
5. Remove top and bottom screws from
wall canopy. Temporarily store screws.
6. Slide canopy away to expose the inner
bracket assembly and side screws.
FIGURE 2.
7. Remove side screws from inner bracket
to allow the fixture arm to pivot, then
lock arm in open position by temporarily
inserting side-screws into secondary
locking holes on each side. FIGURE 3.
1. Route supply wires from J-box through
the ½ inch hole of rear bracket, being
sure to pull them through to allow wiring
access.
• Match wattage of fixture and lamp
exactly.
• Do not remove or insert lamp when
power is on.
• Do not scratch glass or subject lamp
to undue pressure as either may
cause lamp breakage.
• Protect operating lamp from sources
of moisture.
Figure 4
2. Hang fixture onto J-box using the rear
bracket keyhole slot and J-box thumb screw. Tighten thumbscrew with fingers
to secure fixture onto wall. FIGURE 4.
3. From hardware bag, loosely install #8
screw through inner bracket slot into
J-box bracket. Use level to plumb
fixture and once adjusted vertically,
tighten screw with tool to lock position.
©2006 Gotham
4" Elevations
Page 1 of 2
TM
Page 2
4" Elevations
TM
Wall Mount Installation Instructions
SEE FIGURES 5A & 5B. If desired,
additional drywall screws can be
installed through the lower inner
bracket holes and into mounting wall
(not provided).
4. With fixture adjusted and secured,
connect the ballast, source and
socket leads as required, using
wire-nuts provided in hardware kit.
5. Once connections are complete,
bundle connections above the
ballast and/or underneath the pivot
arm bracket.
6. Remove the side screws from the
secondary locking holes to drop
arm and reinstall into the primary
screw holes to lock arm in closed
position.
7. Slide canopy back over inner
bracket assembly and reinstall
upper and lower canopy screws.
INSTALLATION COMPLETE.
FIGURE 6.
Figure 5A
Figure 5B
Figure 6
ivynarofkcehC
motpmySesuaCelbissoPnoitcAevitcerroC
THGIL
DNA
OTSLIAFPMAL
TUOSEOGPMAL
GNITHGILRETFA
NOSELCYCPMAL
FFO
TRAHCGNITOOHSELBUORT
omrotiucricnirorregniriW·
pmalytluaF·
tuptuotsallabroeniL·
tsallabytluaF·
wolooterutarepmettneibmA·
pmalytluaF· naht
erutxifotesolcootsinoitalusnI·
hgihootegattawpmaL·
wolegatlovtuptuotsallaB·
.snoitcaevitcerrocdnasesuacelbissopfotsilgniwollofeht
dezigrenetonerutxifehtgnideeftiucriC·
noitcennocelud
.tcerroc
ilotnwonksitahteno
.enowenahtiw
ehC·
enilkcehC·
.ytiunitnoctiucrickc
.pmalwenaetutitsbuS.thgilotgniliafylpmis
rfnoitalusnievomeR·
.gnisuohnideificepsegattawpmalllatsnI·
nimelborpehtetacol,noitidnocdoognimeesyehtfI.eludomni-emarfropmalehtotegamadelbis
renesitiucrictahterusneotesufrorekaerbtiucrickcehC·
.dezig
erasnoitcennoctahterusneotxobecilpserutxifenimaxE·
ylbareferp,pmalrehtonaetutitsbusdnapmalytluafehtevomeR·
lanigiroehtecalper,sthgilpmalehtfI.thg
.egatlovtiucricnepokcehC.erutxiftaegatlovenilkcehC·
.snoitidnoclatnemnorivnegnitsixetsniagagnitartsallabkcehC·
rehtarmotpmyssihttibihxelliwpmalayllanoisaccO·
)"3tsaelta(eludomdnuoramo
.egatlovtiucricnepokcehC.erutxifehttaegatlov
Part No. CJ520703
©2006 Gotham
4" Elevations
Page 2 of 2
TM
 Loading...