

Page 1

goTenna Mesh 5.0 User Manual
Page 2

Table of Contents
Welcome to the Mesh Network!
What is goTenna Mesh? 4
Hardware Specs 5
Onboarding & Initial Setup 6
Having Trouble Pairing? 10
Chat
1-to-1 Chat 12
Group Chat 14
Shout Chat 16
Emergency Chat 17
Emergency Beacon
Mapping & Location
Download a Map 21
Delete a Downloaded Map 22
Find your Location 23
Create a Pin 24
Share your Location 25
Settings
Settings 28
Conrm your goTenna Firmware is Up-to-Date 30
Pair your goTenna Mesh Device 31
Unpair your goTenna Mesh Device 32
Send an Emergency Beacon 18
Contacts
Create a Contact 20
Stationary Relay Mode 34
goTenna Plus Features
Location Tethering 36
SMS Network Relay 38
Trip Statistics 40
Topographic Maps 42
2 3
Page 3
Welcome to the
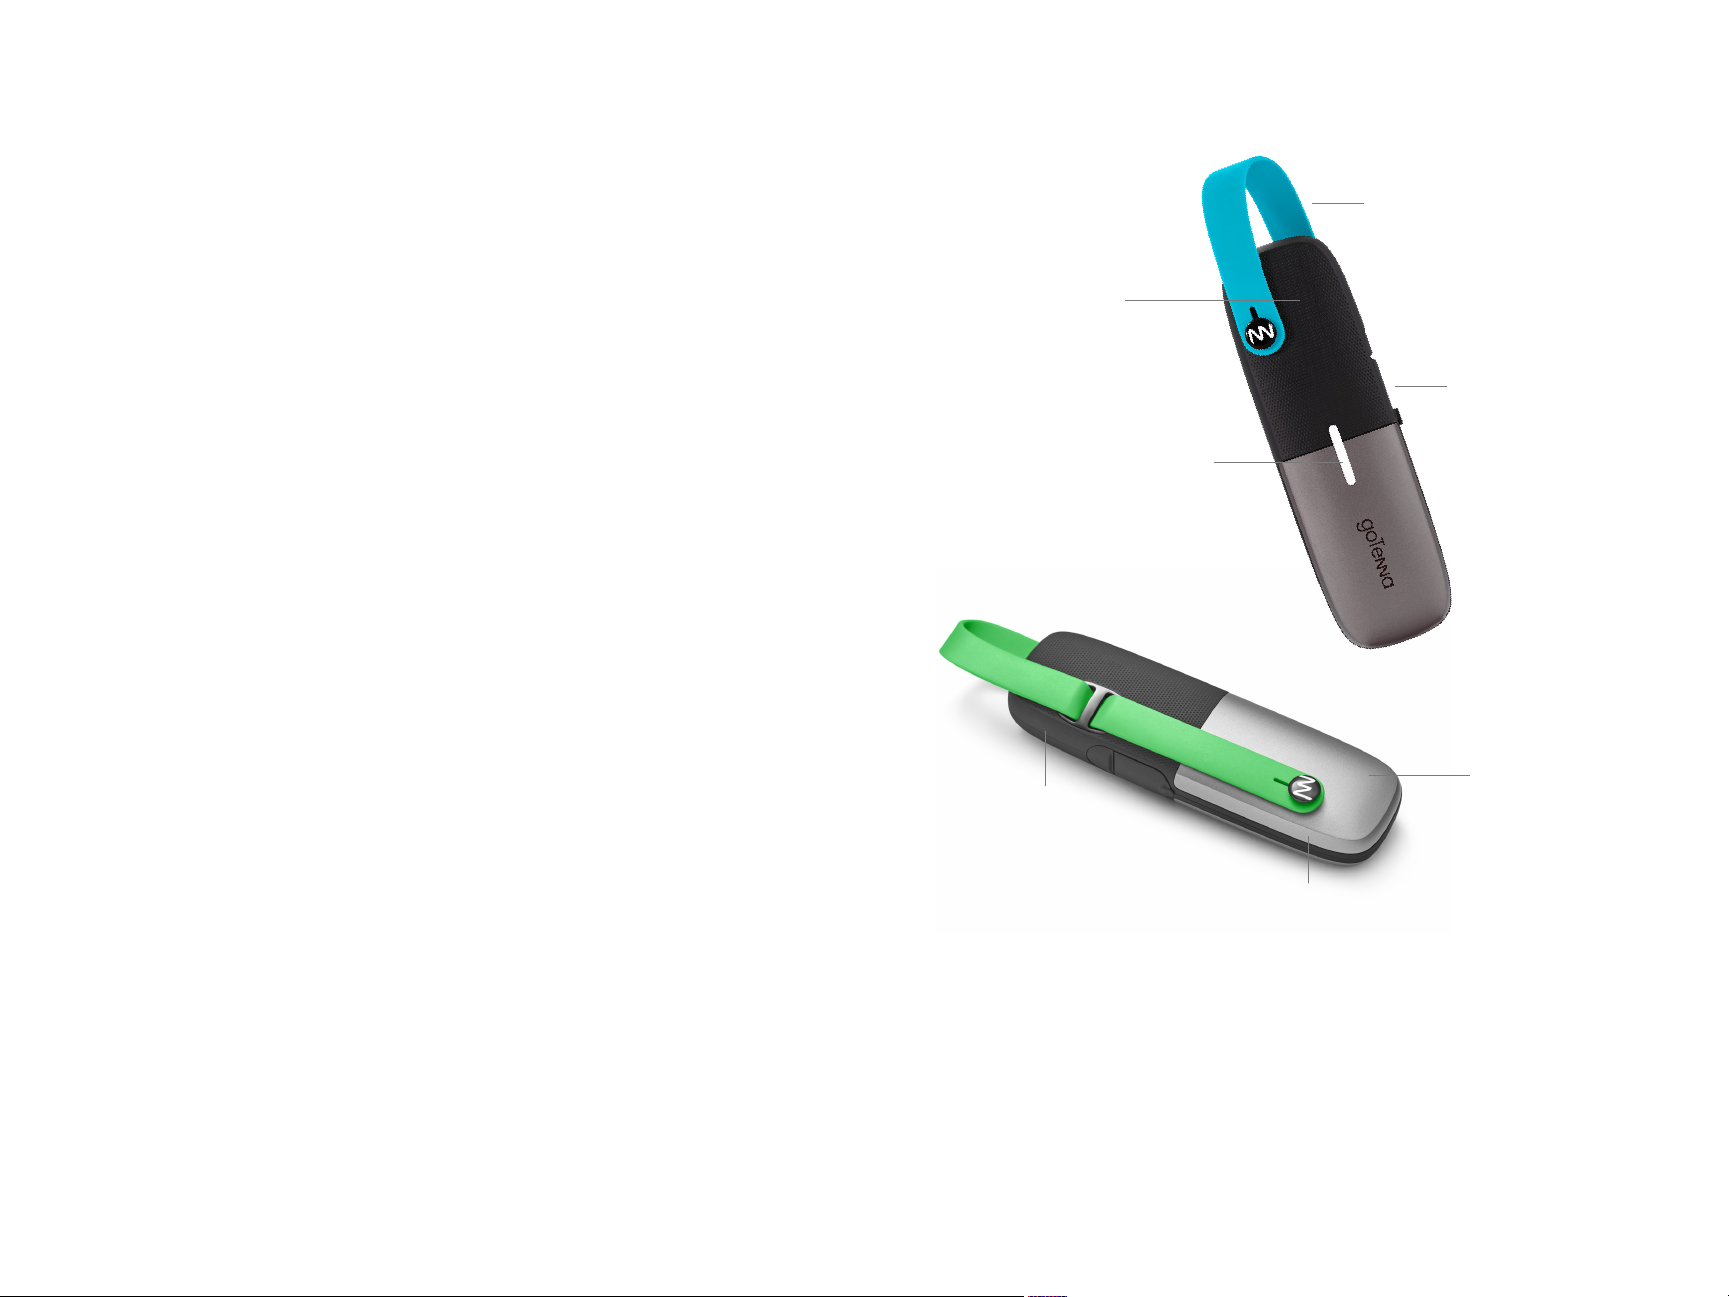
RECHARGEABLE LITHIUM
Hardware Specs
Mesh Network!
In this manual, you’ll nd information to help orient yourself
with your goTenna Mesh. You’ll learn about the goTenna
Mesh device, how to set up and use the goTenna app, and
how your device works in conjunction with the app.
What is goTenna Mesh?
goTenna Mesh is the rst 100% o-grid, mobile, longrange, consumer-ready mesh network. The device pairs
with smartphones to enable communication among
users without any reliance on cell towers, WiFi routers, or
satellites. Additionally, goTenna Mesh enables automatic
and private message relay, eectively doubling or tripling
any device’s range, creating a network that gets stronger the
more people join it.
SILICONE ATTACHMENT STRAP
1-WATT UHF RADIO
MICRO-USB CHARGING
LED STATUS INDICATOR
POLYMER BATTERY
(24+ HOURS)
FLASH MEMORY FOR
100S OF MESSAGES
BLUETOOTH-LE
DIMENSIONS
4.2 × 0.9 × 1.3 in (106.5 × 18 × 13 mm)
WEIGHT
1.7 oz (48 g)
WEATHERPROOF
4 5
Page 4
Onboarding & Initial Setup
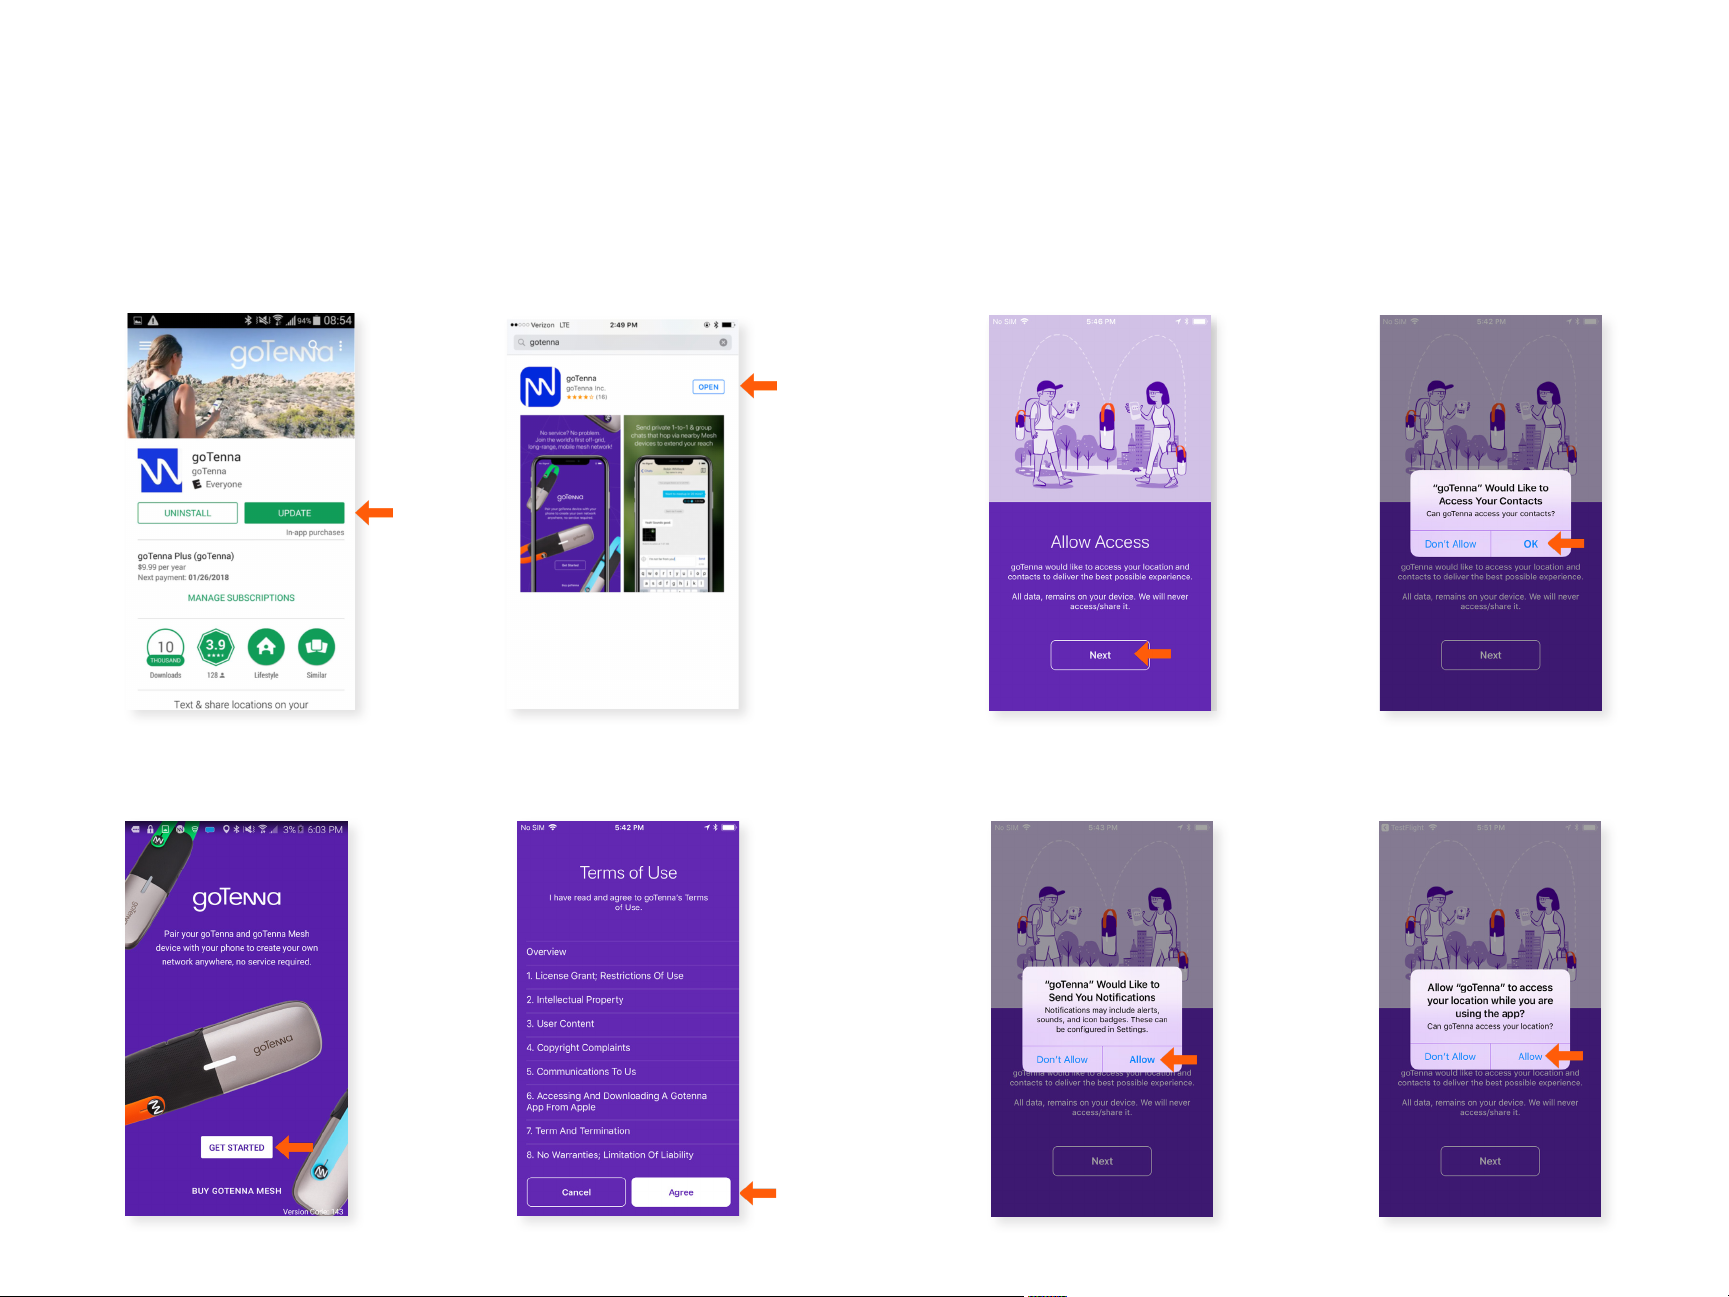
You can download the goTenna app through the Apple App
Store or the Google Play Store. Access to WiFi or 4G-LTE is
required to download the app. The rst time you open the
goTenna app, you’ll be prompted to create a goTenna account
and pair your goTenna Mesh device.
Android
If you have an Android device,
you can download the app in
the Google Play Store.
Step 1 Step 2
iPhone
If you have an iPhone, you
can download the app in the
Apple App Store.
Step 3 Step 4
Select ‘Next’ to allow
location & contact access.
Step 5 Step 6
Select ‘OK’ for goTenna to
access your contacts.
6 7
Select ‘Get Started’.
To use the goTenna app,
you’ll need to select
‘Agree’ to the Terms of Use.
Select ‘Allow’ to allow
goTenna to send you
notications.
Select ‘Allow’ to allow
goTenna to access your
location.
Page 5
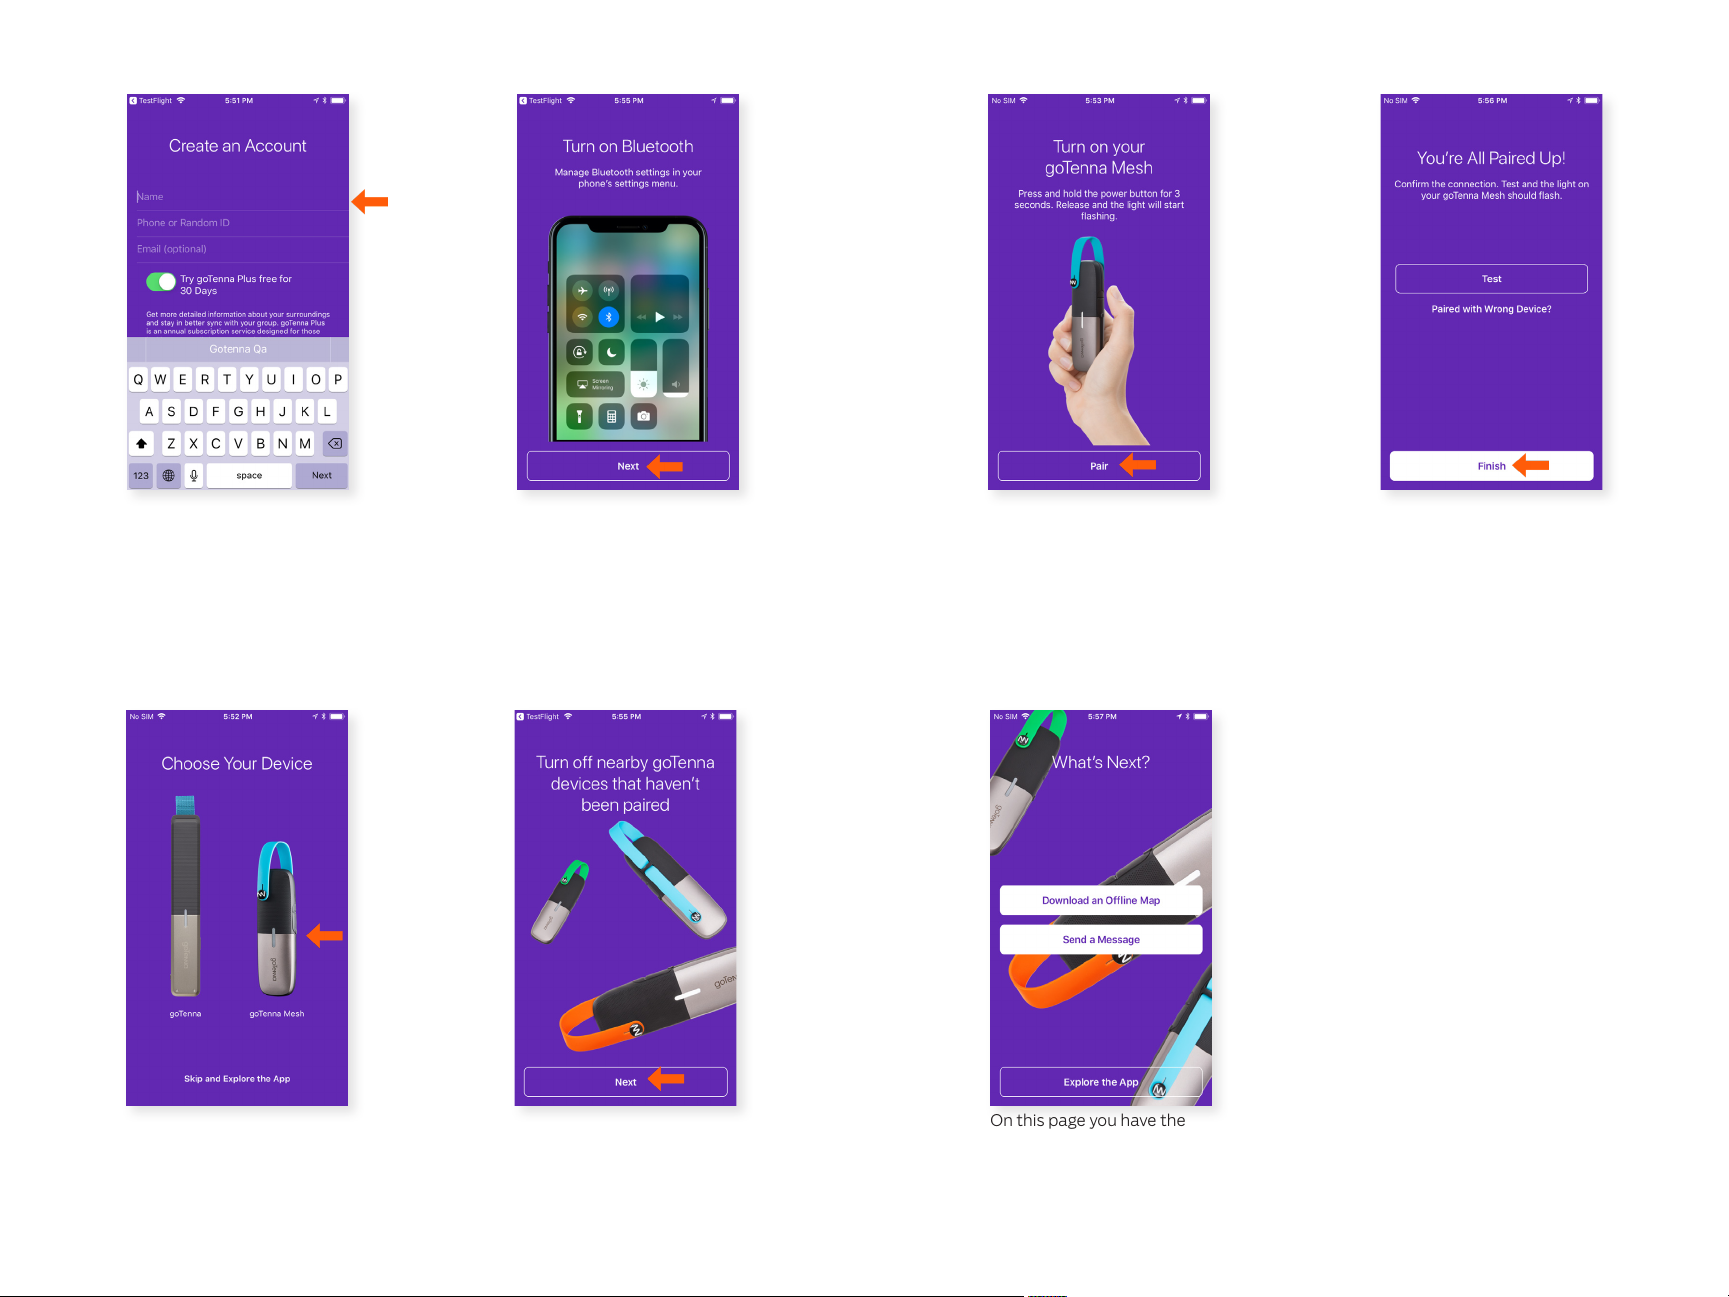
Step 7 Step 8
Step 11 Step 12
Enter your phone number
(recommended) or have
goTenna create a randomly
generated ID. If you entered
your phone number, you’ll be
asked to verify your phone
number via SMS text.
Step 9 Step 10
Never pair your goTenna
Mesh through your
bluetooth settings, always
pair directly through the
goTenna app. Select ‘Next’.
Hold down the power button
until the white light turns on.
Select ‘Pair’ to pair with your
goTenna Mesh device.
Step 13
Once your device pairs, you
are nished. Select ‘Finish’.
Select ‘goTenna Mesh’.
Turn o nearby goTenna
devices that haven’t been
paired. In order to pair
seamlessly, you should only
pair one device at a time.
Select ‘Next’.
On this page you have the
option to download an
oine map, send a message,
or continue exploring the
app.
8 9
Page 6
Having Trouble Pairing?
If you have trouble pairing, make sure you have location services
enabled for the goTenna app.
If you continue to have trouble, try pairing the goTenna Mesh
device to another device. This will help determine what settings
you need to update on your rst device.
If this does not work, close the goTenna app, reset your device’s
network settings, then power your device o/on. Open the
goTenna app and attempt setup again.
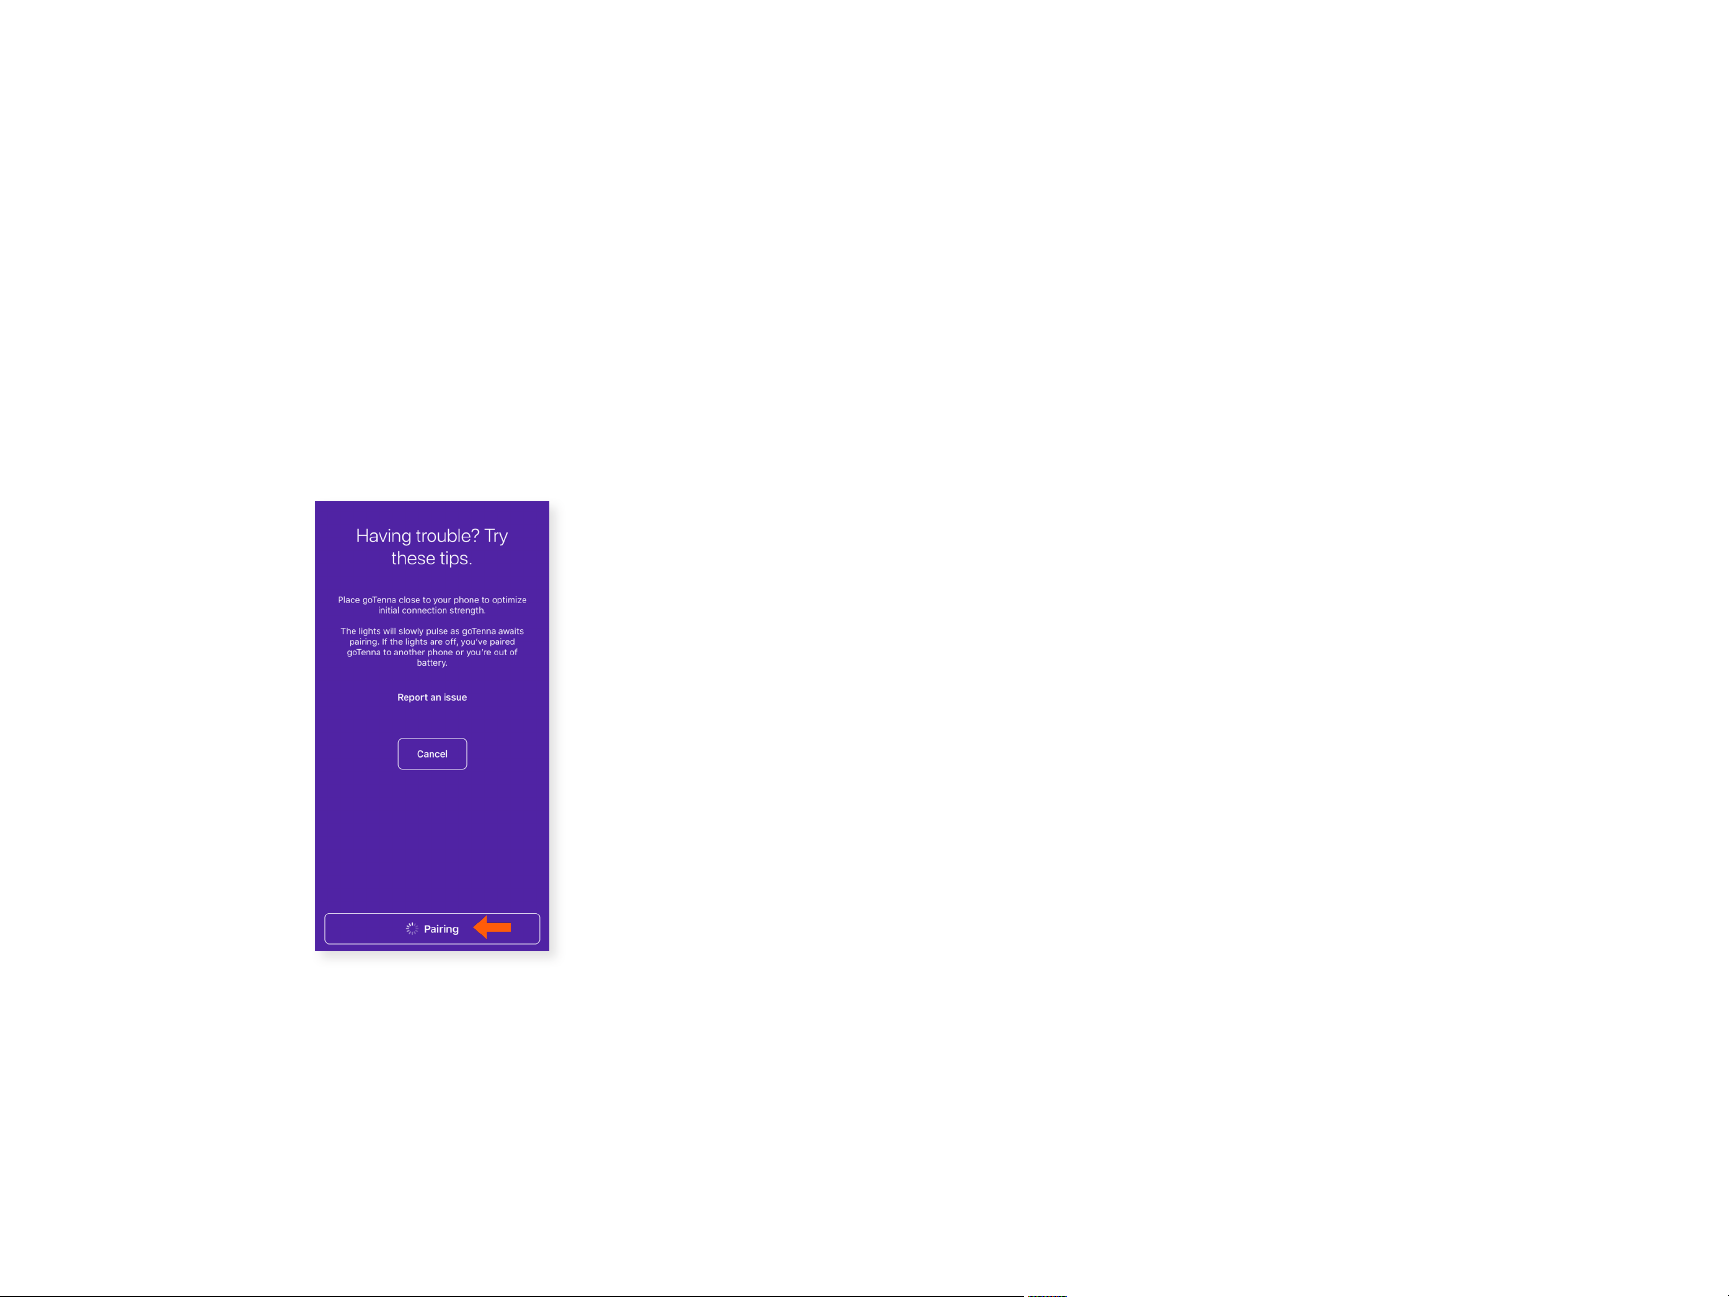
Place goTenna close to your
phone to optimize initial
connection strength. The light
will slowly pulse as goTenna
awaits pairing. If the light is
o, you’ve paired goTenna to
another phone or do not have
sucient battery.
10 11
Page 7
Chat
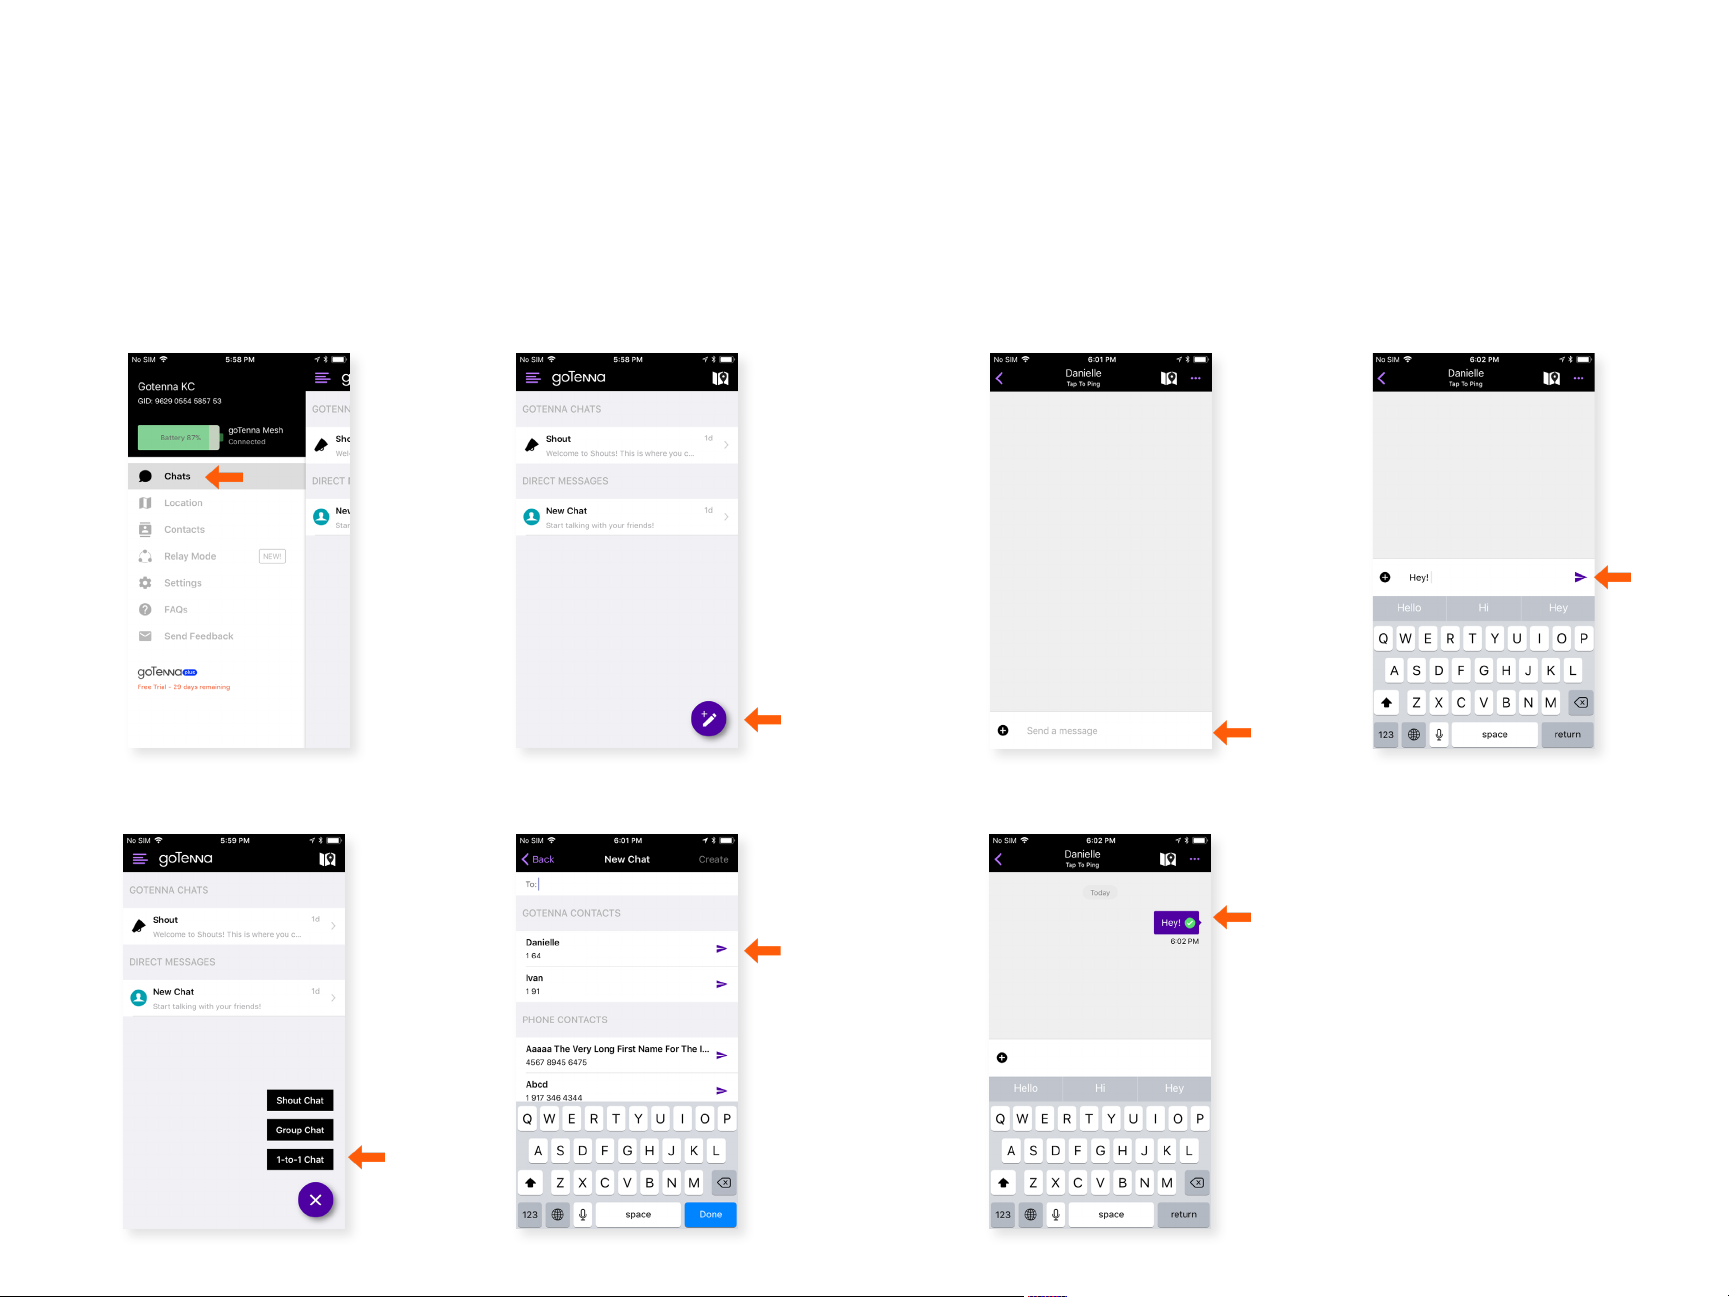
1-to-1 Chat
A 1-to-1 Chat is a private, encrypted message between you and
another goTenna Mesh user. They are automatically meshed
via other goTenna Mesh devices if the person you are trying to
reach is not directly within range.
Step 1 Step 2
Step 5 Step 6
Select ‘Chats’ from the side
menu.
Step 3 Step 4
12 13
Select ‘1-to-1 Chat’. Select the intended recipient.
Choose an existing chat or
create a new chat.
Type your message.
Step 7
A green check mark shows it
was successfully delivered.
Select the send button.
Page 8
Group Chat
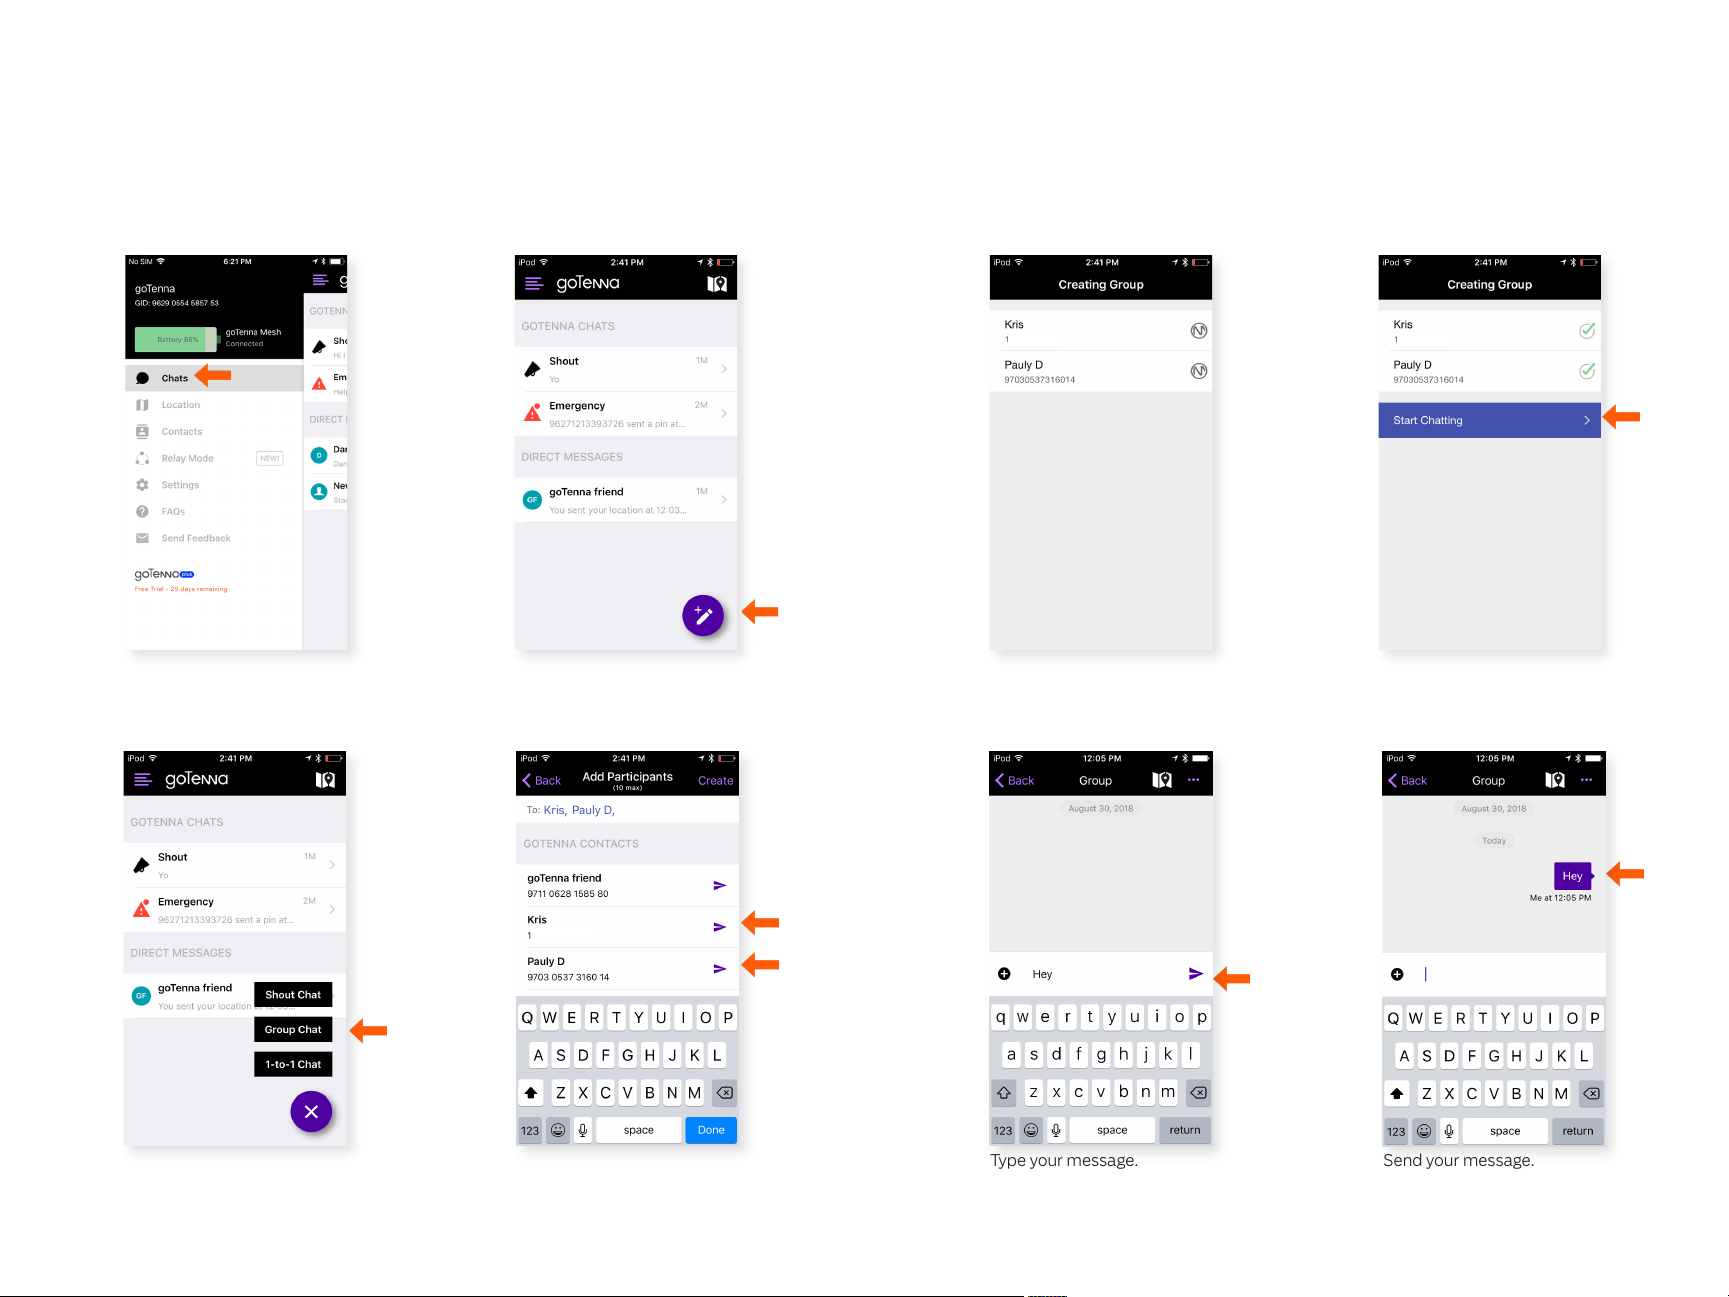
Group Chat is a private message shared between you and up to
9 additional contacts. Like 1-to-1 Chats, Group Chats are endto-end encrypted and mesh.
Step 1 Step 2
Select ‘Chats’ from the side
menu.
Step 3 Step 4
Click the compose icon.
Step 5
Group chat contacts
must be within range and
connected to a goTenna
Mesh.
Step 7 Step 8
Step 6
Select ‘Start Chatting’.
Select ‘Group Chat’. Choose the contacts you
want to include and select
‘Create’.
Type your message. Send your message.
Delivery conrmation is not
supported for Group Chats.
14 15
Page 9
Shout Chat
Emergency Chat
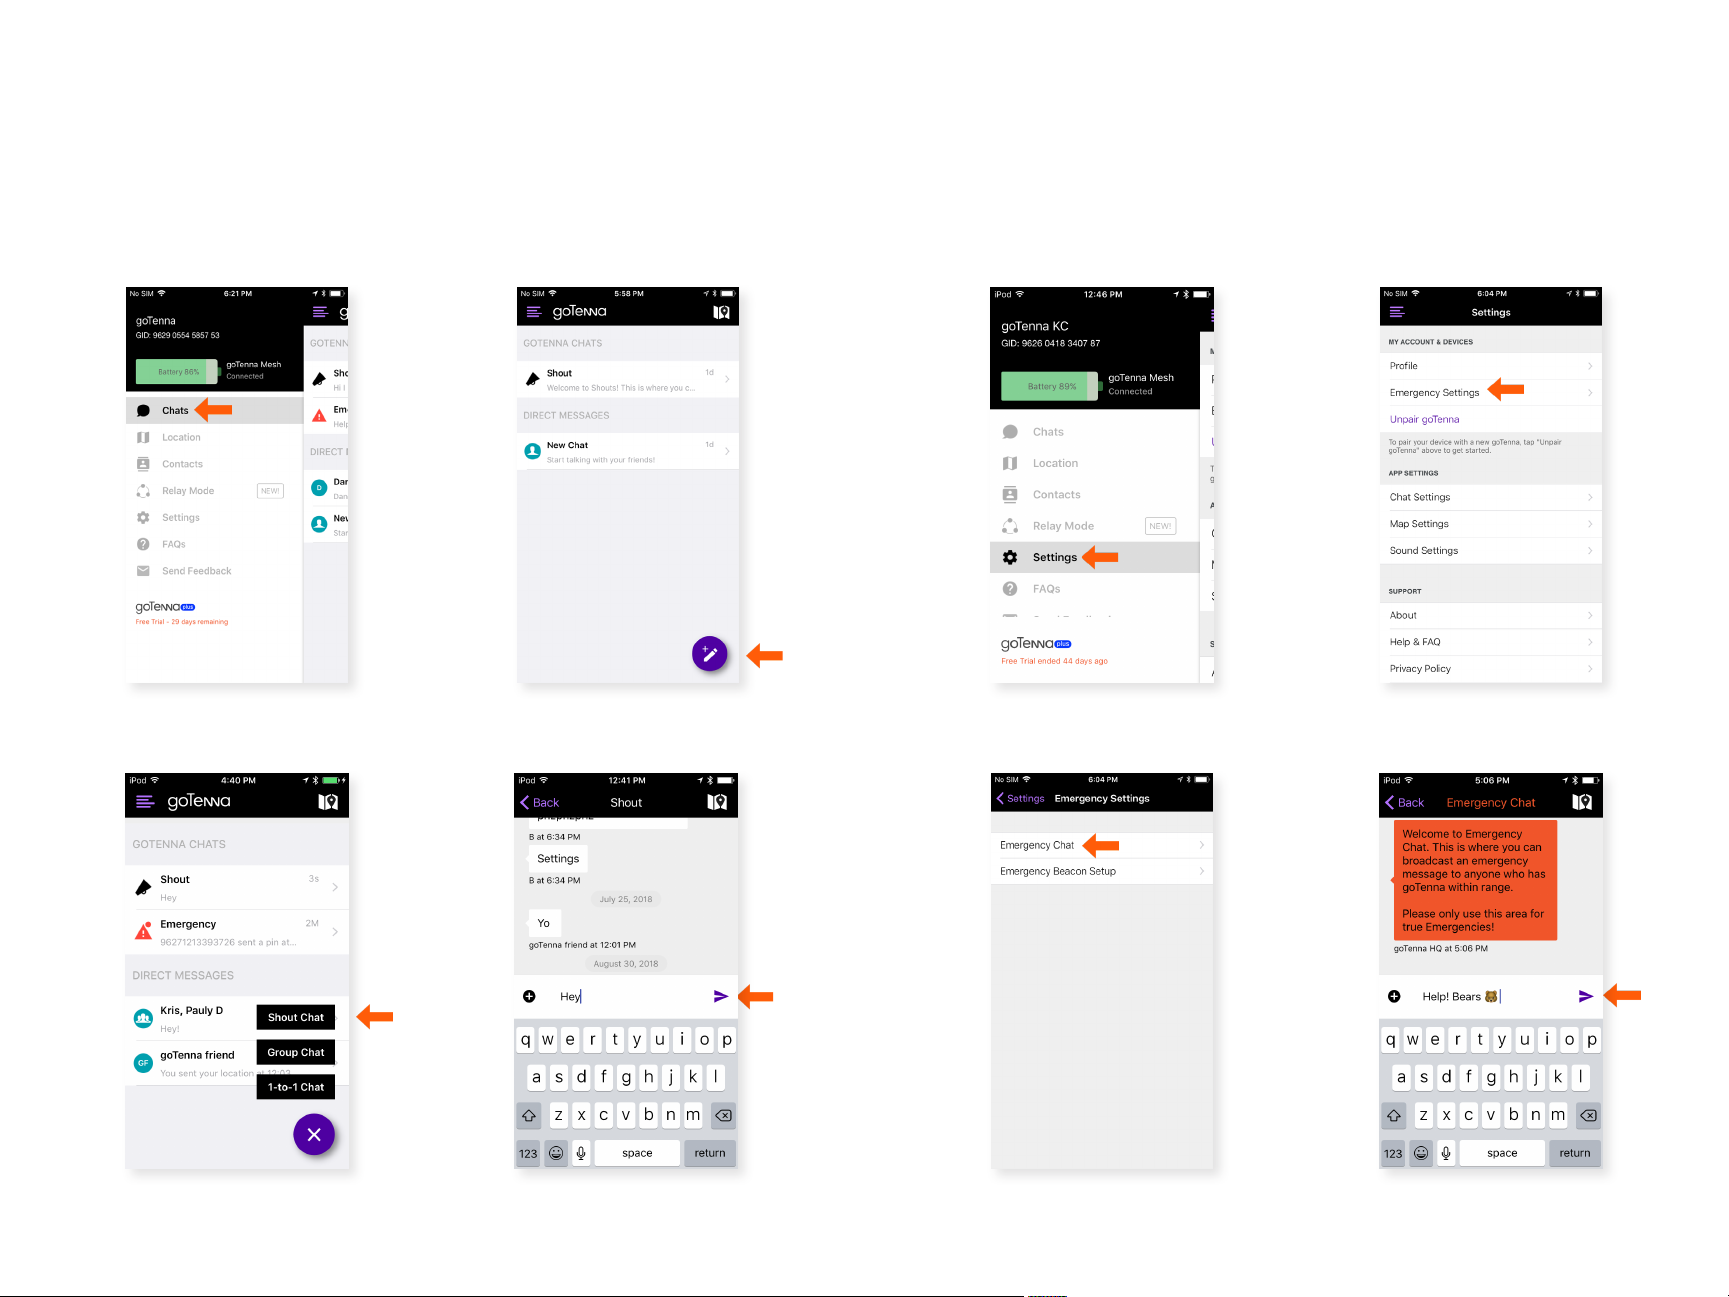
Shout Chat allows you to publicly broadcast to any goTenna
Mesh user within range. Because these messages are public,
they are not end-to-end encrypted and any user within range
will receive it. Shout Chats do not mesh.
Step 1
Select ‘Chats’ from the side
menu.
Step 3
Click the compose icon.
Step 2
Step 4
Emergency Chat transmits messages to all goTenna Mesh users
within range. These messages mesh through other goTenna
Mesh devices to extend their range. Only use Emergency
Chat during emergencies.
Step 2Step 1
Select ‘Settings’ from the
side menu.
Step 3 Step 4
From the Settings menu,
select ‘Emergency
Settings’.
Select ‘Shout Chat’. Type your message. Send
16 17
your message. Delivery
conrmation is not
supported for Shout Chats.
Select ‘Emergency Chat’. Type and send your
message.
Page 10
Emergency Beacon
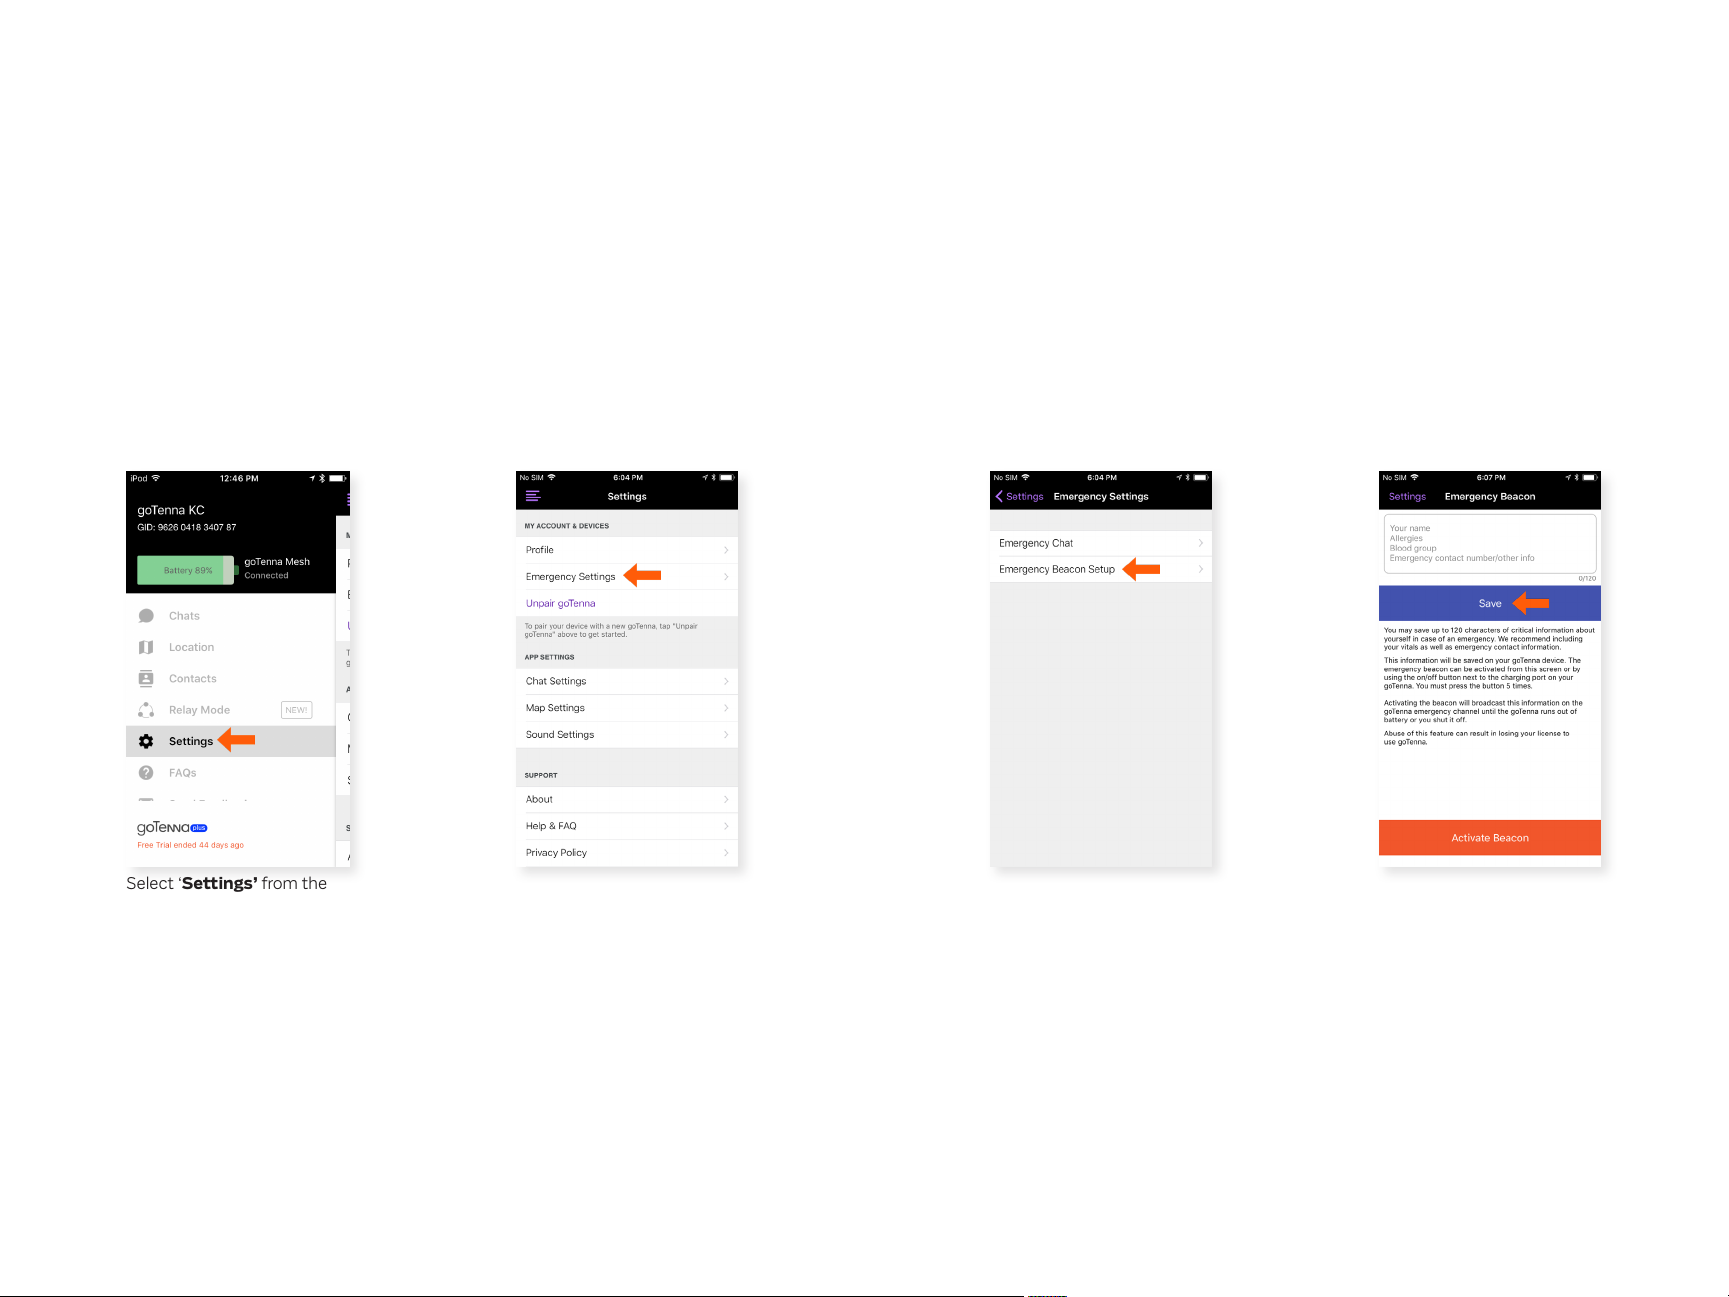
The ‘Push for help’ Emergency Beacon system allows you
to broadcast a custom Emergency Beacon along with your
location and critical info to all goTenna Mesh users within range
(emergency messages always travel 6 hops!). Tapping the
power button on your device 5 times allows you to broadcast
your Emergency Beacon. You can customize the message in
settings. Only use Emergency Beacon during emergencies.
Send an Emergency Beacon
Step 1
Select ‘Settings’ from the
side menu.
Step 2
From the Settings menu,
select ‘Emergency
Settings’.
Step 3 Step 4
Select ‘Emergency Beacon
Setup’.
Type your info and select
‘Save’.
18 19
Page 11
Contacts Mapping & Location
You can access and manage your goTenna contacts from the
side menu. If you haven’t allowed the goTenna app access to
your contacts, you’ll need to manually add contact information.
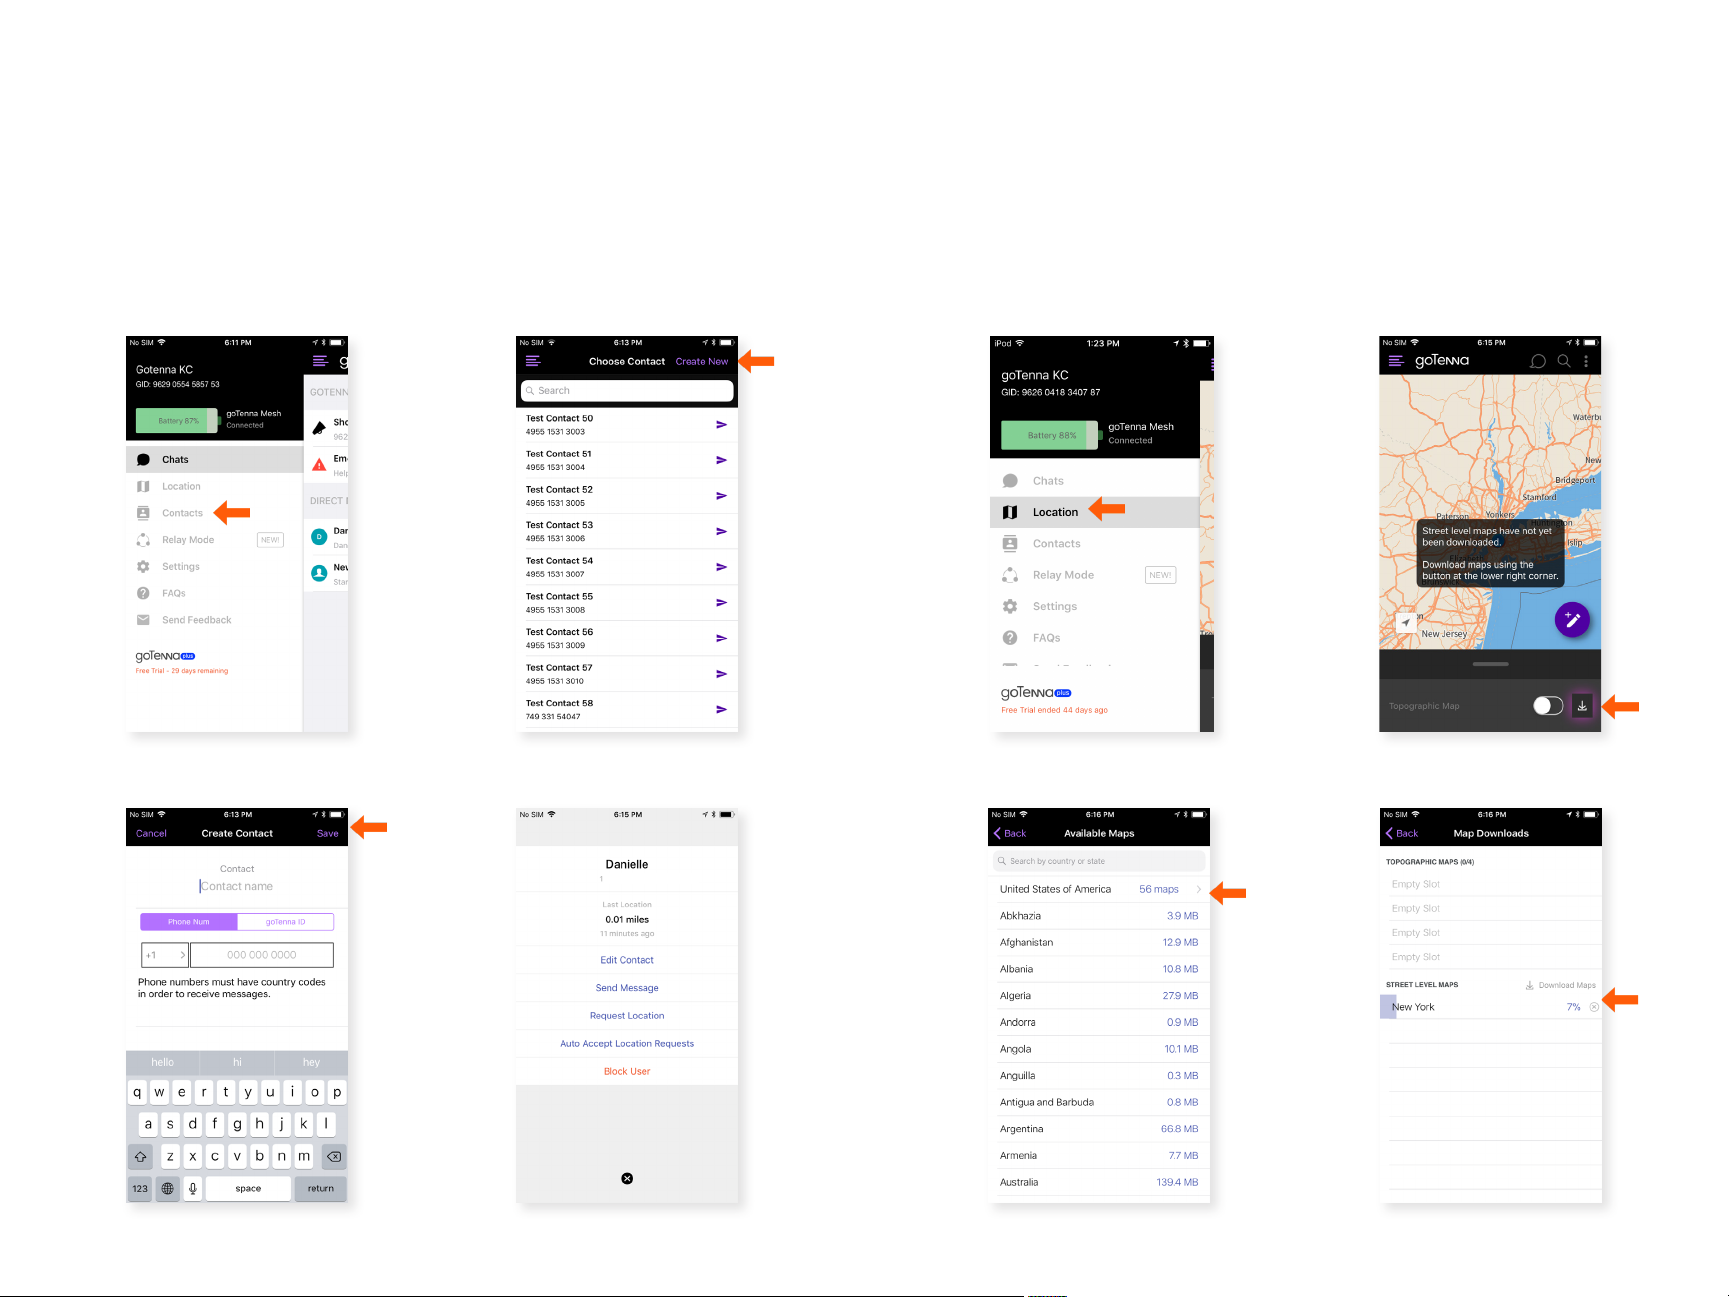
Create a Contact
Step 1 Step 2
The goTenna app allows you to download free, detailed maps
of anywhere in the world that can be used entirely oine. Maps
must be downloaded rst with WiFi or LTE. Once the map is
installed within the app, you can use it 100% oine.
Download a Map:
Step 1 Step 2
Select ‘Contacts’ from the
side menu.
Step 3 Step 4
Type the contact info and
select ‘Save’.
20 21
Tap ‘Create New’ in the
upper right corner.
You can edit, send a
message, request location,
auto accept location
requests, or block the user.
Select ‘Location’ from the
side menu.
Step 3
Select the country and state
of the map you’d like to
download.
Select the download icon on
the bottom right.
Step 5
Your map will be downloaded
and saved here.
Page 12
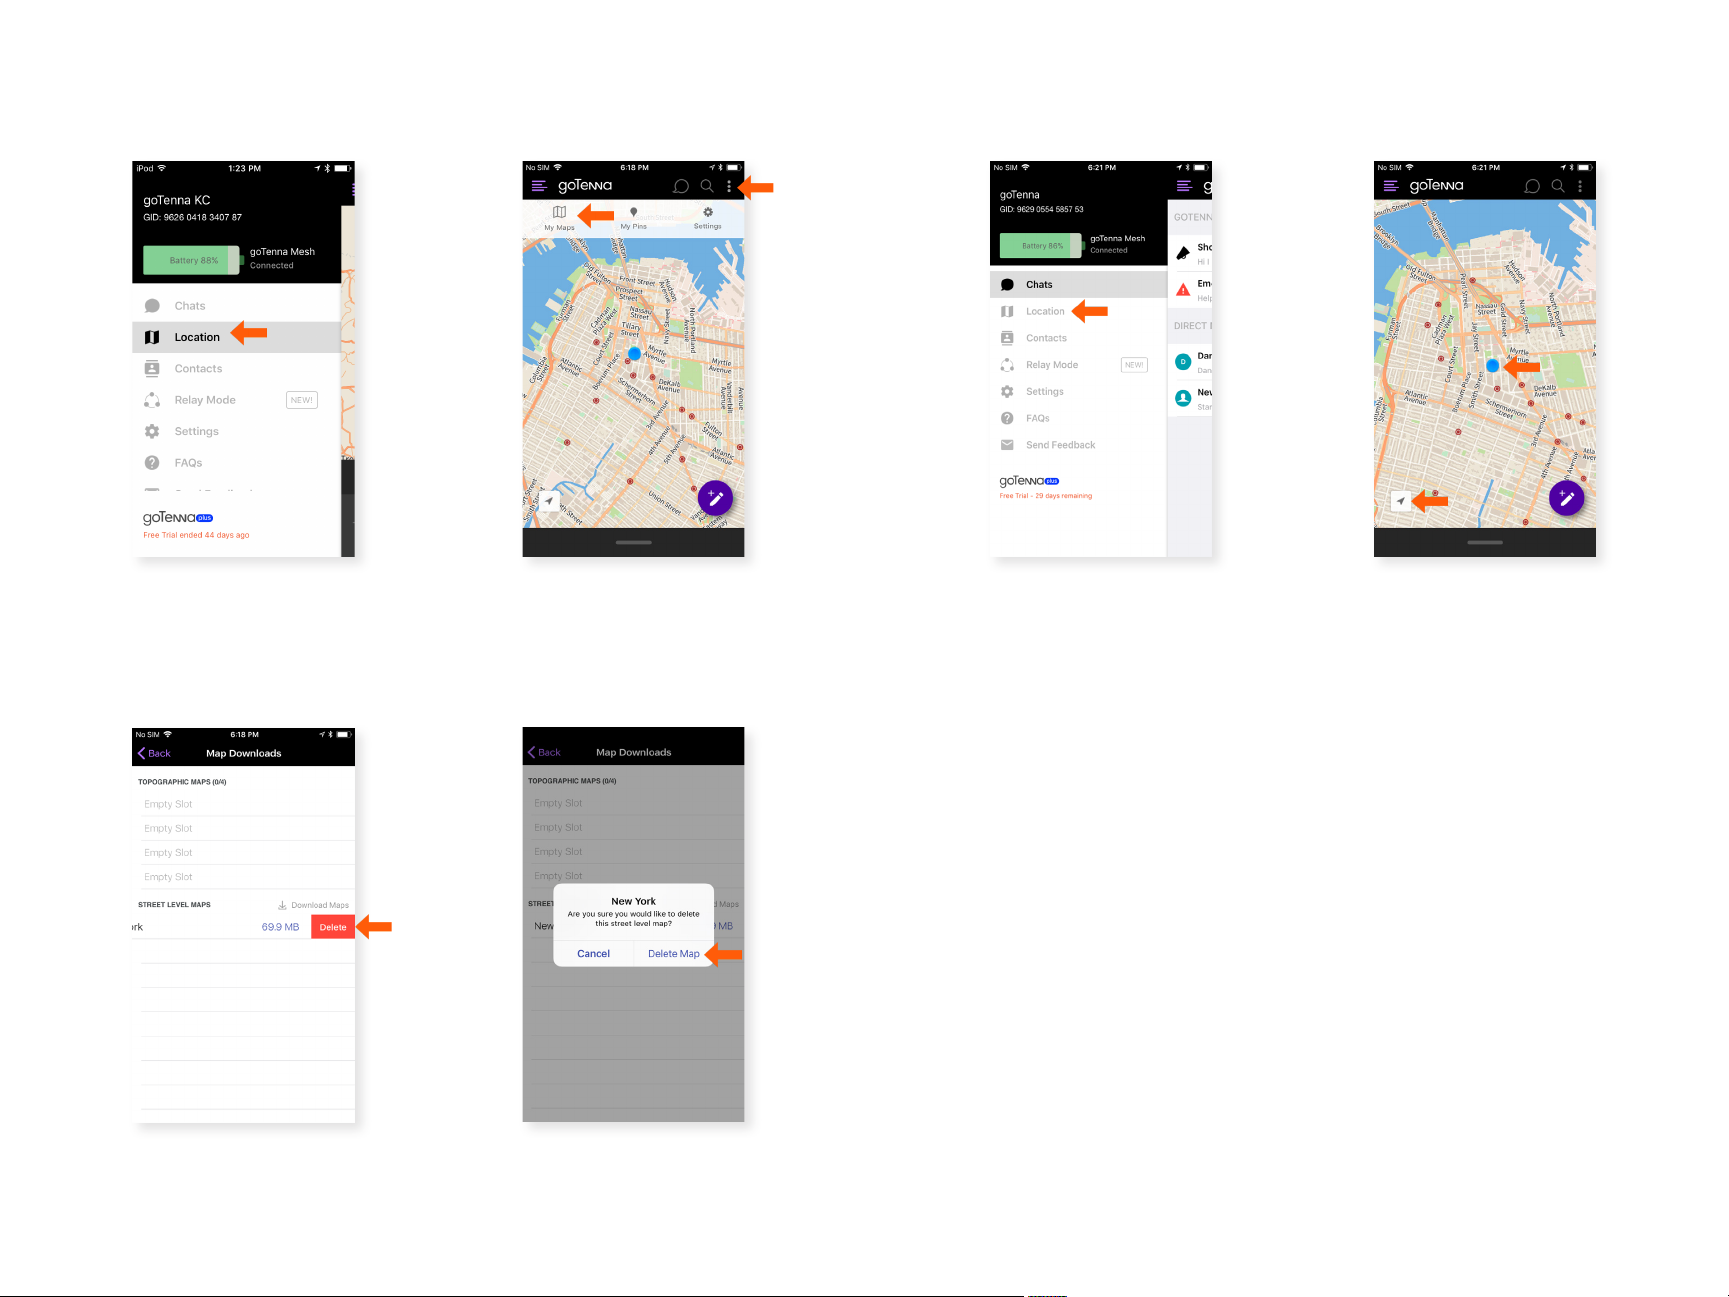
Delete a Downloaded Map:
Find your Location:
Step 1
Select ‘Location’ from the
side menu.
Step 3
Step 2
Select the three dot icon in the
upper right corner, then select
‘My Maps’.
Step 4
Step 1 Step 2
Select ‘Location’ from the
side menu.
Tap the arrow icon in the
lower le corner of
the map. Your location will
be displayed by a blue
dot.
Under Street Level Maps,
swipe le on the map you
would like to delete and
select ‘Delete’.
Select ‘Delete Map’.
22 23
Page 13
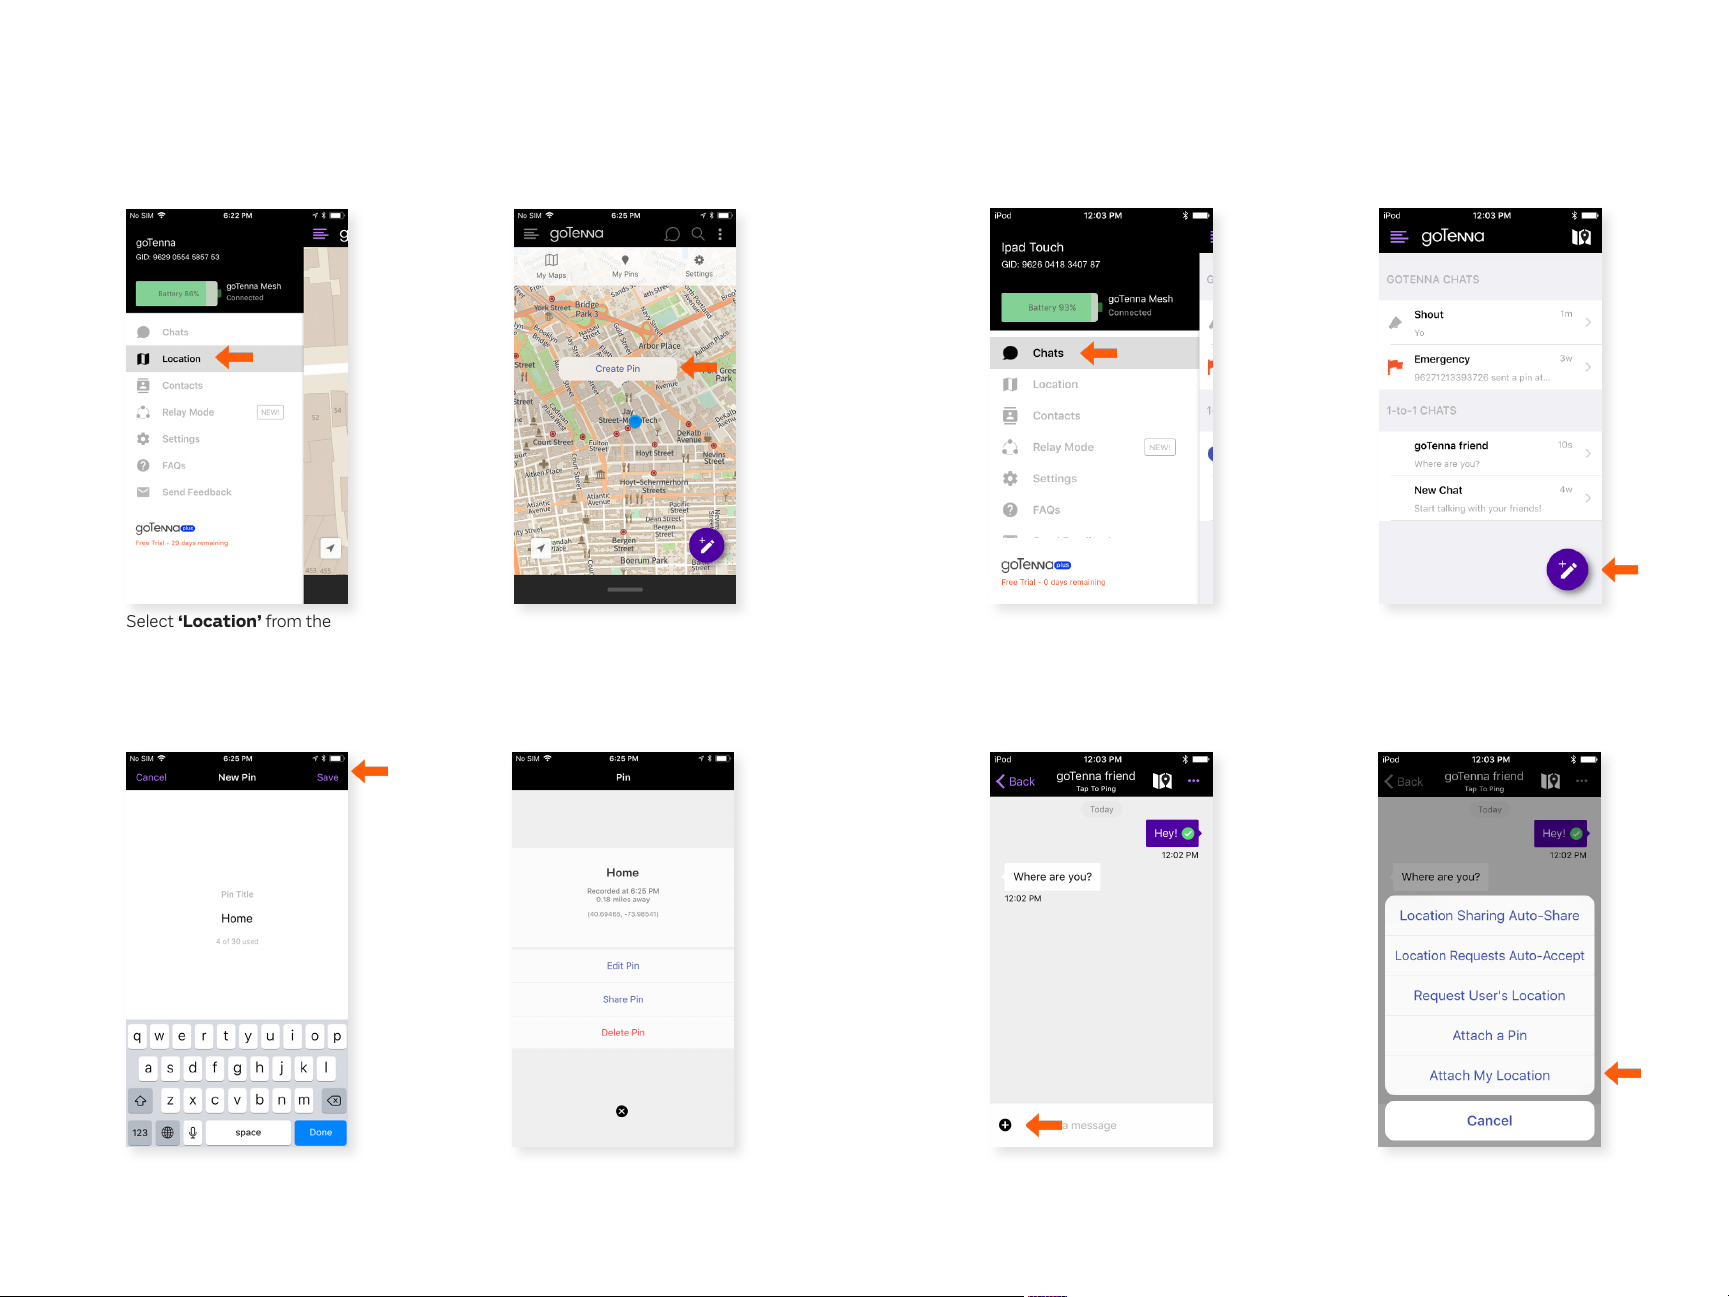
Create a Pin:
Share your Location:
You can follow these steps to auto-accept location requests,
request a user’s location, attach a pin, or attach your location.
Step 1
Select ‘Location’ from the
side menu.
Step 3
Step 2
Drop a pin by long pressing
the location where you’d like
to create a pin. Tap ‘Create
Pin’ when the bubble pops
up.
Step 4
Step 1
Select ‘Chats’ from the Side
Menu.
Step 3
Step 2
Choose an existing chat in
which you’d like to share a
location, or create a new
chat by clicking the compose
icon at the bottom right
corner of the screen.
Step 4
Create a name for your pin
under Pin Title. Select ‘Save’
in the upper right corner of
the screen.
You now have the option to
edit, share, or delete the pin.
Alternatively, you can exit the
screen by selecting the X icon
at the bottom of the screen.
Select the plus icon to the
le of the text box.
Select ‘Attach My
Location’ or any of the
location sharing options.
24 25
Page 14
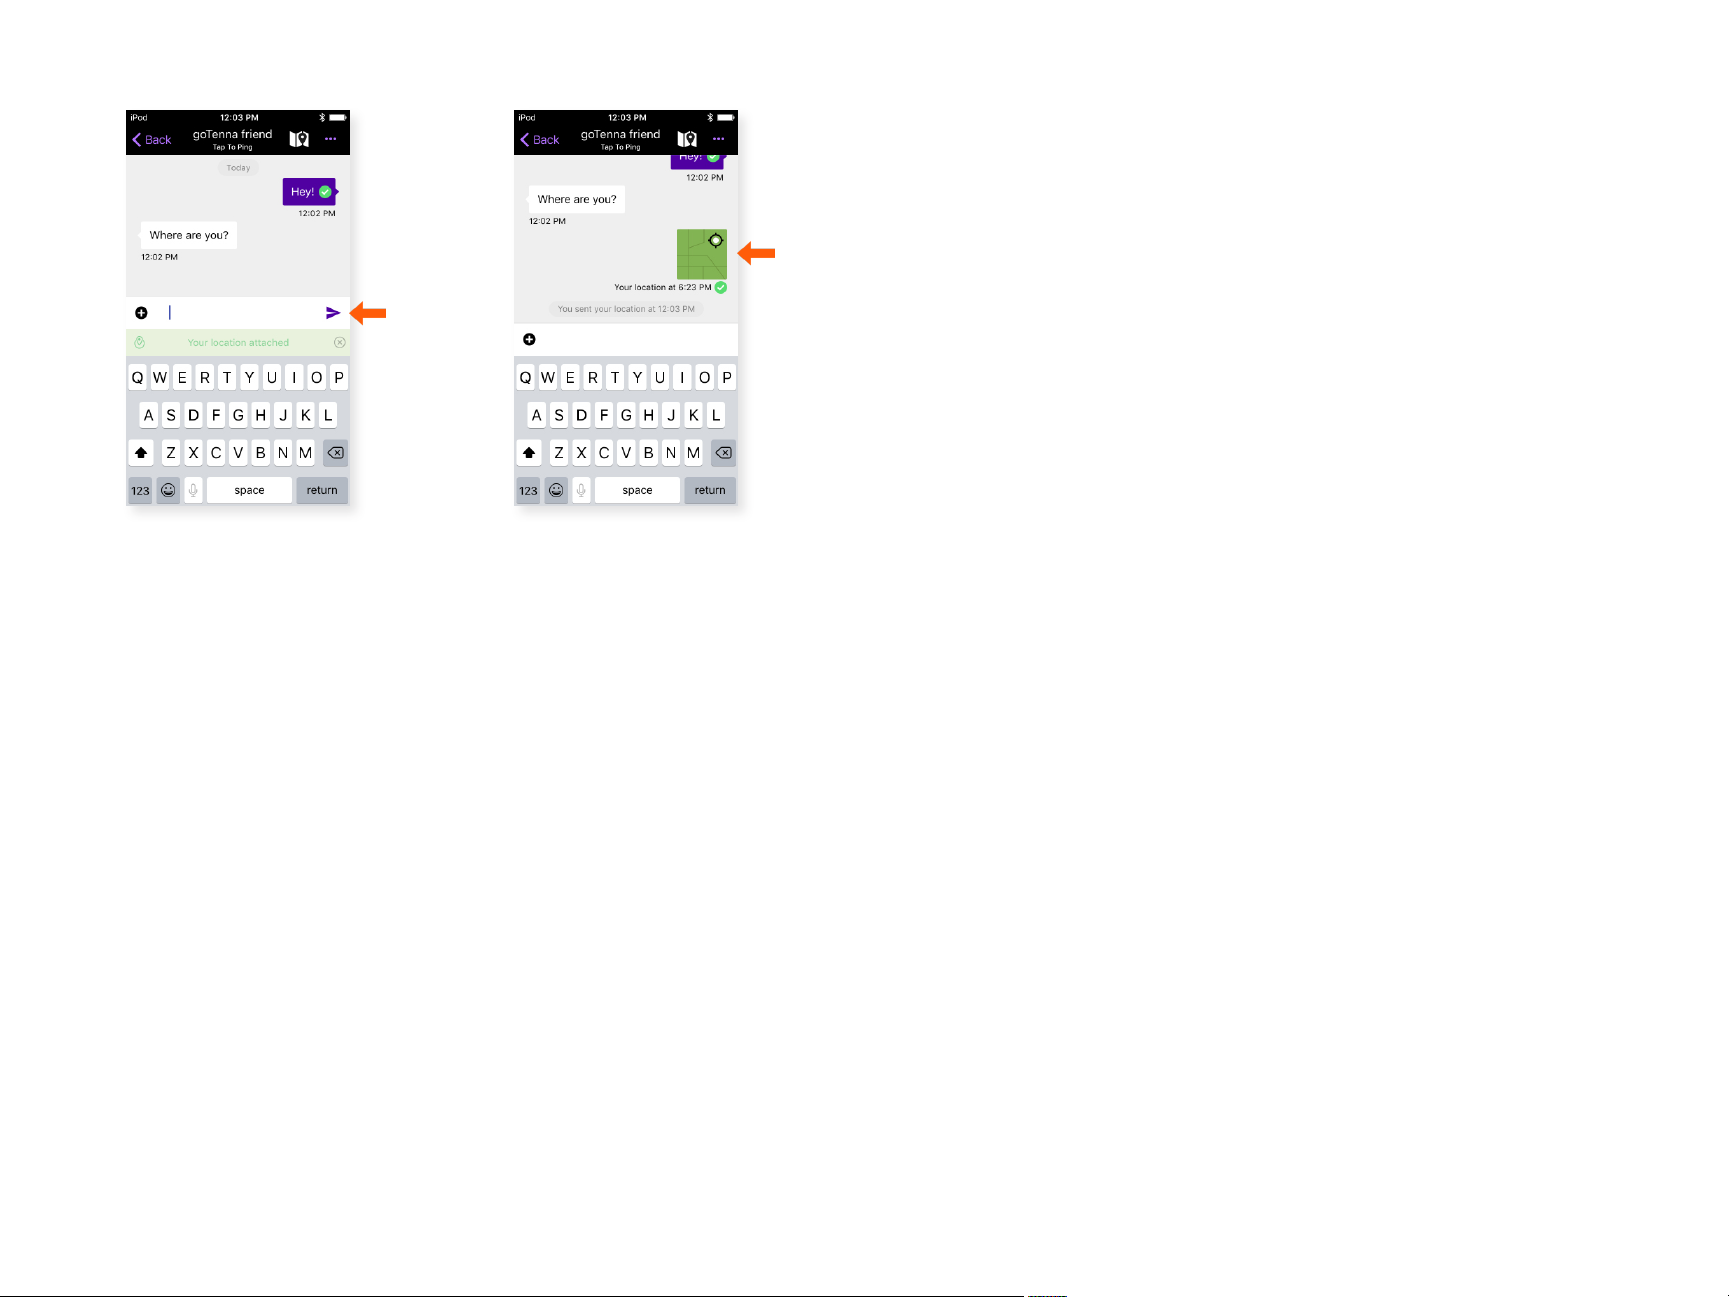
Step 5
Step 6
Type a message if desired.
Select the send button.
Click on the location to view
the map.
26 27
Page 15
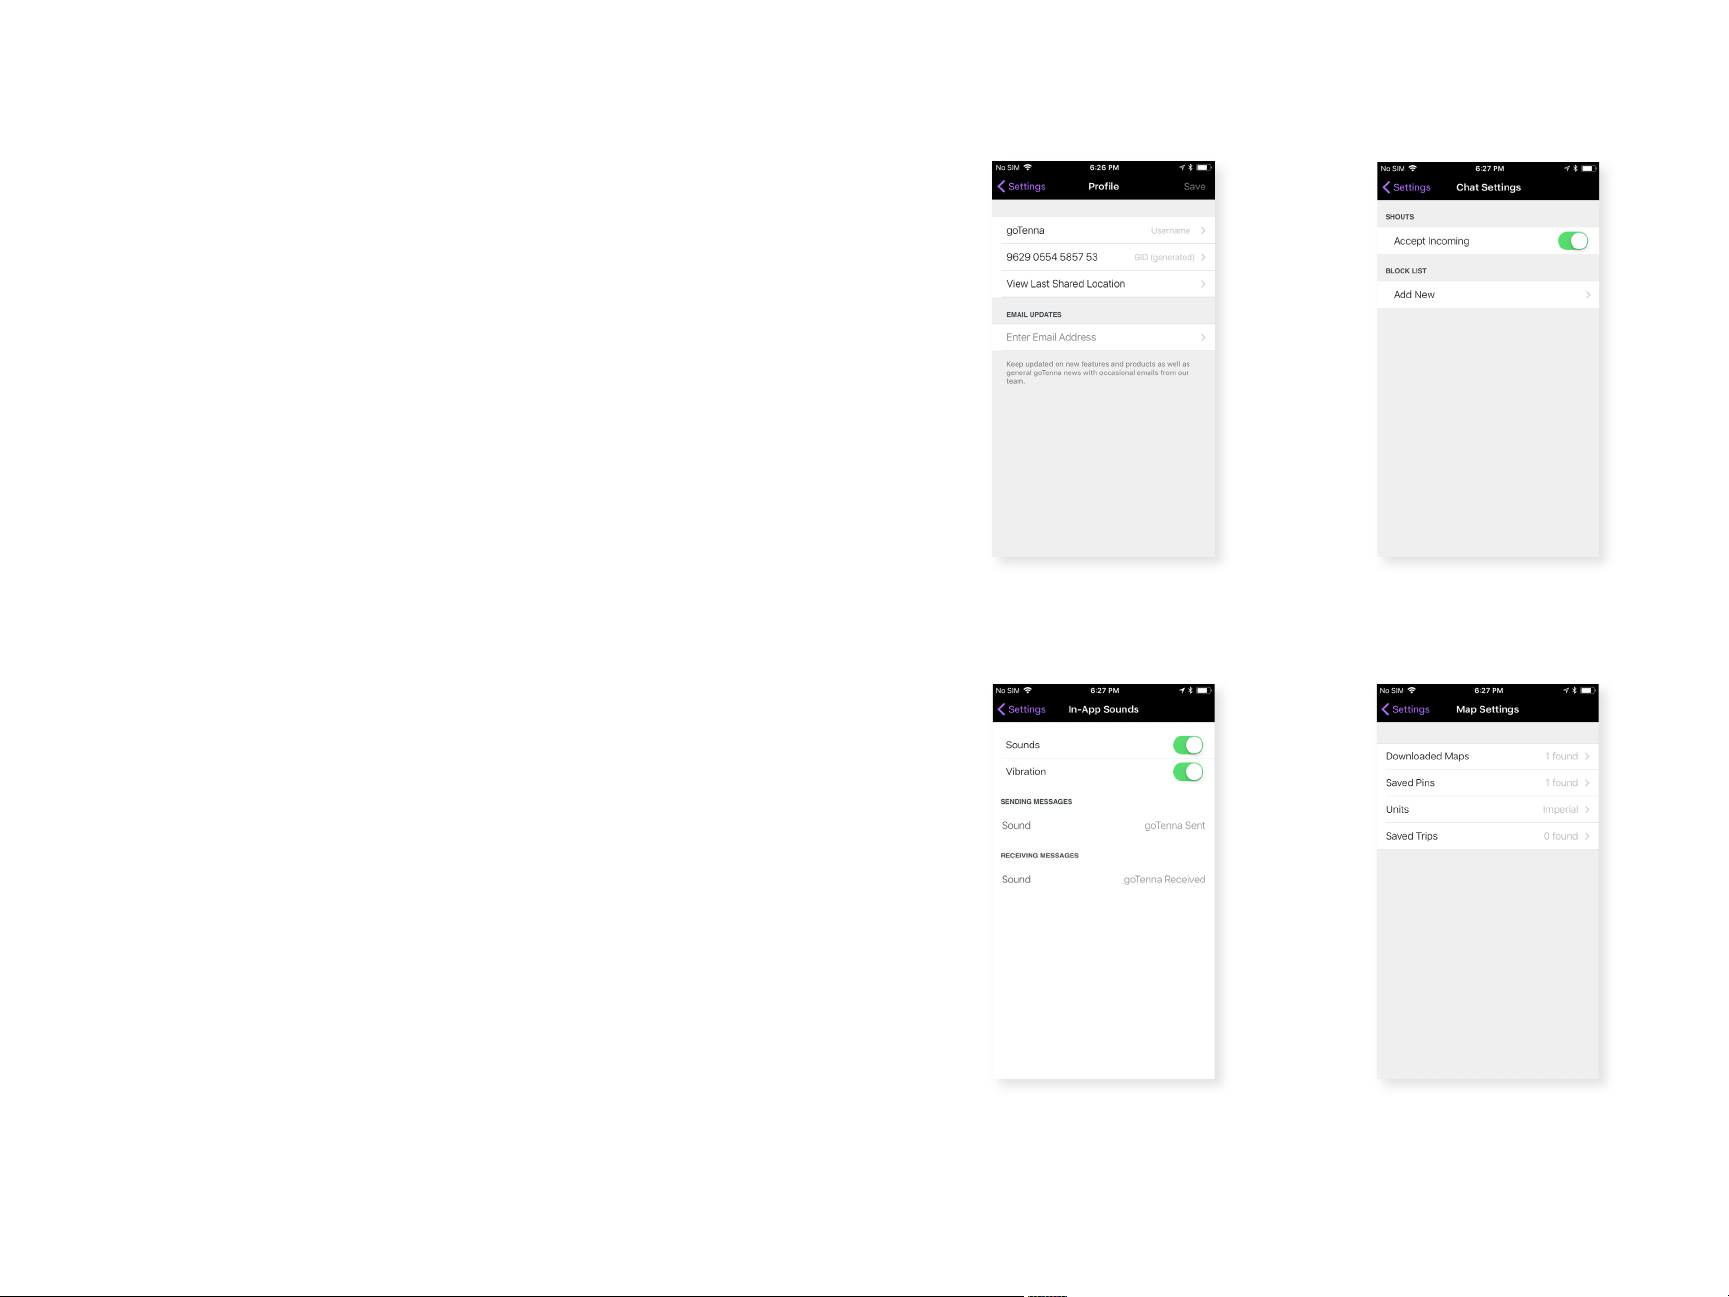
Settings
Within Settings you can ne tune your goTenna app.
MY ACCOUNT & DEVICES:
• Prole - Username, Phone Number or GID, Last Shared
Location, Email Updates
• Emergency Settings - Emergency Chat, Emergency
Beacon Setup
• Pair/Unpair goTenna
APP SETTINGS:
• Chat Settings - Shouts (Accept/Don’t Accept Incoming),
Block List
• Map Settings - Downloaded Maps, Saved Pins, Units, Saved
Trips
• Sound Settings - Sounds (On/O), Vibration (On/O),
Sending Messages Tones, Receiving Messages Tones
SUPPORT:
• About - App Information (App Version, Build Number, Install
Date, Source), Device Information (Battery, Serial, Firmware
Installed, Region)
• Help & FAQ - Answers to questions regarding Messaging,
Maps & Location, Range & Performance, etc.
• Privacy Policy
• Logout - If you log out, you’ll need to undergo account setup
again to use goTenna Mesh.
Prole
Sound Settings Map Settings
Chat Settings
28 29
Page 16
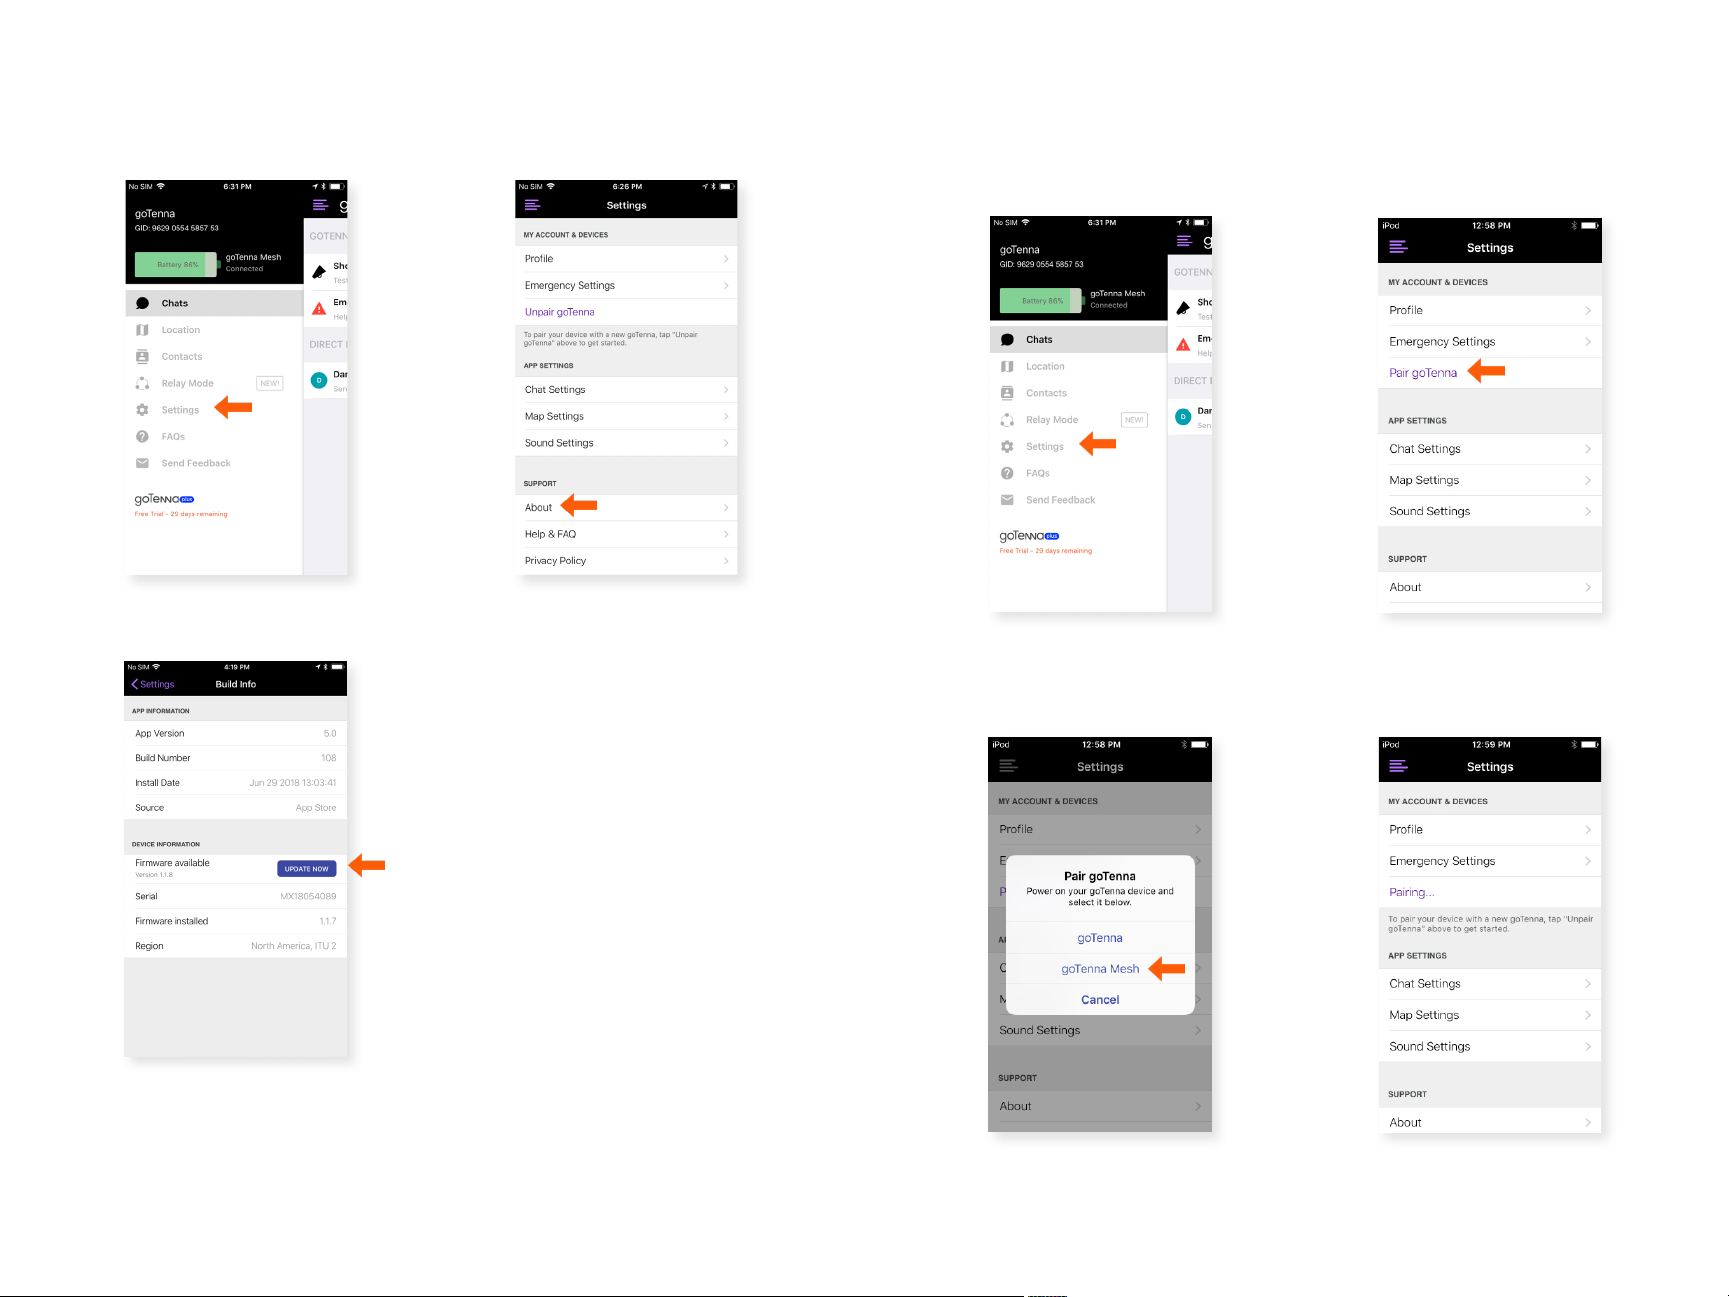
Conrm your goTenna Firmware is
Pair your goTenna Mesh Device:
Step 1
Select ‘Settings’ from the
Side Menu.
Step 3
Up-to-Date:
Select ‘About’.
Step 2
Turn your goTenna Mesh device on. When the light is blinking on
your goTenna Mesh device, follow these steps:
Step 1
Select ‘Settings’ from the
Side Menu.
Select ‘Pair goTenna’.
Step 2
If you need to update your
rmware, you’ll see a blue
button that says ‘UPDATE
NOW’. Select this button
to update your rmware. If
you don’t need to update,
you’ll see the latest rmware
version listed with no action
button.
Step 3
Select ‘goTenna Mesh’. You
should only attempt to pair
one goTenna Mesh device at
a time.
goTenna Mesh will pair.
Step 4
30 31
Page 17
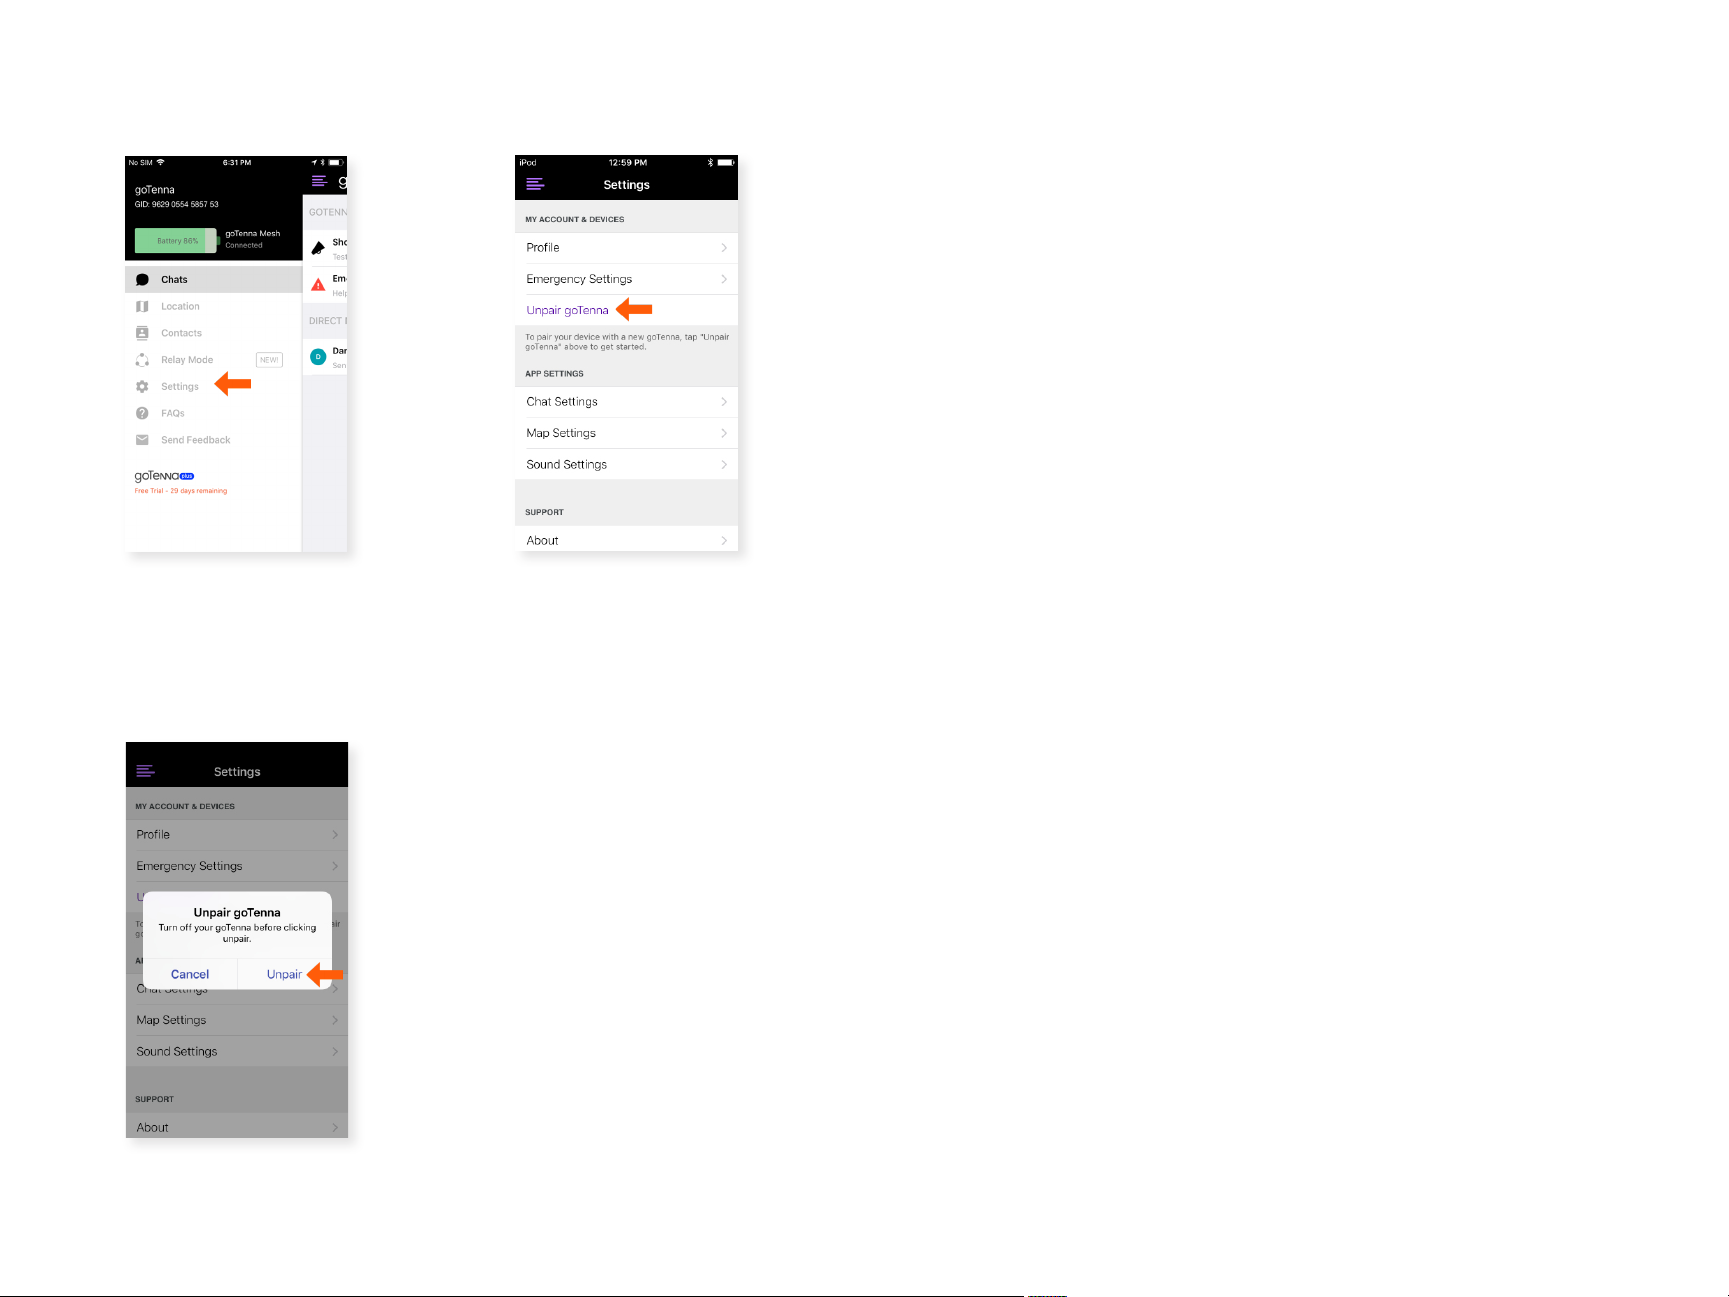
Unpair your goTenna Mesh Device:
Step 1
Select ‘Settings’ from the
Side Menu.
Step 2
Select ‘Unpair goTenna’.
Step 3
Select ‘Unpair’.
32 33
Page 18
Stationary Relay Mode
Your goTenna Mesh device can be set up as a dedicated relay
node in order to increase range. A goTenna Mesh device does
NOT need to be actively paired to a device to serve as a relay
node, but it does have to be powered on.
1-to-1 Chat, Group, and Emergency Chat will relay through other
goTenna Mesh devices or through goTenna Mesh devices that
are set up in Stationary Relay Mode. Shouts do not relay.
To set up Stationary Relay Mode:
1. Turn on your goTenna Mesh device by pressing and
holding the power button on the side of the device for 3
seconds until the light turns on.
2. Triple-press the power button and wait for the light
to stay on. Once the light stays on, quickly
triple-press the power button once again to conrm
Stationary Relay Mode. The light will blink 3 times
then turn o.
Users can also now ‘pair’ to a relay node in order to view battery
life. When a node is set up as a relay, any pairing that occurs
does not take the goTenna Mesh device out of Stationary Relay
Mode. This pairing can ultimately be done “in passing”.
To conrm Stationary Relay Mode is on at any point, press the
power button and the light will blink 3 times.
To deactivate Stationary Relay Mode:
1. Press and hold the power button on your goTenna
Mesh device for 5 seconds until the light turns o.
2. Turn the goTenna Mesh device back on by holding the
power button for 3 seconds until the light turns on.
3. When the light is blinking, you can re-pair your goTenna
Mesh device to your smartphone to continue using all
the app features.
34 35
Page 19
goTenna Plus Features
goTenna Plus is our subscription service that gives users access
to Location Tethering, SMS Network Relay, Trip Statistics, and
Topographic Maps. You can receive a free 30-day, no-stringsattached trial to test out these features.
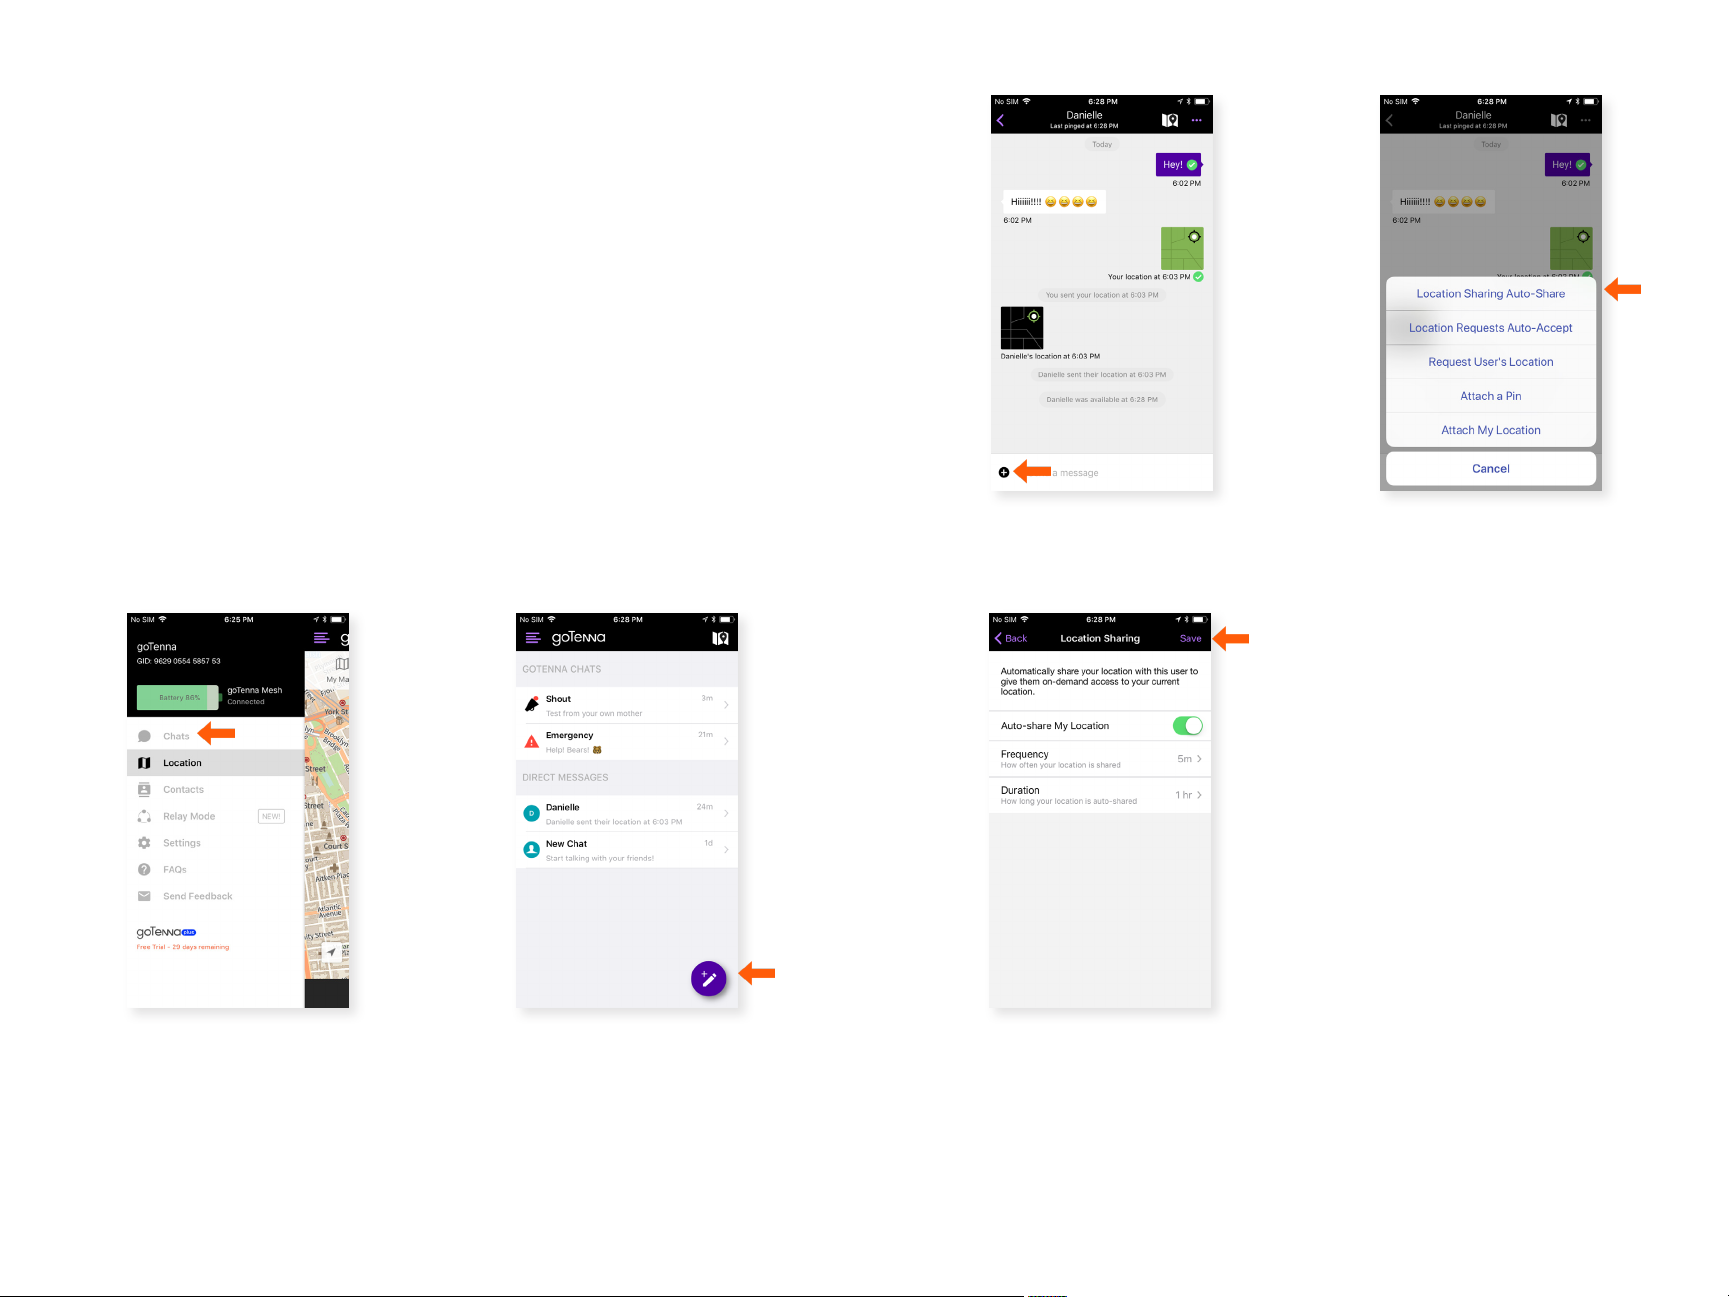
Location Tethering:
This feature broadcasts a user’s location every 1-10 minutes
for up to 12 hours to designated recipients. The times are
customizable upon setup.
Step 3 Step 4
Step 1 Step 2
Select ‘Chats’ from the Side
Menu.
Create a new chat, or select
the existing chat with the
user you’d like to location
tether with.
Select the plus icon to the
le of the text box.
Step 5
From here, you’ll toggle
location tethering on/
o. Select the frequency
(every 1, 5, or 10 minutes) &
duration (15, 30 minutes, or
any duration between 1 - 12
hours) at which you’d like
to update and share your
location.
Select ‘Location Sharing
Auto-Share’.
36 37
Page 20
SMS Network Relay
SMS Network Relay enables users to send messages to other
users that are not within range or using goTenna Mesh by
utilizing another goTenna Mesh user’s internet connection to
send out SMS messages. Messages sent out via SMS Network
Relay will show conrmation with a green check mark and will
appear in the user’s text messaging application.
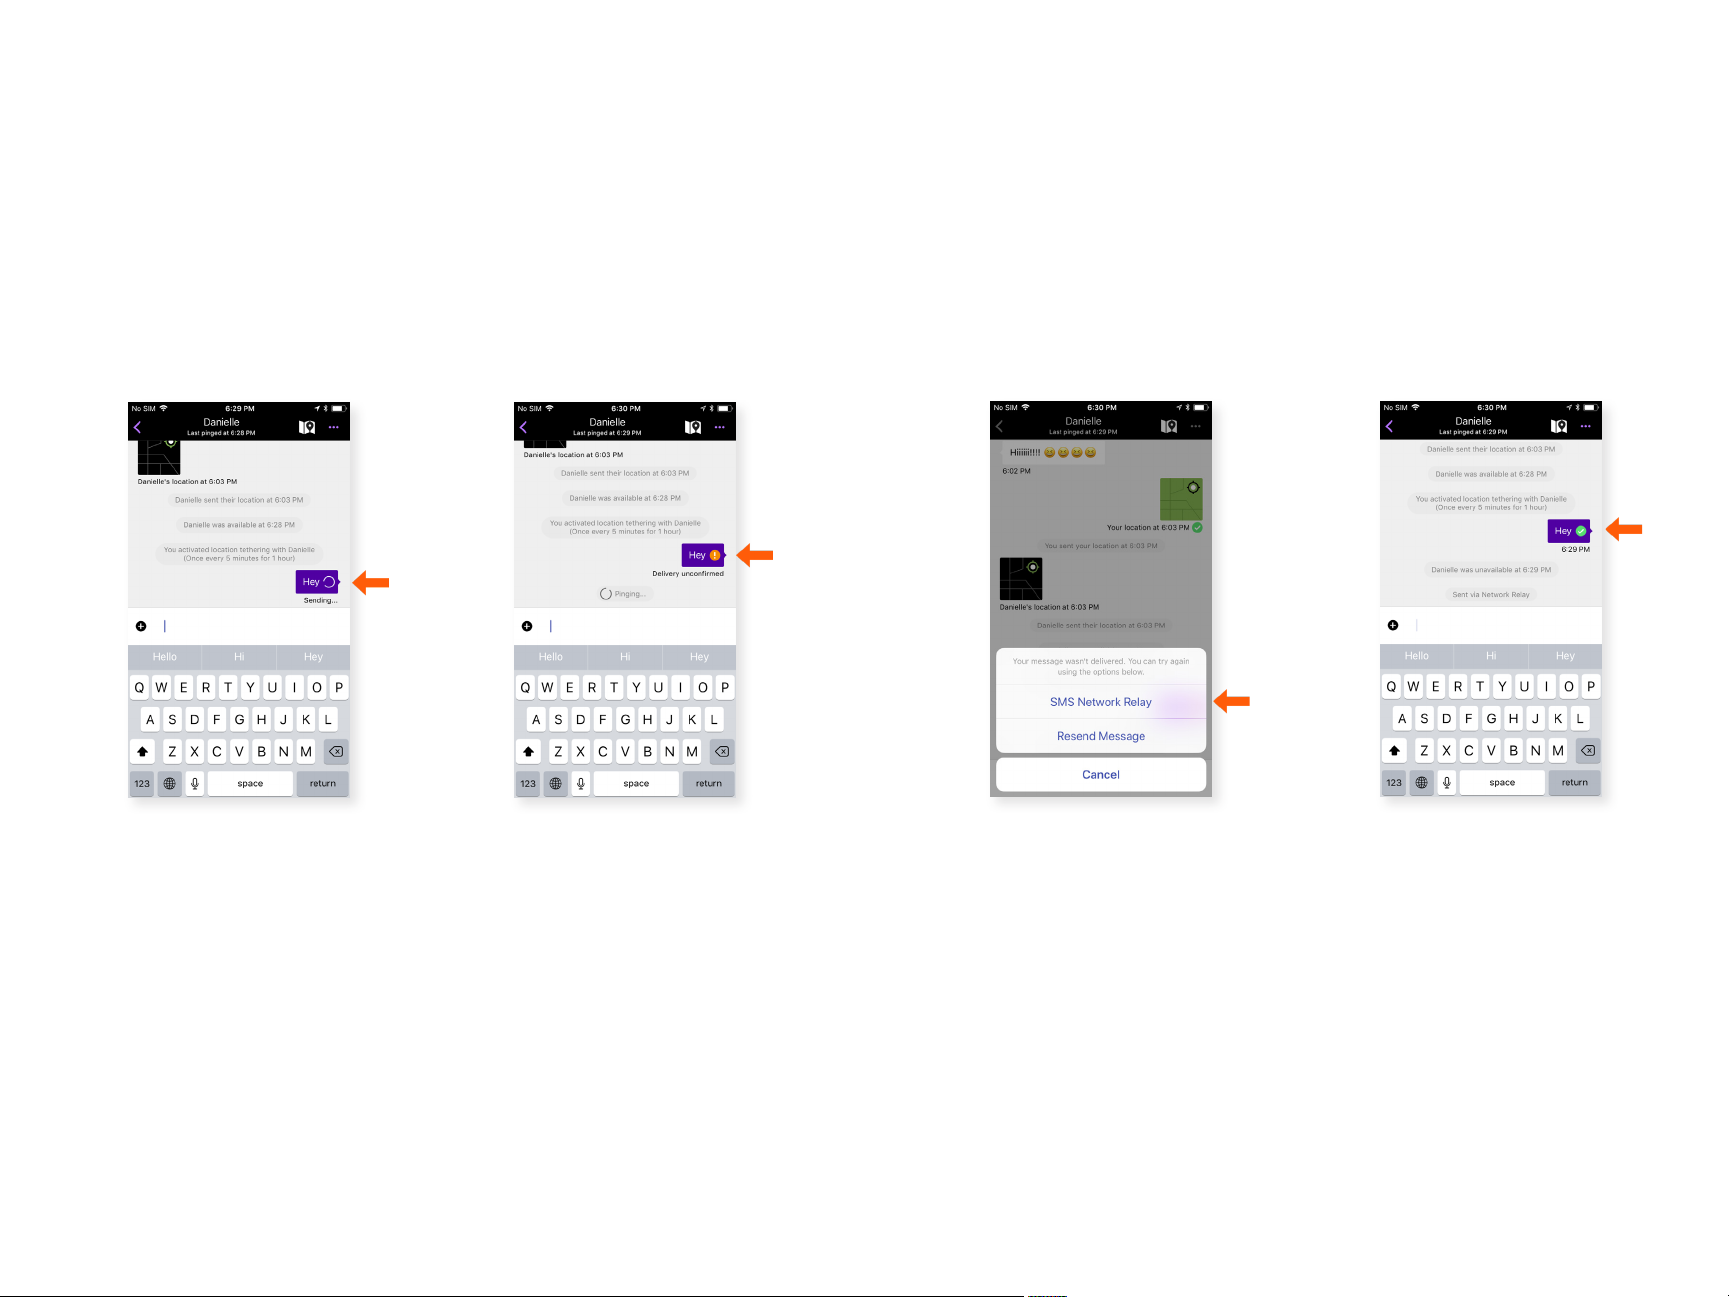
Send a Message via SMS Network Relay:
Step 1 Step 2
Open a chat message and
send a message.
When the message is
marked as ‘Delivery
unconrmed’, select the
orange exclamation point.
Step 3 Step 4
Select ‘SMS Network
Relay’.
Your message will be
sent via SMS. You’ll see a
green check mark when
the message is conrmed
as sent. If delivery
cannot be conrmed,
you’ll see ‘Delivery
unconrmed’.
38 39
Page 21
Trip Statistics
Enabling trip statistics will record your exact trip and
document it along the way. Statistics visible at the bottom
of the screen can be changed by the user. Options include:
altitude, stopped time, moving time, distance, current
speed, average speed and pace. Saving your trip will reveal
all options on one summary page.
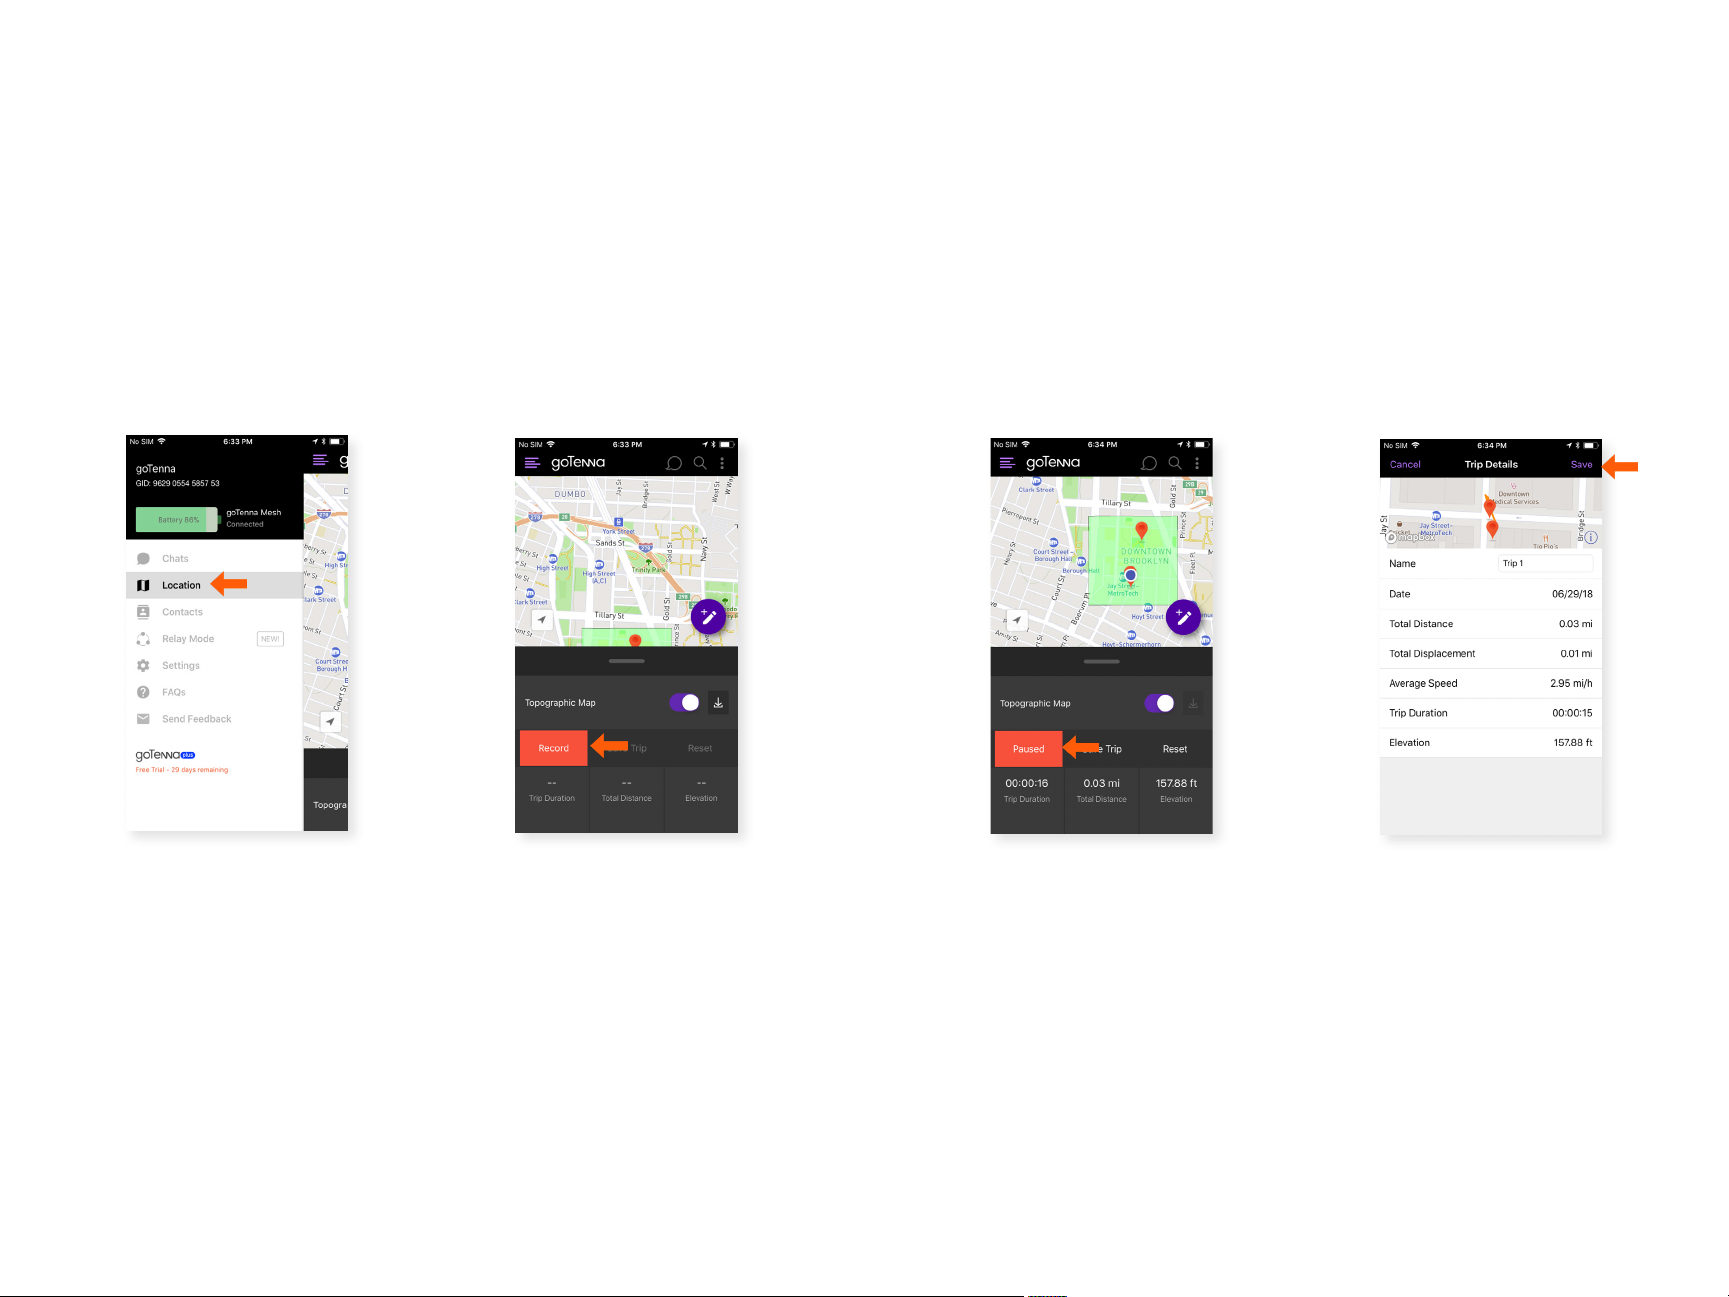
Record Trip Statistics:
Step 1 Step 2
Select ‘Location’ from the
Side Menu.
Swipe up on the black
bottom bar. Tap ‘Record’
to begin recording your trip.
When recording, this button
will show ‘Recording...’.
Step 4
To pause recording, tap
‘Recording...’. which will
then show ‘Paused’. To
reset your trip, tap ‘Reset’.
Step 5
To save your trip, tap ‘Save’.
40 41
Page 22
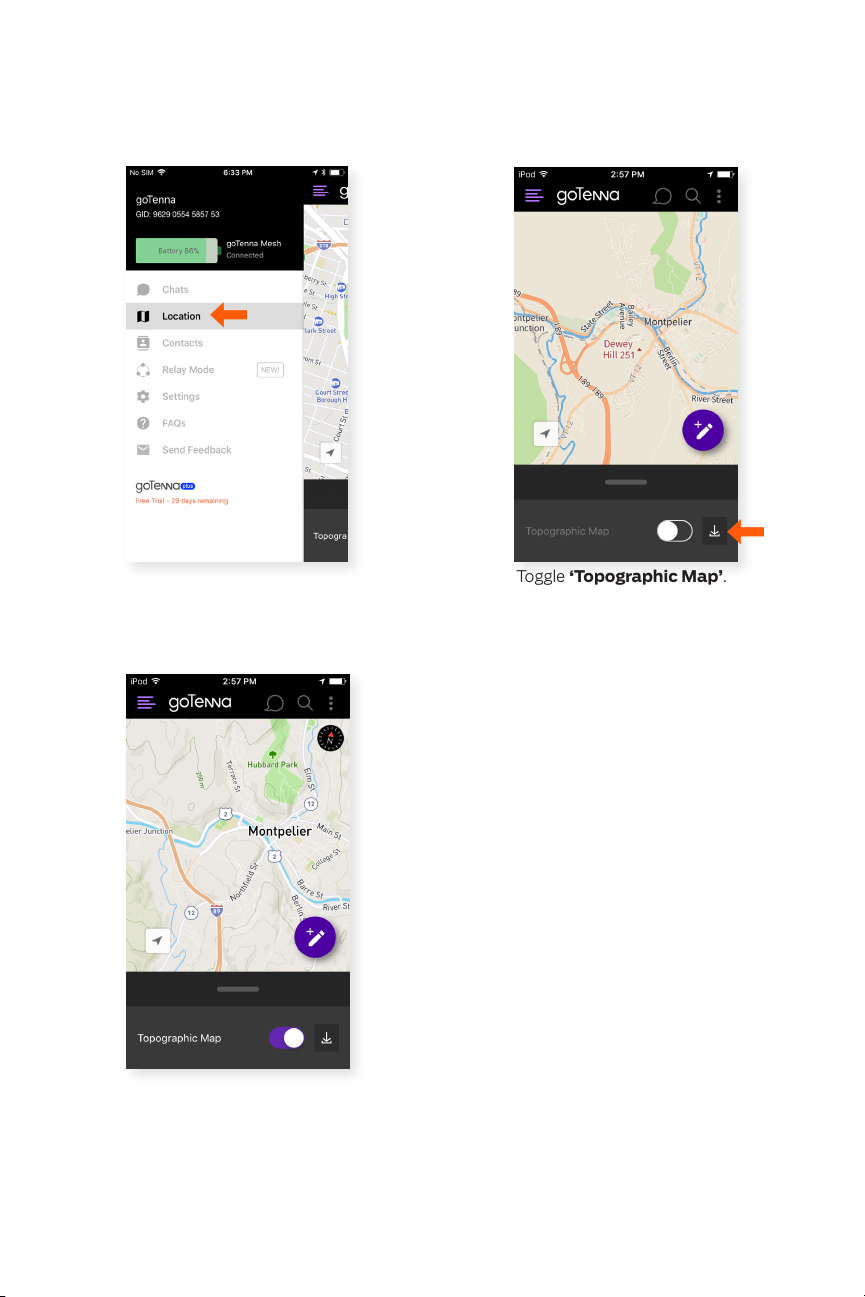
Topographic Maps:
Step 1
Select ‘Location’ from the
Side Menu.
Step 3
Step 2
Toggle ‘Topographic Map’.
42
Here is the Topographic Map.
 Loading...