

Page 1
GOST Watch HD – User Guide
GOST WATCH HD Overview
The GOST Watch HD system allows clients to
access live streaming video on board their boat over the
internet from any computer or web enabled phone and
allows up to 6 cameras per login. Visit our website at:
www.gostglobal.com/home , click on “GOST Watch HD”
Login. GOST Watch HD website features include:
Viewing Live Video
Arm/disarm motion areas of cameras
Set Up video actions off specific events
Record snapshots and video clips
Review archived events
Change user login info
As an added bonus, download the free “GOST Watch
HD” in iPhone / Android app stores. This app allows
clients to log in and stream video from the vessel on
their smartphone/tablet (See page 5).
If the Equipment is registered and the Cellular and/or
KVH Vsat Internet Data plans are activated, Please
proceed to page two of this guide under
“Using your GOST Watch HD system”
If you still need to register, please see the rest of the
first page for instructions and confer with you Marine
Electronics Installer for specific registration numbers
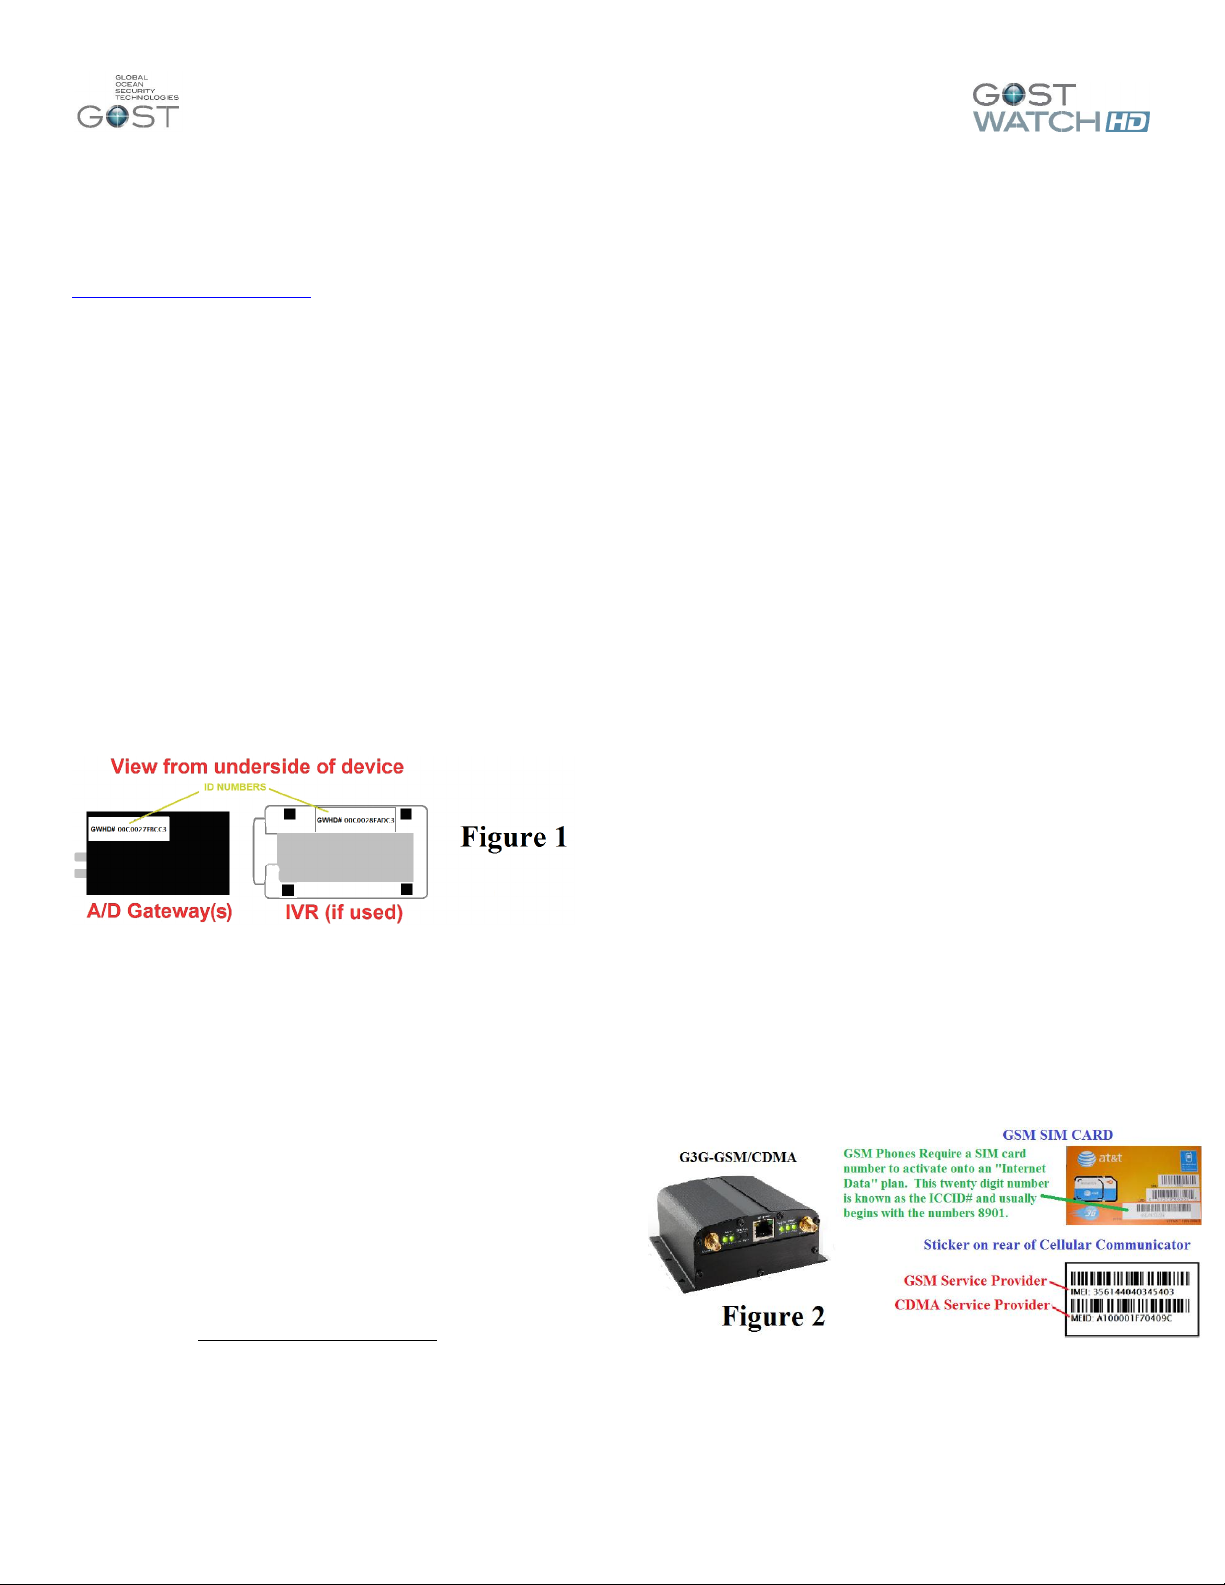
needed as seen in Figure 1.
A/D Gateway MAC GWHD #1 _______________________
A/D Gateway MAC GWHD #2________________________
A/D Gateway MAC GWHD #3 _______________________
A/D Gateway MAC GWHD #4 _______________________
A/D Gateway MAC GWHD #5 _______________________
A/D Gateway MAC GWHD #6 _______________________
IVR
MAC GWHD # __________________
Please allow 24 hours for the GOST Watch HD User ID
to be registered (M-F 8:30am – 5:00pm EST). To
maintain customer privacy, a default password “1 2 3 4“
is given to the account. The client should update the
password once the installation is complete, under “My
Account- My Registered Users” on page 3. It is
imperative that the installing Marine Electronics
Technician have the username for the account to move
forward to setup and configure the GOST Watch HD
system.
REGISTER FOR MOBILE DATA SERVICE
The basic package includes a GSM / CDMA cellular
device and is recognized by all major cellular providers.
The client needs to set up a “DATA” plan that provides
internet to the A/D gateways. Please ensure that the
person setting up the “Cellular Internet Data Activation”
account with the provider (AT&T, Verizon, T-Mobile,
Sprint, etc.) has all the information identified in Figure 2.
The GOST Watch HD is also an approved streaming
video platform with KVH and TracPhone V3IP, V7IP, and
V11IP line of mini-VSATs. The client must be on a KVH
unrestricted rate plan to use the GOST Watch HD
streaming video platform (M-plan on V3ip, U Plan
V7ip,V11ip).The installer should be familiar with KVH
installation standards, follow all included installation
guides, support instructions, and activation procedures
included with the KVH system. See the instructions on
right side of the next page. Also, when activating KVH
system ensure that “COMBOX STANDARD BUNDLE”
is selected on page five of the KVH airtime contract.
CELLULAR INTERNET DATA ACTIVATION
The GSM/CDMA cellular Internet data terminal sold with
the system is the G3G-GSM/CDMA. Make sure to
document the identifiers on the back of the Cellular data
modem. Make sure that the client has this information to
activate the account with the proper plan. Though the
data module should automatically sync to the network,
sometimes it may be necessary to log in locally to
Cellular Data Terminal and select the airtime provider.
See instructions on left side of the next page.
REGISTER FOR GOST WATCH HD SERVICE
It is strongly suggested that the client register for
GOST service at the start of the installation, because the
installer will need a username and password to configure
and test GOST Watch HD camera system.
1.) Go to www.gostglobal.com/home and
Click the “Register for Service” link.
2.) Click “Create Account” and fill out basic info to
sign the secure contract and press continue.
3.) Click on "Let’s get Started" button and Pick A
Product of "GOST Watch HD."
4.) The client needs to enter all of their info and
complete a secure and digitally signed contract.
GSM Accounts (AT&T, T-Mobile)
IMEI # _ _ _ _ _ _ _ _ _ _ _ _ _ _ _
ICCID(SIM)# 8901 _ _ _ _ _ _ _ _ _ _ _ _ _ _ _ _
CDMA Accounts (Verizon, Sprint)
MEID # _ _ _ _ _ _ _ _ _ _ _ _
Page 2
GOST Watch HD – User Guide
2
Using your GOST Watch HD System
1.) With your system activated and the Marine
Electronics Dealer’s installation complete, go to
www.gostglobal.com/home and click the “GOST Watch
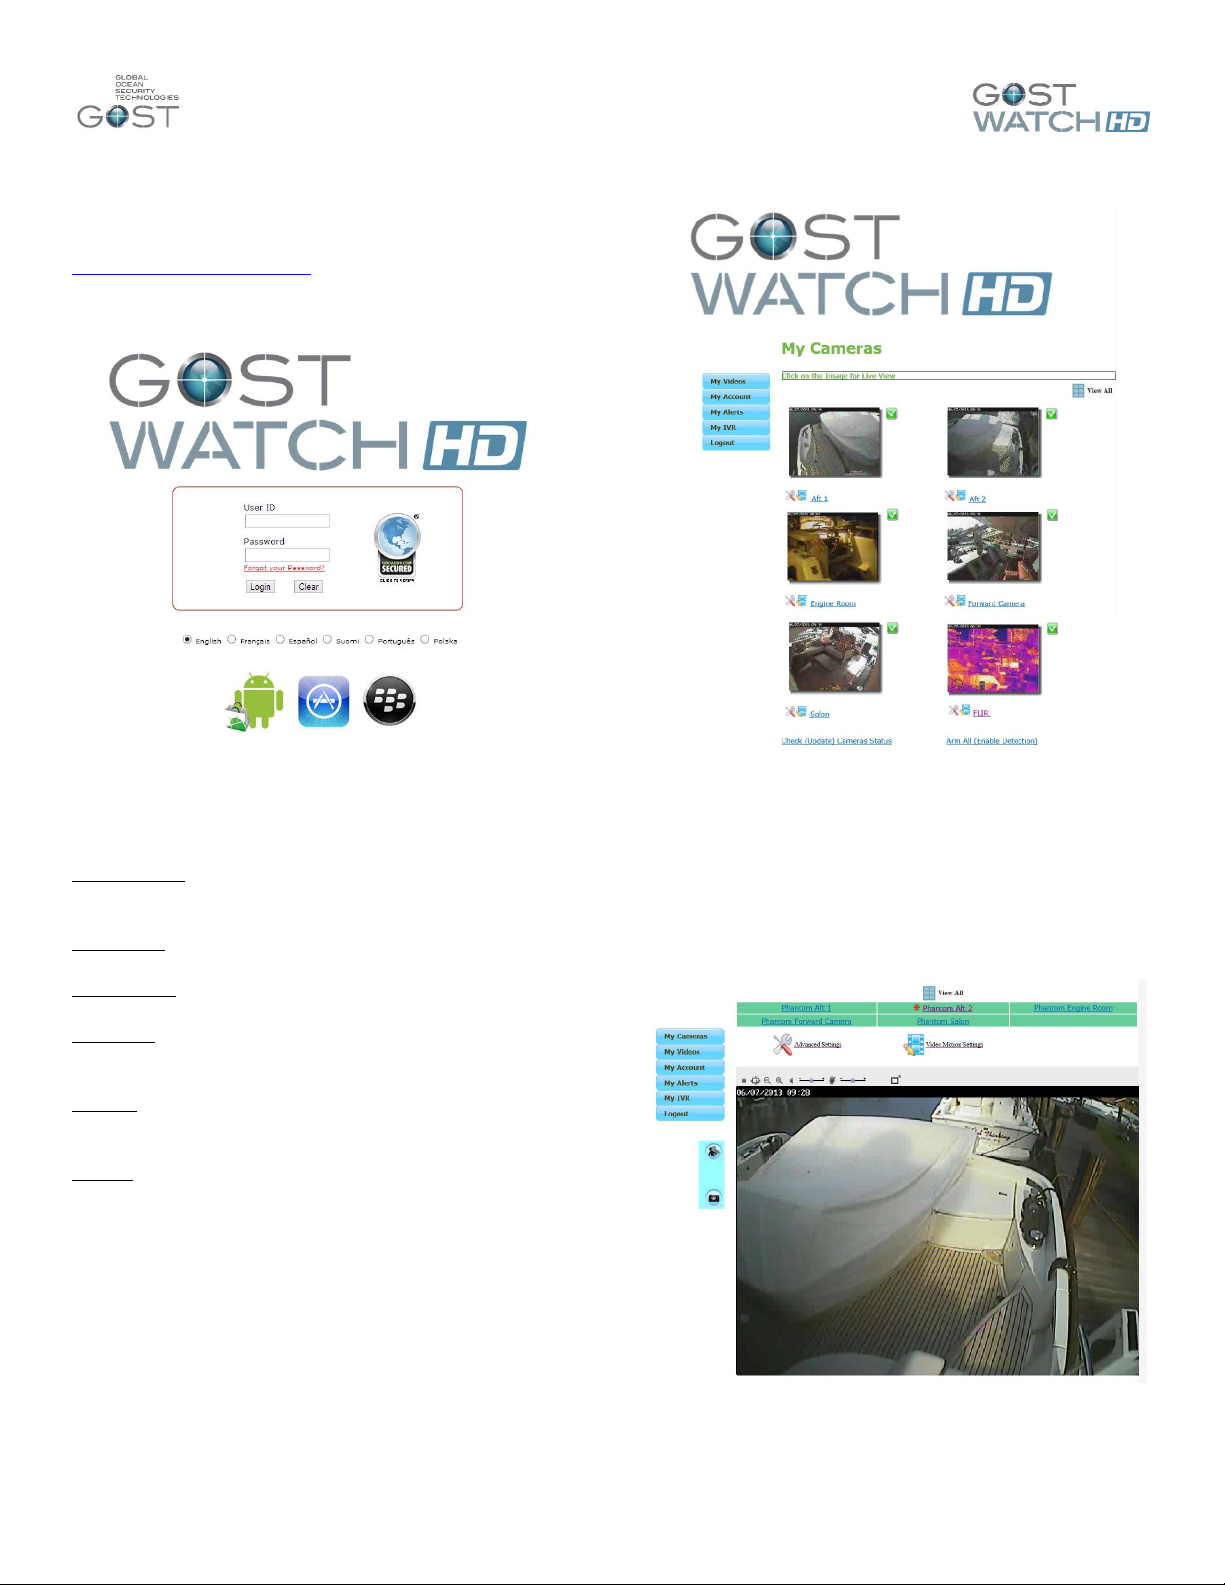
HD Login”. Enter your User ID and temporary password
of “1 2 3 4” (Figure 3)
Figure 3
2.) Once logged in, you will be met with the home
screen with still shots of the cameras. The tabs to the
left are how you navigate the website. See the
description below each tab below and Figure 4 to right.
My Cameras – View live video off boat and configure
motion detection areas for events.
My Videos – View stored videos of events.
My Account – Edit or Add User information.
My Alerts – Set E-mail event alert recipients and
determine verbiage and file format to be sent.
My IVR - View saved footage and configures specific
cameras for IVR Recording (if installed).
Logout – Sign off GOST Watch HD system.
My Cameras
This is the landing page of the login. You will initially see
recent still shots from each camera on the vessel as
seen in Figure 4 and 5 to the right. You may be
prompted by your browser initially to download a
software plug in, Save and install the software plugin as
directed.
Once this is complete, you can:
- Click on the desired camera image for video
- Click “View All” to stream all cameras at once
Figure 4
If you click a single image, you will have the ability to
change “Advanced Settings” and also to configure
“Video Motion Settings” as described on the next page
(Figure 5 below). The average client should have no
reason to change any of the advanced settings (if
desired, see the GOST Watch HD Installation and Setup
Guide).
Figure 5
Page 3

GOST Watch HD – User Guide
3
My Cameras - Video Motion Settings
The Client has the ability to select up to four specific
motion areas of a particular camera. These areas
should be where they would like video capture and/or
email alerts of activity. They are usually placed at door
entries, cockpit areas, or boarding platforms to name a
few. It is designed to give the owner video clips of every
person on or off the vessel. It is important not to focus
on areas that are constantly moving such as Docks with
People traffic, shimmering water, or active waterways.
This is because the user does not want to be inundated
with false triggers in high traffic changing activity areas.
As a general rule, it is best to focus on areas on the
vessel.
To select an area to detect motion in, drag the
respective color square over the area you wish to
monitor. You can reduce or expand the box by pressing
“Shift” over the lower right hand corner. Once the
desired area is boxed in, assure that the “Active” box is
checked along with the respective color (Figure 6).
The “Trigger on change %” should (under most
circumstances) be about 70%. That said, some
sensitivity adjustment may be necessary depending on
the particular camera setup.
Figure 7
My Videos – Viewing Video
After the user clicks on the selected still image to
view, a 10 second video clip will load.
To download the video, click on the down triangle tab in
the bottom right corner of the video. The user also has
the option to post the video directly to a variety of social
media websites. To do so, click the respective
Facebook, twitter, e-mail, etc. links in the bottom left
corner of the page (Figure 8).
Figure 6
My Videos – Finding Footage Events
This area of the website allows the user to view
and/or download saved ten second video clips triggered
from a motion detection or an activation event. Scroll
your cursor over the still images and they will enlarge
(Figure 7). You can click on the image or time stamp for
the video to load. Additionally, you can click on the
symbol to download the video to your computer as an
MP4 format. The website will store up to 50 Mb saved
video for each A/D Gateway that is installed.
My Account – My Registered Users
In this area, the user can modify there account
information as well as change there username and/or
password. Another great feature is the ability to grant
secondary users their own personal access to the
website such as Captains, Crew, Management
companies, etc. Only the master user will be able to
add additional viewers to the login and change any
settings. To modify a user id or password, click on the
button to the right of the User info (Figure 9 on next
page).
Figure 8
Page 4

GOST Watch HD – User Guide
4
particular hardrive.
Figure 9
My Account – My Registered Devices
In this section, the user has the ability to view and or
change all the A/D Gateway camera and IVR names.
Simply click on the Edit tab marked by a pencil and
paper next to each device and a new window will load
for you to change and update(Figure 10). As an
example, the default name of each Camera is the Mac
address of the gateway, you may want to change the
name to “Salon”,”Cockpit”, or “Helm” camera.
My IVR- Viewing and Downloading clips
The GOST Watch HD IVR is an easily accessible
Internet Video Recorder that can be viewed from any
computer with an internet connection. The IVR will work
with up to six A/D Gateways and has a 1 TB hard drive
that should store approximately three months footage for
up to six cameras. Note that the specified storage
capacity can change depending on the footage being
recorded and the size of the
The IVR is normally configured by the installer at the
time of installation. If you see a “N/A” next to the
selected camera, assure it is configured properly
according to “Configuration” Section below. To use,
simply select the camera and the time/date that you wish
to view and press search (Figure 12). You can only
select the starting date and time, a twenty minute clip will
then load from that point. Once the footage loads, you
can view it at x1, x2, x4, and x8 times the speed as well
as download the clip (left side of screen)
Figure 10
My Alerts
In this area of the site, the user can select up to four
receipts’ to receive e-mail alerts for motion captured
events. You can select whether the recipients are to
receive a thumbnail image (.JPG) or a Video clip (.mp4).
One also has the ability to change the e-mail subject as
well as the message in the body. One can also receive
text alerts of a video event captured via the SMS feature.
Assure that the correct airtime provider is selected on
sms alerts (Figure 11).
Figure 11
Figure 12
My IVR- Configuration
Click on the “Configuration” tab to access the setup
menu. Select the camera you wish to enable Instant
IVR recording off, select “Enable”, and press “Save”.
You can also select the time zone of the location that the
IVR is in on the bottom half of this page (Figure 13).
Figure 13
Page 5
GOST Watch HD – User Guide
5
Logout
By selecting this tab, you will completely logout of the
GOST Watch HD website.
Troubleshooting Tips
A/D Gateway saying offline
Double check and recrimp Ethernet Connections
Swap out Ethernet cable temporarily with a confirmed
working one to ensure it is not a cable issue, and wait
5 minutes.
Confirm adequate power supply.
Confirm that the device supplying the Internet via
G3G-GSM-CDMA or KVH is actually providing
internet data to the network.
A/D Gateway Image is blurred
If no Video Out is being fed to boat’s chart plotters or
TVs, ensure that the 75 Ohm Cap is on the Video out.
Swap with other cameras’ “Video In” and see if
problem still persists, thus indicating a problem with
the analog feed.
Check Camera Lens for blockage, and make sure
protective shipping sticker is removed.
Check Analog cable connections for loss.
No Internet on network
Confirm that the Cellular module (G3G-GSM-CDMA)
is configured according to the “Internet Data Terminal
on page 4, else refer to the guide included with
directly with the device.
Ensure that the G3G-GSM-CDMA card is on an
internet Data Plan by confirming with the client.
When using KVH integration ensure network is wired
to Com Box
GOST Watch HD App
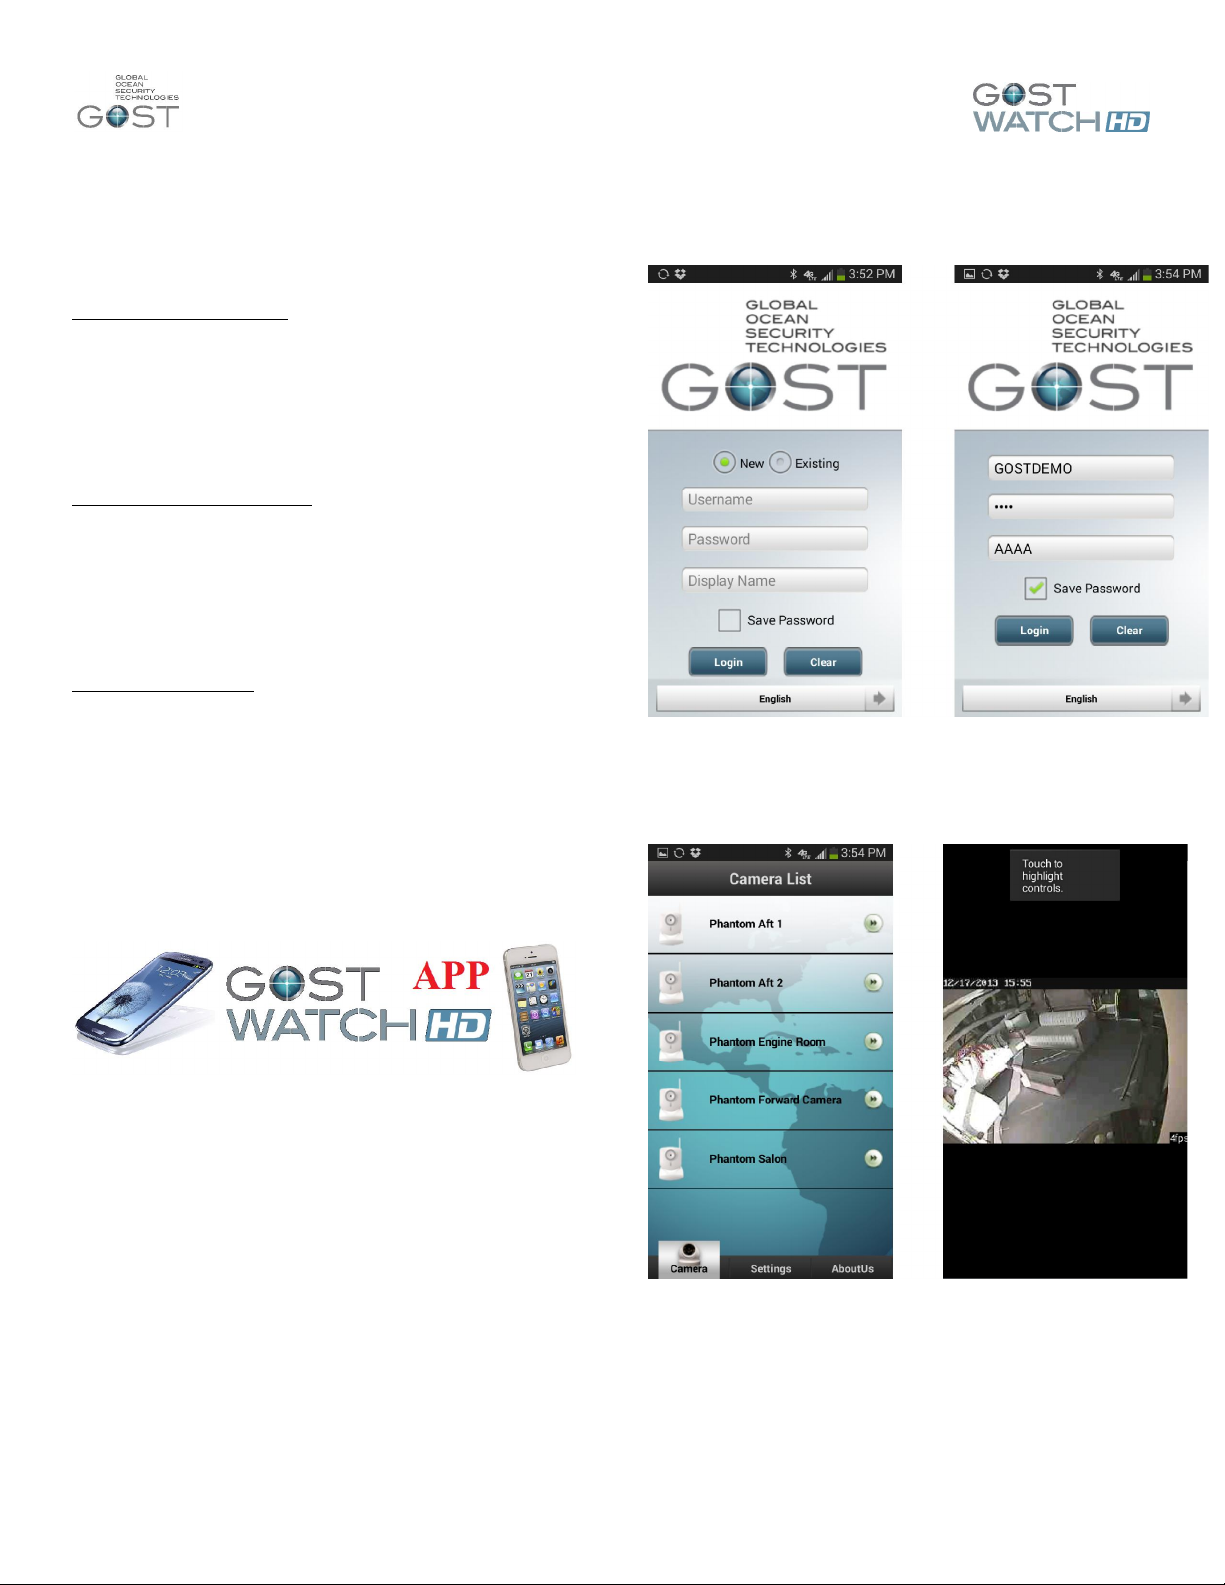
easy login next time by checking “Save Password”
(fFgure 15). You can also select a language. Note that
the app is designed for smart phones. You can use on a
tablet but need to download it from the phone store.
Figure 15
Once logged in to the system, you will be presented
with the full list of cameras to view live. Click on any of
the cameras and the video will load (Figure 16).
Figure 14
The “GOST Watch HD” app is a free download
available in both the Apple and Android app stores
(Figure 14). The purpose of the app is for clients to have
a simplified way to quickly view cameras from their
smartphone. Setting up preferences, viewing stored
videos, and IVR access still needs to be done over the
website browser login. Once you have downloaded the
app proceed to the next step.
To login, you need your username and password
handy (same that you use for the website login). Click
on “New” and enter the information. It also asks for a
Figure 16
If you rotate the Phone when viewing, the image will
become larger (Figure 17 next page).
display name for use with clients that have multiple
logins saved. Simply enter any minimal four characters
such as “AAAA” or “BOAT1”. Save the password for
Page 6

GOST Watch HD – User Guide
6
Figure 17
FLIR M-Series Integration Functionality
The GOST Watch HD system is also now compatible
with the FLIR M-Series line of Thermal / Low Light
cameras to remotely control Pan, Tilt, Zoom, and many
other functions from the webpage (Figure 18). The
marine electronics installer only has to complete a few
steps to add this functionality. This FLIR integration is
only currently supported on the Webpage login (not the
App).
Most of the FLIR JCU functions remain the same
with some slight modifications. See a description of
the functions in Figure 20.
Figure 18
The functionality of the FLIR Puck (JCU) can be seen in
once you load the camera on the Web page.
Figure 19
Figure 20
 Loading...