


GHP10140T
Operating Manual / Guide de l’utilisateur

Owner’s Manual
Thank you for purchasing products from GOSS Power Products Ltd., we appreciate your business.
The following manual is only a guide to assist you and is not a complete or comprehensive manual
of all aspects of maintaining or repairing your equipment. The equipment you have purchased is a
complex piece of machinery and we recommend that you consult with a dealer if you have any
doubts or concerns.
You will save time and the inconvenience of having to go back to the store if you contact us
regarding missing parts, service questions, operating advice or assembly questions.
This manual is intended to explain how to operate your equipment. If you have any questions or
suggestions about this manual, please contact us directly. You may notice that this manual might
differ slightly from the actual product as we continually make improvements to our products. Some
of the pictures may differ slightly from the actual product as well. GOSS Power Products Ltd.
reserves the right to make changes at any time without notice and without incurring any obligation.

Important Safety Information
RESPONSIBILITY OF OPERATOR
1. Carefully read and follow these safety instructions. Failure to do so can result in serious injury.
2. Know your product. Read and understand this manual before use. Compare the illustrations to the
unit. Learn the location and function of all controls. Thoroughly understanding the unit before use will
result in the best performance and safety.
3. Follow all instructions when assembling the unit. If the unit was purchased in assembled condition,
the operator must check the unit carefully to make sure it was assembled according the instructions in
the manual before use.
4. Regularly inspect the tiller. Make sure parts are not bent, damaged, or loose.
5. Use this equipment for its intended purpose only.
6. Operate the unit only with guards, shields, and other safety items in place and working correctly.
7. Service the unit only with authorized or approved replacement parts.
8. Complete all unit maintenance and adjustments according to the instruction in this manual.
Look for this symbol to point out important safety precautions. It means: “ Attention! Become Alert! Your
Safety Is Involved.”
To prevent accidental starting when setting up, transporting, adjusting or making repairs, always
disconnect spark plug wire and put wire where it cannot contact the spark plug.
PREPARATION SAFETY
• Read, understand, and follow all instructions on the machine and in this manual. Be thoroughly
familiar with the controls and the proper use of the tiller before starting. Know how to stop the engine
quickly.
• Familiarize yourself with all the safety and operating decals on this equipment.
• Thoroughly inspect the area where the tiller is to be used and remove all foreign objects. Your
equipment can propel small objects at high speed causing personal injury or property damage. Stay
away from breakable objects, such as house windows, auto glass, greenhouses, etc.
• Check that all nuts and bolts are tight and equipment is in good condition before each use.
• Always check that the flameout wire is connected before starting engine.
OPERATION SAFETY
• Never allow children or young teenagers to operate the tiller.
• Keep area of operation clear of all bystanders, particularly small children and pets.
• Only allow responsible individuals, who are familiar with the instructions, to operate the tiller.

• Do not operate the tiller while under the influence of alcohol, drugs, or other medication which can
cause drowsiness or affect your ability to operate this machine safely.
• Do not use this machine if you are mentally or physically unable to operate the machine safely.
• Always wear ANSI compliant safety goggles or safety glasses with side shields when operating tiller to
protect your eyes from foreign objects, which can be thrown from the unit.
• Wear appropriate clothing such as a long sleeved shirt or jacket. Also wear long trousers or slacks. Do
NOT wear shorts. Do NOT wear loose clothing, which could get caught in this equipment.
• Always wear work gloves and sturdy footwear such as leather work shoes or short boots. These will
protect ankles and shins from small sticks, splinters, and other flying debris, and improve traction.
• It is advisable to wear protective headgear to protect against being struck by small flying particles, or
being struck by low hanging branches, twigs, or other objects, which may be unnoticed by the operator.
• Do not put hands or feet near or under rotating parts.
• Exercise extreme caution when operating on or crossing gravel drives, walks, or roads. Stay alert for
hidden hazards or traffic.
• Exercise caution to avoid slipping or falling. Always be sure of your footing; keep a firm hold on the
handle and walk; never run. Never operate the tiller at high transport speeds on slippery surfaces.
• Never operate the tiller without good visibility or light.
• Do not run the engine indoors or inside a closed area. The exhaust fumes are dangerous, containing
CARBON MONOXIDE, an ODOURLESS AND DEADLY GAS.
• Never leave the tiller unattended when the engine is running. Stop the engine and make sure all
moving parts have stopped. Remove the wire from the spark plug.
• Watch for holes, ruts, bumps, or other rough ground. Tall grass can hide obstacles.
• Always look behind and down and use caution when using reverse or pulling the tiller towards you.
• Never attempt to start the tiller unless both wheels are in the locked position. This acts as a brake for
the tiller. Always start the tiller on the level surface.
• Disengage clutch lever and stop engine before leaving the tiller in operating position. Wait until the
tines come to a complete stop before removing debris or making any adjustments to the tiller.
• Do not attempt to till hard soil, till too deep or till at too fast a rate that can overload the tiller.
• If the tiller should start to vibrate abnormally, stop the engine, disconnect the spark plug wire and
prevent it from touching the spark plug. Check immediately for the cause. Vibration is generally a
warning of trouble.
FUEL SAFETY
• Gasoline is extremely flammable, and gasoline vapours can explode if ignited. Handle with care.
• Use an approved container.
• Check fuel supply before each use, allowing space for expansion as the heat of the engine and/or sun
can cause fuel to expand.
• Fill fuel tank outdoors with extreme care. Never fill fuel tank indoors.
• Never remove gas cap or add fuel with the engine running. Allow engine to cool before refueling.
• Do not smoke while refueling.
• After refueling, replace fuel tank cap securely and wipe up spilled fuel.
• Never store fuel or tiller with fuel in the tank inside a building where fumes may reach an open flame.
• Never fill gasoline containers or the tiller fuel tank inside of a vehicle or in a truck bed. Accidental
electrical static discharge can ignite fuel vapours which could result in serious injury or death.
Assembly
Read and follow the assembly instructions. Do not discard any parts or materials until the unit is
assembled. References to the right or left side of the tiller are from the viewpoint of the operator’s
position behind the tiller.
Do not operate tiller if it is damaged or not completely and correctly assembled.
Before doing any assembly or maintenance to the unit, remove the wire from the spark plug.
Always wear ANSI compliant safety glasses with side shields while assembling the tiller.
(A) How to Remove Tiller from Carton
1. Remove all parts and packaging components.
2. Use a utility knife to cut all 4 vertical edges and lay the side panels flat around the tiller.
3. Remove any remaining packaging.
(B) Assembly Instructions
The tiller comes fully assembled except for a few
parts. The following instructions will help you
complete the tiller assembly.
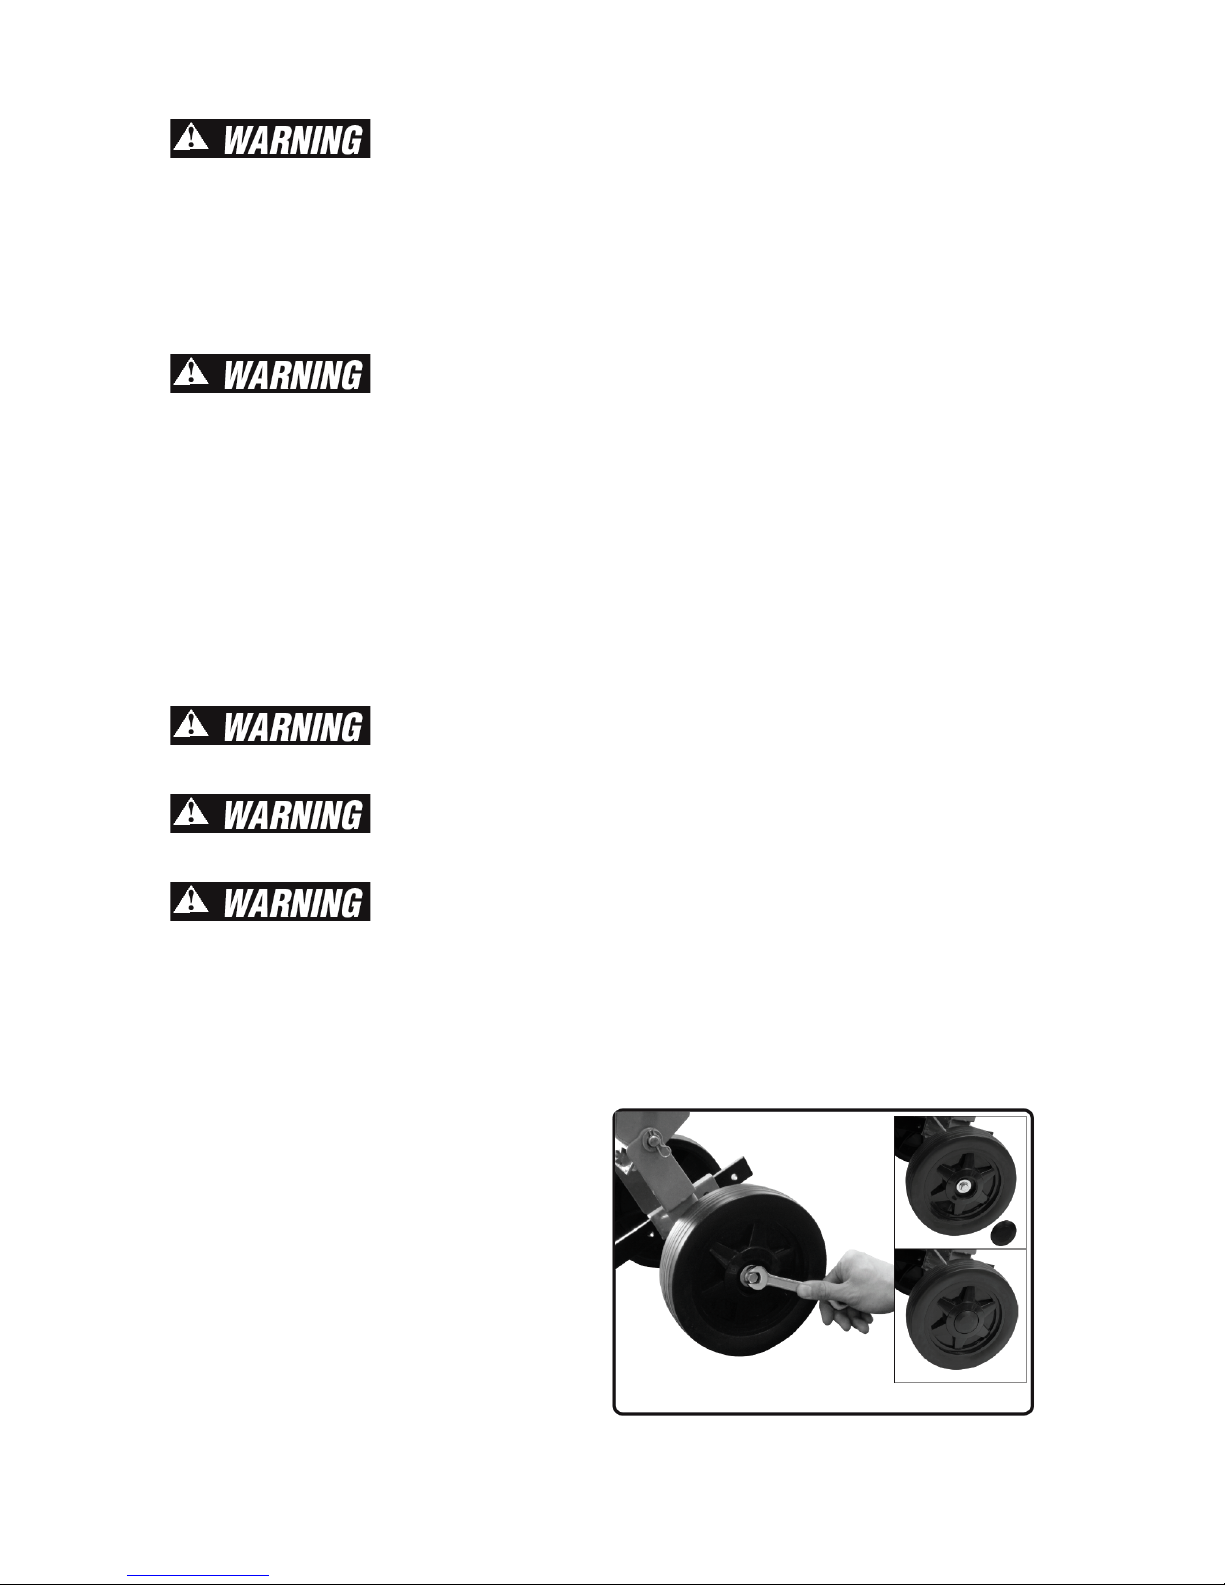
INSTALL THE WHEELS
1. Slide the wheel hub onto the wheel axle.
2. Install the bolt with flat washer.
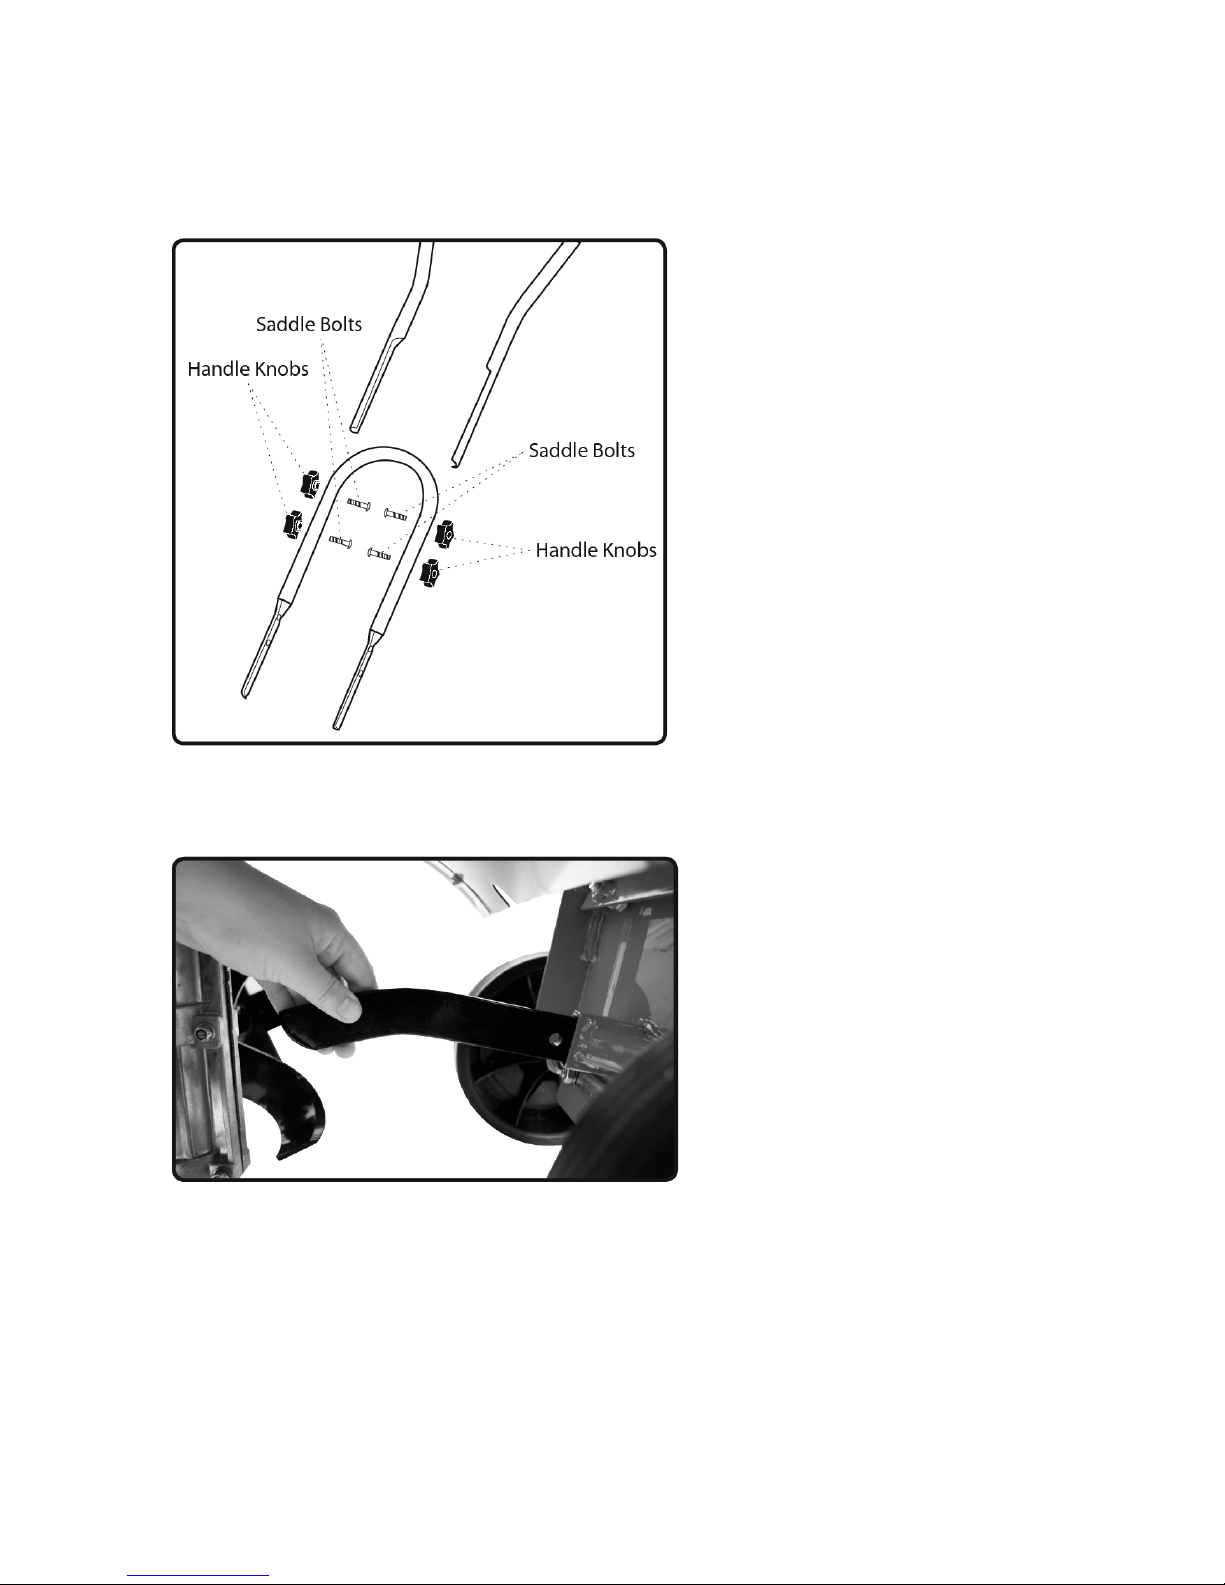
ATTACH UPPER HANDLE
1. Slide the upper handle down over the lower handle and align the holes.
2. Insert the saddle bolts into the holes as shown and securely with the handle knobs.
3. Tighten the handle knobs securely.
INSTALL THE DRAG BAR
1. Insert the drag bar into the bottom of the swing plate bracket.
2. Insert the column uniform pin thru the bracket and drag bar, and fix it by a B shape pin.
INSTALL THE TINES
1. Slide the tines onto the tine axle. Install the internal tines first. Sharp edge of the front and top tines
should face down and forward to till the ground. Tighten the bolt with lock nut provided to secure the
inside tines.
2. For wide 21” tilling, install the outside tines in the way that the long half of the tine pipe faces towards
the inside tines. For narrow 16” tilling, install the outside tines in a way that the short tine pipe faces
towards inside the tines.
3. Tighten the bolt with the locknut provided to secure the outside tines.

Engine Preparation
(A) Engine Oil
Engine shipped without oil. Failure to add oil will result in serious engine damage.
Refer to the chart on the right for alternative oil types to use at different temperatures. Always use a
high quality detergent oil classified “For Service, SG, SH, SJ” or higher. Do not use special additives.
Always use recommended oil type. Using dirty oil or incorrect oil type such as 2-stroke engine oil will
damage the engine.
HOW TO CHECK OIL LEVEL AND FILL TO PROPER LEVEL
Before checking oil, make sure engine is off, and spark plug wire has been disconnected from spark
plug.
1. Place the tiller on a level surface and make sure the drag bar is set so the main frame of the tiller is
level.
2. Remove the oil fill cap/dipstick and wipe with clean cloth.
3. Insert dipstick into fill spout but do NOT screw in. Remove dipstick and check oil level.
4. When oil level is full, the oil will be at upper limit on dip stick. If oil level is near or below the lower limit,
oil must be added.
5. Add oil slowly until the oil level reaches the upper limit of the dipstick. Use a funnel or nozzle to
reduce spillage.

Frequently check oil level while filling. DO NOT OVERFILL. DO NOT UNDERFILL. Running engine at
improper oil level will seriously damage engine.
6. Replace and tighten dipstick.
7. Clean up any spilled oil.
NOTE: THE TRANSMISSION CASE COMES FROM THE FACTORY WITH THE PROPER AMOUNT
AND TYPE OF GEAR OIL.
Operation
(A) Pre-Start Inspection
1. Make sure all safety guards are in place and all nuts and bolts are secure.
2. Check oil level in engine crankcase. See your engine manual for procedure and specifications.
3. Inspect air cleaner for cleanliness. See your engine manual for procedure.
4. Check the fuel supply. Fill the fuel tank no closer than 1 inch from top of tank to provide space for
expansion.
5. Be sure spark plug wire is attached and spark plug is tightened securely.
6. Examine underneath and around engine for signs of oil or fuel leaks.
7. Inspect fuel hoses for tightness and fuel seepage.
8. Look for signs of engine damage.
9. Remove excessive debris from muffler area and recoil starter.
10. Remove any debris from tines and tine shafts.
11. Move the tiller to the area of operation.
12. Check position of wheels swing plate should be in the tilling mode position.
13. Check drag bar position.
IMPORTANT: ENGINE IS SHIPPED FROM FACTORY WITHOUT OIL. YOU MUST ADD ENGINE OIL
BEFORE STARTING ENGINE.
PLEASE DO NOT START YOUR TILLER UNTIL YOU HAVE READ THE MANUAL THAT CAME WITH
YOUR ENGINE, AND THE SECTIONS IN THIS MANUAL TITLED CONTROLS, ADJUSTMENTS AND
SAFETY. IF YOU HAVE READ THESE, FOLLOW THE STEPS BELOW TO START YOUR TILLER.
ALWAYS PERFORM THIS PRE-START CHECKLIST BEFORE STARTING THE ENGINE.
GASOLINE IS HIGHLY FLAMMABLE AND MUST BE HANDLED WITH CARE. NEVER FILL THE
TANK WHEN THE ENGINE IS HOT OR RUNNING. ALWAYS MOVE OUTDOORS TO FILL TANK.
ALWAYS KEEP HANDS AND FEET CLEAR OF ROTATING MACHINE PARTS.
(B) Start the Engine
1. Press ON/OFF switch to ON position.
2. Push primer bulb 3 times. Wait 2 seconds between each push.
3. Grasp starter handle and pull out slowly, until it pulls slightly harder.
4. Pull rope with a rapid full arm stroke until engine runs.

(C) Stop the Engine
1. Press ON/OFF switch to OFF position.
(D) Operating Speed
This tiller is equipped with a fixed throttle that is set for optimum tilling performance.
(E) Shutting Down
To stop the engine at any time, release the clutch lever and press ON/OFF switch to OFF position.
To stop tines at any time, release clutch lever.
(F) Transport Mode and Tilling Mode
Transport Mode
Fold the wheel under the engine for convenient transport.
Tilling Mode
Unfold the wheel back for tilling operation.
(G) Tilling
1. Adjust the drag bar to desired tilling depth.
NOTE: Lower the drag bar one hole at a time testing tiller operation after each adjustment. Lowering
drag bar down too low can result in loss of control of tiller!
2. Pushing down on the clutch lever will engage the tines to move tiller forward.
ALWAYS PRESS CLUTCH LEVER DOWN COMPLETELY ONTO THE HANDLE BAR GRIP. FAILURE
TO DO SO MAY RESULT IN EXCESSIVE DRIVE BELT WEAR AND PRE-MATURE DRIVE BELT
FAILURE.
TEMPERATURE OF MUFFLER AND NEAR BY AREAS MAY EXCEED 1500F/ 660C. AVOID THESE
AREAS. TO STOP TINES AT ANY TIME, RELEASE CLUTCH LEVER TO NEUTRAL POSITION.
ALWAYS RELEASE CLUTCH LEVER TO NEUTRAL POSITION AND STOP THE ENGINE BEFORE
ADJUSTING THE DEPTH OF THE DRAG BAR.
ENGINE, TRANSMISSION AND SURROUNDING PARTS BECOME EXTREMELY HOT DURING
NORMAL USE AND CAN CAUSE SERIOUS BURN INJURIES IF TOUCHED BEFORE THE ENGINE
HAS COOLED.
ALLOW ENGINE TO COOL COMPLETELY BEFORE TOUCHING THESE HOT SURFACES.
IMPORTANT: PRACTICE OPERATING THE CONTROLS AND TILLER WITH TINES OUT OF
GROUND BEFORE BEGINNING TO TILL. IT IS IMPORTANT THAT YOU KNOW HOW TO USE THE
TILLER PROPERLY, KEEP CONTROL AT ALL TIMES, STOP THE TINES, AND STOP THE ENGINE
IF NECESSARY. IF YOU DO NOT KNOW HOW TO DO THESE THINGS, READ THE CON-TROLS,
ADJUSTMENTS AND SAFETY SECTIONS BEFORE PROCEEDING.
(H) Clutch Lever
THIS INFORMATION IS PROVIDED HERE ONLY TO INTRODUCE THE CONTROLS. DO NOT
START THE ENGINE AT THIS TIME. PLEASE READ THIS SECTION AND ALL OPERATING AND
SAFETY INSTRUCTIONS BEFORE STARTING YOUR TILLER.
DO NOT FIX THE CLUTCH LEVER IN DRIVE POSITION BY ANY OTHER MEANS THAN MANUALLY
USING YOUR HAND. DO NOT TIE OR OTHERWISE SECURE THE LEVERS IN DRIVE POSITION.
• TO STOP THE TINES AT ANY TIME RELEASE THE CLUTCH LEVERS.
CLUTCH LEVER
Engages tines into forward. Pulling up the clutch lever toward the handle bar engages the tines.
Releasing the lever stops the tines and brings the tiller to a complete stop.
(I) Adjustments
ENGINE SHOULD BE OFF BEFORE ADJUSTING ANY CONTROLS.
DRAG BAR
Tilling depth is controlled by the height of thedrag bar. To adjust tilling depth:
1. Remove B shape pin and column uniform pin.
2. Adjust the drag bar to position tines at chosen tilling depth.
3. Align hole in drag bar with hole in drag bar and replace column uniform pin and B shape pin.
Drag Bar Up = Shallower tilling.
Place the detent pin in the bottom hole of the depth regulator lever for shallowest tilling.
Drag Bar Down = Deeper tilling.
Place the detent pin in the top hole of the depth regulator lever for deepest tilling.
DO NOT ADJUST TILLING DEPTH UNLESS CLUTCH LEVER IS RELEASED AND ENGINE IS
TURNED OFF.
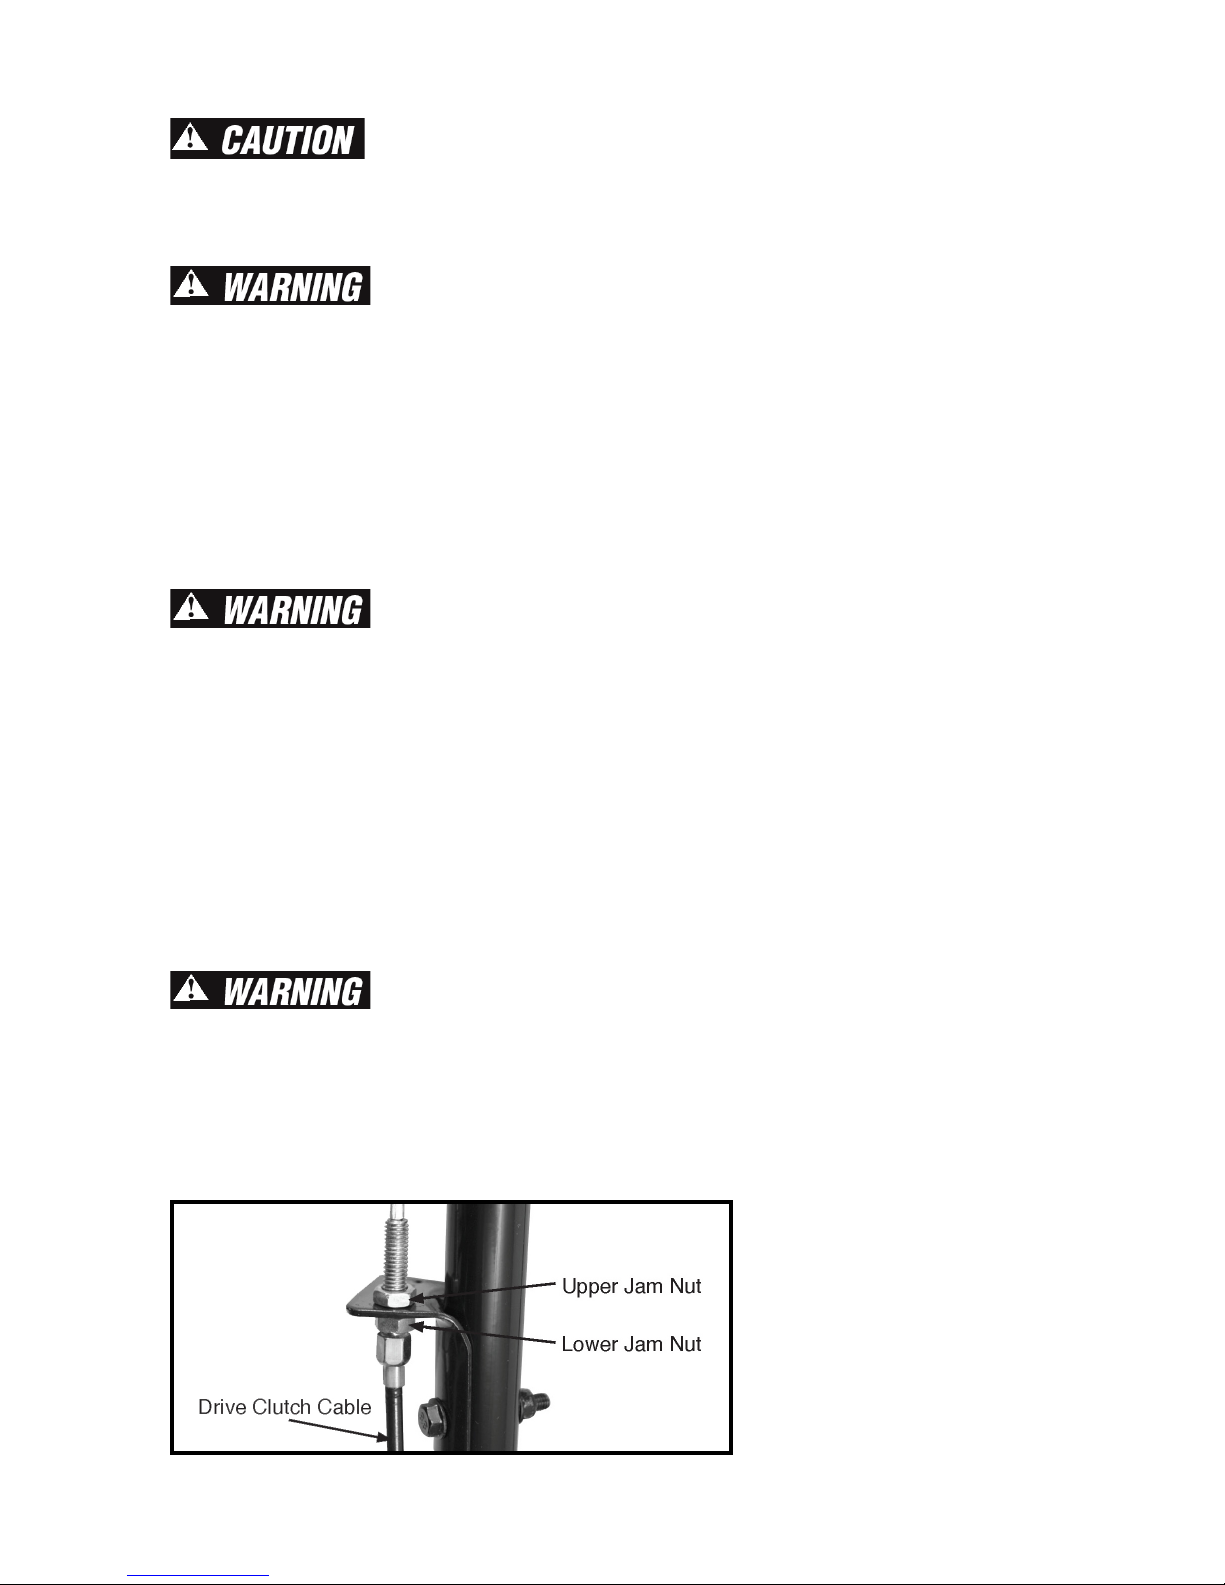
BELT TENSION ADJUSTMENT
Proper belt tension is critical to good performance. After 1/2 hour of operation, all cables may have to
be adjusted due to initial stretch. Thereafter, check tension after every 2 hours of operation.

TO INCREASE BELT TENSION
1. Loosen upper jam nut. Turn nut up cable.
2. Tighten lower jam nut.
3. Check adjustment.
TO DECREASE BELT TENSION
1. Loosen lower jam nut. Turn nut down cable.
2. Tighten upper jam nut.
3. Check adjustment.
This procedure can be repeated until conduit adjustment bolts are fully adjusted. If no more adjustment
can be made, belt may have to be replaced.
(J) Tilling Tips
The key to successful tilling is to begin with a shallow cut on the first pass, and then work an inch or two
deeper on each successive pass.
• Tilling depth will vary with ground conditions.
• When beginning to till in unbroken ground or in extremely hard soil, set the detent pin in the highest
hole of the depth regulator lever (follow instructions under Tilling section). This will allow for shallow
tilling. With the drag stake in this position, make several light passes over the area to be tilled. Reset for
deeper depths with successive passes.
• If tiller jumps or skids uncontrollably, lower the drag stake by placing the detent pin in a higher hole.
This will allow for shallower tilling. Hold firmly to the handlebars to control sudden lurches.
• If weeds, tall grasses, vines, or other materials clog or jam the tines, reverse the tiller to unwind
vegetation.
Immediately release the drive control levers if the tines jam or you strike a foreign object. With drive
control levers in neutral position, stop the engine. Disengage the spark plug wire. When tines have
stopped, remove foreign objects and check for damage.
EXTREME CAUTION MUST BE TAKEN IN SELECTING TILLING DEPTH. IF YOU ATTEMPT TO TILL
TOO DEEPLY FOR SOIL CONDITIONS, THAT IS, WITH THE DEPTH REGULATOR LEVER IN TOO
HIGH A POSITION, LOSS OF CONTROL COULD RESULT.
IF REMOVING MATERIAL FROM THE TINES BY HAND, STOP ENGINE AND REMOVE SPARK
PLUG WIRE FIRST.
(K) Cultivating Tips
If you plan to use your tiller for cultivating:
• Plant rows on 20" - 22" centers for ease of turning.
• Set the depth regulator lever with the detent pin in one of the higher holes. This will allow for shallow
cultivation necessary to turn over weeds, and break up and aerate the soil.
Maintenance
(A) Maintenance Schedule
Before performing any maintenance, turn engine off and remove the wire from the spark plug to prevent
accidental starting and serious injury.
IMPORTANT: The warranty on this tiller does not cover items that have been subjected to operator
abuse or negligence. To receive full value from the warranty, the operator must maintain the tiller as
instructed in this manual, and only use genuine replacement parts. The following table lists required
periodic maintenance.
IMPORTANT NOTES about Maintenance schedule
1. Re-check tightness of all fasteners after first 2 hours of initial use.
2. Change engine oil after first 5-8 hours of initial use.
3. Change oil every 25 hours if operating under heavy load or in high temperatures
4. Clean air filter every 10 hours if operating under dusty conditions.
Use only GENUINE replacement parts. Other parts may damage the unit or result in injury.
(B) Servicing the Tiller
The following information will help you make the necessary checks and perform the procedures
required to follow the normal care recommendations made for your tiller unit. If you prefer, your local
authorized service provider can make these checks and perform the required procedures for you.

TO PREVENT ACCIDENTAL STARTING:
ENGINE MUST BE TURNED OFF AND COOL, AND SPARK PLUG WIRE MUST BE REMOVED AND
SECURED FROM SPARK PLUG BEFORE CHECKING AND ADJUSTING ENGINE OR EQUIPMENT.
CHANGE BELTS
1. Turn off engine. Engine must be cool completely before proceeding.
2. Remove spark plug wire and secure from spark plug.
3. Reduce the belt tension by loosening the cable upper jam nut.
4. Remove the front carry handle, front and rear belt cover.
• remove the belt from the forward engine pulley:
- loosen the three engine mounting bolts
- slide the belt free of the engine pulley
- pull the belt down and out of the way
• install new belt:
- loosen the engine mounting bolts
- place belt around transmission pulley in groove
- Place belt onto engine pulley in groove.
5. Tighten the upper jam nut.
6. Attach spark plug wire.
7. Follow Operating Instructions - start the engine and operate the clutch lever. Check for proper cable
adjustment. Adjust as required.
THE TINES SHOULD NOT ROTATE WITH THE ENGINE RUNNING, THE DEPTH REGULATOR SET
AT TRANSPORT MODE AND THE DRIVE LEVER NOT ENGAGED.
(C) Engine Maintenance
ENGINE MAINTENANCE
Refer to the engine manual included in your parts packet for information on engine maintenance. Your
engine manual provides detailed information and a maintenance schedule for performing the following
tasks:
1. Check oil level before each use or after every 8 hours of operation.
2. Change oil after first 5-8 hours of operation. Change oil while engine is warm. Refill with new oil of
recommended grade.
4. Check spark plug yearly or every 100 hours of operation.
5. Service air cleaner.
6. Keep engine and parts clean.
7. Check engine and equipment often for loose nuts and bolts, keep these items tightened.

CHECK OR FILL ENGINE CRANKCASE
Important: Engine is shipped from factory without oil. You must add engine oil before starting engine.
1. Add oil according to engine manual. Do not overfill. Use clean, high quality detergent oil. Do not
mix oil with gasoline. Oil level must be full. Check the oil level by removing oil fill plug.
2. Always check oil level before starting engine. Refer to engine manual for capacity and type of oil to
use.
LUBRICATION
Proper lubrication of moving mechanical parts is critical for proper care and maintenance. Oil the
moving parts shown at 10 hour intervals using 30 weight oil.
CLEAN TINE AXLE SHAFT
1. Turn off engine. Engine must be cool.
2. Remove spark plug wire and secure from spark plug.
3. Tip the tiller forward. Block the tiller in position so that it rests on the engine mount and the tines are
exposed.
4. Remove all vegetation, string, wire, and other material that may have accumulated on the axle
between the inside set of tines and the seal cover on the transmission housing.
5. Tip the tiller back to a level position.
6. Replace spark plug wire.
(D) How to Prepare for Storage
Never store the tiller indoors with fuel in the fuel tank. Never store in an enclosed, poorly ventilated area
where fumes could reach an open flame, a spark or a pilot light as on a furnace, water heater or clothes
dryer. Allow engine to cool before storing unit.
Do not remove gasoline while inside a building, near a fire, or while you smoke. Gasoline fumes can
cause an explosion or a fire.
NOTE: A yearly checkup or tune-up at an authorized service center will make sure that the tiller will
provide maximum performance for the next season.
When the tiller is put in storage for thirty days or more, the following steps should be followed to make
sure the tiller is in good condition the next season.
1. Let the engine run until it is out of gasoline.
2. Change the oil by following instructions under “How to Change the Oil.”
3. Remove the spark plug from the cylinder. Pour one ounce of oil into the cylinder. Slowly pull the
recoil-start grip so that the oil will protect the cylinder. Install a new spark plug in the cylinder. Pull starter
handle slowly a few times to distribute oil. Pull recoil slowly until resistance is felt. This will close the
cylinder valves.

DO NOT attach spark plug wire to spark plug when storing unit.
4. Clean tiller. Remove all dirt, leaves, debris, grease, etc. from the tiller - including cylinder cooling fans,
recoil starter cover holes, under fuel tank, and under muffler.
5. Check the tiller for worn or damaged parts. Have damaged parts replaced if necessary.
6. Tighten any loose hardware.
7. Apply lubrication as directed in Maintenance section.
8. Put the unit in a building that has good ventilation.
9. Cover the tiller with a breathing material.
Troubleshooting

PARTS LISTINGS

PARTS LISTINGS

PARTS LISTINGS
REF.
Description
REF.
Description
1
Nylon Locknut M8
Fuel Tank
2
Spring Washer 8
Carburetor
3
Flat Washer 8
Spark Plug
4
Outer Hexagon Bolt M8X25
46
Fan
5
Left Blade
47
Flat Key 4.78X5X35
6
Right Blade
48
Small Belt Wheel
7
Outer Blade Holder Assy
49
Semicircle Key 4x6.5x16
8
Inner Blade Holder Assy
50
Adjusting Washer ø22.3xø35x0.5
9
Front Handle
51
Flat Washer φ10Xφ32X4
10
Outer Hexagon Bolt M8X30
52
Bolt 1-24UNF(M10X28)
11
Outer Hexagon Nylon Locknut M12
53
Fenderboard
12
Spring Washer 12
54
Outer Hexagon Flange Bolt M6x25
13
Flat Washer 12
55
Spring Washer 6
14
Big Belt Wheel
56
Engine Seat Assembly
15
Belt 57
Fixing Pole
16
Semicircle Key 4x6.5x16
58
Double Head Screwing Pole
17
Cable Clip
59
Outer Hexagon Bolt M8X130
18
Out Hexagon Nylon Locknut M6
60
Outer Hexagon Bolt M8X150
19
Outer Hexagon Bolt M6X18
61
Outer Hexagon Bolt M8X20
20
Flat Washer 6
62
Rear Cover Plate Assy
21
Outer Hexagon Bolt M10X50
63
Rubber Sheath
22
Out Hexagon Nylon Locknut M10
64
Handle Arm
23
Flat Washer 10
65
Outer Hexagon Bolt M10X25
24
Outer Hexagon Bolt M8X50
66
Spring Washer 10
25
Wheel Holder
67
Front Cover Plate
26
Flat Washer ø14xø28x2
68
Outer Hexagon Bolt M6X12
27
10" Wheel
69
Handlebar
28
Flat Washer 8x22x2
70
Sector Bolt
29
Outer Hexagon Bolt M8X16
71
Knob Nut
30
Adjusting Pole
72
Carble Seat
31
B Pin 73
Outer Hexagon Flange Bolt M6x40
32
Resistance Pole
74
Clutch Handle
33
Pin φ8X25
75
Left Case
34
Clutch Arm Assembly
76
Right Case
35
Tensioner
77
Paper Gasket
36
Retainer Ring 10
78
Output Axle
37
Forward Clutch Cable
79
Worm Pole
38
Belt Block Sleeve
80
Worm Wheel
39
Tensioner Axle Sleeve
81
Semicircle Key 5x9x22
40
Outer Hexagon Bolt M8X60
82
Retainer Ring
41
Flat Washer ø8xø28x3
83
Flat Washer ø25xø40x1
42
Cable Clip
84
Deep Groove Ball Bearing 6204
43
Pin φ6X16
85
Single Taper Roller Bearing 30203

REF.
Description
REF.
Description
44
Uncork Pin
86
Deep Groove Ball Bearing 6005
45
Gasoline Engine
87
Framework Oil Seal φ20Xφ32X6
Recoil Starter
88
Framework Oil Seal φ25Xφ40X7
Muffler 89
Oil Seal Cap
Air Filter
90
Outer Hexagon Flange Bolt M6x35
91
Outer Hexagon Flange Bolt M10x1x14
92
Combination Washer M10
Transmission Assembly
Limited Warranty
GOSS Power Products Ltd. (“GOSS”) warrants as limited herein to the end-user original purchaser of the unit to
which this limited warranty, that the unit shall be free of defects in material and workmanship for a period of (i) one
year if purchased by a retail consumer for regular domestic usage; or (ii) 90 days if purchased for professional or
industrial usage, in each case from the date of original purchase.
In the event of malfunctions or failure of your Home-Pro unit, simply deliver or send it, along with proof of purchase,
within the applicable warranty period to GOSS. GOSS reserves the right to inspect the claimed defective part or
parts to determine if the defect or malfunction complaint is covered by this limited warranty. GOSS shall, within 60
days after receipt of the product, at its option, repaid and/or replace the defective part or parts free of charge (other
than delivery costs to transport the unit or any part or parts thereof). This limited warranty shall only cover defects
arising from normal usage, GOSS assumes no responsibilities whatsoever if the unit should fail during the limited
warranty period by reason of: (i) misuse, negligence, physical damage or accidents; (ii) lack of maintenance (see
owner’s manual for proper maintenance); (iii) repair by any unauthorized party during the limited warranty period.
The limited warranty set out above is further qualified by the restrictions on usage and related matters as are set
out in the owner’s manual. Any contravention of the terms in the owner’s manual shall render this limited warranty
null and void and of no further effect.
GOSS makes no further warranties or representations, express or implied except those contained herein. No
representative dealer is authorized to assume any other liability regarding the unit. The duration of the implied
limited warranty granted under any Provincial law, including warranties of merchantability and fitness for particular
purpose are limited in duration to the express duration provided for herein. GOSS shall in no event be liable for
direct, indirect, special or consequential damages.
Should your Home-Pro unit fail to operate under the terms of this limited warranty, please contact.
GOSS Power Products Ltd.
6226 Danville Rd, Mississauga, ON, L5T 2H7
1-877-270-7772
www.gosspower.com

GHP10140T
Operating Manual / Guide de l’utilisateur

Guide du propriétaire
Merci d'avoir acheté un produit GOSS Power Products Ltds. Nous apprécions votre confiance! Le
présent guide a pour fonction de vous assister mais n'est pas complet. Il ne contient pas toutes les
caractéristiques d'entretien ni de réparation de votre l’apparei. L'appareil que vous venez d'acheter
est une pièce de machinerie complexe et nous vous recommandons de consulter un détaillant
autorisé si vous avez des questions ou des doutes.
Afin de vous éviter de perdre du temps, nous vous invitons à nous appeler pour tout manque de
pièce, question d'entretien, conseils d'utilisation ou question d'assemblage.
Ce guide a pour but de vous expliquer comment utiliser votre l’apparei. Si vous avez des questions
ou suggestions à propos de ce guide, veuillez nous contacter directement. Ce manuel, tout comme
certaines photos, peut différer du produit que vous avez acheté puisque nous améliorons
continuellement nos produits. GOSS Power Products Ltd. Se réserve le droit d'apporter des
changements à ce guide sans préavis et sans obligation encourue.

Consignes de sécurité importantes
RESPONSABILITÉS DE L’UTILISATEUR
1. Lisez et suivez les consignes de sécurité. Ne pas respecter cette consigne pourrait entraîner des
blessures.
2. Connaissez votre appareil. Lisez et comprenez ce guide avant d’utiliser l’appareil. Comparez les
illustrations avec l’appareil. Apprenez l’emplacement et la fonction de tous les contrôleurs. Une bonne
compréhension de l’appareil vous permettra d’en faire une utilisation performante et sécuritaire.
3. Suivez toutes les consignes lorsque vous assemblez l’appareil. Si l’appareil était déjà assemble lors
de l’achat, vous devez vous assurer qu’il a été assemblé selon les consignes de ce guide avant de
l’utiliser.
4. Inspectez régulièrement le rotoculteur. Assurez-vous que les pièces ne sont pas pliées,
endommagées ou lousses et mal fixées.
5. Utilisez cet appareil uniquement pour les tâches qu’il a été conçu.
6. Utilisez l’appareil uniquement si les protecteurs, écrans et autres pièces de sécurité sont en place et
fonctionnels.
7. Entretenez l’appareil uniquement avec des pièces de remplacement approuvées et autorisées.
8. Faites les entretiens et les ajustements de l’appareil en suivant les consignes de ce guide.
Les consignes de sécurité suivant ce symbole doivent être suivie avec précaution. Il signifie: “Attention!
Soyez vigilant! Votre sécurité est en jeu.”
Afin de prévenir un démarrage accidentel lorsque vous préparez, transportez, ajustez ou réparez
l’appareil, débranchez toujours la bougie d’allumage et placez le fil de façon à ce qu’il n’entre pas en
contrat avec la bougie.
CONSIGNES DE SÉCURITÉ LORS DE LA PRÉPARATION
• Lisez, comprenez et suivez toutes les consignes sur l’appareil et dans ce guide. Connaissez bien les
contrôleurs et leurs fonctions avant de démarrer le rotoculteur. Sachez comment arrêter le moteur
rapidement.
• Familiarisez-vous avec toutes les étiquettes de sécurité et d’utilisation sur l’appareil.
• Vérifiez toujours l’espace où l’appareil sera utilisé et enlevez tous les objets. Votre appareil pourrait
projeter les petits objets à très haute vitesse et entrainer des blessures et des dommages matériels.
Restez à distance des objets cassables tells que les fenêtres de maison, les vitres d’auto, les serres,
etc.
• Vérifiez que tous les boulons et les écrous sont solidement vissés et que l’appareil est en bonne
condition avant chaque utilisation.
• Assurez-vous toujours que le fil d’extinction est branché avant de démarrer le moteur.

CONSIGNES DE SÉCURITÉ LORS DE L’UTILISATION
• Ne laissez jamais les enfants ou des jeunes adolescents utiliser le rotoculteur.
• Gardez la zone de travail libre de tout spectateur, particulièrement les jeunes enfants et les animaux.
• Laissez uniquement les personnes responsables, qui sont familières avec les consignes, utiliser
l’appareil.
• N’utilisez pas le rotoculteur lorsque vous êtes sous l’influence de l’alcool, de la drogue ou toute autre
médication qui pourrait cause de la somnolence, ou affecter votre habileté à utiliser l’appareil de façon
sécuritaire.
• N’utilisez pas l’appareil si vous être mentalement ou physiquement incapable de l’utiliser de façon
sécuritaire.
• Portez toujours des équipements de protection respectant la norme ANSI, des lunettes de sécurité avec
des protecteurs latéraux lorsque vous utilisez l’appareil, afin de protéger vos yeux des objets pouvant être
projetés pendant l’utilisation.
• Portez des vêtements appropriés tel qu’un chandail à manches longues. Portez toujours des pantalons.
Ne portez PAS de short ou de bermudas. Ne portez PAS des vêtements amples car ils pourraient se
prendre dans les pièces rotatives.
• Portez toujours des gants et des bottes de travail. Ils protégeront vos chevilles et autres membres des
petites pièces de bois, ou autres débris et améliorera votre traction.
• Il est préférable de porter des équipements de protection pour la tête afin de prévenir des blessures
pouvant être causées par des branches basses, ou autres objets.
• Ne placez pas vos mains ou vos pieds à proximité des pièces rotatives.
• Soyez très prudent lorsque vous utiliser l’appareil ou lorsque vous traversez un chemin de gravelle, une
allée ou une route. Soyez vigilent au trafic ou autres situations hasardeuses.
• Soyez vigilent pour ne pas glisser ou ne pas tomber. Assurez toujours votre position et équilibre; gardez
toujours une prise ferme sur la poignée. Ne courrez pas, marchez. N’utilisez jamais le rotoculteur à une
vitesse rapide de transport sur une surface glissante.
• N’utilisez jamais le rotoculteur sans une bonne visibilité ou dans la pénombre.
• Ne faites pas fonctionner le moteur à l’intérieur ou dans un espace confiné. Les émanations de
l’échappement sont dangereux et contiennent du Monoxyde de carbone, un GAS INODORE ET MORTEL.
• Ne laissez jamais l’appareil sans surveillance lorsque le moteur est en marche. Arrêtez le et assurez
vous que toutes les pièces rotatives sont arrêtées. Débranchez le câble de la bougie d’allumage.
• Vérifiez s’il y a des trous, des bosses, ou autres irrégularité du terrain. Les herbes hautes peuvent
cacher des obstacles.
• Regardez toujours vers l’arrière et vers le bas lorsque vous reculer avec l’appareil ou lorsque vous tirez
l’appareil vers vous.
• Ne tentez jamais de démarrer l’appareil à moins que les deux roues soient dans la position verrouillées.
Ils agissent comme un frein au rotoculteur. Démarrez toujours l’appareil sur une surface à niveau.

• Débrayez à l’aide du levier et arrêtez le moteur avant laisser le rotoculteur dans une position de
marche. Attendez que les dents arrêtent complètement de tourner avant de retirer les débris ou de faire
des ajustements à l’appareil.
• Ne tentez pas de travailler des sols trop durs, trop profonds ou encore de travailler à des vitesses trop
élevées qui pourrait surcharger le rotoculteur.
• Si l’appareil vibre anormalement, arrêtez le moteur, débranchez la bougie d’allumage et éviter le
contact entre le câble et la bougie. Vérifiez pour trouver la cause. Les vibrations sont généralement
liées à un avertissement qu’il y a un problème.
SÉCURITÉ DE L’ESSENCE
• L’essence est très inflammable et ses vapeurs peuvent exploser. À manipuler avec précaution.
• Utilisez un contenant certifié à cet effet.
• Vérifiez votre réserve d’essence avant chaque utilisation, en laissant de l’espace dans le réservoir
puisque la chaleur peut faire augmenter le volume de l’essence.
• Ajoutez de l’essence uniquement à l’extérieur avec beaucoup de précaution. N’ajoutez jamais
d’essence à l’intérieur.
• Ne retirez jamais le bouchon d’essence et n’ajoutez jamais d’essence pendant que le moteur est en
marche. Laissez le refroidir avant d’ajouter de l’essence.
• Ne fumez pas lorsque vous ajoutez de l’essence.
• Après l’ajout d’essence, replacer le bouchon fermement et essuyer les éclaboussures ou
débordements.
• N’entreposez jamais de l’essence ou le rotoculteur avec de l’essence dans un édifice où les vapeurs
d’essence pourraient entrer en contact avec une flamme nue ou des étincelles.
• N’ajoutez jamais de l’essence dans l’appareil ou dans un contenant à l’intérieur d’un véhicule ou dans
une boîte de camion. Des décharges électriques accidentelles pourraient mettre le feu aux émanations
et provoquer de graves blessures ou entraîner la mort.

Assemblage
Lisez et suivez les consignes d’assemblage. Ne jetez aucune pièce ou matériel avant que l’appareil soit
complètement assemblé. Les références aux côtés gauche et droit sont en fonction du point de vue de
l’utilisateur, soit derrière l’appareil.
N’utilisez pas l’appareil s’il est endommagé ou s’il n’est pas complément et correctement assemblé.
Avant de faire toute opération d’assemblage ou d’entretien à l’appareil, débranchez le câble de la
bougie d’allumage.
Portez toujours des protecteurs pour les yeux en conformité aux normes ANSI avec des protecteurs
latéraux lorsque vous assemblez l’appareil.
(A) Comment retirez le rotoculteur de la boîte?
1. Retirez toutes les parties de l’emballage.
2. Utilisez un couteau afin de couper les 4 côtés et laisser tomber les panneaux latéraux autour de
l’appareil.
3. Retirez tout emballage restant.
(B) Consignes d’assemblage
L’appareil est livré assemblé, à l’exception de quelques pièces. Les consignes suivantes vous aideront
à compléter l’assemblage.
INSTALLATION DES ROUES
1. Glisser la roue sur l’axe.
2. Installez un écrou avec une rondelle plate.
INSTALLATION DE LA POIGNÉE SUPÉRIEURE
1. Glissez la poignée supérieure vers le bas par dessus la poignée inférieure et alignez les trous.
2. Insérez les vis dans les trous tel qu’illustré et sécurisez la avec le boulon.
3. Vissez le boulon solidement.

INSTALLATION DE LA BARRE DE RECOUVREMENT
1. Insérez la barre dans la partie inférieure du support de la tourelle.
2. Insérez l’attache de la colonne à travers le support et la barre de recouvrement, et fixez-la à l’aide de
l’attache en forme de « B ».
INSTALLATION DES DENTS
1. Glissez les dents sur l’axe. Installez les dents intérieures en premier. Les côtés coupants doivent être
vers l’avant et les lignes supérieures doivent être vers le bas, vers l’avant pour remuer le sol. Fixez la
ligne avec le boulon fourni pour solidifier les lignes intérieures.
2. Pour le travail en largeur de 21’’, installez les lignes extérieures afin que la longue partie de la ligne
de dents soit face à la ligne intérieure. Pour le travail en largeur de 16’’, installez la ligne de dents
extérieure de façon à ce qu’elle soit face à la ligne intérieure.
3. Vissez le boulon solidement avec l’écrou d’arrêt pour fixer les dents extérieures.
Boulons
Poignée à bouton
Boulons
Poignée à bouton

Préparation du moteur (A) Huile à moteur
Le moteur est livré sans huile. Ne pas ajouter d’huile pourrait entrainer de dommages sérieux à
l’appareil. Consultez le diagramme pour connaître les types d’huile en fonction des différentes
températures. Utilisez toujours une huile à détergent de qualité supérieure pour les services SG, SH,
SJ’’ ou supérieur. N’utilisez pas d’additifs spéciaux.
Utilisez toujours de l’huile de type recommandé. L’utilisation d’huile usée ou de type inapproprié telle
que celle prévue pour les moteurs à deux temps, endommagera le moteur.
COMMENT VÉRIFIER ET AJOUTER DE L’HUILE
Avant de vérifier le niveau d’huile, assurez-vous que le moteur est arrêté et que le câble de la bougie
d’allumage est débranché et qu’il ne risque pas d’entrer en contact avec la bougie.
1. Placez le rotoculteur sur une surface à niveau et assurez-vous que la barre de recouvrement est
placée de façon à ce que le châssis principal de l’appareil est à niveau.
2. Retirez la mesure/bouchon d’huile et essuyez-la avec un linge propre.
3. Insérez et retirez a mesure/bouchon mais NE la vissez PAS. Vérifiez le niveau d’huile
4. Lorsque le réservoir d’huile est au maximum, la limiter supérieur de la mesure sera atteinte. Sil le
niveau est proche ou en dessous de la limite inférieure, vous devez ajouter de l’huile.
5. Ajoutez de l’huile jusqu’à ce que la limite supérieure soit atteinte. Utilisez un entonnoir ou une buse
pour éviter les débordements et les éclaboussures.
Vérifier le niveau d’huile fréquemment lorsque vous en ajouter. NE SURCHARGEZ PAS L’APPAREIL.
Un manque d’huile peut sérieusement endommager le moteur.
6. Replacez et vissez la mesure/bouchon.
7. Nettoyez toute éclaboussure d’huile
Te mpérature ambiante
Mesure/Bouc
hon d’huile
Limite supérieure
Limite inférieure

NOTE: LA TRANSMISSION EST LIVRÉE AVEC LA BONNE QUANTITÉ ET LE BON TYPE D’HUILE.
Utilisation
(A) Vérification avant la mise en marche
1. Assurez-vous que tous les protecteurs sont en place et que les boulons et écrous sont solidement
fixés.
2. Vérifier le niveau d’huile moteur. Voir le guide de l’utilisateur du moteur pour connaître les procédures
et spécifications.
3. Vérifiez le filtre à air. Voir le guide de l’utilisateur du moteur pour la procédure.
4. Vérifiez le réservoir d’essence. Ajouter de l’essence en laissant au minimum 1 pouce d’espace dans
le réservoir en prévision de l’augmentation de volume de l’essence.
5. Assurez-vous que le câble de la bougie d’allumage est bien branché et que la bougie est fixée
solidement.
6. Vérifiez sous le moteur s’il y a des signes de fuite d’huile ou d’essence.
7. Vérifiez la solidité et l’état des conduits d’essence
8. Vérifiez si le moteur comporte des signes de dommage.
9. Enlevez les débris excessif du pot d’échappement et du démarreur.
10. Enlevez les débris des dents et de la barre de dents.
11. Déplacez le rotoculteur au lieu de travail.
12. Vérifiez la position des roues. La tourelle devrait être dans la position de labourage.
13. Vérifiez la position de la barre de recouvrement.
IMPORTANT: LE MOTEUR EST LIVRÉ SANS HUILE. VOUS DEVEZ AJOUTER DE L’HUILE AVANT
DE DÉMARRER LE MOTEUR.
NE DÉMARREZ PAS L’APPAREIL AVANT D’AVOIR LU LE GUIDE DE L’UTILISATEUR, ET LES
SECTIONS PORTANT SUR LES CONTRÔLEURS, LES AJUSTEMENTS ET LA SÉCURITÉ. SI VOUS
AVEZ LU CES SECTIONS, SUIVEZ LES INDICATIONS CI-BAS POUR DÉMARRER LE
ROTOCULTEUR. FAITES TOUJOURS L’INSPECTION AVANT USAGE AVANT CHAQUE
UTILISATION.
L’ESSENCE EST TRÈS INFLAMMABLE ET DOIT ÊTRE MANIPULÉ AVEC SOIN. NE REMPLISSEZ
JAMAIS LE RÉSERVOIR LORSQUE LE MOTEUR EST CHAUD OU EN FONCTION. AJOUTEZ DE
L’ESSENCE À L’EXTÉRIEUR.
GARDEZ TOUJOURS VOS MAINS ET PIEDS À BONNE DISTANCE DES PIÈCES ROTATIVES.
(B) Démarrage du moteur
1. Placez l’interrupteur à la position « Marche ».
2. Appuyez 3 fois sur le bouton de l’amorceur. Attendez 2 secondes entre chaque pression.
3. Prenez la poignée de démarrage et tirez doucement jusqu’à ce que vous sentiez de la résistance.
4. Tirez sur la poignée vigoureusement jusqu’à ce que le moteur démarre.
(C) Arrêt du moteur
1. Placez l’interrupteur à la position Arrêt.

(D) Vitesse d’utilisation
Ce rotoculteur est équipé d’un régulateur de vitesse ajusté pour assurer sa performance optimale.
(E) Arrêt complet
Pour arrêter le moteur à tout instant, relâcher l’embrayage et placez l’interrupteur à la position Arrêt.
Pour arrêter les dents, relâcher le levier d’embrayage.
(F) Mode de transport et Mode de labourage
Mode de transport
Plier les roues sous le moteur pour faciliter le transport.
Mode de labourage
Dépliez les roues pour labourer.
(G) Labourage
1. Ajustez la barre de recouvrement à la profondeur désirée.
NOTE: Abaissez la barre de recouvrement d’un trou et faites des essais à chaque ajustement.
L’abaissement de la barre à un niveau trop bas pourrait entrainer une perte de contrôle.
2. En appuyant vers le bas le levier d’embrayage engagera les dents qui feront avancer le rotoculteur.
ABAISSEZ TOUJOURS LE LEVIER D’EMBRAYAGE COMPLÈTEMENT SUR LA POIGNÉE.
NE PAS ABAISSER LE LEVIER COMPLÈTEMENT ENTRAINERA UNE USURE PRÉMATURÉE DE LA COURROIE ET
UN BRIS PRÉMATURÉ AUSSI.
LA TEMPÉRATURE DU SYSTÈME D’ÉCHAPPEMENT ET DE L’ESPACE ENVIRONNANT PEUVENT ATTEINDRE
1500F/ 660C. ÉVITEZ CES ZONES. POUR ARRÊTER LES DENTS À TOUT MOMENT, RELÂCHEZ LE LEVIER
D’EMBRAYAGE À LA POSITION NEUTRE.
RELÂCHEZ LE LEVIER D’EMBRAYAGE À LA POSITION NEUTRE ET ARRÊTEZ LE MOTEUR AVANT D’AJUSTER LA
PROFONDEUR DE LABOURAGE.
LE MOTEUR, LA TRANSMISSION ET LES PIÈCES ENVIRONNANTES DEVIENNENT TRÈS CHAUDS PENDANT
L’UTILISATION ET PEUVENT CAUSER DES BLESSURES SÉRIEUSES SI VOUS LES TOUCHER AVANT QU’ILS
AIENT REFROIDI.
LAISSEZ LE MOTEUR REFROIDIR COMPLETEMENT AVANT DE TOUCHER À CES SURFACES.
IMPORTANT: PRATIQUEZ L’UTILISATION DES CONTRÔLEURS ET DU ROTOCULTEUR AVEC LES DENTS À
L’EXTÉRIEUR DU SOL AVANT DE COMMENCER À LABOURER. IL EST IMPORTANT QUE VOUS CONNAISSIEZ LES
DIFFÉRENTS CONTRÔLEURS AFIN DE GARDER LE CONTRÔLE EN TOUT TEMPS, ET D’ÊTRE EN MESURE
D’ARRÊTER LES DENTS ET LE MOTEUR AU BESOIN. SI VOUS NE SAVEZ PAS COMMENT FAIRE CES ACTIONS,
LISEZ LA SECTION SUR LE CONTRÔLE, LES AJUSTEMENTS ET LA SÉCURITÉ AVANT D’UTILISER L’APPAREIL.

(H) Levier d’embrayage
CETTE INFORMATION EST FOURNIE SEULEMENT POUR EXPLIQUER LES CONTRÔLEURS. NE
DÉMARREZ PAS LE MOTEUR À CETTE ÉTAPE. LISEZ CETTE SECTION ET TOUTES LES CONSIGNES
DE SÉCURITÉ AVANT D’UTULISER LE ROTOCULTEUR.
NE FIXEZ PAS LE LEVIER D’EMBRAYAGE À LA POSITION DE MARCHE D’AUCUNE FAÇON.
• POUR ARRÊTER LES DENTS À TOUT MOMENT, LÂCHEZ LE LEVIER D’ÉTRANGLEMENT.
LEVIER D’EMBRAYAGE
Le levier active la rotation des dents vers l’avant. Tirer le levier d’embrayage vers la poignée active la
rotation des dents. Le relâchement du levier arrête le mouvement des dents et arrête le mouvement du
rotoculteur.
(I) Ajustements
LE MOTEUR DOIT ÊTRE ARRÊTÉ AVANT D’AJUSTER UN CONTRÔLEUR.
BARRE DE RECOUVREMENT - La profondeur du labourage est contrôlée par la hauteur de la barre de
recouvrement. Pour ajuster la profondeur :
1. Retirez l’attache en «B » et l’attache de la colonne.
2. Ajustez la barre de recouvrement à la position de profondeur des dents désirée.
3. Alignez les trous de la barre et de la colonne, et insérer l’attache en B et l’attache.
Barre de recouvrement vers le haut = Labourage en surface
Placez l’attache dans le trou inférieur du contrôleur de profondeur pour le labourage le plus en surface.
Barre de recouvrement vers le bas = Labourage en profondeur
Placez l’attache dans le trou supérieur du contrôleur de profondeur pour le labourage en profondeur.
N’AJUSTEZ PAS LA PROFONDEUR DE LABORAGE À MOINS QUE LE LEVIER D’EMBRAYAGE EST
RELÂCHÉ ET LE MOTEUR ARRÊTÉ.
AJUSTEMENT DE TENSION DE COURROIE
La tension de la courroie doit être adéquate pour assurer une bonne performance. Après 30 min.
d’utilisation, tous les câbles peuvent avoir besoin d’être ajustés à cause des mouvements initiaux. Après,
vérifier la tension toutes les 2 heures d’utilisation.
Câble de levier
d’embrayage
Boulon inférieur
Boulon supérieur
Câble de levier
d’embrayage
Boulon inférieur
Boulon supérieur

POUR AUGMENTER LA TENSION DE LA COURROIE
1. Dévissez le boulon supérieur. Tournez le boulon supérieur du câble.
2. Vissez le boulon inférieur.
3. Vérifiez l’ajustement
POUR DIMINUER LA TENTIONS DE LA COURROIE
1. Dévissez le boulon inférieur. Tournez le boulon du câble vers le bas.
2. Vissez le boulon inférieur.
3. Vérifiez l’ajustement.
Cette procédure peut être répétée jusqu’à ce que les boulons soient ajustés convenablement. S’il n’y a
plus d’ajustement possible, remplacez la courroie.
(J) Conseille d’utilisation
La clé d’un travail successif commence par un premier passage en surface et augmenter la profondeur
de 1 à 2 pouces à chaque nouveau passage.
• La profondeur de travail variera avec le type et la condition du sol.
• Lorsque vous commencez à travailler un sol non-travaillé ou très dur, placez la tige de détente dans le
trou supérieur du régulateur de profondeur (suivez les consignes de la section « Labourer ») vous
permettant ainsi de labourer en surface. Faites plusieurs passages à ce niveau de labourage. Ajustez
la hauteur selon votre exigence mais toujours en passes successives.
• Si le rotoculteur saute ou patine de façon incontrôlable, baisser le niveau de labourage en modifiant
la position de la tige de détente. Vous pourrez donc labourer en surface. Tenez les poignées fermement
pour contrôler les embardées.
• Si du gazon long, de l’herbe haute, de la vigne ou d’autres matériaux provoquent un bourrage des
dents, reculer l’appareil pour dérouler la végétation.
Lâchez immédiatement les leviers de contrôle si les dents sont bloquées ou si vous frappez un objet.
En gardant les leviers de contrôle à la position neutre, arrêtez le moteur. Débranchez le câble de la
bougie d’allumage. Lorsque les dents sont complètement immobilisées, retirez les objets pris et vérifiez
s’il y a des dommages.
UNE PRÉCAUTION ETRÊME DOIT ÊTRE PRISE LORSQUE VOUS CHOISISSEZ LA
PROFONDEUR DE LABOURAGE. Si vous tentez de labourer trop profondément dans un sol difficile,
vous pourriez perdre le contrôle de l’appareil. Si vous retirez du matériel des dents avec vos mains,
arrêtez le moteur et débranchez le câble de la bougie d’allumage.
(K) Conseil de travail du sol
Si vous planifiez utiliser votre rotoculteur pour cultiver :
• Plantez des rangées sur les centres de 20 – 22 pouces pour faciliter les virages.
• Placez le levier de profondeur dans le trou le plus haut. Le labourage en surface permettra de tourner
sur l’herbe, couper et aéré le sol.

Entretien
(A) Calendrier d’entretien
Avant d’effectuer tout entretien, arrêtez le moteur et retirez le câble de la bougie d’allumage pour éviter
les blessures graves pouvant être causées par un démarrage accidentel.
IMPORTANT: La garantie de ce rotoculteur ne couvre pas les pièces ayant été soumises à une
utilisation anormale ou à la négligence. Pour bénéficier de la garantie, l’utilisateur doit garder l’appareil
dans un bon état en respectant les consignes d’entretien de ce guide et en utilisant uniquement des
pièce de remplacements autorisées.
Le tableau suivant indique les intervalles d’entretiens périodiques.
Tableau d’entretien périodique
Avant
chaque
utilisation
Après
chaque 10
heures
d’utilisation
Après
chaque 25
heures
d’utilisation
Après
chaque 50
heures
d’utilisation
Après
chaque 100
heures
d’utilisation
Avant
chaque
saison
Avant
l’entrep
osage
Voir
note
ci-bas
Vérifiez le niveau d’huile,
Ajouter au besoin.
b
b
Vérifiez les deux
connecteurs du câble
d’extinction
b
b
Nettoyez tous les débris et
saletés.
b
b
b
Lubrifiez tous les pivots
b
b
b
Vérifiez la solidité des
boulons et écrous
b b
1
Vérifiez la courroie.
Remplacez au besoin.
b b
Vérifiez les dents.
Remplacez au besoin.
b
b
Vérifiez les conduits
d’essence. Remplacez au
besoin.
b
b
Lubrifiez l’axe des roues
b
b
b
Vérifiez la bougie
d’allumage. Remplacez au
besoin.
b
b
Changez l’huile moteur
b b
b
2,3
Vérifier le filtre à air.
Remplacez au besoin.
b
b
4
Remplacez la bougie
d’allumage.
b
Nettoyez les dépôts de
combustion du cylindre,
piston et valve.
b

NOTES IMPORTANTES à propos du calendrier d’entretien
1. Revérifiez la solidité de tous les boulons et écrous après les 2 premières heures d’utilisation.
2. Changez l’huile à moteur après les 5 à 8 premières heures d’utilisation.
3. Changez l’huile après 25 heures d’utilisation lorsque vous utilisez l’appareil dans des condition
difficiles ou dans des températures élevées.
4. Nettoyez le filtre à air après 10 heures d’utilisation si vous utilisez l’appareil dans un environnement
très poussiéreux.
Utilisez uniquement de pièce de remplacement ORIGINALES. D’autres pièces pourraient endommager
l’appareil et entrainer des blessures.
(B) Entretien du rotoculteur
Les informations qui suivent vous aideront à faire les vérifications nécessaires et les démarches
appropriées pour garder votre appareil en bon état. Si vous le désirez, votre détaillant de services
autorisé peut faire ces vérifications et les procédures nécessaires à votre place.
POUR PRÉVENIR UN DÉMARRAGE ACCIDENTEL :
Le moteur doit être arrêté et refroidi, et le câble de la bougie d’allumage doit être débranché et placé de
façon à ce qu’il ne puisse entrer en contact avec la bougie, AVANT de faire des vérifications et des
ajustements au moteur et à l’équipement.
CHANGER LES COURROIES
1. Arrêter le moteur. Il doit être totalement refroidi avant de continuer.
2. Retirez le câble de la bougie d’allumage et assurez-vous qu’il ne soit pas en contact avec la
bougie.
3. Réduisez la tension de la courroie en dévissant le boulon supérieur du câble.
4. Retirez la poignée de transport avant et les couvercles avant et arrière de la courroie.
• Retirez la courroie de la poulie avant du moteur :
- Dévissez les 3 vis de fixation du moteur.
- Glissez la courroie à l’extérieur de la poulie du moteur.
- Tirez la courroie vers le bas et enlever la complètement.
• installez la nouvelle courroie :
- Dévissez les boulons de fixation du moteur
- placez la courroie dans le sillon sur la poulie de transmission
- Placez la courroie dans le sillon sur la poulie du moteur.
5. Serrez le boulon supérieur.
Câble
Plaque

6. Rebranchez le câble de la bougie d’allumage.
7. Suivez les consignes d’utilisation – Démarrez le moteur et utiliser le levier d’embrayage. Vérifiez
l’ajustement du câble. Ajustez au besoin.
LES DENTS NE DOIVENT PAS TOURNER SI LE MOTEUR EST EN FONCTION, QUE LE
CONTRÔLEUR DE PROFONDEUR EST À LA POSITION TRANSPORT ET QUE LE LEVIER
D’EMBRAYAGE N’EST PAS ENGAGÉ.
(C) Entretien du moteur
ENTRETIEN DU MOTEUR
Consultez le guide d’utilisateur du moteur inclus dans le paquet contenant les pièces pour les
informations sur l’entretien du moteur. Ce guide contient des informations et un tableau d’intervalles
d’entretien pour faire les procédures suivantes :
1. Vérifiez le niveau d’huile avant chaque utilisation ou après 8 heures d’utilisation.
2. Changez l’huile après les premières 5-8 heures d’utilisation. Changez l’huile pendant que le moteur
est encore chaud. Ajoutez de l’huile de type recommandé.
4. Vérifiez la bougie d’allumage tous les ans ou après 100 heures d’utilisation.
5. Nettoyez le filtre à air;
6. Gardez le moteur et les pièces propres.
7. Vérifiez le moteur et les équipements régulièrement pour les boulons et écrous lousses. Gardez ces
éléments bien serrés
VÉRIFIEZ OU AJOUTEZ DE L’HUILE À MOTEUR
Important: Le moteur est livré dans huile. Vous DEVEZ ajouter de l’huile moteur avant de démarrer
l’appareil.
1. Ajoutez de l’huile en suivant les consignes du guide du moteur. N’ajoutez pas de l’huile au dessus
du niveau supérieur. Utilisez de l’huile propre à détergent de qualité. Ne mélangez pas l’huile à
l’essence. Le niveau d’huile doit est au maximum. Vérifiez l’huile en retirant le bouchon d’huile.
2. Vérifiez toujours le niveau d’huile avant de démarrer le moteur. Référez-vous au guide d’utilisation du
moteur pour les capacités et le type d’huile.
LUBRIFICATION
Il est essentiel de bien lubrifier les pièces mécaniques mouvantes afin d’assurer un bon fonctionnement
et un bon entretien de l’appareil. Huilez les différentes pièces mouvantes à chaque 10 heures
d’utilisation en utilisant de l’huile 30.
NETTOYEZ L’AXE DES DENTS
1. Arrêtez le moteur. Le moteur doit être froid.
2. Retirez le câble de la bougie d’allumage et assurez-vous qu’il ne soit pas en contact avec la bougie.
3. Penchez le rotoculteur vers l’avant. Sécurisez l’appareil dans cette position, sur le support moteur,
de façon à ce que les dents soient exposées.
4. Retirez toute végétation, câble, fil et autre matériel ayant pu s’accumuler sur l’axe entre les différents
ensembles de dents et sur le couvercle de la transmission.
5. Replacez le rotoculteur à sa position originale.
6. Branchez le câble de la bougie.

(D) Comment préparer l’appareil pour l’entreposage
N’entreposez jamais le rotoculteur à l’intérieur avec de l’essence dans le réservoir. Ne jamais
entreposez l’appareil dans un endroit clos, peu aéré où les vapeurs d’essence pourraient entrer en
contact avec une flamme nue, des étincelles ou une flammes d’allumage d’une fournaise, un chauffe
eau ou une sécheuse. Laissez le moteur refroidir avant de l’entreposer.
Ne retirez pas l’essence lorsque vous être à l’intérieur d’un édifice, à proximité d’un feu ou lorsque vous
fumez. Les vapeurs d’essence peuvent causer une explosion ou un feu.
NOTE: Un entretien annuel ou une vérification chez un détaillant de service autorisé pourrait vous
assurez que le rotoculteur offrira une performance maximale pour la prochaines saison.
Lorsque le rotoculteur est entreposé pour plus de 30 jours, les consignes suivantes doivent être suivies
afin de vous assurer que l’appareil sera dans une bonne condition pour la saison suivante.
1. Laissez le moteur en marche jusqu’à ce qu’il n’y ait plus d’essence.
2. Changez l’huile en suivant les consignes de la section « Comment changez l’huile ».
3. Retirez la bougie d’allumage du cylindre. Ajoutez une once d’huile dans le cylindre. Tirer doucement
sur le démarreur manuel afin de répartir l’huile dans le cylindre. Installez une nouvelle bougie dans le
cylindre. Tirez sur le démarreur tranquillement à quelques reprises pour distribuer l’huile. Tirez ensuite
jusqu’à ce que vous sentiez une résistance. Vous fermerez ainsi les valves du cylindre.
NE BRANCHEZ PAS le câble de la bougie d’allumage lorsque vous entreposer l’appareil.
4. Nettoyez l’appareil. Enlevez toutes les saletés, les feuilles, débris, graisse, etc. de l’appareil –
incluant les ventilateurs de refroidissement, le trous du couvercle du démarreur manuel, du dessous du
réservoir d’essence et du pot d’échappement.
5. Vérifiez l’appareil pour toute pièces tordue ou endommagées. Faites remplacer les pièces
endommagées au besoin.
6. Serrez toute pièces lousse ou mal fixées
7. Ajoutez du lubrifiant tel qu’indiqué à la section Entretien.
8. Entreposez l’appareil dans un édifice ayant une bonne ventilation.
9. Couvrez le rotoculteur avec un tissu respirant

Dépannage
Problème
Cause(s) possible(s)
Solution(s)
Moteur difficile à démarrer
1- Manque d’essence
2- Interrupteur à la position Arrêt
3- Moteur non préchauffé
4- Câble de la bougie débranché
5- Bougie défectueuse
6- Carburateur sale
7- Filtre à air bouché
8- Filtre à essence bouché
9- Essence contaminée
1- Ajouter de l’essence propre
2- Placez l’interrupteur à la position marche
3- Activez le levier d’étranglement
4- Branchez le câble de la bougie
5- Retirez la bougie, vérifiez et remplacez au besoin.
6- Apportez l’appareil chez un détaillant autorisé.
7- Retirez et nettoyez le filtre
8- Retirez le filtre, vérifiez et remplacez au besoin.
9- Videz le réservoir d’essence, nettoyez-le et
ajouter de l’essence propre.
Problème du moteur
Le moteur produit beaucoup de fumée
Le moteur fonctionne durement
Le moteur fonctionne irrégulièrement
Le moteur ne garde par sa vitesse
normale.
1- Il n’y a plus d’huile moteur
2- Le niveau d’huile n’est pas approprié.
3- Bougie défectueuse
4- Filtre à air bouché
5- Filtre à essence bouché
6- Essence contaminée
7- Carburateur mal ajusté
1- Ajoutez de l’huile moteur
2- Vérifiez l’huile. Ajoutez ou drainez au besoin.
3- Retirez la bougie, vérifiez et remplacez au besoin
4- Retirez et nettoyez le filtre.
5- Retirez le filtre, vérifiez et remplacez au besoin.
6- Videz le réservoir d’essence, nettoyez-le et
ajouter de l’essence propre.
7- Apportez votre appareil chez un détaillant
autorisé pour faire ajuste le carburateur
Vibrations et bruits excessifs
1- Pièces lousses ou mal fixées
2- Problèmes moteur
1- Serrez tous les boulons et écrous.
2- Consultez les solutions pour le moteur (ci-haut)
Les dents ne tournent pas
1- Des débris bloquent les dents
2- Les dents sont lousses
3- Câbles d’entrainement mal ajustés
4- Courroie inappropriée
1- Enlever les débris autour des dents.
2- Serrez ou remplacez les boulons des dents
3- Consultez la section « Ajustement de tension de
la courroie pour diminuer la tension.
4- Remplacez la courroie.
Les dents continuent de tourner même si
le levier d’embrayage n’est pas activé.
1- Câbles d’entrainement mal ajustés
2- Courroie inappropriée
1- Consultez la section « Ajustement de tension de
la courroie pour diminuer la tension.
2- Remplacez la courroie.
Le moteur n’arrête pas
1- Câble d’extinction débranché
1- Branchez le câble d’extinction.
Les dents ne coupent pas bien
1- Dents défectueuse ou usées
1- Remplacez les dents
Le moteur arrête souvent
1- Profondeur et vitesse de labourage
excessive
2- Problème moteur
1- Labourez à une vitesse modérée. Repassez
plusieurs fois.
2- Consultez les solutions pour le moteur (ci-haut)

LISTES DE PIÈCES

LISTES DE PIÈCES

LISTES DE PIÈCES
REF.
Description
REF.
Description
1
Écrou de blocage, Nylon M8
Carburateur
2
Rondelle de ressort 8
Bougie d'allumage
3
Rondelle plate 8
46
Ventilateur
4
Boulon hex. extérieur M8X25
47
Clé plate 4.78X5X35
5
Lame de gauche
48
Roue de petite courroie
6
Lame de droite
49
Clé demi cercle 4x6.5x16
7
Support de lame extérieure
50
Rondelle ajustable ø22.3xø35x0.5
8
Support de lame intérieur
51
Rondelle plate φ10Xφ32X4
9
Poignée avant
52
Boulon 1-24UNF(M10X28)
10
Boulon hex. extérieur M8X30
53
plaque de protection
11
Écrou de blocage hex. ext. M12
54
boulon de bride hex. Ext. M6x25
12
Rondelle de ressort 12
55
Rondelle de ressort 6
13
Rondelle plate 12
56
Support moteur
14
Roue de grosse courroie
57
Perche
15
Courroie
58
Perche ajustable à double têtes
16
Clé demi cercle 4x6.5x16
59
Bolon hex. Extérieur M8X130
17
Attache pour câble
60
Bolon hex. Extérieur M8X150
18
Écrou de blocage hex. ext. M6
61
Bolon hex. Extérieur M8X20
19
Boulon hex. Extérieur M6X18
62
Couvercle arrière
20
Rondelle plate 6
63
Gaine de caoutchouc
21
Bolon hex. Extérieur M10X50
64
Poignée
22
Écrou de blocage hex. ext. M10
65
Bolon hex. Extérieur M10X25
23
Rondelle plate 10
66
Rondelle de ressort 10
24
Bolon hex. Extérieur M8X50
67
Couvercle avant
25
Support de roue
68
Bolon hex. Extérieur M6X12
26
Rondelle plate ø14xø28x2
69
Poignée de transport
27
Roue 10"
70
Boulon de secteur
28
Rondelle plate 8x22x2
71
Écrou à bouton
29
Bolon hex. Extérieur M8X16
72
Assise de câble
30
Perche ajustable
73
boulon de bride hex. Ext. M6x40
31
Attache en "B"
74
Poignée d'embrayage
32
Perche de résistance
75
Chassis gauche
33
Attache φ8X25
76
chassis droit
34
Levier d'embrayage
77
Rondelle de papier
35
Tensionneur
78
Axe de sortie
36
Rondelle de retenue 10
79
Perche à vis sans fin
37
Câble de levier d'embrayage
80
Roue à vis sans fin
38
Manchon du bloc de courroie
81
Clé demi cercle 5x9x22
39
Manchon de l'axe du tensionneur
82
Rondelle de retenue
40
Boulon hex. Extérieur M8X60
83
Rondelle plate ø25xø40x1
41
Rondelle plate ø8xø28x3
84
Roulement à rainure profonde 6204
42
Attache de câble
85
Roulement à dégression unique 30203
43
Attache φ6X16
86
Roulement à rainure profonde 6005

REF.
Description
REF.
Description
44
Attache débouchée
87
Joint d'huile φ20Xφ32X6
45
Moteur à essence
88
Joint D'huile φ25Xφ40X7
Démarreur manuel
89
Capuchon de joint d'huile
Pot d'échappement
90
boulon de bride hex. Ext. M6x35
Filtre à air
91
boulon de bride hex. Ext. M10x1x14
Réservoir d'essence
92
Rondelle de combinaison M10
Transmission
Garantie limitée
Par la présente, GOSS Power Product Ltd. (« GOSS ») garantit à l’acheteur original et utilisateur final de la
appareil qui cette garantie limitée s’applique, que cet appareil sera exempt de défaut de matériel et de
main-d’œuvre pour une période de (i) une an si elle a été achetée par un consommateur chez un détaillant,
pour des fins d’usage domestique normal, ou (ii) de 90 jours si elle a été achetée pour un usage professionnel
ou industriel, dans les deux cas, à compter de la date d’achat originale.
En cas de mauvais fonctionnement ou de bris de votre appareil, il suffit de le livrer ou de l’expédier
accompagné d’une preuve d’achat, à GOSS durant la période couverte par la garantie. GOSS se réserve le
droit d’inspecter la ou les pièces déclarées défectueuses afin de déterminer si le mauvais fonctionnement ou
le bris est couvert par cette garantie limitée. GOSS peut, à sa discrétion, réparer et/ou remplacer la ou les
pièces défectueuses sans frais (excluant les frais de transport de l’appareil ou d’une ou de plusieurs de ses
pièces), dans les 60 jours à partir de la réception du produit. Cette garantie limitée ne couvre que les
défectuosités et le bris causés par un usage normal, et GOSS n’assume aucune responsabilité si l’appareil
cesse de fonctionner durant la période couverte par la garantie limitée pour une des raisons suivantes : (i)
usage abusif, négligence, dommages matériels ou accidents ; (ii) manque d’entretien (consultez le manuel du
propriétaire qui décrit les méthodes d’entretien adéquates) ; (iii) réparation effectuée durant la période de la
garantie limitée, par une tierce partie non autorisée. Les restrictions concernant l’usage et les autres
spécifications, énoncés dans le manuel du propriétaire s’appliquent également à la garantie limitée
susmentionnée. Le non respect des modalités indiquées dans le manuel du propriétaire annule cette garantie.
GOSS n’offre aucune autre garantie ou déclaration, expresse ou tacite, à l’exception de ce qui est énoncé
dans la présente. Aucun détaillant agréé n’est autorisé à assumer une autre responsabilité concernant
l’appareil. La durée de la garantie limitée stipulée en vertu d’une loi provinciale ou fédérale, y compris les
garanties de qualité marchande et d’aptitude à un emploi déterminé, se limite à la durée expresse mentionnée
dans la présente. En aucun cas, GOSS ne peut être tenu responsable de dommages directs, indirects,
particuliers ou accessoires.
Dans l’éventualité d’un bris ou d’une défectuosité de votre appareil, couvert par cette garantie limitée, veuillez
contacter GOSS au :
GOSS Power Products Ltd.
6226 Danville Rd, Mississauga, ON, L5T 2H7
1-877-270-7772
www.gosspower.com

 Loading...