

Page 1
Operating Instructions
SECUTEST SI+
3-349-613-15
5/4.17
Page 2
5
6
1
2
4
3
7
8
9
10
11
12
13
14
6
SECUTEST SI+
MENU
without Function
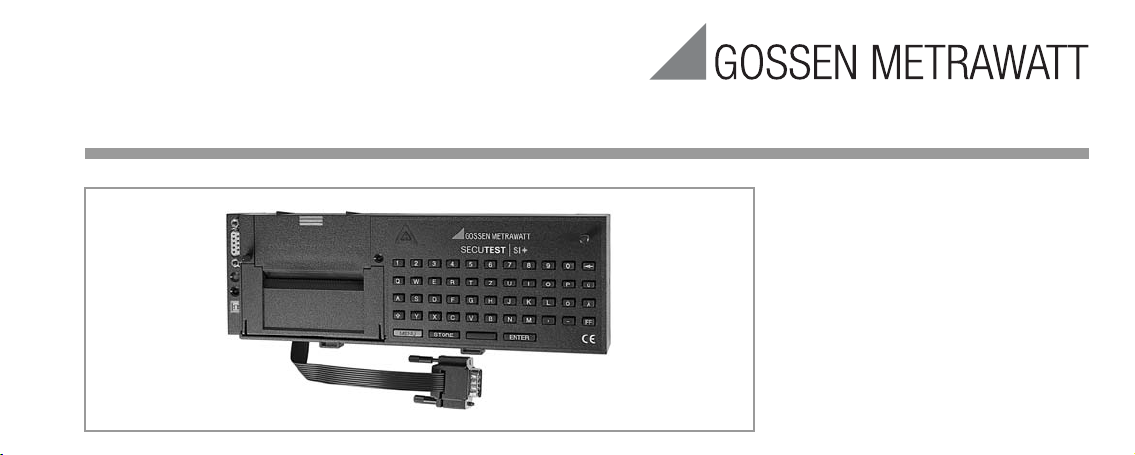
Standard Equipment
1 Input and memory module
SECUTEST SI+,
1 USB connector cable,
1 Operating instructions
The Driver Control software for installing
the USB device driver is available from
our website.
2 GMC-I Messtechnik GmbH
Page 3

ENTER
STORE
,
-
MENU
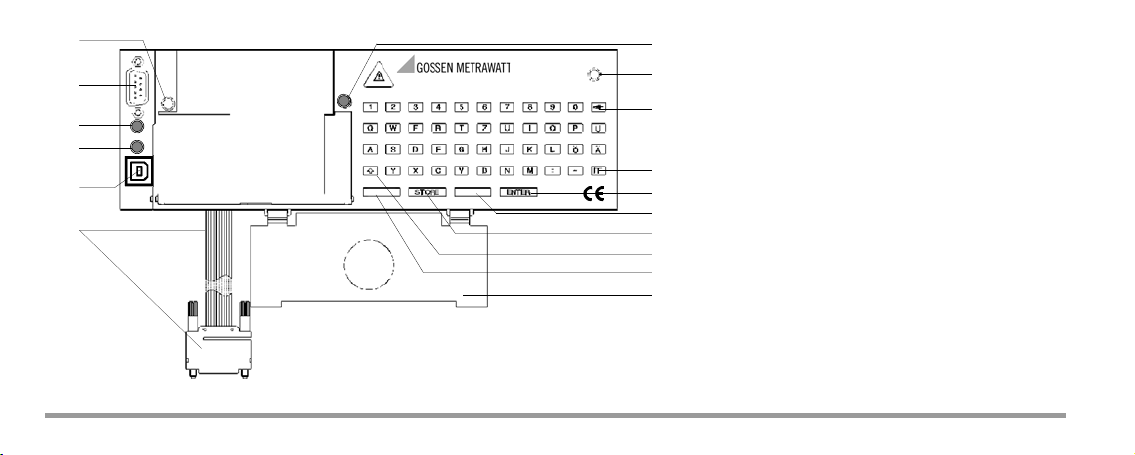
1
STORE
0
1
Ribbon cable with RS232 plug for connection of the SI module to the tester
2 USB socket connector for the transmission of stored data to the PC
LED signal lights up green when USB interface is active
3
provided the USB device driver has been installed to the connected PC
4
LED signal lights up green when RS232 interface is active
5 RS232 connection socket for PC, barcode reader or RFID scanner
6 Knurled screw
Signal LED, lights up briefly when connected with the test instrument and remains
7
deactivated afterwards
8 Clear key to delete single characters or
complete lines in connection with the shift key
Shift key to shift the keyboard from small letters to capital letters and vice versa
12
Key shifts to full stop ( . )
Key shifts to underline ( _ )
13 Key to activate the SI module
14 Flap to fix the probe lead in the lid of the SECUTEST...
Combined keyboard instructions for report entry
(only for SECUTEST... test instrument)
Deletes the line on which the cursor is positioned.
All text entries are deleted,
provided the cursor is positioned in an active text entry section
9 Enter key to conclude the entry and go to the next entry prompt
10 Space key to enter spaces
11 Storage key to store the last test report
+ The report stored last is deleted,
provided no SI module window is active.
+ A reset is done, the SI module is initialized, all stored data are
deleted!
This is only possible in the
GMC-I Messtechnik GmbH 3
Setup
menu under
Clear memory
.
Page 4

Contents Page Page
1 Applications .................................................................................6
1.1 Application SECUTEST... ..............................................................................6
1.2 Application PROFITEST 204 and METRISO 5000 D-PI ....................................7
1.3 Meaning of the Symbols on the Unit .............................................................7
5 How to Display and Store Reports .............................................12
5.1 How to Display Reports, Enter and Store Texts ............................................ 12
5.2 Automatic Report Storage ......................................................................... 14
5.3 Quick Report Storage ................................................................................ 15
5.4 Requesting Stored Reports ........................................................................ 16
2 Safety Features and Safety Precautions .....................................8
6 Statistics ....................................................................................17
3 Getting Started ............................................................................9
3.1 Installing the SI Module ................................................................................9
3.2 Activating the SI Module ..............................................................................9
6.1 Getting Started for Statistics Recording ......................................................17
6.2 View Statistic Data .................................................................................... 18
6.3 Delete Statistic Data ................................................................................. 19
4 Presettings ................................................................................10
4.1 Setting the Clock .......................................................................................10
4.2 Enter and Delete Top and Bottom Lines ......................................................11
4.3 Clear Memory ...........................................................................................11
7 Operation with Barcode Reader .................................................20
7.1 Connecting the Barcode Reader ................................................................ 20
7.2 Configuring the Barcode Reader ................................................................ 20
8 Data exchange with a PC ...........................................................21
4 GMC-I Messtechnik GmbH
Page 5

Contents Page Page
9 Error Message ........................................................................... 21
10 Technical Data ........................................................................... 22
11 Maintenance .............................................................................. 25
11.1 How to Reset the SI Module ...................................................................... 25
11.2 Housing ................................................................................................... 25
11.3 Device Return and Environmentally Compatible Disposal ............................. 25
12 Repair and Replacement Parts Service ..................................... 26
13 Product Support ........................................................................ 26
GMC-I Messtechnik GmbH 5
Page 6

1 Applications
Note
Note
The SI (Storage Interface) module SECUTEST SI+ is a special accessory
for the the following test instruments:
SECUTEST..., SECULIFE ST, PROFITEST 204 and METRISO 5000 D-PI.
It is installed in the lid of the tester and fastened with two knurled screws.
The test results determined with the test instrument are directly transferred to the SI module via the ribbon line.
1.1 Application SECUTEST...
All measured values for approximately 300 reports (amount of one working day) can be stored in this memory.
Via a serial RS232 port or an USB interface, the stored measured values
can be transferred from the SECUTEST SI+ to the PC, archived and pro-
cessed there with our software packages (e.g. for the preparation of
invoices), or printed directly into a pre-made form.
6 GMC-I Messtechnik GmbH
Transmission of the data from the memory of the SI module to the
PC via the RS232 or USB interface is only possible when the SI
module is connected to the test instrument.
Data transmission from the memory of the SI module to the PC
via USB interface is only possible if you have installed the
required device driver to your PC via the Driver Control software.
Page 7

USB Device Driver
!
The Driver Control software for installing the USB device driver including
the operating instructions are available for download from our website
http://www.gossenmetrawatt.com
Products Software Software for Testers
Utilities Driver Control
Free of Charge Starter Programs
An overview of the up-to-date report generating software with and without database for testers (free starter programs and demo software for
data management, report and list generation) is provided on our website.
These programs can be downloaded either directly or after registration.
http://www.gossenmetrawatt.com
Products Software Software for Testers
GMC-I Messtechnik GmbH 7
1.2 Application PROFITEST 204 and METRISO 5000 D-PI
Operation with these test instruments is limited to the function „Entry of
comments via the alphanumeric keyboard.“ Only the following chapters
are relevant in this context:
chap. 2 Safety Features and Safety Precautions
chap. 3.1 Installing the SI Module
chap. 10 Technical Data (without memory function)
chap. 11, 12 and 13 Maintenance and Addresses
1.3 Meaning of the Symbols on the Unit
Warnung concerning a point of danger
(Attention: observe documentation!)
indicates EC conformity
This device may not be disposed of with the trash. Further information
regarding the WEEE mark can be accessed on the
www.gossenmetrawatt.com by entering the search term WEEE.
Internet at
Page 8

2 Safety Features and Safety Precautions
!
!
When the SECUTEST SI+ is properly used, the safety of both the user and
the unit is assured.
In order to meet the legal regulations for electromagnetic compatibility
(EMC), an electrically conductive plastic material is used for the housing for
shielding. Touching of the SI module under normal operation causes no danger as contact-hazardous voltages do not occur in the
Attention!
The housing of the SI module has electrically conductive characteristics that are similar to those of metal. It must not come
into connection with live parts.
Read the operating instructions carefully and completely before you use your unit
and follow them in all respects.
8 GMC-I Messtechnik GmbH
SECU
TEST SI+
.
Data Backup (only instruments of the SECUTEST... series)
The measurement, report and entry data can be safely stored in the
RAM of the SECUTEST SI+ storage module.
We advise you to regularly transmit your stored data to a PC in order to
prevent potential loss of data in the storage module.
We assume no liability for any data loss.
For data processing and management we recommend our software
packages, see page 7.
Page 9

!
MENU
0
3 Getting Started
3.1 Installing the SI Module
➭ SECUTEST... only: Remove the cover from the lid of the SECUTEST.... For
this purpose, press the cover to the side.
➭ Insert the SI module into the lid and fasten it with the two knurled re-
taining screws.
➭ Connect the module to the connection socket of the RS232 interface
of the test instrument via the ribbon cable.
➭ SECUTEST... only: Below the SI module there is a compartment provided
in the lid for the storage of the probe lead. Lock the flap inserted in the
module on the hinge of the lid so that the probe lead will not fall out
when the lid is closed.
3.2 Activating the SI Module
To activate the SI module, a connection to the RS232 interface of the
SECUTEST... must be established and the test instrument must be connected to the mains.
GMC-I Messtechnik GmbH 9
Initial Start-up – Clear memory
For initial start-up, the memory should be completely cleared by means
of a reset:
➭ Activate the menu function by pressing .
➭ Select the Setup menu and then the menu Clear memory.
➭ Press + simultaneously.
➭ Reset date and time after initialization.
Attention!
As long as the signal lamp lights up at the SI module, a synchronization between the test instrument and the SI module is
being performed during which no test data may be imported
from the SI module. Do not press any key at the test instrument.
Page 10

Request menu
MENU
10%
Press 1x
4 Presettings
Upon selection of the menu item „Setup“
you can perform the following settings:
Selection and execution of the functions listed
in the menu is done by means of the corresponding keys on the test instrument.
The other operating controls and connectors
should remain unchanged while the SI module
is active so that the data traffic will not be disturbed.
The menu item "Return" causes a return to the LC display presented
prior to activating the SI module.
The display shows that 10 % of the storage capacity are already
occupied. When 99% of the memory are filled, the data should be trans-
4.1 Setting the Clock
Note:
Please ensure that the same date and time are
set in the connected test instrument.
mitted to a PC and stored there. Subsequently, the existing data must
be deleted before new data can be stored to memory. Otherwise, the
messages „Memory full“ and „Clear memory in setup“ appear.
10 GMC-I Messtechnik GmbH
Page 11

4.2 Enter and Delete Top and Bottom Lines
Note
ENTER
ENTER
0
➭ You will get to the next line by pressing the key
➭ You can delete the top and bottom lines with the and keys
4.3 Clear Memory
To clear the memory, press the key
on the SI module.
From the keyboard, you can enter optional texts which – before and/or
after the test result – are to be automatically included in the report printout. For top and bottom lines, 5 lines of 24 characters each are available.
The top and bottom lines are the same for all test results in the memory.
Enter the texts via the keyboard.
Data entry is also possible via barcode reader (see chapter 7, page 20).
GMC-I Messtechnik GmbH 11
To stop, press the key on the SECUTEST....
With the „Clear memory“ function, text information that has
been entered consisting of headline and bottom line, device
type, manufacturer, prototype as well as details on customer,
repair work and statistics are preserved. These data can only
be deleted by performing a reset ( + ).
Page 12

5 How to Display and Store Reports
Note
STORE
MENU
The test report automatically contains the test result including the measured and limit values as well as information on the visual inspection.
Storage of the results of the safety and function tests as well as their
entry into reports and statistics is only possible after tests have been
performed.
Exception: the function switch is in the „MENUE“ position (older
versions: also „FUNCTION-TEST“). In this position only the
result of the last function test can be stored.
You can load the result of the last test into the SI module and store it
there under an Ident Number. The report of the last test can be printed
out several times.
The results of a complete working day (approximately 300 reports) can
be stored in the memory of the SI module. Pressing the key
several times makes for the same data record to be overwritten again
and again.
12 GMC-I Messtechnik GmbH
Further specific information on device under test, customer and repair
can be integrated in the test report by entries via the keyboard or a barcode reader (see chapter 7, page 20).
The report is presented on the LCD in several windows.
5.1 How to Display Reports, Enter and Store Texts
➭ Request the SI menu via the key
➭ Select Protocol and confirm with
First, the test result including measured and
limit values is shown. The display contains
available data only.
In further windows that can be selected with the
and keys, you can display information on the
visual inspection as well as enter texts via the keyboard, and barcodes via the barcode reader (see
chapter 7, page 20). A maximum of 24 characters
can be entered into one line.
Page 13

End the text entry of a line by pressing the
ENTER
STORE
key. At the same time, this brings you
to the next line.
➭ To store, press the key.
returns you to the SI menu.
When storing the report, the consecutive ident
number is output between date and time.
Figure at left:
Info on DUT
max. 24 charact. each
Figure at right:
Info on customer
max. 24 charact. each
Results of the function test
Information on
e.g. repair
max. 10 lines
of max.
24 characters each
GMC-I Messtechnik GmbH 13
Page 14

If there are no data available in the test instrument when the menu item Protocol is called up,
the following message appears:
➭ SECUTEST... test instrument:
Select the desired test at the function selector switch of the test instrument.
➭ older versions SECUTEST 0701/0702S:
Set the function selector switch of the test instrument to the MENUE
position.
➭ Move the cursor to Setup and confirm with .
➭ Move the cursor to Configureand confirm with .
5.2 Automatic Report Storage
➭
Move the cursor to
Autostore
: activate or deactivate the function with .
All test results are automatically allocated a consecutive ident number*
provided the Autostore function is active. After the safety test as well as
after the function test, a note is displayed indicating that the test data are
being stored.
When the SI module is deactivated, proceed as follows to activate the
Autostore function in the test instrument:
* It consists of max. 24 digits. Counting starts with the first four digits in
each case, beginning with 0000.
14 GMC-I Messtechnik GmbH
Page 15

Note
STORE
ENTER
STORE
5.3 Quick Report Storage
If many measurements are to be made successively and the results are
to be evaluated later, the function "Quick report storage" presents itself.
This function can only be performed after a test (safety test and/or function test).
If a reset has been made accidentally after the test, e.g. by
changing the position of the function switch or pulling the interface cable off, the ident number must again be entered in the
report. The data are preserved.
➭ Activate the SI module with .
This brings you directly to the enter field for
the ident number. Here you can enter a
maximum of 24 digits and confirm with
.
➭ To store, press the key once more.
The report is stored in the data base of the SI
module together with all available data. Empty
data fields are ignored. At the same time you
return to measuring mode to immediately start
the next measurement.
GMC-I Messtechnik GmbH 15
Page 16

5.4 Requesting Stored Reports
i
A list of all stored reports can be requested at any time in order to display
and print out the contents of individual reports at a later date. The first
column contains the consecutive numbers, the second one the ident
numbers. The first 14 characters of the ident number are shown as a
maximum.
➭ Choose Protocol and confirm with .
➭ Press the help key i on the SECUTEST....
A list of the stored reports appears.
➭ Select the desired report using the and keys and confirm
with .
A maximum of 10 stored reports is displayed. The next 10 reports are
selected by browsing through with the cursor.
In the presentation of the archived report, an on the right-hand side of
the first bottom line informs you that the measured data have been
stored under a consecutive number and consequently no more data can
be entered.
16 GMC-I Messtechnik GmbH
Page 17

6 Statistics
Altogether, statistic data of a maximum of eight equipment classes can
be recorded. The statistic data include the number of the errors occurred
as well as their percentage of the total measurement within one class.
The statistics menu appears provided Statistics has been selected in the
main menu, see chapter 3.2, page 9.
6.1 Getting Started for Statistics Recording
Where statistic data are to be recorded, the associated class designation
must be defined prior to a measurement by selection of Class. If a class
name is already entered, it must be activated.
➭ Move the cursor to Class and , set menu is displayed.
➭ Move the cursor to the respective class name and ,
an underline appears at the end of the text.
➭ If you want another class name: delete existing characters with ,
or complete lines with
and enter a maximum of eight charac-
ters via the alphanumeric keyboard.
➭ Confirm with , the cursor moves to the error column.
➭ Determine with or whether only the first or all errors are to be
considered. Confirm with . A lightning symbol appears behind the
activated class name.
➭ Repeat Return until the SI LCD no longer appears.
GMC-I Messtechnik GmbH 17
Page 18

The safety tests as well as the function tests can now be performed for
the selected class.
After the start of a report recording, the setting First or All in the statistics
menu can no longer be changed.
After each complete measurement, consting of safety test and function
test, the measured data must be stored so that they will be available for
statistic evaluation. See „How to Display and Store Reports“ on page 12.
If, after the measurement, First or All is followed by a symbol, statistic
6.2 View Statistic Data
Select the Statistics menu to request statistic data:
➭ With or move the cursor to Display and confirm with , View
menu is shown.
➭ Select the class the statistic data of which you wish to see, confirm
with . The statistic data of the selected class are listed.
Moreover, in this mode you can browse through the statistic data of all
classes with the or keys.
data have been stored for the respective class.
All following measurements expand the statistics of the class activated at
the time by the additional measured results. If new statistic data are to
be recorded for an existing class, the stored statistic data can be
deleted, see chap. 6.3 Delete Statistic Data.
18 GMC-I Messtechnik GmbH
Page 19

6.3 Delete Statistic Data
➭ With or , move the cursor to Delete and press .
➭ Select the class the data of which is to be deleted
or
➭ Select Delete: all to delete the stored statistic data of all classes!
After all classes are deleted, class A is set active and the error type of
each class is set to First.
GMC-I Messtechnik GmbH 19
Page 20

7 Operation with Barcode Reader
The barcode reader Z720A (as accessory) allows for all information available in barcode form to be quickly, easily and safely entered into the test
reports. This type of data entry permits time-saving and low-cost acquisition of large amounts of information, e.g. for series measurements of
devices provided with barcodes.
7.2 Configuring the Barcode Reader
The barcode reader Z720A is configured for the following barcodes:
CODE 39 / CODE 128 / EAN13 (12 digits) *
The barcode reader is immediately ready for operation when connected
to a SECUTEST... or SECUTEST SI+ test instrument.
7.1 Connecting the Barcode Reader
➭ Connect the reader to the RS232 interface of the SI module.
An SI LCD window must not be active!
The barcode reader confirms the correct connection with a double
For operation with PROFITEST 204, the barcode reader has to be configured with the code indicated in the operating instructions of the barcode reader adapter. For these test instruments, only Code 128 is possible.
acoustic signal.
If you wish to use other codes for the SECUTEST..., please consult our
Product Support Hotline, see chapter 13, page 26
* Z720A has the appropriate scanning width to be programmed to the EAN 128
barcode.
20 GMC-I Messtechnik GmbH
Page 21

8 Data exchange with a PC
STORE
Transmission of the data to the PC is only possible when the SI module is
connected to the test instrument, which, in turn is connected to the
mains.
➭ Connect the PC to the RS232 connection socket of the SI module via
an interface cable.
9 Error Message
Message when the key has been
pressed although there is no free memory.
GMC-I Messtechnik GmbH 21
Page 22

10 Technical Data
Note
Connection elements
Fasteners on test instrument
2 knurled screws for fastening in the lid of
Data Memory
RAM (data) 100 kbytes
Real-time clock with date battery-backed by embedded Lithium cell
the test instrument; transmission of measured data and power supply via ribbon
cable and 9-pin D-SUB connector, to be
connected to the RS232 interface of the
test instrument
Interfaces RS232, bidirectional, 9-pin D-SUB socket,
e.g. for connection to a PC or a barcode
reader, or RFID Scanner
USB, 4 pin USB1.1 type B,
for connection to a PC
(only for transmission of measured data)
RS232 Interface
Type RS232, serial, per DIN 19241
Operating voltage
6.5 V ... 12 V for connection to test instrument
Current consumption 40 mA typical
Baud rate 9600 bauds
Parity none
Data bits 8
Stop bit 1
A comprehensive description of the interface protocole can be
downloaded from our website www.gossenmetrawatt.com.
Assignment of the Interfaces: see following page
22 GMC-I Messtechnik GmbH
Page 23

The 9-pin D-SUB connector for connection of the SI module to the
1: Enable remote control „Plus“
2: RXD
3: TXD
4: NC
5: GROUND
6: Enable remote contr. "GROUND"
7: NC
8: NC
9: +9 V
9876
54
3
21
1: NC
2: TXD
3: RXD
4: Switching input
5: GROUND
6: +5 V
7: CTS
8: RTS
9: NC
6789
12
3
45
SECUTEST 0701S tester has the following pin assignment:
USB Interface
Ty pe
USB 1.1
Operating voltage 5 V DC 10 % from the RS232 interface of
the test instrument
Current consumption 40 mA typical
Baud rate 9600 bauds
Parity none
Data bits 8
The 9-pin D-SUB connection socket for connection to PC, barcode reader,
etc., has the following pin assignment:
GMC-I Messtechnik GmbH 23
Stop bit 1
Terminal assignment Type B 4 pin,
1: VCC, 2: D–, 3: D+, 4: GND
Page 24

Reference Conditions
Operating voltage for
connection to test instrument
9V 0.5 V DC or 8 V 0.5 V rectified
Ambient temperature +23
Relative humidity 40
C 2K
60 %
Electromagnetic Compatibility (EMC)
Interference emission EN 61326-1:2013 class B
Interference immunity EN 61326-1:2013
Mechanical Design
Ambient Conditions
Operating temperature 0
Storage temperature
C ... +40 C
20 C ... +60 C
Humidity max. 75 % RH; no condensation
24 GMC-I Messtechnik GmbH
Protection type IP 20 for the housing
Dimensions 240 mm x 81 mm x 40 mm
(without knurled screws and ribbon cable)
Weight approx. 0.4 kg
Page 25

11 Maintenance
0
Pb Cd Hg
11.1 How to Reset the SI Module
Should the SI module no longer react, e.g. due to incorrect operation, it
must be initialized:
➭ Pull the line plug of the test instrument and restart it. Stored data are
preserved
or
➭ If stored data are to be deleted at the same time:
Select the Setup menu and then the menu item Clear memory.
Press + simultaneously.
Check the preset time after a reset!
11.2 Housing
No special maintenance is required for the housing. Keep outside surfaces clean. Use a slightly dampened cloth for cleaning. Avoid the use of
cleansers, abrasives or solvents.
11.3 Device Return and Environmentally Compatible Disposal
The instrument is a category 9 product (monitoring and control instrument) in accordance with ElektroG (German Electrical and Electronic
Device Law). This device is subject to the RoHS directive.
We identify our electrical and electronic devices in accordance
with WEEE 2012/19/EU and ElektroG with the symbol shown to
the right per DIN EN 50419. These devices may not be disposed with the trash. Please contact our service department regarding
the return of old devices, address see chap. 12.
If you use batteries or rechargeable batteries in your instrument or
accessories which no longer function properly, they must be duly disposed of in compliance with the applicable national regulations.
Batteries or rechargeable batteries may contain harmful substances or
heavy metal such as lead (PB), cadmium (CD) or mercury (Hg).
They symbol shown to the right indicates that batteries or
rechargeable batteries may not be disposed of with the trash,
but must be delivered to collection points specially provided for
this purpose.
GMC-I Messtechnik GmbH 25
Page 26

12 Repair and Replacement Parts Service
When you need service, please contact:
GMC-I Service GmbH
Service Center
Thomas-Mann-Straße 20
90471 Nürnberg • Germany
Phone +49 911 817718-0
Fax +49 911 817718-253
E-Mail service@gossenmetrawatt.com
www.gmci-service.com
This address is only valid in Germany. Please contact our representatives
or subsidiaries for service in other countries.
Edited in Germany Subject to change without notice A pdf version is available on the internet
13 Product Support
When you need support, please contact:
GMC-I Messtechnik GmbH
Product Support Hotline
Phone +49 911 8602-0
Fax +49 911 8602-709
E-Mail support@gossenmetrawatt.com
GMC-I Messtechnik GmbH
Südwestpark 15
90449 Nürnberg •
Germany
Phone +49 911 8602-111
Fax +49 911 8602-777
E-Mail info@gossenmetrawatt.com
www.gossenmetrawatt.com
 Loading...