

Page 1
Operating Instructions
®
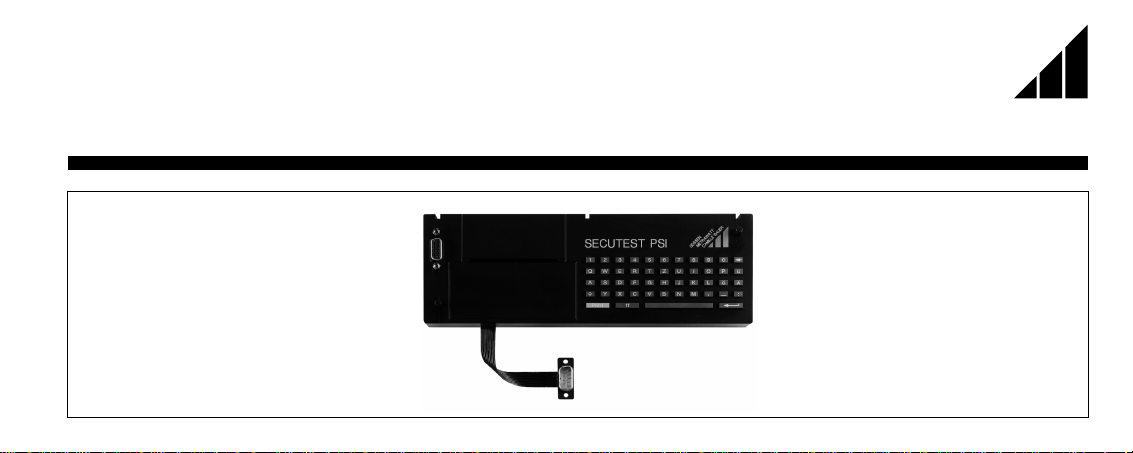
SECUTEST PSI
S
O
G
SEN
METRAW
CAMILLE BAUER
3.348.713.03
TT
A
5/7.96
Page 2
1
2
SECUTEST PSI
3
4
9
10
5
11
5
6
7
8
12
13
14
15
16
17
18
2 GOSSEN-METRAWATT
Page 3

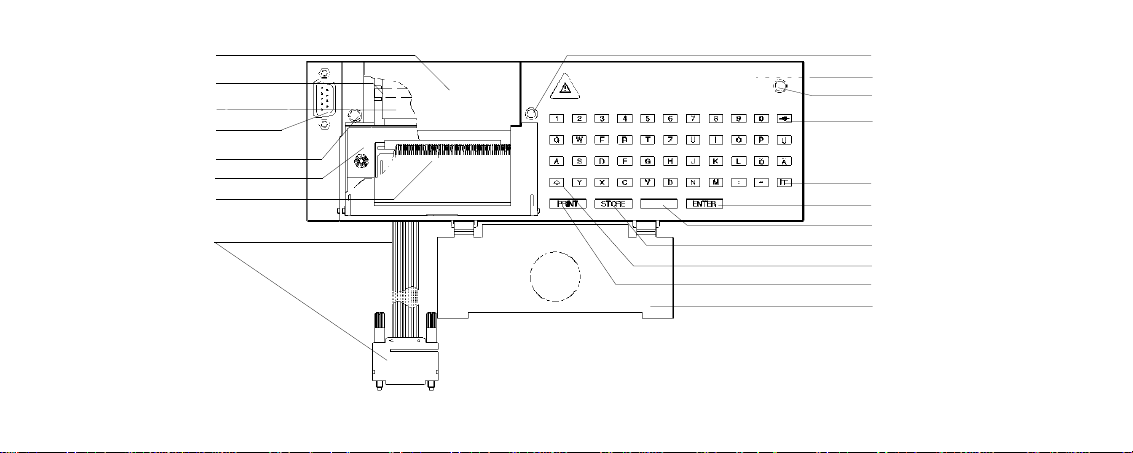
1 Cover of chart compartment
2 Metal flap for paper advance
3 Paper roll
4 RS-232 connection socket for PC or bar code reader
5 Knurled screws
6 Ribbon cassette
7 Printer cover with chart tear-off edge, foldable
8 Ribbon cable with RS-232 plug for connection of the PSI module to the tester
9 Pilot light, lights in battery mode
10 Battery compartment for 4 x 1.5 V Mignon cells (rear)
11 Clear key to delete single characters or
complete lines in connection with the shift key (16)
FF
12 Key for chart advance
13 Enter key to conclude the entry and
GOSSEN-METRAWATT 3
ENTER
go to the next entry prompt
14 Space key to enter spaces
15 Storage key to store the last test protocol
16 Shift key for a keyboard shift lowercase/uppercase letters
Key shifts to period (
Key shifts to underline ( _ )
17 Key to activate the PSI module and to start printing
18 Flap to fix the probe lead in the lid of the SECUTEST 0701S
Combined keyboard instructions for protocol entry
+ Deletes the line on which the cursor is positioned.
+ All text entries are deleted,
+
+ A reset is made, the PSI module is initialized, all stored data is deleted!
STORE
,
-
PRINT
1
The protocol stored last is deleted,
STORE
0
. )
provided the cursor is positioned in an active text entry section
provided no PSI module window is active.
This is only possible in the Setup menu under Clear memory.
Page 4

Contents Page
1 Applications ............................................................................................. 6
2 Safety features and safety precautions ................................................... 7
3 Getting started ......................................................................................... 8
3.1 Installing ribbon and batteries ...................................................................................... 8
3.2 Installing the PSI module ............................................................................................. 8
3.3 Activating the PSI module ............................................................................................ 9
4 Presettings ............................................................................................. 10
4.1 Setting the clock ....................................................................................................... 10
4.2 Enter and delete top and bottom lines ........................................................................ 10
4.3 Clear memory ........................................................................................................... 11
5 How to display, print and store protocol ................................................ 12
5.1 How to display protocol, enter and store texts ............................................................. 12
5.2 Automatic protocol storage ........................................................................................ 14
5.3 Quick protocol storage .............................................................................................. 14
5.4 Requesting stored protocols ...................................................................................... 15
5.5 Print protocol ............................................................................................................ 15
4 GOSSEN-METRAWATT
6 Statistics ............................................................................................... 16
6.1 Getting started for statistics recording ........................................................................ 16
6.2 Request and print statistic data ................................................................................. 17
6.3 Delete statistic data .................................................................................................. 19
7 Operation with bar code reader B3261 B3261 ...................................... 20
7.1 Connecting the bar code reader ................................................................................. 20
7.2 Configuring the bar code reader ................................................................................ 20
7.3 Reading bar codes .................................................................................................... 21
8 Battery mode ......................................................................................... 22
9 RS-232 interface ................................................................................... 24
9.1 Interface definitions and protocol ............................................................................... 24
9.2 Instruction set, validity and syntax .............................................................................. 26
9.3 Instruction list for the PSI module .............................................................................. 26
10 Print LC displays .................................................................................... 34
11 Error messages ..................................................................................... 35
Page
Page 5

Page
12 Specifications ....................................................................................... 35
13 Maintenance ......................................................................................... 38
13.1 How to reset the PSI module ...................................................................................... 38
13.2 Batteries ................................................................................................................... 38
13.3 Recording paper ....................................................................................................... 38
13.4 Maintenance case ..................................................................................................... 39
13.5 Ribbon ...................................................................................................................... 40
14 Repair and replacement parts service .................................................. 41
15 Training ................................................................................................. 41
GOSSEN-METRAWATT 5
Page 6

1 Applications
The PSI (Printer Storage Interface) module is a special accessory for the SECUTEST 0701S appliance
tester. It is installed in the lid of the SECUTEST 0701S and fastened with two knurled screws (5).
The test results determined with the SECUTEST 0701S a ccordi ng to DIN VDE 0701 are directly transferred to the PSI module via the ribbon line (8) and stored there. All measured values for approximately 200 protocols (amount of one working day) can be stored in this memory.
Printing out of the test results can be made di rectly at the site in the form of clear hardcopy measurement and test protocols including date, time and texts entered from the keyboard.
Via a serial RS-232 port (4), the stored measured values can be transferred from the SECUTEST PSI
to the PC and archived, processed there (e.g. for the preparation of invoices), or printed directly into
a pre-made form. Transmission of the data to the PC is also possible without the appliance tester.
6 GOSSEN-METRAWATT
Page 7

2 Safety features and safety precautions
When the SECUTEST PSI is properly used, the safety of both the user and the unit is assured.
In order to meet the legal rules for electromagnetic compatibility (EMC), an electrically conductive
plastic material is used for the case for shielding. Touching of the PSI modul e under normal ope ration
causes no danger as contact-hazardous voltages do not appear in the printer.
Caution!
The case of the PSI module has electrically conductive characteristics that are similar
!
to those of metal. It must not come into connection with live parts.
Read the operating instructions carefully and completely before you use your unit and follow them in
all respects.
Meaning of the symbol on the unit
The symbol on the unit has the following meaning:
Warning of danger
(Attention, note documentation!)
!
GOSSEN-METRAWATT 7
Page 8
3 Getting started
3.1 Installing ribbon and batteries
Before getting started insert the ribbon (see section 13.4, page 40).
To store the data in the PSI module and to transmit the data to the PC, four commercially available
1.5 V Mignon cells according to IEC LR 6 are required when the PSI module is not powered from the
appliance tester.
Always replace the complete battery set. Dispose of the batteries in a way that protects the environment.
The battery compartment (10) is located at the rear of the printer.
8 GOSSEN-METRAWATT
Note
Only alkaline-manganese cells that comply with the IEC LR 6 standard are to be used.
The use of manganese-dioxide cells is not recommended as their lifespan is too short.
Free the catch by exerting lateral pressure on the clamping bow of the cover of the battery compartment and remove the cover. The battery holder falls out of the battery compartment when you
tilt the module.
Insert four 1.5 V Mignon cells into the battery holder with correct polarity according to the given
symbols.
Insert the equipped battery holder into the battery compartment.
Attach the cover of the battery compartment to the battery compartment and engage it by exerting a slight pressure.
Note
When replacing the batteries, stored data is saved in the memory even if no voltage is
applied for about 5 minutes.
If no batteries were inserted for a longer period of time, e.g. after delivery from the factory, a reset should be perf ormed. This makes for a defin ed condition to the es tablished.
See combined keyboard instructions on page 3 for making a reset.
3.2 Installing the PSI module
From the lid of the SECUTEST 0701S, remove the cover on which the symbols are printed. For
this purpose, press the cover to the side.
Insert the PSI module into the lid and fasten it with the two knurled retaining screws (5).
Connect the module to the connection socket of the RS-232 interface of the appliance tester via
the ribbon cable (8).
Below the PSI module there is a compartment provided for th e storage of the probe lead. Lo ck the
flap (18) inserted in the module o n the hinge of the lid so that the pr obe lead will not fal l ou t when
the lid is closed.
Page 9
3.3 Activating the PSI module
To activate the PSI module, a connection to the RS-232 interface of the SECUTEST 0701S must be
made and the appliance tester must be connected to the line.
Press once (17)
Selection and execution of the functions listed in the menu is made by means of the corresponding
keys on the appliance tester.
PRINT
The other operating controls and c onnectors should remain unchan ged while the PSI modu le is ac tive
so that the data traffic will not be disturbed.
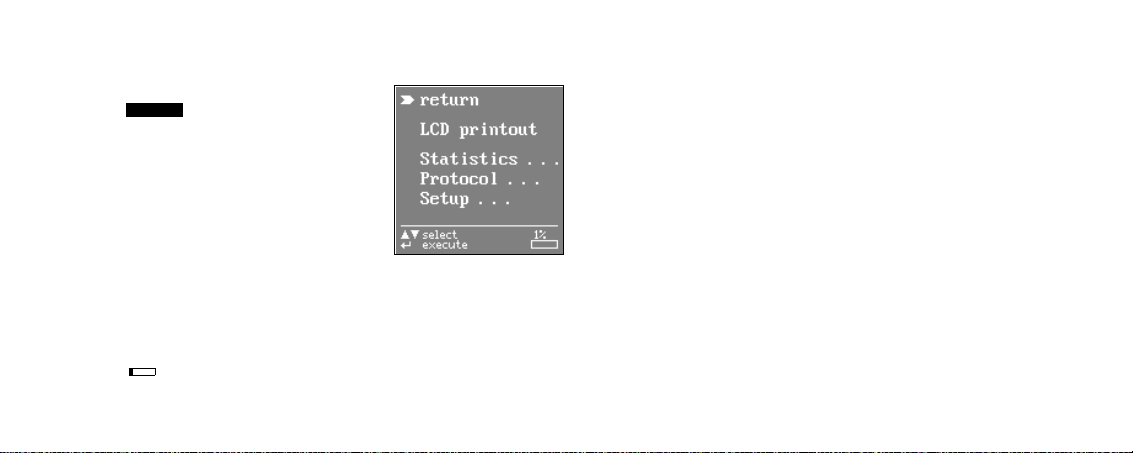
The menu item "Return" causes a return to the display presented prior to activating the PSI module.
The display shows that 10 % of the storage capacity are already occupied. When 99% of the
memory are filled, the memory should be cleared and deleted (storage space for approximately
5 protocols left).
GOSSEN-METRAWATT 9
10%
Page 10

4 Presettings
Upon selection of the menu item „Setup“
you can perform the following settings:
4.2 Enter and delete top and bottom lines
4.1 Setting the clock
10 GOSSEN-METRAWATT
From the keyboard, you can enter optional texts which – prior to and/or after the test result – are to
be automatically included in the printout. For top and bottom lines, each 5 lines of 24 characters
each are available.
The top and bottom lines are the same for all test results in the memory.
Enter the texts from the keyboard.
Data entry is also possible via bar code readers (see section 7, page 20).
Page 11

You will get to the next line at a time by pressing the key
You can delete the top and bottom lines with the and keys
ENTER
4.3 Clear memory
To clear the memory, press
the key (13) on the PSI module.
ENTER
To stop, press the
key on the SECUTEST 0701S.
GOSSEN-METRAWATT 11
Page 12
5 How to display, print and store protocol
You can load the result of the last te st according to DIN VD E 0701 at a time into the P SI module, store
it there under an Ident Number, enter it and print it out. The protocol of the last test can be printed
out several times.
The results of a complete working day (approximately 200 protoco ls) c an be s tored in the memory of
the PSI module. Pressing the key (15) several times makes for the same record to be
overwritten again and again.
The test protocol automatically contains the test result including the measured values and limits as
well as information on the visual inspection. Further specific information on device under test, customer and repair can be integrated i n the test protocol by entries from the k eyboa rd or v ia a bar co de
reader (see section 7, page 20).
The protocol is presented on the LCD in several windows.
12 GOSSEN-METRAWATT
Note
Storage of the results of the safety and function tests as well as their entry into pro-
tocol and statistics is only possible after tests according to DIN VDE 0701; that is,
the function switch must be set the "AUTO", "SK I", "SK II", "SK III" or "T 240"
position!
With the switch set to "MENU" and "FUNCTION TEST", only the display shown on the
LCD at a time can be printed out and the result of the last function test at a time can be
stored (see section 10, page 34).
STORE
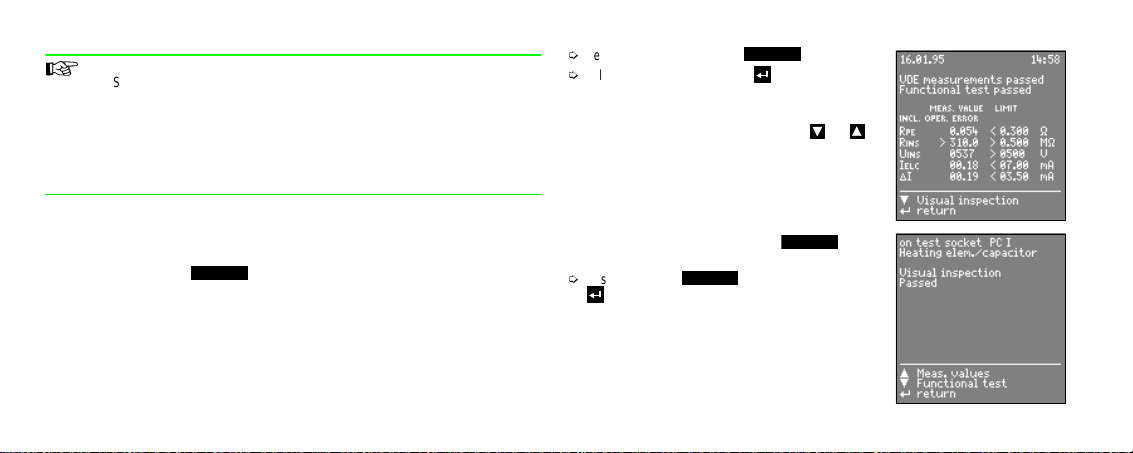
5.1 How to display protocol, enter and store texts
Request the PSI module via the key
Select Protocol and confirm with
First, the test result including measured values
and limits is shown. The display contains available data only.
In further windows that can be selected with the and
keys, you can display information on the visual inspec tion as
well as enter texts via the keyboard, and bar codes via the
bar code reader (see section 7, page 20). A maximum of
24 characters can be entered into one line.
End the text entry of a line by pressing the key.
At the same time, this brings you to the next line.
To store, press the key.
returns you to the PSI menu.
When storing the protocol, the successive ident number is
output between date and time.
STORE
PRINT
ENTER
Page 13
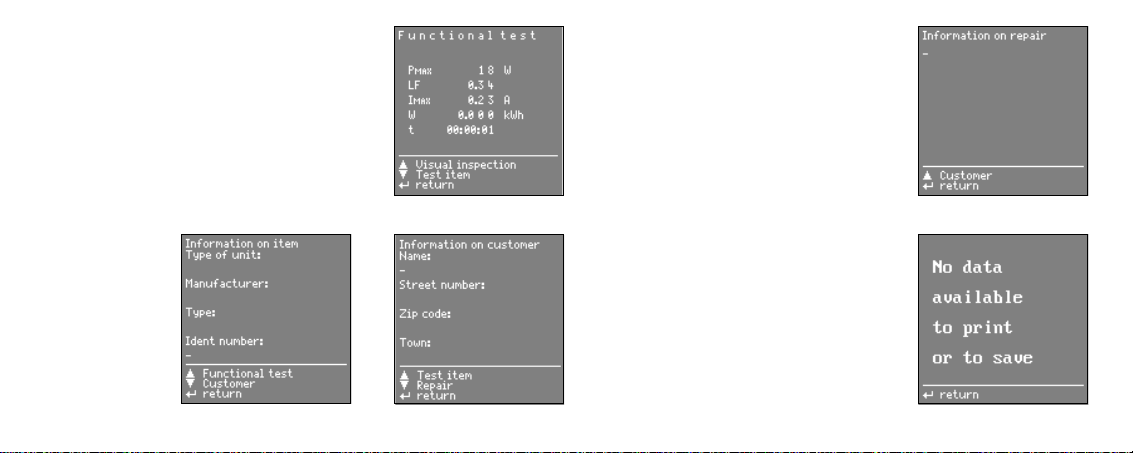
Results of the function test
Information on
the repair
Max. 10 lines of
max. 24 characters each
Figure at left:
Info on the DUT
max. 24 charact. each
If there is no data available in the appliance tester
when the menu item Protocol is called up,
the following message appears:
Figure at right:
Info on the customer
max. 24 charact. each
GOSSEN-METRAWATT 13
Page 14

5.2 Automatic protocol storage
All test results are automaticall y given a succ essive ident number * provid ed the Autostore function is
active. After the safety test as well as after the function test, a note is displayed at a time to sh ow that
the test data is stored.
Open the Setup menu in the SECUTEST 0701S with the PSI module deactivated (switch position
MENU), and there select the Configure menu.
Move the cursor to Autostore: Press , this switches the function on or off.
5.3 Quick protocol storage
If many measurements are to be made successively and the results are to be evaluated later, the
function "Quick protocol storage" is offered. This function can only be used after a test (safety test
and/or function test).
Activate the PSI module with .
This brings you directly to the enter field for
the ident number. Here, you can enter
a max. of 24 digits and confirm with .
To store, press the key once more.
The protocol is stored in thedatabase of the PSI module
together with all available data. Empty data fields are
ignored. At the same time you return to measuring mode to
immediately start the next measurement.
STORE
ENTER
STORE
* It consists of a max. of 24 numerals. Only the first four numrals are used;
counting begins with 0001.
14 GOSSEN-METRAWATT
Note
If a Reset has been made accid entally a fter the test, e.g. by c hanging the position of the
function switch or pulling the interface cable off, the ident number must again be
entered in the protocol. The data is saved.
Page 15

5.4 Requesting stored protocols
A list of all stored protocols can be requested at any time in order to display and print out the contents of individual protocols at a later date. The first column contains the successive numbers, the
second one the ident numbers. The first 14 characters of the ident number are shown as a maximum.
Open Protocol and confirm with .
Press the Help key i (13) on the SECUTEST 0701S.
A list of the already stored protocols appears.
Select the desired protocol using the and keys and confirm with .
GOSSEN-METRAWATT 15
A maximum of 10 stored protocols is displayed. The next 10 protocols at a time are selected by leafing through with the cursor.
In the presentation of the archived protocol, an on the first bottom line informs you that no more
data can be entered here.
i
5.5 Print protocol
With the PSI module activated, press the key (17).
The protocol is printed with all avai lable data, in cudin g the en tered tex ts and the enter ed top and bottom lines. Empty data fields are ignored when printing. The print procedure can be repeated at random.
After printing, the LC display again shows the previous menu.
How to stop the printing process
Paper advance
PRINT
Press the key (17) while the print mechanism is working.
FF
Press the key (12)
The recording strip is advanced as long as you keep the key pressed.
PRINT
Page 16

6 Statistics
All together, statistic data of a maximum of eight equipment classes can be recorded. The statistic
data includes the number of the errors occurred a s well as their percentage of the to tal measurement
within one class.
The statistics menu appears provided Statistics has been selected in the main menu, see section
3.3, page 9.
16 GOSSEN-METRAWATT
6.1 Getting started for statistics recording
Where statistic data is to be recorded, the associated class designation must be defined prior to a
measurement by selection of Class. If a class name is already entered, it must be activated.
Move the cursor to Class and , the menu select: is displayed.
Move the cursor to the respective class name and ,
an underline appears at the end of the text.
If you want another class name: delete existing characters with , or lines
+ enter a maximum of eight characters from the alphanumeric keyboard.
with
Confirm with , the cursor moves to the error column.
Determine with or whether only the first or all errors are to be considered.
Confirm with . An arrow appears behind the activated class name.
Repeat Return until a PSI display does no longer appear.
The safety tests as well as the function tests can now be performed for the selected class.
After the start of a protocol recording, the setting First or All in the statistics menu can no longer be
changed.
Page 17

After each complete measurement, consting of safety test and function test, the measured data must
be stored so that it will be available for statistic evaluation. See "How to display, print and store protocol" on page 12. If, after the measurement, First or All is followed by a character , statistic data
has been stored for the respective class.
All following measurements expand the statistics of the class activated at the time by the additional
measured results. If new statistic data is to be recorded for an already existing class, the already
stored statistic data can be deleted, see 6.3 Delete statistic data.
6.2 Request and print statistic data
Select the Statistics menu to request statistic data:
With or move the cursor to Printout and confirm with ,
the menu Printout: is shown.
Select the class the statistic data of which you wish to see, confirm with .
The statistic data of the selected class is listed.
Moreover, in this mode you can go between the statistic data of all classes
with the aid of the or keys.
GOSSEN-METRAWATT 17
Page 18

If the page displayed at a time is to be printed out: press .
The page print STATISTICS appears. Start of test as well as end of test of the selected class is
printed out as test period.
If all statistics are to be printed out successively: press Print total.
Start of test of the first device under test as well as end of test of the last device under test is output as test period, regardless of the associated class.
A prompt appears whether all statistic data a re to be deleted after bei ng documented by mean s of
the statistics printout.
18 GOSSEN-METRAWATT
PRINT
Statistics printout
of a class
01.03.95 12:00
SECUTEST
< Top lines 1 to 5 settable via PSI >
TEST STATISTICS:
Test period:
01.01.95 11:11 - 21.01.95 14:21
Class B / first error
DUT: 119 100
Visual error: 5 4.2
Rsl: 17 14.2
Sum ISO: 0 0
Riso 0
Iea 0
Isonde 0
∆I 0
ERROR TOTAL: 22 18.4
< Bottom lines 1 - 5 via PSI, 6 - 7 via PC >
Number %
Page 19
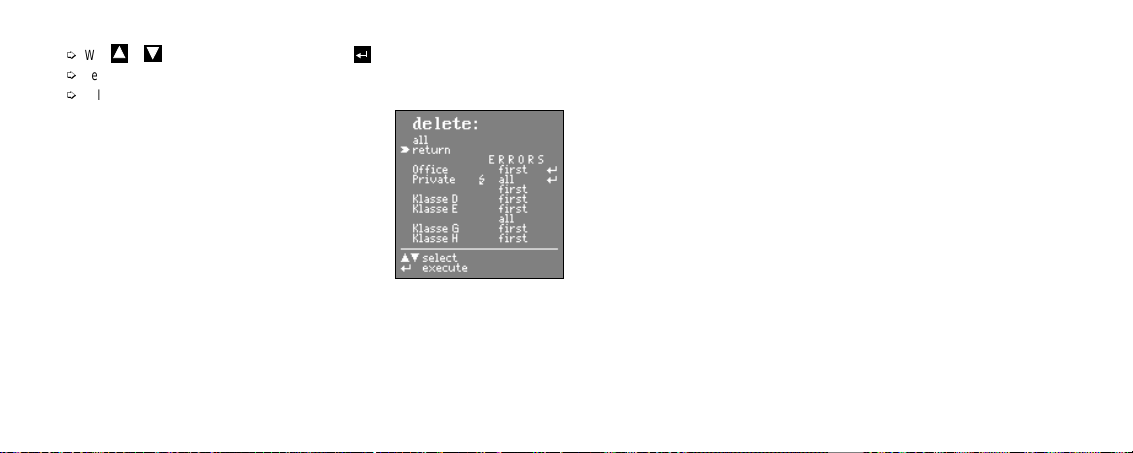
6.3 Delete statistic data
With or , move the cursor to Delete and press .
Select the class the data of which is to be deleted or
Select Delete: total, the stored statistic data of all classes is deleted!
After all classes are deleted, class A is set active and the error type of each class is set to First.
GOSSEN-METRAWATT 19
Page 20

7 Operation with bar code reader B3261
The bar code reader B3261 (accessory) allows for all information available in bar code form to be
quickly, easily and safely entered into the test protocols. This type of data entry permits time-saving
and low-cost acquisition of larger amounts of information, e.g. series measurements of devices provided with bar codes.
7.1 Connecting the bar code reader
Connect the reader to the RS-232 interface (4) of the PSI module.
A PSI LC display window must not be active!
The bar code reader confirms the correct connection with a four-fold sound signal.
The following bar code includes all information about the bar code line of the table.
Bar code for configuration of the reader for operation on the PSI module
7.2.1 Application of EAN13 codes (e.g. for the SE-Q.base program)
Using EAN13 codes, the 13th digit (test numeral) is disabled when reading the following bar code.
7.2 Configuring the bar code reader
For operation on the PSI module, the bar code reader B3261 (DL80) must be configured. For that
reason, codes (instructions) must be entered. This is possible
– By entering the bar code shown below or
– By entering several bar codes in the order listed in the following table. You will find these codes
on the pages "Appendixes 1" and "Appendixes 2" of the operating instructions of the bar code
reader.
The following bar code contains all information of the bar code series given in the table.
Enter as described in section 7.3, page 21.
20 GOSSEN-METRAWATT
Page 21

Setting
Code (instruction)
from operating instructions
Sound
signal
Start configuration Enter configuration mode 4 x
Set protocol for
RS-232 interface
to XON/XOFF
C1 x
E1 x
11 x
Remarks
Setting is always
required for operation
with PSI module!
7.3 Reading bar codes
Point the reader to the bar code to be acquired (max. distance 1 cm) and press the button on the
reader.
A correct reading is confirmed by a sound signal.
B1 x
Each bar code
should be read once
RecommendedC1 x
01 x
Save and end
configuration
Esc and s ave
1 x
+ 4 x
In the case of reading errors 3 x
GOSSEN-METRAWATT 21
Page 22

8 Battery mode
If the PSI module is not connected to the SECUTEST 0701S, only battery mode with the following
functions is possible:
– Paper speed
– Data exchange with a PC
Switching the PSI module on
Switching the paper speed on
22 GOSSEN-METRAWATT
Note
Even with the PSI module connected, batteries must be in serted so that the data can be
saved. Power for all other functions is then supplied by the tester.
PRINT
Press the key (17) until the signal lamp (9) lights.
FF
Press the key (12). The paper speed is switched on as long as you keep the key pressed.
Data exchange with a PC
Connect the PC to the RS-232 connection socket (4) of the PSI module via an interface cable
(see section 9, page 24).
Automatic switch-off
The battery is automatically switched off
– If the key for the paper speed is not pressed within 10 seconds after switch-on
– If there is a pause of more than 10 seconds in the data transfer with the PC.
Page 23

GOSSEN-METRAWATT 23
Page 24

9 Data transmission via the RS-232 interface
Stored protocols, measured values of the function test as well as statistic data can be transmitted to
a PC via the RS-232 interface.
For this purpose, connect an interface cabl e to the PC at the RS-232 c onnect ion socke t (4) of the
PSI module. Thereby, the PSI module must not be active!
Attention!
Data transmission to a PC via the RS-232 interface is not possible when the PSI mod-
!
ule is active for data entry (for top and bottom lines, for protocol texts and for setting
the clock)!
24 GOSSEN-METRAWATT
Note
The software packages PC.doc, PC.base and SE-Q.base are available for data acquisition and data management as well as for protocol establishment with the PC. These
packages also include the required interface cable.
Note
Data transmission from the PSI module to the PC is also possible when the PSI module
is not connected to th e SECUTEST 0701S a nd switc hed to battery mode (see se ction 8,
page 22).
9.1 Interface definition and interface protocol
The interface of the SECUTEST PSI complies with the RS-232 standard.
Technical data:
Baud rate 9600 bd, fixed Length of characters 8 bits
Parity None Stop bit 1
Data protocol to DIN 19 244,
The interface information is processed via an interrupt routine, thus, the PSI module is continuously
on standby. In addition, the character <CR>=OD
numbers are to be transmitted, they must be converted into two ASCII-HEX-BCD characters. The
characters '_' (=178
Control characters:
^D Echo on (useful for terminal mode; entry of instructions via termnianl program of an
^F Echo off (for remote control via processing program of an external PC
^S / ^Q SW-handshake
CR Instruction conclusion
LF Ignored (but sent as line end)
X_ON/X_OFF protocol
=B2H) is thus presented as 'B2'.
D
external PC)
e.g. via DOS software PC.doc)
is used to signal the end of a message. If hex
H
Page 25

Each message, regardless of being a command or a reply, has the following structure:
<OPERATION><ADRESSE><OPERATOR>[PARAMETER[;PARAMETER]] <DELIMITER$>
<CHKSUM><CR>
<OPERATION> This is the proper command, e.g. IDN? gives the equipment identification.
<ADRESSE> The SECUTEST PSI knows the address states "Not addressed" and "Address
assigned" (with IDN).
Instructions without addressing: (general instructions)
The SECUTEST PSI always reacts (e.g. to read the actual address with IDN?).
Instructions with addressing: In a non-addressed state, the SECUTEST PSI does not always react,
in an addressed state only when the sent address agrees with the actual address.
<PARAMETER> Four basic types are distinguished:
– TYPE1: Fixed parameters, e.g. "ON", "OFF", "M" ...
They must exactly be written as specified.
– TYPE2: Variable parameters, e.g. "GTM5015-S series 12345"
– TYPE3: Numeric parameters, e.g. "<-121.0" or "0539" are transmitted with a floating
Random character strings can be transmitted here.
point and may be up to 7 characters long.
– TYPE4: Measuring number (consisting of type of measurement and measuring range)
<DELIMITER$>:As delimiter, the '$' character marks the end of a message.
They must always be separated by the delimiter ";".
It is always followed by the checksum
<CHKSUM> The checksum is always relative to the total previous message including the
<CR> Th e carriage return (c hr$(13)) charac ter concludes a message. With the reco gnition
$ delimiter. It is transmitted with 2 ASCII characters.
of <CR>, the SECUTEST PSI tester accepts a message from the input buffer to the
<OPERATOR> Shows whether it is
a request ... ?
an assignment...! or
a response ...=
GOSSEN-METRAWATT 25
working buffer and then performs a syntax test. If this is successful, a reply message is sent.
Page 26

With the following telegram, the SECUTEST PSI acknowledges whether i t ha s e xecu ted a n in str uctio n
(Y=Yes) or not (N=No). An ack nowledgeme nt, for example, is als o made when a reply mess age is not
required:
Acknowledge: Instruction executed, transmission format:
Not-Acknowledge: Instruction not executed, transmission format:
Y<ADRESSE><DELIMITER$><CHKSUM> <CR>
N<ADRESSE><DELIMITER$><CHKSUM> <CR>
9.2 Instruction set, validity and syntax
The syntax checker in the tester checks only the first three characters of each instruction. If they are
correct, the instruction is accepted.
Parameters and instructions are configured in suc h a way that there will be no ambi guities. Writing in
uppercase or lowercase letters is of no importance. At any rate, the checksum can only be obtained
from the actually sent characters.
The parameter x is the address of the device (SECUTEST 0701S or SECUTEST PSI) which is to be
addressed. If only one equipment is connected, an address need not be given.
Address range: 0
26 GOSSEN-METRAWATT
≤ x ≤90
9.3 Instruction list for the PSI module
IDN? Gives the equipment identification
ESR? Gives the equipment status
RST! Clears the entire memory including top and bottom lines, date, time and statistics
MEM! Deletes the data in the protocol memory
WER? Gives the complete memory contents that is, the data from the PRO? instruction,
completed by the entries in the PSI module
FKT? Gives the data of the function test
DAT? Gives date and time
DAT! Sets date and time
KOP? Reads the top lines
KOP! Sets the top lines 1 ...5
FUS? Reads the bottom lines
FUS! Sets the bottom lines 1 ...5
FOO! Sets the bottom lines 6 and 7
STA? Reads the statistic data
STA! Deletes the statistic data
CLA? Reads class name and identification byte
CLA! Changes class name and type of error
PRO? Reads the data of safety test and function test
(see operating instructions SECUTEST 0701S)
Instructions unknown to the PSI module are automatically passed to the SECUTEST 0701S
(e.g. in the case of instruction PRO?)
Page 27

How to read out equipment identity and status
IDNx? The PSI module reports the actual equipment identity to the user
Format: IDNx=x;GMN;SECUTEST PSI;GTM5016000R0001;DD MM YY HH MM SS$ with:
How to delete memory contents
RSTx! This instruction enables resetting of the software of the PSI module to the
status of start-up:
DD: Day HH: Hour
MM: Month MM: Minute
YY: Year SS: Second
The data and program memory is completely cleared,
all pointers are initialized,
the clock is set to 1.1.95 12:00,
ESRx? The PSI module reports the actual equipment status:
Memory occupancy in %
Number of protocols in memory
Ex. of an inquiry: ESR0?$<CS1><CS2><CR>
Ex. of a response: ESR0=;034%;0070$
Meaning: 34 % memory occupied
70 protocols stored
the top and bottom lines are deleted,
all protocol data is deleted,
the statistic data is deleted and set to class A / first error.
If all is correct, the PSI module responds with Acknowledge.
MEMx! The memory containing the protocol data of the PSI module is cleared without a safety
prompt.
If all is correct, the PSI module responds with Acknowledge.
GOSSEN-METRAWATT 27
Page 28

How to transfer date and time
DATx? This instruction makes for date and time to be reported.
Example of an inquiry: DAT0?$<CS1><CS2><CR>
Example of a response: DAT0=08.03.94;14:53$<CS1><CS2><CR>
System clock is set to 8 March 1994, 14:53 h
How to transmit top and bottom lines
KOPx? This instruction makes for the top line to be read out of the memory (identical for all pro-
tocols). 5 strings are always transmitted. Each line is transmitted as one string.
FUSx? This instruction makes for the bottom line to be read out of the memory (identical for all
protocols). 5 strings are always transmitted. Each line is transmitted as one string.
DATx! Instruction to set system cock in the PSI module in accordance with the above format.
Example: 4 top lines have been entered
Example: DATIM0!08.03.94;14:53$<CS1><CS2><CR>
Note the order: Date first, then time,
date in German format,
always two characters for day, month, year and minute,
separation of date and time by delimiter ';'
If all is correct, the PSI module responds with Acknowledge.
Inquiry: KOPF0?$CHECKSUMME<CR>
Response: KOPF0=test protocol according to;DINVDE0701 Part1;
Test person;Erwin Beckenbauer;;$CHECKSUMME<CR>
KOPx!t1;t2;...;t5 Instruction: Overwrite top lines in the data memory of the PSI module.
FUSx!t1;t2;...;t5 Instruction: Overwrite bottom lines in the data memory of the PSI module.
tn > 24 characters causes the line to be broken up after 24 characters, the
remaining characters are automatically written to the next line.
If tn is omitted, all characters on the lines 1 to 5 are written. Characters > 5
are ignored.
28 GOSSEN-METRAWATT
Page 29

FOO!<t6><t7> Instruction: Define bottom lines 6 and 7. They are only output in the statistics
printout.
Each of these bottom lines may contain a maximum of 24 characters. The
bottom lines are checked for validit y after eac h initial start (c hecksum) a nd are
eventually deleted.
How to output the contents of the function test memory
FKT? The function test memory of the PSI module is output.
If the memory is empty, Not-Acknowledge is prompted.
The PSI module sequentially sends all records of the memory.
A record contains a complete function test of the SECUTEST tester, e.g.:
<Pmax;L;Imax;W;t>$CS<CR>
If a function test was not made, merely $24 is shown (24 = CHECKSUM $).
If several records are stored, after the first record a ';' is sent as delimiter
in place of <CR>.
The last record in a response ends with $CS<CR>.
GOSSEN-METRAWATT 29
Page 30

How to output the contents of the protocol memory
WERx? This instruction is used to output the memo ry contents o f the PSI modul e. The PSI modu le
sequentially sends all records of the memory. This record contains a protocol which is
generated by the SECUTEST 0701S tester, completed by the protocol entries in the PSI
module. Should the memory be empty, a Not-Acknowledge is sent.
WERTEx= SECUTEST protocol; date;time;device;manufacturer;type; identnumber;name;street,zip-
code;twon;repair1; repair2; repair3;repair4;repair5,repair6;repair7;repair8, repair9,
repair10;protocol number$CS<CR>
– If several records are stored, after the first record a ';' is sent as delimiter in place of <CR>
– The last record in a response ends with $CS<CR>
– Wi thin a record, the data is separated fro m each other by the deli miter ';'. I f there is n o data av ail -
able, it is omitted in the transmission, but the delimiters are maintained as place holders.
30 GOSSEN-METRAWATT
Note
The SECUTEST 0701S tester transmits only data that has been acquired. That is why
the number of transmitted strings may vary.
EXAMPLE: WERø?
Prompt: VALUESx=PHOENIX;2701000000000000;
0.23;1.0;5.23;0.5;534;500;0.003;7.0;1.37;3.5;10.06.1995;13:45;
Waschmaschine;Siemens;A0815;A1234567;Huber Franz;Untere Kanalstr. 28;
98234;Moosbach;Motor;Pumpe;Kondensator;;;;;;;;0001$CHECKSUMME;
PHOENIX;0602000000000000;7.34;2.00;523;500;0.23;1.0;0002$CHECKSUMME;
TESTER;0602000000000000;7.34;2.00;523;500;0.23;1.0;0003$CHECKSUMME<CR>
Line breaks and spaces in the response transmis sio ns of the ex ample s ar e for clear pr es entation only, they are not included in the transmission.
With the first device under test, a Class I test was performed, followed by a function test,
and a protocol completely filled in;
with the 2nd device under test, only a Class II test was performed without any entries via
the keyboard.
The 3rd device under test was measured with another SECUTEST 0701S tester (name
Tester), otherwise protocol same as 2nd device under test.
Page 31

How to output statistic data
The statistic data stored in the PSI module for the 8 classes can be requested by means of the following instruction:
STAx?
– If several statistics are requested, in place of <CR> a ';' is sent as delimiter after each statistic.
– The last statistic in a response ends with $CS<CR>
– Within a statistic (of a class), the data is separated from each other by a delimiter ';'. If there is no
data available, it is omitted in the transmission, but the delimiters remain as place holders.
If the statistic data of defined classes is to be requested, the instruction must be completed by the
desired class. The options are given in angle brackets:
Example:
STA0?A;C;D
STAx?<A><;><B><;><C><;><D><;><E><;><F><;><G><;><H>
Response: 103; 100; 0; 0; 2; 1.9; 0; 0; 0; 0; 0; 2; 1.9; Class A; 11; $CHECKSUM;
Response: Number of DUT;percentage thereof(100);number of visual errors;percentage
thereof;number R
R
; number IEA; I
Iso
name;identification byte$CS<CR>
; percentage thereof;number sum ISO; percentage thereof; number
SL
; number ýI; number error sum;percentage thereof;class
Sonde
The identification byte is composed of:
01: first error; not yet stored
02: all errors; not yet stored
1X: ..... errors; some stored
GOSSEN-METRAWATT 31
; ; ; ; ; ; ; ; ; ; ; ; ; ; Class C; 01$CHECKSUM;
1; 100; 0; 0; 1; 100; 0; 0; 0; 0; 0; 0; 1; 100; Class D; 12$CHECKSUM<CR>
Line breaks and spaces in the response transmissions of the examples are for clear
presentation only, they are not included in the transmission.
Page 32

How to output names and identification byte
If only name and identification byte are to be sent, the instruction must be completed by the desired
class. If a class is not given, name and identification byte of all eight classes are sequentially sent.
CLAx?<A><;><B><;><C><;><D><;><E><;><F><;><G><;><H>
The identification byte is composed as follows:
How to delete statistic data
If statistic data of defined classes are to be deleted only, the instruction must be completed by the
desired class. Attention! If a class is not given, the statistic data of all classes is deleted.
STAx!<A><;><B><;><C><;><D><;><E><;><F><;><G><;><H>
Thereby, the deleted statistics are always set to `first error' acquisition. The name once stored is
maintained.
0000$0001b: first error; not yet stored
0000$0010b: all errors; not yet stored
0001$00XXb: ..... errors; some stored
100X$00XXb: ..... errors; ........ stored; active at present!
Example:
CLA?A;C;D
Response: Class A; 11; $CHECKSUM; Class C; 01$CHECKSUM;
Class D; 92$CHECKSUM<CR>
How to change class name and type of error
CLAx!<A='xxxxxxxx';2><;><B='yyyyyyyy';2><;><C=...
The letters A ... H are used as place holders for the maximum of 8 class names each of which can be
assigned 8 alphanumeric characters as well as two types of errors. Two types of errors are possible
here.
1: Only the first error is considered in the statistics
2: All errors are considered in the statistics
Apart from the separation between the instructions, a separation mus t be made between c lass (A...H)
and type of error (1 or 2) by means of a semicolon. Only those letters must be given whose associated class name or type of error is to be changed.
32 GOSSEN-METRAWATT
Page 33

How to change the active statistics
CLAx!<A><B><C><D><E><F><G><H>
Only one option must be given on principle!
Example:
Several statistic settings for different classes are to be made in an instruction:
CLA1!A=Hausger.;2;B;2;C=Kühlsch.;1;D=PC;E;2;;C
Different changes within an instruction
The following applies:
– The following can follow a change in name:
... The type of error, separated by a semicolon
... The introduction of another statistic with 'A ... F', separated by a semicolon
Meaning: Statistic A: Assign the name 'Household appliances', set to 'all errors'
Statistic B: Set to 'all errors'
Statistic C: Assign the name 'Refrigerator', set to 'first error'
Statistic D: Assign the name 'PC', the type of error is maintained
Statistic E: Set to 'all errors'
Statistic C: Activate
... The active statistic (must always be placed at the end), separated by two semicolons
– After a change in the type of error:
... The introduction of another statistic with 'A ... F', separated by a semicolon
... The active statistic (must always be placed at the end), separated by two semicolons
– After a change in the active statistics:
... Nothing else must be specified !
GOSSEN-METRAWATT 33
Page 34

10 Print LC display
Each presentation on the LCD can be printed out on the recording strip without any changes. This
way, it is possible to print out measured results achieved with the switch set to "MENU" and "FUNCTION TEST".
The presentation to be printed is shown on the LCD.
Activate the PSI module by pressing the key (17) and call up the menu i tem "Print L C
display" (see section 3.3., page 9).
Stop printing
34 GOSSEN-METRAWATT
PRINT
Press the key (17) while the print mechanism operates, but not during a print pause.
PRINT
Page 35

11 Error messages
When the batteries are nearly exhausted,
the following message appears
when the PSI module is activated.
Message when the key (15) is pressed, even though there is no free memory.
GOSSEN-METRAWATT 35
STORE
12 Specifications
Connection elements
Fasteners
on tester 2 knurled screws for fastening in the lid of the SECUTEST 0701S;
Interface RS-232, bidirectional, 9-pin D-SUB socket, e.g. for connection to a
Data memory
RAM (data) 100 kbytes
Printer
Print mechanism 4-needle matrix printer
Print width 40 characters per line
Real-time clock with date Battery-buffered
transmission of measured data and power supply via ribbon cable and
9-pin D-SUB connector, to be connected to the RS-232 interface of
the SECUTEST 0701S
PC or a bar code reader
Page 36
Interface
Type RS-232, serial, acc. to DIN 19241
Baud rate 9600 bauds
Parity None
Data bits 8
Stop bit 1
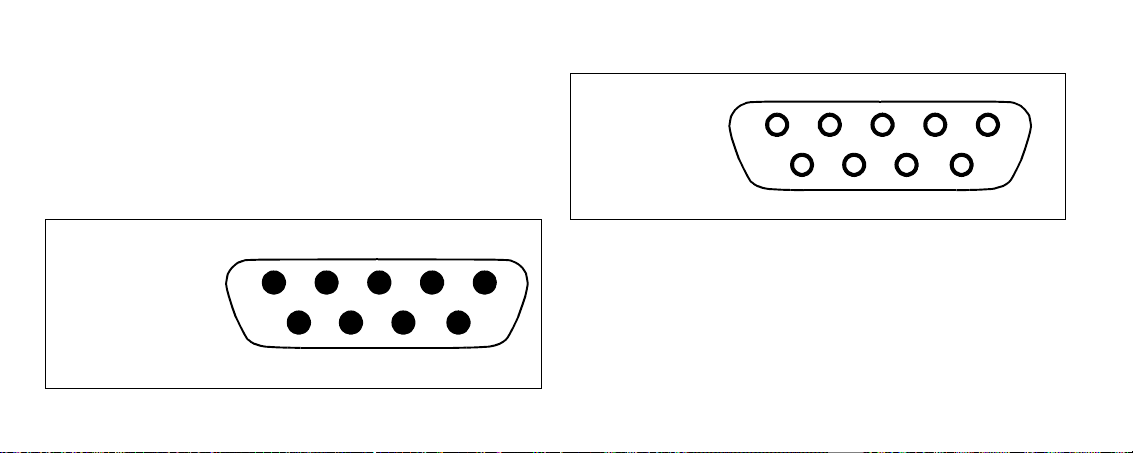
Assignment of the interfaces
The 9-pin D-SUB connector for connection of the PSI module to the SECUTEST 0701S teste r has the
following pin assignment:
1: Enable for remote control „Plus“
2: RXD
3: TXD
4: NC
5: GROUND
6: Enable for remote
control "GROUND"
7: NC
8: NC
9: +9 V
36 GOSSEN-METRAWATT
3
21
54
9876
The 9-pin D-SUB connection socket for connection to PC, bar code reader, etc., has the following
assignment:
1: NC
2: TXD
3: RXD
4: Switching input
5: GROUND
6: +5 V
7: CTS
8: RTS
9: NC
Reference conditions
Battery voltage 6 V
Auxiliary power 9V
Ambient temperature +23
Relative humidity 50 %
Storage temperature
Stockage temperature
Operating temperature 0
Humidity max. 75 % RH; no dewing
± 0.5 V
± 0.5V DC or 8V ± 0.5 V rectified
°C ± 2K
± 5%
− 20 °C ... +60 °C, except for batteries, paper and ribbon
°C ... +40 °C
3
45
789
12
6
Page 37

Power supply
Supply voltage
with connection
to SECUTEST 0701S 6.5 V ... 12 V
with battery mode 4 each 1.5 V mignon cells (alkaline-manganese) acc. to IECLR6
Power consumption
Standby (data buffering), 5
Print protocol < 500 mA
Paper feed < 200 mA
µA ... 200 µA
Data transmission to PC < 100 mA
EMC
EN 50081-1
EN 50082-2
Mechanical configuration
Protection type IP 20 for the case
Dimensions 240 mm x 81mm x 40mm
(excl. knurled screws and ribbon cable)
Weight approx. 0.8 kg
GOSSEN-METRAWATT 37
Page 38
13 Maintenance
13.1 How to reset the PSI module
Should the PSI module no longer react, e.g. due to incorrect operation, it must be initialized:
Pull the line plug of the SECUTEST 0701S and make a new start. Stored data is saved or
If stored data is to be deleted at the same time:
Select the Setup menu and there the menu item Clear memory.
Simultaneously press + .
13.2 Batteries
If, when activating the PSI module, the unit reports that the batteries are nearly exhausted, the complete battery set should be replaced with a new one with the least possible delay to prevent loss of
data (see section 3.1, page 8).
Caution!
Exhausted batteries must not be left in the unit.
!
Dispose of the batteries in a way that protects the environment.
38 GOSSEN-METRAWATT
0
13.3 Recording paper
At regular intervals, check that there is sufficient paper supply. The printer should not be operated
without paper as this can cause damage to the print head.
At a high humidity of the atmosphere or at high ambient temperatures, the recording paper in the
printer may deform. If this is the case, the print mechanism can no longer transport the recording
strip.
In this case, remove the deformed paper plus about another 20 cmand reload the paper.
Type designation for a pack of 10 rolls of recording paper: PS-10P
How to load the paper
Remove the PSI module from the lid of the SECUTEST 0701S.
First fold up the cover of the pape r compartment (1), the n the prin ter cover with the paper tear-off
edge (7).
Page 39

Metal axle for
paper advance
Paper roll
Paper compartment
Guide slot
First insert the metal axle for paper advance (2) into the paper roll (3), then, together with the paper roll into the two holders at the sides of the paper compartment.
Fold the paper tear-off edge (7) back and close the cover of the paper compartment (1) so that
the catch engages audibly.
13.4 Maintenance case
Special maintenance of the case is not required. Ensure a c lean surfa ce. Use a slightly mois t cloth for
cleaning. Do not use detergents and scouring agents.
Take care that the print mechanism can be switched on when the key (12) is pressed.
For this purpose, sufficiently charged batteries must be installed. If the batteries are not to be
FF
used, connect the PSI module to the SECUTEST 0701S – e.g. via an interface cable as extension
cable.
Slide the front end of the paper strip into the guide slot of the print mechanism and simultaneously press the key (12), keep the key pressed until the front end of the paper appears at the
paper outlet.
FF
Prior switch-on of the PSI module is required for battery mode (see section 8, page 22).
GOSSEN-METRAWATT 39
Page 40

13.5 Ribbon
When the printout becomes too pale, you should replace the ribbon.
How to replace the ribbon
40 GOSSEN-METRAWATT
Note
Type designation for a pack of 10 ribbon cassettes: Z3210.
You can print about 6 rolls of paper with one ribbon.
First fold up the cover of the paper compartment (1), th en th e pri nter c over with the pape r tear-off
edge (7).
To remove the ribbon cassette, exert a slight pressure on the right side of the cassette. The ribbon cassette comes off its holder. Carefully remove the ribbon cassette.
Insert the new ribbon cassette (6) with the tension s crew to the left into the left g uide provided for
this purpose. A slight pressure exerted on the right side of the cassette makes for the cassette to
firmly engage in the holder.
With the print paper inserted, the paper strip must be threaded through the guide between ribbon
and cassette prior to inserting the cassette.
When you insert the ribbon into the guide, take care that it is smooth and placed completely under the recording paper. The tension of the ribbon can be adjusted by turning the ribbon tension
screw.
Fold the paper tear-off edge (7) back and close the cover of the paper compartment (1) so that
the catch engages audibly.
Cover for the
paper compartment
Ribbon cassette
Printer cover with
paper tear-off edge
Page 41

14 Repair and replacement parts service
When you need service, please contact:
GOSSEN-METRAWATT GMBH
Service
Thomas-Mann-Straße 16 - 20
D - 90471 Nürnberg
Telefon (09 11) 86 02 - 4 10 / 4 11
Telefax (09 11) 86 02 - 2 53
Telex 6 23 729 gome d
This address is for Germany only.
Abroad, our representatives or establishments are at your disposal.
GOSSEN-METRAWATT 41
15 Training
We offer interesting seminars with practical training on the topic "Measurements for testing the protecting devices in power installations and equi pment". These s eminar s also pr ov ide detaile d information on how to operate the SECUTEST 0701S and the SECUTEST PSI and, moreover, how to perform
the measurements specified by DIN VDE.
We will be glad to send you more informative documents.
GOSSEN-METRAWATT GMBH
Bereich Schulung
Telefon (09 11) 86 02 – 4 06
Telefax (09 11) 86 02 – 7 24
Page 42

42 GOSSEN-METRAWATT
Page 43

GOSSEN-METRAWATT 43
Page 44

Printed in Germany ⋅ Subject to change without notice
Company address:
Thomas-Mann-Straße 16 – 20
GOSSEN-METRAWATT GMBH
D-90327 Nürnberg
D-90471 Nürnberg
Telefon (09 11) 86 02 – 0
Telefax (09 11) 86 02 – 6 69
GOSSEN
AM
METRAW
C
AT
ER
T
AU
B
E
L
IL
 Loading...