

Page 1
Operating Instructions
PROFITEST2
Tester DIN VDE 0100
3-349-491-03
8/12.14
Page 2
1
2
3
4
22
21
56789101112 1314
16
17181920
15
35
2 GMC-I Messtechnik GmbH
Page 3
17
18
2
3
4
34 33
29 30 31 32
9
24
23
25
26
27
28
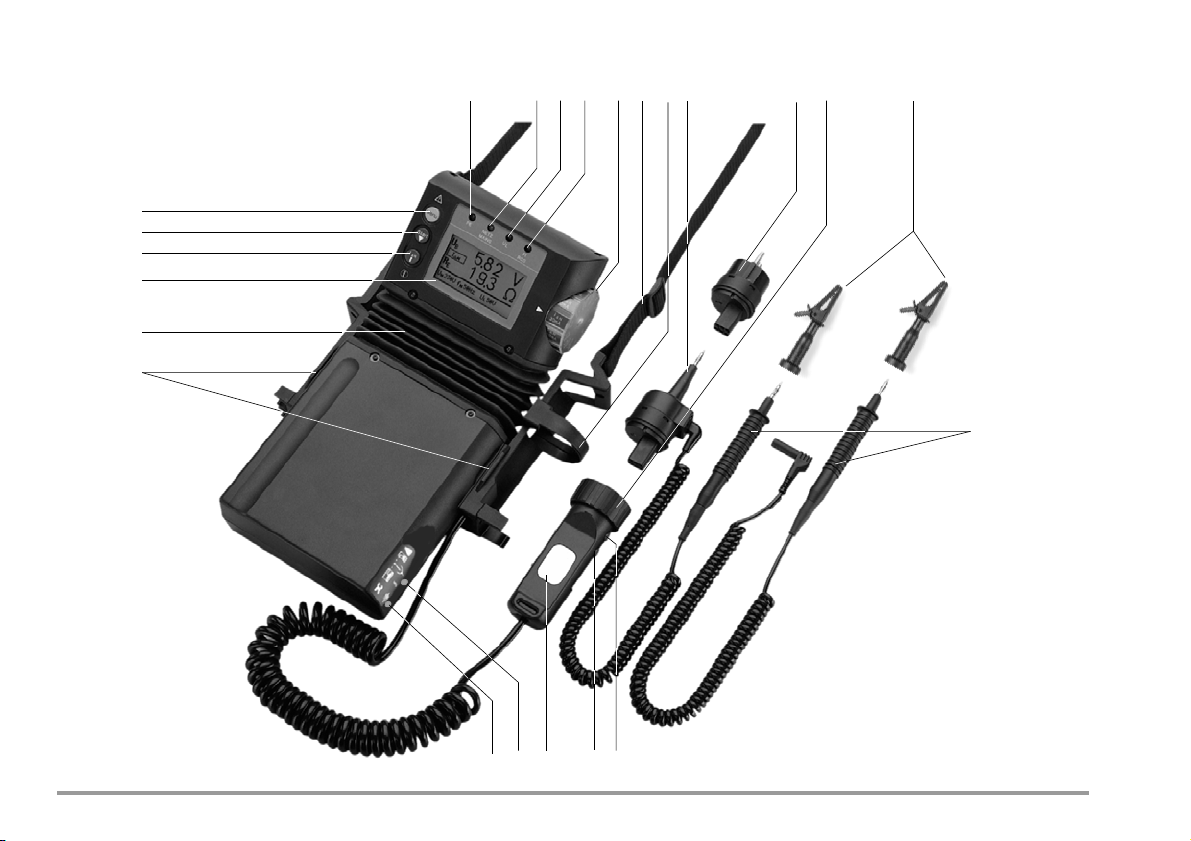
1 LC Display Field
/ i Key
2I
N
3Start Key
4Menu Key
5 PE Lamp
6 NETZ/MAINS Lamp
L/RL
Lamp
7U
8 FI/RCD Lamp
9 Function Selector Switch
10 Shoulder Strap
11 Test Plug Holder
GMC-I Messtechnik GmbH 3
12 Measuring Adapter (2-pole)
13 Plug Insert
(country specific)
14 Test Plug
(with retainer ring)
15 Alligator Clip
(plug-on)
16 Test Probes
17 Start Key
18 Key I
19 Contact Surfaces
20 Probe Connector Socket
21 Strap Eyelets
22 Swivel Hinge
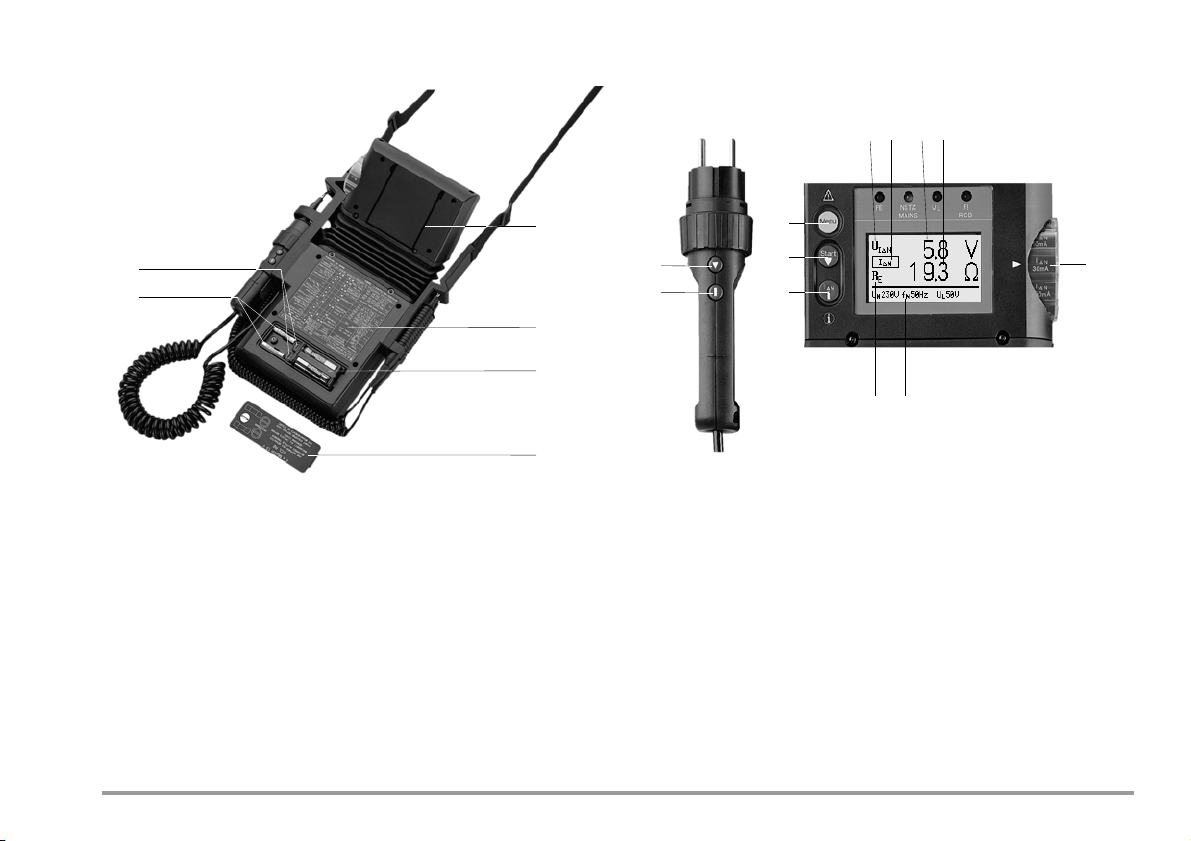
23 Replacement Fuses
24 Fuses
25 Fold-Out Stand
26 Serial Plate
27 Battery Holder
28 Battery Compartment Lid
29 Measurement Value 1,
Abbreviated
30 Abbreviation for Selected
Sub-Function
31 Three Place Numeric Display: Measure-
32 Three Place Numeric Display: Measure-
33 Abbreviation for Selected Sub-Function,
34 Measurement Value 2, Abbreviated
35 Charging Socket / Current Transformer
ment Value 1 with Unit of Measure
ment Value 2 with Unit of Measure
Messages and Help
Connector Jack
Page 4

Contents Page Contents Page
1 Applications ..................................................................................6
7.3 Testing for Special RCDs ...............................................................25
7.3.1 Systems with Selective RCDs ......................................................... 25
2 Safety Features and Precautions ..................................................7
7.3.2 Type G RCCBs ..............................................................................27
7.4 Testing with Adjustable Residual Current ........................................28
3 Initial Start-Up ..............................................................................8
3.1 Installing or Replacing Batteries .......................................................8
7.5 Testing RCDs in IT Systems ...........................................................28
7.6 Testing Residual Current Circuit Breakers in TN-S Systems .............30
3.2 Selecting a Language, Basic Function and Sub-Function Settings ......8
3.3 Battery Test ....................................................................................9
3.4 Recharging the rechargeable Batteries ...........................................10
4 Abbreviated Instructions for Quick Initial Start-Up .....................12
5 General Instructions ...................................................................14
5.1 Connecting the Instrument .............................................................14
5.2 Automatic Settings, Monitoring and Shut-Off ..................................14
5.3 Measurement Value Display ...........................................................15
5.4 Testing Earthing Contact Sockets for Correct Connection .................15
5.5 Help Function ...............................................................................16
Testing of Breaking Requirements for Overcurrent Protective Devices,
8
Measurement of Loop Impedance and Determination of ShortCircuit Current (functions Z
and IK) ......................................31
Loop
8.1 Measurement with Positive or Negative Half-Waves ........................32
8.2 Evaluation of Measurement Values .................................................33
8.3 Loop Impedance Measurement
– Measurement via and without tripping the RCCB .........................33
8.4 Testing Meter Start-Up with the Adapter ......................................... 34
9 Measuring Supply Impedance (function Z
) ................................35
I
9.1 Testing Meter Start-Up with Earthing Contact Adapter .....................36
6 Measuring Alternating Voltage and Frequency ...........................16
6.1 Voltage between L and N (U
) .....................................................16
L-N
6.2 Voltage between L and PE, N and PE, as well as L and N ................17
6.3 Voltage between the Probe and PE (U
) ......................................18
S-PE
10 Earthing Resistance Measurement (function R
) .......................37
E
10.1 Measuring with Probe ...................................................................38
10.2 Measuring without Probe ...............................................................38
10.3 Evaluation of Measurement Values .................................................39
6.4 Measuring Current with a Clip-On Current Transformer ...................18
11 Measuring Insulation Resistance
7 Testing RCDs ..............................................................................20
7.1 Measuring Contact Voltage (with reference to nominal residual current)
with 1/3 Nominal Residual Current and Tripping Test with Nominal Re-
sidual Current ...............................................................................20
(Function R
11.1 Insulation Measurement with Rising Test Voltage ............................ 41
11.2 Evaluation of Measurement Values .................................................42
11.3 Setting the Limit Value ..................................................................42
) ............................................................................40
ISO
7.2 Special Testing for Systems and RCCBs .........................................23
7.2.1 Testing for Systems and RCCBs with Rising Residual Current ..........23
7.2.2 Testing of RCCBs which are Suited for
Pulsating DC Residual Current .......................................................24
4 GMC-I Messtechnik GmbH
Page 5

Contents Page Contents Page
12 Measuring Low-Value Resistance of up to 100
(protective conductor and bonding conductor) .......................... 42
12.1 Measuring Low-Value Resistance (function RLO) ............................. 42
12.2 Compensation for Extension Cables of up to 10
(function R
) ............................................................................ 44
LO
12.3 Calculation of Cable Lengths for Common
Copper Conductors ....................................................................... 45
17 Appendix .................................................................................... 61
17.1 Table 1 ........................................................................................ 61
17.2 Table 2 ........................................................................................ 61
17.3 Table 3 ....................................................................................... 62
17.4 Table 4 ....................................................................................... 62
17.5 Table 5 ........................................................................................ 63
17.6 List of Abbreviations and their Meanings ........................................ 64
12.4 Setting the Limit Value ..................................................................45
18 Repair and Replacement Parts Service
13 Phase Sequence Testing ............................................................ 46
Calibration Center and Rental Instrument Service .......................... 65
14 Operating and Display Elements ................................................47
15 Characteristic Values ................................................................ 52
19 Recalibration .............................................................................. 65
20 Product Support ......................................................................... 66
15.1 Lamp Functions ............................................................................ 56
16 Maintenance ..............................................................................57
16.1 Self-Test ...................................................................................... 57
16.2 Battery and Rechargeable Battery Operation, and Charging ............. 59
16.3 Fuses .......................................................................................... 60
16.4 Housing ....................................................................................... 60
16.5 Device Return and Environmentally Compatible Disposal .................60
GMC-I Messtechnik GmbH 5
Page 6
1 Applications
!
–
+
The PROFITEST 2 test instrument allows for quick and effective
testing of protective measures in accordance with DIN VDE 0100
part 610:2004, ÖVE-EN 1 (Austria), NIV/NIN SEV 1000 (Switzerland), as well as regulations specific to additional countries.
The device is equipped with a microprocessor and complies with
IEC 61557/EN 61557/VDE 0413 regulations:
Part 1: General requirements
Part 2: Insulation resistance testers
Part 3: Loop resistance testers
Part 4: Instruments for the measurement of resistance at earth-
ing conductors, protective conductors and bonding con-
ductors
Part 5: Earthing resistance testers
Part 6: Instruments for the testing of proper functioning of resid-
ual current devices (RCDs) and the effectiveness of pro-
tective measures in TT and TN systems
Part 7: Phase sequence testers
Part 10: Electrical safety in low-voltage systems
It is especially suited for:
•Systems set-up
• Initial start-up
• Periodic testing
• Troubleshooting for electrical systems
All measurement values required for approval reports (e.g. ZVEH)
can be acquired with the instrument.
The applications range of the PROFITEST 2 covers all alternating
and three-phase current systems with nominal voltages of 230 V
(240 V if “English/UK-parameter” has been selected in setup) /
400 V (300 V / 500 V) and nominal frequencies of 162/3/ 50 /
60 / 200 / 400 Hz.
The following measurements and tests can be performed with the
PROFITEST 2:
• Voltage / frequency / phase sequence
• Loop impedance / line impedance
• RCD protection
• Earthing resistance
• Insulation resistance
• Low-value resistance (potential equalization)
• Leakage currents with clip-on current transformer
• Meter start-up
•Cable length
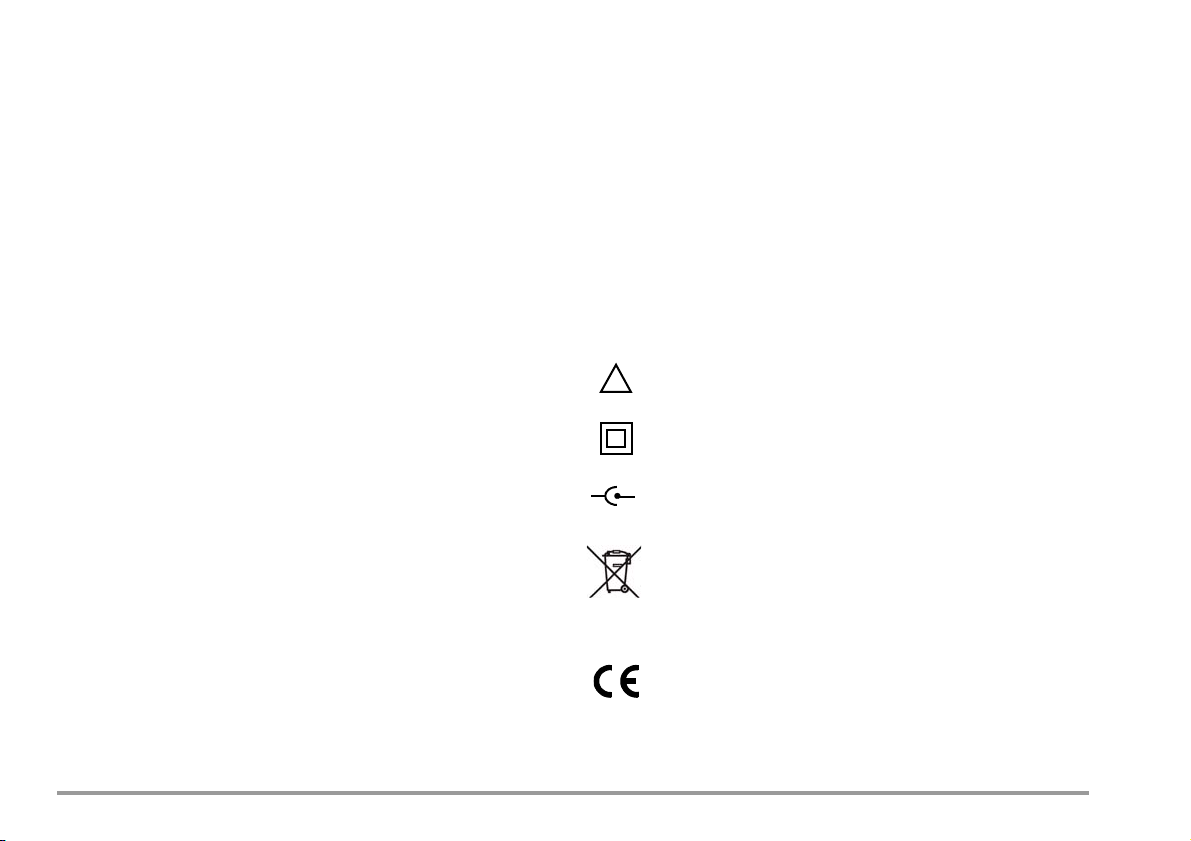
Meaning of Symbols on the Instrument
Warning concerning a point of danger
(Attention, observe documentation!)
Safety class II device
9 V DC charging socket
for battery charger
This device and the inserted (rechargeable) batteries
may not be disposed of with the trash.e trash.
Further information regarding the WEEE mark can be
accessed on the Internet at www.gossenmetrawatt.com by entering the search term ’WEEE’.
EC label of conformity
6 GMC-I Messtechnik GmbH
Page 7

2 Safety Features and Precautions
Note
This instrument fulfills the requirements of the applicable European and national EC guidelines. We confirm this with the CE
marking. The relevant declaration of conformity can be obtained
from GMC-I Messtechnik GmbH.
The PROFITEST 2 electronic measuring and test instrument is manufactured and tested in accordance with safety regulations
IEC 61010-1/EN 61010-1/VDE 0411-1.
When used for its intended purpose, safety of the operator, as
well as that of the instrument, is assured.
Read the operating instructions thoroughly and carefully before placing
your instrument into service, and follow all instructions contained
therein. Make sure that the operating instructions are available to all
users of the instrument.
Tests may only be performed under the supervision of a qualified electrician. The user must be instructed by a qualified electrician concerning
performance and evaluation of the test.
Manufacturers and importers of electrical medical devices must
provide documentation for the performance of maintenance by
trained personnel.
The measuring and test instrument may not be placed into service:
• if the battery compartment lid has been removed
• if external damage is apparent
• if connector cable or measuring adapters are damaged
• if the instrument no longer functions flawlessly
• after a long period of storage under unfavorable conditions
(e.g. moisture, dust, extreme temperatures).
Exclusion of Liability
When testing systems with RCCBs, the latter may switch off. This
may occur even though the test does not normally provide for it.
Leakage currents may be present which, in combination with the
test current of the test instrument, exceed the shutdown threshold value of the RCCB. PCs which are operated in proximity to
such RCCB systems may switch off as a consequence. This may
result in inadvertent loss of data. Before conducting the test, precautions should therefore be taken to ensure that all data and
programs are adequately saved and the computer should be
switched off, if necessary. The manufacturer of the test instrument assumes no liability for any direct or indirect damage to
equipment, computers, peripheral equipment or data bases when
performing the tests.
Grip and hold the test plug and test probes securely when they
have been inserted, for example, into a socket. Danger of injury
exists if tugging at the coil cord occurs, which may cause the test
plug or test probes to snap back.
GMC-I Messtechnik GmbH 7
Opening of Equipment / Repair
The equipment may be opened only by authorized service personnel to ensure the safe and correct operation of the equipment
and to keep the warranty valid.
Even original spare parts may be installed only by authorized service personnel.
In case the equipment was opened by unauthorized personnel,
no warranty regarding personal safety, measurement accuracy,
conformity with applicable safety measures or any consequential
damage is granted by the manufacturer.
Page 8

3 Initial Start-Up
Attention!
Note
Attention!
MENU
START
MENU
START
MENU
!
!
U
L-N
3.1 Installing or Replacing Batteries
Before opening the battery compartment, disconnect the
instrument from the measuring circuit (mains) at all poles!
Six commercially available 1.5 V mignon cells in accordance with
IEC LR 6 are required for operation of the PROFITEST 2.
Only alkaline manganese cells may be used which comply with
IEC LR 6. The use of zinc-carbon batteries is to be avoided due
their short service life.
3.2 Selecting a Language, Basic Function and Sub-Function Settings
Rechargeable NiCd or NiMH cells may also be used. See
also chapter 16.2 on page 59 concerning charging and
the battery charger.
Always replace batteries in complete sets.
Dispose of batteries in an environmentally sound fashion.
Ð Loosen the slotted screw at the Battery Compartment Lid (28)
and remove the lid.
Ð Pull the Battery Holder (27) out with the strap and insert six
1.5 V mignon cells with plus and minus poles in accordance
with the symbols on the holder.
Ð Insert the Battery Holder (27) with batteries into the battery
compartment (strap must be positioned beneath the holder).
The holder can only be inserted in its proper position.
Ð Replace the lid and retighten the screw.
The instrument may only be placed into service if the
battery compartment lid is securely fastened!
8 GMC-I Messtechnik GmbH
Any of the available languages can be selected by
pressing the Menu Key (4).
If the “English/UK-parameter” has been selected, the following
differences apply to the other menu items:
• Nominal voltage of 240 V instead of 230 V
• RCD trip test includes 2 sec. at 50% (nominal fault)
current before RCD is tripped
• No autom. change Phase to Neutral for socket outlets wired incorrectly
Page 9
By pressing the Menu Key (4), you can determine whether the
Note
START
MENU
START
MENU
MENU
START
Note
U
L-N
basic instrument functions are made available when the instrument is switched on, or if the last selected sub-function is made
available for immediate measurement.
The basic functions are selected automatically if the Function Selector Switch (9) has been activated. If the device is
in self-test mode, self-testing must first be completed!
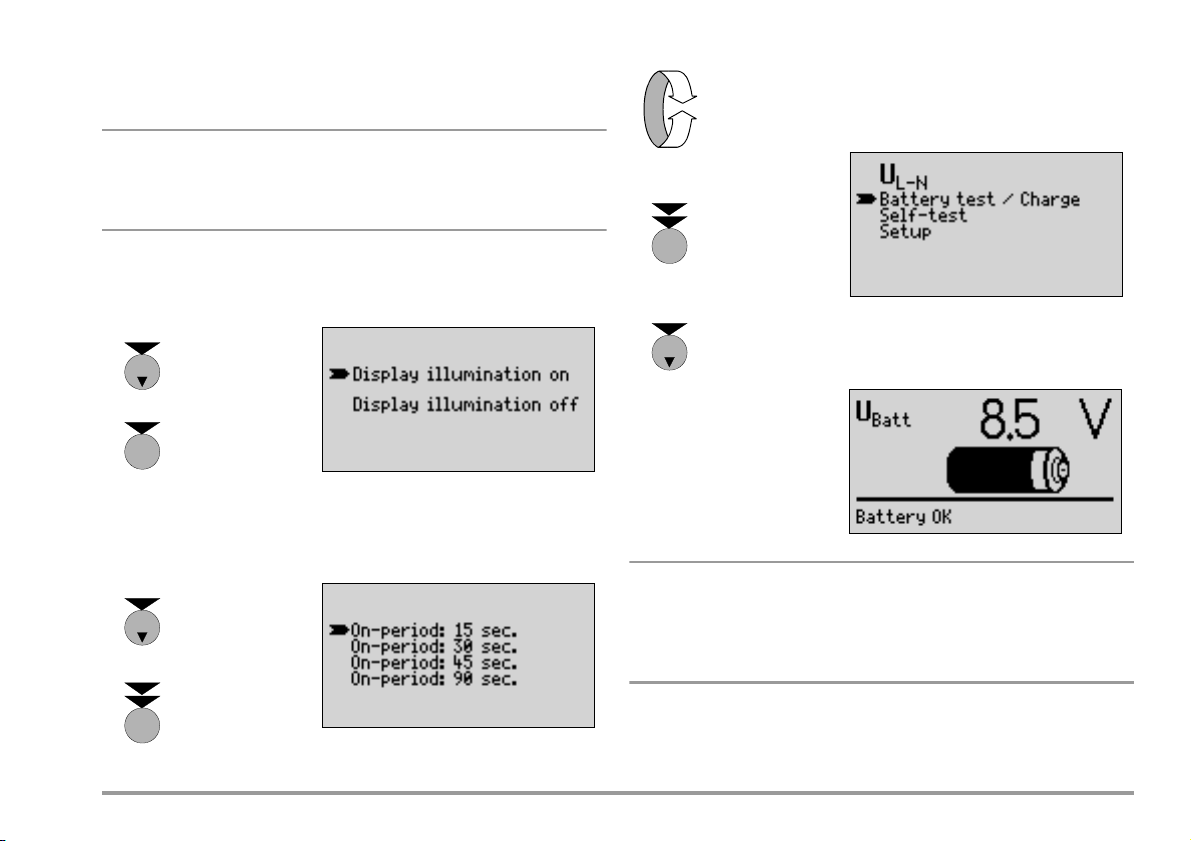
Display Illumination
Display illumination can be deactivated by pressing the Menu Key
(4) in order to extend the service life of the batteries.
On-Time
The period of time after which the test instrument is automatically
shut off can be selected here with the Menu Key (4).
3.3 Battery Test
Batteries or rechargeable batteries are tested under load
conditions. When the Start Key (3 or 17) is activated,
the NETZ/MAINS, UL/RL and FI/RCD lamps light up
briefly for this reason.
The selected on-time has as substantial influence on battery service life.
GMC-I Messtechnik GmbH 9
Page 10
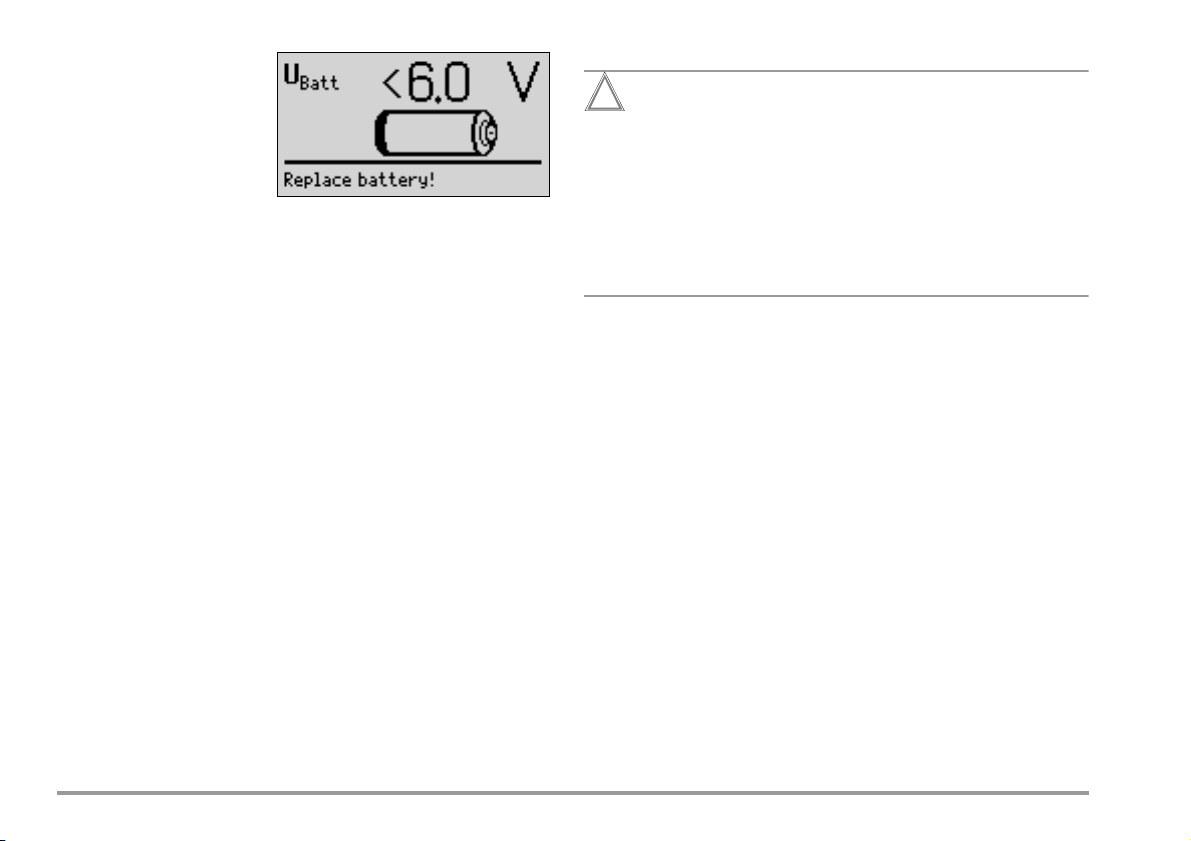
If battery voltage has fallen
Attention!
!
below the allowable lower
limit, the symbol to the
right appears:
The instrument does not
function if the batteries
have been depleted excessively, and no display
appears.
3.4 Recharging the rechargeable Batteries
Use only the NA101 (article no. Z501M) battery charger
with reliable electrical insolation for the recharging of batteries.
Before connecting the charger to the charging socket
make certain that:
– Rechargeable batteries have been installed
(not standard batteries)
– The instrument has been disconnected from the
measuring circuit at all poles
Connect the NA101 battery charger to the charging socket at the
side of the housing bottom with the 3.5 mm jack plug.
Charging is started with the same procedure as used for the battery test. The instrument detects the presence of the charger and
initiates the charging process.
Depleted batteries (display < 6 V) require approximately 4 hours
for complete charging. The test instrument cannot be switched
on if the batteries are severely depleted. In such a case, leave the
instrument switched on with battery charger connected for about
30 minutes, and then proceed as described above.
10 GMC-I Messtechnik GmbH
Page 11

This page was intentionally left free.
GMC-I Messtechnik GmbH 11
Page 12
4 Abbreviated Instructions for Quick Initial Start-Up
U
L-NUL-PE
I
N
10 mA
I
N
30 mA
The performance of measurements and testing with the
PROFITEST 2 is quick and easy.
The integrated on-line help and the abbreviated instructions are
sufficient for most measurements. Nevertheless, you should read
and observe the instructions which follow these abbreviated
instructions as well.
Term in ol og y
Basic Function The basic functions are selected with the Func-
tion Selector Switch (9). The basic function is
the first entry in the menu window and is automatically selected when the function selector
switch is activated.
Sub-Function Functions which are subordinate to the basic
function in the menu window. Sub-functions
are selected with the yellow Menu Key (4), and
are subsequently highlighted with the arrow.
Measurements can be performed as follows for all measuring
functions:
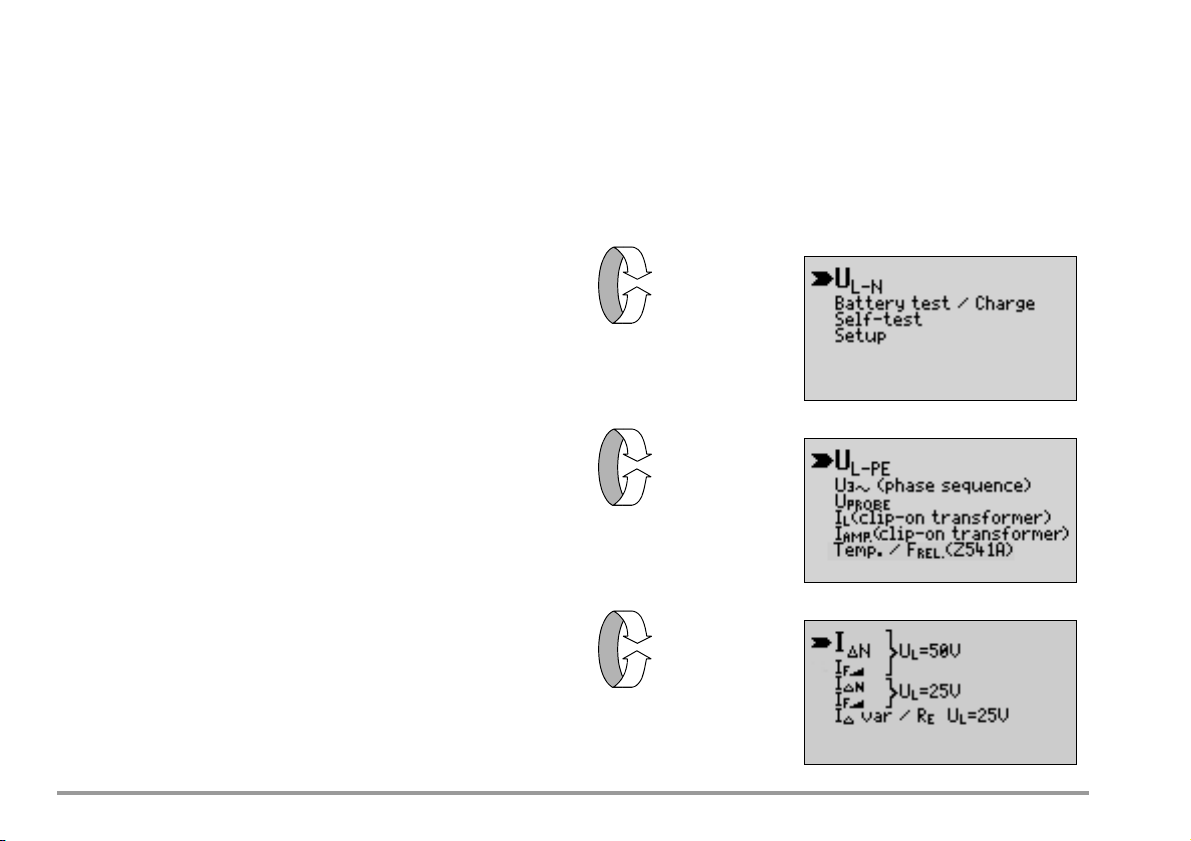
ò Select the basic function with the Function Selector Switch (9)
Ð Turn the Function Selector Switch (9) to the desired basic func-
tion.
After a basic function or a sub-function has been selected as
described below, the corresponding circuit diagram can be queried at the LC Display Field (1) by pressing the IN / i key
(2 or 18).
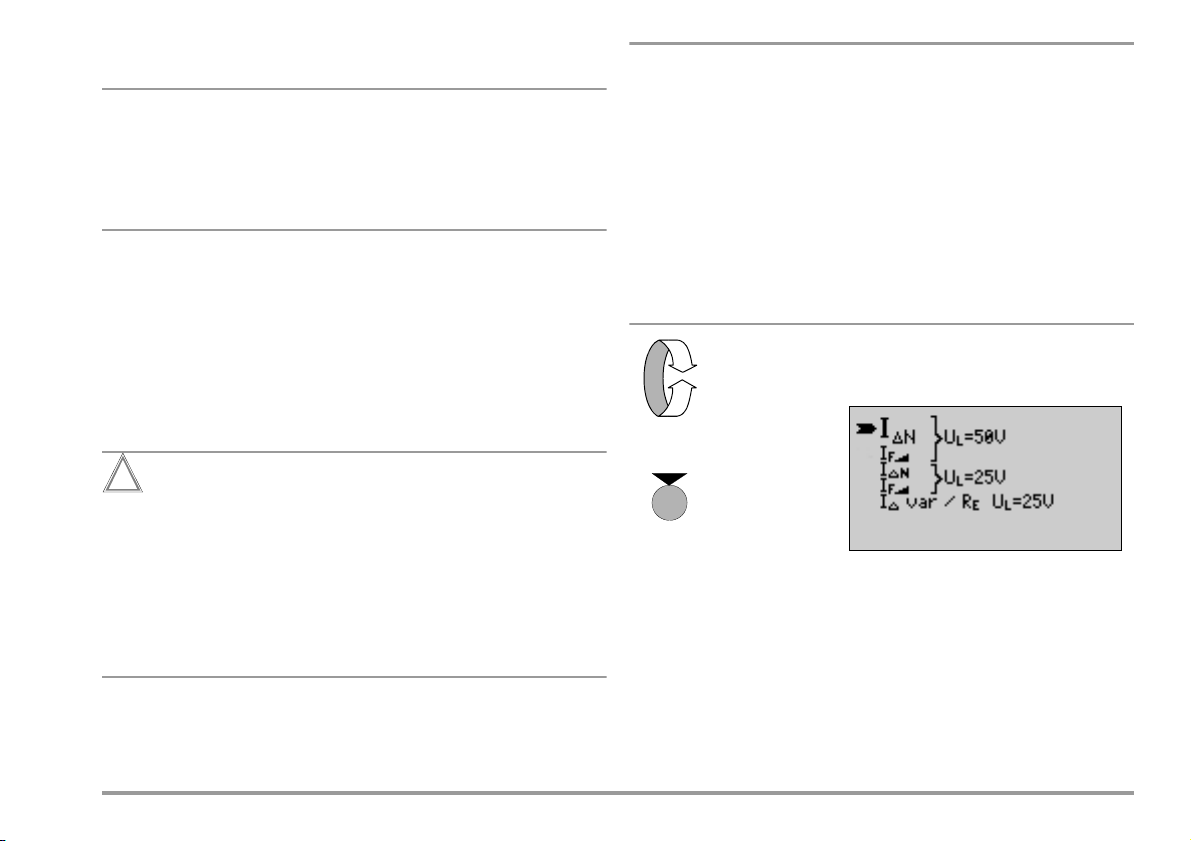
ä Selecting a basic function or a sub-function with the Menu Key (4)
When the Menu Key (4) is first activated, the instrument is
switched on. The basic function and its corresponding
sub-functions are displayed in the menu:
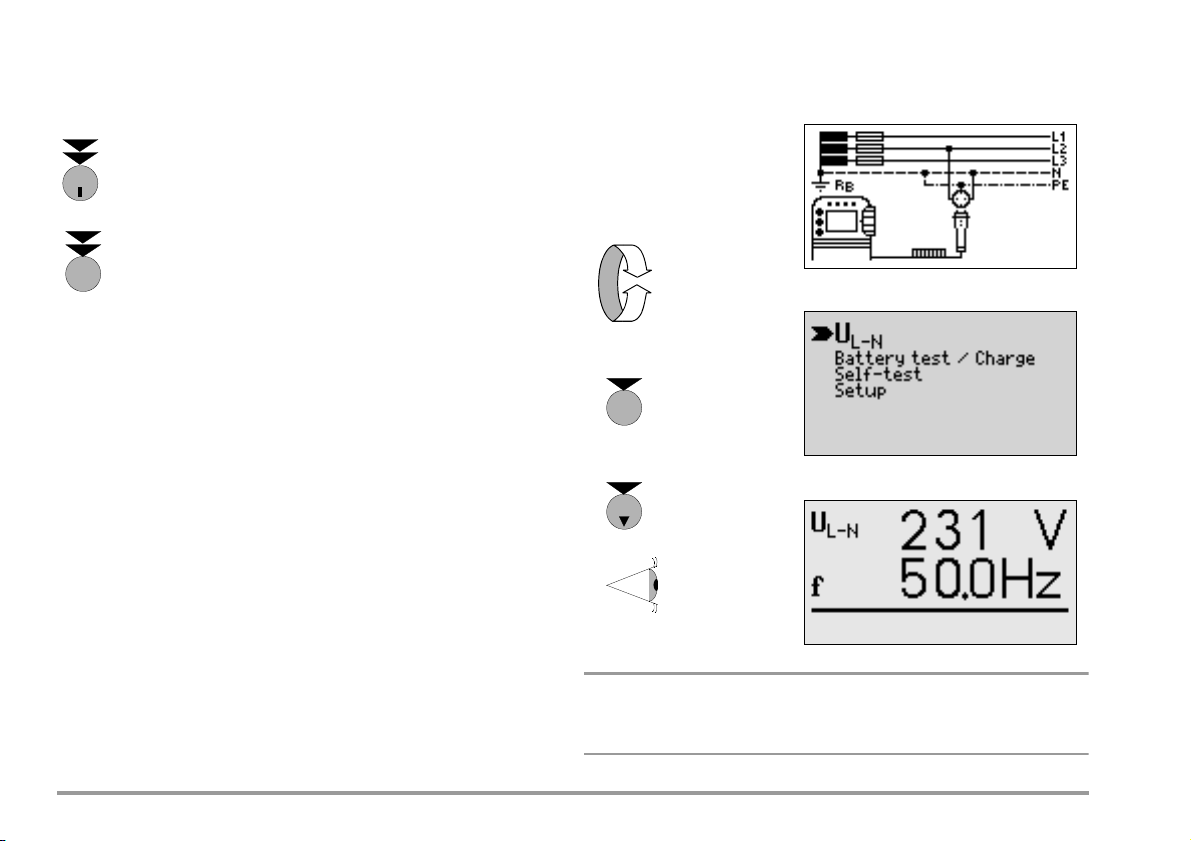
ù Connect the test instrument
Ð Connect the Test Plug (14) with attached Plug Insert (13) to the
mains outlet, or connect the instrument directly in a 2-pole
mannerwith the plug-on Measuring Adapter (2-pole) (12).
12 GMC-I Messtechnik GmbH
Page 13

Ð Repeatedly press the Menu Key (4) until the arrow points to the
IN100 mA
I
N
300 mA
I
N
500 mA
Z
Loop
ZIRER
ISORLO
desired function.
On-line help can be queried for any selected function with the
I
/ i keys (2 or 18).
N
The selection of a function is not necessary if basic functions and
sub-functions have been pre-configured as described.
ë Start measurement with the Start Key (3 or 17) and
read measurement results
Ð Press the I
the instrument has shut itself off automatically) in order to perform the tripping test for RCCBs.
GMC-I Messtechnik GmbH 13
key (2 or 18) during the on-time period (before
N
Page 14

5 General Instructions
5.1 Connecting the Instrument
For systems with earthing contact sockets, connect the instrument with the Test Plug (14), on which the Plug Insert (13) is
attached, to the mains. Voltage between phase conductor L and
the PE protective conductor may not exceed 253 V!
Poling at the socket need not be taken into consideration. The
instrument detects the positions of phase conductor L and neutral conductor N, and automatically reverses poles if necessary.
This does not apply to the following measurements:
– Voltage measurement in selector switch position U
– Insulation resistance measurement
– Low-value resistance measurement
– Phase sequence testing
– Selection of “English/UK-parameter” in setup. In this case no
automatic pole reversal occurs.
The positions of phase conductor L and neutral conductor N are
identified at the Plug Insert (13).
If measurement is to be performed at three-phase outlets, at distribution cabinets or at permanent connections, the Measuring
Adapter (2-pole) (12) must be fastened to the Test Plug (14) (see
also chapter 15.1). Connection is established with the test
probes: one at PE or N and the other at L.
The 2-pole measuring adapter must be expanded to 3 poles with
the included measurement cable for the performance of phase
sequence testing. Measurements with the Measuring Adapter (2pole) (12) are not possible with the Function Selector Switch (9) in
the U
in selector switch positions U
or ZI positions. These measurements can be performed
L-N
L-PE
and Z
Loop
.
Contact voltage (during RCCB testing) and earthing resistance
can be, probe voltage and RCCB performance in IT systems must
be measured with a probe. The probe is connected to the Probe
Connector Socket (20) with a 4 mm contact protected plug.
L-PE
5.2 Automatic Settings, Monitoring and Shut-Off
The PROFITEST 2 automatically sets all operating conditions which
it is able to determine itself. It tests line voltage and frequency. If
these lie within their valid nominal ranges, they appear at the LC
Display Field (1). If they are not within nominal ranges, prevailing
voltage (U) and frequency (f) are displayed instead of U
Line voltage fluctuations have no effect on measurement results.
Contact voltage which is induced by test current is monitored for
each measuring sequence. If contact voltage exceeds the limit
value of > 25 V or > 50 V, measurement is immediately interrupted. The UL (7) lamp lights up red.
If battery voltage falls below the allowable limit value the instrument
cannot be switched on, or it is immediately switched off.
The measurement is interrupted automatically, or the measuring
sequence is blocked (except for voltage measuring ranges and
phase sequence testing) in the event of:
• non-allowable line voltages (< 60 V, > 253 V / > 330 V /
> 440 V or > 550 V) for measurements which require line voltage
• interference voltage during insulation resistance or low resis-
tance measurements
• overheating at the instrument.
As a rule, excessive temperatures only occur after approximately 500 measurement sequences at intervals of 5 s, when
the Function Selector Switch (9) is set to the Z
tion.
If an attempt is made to start a measuring sequence, an appropriate message appears at the LC Display Field (1).
or ZI posi-
Loop
and fN.
N
14 GMC-I Messtechnik GmbH
Page 15

The instrument only switches itself off automatically after comple-
Note
Attention!
!
tion of an automatic measuring sequence, and after the predetermined on-time has expired (see chapter 3.2). On-time is reset to
its original value as defined in the setup menu, as soon as any key
or the Function Selector Switch (9) is activated.
The instrument remains on for approximately 75 s in addition to
the preset on-time for measurements with rising residual current
in systems with selective RCDs.
The instrument always shuts itself off automatically!
5.3 Measurement Value Display
The following appear at the LC Display Field (1):
• Measurement values with abbreviations and units of measure
• Selected function
• Nominal voltage
• Nominal frequency
• Error messages
Measurement values for automatic measuring sequences are
stored and displayed as digital values until the next measurement
sequence is started, or until automatic shut-off occurs.
If the measuring range upper limit is exceeded, the upper limit
value is displayed and is preceded by the “>” symbol (greater
than), which indicates measurement value overrun.
5.4 Testing Earthing Contact Sockets for Correct Connection
The testing of earthing contact sockets for correct connection
prior to protective measures testing is simplified by means of the
instrument’s error detection system. The instrument indicates
improper connection as follows:
• Non-allowable line voltage (< 60 V or > 253 V):
The NETZ/MAINS Lamp (6) blinks red and the measuring sequence is blocked.
• Protective conductor not connected or potential to earth 100 V at f >
45 Hz: The PE Lamp (5) lights up red when contact is made
with the Contact Surfaces (19).
The measurement is not blocked when the lamp is lit. It does
not light up, i.e. is not functional, when the instrument is
switched on and the Function Selector Switch (9) is in the U
or the Z
position (see Lamp Functions on page 56).
I
L-N
If the instrument is off and the selector switch is in the
U
or the ZI position, the red PE lamp may light up if
L-N
contact is made with the Contact Surfaces (19), and if the
terminal designated N at the plug insert is connected to
the phase conductor at the socket.
• Neutral conductor N not connected:
The NETZ/MAINS Lamp (6) blinks green
(see Lamp Functions on page 56).
• One of the two protective contacts is not connected:
Testing for this condition is performed automatically for the FI,
Z
, Z
and RE functions. Poor contact resistance at one of
I
Loop
the contacts leads to one of the following displays depending
upon poling of the plug:
– A value of only approximately half the anticipated line voltage
is displayed.
– A “STOP-sign” with the following warning appears: “Earthing
resistance to high or defective fuse”.
Reversal of N and PE in a system without RCCBs cannot
be detected and is not indicated by the instrument. If an
RCCB is present in the system, it is tripped during Z
measurement if N and PE have been reversed.
I
GMC-I Messtechnik GmbH 15
Page 16
5.5 Help Function
MENU
START
Note
I
N
MENU
U
L-N
The appropriate circuit diagrams and on-line help can be queried
at the LC Display Field (1) for each of the basic functions and subfunctions, after these have been selected in the corresponding menu.
Press the I
diagram. Press the same key again to alternate between
the circuit diagram and on-line help.
Press the Menu Key (4) to exit the help function.
/ i key (2 or 17) once to display the circuit
N
6 Measuring Alternating Voltage and Frequency
6.1 Voltage between L and N (U
Set-Up
L-N
)
Measurements cannot be made with the Measuring
Adapter (2-pole) (12) in the U
16 GMC-I Messtechnik GmbH
function!
L-N
Page 17
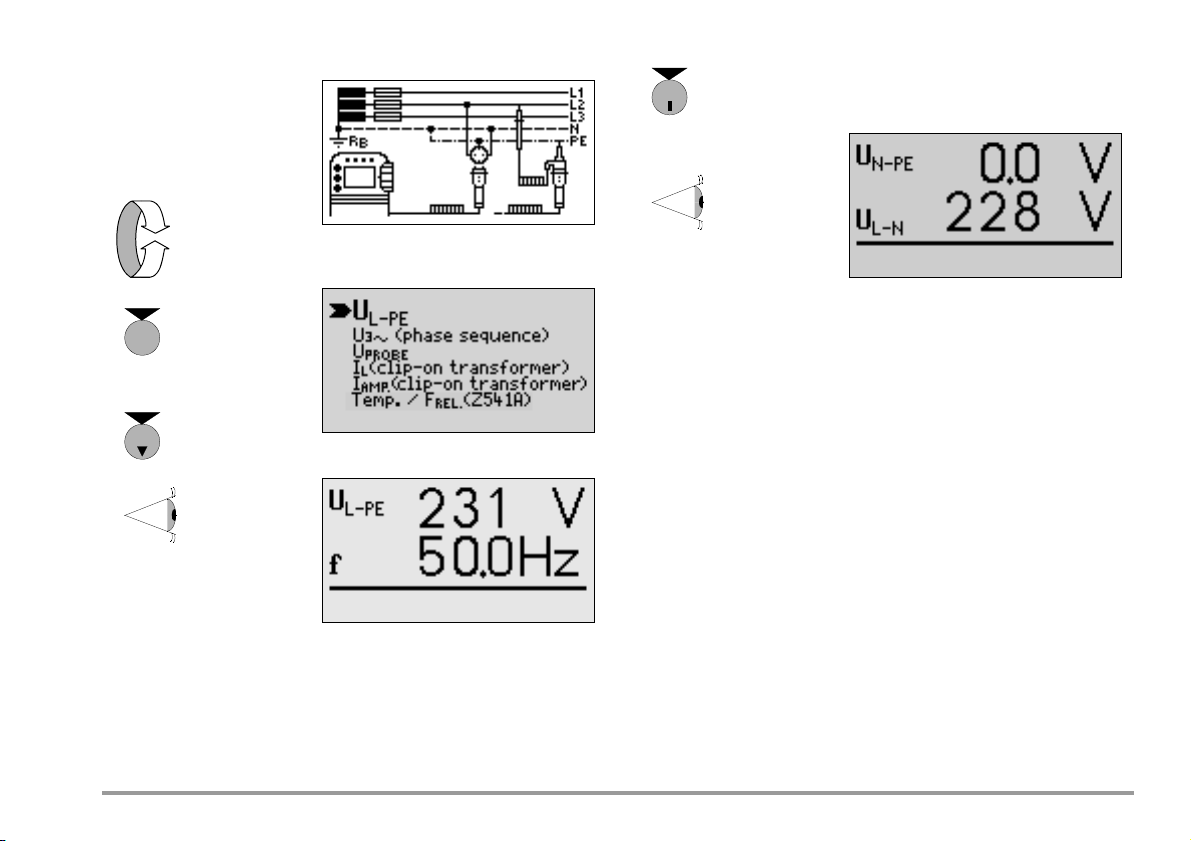
6.2 Voltage between L and PE, N and PE, as well as L and N
MENU
START
I
N
U
L-PE
Set-Up
The display is switched to the other two voltages measured at the
socket by pressing the I
be recalled by pressing the START key.
GMC-I Messtechnik GmbH 17
/ i key. The previous display can only
N
Page 18
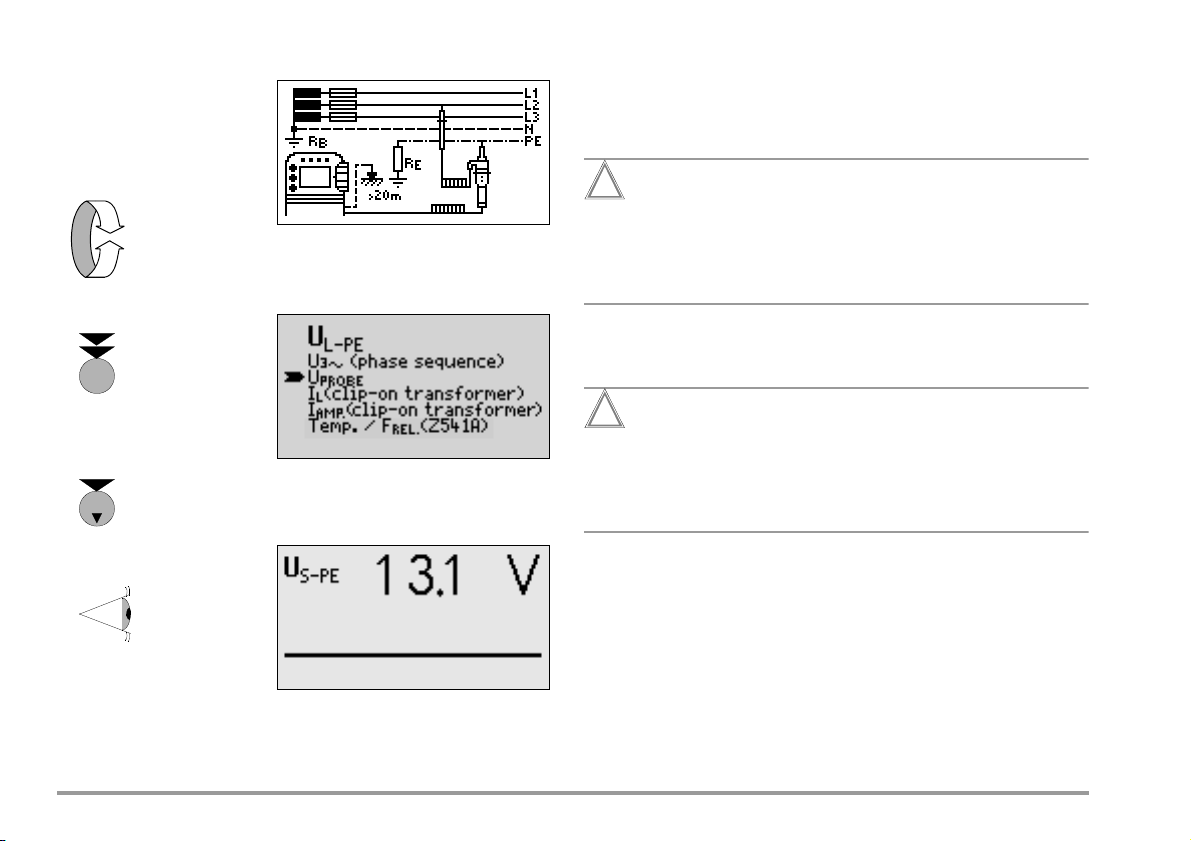
6.3 Voltage between the Probe and PE (U
MENU
START
Attention!
!
Attention!
!
U
L-PE
Set-Up
S-PE
)
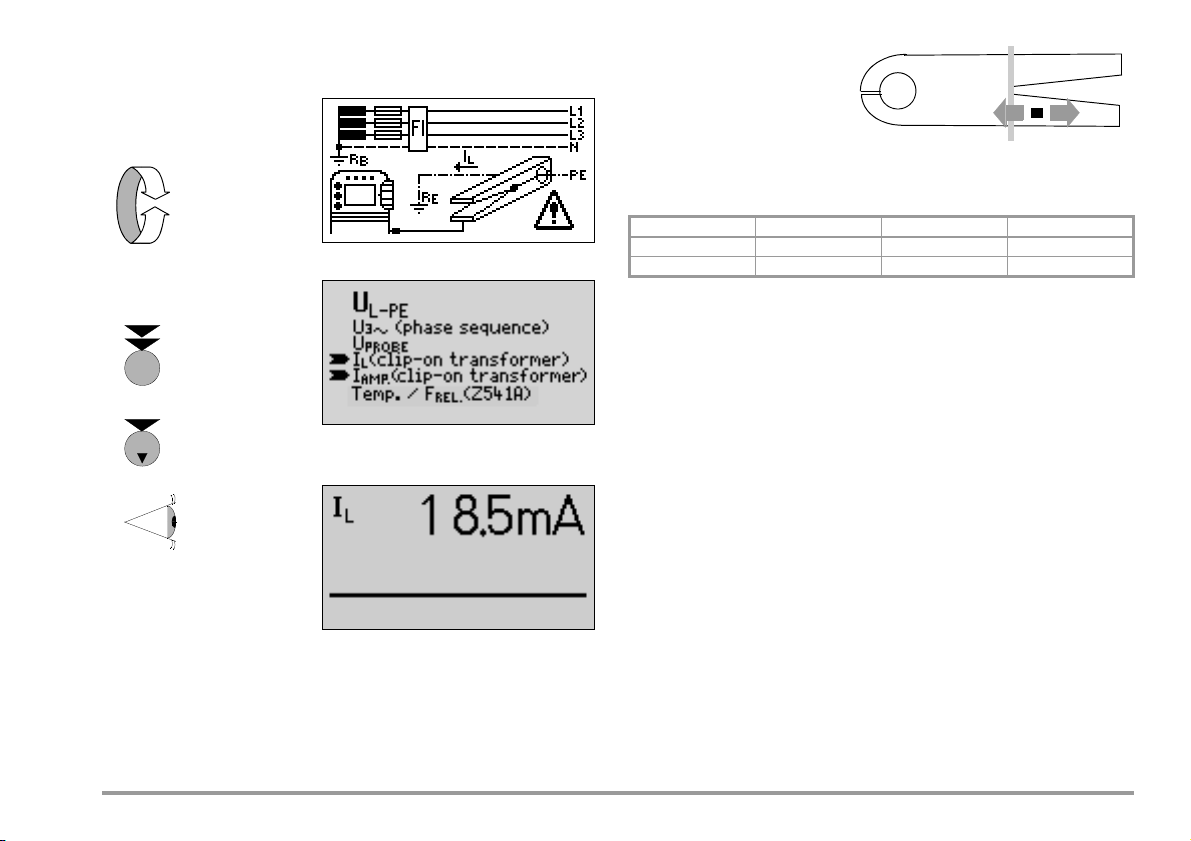
6.4 Measuring Current with a Clip-On Current Transformer
Bias, leakage and circulating current to 1 A, as well as leakage
current to 150 A can be measured with the help of the
0100S Clip, special clip-on current transformer, which is connected at the charging socket.
High-Voltage Danger!
Use only the above mentioned clip-on current transformer.
Other current clips may not be terminated with an output
load at the secondary side. Dangerously high voltage may
endanger the user and the device in such cases.
The maximum allowable operating voltage is equal to the nominal
voltage of the current transformer. Take additional display error
into consideration when reading the measurement value.
Do not, under any circumstances, connect any accessories to the charging socket which have not been recommended and approved by GMC-I Messtechnik GmbH!
The instrument and the user may otherwise be endangered and may suffer damage or injury.
All other instrument test functions are blocked if the clip-on current transformer or the battery charger is connected. If you nevertheless attempt to activate another function, the following message appears: “remove adapter”. No testing is performed. After
the clip-on current transformer or the battery charger has been
removed, this message disappears automatically for functions
involving long-term measurements (e.g. voltage measurement).
For other functions it disappears as soon as a new measurement
is started, or when a new function is selected.
18 GMC-I Messtechnik GmbH
Page 19
If no clip-on current transformer has been connected for the IL or I
MENU
START
U
L-PE
I
L
I
AMP.
CLIP0100s
function, the following message appears: “use current clip”.
Set-Up
AMP
The switch position at the
respective clip-on current transformer must be
matched to the ranges of
the selected measuring
parameter, I
Measuring Range Tester CLIP0100S Z3512A *
* Connection via CLIP-ON adapter cable (Z501G);
ranges b and c not possible in this case.
I
AMP.
or I
L
I
L
!
AMP.
5 mA ... 1.0 A 1 mA... 15 A d: 1 mA ... 1 A
10 ... 150 A 1 A ... 150 A a: 1 ... 1000 A
GMC-I Messtechnik GmbH 19
Page 20
7 Testing RCDs
Attention!
!
The testing of residual current devices (RCDs) includes:
• Visual inspection
•Testing
•Measurement
The PROFITEST 2 is used for testing and measurement. Measure-
ments can be performed with or without a probe. However, a
probe is always required for measurements in IT systems.
Measurements with probe require that the probe and reference
earth are of like potential. This means that the probe must be
positioned outside of the resistance area of the earth electrode
(RE) at the RCD.
The distance between the earth electrode and the probe should
be at least 20 m.
The probe is connected with a 4 mm contact protected plug.
In most cases this measurement is performed without probe.
The probe is part of the measuring circuit and may carry
a current of up to 3.5 mA in accordance with VDE 0413.
Testing for the absence of voltage at the probe can be performed
with the U
function. See also chapter 6.3 on page 18.
PROBE
7.1 Measuring Contact Voltage (with reference to nominal
residual current) with
1
/3 Nominal Residual Current and
Tripping Test with Nominal Residual Current
Set-Up
Measuring Method
The following must be substantiated per DIN VDE 0100 part 600:
2008:
– Contact voltage occurring at nominal residual current may not
exceed the maximum allowable value for the system.
– Tripping of the RCCB must occur within 400 ms
(1000 ms for selective RCDs) at nominal residual current.
1) Measurement of Contact Voltage
The instrument uses a measuring current of only 1/3 nominal
residual current for the determination of contact voltage U
which occurs at nominal residual current. This prevents tripping of
the RCCB.
This measuring method is especially advantageous, because
contact voltage can be measured quickly and easily at any electrical outlet without tripping the RCCB.
The usual, complex measuring method involving testing for the
proper functioning of the RCD at a given point, and subsequent
substantiation that all other systems components requiring protection are reliably connected at low resistance values to the
selected measuring point via the PE conductor, is made unnecessary.
IN
20 GMC-I Messtechnik GmbH
Page 21
Contact voltage U
Note
Attention!
!
Note
MENU
I
N
10 mA
I
N
30 mA
appear at the LC Display Field (1).
and calculated earthing resistance RE
IN
Displayed earthing resistance RE is measured with
relatively little current and may thus be inaccurate where
small values are involved. Use the RE selector switch
position for accurate determination of earthing
resistance.
After contact voltage has been measured, testing can be performed to determine whether or not the RCCB is tripped within
400 ms, or 1000 ms, at nominal residual current.
If the RCCB is tripped at nominal residual current, time to trip and
earthing resistance are displayed.
If the RCCB is not tripped at nominal residual current, FI/RCD
Lamp (8) lights up red.
The tripping test need only be performed at one measuring point
for each RCCB.
The measurement of contact voltage with 30% nominal
residual current does not normally trip an RCCB. However, the trip limit may be exceeded as a result of leakage
current in the measuring circuit, e.g. due to interconnected consumers with EMC circuit, e.g. frequency converters, PCs.
In order to prevent the loss of data in data processing
systems, perform a data backup before starting the
measurement and switch off all consumers.
Interference voltages at protective conductor PE, at the
earth electrode or at the probe (if properly connected) have
no influence on measurement results. Interference voltages
can be measured with the Measuring Adapter (2-pole) (12)
by means of voltage measurement. If bias currents should
occur, these can be measured with the help of a clip-on current transformer as described in chapter 6.4 on page 18.
The RCCB may be tripped during the testing of contact voltage if extremely large bias currents are present within the
system, or if a test current was selected which is too great
for the RCCB. In such cases, the following message
appears: “check test set-up”.
If the “English/UK parameter” has been selected in setup, a 2 second test at 50% nominal residual current is performed before the
RCD is tripped. If the RCD trips within this test period, the FI/RCD
Lamp (8) also lights up red, and no trip delay is displayed.
GMC-I Messtechnik GmbH 21
Page 22

MENU
START
If contact voltage U
Note
Note
I
N
IN100 mA
I
N
300 mA
I
N
500 mA
nal residual current I
the U
(7) lamp lights up red.
L/RL
If contact voltage U
sequence, safety shut-down occurs. See also Note „Safety Shut-
, which has been measured with 1/3 nomi-
IN
and expounded to IN, is > 50 V (> 25 V),
N
exceeds 50 V (25 V) during the measuring
IN
down“ on page 22.
Contact voltages of up to 70 V are displayed. If contact voltage is
greater than 70 V, U
> 70 V is displayed.
IN
The measured earthing resistance value RE is acquired
with very little current. More accurate results can be
obtained with the selector switch in the R
Perform measurement upstream from the RCCB in order
position.
E
to prevent it from tripping in the case of the high measuring currents used in this context.
Limit Values for Allowable, Continuous Contact Voltage
The limit for allowable, continuous contact voltage is equal to
U
= 50 V for alternating voltages (international agreement).
L
Lower values have been established for special applications
(e.g. medical applications UL=25V).
Safety Shut-down: Up to 70 V, a safety shut-down is
tripped within 3 s in accordance with IEC 61010.
2) Tripping Test after the Measurement of Contact Voltage
Ð Press the I
(approximately 30 s).
key (2 or 18) before on-time has expired
N
If the RCCB is tripped at nominal residual current, the NETZ/
MAINS Lamp (6) blinks red (line voltage disconnected), and time
to trip t
Field (1).
and earthing resistance RE appear at the LC Display
A
22 GMC-I Messtechnik GmbH
Page 23

If the IN key (2 or 18) is pressed again, the previous display
Attention!
!
Note
MENU
I
N
10 mA
I
N
30 mA
appears at LC Display Field (1) for about 3 s.
If the RCCB is not tripped at nominal residual current, the FI/RCD
Lamp (8) lights up red.
If contact voltage is too high, or if the RCCB is not
tripped, the system must be repaired (e.g. earthing resistance is too high, defective RCCB etc.)!
For proper RCD testing at three-phase connections, the tripping
test must be conducted for each of the three phase conductors
(L1, L2 and L3).
Voltage peaks may occur within the measuring circuit if
inductive consumers are shut down during an RCCB trip
test. If this is the case, the test instrument may display the
following message: “Check test setup”. If this message
appears, switch all consumers off before performing the
trip test. In extreme cases one of the fuses in the test
instrument may blow.
7.2 Special Testing for Systems and RCCBs
7.2.1 Testing for Systems and RCCBs with Rising Residual Current
Measuring Method
The instrument generates a continuously rising residual current of
(0.3 ... 1.3) I
The instrument stores the contact voltage and tripping current
values which were measured at the moment tripping of the RCCB
occurred, and displays them.
One of two contact voltage limit values, U
can be selected for measurement with rising residual current.
Set-Up
within the system for the testing of RCDs.
N
=25V or UL=50V,
L
GMC-I Messtechnik GmbH 23
Page 24

MENU
START
Measuring Sequence
Attention!
!
+
I
N
MENU
I
N
100 mA
I
N
300 mA
I
N
500 mA
After the measuring sequence has been started, the test current
generated by the instrument is continuously increased starting at
0.3 times nominal residual current, until the RCCB is tripped. This
rise can be observed at the horizontal bar display.
If contact voltage reaches the selected limit value (U
25 V) before the RCCB is tripped, safety shut-down occurs. The
=50V or
L
UL/RL (7) Lamp lights up red.
If the RCCB is not tripped before the rising current reaches nomi-
nal residual current I
, the FI/RCD Lamp (8) lights up red.
N
If bias current is present within the system during measurement, it is superimposed onto the residual current
which is generated by the instrument and influences
measured values for contact voltage and tripping current. See also note on page 21.
According to DIN VDE 0100, Part 610, rising residual current
must, however, be used for measurements in the evaluation of
RCDs, and contact voltage at nominal residual current I
be calculated from the measured values.
N
must
The faster, more simple measuring method should thus be taken
advantage of (see chapter 7.1).
7.2.2 Testing of RCCBs which are Suited for Pulsating DC Residual Current
In this case, RCCBs can be tested with either positive or negative
half-waves. The standard calls for tripping at 1.4 times nominal
current.
Press and *
hold the
key!
24 GMC-I Messtechnik GmbH
Page 25

+
I
N
MENU
Note
Note
7.3 Testing for Special RCDs
MENU
S
I
N
100 mA
I
N
300 mA
I
N
500 mA
Press and *
hold the
key!
According to DIN EN 50178 (VDE 160), RCCBs of type B
(AC-DC sensitive) are sufficient for devices > 4 kVA,
which are capable of generating smooth DC fault currents (e.g. frequency converters).
Tests with pulsating DC fault currents are not suitable for
these RCCBs. For this purpose we recommend the
PROFiTESTDC-II adapter.
Measurement is performed with positive and negative
half-waves for testing RCCBs during manufacturing. If a
circuit is charged with pulsating direct current, the function of the RCCB can be executed with this test in order
to assure that the RCCB is not saturated by the pulsating
direct current so that it no longer trips.
* Press the key repeatedly until the symbol for positive or negative
pulsating DC current appears.
7.3.1 Systems with Selective RCDs
Selective RCDs are used in systems which include two series
connected RCCBs which are not tripped simultaneously in the
event of a fault. These selective RCDs demonstrate delayed
response characteristics and are identified with the symbol .
Measuring Method
The same measuring method is used as for standard RCCBs (see
points 7.1 on page 20 and 7.2.1 on page 23).
If selective RCDs are used, earthing resistance may not exceed
half of this value for standard RCCBs.
For this reason, the instrument displays twice the measured value
for contact voltage.
GMC-I Messtechnik GmbH 25
Page 26

START
Tripping Test
Note
START
Ð Press the I
glass appears at the LC Display Field (1), which is followed by
key (2 or 18). The RCCB is tripped. The hour
N
the display of time to trip tA and earthing resistance RE.
Selective RCDs demonstrate delayed response characteristics. Tripping performance is briefly influenced (up to
30 s) due to pre-loading during measurement of contact
voltage. In order to eliminate pre-loading caused by the
measurement of contact voltage, a waiting period must
If the IN key (2 or 18) is activated again, the LC Display Field (1)
returns to the U
display.
IN
be observed prior to the tripping test. After the measuring
sequence has been started (tripping test), the hour glass
appears in the LC Display Field (1).
Times of up to 1000 ms are allowable.
26 GMC-I Messtechnik GmbH
Page 27

7.3.2 Type G RCCBs
MENU
Note
Note
I
N
10 mA
I
N
30 mA
In addition to standard RCCBs and selective RCDs, the special
characteristics of the type G RCCB can also be tested with the
PROFITEST 2 test instrument.
Menu item S for selective RCDs is not suitable for type G
RCCBs.
Ð Set the test instrument function selector switch to I
or 10 mA, and select the I
menu item with the cursor.
N
=30mA
N
Contact voltage and time to trip can be tested in the same way as
for standard RCCBs.
It must be observed that time to trip for type G RCCBs
may be as long as 1000 ms when measurement is made
at nominal residual current. In such cases disregard the
red FI/RCD Lamp.
GMC-I Messtechnik GmbH 27
Page 28

7.4 Testing with Adjustable Residual Current
I
N
The same tests as described in chapter 7.1 can be performed
under menu item I
ments are performed with a test current which can be adjusted
VAR/RE
within a range of 3 mA to 550 mA. This function (e. g. contact voltage at the tripping contact) is suitable for the examination of RCD
characteristics and contact voltage directly at the RCCB tripping
contact, as well as for the determination of earthing resistance in
systems with RCDs when no PROFiTEST
bridging the RCDs. This menu item can only be used for 10 mA
and 30 mA RCCBs.
Proceed as follows in order to select the desired residual current:
Ð Select menu item I
Ð Press the I
appears.
/ i key. A field for the entry of residual current
N
except that all tests and measure-
DC-II is available for
VAR/RE
.
If the Menu Key is pressed again, the main menu appears at the
display. If no entries are made within approximately 10 s, the
menu is exited.
The determination of contact voltage, as well as the tripping test,
are performed with the pre-selected residual current.
If a residual current value is selected which is very close to the
tripping current of the RCCB, the calculated contact voltage corresponds to the contact voltage which occurs at the moment the
RCCB is tripped.
7.5 Testing RCDs in IT Systems
All of the tests described in chapters 7.1 through 7.5 can also be
performed in IT systems with the PROFITEST 2. The only prerequisite is that the system is capable of applying the necessary test
and tripping currents to earth.
Set-Up
Each time the I
pressing and holding the I
ously. The speed at which the value rises is increased after a few
/ i is activated current is increased by 1 mA. By
N
/ i key, the value is increased continu-
N
Ð Connect the test instrument to the phase conductor which
demonstrates the greatest earth potential.
seconds. If the Menu Key is pressed and held at the same time, the
value is reduced at the same speed. After the desired value has be
set, testing can be started with the Start Key as described in chapter 7.1. Testing is started with the positive half-wave. If the test is to
be started with the negative half-wave, the menu item “Start with
negative half-wave (180
28 GMC-I Messtechnik GmbH
” must be selected prior to testing.
Page 29

Attention!
!
Testing of RCCBs in IT systems cannot be performed
+
I
N
MENU
MENU
START
Note
+
I
N
MENU
I
N
10 mA
I
N
30 mA
I
N
100 mA
I
N
300 mA
I
N
500 mA
without a probe; a probe is absolutely necessary! The
probe and reference earth must be of like potential.
Press and *
hold the key!
The MAINS Lamp (6) has no function for the testing of
RCDs in IT systems (in the IT mode).
Exit IT mode manually:
Press and hold the Menu Key and repeatedly press the IN/I key
until the IT symbol group and half-wave disappear.
The IT mode is exited automatically if:
– an attempt is made to perform the measurement without a
probe or if probe resistance is greater than 50 k
– a prohibited bias occurs between the probe and earth
– the function selector switch (9) is turned
– the instrument shuts itself off automatically
* Press the key repeatedly until the IT symbol group appears.
GMC-I Messtechnik GmbH 29
Page 30

7.6 Testing Residual Current Circuit Breakers in TN-S Systems
Note
UINREIN 1 30mA 30mV 0 03V,== ==
Connections
RCCBs can only be used in TN-S systems. An RCCB would not
work in a TN-C system because PE is directly connected to the
neutral conductor in the outlet (it does not bypass the RCCB).
This means that residual current would be returned via the RCCB
and would not generate any differential current, which is required
in order to trip the RCCB.
As a rule, the display for contact voltage is also 0.0 V, because
the nominal residual current of 30 mA together with minimal loop
resistance result in a very small voltage value:
In determining contact voltage and earth resistance, it must be
kept in mind that loop impedance Z
earth resistance R
Due to minimal measuring current with a value of, for example,
.
E
10 mA for a 30 mA RCCB, resolution is only 3 for R
Since loop resistance is generally less (e.g. 1 ), 0 is displayed
is determined rather than
Loop
E
(=Z
Loop
Measuring resolution is 100 mV, and the display value is thus
rounded down to 0.0 V.
).
in most cases.
Observe national regulations, e.g. the necessity of conducting measurements without regard for RCCBs in Austria, see also chapter 8.3.
30 GMC-I Messtechnik GmbH
Page 31

8 Testing of Breaking Requirements for Overcurrent Protective Devices,
Measurement of Loop Impedance and Determination of Short-Circuit Current (functions Z
Testing of overcurrent protective devices includes visual inspection and measurement. The PROFITEST 2 is used for the perfor-
mance of measurements.
Measuring Method
Loop impedance Z
ascertained in order to determine if the breaking requirements for
is measured and short-circuit current IK is
Loop
protective devices have been fulfilled.
Loop impedance is the resistance within the current loop (utility
company plant – phase conductor – protective conductor) when
a short-circuit to an exposed conductive part occurs (conductive
connection between phase conductor and protective conductor).
Short-circuit current magnitude is determined by the loop impedance value. Short-circuit current I
mined value set forth by DIN VDE 0100, so that reliable breaking
may not fall below a predeter-
K
of the protective device (fuse, automatic circuit breaker) is
assured.
Thus the measured loop impedance value must be less than the
maximum allowable value.
Tables containing allowable display values for loop impedance
and minimum short-circuit current display values for ampere ratings for various fuses and circuit breakers can be found in chapter
17 starting on page 61. Maximum device error in accordance with
VDE 0413 has been taken into consideration in these tables. See
also chapter 8.2.
In order to measure loop impedance Z
test current of 0.83 A to 4 A dependent upon line voltage and line
, the instrument uses a
Loop
frequency. The test has a duration of max. 600 ms.
If dangerous contact voltage occurs during measurement
(> 50 V), safety shut-down occurs.
The test instrument calculates short-circuit current I
measured loop impedance Z
current calculation is made with reference to nominal line voltage
for line voltages which lie within the nominal ranges for 120 V,
230 V (240 V for „English/UK-parameter“) and 400 V systems. If
line voltage does not lie within these nominal ranges, the instrument calculates short-circuit current I
voltage and measured loop resistance Z
Loop resistance can be measured with either the positive or the
negative half wave with the PROFITEST 2.
This measuring method, in combination with the
PROFiTEST
DC-II adapter, allows for the measurement of loop
impedance in systems which are equipped with RCCBs.
A four conductor measuring cable is used between the instru-
ment and the Test Plug (14). Cable and measuring adapter (12)
resistance is automatically compensated for during measurement
and does not effect measurement results.
and IK)
Loop
and line voltage. Short-circuit
Loop
based upon prevailing line
K
Loop
K
.
based on
GMC-I Messtechnik GmbH 31
Page 32

Set-Up
MENU
START
MENU
START
Z
Loop
Z
Loop
8.1 Measurement with Positive or Negative Half-Waves
Measurement by means of half-waves in combination with the
PROFiTEST
impedance in systems which are equipped with RCCBs.
Set-Up
Whether positive or negative half-waves are used for the measurement depends upon the poling of DC biasing at the ballast. If
the RCCB is tripped, testing is then performed with the other halfwave.
DC-II adapter allows for the measurement of loop
Measurement of loop impedance to earth must be performed at
all three phase conductors (L1, L2, and L3) for the testing of overcurrent protective devices at three phase outlets.
32 GMC-I Messtechnik GmbH
Page 33

8.2 Evaluation of Measurement Values
I
N
Attention!
!
Z
Loop
The maximum allowable loop impedance Z
played after allowance has been made for maximum operating
measurement error (under normal measuring conditions) can be
determined with the help of Table 5 on page 63. Intermediate values can be interpolated.
The maximum allowable nominal current for the protective device
(fuse or circuit breaker) for a line voltage of 230/240 V after allowance has been made for maximum measuring error can be determined with the help of Table 5 on page 63 based upon measured
short-circuit current (corresponds to DIN VDE 0100 Part 610).
After measurement has
been performed, allowable fuse types can be displayed by pressing the I
/ i key.
lI
breaking current, IK short-circuit current, IN nominal current
A
tA time to trip < 0.4: current standard 2004 issue 0.5: previous standard 1994 issue
N
The table shows maximum allowable nominal current dependent
upon fuse type and breaking requirements.
which may be dis-
Loop
99.9 . Calculated short-circuit current is also displayed. Recommended fuse types do not appear at the display. If RCCBs are utilized, fuse values are determined based upon internal system
resistance.
This measurement can be performed for system RCD protection
where RCCBs up to 500 mA are utilized as protective devices,
although, for example, loop resistance must be determined for
purposes of documentation.
The measurement is sufficiently accurate for testing earth-fault
loop impedances of less than 100 (at 500 mA).
Earth-fault loop impedances of less than 1 must be
reliably substantiated for testing trip conditions with
protective multiple earthing. Loop impedance
measurement must be performed with the help of the
PROFiTEST
DC-II for testing purposes
(see chapter 8.1).
8.3 Loop Impedance Measurement – Measurement via and without tripping the RCCB
Loop impedance L-PE can be determined with a nominal residual
current of at least 30 mA with this function, even downstream
from RCCBs. Measurement is performed for 2 seconds with a
nominal residual current of 15 mA, and results are displayed with
a typical accuracy of 1 . The display range runs from 0.1 to
GMC-I Messtechnik GmbH 33
Page 34

8.4 Testing Meter Start-Up with the Adapter
MENU
Attention!
!
START
Z
Loop
Start-up of energy consumption meters which are connected
between L and L or L and N can be tested with this function.
Set-Up
Use only the 2-pole adapter and contact L1 (L2, L3) and
N at the meter output.
Meters are tested with the help of an internal load resistor. After
pressing the Start Key t (3), the meter can be tested for proper
start-up within a period of 5 s. All phases must be tested against
N, one after the other.
After testing has been completed, testing power is displayed. The
instrument is now ready for further testing (“READY”).
34 GMC-I Messtechnik GmbH
Page 35

9 Measuring Supply Impedance (function ZI)
MENU
START
Note
Z
I
Measuring Method
Supply impedance Z
used for loop impedance Z
ever, the current loop is completed via neutral conductor N rather
than protective conductor PE as is the case with loop impedance
measurement.
Set-Up
is measured by means of the same method
I
(see chapter 8, page 31). How-
Loop
Measurement of supply impedance is only possible with
the Z
is attached!
function if the Measuring Adapter (2-pole) (12)
Loop
GMC-I Messtechnik GmbH 35
Page 36

9.1 Testing Meter Start-Up with Earthing Contact Adapter
MENU
START
Z
I
Start-up of energy consumption meters which are connected
between L and N can be tested with this function.
Set-Up
Meters are tested with the help of an internal load resistor. After
pressing the Start Key t (3), the meter can be tested for proper
start-up within a period of 5 s. All phases must be tested against
N, one after the other.
After testing has been completed, testing power is displayed. The
instrument is now ready for further testing (“READY”).
36 GMC-I Messtechnik GmbH
Page 37

10 Earthing Resistance Measurement (function RE)
Note
Attention!
!
Earthing resistance is the sum of earth electrode resistance (RA)
and earth conductor resistance. Earthing resistance is measured
by applying an alternating current via the earth conductor, the
earth electrode and earth electrode resistance. This current, as
well as voltage between the earth electrode and a probe, are
measured.
The probe is connected to the Probe Connector Socket (20) with
a 4 mm contact protected plug.
Direct measurement of earthing resistance R
within a measuring circuit which includes a probe. However, this
means that the probe and reference earth must be of like potential, i.e. that they are positioned outside of the earth electrode
resistance area. The distance between the earth electrode and
the probe should be at least 20 m.
In many cases, especially in extremely built-up areas, it is difficult,
or even impossible, to set a measuring probe. In such cases,
earthing resistance can be measured without a probe. In this
case, however, the resistance values for the operational earth
electrode RB and phase conductor L are also included in the
measurement results (see chapter 10.2 “Measuring without
Probe“ on page 38).
Measuring Method
The instrument measures earthing resistance R
ammeter-voltmeter test (earth electrode loop resistance). The test
current which is applied to earthing resistance is controlled by the
instrument and demonstrates the following values in the various
measuring ranges:
0 to 10 k- 4 mA, 0 to 1 k - 40 mA, 0 to 100 - 0.4 A and 0 to
10 > 0.8 A to approx. 4 A (independent of voltage).
A voltage drop is generated which is proportional to earthing
resistance.
Measuring range selection, and thus the selection of test current
as well, are carried out automatically.
is only possible
E
by means of the
E
Measurement cable and measuring adapter (12) resistance are compensated for automatically during measurement and have no effect on measurement results.
Interference voltages at protective conductor PE, at the
earth electrode or at the probe (if properly connected) do
not influence measurement results. They can be measured by means of voltage measurement (with the Measuring Adapter (2-pole) (12)).
If dangerous contact voltages occur during measurement
(> 50 V), the measurement is interrupted and safety shutdown occurs.
Probe resistance does not effect measurement results
and may be as high as 50 k. If probe resistance is too
high, measurement is automatically performed without
the probe (see chapter 10.2 “Measuring without Probe“
on page 38).
The probe is part of the measuring circuit and may carry
a current of up to 3.5 mA in accordance with VDE 0413.
GMC-I Messtechnik GmbH 37
Page 38

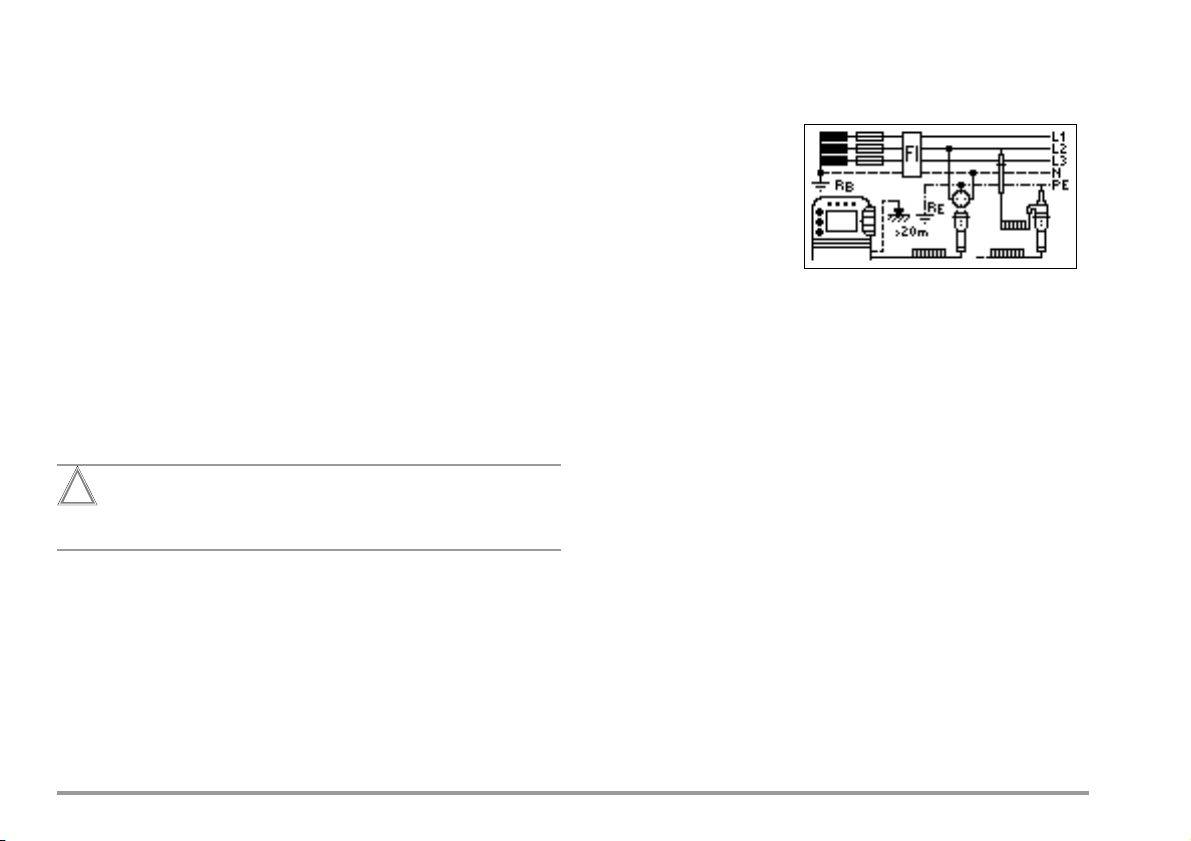
10.1 Measuring with Probe
MENU
START
START
R
E
Set-Up
Automatic Measuring Range Selection
10.2 Measuring without Probe
In the event that it is impossible to set a probe, earthing resistance can be estimated by means of an “earth loop resistance
measurement” without probe.
The measurement is performed exactly as described in chapter
10.1 “Measuring with Probe“ starting on page 38. However, no
probe is connected to the Probe Connector Socket (20).
The resistance value R
method also includes operational earth electrode resistance and
resistance at phase conductor L. These values must be deducted
from the measured value in order to determine earthing resistance.
If conductors of equal cross section are assumed (phase conductor L and neutral conductor N), phase conductor resistance is half
as great as supply impedance ZI (phase conductor + neutral conductor).
Supply impedance can be measured as described in chapter 9
starting on page 35.
In accordance with DIN VDE 0100, the operational earth electrode R
must lie within a range of “0 to 2 ”.
B
obtained with this measuring
ELoop
38 GMC-I Messtechnik GmbH
Page 39

Earthing resistance is determined with the following equation:
RER
E
Loop
=
1
2
---
– RI RB–
The value for operational earth conductor resistance R
ignored in the calculation of earthing resistance, because it is
should be
B
generally unknown.
The calculated earthing resistance thus includes operational earth
conductor resistance as a safety factor.
10.3 Evaluation of Measurement Values
The maximum allowable displayed resistance values which assure
that the required earthing resistance is not exceeded, and for
which maximum device operating error has already been taken
into consideration (at nominal conditions of use), can be determined with the help of Table 2 on page 61. Intermediate values
can be interpolated.
GMC-I Messtechnik GmbH 39
Page 40

11 Measuring Insulation Resistance
Note
Note
MENU
START
Note
R
ISO
(Function R
Set-Up
If you use the test plug together with a plug insert, insulation resistance is only measured between the phase conductor terminal designated “L” and the protective conductor terminal PE!
Checking the Measurement Cables
Before performing insulation measurement, the test
probes on the measurement cables should be shortcircuited in order to assure that the instrument displays a
value very close to 0 . In this way, incorrect connection
can be avoided and broken measurement cables can be
detected.
ISO
)
If measured insulation resistance is less than the selected limit
value (see chapter 11.3), the U
Lamp (7) lights up.
L/RL
Insulation resistance can only be measured at voltagefree objects.
If an interference voltage of 10 V is present within the system,
insulation resistance is not measured. The NETZ/MAINS Lamp (6)
lights up and a display appears at the LC Display Field (1), e.g.:
40 GMC-I Messtechnik GmbH
Page 41

START
All conductors (L1, L2, L3 and N) must be tested against PE!
Attention!
!
Attention!
!
Note
When an insulation resistance measurement has been performed
on a capacitive object it is automatically discharged by the instrument after the StartKey(3 or 17) has been released. Contact
between the object and the instrument may not be interrupted.
The voltage decline can be observed directly at the LC Display
Field (1).
Do not disconnect the object until voltage has fallen below 25 V!
The instrument’s batteries are exposed to excessive
stress during insulation resistance measurement. Only
hold the Start Key (3 or 17) depressed until the display
has stabilized.
Do not touch the instrument’s terminal contacts during
insulation resistance measurements!
If nothing has been connected to the terminal contacts, or if a
resistive load component has been connected for measurement,
your body would be exposed to a current of approx. 1 mA at a
voltage of 500 V.
The resulting electrical shock is not life endangering. However, the
noticeable shock may lead to injury (e.g. resulting from a startled
reaction etc.).
If measurement is performed at a capacitive object such
as a long cable, it becomes charged with up to approx.
500 V!
Touching such objects is life endangering!
GMC-I Messtechnik GmbH 41
11.1 Insulation Measurement with Rising Test Voltage
The “U
tion, as well as to determine response voltage for voltage limiting
components.
As long as the START key is held depressed, test voltage rises
continuously. Insulation measurement is started:
• As soon as the upper voltage limit of 500 V has been reached
or
• As soon as the START key has been released
(when the desired voltage appears at the display)
or
• As soon as a measurable test current has been detected (e.g.
after sparkover occurs at breakdown voltage).
Test voltage, any response and breakdown voltage which may be
present and insulation resistance are displayed.
” function is used to detect weak points in the insula-
ISO
Page 42

11.2 Evaluation of Measurement Values
START
I
N
MENU
Attention!
!
MENU
R
LO
Instrument measuring error must be taken into consideration in
order to assure that the limit values set forth in DIN VDE regulations are not fallen short of. The required minimum display values
for insulation resistance can be determined with the help of
Table 3 on page 62. These values take maximum device error into
consideration (under nominal conditions of use). Intermediate values can be interpolated.
11.3 Setting the Limit Value
The insulation resistance limit value can be set with the
“R
Limit” function. If measurement values occur which are
ISO
below this limit value, the red U
limit values ranging from 100 k to 10 M is available. Select the
limit value with the I
N
/i key.
The instrument can be returned to the menu display by pressing
the MENU key, or testing can be started with the basic function
by activating the START key.
LED lights up. A selection of
L/RL
12 Measuring Low-Value Resistance of up to 100
(protective conductor and bonding conductor)
12.1 Measuring Low-Value Resistance (function RLO)
According to the regulations, the measurement of low-value resistance at protective conductors, earth conductors or bonding conductors must be performed with (automatic) pole reversal of the
test voltage, or with current flow in one (+ pole to PE) and the
other direction (– pole an PE).
Low-value resistance can only be measured at voltagefree objects.
Set-Up
42 GMC-I Messtechnik GmbH
Page 43

Attention!
!
The test probes should always be in contact with the DUT
START
before the Start Key (3 or 17) is activated.
If the object is charged with voltage, the measurement is
blocked if the test probes are first placed into contact with the
DUT, and the instrument fuse is blown if the StartKey is activated first.
After the measuring sequence has been started, the instrument
performs measurement with automatic pole reversal, first with
current flow in one direction, and then in the other. The largest
measured resistance value is always displayed.
Differing results for measurements in both directions indicate voltage at the DUT (e.g. thermovoltages or unit voltages). In the case
of major deviations between the two measured values, both values are displayed:
GMC-I Messtechnik GmbH 43
Measurement results can be distorted by parallel connected
impedances at operating current circuits and by circulating current, especially in systems which make use of “overcurrent protection devices” (earlier neutralization) without an isolated protective conductor. Resistances which change during measurement
(e.g. inductance), or a defective contact, can also cause distorted
measurements (double display).
In order to assure unambiguous measurement results, causes of
error must be located and eliminated.
Display for interference voltage, for example:
In order to find the cause of the measuring error, measure resistance in both current flow directions.
Page 44

The instrument’s batteries are exposed to excessive stress during
Note
Note
insulation resistance measurement. For measurement with current flow in one direction, only press and hold the Start Key
(3 or 17) as long as is necessary for the measurement.
Measuring Low-Value Resistance
Measurement cable and Measuring Adapter (2-pole) (12)
resistance is compensated for automatically thanks to the
four conductor method and do not effect measurement
results. However, if an extension cable is used its resistance must be measured and deducted from the measurement results in accordance with chapter 12.2.
Resistances which do not demonstrate a stable value
until after a “settling in period” should not be measured
with automatic pole reversal. Measurement with automatic pole reversal may lead to varying and/or inflated
measurement values, and thus to an ambiguous reading.
Examples of resistances whose values may change during measurement include:
– Incandescent lamp resistance, whose values change
due to warming caused by test current
– Resistances with a great conductive component
– Contact resistance
12.2 Compensation for Extension Cables of up to 10
(function R
If extension cables are used, their resistance can be deducted
automatically from the measurement results. Proceed as follows:
Ð Short-circuit the end of the measurement extension cable with
the second test probe at the instrument.
Ð Select one of the items under R
Ð Initiate measurement with the Start Key.
Ð After measurement has been completed, press the I
The following message appears in the status line at the display: RLO Offset xxx , where xxx is equal to a value between
0.00 and 9.99 . This value will now be deducted from the
actual measurement value for all subsequent R
ments. Once the offset has been stored to memory, it remains
even after the instrument has been switched off.
Only use this function when taking measurements with
an extension cable. Whenever different extension cables
are used, the above described procedure must be
repeated.
)
LO
in the menu.
LO
/i key.
N
measure-
LO
44 GMC-I Messtechnik GmbH
Page 45

12.3 Calculation of Cable Lengths for Common
START
I
N
MENU
I
N
Copper Conductors
If the IN/ i key is activated after performance of resistance measurement in accordance with chapter 12.1, the
cable lengths corresponding to common conductor cross
sections are displayed.
If results vary for the two different current flow directions, cable
length is not displayed. In this case, capacitive or inductive components are apparently present which would distort the calculation.
This table only applies to cables made with commercially available
copper conductors and cannot be used for other materials (e.g.
aluminum)!
12.4 Setting the Limit Value
The resistance limit value can be set with the “RLOLimit” function.
If measurement values which exceed this limit occur, the red U
LED lights up. Limit values can be selected within a range of
R
L
0.10 to 10 . Select the desired limit value with the I
The display returns to the menu when the MENU key is activated.
N
The instrument can be returned to the menu display by pressing
the MENU key, or testing can be started with the basic function
by activating the START key.
L
/i key.
/
GMC-I Messtechnik GmbH 45
Page 46

13 Phase Sequence Testing
MENU
Note
START
U
L-PE
Set-Up
Clockwise rotation
The Measuring Adapter (2-pole) (12) is required for connection of
Counter-clockwise rotation
the instrument, and is expanded to a 3-pole measuring adapter
with the included measurement cable.
PE or N to phase
The following appear at the LC Display Field (1):
Phase missing
– Highest occurring voltage within the measuring circuit
– All three phases displayed in order of their sequence
represented by the numbers 1, 2, 3
(the numbers are separated by two periods)
– A circle with an arrow, which indicates
direction of rotation
46 GMC-I Messtechnik GmbH
Page 47

14 Operating and Display Elements
Note
(1) LC Display Field
The following are displayed at the LCD:
• One or two measurement values as three place numeric display with unit of measure and abbreviated measuring quantity
• Nominal values for voltage and frequency
•Circuit diagrams
• On-line help
• Messages and instructions
(2) I
The following sequences can be started with this key:
• Starts the tripping test after measurement of contact voltage
• Displays the appropriate circuit diagram and on-line help after
• Selects special RCCB tests (testing with positive or negative
• Displays information for Z
This key has the same function as the Ikey (18).
/ i Key
N
for RCCB testing (I
N
).
a function has been selected in the menu.
half-wave in IT systems).
, ZI and RLO measurements.
Loop
(4) Menu Key
The basic functions menu for the function selected with the Function Selector Switch (9) is called up with the yellow menu key, and
the instrument is switched on at the same time, if is was off. Each
additional activation of the key advances the arrow for the selection of one of the various functions.
(5) PE Lamp
The PE lamp lights up red if a potential difference of greater than
100 V occurs between the Contact Surfaces (19) and the safety
contact or terminal N at the Plug Insert (13), depending on the
position of the Function Selector Switch (9) (see chapter 15.1
“Lamp Functions“ on page 56).
The PE lamp might also light up if a potential transfer
occurs during measurement. A potential transfer might
occur if, for example, the Measuring Adapter (2-pole) (12)
has been attached and you contact phase conductor L
with the Test Probe (16) in one hand and touch a Contact
Surface (19) at the Test Plug (14) with the other hand
while standing on an insulated floor. In this case your
body functions as a (capacitive) voltage divider.
(3) StartKey
This key starts the measuring sequence for the function which
has been selected in the menu. If the instrument is off, it is
switched on by pressing this key, and the measurement for the
basic function or the pre-selected function is started.
In the functions R
ing conductor resistance) measurement is performed until the key
(insulation resistance) and R
ISO
LO+ RLO–
(bond-
is released.
(6) NETZ/MAINS Lamp
This lamp is only functional when the instrument is switched on. It
has no function in the voltage ranges U
It lights up green, red or orange, or blinks green or red depending
L-N
and U
L-PE
.
upon how the instrument has been connected and the selected
function (see chapter 15.1 “Lamp Functions“ on page 56).
This lamp also lights up if line voltage is present during measurement of R
and RLO.
ISO
This key has the same function as the key (17).
GMC-I Messtechnik GmbH 47
Page 48

(7) UL/RL Lamp
Attention!
!
Attention!
!
Note
This lamp lights up red if contact voltage is greater than 25 V or
50 V during RCD testing, as well as after safety shut-down
occurs. It also lights up if R
exceeded or fallen short of.
(8) FI/RCD Lamp
This lamp lights up red if the RCCB is not tripped within 400 ms
(1000 ms for selective RCDs) during the tripping test with nominal
residual current.
It also lights up if the RCCB is not tripped before nominal residual
current has been reached during measurement with rising residual current.
If the “English/UK-parameter” has been selected, it also indicates
RCD tripping at 50% I
(9) Function Selector Switch
The following basic functions can be selected with this rotary
switch:
U
L-N / UL-PE
Z
Loop
The various basic functions are selected by turning the function
selector switch while the instrument is switched on.
(10) Shoulder Strap
The included shoulder strap can be attached at the right and left
hand sides of the instrument. You can hang the instrument from
your shoulder and keep both hands free for measurement.
(11) Test Plug Holder
The Test Plug (14) can be stored in the holder at the instrument
along with the attached Plug Insert (13).
/ IN (10 mA/30 mA/100 mA/300 mA/500 mA)
/ ZI / RE / R
ISO
N
/ R
or RLO limit values have been
ISO
.
LO
(12) Measuring Adapter
The Measuring Adapter (2-pole) (12) may only be used
together with the Test Plug (14) included with the
Use for other purposes is prohibited!
The plug-on Measuring Adapter (2-pole) (12) is used together with
the two test probes (16) for measurements in systems without
earthing contact outlets, e.g. at permanent installations, distribution cabinets and all three-phase outlets, as well as for insulation
resistance and low-value resistance measurements.
The 2-pole measuring adapter can be expanded to three poles for phase
sequence testing with the included measurement cable (test probe).
(13) Plug Insert (country specific)
The Plug Insert (13) may only be used with the Test Plug
(14) included with the PROFITEST 2.
Use for other purposes is prohibited!
After the plug insert has been attached, the instrument can be
directly connected to earthing contact outlets. You need not concern yourself with poling at the plug. The instrument detects the
positions of phase conductor L and neutral conductor N and
automatically reverses poles if necessary.
No automatic polarity reversal occurs if the “English/UKparameter” has been selected in setup.
The instrument automatically determines whether or not both protective contacts in the earthing contact outlet are connected to one another, as well as
to the system protective conductor, for all types of protective conductor measurements when the plug insert is attached to the Test Plug (14).
PROFITEST 2
.
48 GMC-I Messtechnik GmbH
Page 49

(14) Test Plug
The various country specific plug inserts (e.g. protective contact
plug insert for Germany or SEV plug insert for Switzerland) or
theMeasuring Adapter (2-pole) (12) are attached to the test plug
and secured with a threaded connector.
(15) Alligator Clip (plug-on)
(16) Test Probes
The test probes comprise the second (permanently attached) and
third (plug-on) poles of the Measuring Adapter (12). A coil cable
connects them to the plug-on portion of the measuring adapter.
(17) Key
This key has the same function as the Start Key (3).
(18) Taste I
This key has the same function as the I
/ i key (2).
N
(19) Contact Surfaces
The contact surfaces are located at both sides of the Test
Plug (14). When the contact plug is grasped in the hand, contact
is automatically made with these surfaces. The contact surfaces
are electrically isolated from the terminals and from the measuring
circuit. The instrument can be used as a phasing tester for protection class II devices!
If a potential difference of greater than 100 V occurs between the
protective conductor terminal PE and the contact surface, the
PE Lamp (5) lights up (see chapter 15.1 “Lamp Functions“ on
page 56).
(20) Probe Connector Socket
The probe connector socket is required for the measurement of
probe voltage U
tance R
and standing surface insulation resistance.
E
, earth electrode voltage UE, earthing resis-
S-PE
It can be used for the measurement of contact voltage during
RCD testing. The probe is connected with a 4 mm contact protected plug.
The instrument determines whether or not the probe has been
properly set and displays results at the LC Display Field (1).
(21) Strap Eyelets
Strap eyelets are located at the left and right hand sides of the
instrument. A strap or a belt can be passed through these eyelets
for strapping the instrument to the operator’s body.
(22) Swivel Hinge
The display and control field can be swiveled forward or backward with the detented swivel hinge. The instrument can thus be
set to the optimum reading angle.
(23) Replacement Fuses
Two replacement fuses are located beneath the Battery Compartment Lid (28).
(24) Fuses
The two type M 3.15/500G fuses (safety fuse FF 3.15/500G) protect the instrument against overload. Phase conductor L and neutral conductor N are fused individually. If a fuse is defective, and if
an attempt is made to perform a measurement which uses the
circuit protected by this fuse, a corresponding message appears
at the LC Display Field (1).
GMC-I Messtechnik GmbH 49
Page 50

Attention!
!
Severe damage to the instrument may occur if
Note
Attention!
!
incorrect fuses are used.
Only original fuses from GMC-I Messtechnik GmbH
assure required protection by means of suitable blowing
characteristics (order no. 3-578-189-01).
(28) Battery Compartment Lid
When the lid is removed, the instrument must be disconnected from the measuring circuit at all poles!
The battery compartment lid covers the Battery Holder (27) with
the batteries, the Fuses (24) and the Replacement Fuses (23).
Voltage ranges U
fuses have blown.
(25) Fold-Out Stand
The fold-out stand provides the adjustable control and display
field with a more secure stance.
(26) Serial Plate
The serial plate includes information concerning the functions, as
well as the instrument’s characteristic values.
(27) Battery Holder
The battery holder is designed for use with six 1.5 V mignon cells
in accordance with IEC LR 6 for power supply to the instrument.
Make certain that the batteries are poled in accordance with the
symbols when inserting new batteries.
The holder can only be inserted into the battery compartment in
its proper position.
50 GMC-I Messtechnik GmbH
L-N
and U
remain functional even if
L-PE
(29) Measurement Value 1, Abbreviated
(30) Abbreviation for Selected Sub-Function
(31) Three Place Numeric Display: Measurement Value 1
with unit of measure
(32) Three Place Numeric Display: Measurement Value 2
with unit of measure
(33) Abbreviation
for selected sub-function, messages and help
(34) Measurement Value 2, Abbreviated
(35) Charging Socket / Current Transformer Connector Jack
This socket may only be used for connection of the battery charger for recharging batteries in the instrument or the Z501G clip-on
current transformer.
Page 51

This page was intentionally left free.
GMC-I Messtechnik GmbH 51
Page 52

15 Characteristic Values
Func-
Measuring
tion
Quantity
U
L-PE
f
U
U
L–PE
L–N
U
3~
U
Probe
I
L
I
AMP.
U
L-N
f
U
IN
R
/ IN = 10 mA 10 ... 6.51 k 10
E
RE / IN = 30 mA
R
/ IN =100mA 1 ... 651 1
E
R
/ IN =300mA
E
R
/ IN =500mA
E
I
N
I
/ IN = 10 mA 3.0 ... 13.0 mA
I
/ IN = 30 mA 9.0 ... 39.0 mA 9.0 ... 39.0 mA 9.0 ... 39.0 mA
I
/ IN =100 mA 30 ... 130 mA 1 mA 30 ... 130 mA 30 ... 130 mA
I
/ IN = 300mA 90 ... 390 mA 1 mA 90 ... 390 mA 90 ... 390 mA
I
/ IN = 500mA 150 ... 650 mA 1 mA 150 ... 650 mA 150 ... 650 mA
U
/ UL = 25 V 0 ... 25.0 V
I
U
/ UL = 50 V 0 ... 50.0 V 0 ... 50.0 V
I
/ I
t
A
N
Display Range
0 ... 99.9 V
100 ... 500 V
0 ... 99.9 V
100 ... 500 V
15.0 ... 99.9 Hz
100 ... 1000 Hz
0 ... 99.9 V
100 ... 500(850
0 ... 99.9 V
100 ... 253 V
0 ... 1 A 0.1 mA 5 mA ... 1.0 A (5% rdg. + 5 d) (3% rdg.+ 3 d)
0 ... 99.9 A
100 ... 199 A
0 ... 99.9 V
100 ... 300 V
15.0 ... 99.9 Hz
100 ... 1000 Hz
0 ... 70.0 V 0.1 V 0.3 · I
3 ... 999
1 k ... 2.17 k
0.3 ... 99.9
100 ... 217
0.2 ... 9.99
100 ... 130
0 ... 1000 ms 1 ms 1.05 · I
Resolution
0.1 V
0.1 V
0.1 Hz
1 Hz
0.1 V
1)
) V
0.1 V
0.1 A
0.1 V
0.1 Hz
1 Hz
3
10
0.3
1
0.2
1
0.1 mA
0.1 V same as I
1 V
1 V
1 V
1 V
1 A
1 V
Input
Impedance/
Tes t Current
Ter m in a l L- N -P E
500 k
Ter m in a l L- P E
500 k
Probe-PE
1M
330 k
N
3.0 ... 13.0 mA 3.0 ... 13.0 mA
N
Measuring
Range
108 ... 253 V
108 ... 500 V
Nominal
Values
6)
Measuring
Uncertainty
(2% rdg. + 1 d)
(1% rdg.+ 5 d)
(1% rdg.+ 1 d)
(1% rdg.+ 5 d)
(1% rdg.+ 1 d)
15.4 ... 420 Hz (0.2% rdg.+ 1 d) (0.1% rdg.+ 1 d
108 ... 500 V
6)
(3% rdg. + 1 d) (2% rdg.+ 1 d)
0 ... 253 V (3% rdg. + 5 d) (2% rdg.+ 4d)
10 A ... 150 A (10% rdg.+5d) (5% rdg.+3d)
108 ... 253 V (2% rdg. + 1 d)
(1% rdg.+ 5 d)
(1% rdg.+ 1 d)
15.4 ... 420 Hz (0.2% rdg. +1 d) (0.1% rdg.+ 1 d)
+1% rdg. –1 d ...
5 ... 70 V
value calculated
from U
IN/IN
0 ... 25.0 V
= 120/230 V
U
N
f
= 50/60 Hz
N
U
= 25/50 V
L
I
= 10/30/
N
100/300/500
mA
2)5)
U
= 400 V
N
+10% rdg. + 1 d
(5% rdg. + 1 d) (3,5% rdg. +2 d)
+10% rdg. + 1 d
0 ... 1000 ms 4 ms 3 ms
Intrinsic
Uncertainty
+9% rdg. + 1 d
+2.5% rdg. –1d
...
+9% rdg. + 1 d
Plug
2-Pole
2)
Insert
Adapter
Connections
3-Pole
Adapter
Probe Clip
option
ally
52 GMC-I Messtechnik GmbH
Page 53

Func-
tion
Z
Loop
Z
R
R
ISO
I
E
Measuring
Quantity
Z
(full
Loop
waves)
Z
I
Z
Loop
(+/– half-waves)
I
K
R
E
(R
without
ELoop
probe)
R
ISO
Display Range
Resolution
0.01 ... 9.99 10 m 0.83 ... 4.0 A
0 A ... 999 A
1,00 kA ... 9,99 kA
10,0 kA ... 50,0 kA
0 ... 10
0 ... 10
0 ... 10
0 ... 100
0 ... 1 k
1 k ...10 k
0.01 ... 9.99 M
10.0 ... 99.9 M
0.01 ... 9.99 M
10.0 ... 99.9 M
100 ... 200 M
0.01 ... 9.99 M
10.0 ... 99.9 M
100 ... 300 M
3)
1 A
10 A
100 A
10 m
10 m
10 m
10 m
1
1
10 k
100 k
10 k
100 k
1 M
10 k
100 k
1 M
Input
Impedance/
Tes t Current
—
0.83 ... 3.4 A
0.83 ... 3.4 A
0.83 ... 3.4 A
400 mA
40 mA
4 mA
I
= 1.5 mA 50 k... 100 M
K
Measuring
Range
0.15 ... 0.49
0.50 ... 0.99
1.0 ... 9.99
0.25 ... 0.99
1.00 ... 9.99
120 (108 ... 132) V
230 (196 ... 253) V
400 (340 ... 440) V
0.15 ... 0.49
0.50 ... 0.99
1.0 ... 9.99
10 ... 99.9
100 ... 999
1 k ... 9.99 k
U 25 ... 600 V– 1 V 500 k 25 ... 600 V (3% rdg. + 1d)
R
LO
1)
Only for systems with overvoltage category II, contamination factor 2, max. 5 minutes
2)
U > 253 V with 2-pole adapter only
3)
100 UN x 1/
5)
IN = 500 mA, max. UN = 250 V
6)
L-PE: 300 V, L-L: 500 V
R
LO
0.01 ... 9.99
10.0 ... 99.9
10 m
100 m
Im 200 mA 0.1 ... 6 U0 = 4.5 V (4% rdg. + 2d) (2% rdg.+ 2 d)
Nominal
Values
U
= 120/230 V
N
U
= 400 V/
N
2)
500 V
at Z
fN = 50/60 Hz
U
= 120/230 V
N
UN = 400 V
fN = 50/60 Hz
= 100 V
U
N
I
= 1 mA
N
UN = 250 V
I
= 1 mA
N
U
= 500 V
N
I
= 1 mA
N
Measuring
Uncertainty
(10% rdg. +2d)
(10% rdg. +3d)
(5% rdg. + 3d)
(18% rdg. +3d)
(10% rdg. +3d)
Loop
(4% rdg.+ 3d)
(3% rdg. +3d)
(6% rdg. +5d)
(4% rdg. +3d)
value calculated from Z
(10% rdg. +2d)
(10% rdg. +3d)
(5% rdg. + 3d)
2)
(10% rdg. +3d)
(10% rdg. +3d)
(10% rdg. +3d)
(4% rdg. +3d)
(3% rdg. +3d)
(3% rdg. +3d)
(3% rdg. +3d)
(3% rdg. +3d)
(5% rdg. + 1d) (3% rdg. +1d)
Intrinsic
Uncertainty
3 d
Loop
3 d
(1.5% rdg.
+1d)
Plug
2-Pole
3-Pole
Insert
2)
Adapter
Z
Loop
Adapter
Probe Clip
Connections
GMC-I Messtechnik GmbH 53
Page 54

Reference Conditions
Line Voltage 230 V 0.1 %
Line Frequency 50 Hz 0.1 %
Meas. Quantity Frequency 45 Hz ... 65 Hz
Meas. Quantity Waveform sine (deviation between effective
and rectified value 0.1%)
Line Impedance Angle cos =1
Probe Resistance 10
Supply Voltage battery: 8 V 0.5 V
Ambient Temperature + 23 C 2 K
Relative Humidity 40 % ... 60 %
Contact Finger for testing potential diff. at earth
Ambient Conditions
Storage Temperature –20 C ... +60 C (without batteries)
Operating Temperature –10 C ... +50 C
Relative Humidity max. 75 %, no condensation
Elevation max. 2000 m
Power Supply
Batteries 6 ea. 1.5 V mignon cell (alkaline
manganese per IEC-LR6
(or ANSI-AA or JIS-AM3)
Rechargeable Batteries NiCd or NiMH
battery charger NA101 (article no. Z501M)
(not included) jack plug, 3.5 mm dia.
Charging Time approx. 8 hours
Nominal Ranges of Use
Voltage U
N
120 V (108 ... 132 V)
230 V (196 ... 253 V)
400 V (340 ... 440 V)
Frequency f
N
16 2/3Hz (15.4 ... 18 Hz)
50 Hz (49.5 ... 50.5 Hz)
60 Hz (59.4 ... 60.6 Hz)
200 Hz (190 ... 210 Hz)
400 Hz (380 ... 420 Hz)
Overall Voltage Range U
Y
65 ... 550 V
Overall Frequency Range 15.4 ... 420 Hz
Waveform sine
Number of Measurements (with one set of batteries), without illumination
R
ISO
R
LO
1 measurement – 25 s pause:
1500 measurements
automatic pole reversal
(1 measuring cycle) – 25 s pause:
1500 measurements
Due to the minimum capacity of rechargeable batteries as compared to standard batteries, a fewer number of measurements
indicated above can be performed with rechargeable batteries.
By means of the 0100S rechargeable battery set (article no.
Z501B)
2
/3 of the number of measurements indicated above can
be performed.
Temperature Range 0 C ... + 40 C
Battery Voltage 6 ... 10 V
Line Impedance Angle corresponds to cos = 1 ... 0.95
Probe Resistance < 50 k
54 GMC-I Messtechnik GmbH
Page 55

Electricity Safety
Safety Class II per IEC 61010-1/EN 61010-1/
VDE 0411-1
Nominal Voltage 230/400 V (300/500 V)
Test Voltage 3.7 kV 50 Hz
Measuring Category 300 V CAT III
Pollution Degree 2
Fusing
Terminals L and N 1 cartridge fuse-link ea.
M 3.15/500G 6.3 mm x 32 mm
(safety fuse FF 3.15/500G)
Electromagnetic Compatibility (EMC)
Product standard EN 61 326-1:1997
EN 61326:1997/A1:1998
Interference Emission Class
EN 55022 A
Interference Immunity Te st Val ue
EN 61000-4-2 Contact/Atmos. - 4 kV/8 kV
EN 61000-4-3 10 V/m
EN 61000-4-4 Mains Connection - 2 kV
Overload Capacity
R
iso
U
L-P E
Fi, R
Z
Loop
, U
L-N
E
, Z
i
600 V continuous
600 V continuous
440 V continuous
550 V (limits the number of mea-
surements and pause duration.
If overload occurs, the instrument is
switched off by means of a thermo-
static switch)
R
LO
Electronic protection prevents
switching on if interference voltage
is present
Fine Wire Fuse
Protection 3.15 A 10 s,
fuses blow at > 5 A
Mechanical Design
Dimensions 240 mm x 340 mm x 62 mm
(without measurement cables)
Weight approx. 2.5 kg with batteries
Protection housing: IP 40, test probe: IP 40
per DIN VDE 0470 Part 1/EN 60529
Extract from table on the meaning of IP codes
IP XY
st
(1
digit X)
0 not protected 0 not protected
1 50.0 mm
2 12.5 mm
3 2.5 mm
4 1.0 mm
Protection against
foreign object entry
(2nd digit Y)
IP XY
Protection against the pene-
tration of water
1 vertically falling drops
2
3spraying water
4 splashing water
vertically falling drops with
enclosure tilted 15
GMC-I Messtechnik GmbH 55
Page 56

15.1 Lamp Functions
Lamp Status Test Plug
lights up
PE
PE
NETZ/
MAINS
NETZ/
MAINS
NETZ/
MAINS
NETZ/
MAINS
NETZ/
MAINS
NETZ/
MAINS
NETZ/
MAINS
U
L/RL
FI/RCD
1)
The NETZ/MAINS Lamp (6) has no function during testing for residual current devices (RCDs) in IT systems.
red
lights up
red
lights up
1)
green
blinks green X IN / RE / RI / Z
1)
blinks green X Z
lights up
1)
orange
blinks red X IN / RE / ZI / Z
1)
blinks red X Z
lights up
red
lights up
red
lights up
red
Meas.
Adapter
XX all
XXI
XI
XI
XX
XX I
Function Selector Switch
Position (9)
/ RE / RLO / Z
N
/ RE / RI / Z
N
/ RE / ZI / Z
N
XR
ISO
R
ISO
Loop
Loop
/ R
I
N
/ R
N
Loop
LO
LO
/ R
Loop
Loop
Loop
Loop
Function
Instrument off and potential difference 100 V between contact finger and one of terminals L, N, PE or L1, L2,
L3 with single-pole connection or PE (earthing contact) with multi-pole connection,
frequency f > 45 Hz
Instrument on and potential difference 100 V between contact finger and PE (earthing contact).
ISO
frequency f > 45 Hz
Line voltage of 65 V to 253 V, measurement can be performed
Line voltage of 65 V to 440 V, N conductor not connected, measurement can be performed
(I
500 mA, 330 V)
N
Line voltage of 65 V to 550 V, measurement can be performed
Line voltage of 65 V to 253 V to PE, 2 different phases active
(no N conductor at mains), measurement can be performed
Line voltage of < 65 V or > 253 V, measurement blocked
Line voltage of < 65 V or > 550 V, measurement blocked
Interference voltage detected, measurement blocked
– Contact voltage U
– Safety shut-down has occurred
– Limit value exceeded or fallen short of for R
The RCCB was not tripped, or was tripped too late during the tripping test;
the RCD tripped at 50 % with „English/UK-parameter“
IN
or UI >25V respectively >50V
/ R
ISO
LO
function
56 GMC-I Messtechnik GmbH
Page 57

16 Maintenance
MENU
START
START
Note
START
U
L-N
16.1 Self-Test
The following information is displayed at the test window:
Software version with date of issue
Instrument type
Date of last calibration / last balancing
Status display for internal testing
(“OK !” must appear at the ROM and CAL-CHECK
SUM display. If OK is not displayed, the measuring
and test instrument may no longer be used for the
performance of measurements. Please contact your
nearest customer service center.
In order to run all of the tests, press the Start Button (3 or 17)
after each test window appears at the display.
The self-test can be interrupted after any given test window has
appeared by pressing the Menu Key (4).
Six different test windows appear at first with horizontal and vertical lines, e.g.:
GMC-I Messtechnik GmbH 57
Page 58

Subsequently, the following test windows are displayed:
START
START
Note
START
Note
START
Each of the indicated relays is actuated twice.
Each of the four indicated lamps blinks three times.
The PE lamp cannot be tested automatically!
58 GMC-I Messtechnik GmbH
The measuring and testing instrument is restarted
by pressing any key.
Page 59

16.2 Battery and Rechargeable Battery Operation, and Charging
Note
MENU
START
Attention!
!
U
L-N
Check to make sure that no leakage has occurred at batteries or
rechargeable batteries at short, regular intervals, or after the
instrument has been in storage for a lengthy period of time. If
leakage has occurred, the electrolyte must be carefully and completely removed with a damp cloth and new batteries must be
installed before the instrument is placed back into operation.
Prior to lengthy periods of rest (e. g. holiday), we recommend removing the (rechargeable) batteries. This helps to
prevent excessive depletion or leakage of batteries,
which, under unfavourable circumstances, may cause
damage to the instrument.
If the battery test indicates that battery voltage has fallen below
the minimum allowable value (see chapter 3.3 “Battery Test“ on
page 9), install a new set of batteries or charge the rechargeable
batteries (see chapter 3.1 “Installing or Replacing Batteries“ on
page 8).
Use only the NA101 (article no. Z501M) battery charger
with reliable electrical isolation for the recharging of batteries.
Before connecting the charger to the charging socket
make certain that:
– Rechargeable batteries have been installed
(not standard batteries),
– The instrument has been disconnected from the
measuring circuit at all poles.
GMC-I Messtechnik GmbH 59
Page 60

16.3 Fuses
Note
Attention!
Attention!
!
!
Pb Cd Hg
If a fuse has blown due to overload, a corresponding message
error appears at the LC Display Field (1). The instrument’s voltage
measuring ranges are nevertheless still functional.
Ð
Remove the defective fuse and insert a Replacement Fuses (23).
Ð Insert the fuse closure after the fuse has been replaced and
secure by turning clockwise.
Ð Replace the Battery Compartment Lid (28) and retighten the
screw.
Blown fuses cannot be detected when the instrument is
set to certain functions. In such cases, the following message appears at the display: “Check test setup”. There
are many possible causes, amongst others a blown fuse.
Replacing Fuses
Disconnect the instrument from the measuring circuit at
all poles before opening Battery Compartment Lid (28)!
Ð Loosen the slotted screw at the Battery Compartment Lid (28)
at the back of the instrument and remove the lid. Fuses (24)
and Replacement Fuses (23) are now accessible.
Ð Open the fuse closure with the help of an appropriate tool
(e.g. a screwdriver) by pressing and turning counter-clockwise.
Severe damage to the instrument may occur if
incorrect fuses are used.
Only original fuses from GMC-I Messtechnik GmbH
assure required protection by means of suitable blowing
characteristics (order no. 3-578-189-01).
Short-circuiting of fuse terminals of the repair of fuses is
prohibited!
The instrument may be damaged if fuses with incorrect
ampere ratings, breaking capacities or blowing characteristics are used!
16.4 Housing
No special maintenance is required for the housing. Keep outside
surfaces clean. Use a slightly dampened cloth for cleaning. Avoid
the use of cleansers, abrasives or solvents.
16.5 Device Return and Environmentally Compatible Disposal
The instrument is a category 9 product (monitoring and control
instrument) in accordance with ElektroG (German Electrical and
Electronic Device Law). This device is subject to the RoHS directive. Furthermore, we make reference to the fact that the current
status in this regard can be accessed on the Internet at
www.gossenmetrawatt.com by entering the search term WEEE.
We identify our electrical and electronic devices in accordance with WEEE 2012/19EU and ElektroG with the symbol shown to the right per DIN EN 50419 .
These devices may not be disposed with the trash. Please contact our service department regarding the return of old devices.
If you use batteries or rechargeable batteries in your instrument or
accessories which no longer function properly, they must be duly
disposed of in compliance with the applicable national regulations.
Batteries or rechargeable batteries may contain harmful substances or heavy metal such as lead (PB), cadmium (CD) or mercury (Hg).
They symbol shown to the right indicates that batteries or
rechargeable batteries may not be disposed of with the
trash, but must be delivered to collection points specially
provided for this purpose.
60 GMC-I Messtechnik GmbH
Page 61

17 Appendix
Tables for the determination of maximum or minimum display values under consideration of maximum instrument operating error:
17.1 Table 1 17.2 Table 2
Z
(full wave) / ZI ()Z
Loop
Limit Value
0.10 0.07 0.10 0.05
0.15 0.11 0.15 0.10
0.20 0.16 0.20 0.14
0.25 0.20 0.25 0.18
0.30 0.25 0.30 0.22
0.35 0.30 0.35 0.27
0.40 0.34 0.40 0.31
0.45 0.39 0.45 0.35
0.50 0.43 0.50 0.39
0.60 0.51 0.60 0.48
0.70 0.60 0.70 0.56
0.80 0.70 0.80 0.65
0.90 0.79 0.90 0.73
1.00 0.88 1.00 0.82
1.50 1.40 1.50 1.33
2.00 1.87 2.00 1.79
2.50 2.35 2.50 2.24
3.00 2.82 3.00 2.70
3.50 3.30 3.50 3.15
4.00 3.78 4.00 3.60
4.50 4.25 4.50 4.06
5.00 4.73 5.00 4.51
6.00 5.68 6.00 5.42
7.00 6.63 7.00 6.33
8.00 7.59 8.00 7.24
9.00 8.54 9.00 8.15
9.99 9.48 9.99 9.05
Max.
Display Value
(+/- half-wave) ()
Loop
Limit Value
Max.
Display Value
RE / R
()
Limit
Valu e
0.10 0.07 10.0 9.49 1.00 k 906
0.15 0.11 15.0 13.6 1.50 k 1.36 k
0.20 0.16 20.0 18.1 2.00 k 1.81 k
0.25 0.20 25.0 22.7 2.50 k 2.27 k
0.30 0.25 30.0 27.2 3.00 k 2.72 k
0.35 0.30 35.0 31.7 3.50 k 3.17 k
0.40 0.34 40.0 36.3 4.00 k 3.63 k
0.45 0.39 45.0 40.8 4.50 k 4.08 k
0.50 0.43 50.0 45.4 5.00 k 4.54 k
0.60 0.51 60.0 54.5 6.00 k 5.45 k
0.70 0.60 70.0 63.6 7.00 k 6.36 k
0.80 0.70 80.0 72.7 8.00 k 7.27 k
0.90 0.79 90.0 81.7 9.00 k 8.17 k
1.00 0.88 100 90.8 9.99 k 9.08 k
1.50 1.40 150 133
2.00 1.87 200 179
2.50 2.35 250 224
3.00 2.82 300 270
3.50 3.30 350 315
4.00 3.78 400 360
4.50 4.25 450 406
5.00 4.73 500 451
6.00 5.68 600 542
7.00 6.63 700 633
8.00 7.59 800 724
9.00 8.54 900 815
Max.
Display Value
Limit
Valu e
ELoop
Max.
Display Value
Limit
Valu e
Max.
Display Value
GMC-I Messtechnik GmbH 61
Page 62

17.3 Table 3 17.4 Table 4
R
M
ISO
Limit Value
0.10 0.12 10.0 10.7
0.15 0.17 15.0 15.9
0.20 0.23 20.0 21.2
0.25 0.28 25.0 26.5
0.30 0.33 30.0 31.7
0.35 0.38 35.0 37.0
0.40 0.44 40.0 42.3
0.45 0.49 45.0 47.5
0.50 0.54 50.0 52.8
0.55 0.59 60.0 63.3
0.60 0.65 70.0 73.8
0.70 0.75 80.0 84.4
0.80 0.86 90.0 94.9
0.90 0.96 100 106
1.00 1.07 150 158
1.50 1.59 200 211
2.00 2.12 250 264
2.50 2.65 300 316
3.00 3.17
3.50 3.70
4.00 4.23
4.50 4.75
5.00 5.28
6.00 6.33
7.00 7.38
8.00 8.44
9.00 9.49
Min.
Display Value
Limit Value
Min.
Display Value
Limit Value
Display Value
0.10 0.07 10.0 9.59
0.15 0.12 15.0 14.4
0.20 0.17 20.0 19.2
0.25 0.22 25.0 24.0
0.30 0.26 30.0 28.8
0.35 0.31 35.0 33.6
0.40 0.36 40.0 38.4
0.45 0.41 45.0 43.2
0.50 0.46 50.0 48.0
0.60 0.55 60.0 57.6
0.70 0.65 70.0 67.2
0.80 0.75 80.0 76.9
0.90 0.84 90.0 86.5
1.00 0.94 99.9 96.0
1.50 1.42
2.00 1.90
2.50 2.38
3.00 2.86
3.50 3.34
4.00 3.82
4.50 4.30
5.00 4.78
6.00 5.75
7.00 6.71
8.00 7.67
9.00 8.63
Max.
RLO
Limit Value
Max.
Display Value
62 GMC-I Messtechnik GmbH
Page 63

17.5 Table 5 Short-Circuit Current Minimum Display Values
for the determination of nominal current for various fuses and breakers for systems with nominal voltage of U
in accordance with the DIN VDE 0636 series of standards
Nominal
Current I
Characteristic gL, gG, gM Characteristic gL
N
[A]
100 580 675 1200 1.49 k
125 750 889 1440 1.84 k
160 930 1.12 k 1920 2.59 k
Breaking Current I
Limit Value
[A]
2 9.2 10 16 17 10 11 20 21 40 42 24 25
314.11524251516303260643638
4192032342021404280854851
627284750303260641201287276
8373965694042808516017296102
10 47 50 82 87 50 53 100 106 200 216 120 128
13 56 59 98 104 65 69 130 139 260 297 156 167
16 65 69 107 114 80 85 160 172 320 369 192 207
20 85 90 145 155 100 106 200 216 400 467 240 273
25 110 117 180 194 125 134 250 285 500 578 300 345
32 150 161 265 303 160 172 320 369 640 750 384 447
35 173 186 295 339 175 188 350 405 700 825 420 492
40 190 205 310 357 200 216 400 467 800 953 480 553
50 260 297 460 529 250 285 500 578 1000 1.22 k 600 700
63 320 369 550 639 315 363 630 737 1260 1.58 k 756 896
80 440 517 960 1.16 k
Low Resistance Fuses
5 s Breaking Current IA 0.4 s
A
Min. Display
[A]
Limit Value
[A]
Min. Display
[A]
Characteristic B/E
(formerly L)
Breaking Current I
5 x IN (< 0.2 s/0.4 s)
Limit Value
[A]
A
Min. Display
[A]
with Circuit Breaker and Line Switch
Characteristic C
(formerly G, U)
Breaking Current I
10 x IN (< 0.2 s/0.4 s)
Limit Value
[A]
A
Min. Display
[A]
Characteristic D
Breaking Current I
20 x IN (< 0.2 s/0.4 s)
Limit Value
Min. Display
[A]
[A]
A
=230/240 V
N
Characteristic K
Breaking Current I
12 x IN (< 0.1 s)
Limit Value
[A]
Min. Display
[A]
A
Example
Display value 90.4 A É next smallest value for circuit breaker characteristic B from table: 85 A É protective device nominal current (I
max. 16 A
GMC-I Messtechnik GmbH 63
N
)
Page 64

17.6 List of Abbreviations and their Meanings
S
RCCBs (Residual Current Device/RCD)
Tripping current
I
I
Nominal residual current
N
I
Rising test current (residual current)
F
R
Calculated earthing or earth electrode loop resistance
E
Selective residual current device
t
Time to trip / breaking time
A
U
Contact voltage at moment of tripping
I
U
Contact voltage
IN
in relationship to nominal residual current I
U
Contact voltage limit value
L
Overcurrent Protective Devices
I
Calculated short-circuit current (at nominal voltage)
K
Z
Line impedance
I
Z
Loop impedance
Loop
Earthing
R
Operational earth resistance
B
R
Measured earthing resistance
E
R
Earth electrode loop resistance
ELoop
Low-Value Resistance at
Protective, Earthing and Bonding Conductors
Bonding conductor resistance (+ pole to PE)
R
LO+
R
Bonding conductor resistance (– pole to PE)
LO–
N
Insulation
R
Insulation resistance
ISO
Current
I
Breaking current
A
I
Leakage current
L
(measured with clip-on current transformer)
I
Measuring current
M
I
Nominal current
N
I
Test current
P
Voltage
f Line voltage frequency
f
Nominal voltage rated frequency
N
U
Operating voltage
Batt
U
Earth electrode voltage
E
U
Voltage between two phase conductors
L-L
U
Voltage between L and N
L-N
U
Voltage between L and PE
L-PE
U Voltage
U
Nominal line voltage
N
U
Highest measured voltage during determination of
3~
phase sequence
U
Probe/US-PE
Conductor voltage to earth
U
Y
Voltage between probe and PE (probe voltage)
64 GMC-I Messtechnik GmbH
Page 65

18 Repair and Replacement Parts Service
Calibration Center* and Rental Instrument Service
If required please contact:
GMC-I Service GmbH
Service-Center
Thomas-Mann-Strasse 16-20
90471 Nürnberg • Germany
Phone +49 911 817718-0
Fax +49 911 817718-253
E-mail service@gossenmetrawatt.com
www.gmci-service.com
This address is only valid in Germany.
Please contact our representatives or subsidiaries for service in
other countries.
* DAkkS Calibration Laboratory for Electrical Quantities D-K-15080-01-01
accredited per DIN EN ISO/IEC 17025:2005
Accredited measured quantities: direct voltage, direct current values, DC
resistance, alternating voltage, alternating current values, AC active power, AC
apparent power, DC power, capacitance, frequency and temperature
Competent Partner
GMC-I Messtechnik GmbH is certified in accordance with
DIN EN ISO 9001:2008.
Our DAkkS calibration laboratory is accredited by the Deutsche Akkreditierungsstelle GmbH (National accreditation body for the Republic of Germany) in accordance with DIN EN ISO/IEC 17025:2005 under registration
number D-K-15080-01-01.
We offer a complete range of expertise in the field of metrology: from
and
proprietary calibration certificates
Our spectrum of offerings is rounded out with free
An on-site DAkkS calibration station is an integral part of our service depart-
ment. If errors are discovered during calibration, our specialized personnel
are capable of completing repairs using original replacement parts.
As a full service calibration laboratory, we can calibrate instruments from
other manufacturers as well.
right on up to
DAkkS calibration certificates
test equipment management
test reports
.
19 Recalibration
The respective measuring task and the stress to which your measuring instrument is subjected affect the ageing of the components and may result in deviations from the guaranteed accuracy.
If high measuring accuracy is required and the instrument is frequently used in field applications, combined with transport stress
and great temperature fluctuations, we recommend a relatively
short calibration interval of 1 year. If your measuring instrument is
mainly used in the laboratory and indoors without being exposed
to any major climatic or mechanical stress, a calibration interval of
2-3 years is usually sufficient.
During recalibration* in an accredited calibration laboratory
(DIN EN ISO/IEC 17025) the deviations of your instrument in relation to traceable standards are measured and documented. The
deviations determined in the process are used for correction of
the readings during subsequent application.
We are pleased to perform DAkkS or factory calibrations for you in
our calibration laboratory. Please visit our website at
www.gossenmetrawatt.com ( Company DAkkS Calibration
Center or FAQs Calibration questions and answers).
By having your measuring instrument calibrated regularly, you fulfill the requirements of a quality management system per
DIN EN ISO 9001.
* Verification of specifications or adjustment services are not part of the
calibration. For products from our factory, however, any necessary ad-
.
justment is frequently performed and the observance of the relevant
specification is confirmed.
GMC-I Messtechnik GmbH 65
Page 66

20 Product Support
If required please contact:
GMC-I Messtechnik GmbH
Product Support Hotline
Phone +49 911 8602-0
Fax +49 911 8602-709
E-mail support@gossenmetrawatt.com
66 GMC-I Messtechnik GmbH
Page 67

GMC-I Messtechnik GmbH 67
Page 68

Edited in Germany • Subject to change without notice • A pdf version is available on the internet
GMC-I Messtechnik GmbH
Südwestpark 15
90449 Nürnberg •
Germany
Phone +49 911 8602-111
Fax +49 911 8602-777
E-Mail info@gossenmetrawatt.com
www.gossenmetrawatt.com
 Loading...