

Page 1
Operating Instructions
METRISO PRIME+
Digital High-Voltage Insulation Test Instrument
3-349-822-03
6/6.18
Test instrument may
only be operated under
the supervision of a
qualified electrician!
Page 2
12345
6
7
8
9 10
14
12
13
12
16
17
18
11
15
2 GMC-I Messtechnik GmbH
11
19
Page 3
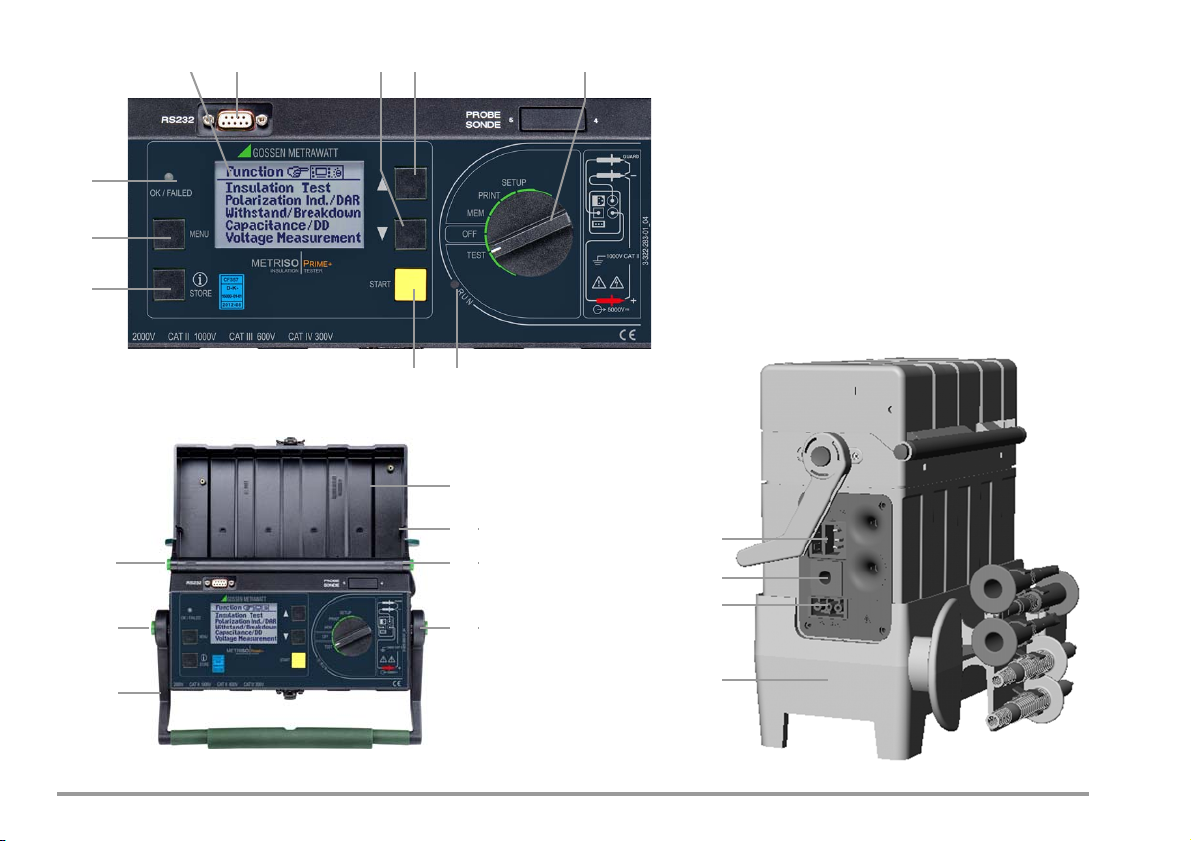
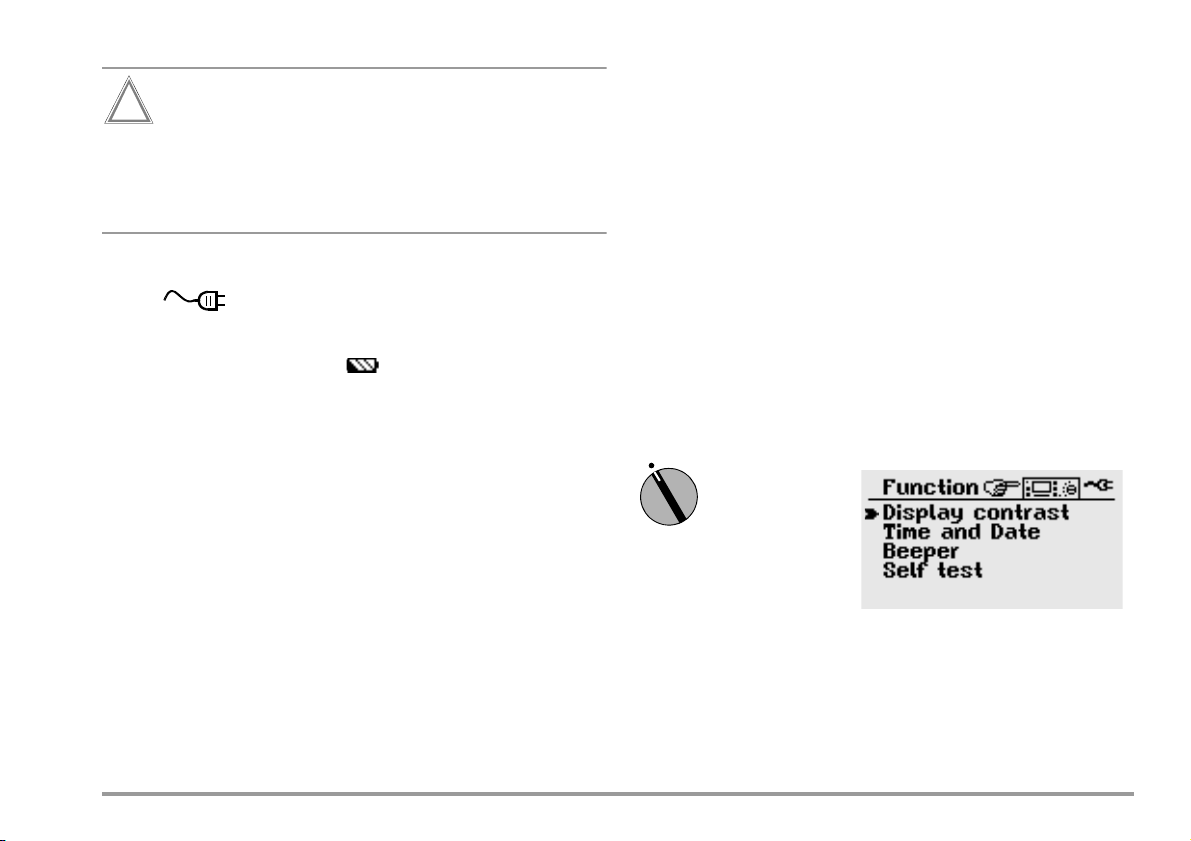
1 Function selector switch
Attention!
!
Note
Switch positions:
SETUP: General device settings
Print out measured values and reports
Select data memory function
OFF: Switches the test instrument off *
TEST: Select measuring and test parameters,
and execute measurements and tests
2 : Select main menus and submenus, and adjust values
3 : Select main menus and submenus, and adjust values
4 Socket connector for RS 232 interface
5LCD panel
6 Signal lamp for test passed (green) / test failed (red)
7 MENU: Key for selecting and querying menus for setting
parameters, for returning to the main menu and for
stopping the measuring process
8 i/STORE: Before performing a measurement:
Key for querying context sensitive help
After performing a measurement:
Key for saving measured values and parameters to memory
9 START: Key for starting the selected test
10 Signal lamp: “testing ...” (yellow)
11 Pushbuttons (left and right) for releasing the handle
12 Pushbuttons (left and right) for releasing the cover
13 Cover
14 SECUTEST PSI printer module
15 Handle and bar function as a tilt stand
16 Inlet plug for supply power with fuse compartment
17 Connector jack for guard cable (feature G1)
18 Connection for automotive charging adapter J1
19 Device base
Outside: With uptake for measurement cable, test probes and alligator clips
Inside: Uptake for guard cable with test probe (feature G1),
battery compartment
Connect 5 m long Leadex 5000 accessory extension
cable (feature H1) to + measurement cable only!
Maximum rated voltage to earth is 1000 V~, even if perma-
nently connected measurement cables for 2 kV~ CAT II
are permissible.
* During battery operation: battery is disconnected
During mains operation: transformer is still connected to the mains
GMC-I Messtechnik GmbH 3
Page 4

PC Program ETC for communication with METRISO PRIME+
The free PC starter software ETC is used for communication with
your METRISO PRIME+ test instrument. ETC is available on our
homepage with the following content and functions:
• Transmission of measurement data from the test instrument to
the PC
• preparation and modification of templates for test reports at the
PC and transmission of the templates to the test instrument
• preparation, printout and filing of test reports at the PC
The following interface cables and/or converters are required for
communication between test instrument and PC:
– Z3241 RS232 (tester*) – RS232 (PC)
– RS232-USB Converter (Z501L) RS232 (tester*) – USB (PC)
* not possible via the RS232 terminal of a connected SECUTEST PSI
Downloading the Software ETC
The most up-to-date version of ETC report generating software
can be downloaded free of charge from the mygmc page of our
website as a ZIP file, if you have registered your test instrument:
www.gossenmetrawatt.com
Products Software Software for Testers
Report Software without Database
ETC myGMC
4 GMC-I Messtechnik GmbH
Page 5

Contents Page Contents Page
1 Applications ................................................................................. 7
1.1 List of Available Features .............................................................. 8
2 Safety Features and Precautions ................................................. 9
2.1 Checklist for High-Voltage Tests .................................................... 10
2.2 Significance of Symbols ................................................................ 11
2.2.1 Symbols on the Device .............................................................. 11
2.2.2 Symbols in the Operating Instructions ........................................ 11
2.2.3 Symbols in the User Interface .................................................... 11
3 Initial Start-Up ............................................................................ 12
3.1 Battery Operation, Feature C1 ...................................................... 12
3.1.1 Removing the Device Base and Inserting or Replacing
the Battery Pack ....................................................................... 12
3.2 Mains Connection ......................................................................... 14
3.3 User Interface ............................................................................... 15
3.4 Help Functions ............................................................................. 15
3.5 Setup ........................................................................................... 16
3.5.1 Adjusting Contrast and LCD Illumination ..................................... 17
3.5.2 Setting Date and Time ..............................................................17
3.5.3 Beeper Settings ..................................................................... 18
3.5.4 Executing the Self-Test ............................................................. 19
3.5.5 Downloading a Language or a Software Update ......................... 20
4 Performing Tests ........................................................................ 23
4.1 Insulation (resistance) Test ............................................................ 23
4.1.1 Setting Test Parameters ............................................................ 24
, U
4.1.2 Starting the Test (U
4.1.3 Starting the Test (U
NOM
STEP
) ................................................... 25
VAR
) ............................................................ 25
4.1.4 Data logger function (min log)(as of firmware version AH) ............ 26
4.1.5 Measurements with the Guard Cable (feature G1) ...................... 27
4.2 Polarization Index Measurement ................................................... 28
4.3 Breakdown Voltage ..................................................................... 30
4.3.1 Setting Test Parameters ........................................................... 31
4.3.2 Starting the Test ....................................................................... 31
4.4 Capacitance Measurement and
Determination of Dielectric Discharge (optional)
.................................32
4.4.1 Setting Test Parameters ........................................................... 32
4.4.2 Starting the Test ....................................................................... 33
4.5 Voltage Measurement (protection against residual voltage) ........... 34
4.5.1 Setting Test Parameters ........................................................... 35
4.5.2 Starting the Test ....................................................................... 35
5 Processing, Reorganizing and Deleting Data ............................. 36
5.1 Select Device under Test (DUT) .................................................... 36
5.1.1 Entering Descriptions ............................................................... 37
5.1.2 Copying Descriptions ............................................................... 38
5.1.3 Deleting Descriptions ............................................................... 38
5.2 Processing Data (checking measured values) ................................ 38
5.3 Data Reorganization ..................................................................... 39
5.3.1 Deleting Already Printed Data ................................................... 39
5.3.2 Memory Test ........................................................................... 39
5.4 Clearing the Memory ................................................................... 40
6 Printing Test Results ................................................................. 41
7 Characteristic Values ................................................................. 42
8 Data Interfaces .......................................................................... 45
8.1 RS 232 Serial Interface ................................................................. 45
8.1.1 Software Analysis of Measurement Results ................................ 45
8.1.2 Interface Specification and Protocol ........................................... 45
8.1.3 Connector Pin Assignments ...................................................... 45
9 Displays and Error Messages – Causes – Remedies ................ 46
4.2.1 Setting Test Parameters ............................................................ 29
4.2.2 Starting the Test ....................................................................... 29
GMC-I Messtechnik GmbH 5
Page 6

10 Maintenance ...............................................................................48
10.1 Replacing the Mains Fuse ..............................................................48
10.2 Testing of Rechargeable Batteries ..................................................48
10.3 Housing and Test Probes ...............................................................48
10.4 Measurement Cables ....................................................................49
10.5 Software .......................................................................................49
10.6 Recalibration ................................................................................50
10.7 Device Return and Environmentally Compatible Disposal .................50
11 Appendix .....................................................................................51
11.1 Glossary ......................................................................................51
11.2 Minimum Display Values in Consideration of
Measuring Error ............................................................................51
Voltage at Device Under Test During Insulation Resistance Test .................. 52
11.3
11.4 Index ............................................................................................53
12 Repair and Replacement Parts Service,
Calibration Center and Rental Instrument Service ................................. 54
13 Product Support ..........................................................................55
6 GMC-I Messtechnik GmbH
Page 7
1 Applications
!
The METRISO PRIME+ insulation measuring instrument is in
compliance with the following standards and regulations:
Standard DIN EN 61557-1:2007
DIN EN 61557-2:2008
VDE regulation VDE 0413-1:2007
VDE 0413-2:2008
“Equipment for testing, measuring or monitoring protective measures in systems with line voltages of up to 1000 V AC and
1500 V DC,
part 2, insulation resistance measuring instruments”.
The instrument is suitable for the measurement of insulation resistance at voltage-free devices and equipment with nominal voltages of up to 1000 V. It is also suitable for the measurement of
insulation resistance with values of up to 1 T, and open-circuit
voltages of up to 5000 V.
The instrument is also equipped with a 1000 V measuring range
for direct and alternating voltages. This provides users with the
advantage of checking devices under test for the absence of voltage, and discharging capacitive devices under test.
All of the values required for approval reports can be measured
with this instrument.
The SECUTEST PSI module (feature I1) – a printer which can be
inserted into the cover which includes an integrated interface and
keypad – expands the range of possible applications for the
METRISO PRIME+.
All measured data can be archived with the help of measurement and
test reports which can be printed out directly via a PC. This is a very
important feature, especially with regard to product reliability.
Using the test probes (Electrical Safety)
Maximum rated voltage 300 V
Measuring category
With safety cap attached
Without safety cap
CAT IV CAT II I CAT I I
600 V
1000 V 5000 V
—
——
— —
Attention!
Measurements per DIN EN 61010-031 may only be
performed in environments in accordance with measuring categories III and IV with the safety cap
attached to the test probe at the end of the measurement cable.
In order to establish contact inside 4 mm jacks, the safety caps
have to be removed by prying open the snap fastener with a
pointed object (e.g. the other test probe).
Notes Regarding SECUTEST PSI Operating Instructions
In combination with the METRISO PRIME+, the SECUTEST PSI
printer module is only used for printing out measured values and
for entering comments with the alphanumeric keypad.
The following chapters from the SECUTEST PSI operating
instructions are relevant as regards operation together with the
METRISO PRIME+:
• Chapter 2 Safety Features and Precautions
•
Chap. 3.1 and 3.2
Installing the Batteries and the PSI Module
• Chapter 12 Characteristic Values
• Chapter 13 Maintenance
• Chapter 14 Repair and Replacement Parts Service
The following functions are not active, or only make sense in com-
bination with a SECUTEST test instrument:
• Display, print and store reports to memory
• Statistics
• Operation with a barcode scanner
GMC-I Messtechnik GmbH 7
Page 8
1.1 List of Available Features
Features 0 0102040507101543
with
with
with
with
GB in-
ter-
D
FRAFNLD
nati-
ESPEITAICHECHUSA
NL
USA
onal
Country version
(user interface
language,
A
mains plug type)
Set of batteries C none
“Guard 5000A”
measurement cable
“LEADEX 5000”
extension cable
SECUTEST PSI
printer module
G none
H none
I none
Specify the designation of the basic M5000 instrument in your order, as
well as any features which deviate from feature 0!
Example of a complete type designation
(= article number, = order code) for a METRISO PRIME+:
– Test instrument for German speaking countries with DAkkS
3)
calibration certificate
and SECUTEST PSI printer module:
M5000 A01 I1
3)
The test instrument can be recalibrated by our calibration service at any time.
We recommend a calibration interval of 1 to 2 years.
8 GMC-I Messtechnik GmbH
Page 9

2 Safety Features and Precautions
The METRISO PRIME+ test instrument have been manufactured
and tested in accordance with the following safety regulations:
Standard DIN EN 61557-1:2007
DIN EN 61557-2:2008
IEC 61010-1:2010
DIN EN 61010-1:2011
VDE regulation VDE 0413-1:2007
VDE 0413-2:2008
VDE 0411-1:2011
If used for its intended purpose, safety of the user, the instrument
and the device under test is assured.
Read the operating instructions completely and carefully before using the
device, and follow all instructions included therein.
The operating instructions should be made available to all users.
Observe the following safety precautions:
• The instrument may only be connected to a 230 V or 120 V
electrical system (depending on the country-specific design)
which is protected with a fuse or circuit breaker with a maximum nominal current rating of 16 A.
• Be prepared for the occurrence of unexpected voltages at devices under test (for example, capacitors may be dangerously
charged).
• Make sure that connector, measurement and test cables are
not damaged (i.e. broken insulation, kinks, interruptions etc.).
• Impulse withstand voltage of up to 2.5 kV may occur in
measurement category II systems with 230/400 V.
• If only the batteries are to be charged (instrument is ready for
operation in SETUP position), please ensure that the test instrument cannot be used by unauthorized personnel during
the charging process.
GMC-I Messtechnik GmbH 9
• Measurement may only be performed on voltage-free equipment and devices.
• Measurements may not be performed under moist ambient
conditions, where condensation has occurred, or in explosive
atmospheres.
• Do not disconnect the measurement cables until the device
under test has been fully discharged.
• Observe accident prevention regulation (Health and Safety Policy DGUV regulation 3), “Electrical Systems and Equipment”.
• Do not perform measurements alone: always have a second
person help if possible.
• Make sure that measurement cables are connected correctly.
• Do not touch the test probes at any point beyond the finger
guard.
The METRISO PRIME+ may not be used:
• If visible damage is apparent
• With damaged connector, measuring or test cables (test cables may not, under any circumstances, be mechanically damaged or kinked, because impaired insulation characteristics
may otherwise result)
• If these no longer function flawlessly
In such cases, the devices must be removed from service and
secured against any possible inadvertent use.
Send the instrument to our Repair and Replacement Parts service
department in such cases (see chapter 12 on page 54).
Page 10

Opening of Equipment / Repair
Attention!
!
The equipment may be opened only by authorized service personnel to ensure the safe and correct operation of the equipment
and to keep the warranty valid. Even original spare parts may be
installed only by authorized service personnel.
In case the equipment was opened by unauthorized personnel,
no warranty regarding personal safety, measurement accuracy,
conformity with applicable safety measures or any consequential
damage is granted by the manufacturer.
2.1 Checklist for High-Voltage Tests
Measurements may not be performed under moist ambient conditions, where condensation has occurred or in
explosive atmospheres.
Personnel Safety
➭ Turn the machine under test off and lock it in the off position.
➭ Perform insulation resistance measurement.
➭ Make sure that the system is grounded.
➭ Secure the danger zone with barriers, closing even narrow en-
trance ways.
➭ Set up warning signs such that they are plainly visible.
➭ Set up warning lamps such that they are plainly visible.
➭ Attach the emergency stop button in a plainly visible fashion.
➭ Warn personnel working in the area of possible danger.
➭ Always turn the test instrument off with the key switch and re-
move the key before leaving the work area.
10 GMC-I Messtechnik GmbH
Safety Precautions for the Machine Under Test (recommended)
➭
Review the circuit diagrams and make a note of all electrical circuits.
➭ Disconnect the neutral conductor from the mains.
➭ Short circuit each electrical circuit to itself.
➭ Disconnect control circuits with overvoltage arresters, if the ar-
resters would be triggered by utilized test voltage.
➭ Disconnect PELV circuits (no high-voltage testing is required
for these circuits).
➭ Test insulation at each circuit with 1000 V.
(If insulation resistance is OK at 1000 V, no failures should
occur during the high-voltage test.)
➭ Disconnect frequency converters.
➭ Caution in TN systems!
The protective conductor is connected to the neutral conductor in the junction box. High-voltage is thus applied between
the phase conductors and the neutral conductor.
The neutral conductor must be cut if necessary, because it is
not disconnected from the mains by means of fuses.
Setting Up the Test Instrument
High-Voltage Test
➭
Test all circuits (conductors) against the protective conductor (all
switches in the mains circuit must be turned on, and testing must be
performed upstream and downstream from all relays and contactors).
➭ Remove all shorting devices after testing has been completed.
Testing Without Short-Circuiting
➭ Separately test all conductors from all circuits against the pro-
tective conductor (the machine could be damaged in the case
of arc-over).
Functions Test
➭ The machine must be tested for correct functioning after the
high-voltage test, especially as regards safety functions.
Page 11
2.2 Significance of Symbols
!
!
2.2.3 Symbols in the User Interface
2.2.1 Symbols on the Device
The symbols on the device have the following meanings:
Indicates EC conformity
Life endangering for the operator if the wiring diagram and the operating instructions are not
observed!
Warning concerning a source of danger
(attention: observe documentation!)
This device may not be disposed of with the trash. Further information regarding the WEEE mark can be
accessed on the Internet at www.gossenmetrawatt.com
by entering the search term ’WEEE’.
Report functions
Data management
2.2.2 Symbols in the Operating Instructions
High-voltage warning,
Voltage at the test probe
between 1000 and 5000 V
Warning concerning a source of danger,
Voltage at the test probe
between 25 and 1000 V
Insulation measurement:
interference voltage at the test probes
All-clear after an insulation test:
voltage at test probes less than 25 V
Timer function: symbolizes test duration
This symbol appears after the voltage measurement value has been frozen (see chapter 4.5 on
page 34).
Life endangering for the operator if instructions
identified with this symbol are not observed
Danger for the operator and the device if instructions identified with this symbol are not observed
GMC-I Messtechnik GmbH 11
Indicates progress of the test.
Indicates storage of the measurement value.
Page 12

3 Initial Start-Up
Attention!
!
Attention!
!
Attention!
!
The METRISO PRIME+ test instrument is supplied with a base
which serves as a compartment for storing test cables, the guard
cable (feature G1), the test probes and the battery pack
(feature C1).
3.1.1 Removing the Device Base and Inserting or Replacing the Battery Pack
Please observe instructions included in this chapter if the device
is to be retrofitted with a battery pack, or if the battery pack
requires replacement.
The test instrument may only be operated if the
base is properly attached and secured.
3.1 Battery Operation, Feature C1
The battery pack is required for operation of the
METRISO PRIME+ without mains power. The battery back
includes 8 NiMH batteries. No other battery packs may be used.
The battery pack is charged automatically by the integrated mains
power pack. Optional use of an automotive charging adapter is
also possible. The device must be switched on in this case (any
switch position other than OFF).
If only the batteries are to be charged (instrument is
ready for operation in SETUP position), please ensure
that the test instrument cannot be used by unauthorized
personnel during the charging process.
12 GMC-I Messtechnik GmbH
➭ Close the cover and position the handle at the side of the de-
➭ Turn the device upside down, i.e. place it onto its cover.
➭ Unwind the test cables from the cable uptake at the side.
➭ Remove the guard cable from the device base if one is in-
➭ Loosen the three Phillips head screws at the bottom of the de-
➭ Lift the device base up, and set it down at the side of the de-
➭ Place the battery pack onto the two rubber cushions in the re-
Before dismantling the device base:
– Disconnect the device from the measuring circuit at all
poles.
– Disconnect the device from mains power.
– Turn the device off (set the switch to OFF).
vice.
cluded (feature G1).
vice base.
vice with the feet at the bottom.
cess in the device base such that the connector cable with
plug connector from the battery pack is on the same side as
the device’s connector cable with socket connector.
Double-check: The opening at the side of the base coincides
with the device’s connection panel.
Page 13
➭ Connect the two cables to each other and secure the connec-
tion with the snap hooks.
➭ Position the cable such that is cannot be pinched during sub-
sequent assembly.
➭ Carefully set the device onto the base as shown in the photo
by grasping the handle with one hand, and guiding the bottom
of the device into position with the other hand.
➭ Grasp the base and the device, and turn the entire unit upside
down.
GMC-I Messtechnik GmbH 13
Page 14
➭ Secure the base with the included screws and washers.
Attention!
!
L1
N
green-yellow
green-yellow
PE
L1
L2
L3
N
PE
L1
L2
L3
N
green-yellow
U
L–N
= 230 V
Use only the screws furnished with the device together
with washers. Longer screws may reduce creepage distances or damage the device.
If a battery pack (feature C1) has been installed and the device is
not connected to the mains, the battery symbol appears at
the display when the device is switched on, and the number of
dark bars displayed in the symbol indicates the battery charge
level.
After installing the battery pack, the device is automatically supplied with power from the batteries.
3.2 Mains Connection
➭ Connect the test instrument to 230 V or 120 V mains power
(depending on the country-specific design) with the included
mains connector cable.
14 GMC-I Messtechnik GmbH
Page 15
Attention!
!
If a connection via earthing contact outlet is not possible,
SETUP
disconnect the mains from all sources of voltage before
connecting the cables of the coupling socket via pick-up
clips with the mains connections, as shown in the drawing.
If a battery pack has not been installed, the mains connection
symbol appears after the test instrument has been
switched on.
If a battery pack has been installed (feature C1), it is automatically
recharged. The battery symbol appears at the display, and
the blinking bars shown in this symbol indicate the remaining
capacity which still needs to be charged. The device need not be
disconnected from mains power after the batteries have been fully
charged (overcharge protection).
3.3 User Interface
Measuring and testing with the METRISO PRIME+ is quick and
easy. The integrated user interface provides the operator with information regarding required operating steps, operator errors,
measurement results and more for all measuring functions. All information and measurement results appear at a dot matrix LCD
panel in plain text.
The integrated user interface is entirely adequate for the great
majority of all tests and measurements. Nevertheless, operators
should carefully read and understand the contents of these operating instructions.
3.4 Help Functions
Help texts can be queried and displayed at the LCD for all measuring and test functions, and for practically all settings.
Example: Display Contrast Function
Switch Position
GMC-I Messtechnik GmbH 15
Page 16
➭ Press the STORE key in order to query online help:
STORE
MENU
START
SETUP
MENU
MENU
Query Help
➭ Press the same key once again, or the MENU key, in order to
exit the help function:
Exit Help
or
➭ Start the selected function directly from the help menu by
pressing the START key:
3.5 Setup
Various basic settings can be selected for the test instrument with
the selector switch in the SETUP position.
Select Parameter
Open Menu for Entering Parameters
All setting and changes entered to the menu accessed in the
SETUP switch position are saved to memory automatically, and
are retained after disconnecting the device from mains power.
Start Function
Exit Function
Restoring default setting – standard values
Switch off the test instrument: switch position OFF.
Then press and hold the MENU and i/STORE keys simultaneously, and turn the function key to TEST position. The standard
values of the default setting are thus restored.
16 GMC-I Messtechnik GmbH
Page 17
3.5.1 Adjusting Contrast and LCD Illumination
SETUP
MENU
START
SETUP
MENU
START
Contrast can be increased or decreased with this function.
LCD illumination can be switched on or off as well.
Select Display Contrast
3.5.2 Setting Date and Time
The test instrument’s internal clock can be set with this function.
The clock continues to run after supply power has been disconnected. Date and time are included in the test reports.
Entries are made using the following formats:
Date: DD.MM.YYYY (Day.Month.Year)
Time: hh:mm (Hour:Minute)
Open Entry Menu
Adjust Contrast
Select Date/Time
Open Entry Menu
(and select date or time)
Switch Illumination On or Off *
* Background illumination is switched off automatically after approximately 2.5 min-
ute s i f n one of the k ey s a re activ ated dur in g this time . Each time a key is ac tivat ed ,
background illumination is extended for an additional 2.5 minutes.
Select Cursor Position
Change Values
GMC-I Messtechnik GmbH 17
Page 18

3.5.3 Beeper Settings
SETUP
MENU
The beeper can be completely deactivated or activated as indicated in the table below.
Beeper
deactivated
Beeper
upon key stroke
Beeper upon good/
bad measurement
results *
Intermittent
beeper for highvoltage > 1000 V
* a good measurement result (passed) is indicated with one long acoustic signal,
a bad result (failed) with three brief acoustic signals.
Beeper
activated
— ——
— —
—
Beeper for
measuring functions
Beeper for
high-voltage
Select Beeper
Open Entry Menu
Select Beeper Function
18 GMC-I Messtechnik GmbH
Page 19

3.5.4 Executing the Self-Test
SETUP
MENU
START
START
Note
✓
This function displays important device data first. If required, display lamp and relay functions, as well as other options, can be
tested automatically and results appear at the display.
Battery Voltage and LED Test
Select Self-Test
Open Entry Menu
Continue Test
Results: OK
Error message:
– Test failed
– component defective
– component not available (e.g. batteries not inserted or
high-voltage module not available)
LCD Test
Neighboring horizontal and vertical segments of the LCD panel
are activated separately or test images are indicated by means of
the following tests. If one of the segments fails to blink, send the
test instrument to an authorized service center for repair.
GMC-I Messtechnik GmbH 19
Before a check mark appears to indicate correct functioning the LEDs must first blink, and the relays must
switch.
Page 20

3.5.5 Downloading a Language or a Software Update
Note
If you require a language other than one of those included with
the instrument, it can be downloaded with the help of WinProfi*
PC software. The data file with the desired language is transmitted to the test instrument via the serial interface. The previously
installed language is overwritten.
Software updates can be downloaded with the help of the same
program, regardless of the currently installed language.
You can use WinProfi software at the PC side (included
with the METRISO PRIME+) to download a language to
the test instrument. This software includes all of the functions required for communications between the
METRISO PRIME+ and the PC. A description of the program is included in the online user’s manual which can be
accessed from WinProfi.
A Installing WinProfi to the PC and Starting the Program
➭ Download the WinProfi software from our homepage:
http://www.gossenmetrawatt.com
(Products Software Software for Testers WinProfi)
➭ Unzip the zip file „winprofi.zip“.
➭ Install the software on your PC by executing file Setup_Win-
Profi_Vx.xx.exe.
➭ Select the desired language for the WinProfi software and for
the user interface of the test instrument.
➭ Follow the instructions which appear at the monitor.
The program is added to your start menu after installation.
➭ Connect the METRISO PRIME+ with your PC by means of an
appropriate interface cable, see page 4.
➭ Start WinProfi.
➭ Switch on the test instrument.
Displaying and printing out the online user’s manual
(contains information concerning the software which is not
included in these operating instructions).
* WinProfi is currently applicable up to Windows 7 (32 Bit)
20 GMC-I Messtechnik GmbH
Page 21

B Prerequisites for Software Update or Exchange of Data
Note
Attention!
!
➭ Find the interface to which the METRISO PRIME+ is con-
nected.
Always start this function first, before performing an update
or changing report templates. After starting this function,
WinProfi loads the report files required specifically for the
connected instrument.
Due to the fact that WinProfi has been created for use
with several types of test instruments, incorrect test
reports may otherwise be loaded, or erroneous options
may be made available.
➭ Querying information regarding current software version
C Transmitting a Software Update to the Test Instrument
➭ PC: Select Update all from the update menu. Follow the instruc-
tions which appear at the monitor.
Depending upon the utilized PC, updating takes from 1 to 2 minutes.
The green LED indicates that the instrument is ready to receive
data. If the PC and the test instrument are correctly synchronized,
the yellow LED lights up and the green LED goes out. The red
LED lights up during programming sequences. After transmission
has been completed, the LED goes out and the device is
restarted.
The message “Transmission done” appears at the PC.
The instrument may not, under any circumstances, be
switched off during transmission, nor may the connection between the instrument and the PC be interrupted!
• Subsequently select “Language” (loading the respective language), if applicable.
GMC-I Messtechnik GmbH 21
Page 22

D Organizing Report Data with ETC
ETC is a free starter software program for fast report generation of
your measuring results in conjunction with our test instruments.
ETC offers a variety of supporting options for data logging, data
management as well as report generation.
Downloading the Software ETC
The most up-to-date version of ETC report generating software
can be downloaded free of charge from the mygmc page of our
website as a ZIP file, if you have registered your test instrument:
www.gossenmetrawatt.com
Products Software Software for Testers
Report Software without Database
ETC myGMC
22 GMC-I Messtechnik GmbH
Page 23

4 Performing Tests
Each of the following tests is automatically assigned to one currently available object number. Any given test which is saved to
memory with the “STORE” key is stored with reference to this
number. The object number can be entered in the “DUT data”
menu (see chapter 5.1 on page 36).
Measuring mode operation is always carried out according to the following sequence:
• Select the desired test.
• Enter test parameters (if required).
• Start the measurement or return to the initial menu.
• Save measured values to memory and enter a description
(if desired).
Observe the following for all tests:
• Safety features and precautions, see chapter 2.
• Disconnect the device under test from all sources of voltage
first.
• Test for absence of voltage.
• Do not disconnect the measurement cables until the device
under test has been fully discharged.
4.1 Insulation (resistance) Test
Test voltage can be set between 100 V and 5,000 V for this test.
This voltage, as well as the allowable limit value for insulation
resistance, can be selected as a test parameter.
Voltage at the device under test appears at the LCD in addition to
measured insulation resistance.
Discharge
After the measurement has been completed, the device under
test is discharged automatically in order to assure zero voltage.
The falling voltage value can be observed at the display during the
discharging process. The measured insulation resistance value
remains in memory during this period of time.
Interference Voltage
If voltage is present at the test probes after measurement is started, an “external voltage” warning
appears at the display. The level of the interference
voltage is shown at the display. The insulation test is aborted after
the test probes have been removed from the DUT. The test has to
be conducted again on the de-energized DUT.
GMC-I Messtechnik GmbH 23
Page 24

Attention!
!
Do not touch the test probes during measurement!
Note
TEST
MENU
MENU
A direct voltage of up to 5000 V is present between the
test probes.
Testing the Measurement Cables:
Initial testing should be performed after short-circuiting
the measurement cables with their test probes. The
instrument should display nearly zero M. A broken measurement cable can be detected in this way.
4.1.1 Setting Test Parameters
The type of utilized test voltage can be selected here:
• Fixed test voltage
• Variable test voltage
(e.g. lower test voltage for voltage-sensitive components)
• Test voltage in a sequence of steps (U
order to allow for better evaluation of insulation quality with regard to dielectric strength
Additional parameters must be set as well depending upon the
selected type of test voltage.
Select Parameter
= step voltage), e.g. in
STEP
Select the Test
Set Value
Open the Submenu
24 GMC-I Messtechnik GmbH
Page 25

Significance of Parameters with Variable and Fixed Test Voltage
Note
START
START
Test voltage U
U
ins
Limit R
ins
: Test voltage in fixed steps
nom
U
var
(100/250/500 V, 1.00/1.50/2.00/2.50/5.00 kV)
: Variable test voltage
(100 V 5.00 kV in 50 V steps)
Test voltage
Limit value for insulation resistance
(If value stays below limit value: measurement failed)
Te st
duration Maximum test duration in seconds
<Auto>: measurement until steady state is reached
Time in sec.: Measurement = 1 to 120 seconds
>>>>: cont. measurement: stop with MENU key
Time in min log:Measurement = 2 to 60 minutes with
automatic storage of 30 measured values at equal time
intervals including information on the current test time.
(see chapter 4.1.4 on page 26).
Significance of Parameters with Step Voltage
Test v. U
U
(INS) END
R
Lim
: Test voltage as a sequence of steps
step
Final value of the step sequence
(250 V 5.00 kV in steps of 250 V)
Maximum allowable statistical deviation from the measured mean value
t/250V Dwell time per step (10 s 50 s)
Resetting parameter values to default setting, see page 16.
4.1.2 Starting the Test (U
Display of results
after completion of test
4.1.3 Starting the Test (U
NOM
STEP
, U
)
VAR
)
In the event of very high insulation resistances the capacitive
influence of the person performing the measurement and/or of
the measuring cable may distort the measured value.
GMC-I Messtechnik GmbH 25
Page 26

Note
STORE
4.1.4 Data logger function (min log)(as of firmware version AH)
MENU
Note
Statistical analysis
Press the CURSOR DOWN or CURSOR UP keys to return to the previous
LCD display.
If the measuring range is exceeded (overflow of display
range), no statistical analysis will be performed. In this
case, the individual measured values are listed, but no
value for R
is calculated.
MAX
Press briefly: Save results
Press & hold: Save results and activate the entry field:
A description of the measurement with up to 15
characters can be entered to the information field
at the bottom. See chapter 5.1.1 regarding entry.
Select Parameter
If you choose time parameter setting "min log" from the menu,
exactly 30 measured values are automatically stored during the
selected test duration at time intervals between 4 seconds and
2 minutes. This makes data logger operation possible for measuring durations between 2 and 60 minutes. In this case, the residual
time of the current measurement is not indicated in seconds, but
in minutes. While the test is being performed, icon “Stored” is
briefly shown in the display and the yellow signal lamp “Testing ...”
disappears briefly each time a measured value is being stored. If
the signal generator is activated, an acoustic signal sounds additionally.
In this function, the current test time is stored for each measurement instead of the parameter for the test duration to ensure the
temporal correlation between measured value and time of measurement.
Before the start of each test with data logger as
described in chapter 5.1, select a new device under test
to avoid the measured values being stored successively
within the same DUT.
This considerably facilitates the subsequent evaluation of
the stored measured values.
26 GMC-I Messtechnik GmbH
Page 27

4.1.5 Measurements with the Guard Cable (feature G1)
Note
+Measurement Cable
–Measurement Cable
Guard Cable
Conductor
Insulation
Material
Guard Rings
Contact Ring
The measurement of very high resistances necessitates extremely
minimal measuring current and may be rendered problematic as a
result of influences such as electromagnetic fields, humidity or
surface current. An accurate test set-up is thus absolutely essential.
A guard cable must be used for measurements within a range of
100 G (10 G) 1T, in order to prevent surface current from
distorting measurement results. The guard rings prevent current
at the surface of the insulation material from flowing from the
+measurement cable to the –measurement cable, instead of
through the insulation material itself.
➭ Insert the plug from the guard cable into the appropriate jack in
the test instrument.
➭ Plug the alligator clip onto the guard cable test probe.
➭ Connect the alligator clip to the guard ring between the two
measuring points at the insulation material under test.
➭ Refer to chapter 4.1.2 on page 25 regarding the measuring se-
quence
GMC-I Messtechnik GmbH 27
The following materials can be used as guard rings: aluminum foil, copper foil or metallic hose clamps.
Page 28

4.2 Polarization Index Measurement
TEST
MENU
A polarization index test is recommended for electrical machines.
This procedure involves expanded testing of insulation resistance.
DC measuring voltage from the METRISO PRIME+ is applied to
the insulation for a duration of 10 minutes. Measured values are
documented after one minute, and after ten minutes. If the insulation is good, the value measured after ten minutes is higher than
the value measured after one minute. The relationship between
the two measurement values is the polarization index. Charged
material within the insulation is aligned due to the application of
measuring voltage over a long period of time, resulting in polarization. The polarization index indicates whether or not the charged
material contained in the insulation can still be moved, thus allowing for polarization. This, in turn, is an indication of the condition of
the insulation.
The following rules apply in general:
PI values < 1 Troubleshooting is required.
PI values = 1 2 Maintenance is recommended.
PI values = 2 4 DUT is OK, no immediate action is
required. Preventive maintenance can be
planned according to the number of tests to
be performed.
PI values > 4 DUT is in flawless condition.
Applications
Determination of moisture and contamination levels
Absorption Index (DAR)
– DC Charging Test
The absorption index test is part of the polarization index test.
Insulation resistance measurements are placed in relationship to
one another after 30 and 60 seconds.
Application: Faster version of the polarization index text
Select the Test
Open the Submenu
28 GMC-I Messtechnik GmbH
Page 29

4.2.1 Setting Test Parameters
MENU
START
STORE
Select Parameter
4.2.2 Starting the Test
Set Value
test time for each respective function.
Significance of Parameters
The two countdown timers (10:00 and 02:00) display remaining
U
ins[nom]
Nominal insulation voltage
100/250/500 V, 1.00/1.50/2.00/2.50/5.00 kV
PI(t2/t1) Polarization index PI is the relationship between insula-
tion resistance values measured after 1 minute PI(t1),
and after 10 minutes PI(t2). Other durations can be
selected if required.
PI (limit) Selected polarization index limit value: appears in the
footer in the measuring menu
DAR(t2/t1) Absorption ratio DAR is the relationship between insu-
lation resistance values measured after 30 seconds
DAR(t1), and after 60 seconds DAR (t2). Other durations can be selected if required.
DAR (limit) Selected absorption ratio limit value: appears in the
Press briefly: Save results
Press & hold: Save results and activate the entry field:
A description of the measurement with up to 15
characters can be entered to the information field
at the bottom. See chapter 5.1.1 regarding entry.
footer in the measuring menu
For resetting parameter values to default setting, see page 16.
GMC-I Messtechnik GmbH 29
Page 30

4.3 Breakdown Voltage
TEST
MENU
Rise
Test Duration
t
ON
t [s]
U
ins
U [V]
Step-Voltage Test – DC Charging Test
Voltage is increased up to the limit value (selected maximum test
voltage) over the selected rise time during the breakdown voltage
test. If voltage breakdown occurs before this value is reached,
breakdown voltage U
If the selected test voltage is reached, testing is continued at this
voltage level until the time period selected under “test duration”
has elapsed.
If no breakdown occurs before the selected test duration has
elapsed, the test has been passed, in which case the following
display appears: U
other cases.
Applications
For the recognition of cracks and holes in the insulation
is displayed.
brk
– – –. Breakdown voltage is displayed in all
brk
Select the Test
Open the Submenu
30 GMC-I Messtechnik GmbH
Page 31

4.3.1 Setting Test Parameters
START
STORE
Set Parameters
Significance of Parameters with Variable and Fixed Test Voltage
Test voltage U
U
ins
Rise Time after which maximum test voltage will be reached
Tes t
duration Test duration at maximum test voltage
For resetting parameter values to default setting, see page 16.
: Test voltage in fixed steps
nom
U
var
(100/250/500 V, 1.00/1.50/2.00/2.50/5.00 kV)
: Variable test voltage (100 V 5.00 kV)
Test voltage (see fixed steps above)
(5 s 300 s)
(AUTO, 1 s 120 s,
>>>> (continuous, burn mode))
4.3.2 Starting the Test
Press briefly: Save results
Press & hold: Save results and activate the entry field:
A description of the measurement with up to 15
characters can be entered to the information field
at the bottom. See chapter 5.1.1 regarding entry.
GMC-I Messtechnik GmbH 31
Page 32

4.4 Capacitance Measurement and
TEST
MENU
DD
I
Disch
1min
UC
-----------------------------
1000=
Determination of Dielectric Discharge (optional)
Capacitance measurement is performed with adjustable test voltage by charging with constant current. The measurement is performed with automatic range selection. One of the nominal test
voltages (U
used.
Dielectric Discharge Test (DD)
This test was developed for use with large machines and is performed, as its name indicates, during discharge. It designates the
ratio of the discharge current after one minute and the product of
voltage by capacitance:
DD values > 4: Troubleshooting is required
DD values = 2 4 Maintenance is recommended
DD values < 2 DUT is OK, no immediate
), or a freely selectable test voltage (U
nom
action is required.
) can be
var
Select the Test
Open the Submenu
4.4.1 Setting Test Parameters
Application: Determination of the magnitude of absorbed contami-
Set Parameters
nation or moisture
For resetting parameter values to default setting, see page 16.
32 GMC-I Messtechnik GmbH
Page 33

4.4.2 Starting the Test
START
STORE
After capacitance has been determined, the instrument automatically continues with dielectric discharge testing. This takes about
30 minutes. However, the measurement can be aborted at any
time by pressing the MENU key. Only capacitance is displayed in
this case.
Press briefly: Save results
Press & hold: Save results and activate the entry field:
A description of the measurement with up to 15
characters can be entered to the information field
at the bottom. See chapter 5.1.1 regarding entry.
GMC-I Messtechnik GmbH 33
Page 34

4.5 Voltage Measurement (protection against residual voltage)
Note
TEST
MENU
EN 60204 requires that voltages in excess of 60 V occurring at all
accessible machine components during operation must drop to a
residual voltage value of 60 V or less within a period of 5 seconds
after supply power has been switched off.
Testing for the absence of voltage is performed by means of a
voltage measurement which involves measuring discharge time
with the METRISO PRIME+. Elapsed time as of disconnection
from supply power is displayed continuously at the LCD during
discharge, until the limit value of 60 is reached.
In addition to voltage type (AC, DC or AC+DC), frequency is measured and displayed as well. The mean value is always read out.
In addition to voltage and frequency, voltage type (AC, DC or
AC+DC) appears at the symbol field in the display.
If voltage drops by more than 5% of the measured value during a
single measuring period (approx. 0.7 sec.) while performing a voltage measurement which results in a value of greater than 60 V, a
time measurement is started automatically in order to test protection against residual voltage. This time measurement can be
observed at the display in the symbol field. Time measurement is
stopped after voltage drops to below the limit value of 60 V. Time
required to discharge down to 60 V then appears at the display in
seconds. Voltage measurement continues until maximum allowable discharge time has elapsed (normally 5 seconds). The results
of the voltage measurement are then “frozen”, and the
DATA HOLD symbol appears at the display. If the 60 V limit value
is not reached before allowable discharge time has elapsed, the
voltage value is “frozen” and time measurement continues until
the 10 second time limit has elapsed. If voltage is still greater than
60 V after 10 seconds, the test is aborted and the instrument
restarts voltage measurement.
When the display is “frozen”, voltage measurement is not started
again until:
• The START key is pressed.
• The measured value is saved to memory by pressing the
i/Store key.
• Voltage measurement is restarted from the menu.
• Or voltage at the test probes climbs back up to a value of
greater than 60 V, or if the next measured value after a measurement of greater than 60 V is even higher, i.e. if a climbing
tendency can be observed.
Both elapsed time and the prevailing voltage value after allowable
discharge time has elapsed are saved to memory by pressing the
i/Store key. If no discharge takes place, only the voltage value is
saved.
If, for example, conductors are exposed when a machine
is switched off – e.g. if plug connectors are disengaged –
and if these are not protected against direct contact,
maximum allowable discharge time is 1 second!
Select the Test
Open the Submenu
34 GMC-I Messtechnik GmbH
Page 35

4.5.1 Setting Test Parameters
START
STORE
The discharge time during which the voltage value must drop to a
non-hazardous value of less than 60 V can be specified as a limit
value between 1.0 and 9.00 seconds. The following message
appears in order to indicate that the limit has been reached:
“residual voltage less than 60 V!”.
4.5.2 Starting the Test
Set Discharge Time
Press briefly: Save results
Press & hold: Save results and activate the entry field:
Test duration is always set to continuous measurement in this case
because residual voltage testing is triggered automatically and
voltage measurement is always active for safety reasons.
A description of the measurement with up to 15
characters can be entered to the information field
at the bottom. See chapter 5.1.1 regarding entry.
For resetting parameter values to default setting, see page 16.
GMC-I Messtechnik GmbH 35
Page 36

5 Processing, Reorganizing and Deleting Data
MENU
Previously stored data and data records can be processed with
the selector switch in the data management position.
The following functions are available:
• DUT data
An object number can be assigned here, and measurements
can be saved with reference to the selected number. Beyond
this, a description can be entered for the respective object.
• Data Processing
Individual data resulting from a measurement (e.g. insulation
measurement) performed on a previously selected object can
be displayed with this function, and subsequently deleted if desired.
• Data Reorganization
Previously entered objects can be deleted from memory with
this function, and memory can be tested as well.
• Clear Memory
This command deletes data records previously saved to memory for all objects. Full memory capacity is made available by
means of this procedure.
Memory Occupancy
Current memory occupancy is continuously displayed as a bar
graph for the first three menu items listed above.
Depending upon the number of objects stored to memory
(max. 254), up to 1,600 measurements can be saved.
5.1 Select Device under Test (DUT)
Select a Command
Submenu
Object no.
Select Number
Status: A filled file cabinet indicates that measurement data
36 GMC-I Messtechnik GmbH
have already been saved to memory for the selected
object.
Page 37

5.1.1 Entering Descriptions
MENU
STORE
START
MENU
– Entry using keys at the METRISO PRIME+
Select Letter, Number or Character.
Description
Move Cursor Left
Description: A description can be entered here for an object, which
is displayed and subsequently printed out when the respective
object is selected.
Move Cursor Right
There are five different ways to enter descriptions:
– Convenient entry with the PSI module (feature I1)
In this case, descriptions are entered using the alphanumeric
keypad included with the PSI module (see operating instructions for SECUTEST PSI).
–
Entry with the help of a barcode scanner (accessory no. B3261)
or RFID scanner (accessory no. Z751G)
– Entry from a terminal
– Entry with PC keyboard via the PROFI-MFII adapter
Completed entries must be acknowledged with the MENU key.
The entry is then saved to memory. Alternatively, the “Store” key
can be pressed at the PSI module.
Up to 250 characters can be entered. The entry line scrolls automatically.
A comment can be entered for each test step in the same way,
immediately after the test has been performed. However, the
length of these comments is limited to 15 characters.
(accessory no. Z504H)
GMC-I Messtechnik GmbH 37
Page 38

5.1.2 Copying Descriptions
MENU
STORE
➭ Select the object with the description to be copied and press
the MENU key 3 times.
➭ Select the new object and press the MENU key.
The copied text is displayed and can be edited.
5.1.3 Deleting Descriptions
➭ Simultaneously press the i/STORE and START keys.
The description is deleted and the cursor is sent to the first character entry position in the description field.
5.2 Processing Data (checking measured values)
Measured values can be checked with this function, and individual measurements can be deleted if desired.
Select a Command
Select an Object
Delete the Object
“Data record deleted” appears after deletion of the respective
measurement has been started.
In order to delete a data record, the i/Store key must be pressed
and held for approximately 1 second, thus avoiding inadvertent
deletion. If the key is not released, all subsequent data records
are then deleted sequentially at a rate of 1 record per second.
38 GMC-I Messtechnik GmbH
Page 39

5.3 Data Reorganization
MENU
START
STORE
MENU
START
5.3.1 Deleting Already Printed Data
Data for individual DUTs which have already been printed out in
report form, or DUTs which have been entered although no measured values have been saved for them yet, can be deleted here if
desired.
Select a Command
Submenu
Start Deletion
print-out is generated including all DUTs for which measured data
are stored to memory.
5.3.2 Memory Test
The memory module is checked for errors with this function.
Errors can be corrected in some cases. Follow the instructions
which appear at the display.
Test Memory (press 3 times)
Delete the Object
Security acknowledgement must be entered before deleting each
individual object. As soon as objects whose data have already
been printed out in report form have been deleted, a message to
this effect appears. If the START key is pressed once again, a
GMC-I Messtechnik GmbH 39
Page 40

5.4 Clearing the Memory
Attention!
!
MENU
START
STORE
This command deletes data records previously saved to memory
for all DUTs. Full memory capacity is made available by means of
this procedure.
Data should be downloaded to a PC and saved before
clearing the memory!
Select a Command
Submenu
A security acknowledgement must be entered before memory is
cleared. Final deletion is initialized with the i/STORE key.
Clearing the memory entirely may takes several seconds. “Memory cleared” is then displayed.
Execute the Command
40 GMC-I Messtechnik GmbH
Page 41

6 Printing Test Results
MENU
START
The test instrument’s report functions can be activated with the
selector switch in the printer position. The following functions are
available:
• Print out values at the PSI module (feature I1):
Measured values for a selected object can be printed out at
the utilized printer module via the serial interface.
• Download templates from a PC (see WinProfi PC software in
chapter 3.5.5):
Report layouts can be specified by the user. A template with a
header, a text body and a footer is required to this end. A template created by the user at a PC can be downloaded to the
test instrument via the serial interface.
Select Printer
Printer Menu
Select an Object or a Number
Start Printing *
Status: A filled file cabinet indicates that measurement data
have already been saved to memory for the selected
DUT.
A printer symbol appears as long as data is being
transmitted to the printer.
* A print-out which has already been started can only be aborted by turning the se-
lector switch. An error message is generated if the printer does not work. Printing
must be restarted in this case.
GMC-I Messtechnik GmbH 41
Page 42

7 Characteristic Values
Standards DIN EN 61557-1:2007
DIN EN 61557-2:2008
VDE regulations VDE 0413-1:2007
VDE 0413-2:2008
Insulation Resistance
Display Range
[]
0.00 M ... 50.0 G 0.60 M ...10.0 G 100 V ...250 V
0.00 M ... 250 G 0.40 M...50.0 G > 250 V ... 1.00 kV
0.00 M ... 999 G 0.40 M...200 G > 1.00 kV ... 5.00 kV
Test duration: automatic (until measured value stabilizes),
Measuring
Range []
Test Voltage Intrinsic
Uncertainity
±(7% rdg.+ 6 d)
> 10.0 G...50.0 G
±(7% rdg.+ 6 d)
±(7% rdg.+ 6 d)
> 50.0 G...250 G
±(7% rdg.+ 6 d)
±(7% rdg.+ 6 d)
> 200 G...999 G
manual (1 ... 120 s) or continuous measurement (lock function)
±(7% rdg.+ 6 d)
Measuring
Uncertainty
±(10% rdg.+ 8 d)
±(10% rdg.+ 8 d)
±(10% rdg.+ 8 d)
±(10% rdg.+ 8 d)
±(10% rdg.+ 8 d)
±(10% rdg.+ 8 d)
Insulation Test Voltage
Nominal Values,
Tes t Vo lta ge
100 V, 250 V, 500 V, 1.00 kV
1.50 kV, 2.00 kV, 2.50 kV 0.4 mA ± 5% rdg.
5.00 kV 0.1 mA ± 3.5% rdg.
Variable test voltage selectable in 50 V steps
Short-circuit current less than 2 mA with test voltage to 1.00 kV
Variable
Tes t Vo lta ge
100 V...1.00 kV 1.0 mA ± 15% rdg.
> 1.00 kV...2.50 kV 0.4 mA ± 5% rdg.
> 2.50 kV...5.00 kV 0.1 mA ± 3.5% rdg.
Nominal Current Intrinsic Uncertainty
1.0 mA 0 ... +25% rdg.
Voltage Measurement
Measuring Range Frequency
dc test voltage
50 V ... 5.00 kV
50 V ... 1.00 kV ac/dc 15 ... 500 1 M ±(2.5% rdg. + 2 d) (5 % rdg. + 5 d)
50 V ... 1.00 kV ac/dc > 500 ... 1 k 1 M ±(10 % rdg. + 2 d)
in Hz
Impedance Intrinsic
— — ±(2.5 % rdg. + 5 d) (5 % rdg. + 5 d)
Uncertainty
Measuring
Uncertainty
±(12.5% rdg. + 5 d)
Polarization Index (PI), Absorption Ratio (DAR)
t1 t2 Limit
00:00 ... 01:00 ... 99:50 min 00:00 ... 10:00 ... 99:50 min 0.10 ... 4.00 ... 9.80 min
PI
DAR
00:00 ... 00:30 ... 99:50 min 00:00 ... 01:00 ... 99:50 min 0.10 ... 1.60 ... 9.80 min
PI and DAR are calculated values. Insulation measurement specifications apply.
Frequency Measurement
Measuring Range Impedance Intrinsic
15.0 Hz 1.00 kHz 1 M(0.5% rdg. + 2 d) (1 % rdg. + 2 d)
Measured quantity voltage: 50 V ... 1 kV
Uncertainty
Measuring
Uncertainty
Breakdown Voltage
Parameter Setting Range Intrinsic Uncertainty Measuring
Voltage range 100 5,000 V (10 % rdg. + 8 d)
Rise time 5 300 s — —
Measuring time 1 120 s /
auto / continuous
measurement
——
42 GMC-I Messtechnik GmbH
Uncertainty
(15% rdg. + 10 d)
Page 43

Capacitance Measurement
Display
Range
0.00 10.0 F 0.10 5.00 F
Measuring
Range
Test Voltage Intrinsic Uncertainty Measuring
100450 V (10% rdg. + 5 d) (15 % rdg. + 8 d)
5005 kV (5 % rdg. + 5 d) (10% rdg. + 8 d)
Uncertainty
Dielectric Discharge (DD)
Limit
DD 0.10 ... 2.00 ... 9.80
Reference Conditions
Ambient temperature +23 C 2K
Relative humidity 40 ... 60%
Measured quantity
frequency 50 Hz 10 Hz (during voltage
measurement)
Line voltage
waveshape Sinusoidal, deviation between RMS and
rectified value < 1%
Power Supply
Line voltage 207 V
253 V / 49 Hz 61 Hz
or (depending on country-specific design)
108 V
132 V / 59 Hz 61 Hz
Power consumption < 18 VA
Set of batteries NiMH 9.6 V, 3 Ah, charging time 6 hours
Number of measurements
with nominal current
per VDE 0413 700
Electrical Safety
Standards IEC 61010-1:2001
DIN EN 61010-1:2011
VDE regulations VDE 0411-1:2011
Pollution degree 2
Protection IP 40
Measuring category Insulation measurement – 5000 V DC –
no overvoltage
Voltage measurement – 1000 V CAT II,
600 V CAT I I I, 300 V CAT IV
Safety class II
GMC-I Messtechnik GmbH 43
Page 44

Electromagnetic Compatibility (EMC) METRISO PRIME+
Warning!
Product standards EN 61326-1:2013
Interference Emission
EN 55022 Class A
Interference Immunity Tes t Va lue
EN 61000-4-2
EN 61000-4-3 10 V/m
EN 61000-4-4
EN 61000-4-5
EN 61000-4-6 Mains connection – 3 V
EN 61000-4-11 0.5 period / 100%
Contact/atmos. – 4 kV/8 kV
Mains connection – 2 kV
Mains connection – 1 kV
This is a class A device. This device may cause radio
interference in residential areas.
If this is the case, the owner may be required to implement appropriate corrective measures.
Ambient Conditions
Accuracy 0 C ... + 40 C
Operating temperature 5 C ... + 40 C
Storage temperature 20 C ... + 60 C (without battery set)
Relative humidity max. 75%, no condensation allowed
Elevation to 2000 m
Mechanical Design
Display Multiple display with dot matrix
128 x 64 pixels
Dimensions W x H x D:
255 mm x 133 mm x 240 mm
Weight approx. 5 kg with batteries
44 GMC-I Messtechnik GmbH
Page 45

8 Data Interfaces
1: NC
2: TxD (PSI)
3: RxD (PSI)
4: NC 6
5: GND
6: NC 4
7: NC 8
8: NC 7
9: +9 V
9 876
5 4321
RxD TxD
GND
+9V +5V
8.1 RS 232 Serial Interface
The data interface socket connector (4) is used to connect the
SECUTEST PSI module (feature I1).
Pins 9 and 6 may not be short jumpered to pin 5!
8.1.1 Software Analysis of Measurement Results
Test reports can be conveniently created at a PC and downloaded to the test instrument with the included software.
8.1.2 Interface Specification and Protocol
The interface included with the METRISO PRIME+ complies with
the RS 232 standard.
Technical Data:
Baud rate 9600 baud, fixed
Character length 8 bit
Parity none
Stop bits 1
8.1.3 Connector Pin Assignments
GMC-I Messtechnik GmbH 45
Page 46

9 Displays and Error Messages – Causes – Remedies
Displays and Error Messages Meaning / Cause Remedy
Test Sequence
Countdown runs here until residual voltage is less than 60 V.
All-clear after an insulation test:
voltage at test probes less than 25 or 60 V depending upon measuring
function
The test has been passed.
The test results are not within allowable limit values.
LCD does not light up
– Mains cable not plugged in
– Mains fuse is blown
Indicates type of voltage:
Alternating voltage with superimposed direct voltage – direct voltage –
alternating voltage
Insulation measurement:
Interference voltage at the test probes, measurement aborted
Warning against high voltage,
voltage at the test probe between 1,000 V and 5,000 V
Warning concerning a source of danger,
voltage at the test probe between 25 V and 1,000 V
This symbol appears after the voltage measurement value has been frozen (see chapter 4.5 on page 34).
– Plug in the mains cable (see chapter 3.2 on page 14).
– Replace the mains fuse (see chapter 10.1 on page 48).
Database Operations
– No measurement has been performed.
– The measurement has already been saved to memory.
See text at the display. Press the START key to repair.
An error has occurred while saving data to memory. Save data to a PC and then clear the memory.
46 GMC-I Messtechnik GmbH
Page 47

Displays and Error Messages Meaning / Cause Remedy
See text at the display. Press the START key to repair.
Memory in no longer able to save new measurement data. Save data to a PC and then clear the memory.
See text at the display. Transmit data to a PC or print them out, and then delete
No data have yet been saved to this data record.
Printing is not possible. Check connections at the printer and make sure paper is
Data are being transferred to the printer. The printer may wait until data
transmission has been entirely completed before it starts printing.
A filled file cabinet indicates that measurement data have already been
saved to memory for the selected DUT.
The data record has been deleted for a DUT.
The printer is not working. Check the data record.
The printer is not working. Check the connection between the printer and the
The printer is working correctly. Turn the selector switch in order to abort the print-out.
The measurement has been saved to memory.
DUTs which are no longer necessary, or clear the entire
memory.
available.
Check the printer for possible errors.
METRISO PRIME+.
Then press the START key.
GMC-I Messtechnik GmbH 47
Page 48

10 Maintenance
Attention!
!
Attention!
!
Note
Attention!
!
10.1 Replacing the Mains Fuse
Disconnect the device from the measuring circuit at all
poles before opening the fuse compartment!
Disconnect the device from the mains.
10.2 Testing of Rechargeable Batteries
Check the batteries for leakage or damage at short regular intervals, and after long periods of storage. If damage or leakage has
occurred, carefully and completely clean the electrolyte from the
instrument with a damp cloth, and replace the batteries with a
new battery pack (accessory no. …..) before placing the instrument back into service.
If the battery test (see chapter 3.5.4 on page 19) indicates that backup
battery voltage or rechargeable battery voltage has dropped below the
minimum allowable value, recharge the battery pack or have the backup
battery replaced by GMC-I Service GmbH.
Use only specified, original replacement fuses!
Bypassing or repairing fuses is prohibited!
If fuses with other current ratings, breaking capacities or
blowing characteristics are used, the device may be
damaged!
➭ Open the fuse compartment at the inlet socket with a suitable
tool (e.g. a screwdriver).
➭ Replace the blown fuse with a new fuse with identical specifi-
cations.
➭ Close the fuse compartment.
48 GMC-I Messtechnik GmbH
10.3 Housing and Test Probes
No special maintenance is required. Keep outside surfaces clean
and dry. Use a slightly dampened cloth for cleaning. Avoid the use
of solvents, cleansers and abrasives.
Measurements may not be performed under moist ambient conditions, where condensation has occurred or in explosive atmospheres.
Prior to lengthy periods of rest (e. g. holiday), we recommend removing the (rechargeable) batteries. This helps to
prevent excessive depletion or leakage of batteries,
which, under unfavourable circumstances, may cause
damage to the instrument.
No condensation may be permitted to occur at the test
instrument, the test cables or the device under test,
because high-voltage may otherwise cause leakage current at the surfaces. Insulated components may also
conduct high-voltage in this case.
Page 49

10.4 Measurement Cables
Attention!
!
Note
Inspect the measurement cables for mechanical damage at regular intervals.
Even if only minimal damage is discovered at the test cables, it is advisable to send them immediately to GMC-I
Service GmbH.
10.5 Software
Internal test instrument software can be updated with the help of
a PC and an interface cable for the RS 232 interface. The software is downloaded to the flash EPROM in the
METRISO PRIME+.
The data file with the desired software version is transmitted to
the test instrument via the serial interface with the help of the
update function included with WinProfi software. Previously
installed software is overwritten in the process.
Downloading Procedure
➭ Establish a connection between the PC and the
METRISO PRIME+.
➭ Switch the PC and the test instrument on.
Continue as described in chapter 3.5.5 on page 20.
After updating the software, reinstall the desired language to the test instrument as well, even if the language
will not be changed. This assures that all of the additional
functions included in the update are correctly displayed.
GMC-I Messtechnik GmbH 49
Page 50

10.6 Recalibration
Pb Cd Hg
The respective measuring task and the stress to which your measuring instrument is subjected affect the ageing of the components and may result in deviations from the guaranteed accuracy.
If high measuring accuracy is required and the instrument is frequently used in field applications, combined with transport stress
and great temperature fluctuations, we recommend a relatively
short calibration interval of 1 year. If your measuring instrument is
mainly used in the laboratory and indoors without being exposed
to any major climatic or mechanical stress, a calibration interval of
2-3 years is usually sufficient.
During recalibration* in an accredited calibration laboratory
(DIN EN ISO/IEC 17025) the deviations of your instrument in relation to traceable standards are measured and documented. The
deviations determined in the process are used for correction of
the readings during subsequent application.
We are pleased to perform DAkkS or factory calibrations for you in
our calibration laboratory. Please visit our website at
www.gossenmetrawatt.com ( Company DAkkS Calibration
Center or FAQs Calibration questions and answers).
By having your measuring instrument calibrated regularly, you fulfill the requirements of a quality management system per
DINENISO9001.
* Verification of specifications or adjustment services are not part of the calibration.
For products from our factory, however, any necessary adjustment is frequently
performed and the observance of the relevant specification is confirmed.
10.7 Device Return and Environmentally Compatible Disposal
The instrument is a category 9 product (monitoring and control
instrument) in accordance with ElektroG (German Electrical and
Electronic Device Law). This device is subject to the RoHS directive. Furthermore, we make reference to the fact that the current
status in this regard can be accessed on the Internet at
www.gossenmetrawatt.com by entering the search term WEEE.
We identify our electrical and electronic devices in accordance with WEEE 2012/19/EU and ElektroG with the
symbol shown to the right per DIN EN 50419.
These devices may not be disposed of with the trash. Please contact our service department regarding the return of old devices.
If you use batteries or rechargeable batteries in your instrument or
accessories which no longer function properly, they must be duly
disposed of in compliance with the applicable national regulations.
Batteries or rechargeable batteries may contain harmful substances or heavy metal such as lead (PB), cadmium (CD) or mercury (Hg).
They symbol shown to the right indicates that batteries or
rechargeable batteries may not be disposed of with the
trash, but must be delivered to collection points specially
provided for this purpose.
50 GMC-I Messtechnik GmbH
Page 51

11 Appendix
11.1 Glossary
Abbreviation
DAR
DD Dielectric Discharge
R
t/250V Dwell Time per Step
PI Polarization Index:
I
MAX
I
T
R
ins
Limit R
T
R
T
D
U
AC.MAX.
U
brk
U
ins
U
(ins) end
U
meas
U
nom
U
T
U
STEP
U
test
U
var
Meaning
Absorption Ratio: Ratio between insulation resistance values measured after 30 and 60 seconds
Maximum allowable statistical deviation from the measured mean value
Lim
Ratio between insulation resistance values measured after 1 and 10 minutes
Max. allowable current before high-voltage is switched off
Interrupting current for high-voltage test
Insulation Resistance
Limit value for insulation resistance
ins
Rise time: time during which test voltage climbs to U
Test duration at maximum test voltage U
Maximum test voltage for high-voltage testing
Breakdown Voltage
Tes t Vo lt age
Ramp Function Upper Limit
Measuring Voltage
Nominal Test Voltage
Voltage value before exceeding interrupting current during high-voltage testing
Test voltage as ramp sequence
Tes t Vo lt age
Variable Test Voltage
(not including rise time TR)
AC.MAX.
AC.MAX .
11.2 Minimum Display Values in Consideration of
Measuring Error
Table for determining minimal display values for insulation resistance in consideration of the instrument’s measuring error:
Limit Value Minimum Display
Value
0.10 M 0.12 M 100 M 118 M
0.20 M 0.23 M 200 M 228 M
0.50 M 0.56 M 500 M 558 M
1.00 M 1.18 M 1.00 G 1.18 G
2.00 M 2.28 M 2.00 G 2.28 G
5.00 M 5.58 M 5.00 G 5.58 G
10.0 M 11.8 M 10.0 G 11.8 G
20.0 M 22.8 M
50.0 M 55.8 M
Limit Value Minimum Display
Valu e
GMC-I Messtechnik GmbH 51
Page 52

11.3 Voltage at Device Under Test During Insulation Resistance Test
100
U/V
R
x
/k
100
80
60
40
20
0
U
N
= 100 V
0
100
200
300
400
500
500
U
N
= 500 V
U/V
R
x
/k
0
200
400
600
800
1000
1
U
N
= 1000 V
U/V
R
x
/M
0
500
1000
1500
2000
2400
3
U
N
= 2400 V
U/V
R
x
/M
1
0
1000
2000
3000
4000
5000
5
U
N
= 5000 V
U/V
R
x
/M
10 2031
2400
3200
Test voltage U at the device under test depending upon its
resistance R
5000 V:
at nominal voltage 100, 500, 1000, 2400 and
x
52 GMC-I Messtechnik GmbH
Page 53

11.4 Index
B
Beeper
Setting . . . . . . . . . . . . . . . . . . . . . . . . . . . . . 18
D
Data management
Data
Deleting . . . . . . . . . . . . . . . . . . . . . . . 39
Processing . . . . . . . . . . . . . . . . . . . . 38
Description
Copying . . . . . . . . . . . . . . . . . . . . . . . 38
Deleting . . . . . . . . . . . . . . . . . . . . . . . 38
Entry . . . . . . . . . . . . . . . . . . . . . . . . . . 37
Entry options . . . . . . . . . . . . . . . . . . . 37
Display messages . . . . . . . . . . . . . . . . . . . 46
Memory
Deleting . . . . . . . . . . . . . . . . . . . . . . . 40
Occupancy . . . . . . . . . . . . . . . . . . . . 36
Testing . . . . . . . . . . . . . . . . . . . . . . . . 39
Printing test results . . . . . . . . . . . . . . . . . . 41
Selecting device under test . . . . . . . . . . . 36
Discharge
Automatic after insulation test . . . . . . . . . 23
Dielectric during capacitance
measurement . . . . . . . . . . . . . 32
E
ETC
Transmission and print-out of
report data . . . . . . . . . . . . . . . . 22
F
Fuses
Replacement . . . . . . . . . . . . . . . . . . . . . . . 48
I
Interference voltage
during insulation test . . . . . . . . . . . . . . . . . 23
M
Measuring of
Absorption index . . . . . . . . . . . . . . . . . . . . 28
Breakdown voltage . . . . . . . . . . . . . . . . . . 30
Capacitance . . . . . . . . . . . . . . . . . . . . . . . . 32
High resistances . . . . . . . . . . . . . . . . . . . . 27
Polarization index . . . . . . . . . . . . . . . . . . . . 28
Voltage . . . . . . . . . . . . . . . . . . . . . . . . . . . . . 34
P
Product Support Hotline . . . . . . . . . . . . . . . . . 55
R
Residual voltage
Determining the value . . . . . . . . . . . . . . . . 34
Display of discharge time . . . . . . . . . . . . . 34
S
Safety measures
Control circuits . . . . . . . . . . . . . . . . . . . . . .10
Frequency Converters . . . . . . . . . . . . . . . .10
Neutral conductor . . . . . . . . . . . . . . . . . . .10
PELV circuits . . . . . . . . . . . . . . . . . . . . . . . . 10
Persons . . . . . . . . . . . . . . . . . . . . . . . . . . . . 10
TN systems . . . . . . . . . . . . . . . . . . . . . . . . .10
Statistical analysis
during insulation measurement . . . . . . . .26
Storage batteries
Display of measuring voltage . . . . . . . . . . 19
Display of remaining capacity . . . . . . . . . 15
Operation with battery pack . . . . . . . . . . . 12
Recharging during mains operation . . . . 15
T
Test voltage
during HV test
on device under test . . . . . . . . . . . .52
during insulation test
Fixed steps . . . . . . . . . . . . . . . . . . . .25
on device under test . . . . . . . . . . . .52
variable/50 V steps . . . . . . . . . . . . . . 25
during insulation test as a sequence
of steps . . . . . . . . . . . . . . . . . . .25
W
WinProfi
Installation and program start . . . . . . . . . 20
GMC-I Messtechnik GmbH 53
Page 54

12 Repair and Replacement Parts Service,
Calibration Center* and Rental Instrument Service
When you need service, please contact:
GMC-I Service GmbH
Service Center
Beuthener Straße 41
90471 Nürnberg, Germany
Phone: +49 911 817718-0
Fax: +49 911 817718-253
e-mail: service@gossenmetrawatt.com
www.gmci-service.com
This address is only valid in Germany.
Please contact our representatives or subsidiaries for service in
other countries.
* DAkkS Calibration Laboratory for Measured Electrical Quantities:
D-K-15080-01-01 accredited as per DIN EN ISO/IEC 17025
Accredited quantities: direct voltage, direct current value, direct current resistance,
alternating voltage, alternating current value, alternating current active power,
alternating current apparent power, DC power, capacitance, frequency and
temperature
Competent Partner
GMC-I Messtechnik GmbH is certified in accordance with
DIN EN ISO 9001.
Our DAkkS calibration laboratory is accredited by the Deutsche
Akkreditierungsstelle GmbH (National accreditation body for the
Federal Republic of Germany) in accordance with DIN EN ISO/
IEC 17025 under registration number D-K-15080-01-01.
We offer a complete range of expertise in the field of metrology:
from test reports and proprietary calibration certificates right on up to
DAkkS calibration certificates.
Our spectrum of offerings is rounded out with free test equipment
management.
An on-site DAkkS calibration station is an integral part of our service
department. If errors are discovered during calibration, our specialized personnel are capable of completing repairs using original
replacement parts.
As a full service calibration laboratory, we can calibrate instruments from other manufacturers as well.
54 GMC-I Messtechnik GmbH
Page 55

13 Product Support
When you need service, please contact:
GMC-I Messtechnik GmbH
Product Support Hotline
Phone: +49 911 8602-0
Fax: +49 911 8602-709
e-mail support@gossenmetrawatt.com
GMC-I Messtechnik GmbH 55
Page 56

Edited in Germany Subject to change without notice A pdf version is available on the internet.
GMC-I Messtechnik GmbH
Südwestpark 15
90449 Nürnberg •
Germany
Phone +49 911 8602-111
Fax +49 911 8602-777
E-Mail info@gossenmetrawatt.com
www.gossenmetrawatt.com
 Loading...