

Page 1
METRACLIP EARTH
EARTH CLAMP
Operating Instructions
E N G L I S H
Page 2
2
Thank you for purchasing a METRACLIP EARTH earth clamp. For best results
from your instrument:
■ read these operating instructions carefully,
■ comply with the precautions for use.
Symbol
Meaning
WARNING, risk of DANGER! The operator must refer to these
instructions whenever this danger symbol appears.
Equipment protected throughout by double or reinforced insulation.
Application or withdrawal authorized on uninsulated or bare
conductors at dangerous voltages.
The product has been declared recyclable after analysis of
its life cycle in accordance with the ISO 14040 standard.
An Eco-Design approach has been adopted in order to design this
appliance. Analysis of the complete lifecycle has enabled us to
control and optimize the effects of the product on the environment.
In particular this appliance exceeds regulation requirements with
respect to recycling and reuse.
The CE marking indicates conformity with European directives, in
particular LVD and EMC.
The rubbish bin with a line through it indicates that, in the European
Union, the product must undergo selective disposal in compliance
with Directive WEEE 2012/19/EU. This equipment must not be
treated as household waste
Useful information or tip.
Definition of measurement categories:
■ Measurement category IV corresponds to measurements taken at the source
of low-voltage installations.
Example: power feeders, counters and protection devices.
■ Measurement category III corresponds to measurements on building
installations.
Example: distribution panel, circuit-breakers, machines or fixed industrial
devices.
■ Measurement category II corresponds to measurements taken on circuits
directly connected to low-voltage installations.
Example: power supply to domestic electrical appliances and portable tools.
Page 3

3
PRECAUTIONS FOR USE
This instrument and its accessories comply with safety standards EN 61010-1,
EN 61010-030, and EN 61010-2-032 for voltages of 600V in category IV at an
altitude of less than 2000 m, indoors, with a degree of pollution of not more than
2.
Failure to observe the safety instructions may result in electric shock, fire,
explosion, and destruction of the instrument and of the installations.
■ The operator and/or the responsible authority must carefully read and clearly
understand the various precautions to be taken in use. Sound knowledge and
a keen awareness of electrical hazards are essential when using this
instrument.
■ If you use this instrument other than as specified, the protection it provides
may be compromised, thereby endangering you.
■ Do not use the instrument on networks of which the voltage or category
exceeds those mentioned.
■ Do not use the instrument if it seems to be damaged, incomplete, or poorly
closed.
■ Before each use, check the condition of the insulation on housing. Any item of
which the insulation is deteriorated (even partially) must be set aside for repair
or scrapping.
■ Use personal protection equipment systematically.
■ When handling the instrument, keep your fingers behind the physical guard.
■ All troubleshooting and metrological checks must be performed by competent
and accredited personnel.
■ Avoid impacts on the measurement head, in particular the air gap.
■ Keep the surfaces of the air gap clean; even a little dirt can cause the clamp to
malfunction.
Note: Bluetooth® is a registered trade mark.
Page 4

4
CONTENTS
Page
............................................................................................................................... 1
DEFINITION OF MEASUREMENT CATEGORIES: .............................................. 2
CONTENTS ........................................................................................................... 4
1. GETTING STARTED ......................................................................................... 7
1.1 Scope of supply ............................................................................................ 7
1.2 INSERTING THE BATTERIES ..................................................................... 7
1.3 Setting the date and time .............................................................................. 7
1.4 EXAMPLE OF DISPLAY .............................................................................. 8
2. DESCRIPTION OF THE DEVICE ...................................................................... 8
2.1 FUNCTIONS OF THE DEVICE .................................................................... 9
2.2 FRONT PANEL .......................................................................................... 10
2.3 DEVICE–REAR PANEL ............................................................................. 12
2.4 DISPLAY UNIT ........................................................................................... 13
2.5 AUDIBLE SIGNALS.................................................................................... 15
3. MEASUREMENT PRINCIPLE ......................................................................... 16
4. USE.................................................................................................................. 17
4.1 INSERTING THE BATTERIES ................................................................... 17
4.2 COMMISSIONING THE DEVICE ............................................................... 17
4.3 SETTING THE INTERNAL CLOCK ............................................................ 17
4.4 STANDARD OR ADVANCED MODE ......................................................... 18
4.5 USE OF THE FUNCTIONS ........................................................................ 18
4.6 USE OF THE Hold KEY ............................................................................. 18
4.7 USE OF Pre-Hold ....................................................................................... 19
4.8 STORAGE OF THE DATA ......................................................................... 19
4.8.1 Conditions ......................................................................................... 19
4.8.2 EFFECTIVE STORAGE .................................................................... 19
4.8.3 INFORMATION CONCERNING THE STORED DATA ..................... 19
4.8.4 MEMORY FULL ................................................................................ 19
4.8.5 READING THE STORED DATA ....................................................... 20
4.9 MANAGEMENT OF THE ALARMS ............................................................ 20
4.9.1 NO ALARM DETECTION.................................................................. 20
4.9.2 VOLTAGE ALARM ............................................................................ 20
4.9.3 CURRENT ALARM ........................................................................... 21
4.9.4 IMPEDANCE ALARM ....................................................................... 21
5. Ω+A POSITION ................................................................................................ 23
5.1 USE IN Standard MODE ............................................................................ 23
5.1.1 OBJECT ............................................................................................ 23
Page 5

5
5.1.2 PARAMETERIZING THE MEASUREMENT ..................................... 23
5.1.3 MEASUREMENT .............................................................................. 23
5.1.4 MEASUREMENT RESULT ............................................................... 24
5.1.5 STORAGE OF THE MEASUREMENTS ........................................... 24
5.1.6 PRESENCE OF ALARMS ................................................................ 24
5.2 USE IN ADVANCED MODE ....................................................................... 24
5.2.1 OBJECT ............................................................................................ 24
5.2.2 SELECTION ...................................................................................... 24
5.2.3 PARAMETERIZING THE MEASUREMENT ..................................... 24
5.2.4 MEASUREMENT .............................................................................. 25
5.2.5 MEASUREMENT RESULT ............................................................... 25
5.3 COMPLEMENTARY INFORMATION ......................................................... 26
5.3.1 PRODUCT ZXI GREATER THAN 50V ............................................. 26
5.3.2 IMPEDANCE GREATER THAN 1500Ω ............................................ 27
5.3.3 PERTURBING LEAKAGE CURRENT .............................................. 27
5.3.4 CURRENT GREATER THAN 10A .................................................... 27
5.3.5 STORAGE OF THE MEASUREMENTS ........................................... 28
5.3.6 PRESENCE OF ALARMS ................................................................ 28
6. POSITION A .................................................................................................... 29
6.1 OBJECT ..................................................................................................... 29
6.2 PARAMETERIZING THE MEASUREMENT ............................................... 29
6.3 MEASUREMENT ....................................................................................... 29
6.4 MEASUREMENT RESULT ........................................................................ 29
6.5 PRESENCE OF ALARMS .......................................................................... 29
6.6 MANAGEMENT OF THE ALARMS ............................................................ 30
7. MEMORY READ (MR) ..................................................................................... 31
7.1 OBJECT ..................................................................................................... 31
7.2 SELECTION OF THE memory read MODE ............................................... 31
7.3 DATA DISPLAYED ..................................................................................... 31
7.3.1 DATA DISPLAYED IN Standard MODE ........................................... 31
7.3.2 DATA DISPLAYED IN ADVANCED MODE ...................................... 32
7.3.3 USE OF THE KEYS .......................................................................... 33
7.3.4 ERASURE OF THE STORED DATA ................................................ 33
7.3.5 EXITING FROM THE READ MODE ................................................. 34
8. SET-UP ............................................................................................................ 35
8.1 OBJECT ..................................................................................................... 35
8.2 ACCESS TO THE SET-UP MENUS ........................................................... 35
8.3 DISPLAY OF THE SET-UP MENUS .......................................................... 35
8.4 SELECTING A SPECIFIC MENU ............................................................... 36
8.5 DETAILS OF THE SET-UP MENUS .......................................................... 36
9. OFF POSITION ................................................................................................ 42
9.1 MANUAL SWITCHING OFF ....................................................................... 42
9.2 AUTOMATIC SWITCHING OFF ................................................................. 42
9.3 BACKUP OF THE CONFIGURATION ........................................................ 42
Page 6

6
9.4 PROLONGED STOP .................................................................................. 42
10. TECHNICAL CHARACTERISTICS ................................................................ 43
10.1 REFERENCE CONDITIONS .................................................................... 43
10.2 ELECTRICAL CHARACTERISTICS ......................................................... 43
10.2.1 LOOP RESISTANCE MEASUREMENT ........................................... 43
10.2.2 LOOP INDUCTANCE MEASUREMENT ........................................... 44
10.2.3 ESTIMATE OF THE CONTACT VOLTAGE ...................................... 44
10.2.4 CURRENT MEASUREMENT ............................................................ 44
10.3 VARIATIONS IN THE DOMAIN OF USE ................................................. 45
10.4 POWER SUPPLY ..................................................................................... 45
THE BATTERIES WILL BE WITHDRAWN FOR LONG-TERM STORAGE. ........ 45
10.5 ENVIRONMENTAL CONDITIONS ........................................................... 46
10.6 MECHANICAL CHARACTERISTICS ....................................................... 46
10.7 COMPLIANCE WITH INTERNATIONAL STANDARDS ........................... 46
10.8 Electromagnetic compatibility ................................................................... 46
THE DEVICE IS COMPLIANT WITH STANDARD IEC-61326-1. ........................ 46
11. SERVICING AND MAINTENANCE ................................................................ 47
11.1 Cleaning ................................................................................................... 47
11.2 Replacement of the batteries .................................................................... 47
11.2.1 PROCEDURE ................................................................................... 47
11.2.2 PRESERVATION OF STORED DATA ............................................. 48
11.3 CHECK OF ACCURACY .......................................................................... 48
11.3.1 OBJECT AND EQUIPMENT NECESSARY ...................................... 48
11.3.2 EQUIPMENT ..................................................................................... 48
11.3.3 PROCEDURE ................................................................................... 48
11.4 ADJUSTMENT ......................................................................................... 48
11.4.1 OBJECT AND EQUIPMENT NECESSARY ...................................... 48
11.4.2 EQUIPMENT ..................................................................................... 48
11.4.3 PROCEDURE ................................................................................... 49
11.5 Metrological check, Repair and Replacement Parts Service, Calibration
Center............................................................................................................... 49
11.6 Product support ........................................................................................ 49
12. WARRANTY .................................................................................................. 50
13. TO ORDER .................................................................................................... 51
Page 7

7
1. GETTING STARTED
1.1 SCOPE OF SUPPLY
Rep.
Designation
1
Carrying case.
2
METRACLIP EARTH earth clamp.
3
Set of 4 AA batteries (1.5 V).
4
CD containing the operating instructions.
5
Verification certificate.
6
Safety data sheet (20 languages)
7
Quick Start guide
Fig. 1
1.2 INSERTING THE BATTERIES
Refer to §11.2.
1.3 SETTING THE DATE AND TIME
Set the function switch to Ω+A. All icons of the display unit light for approximately 2
seconds. The device waits for the date and time of the device to be set using the ▲,
▼, and ► keys; refer to § 4.3 for a detailed description of the procedure.
Page 8
8
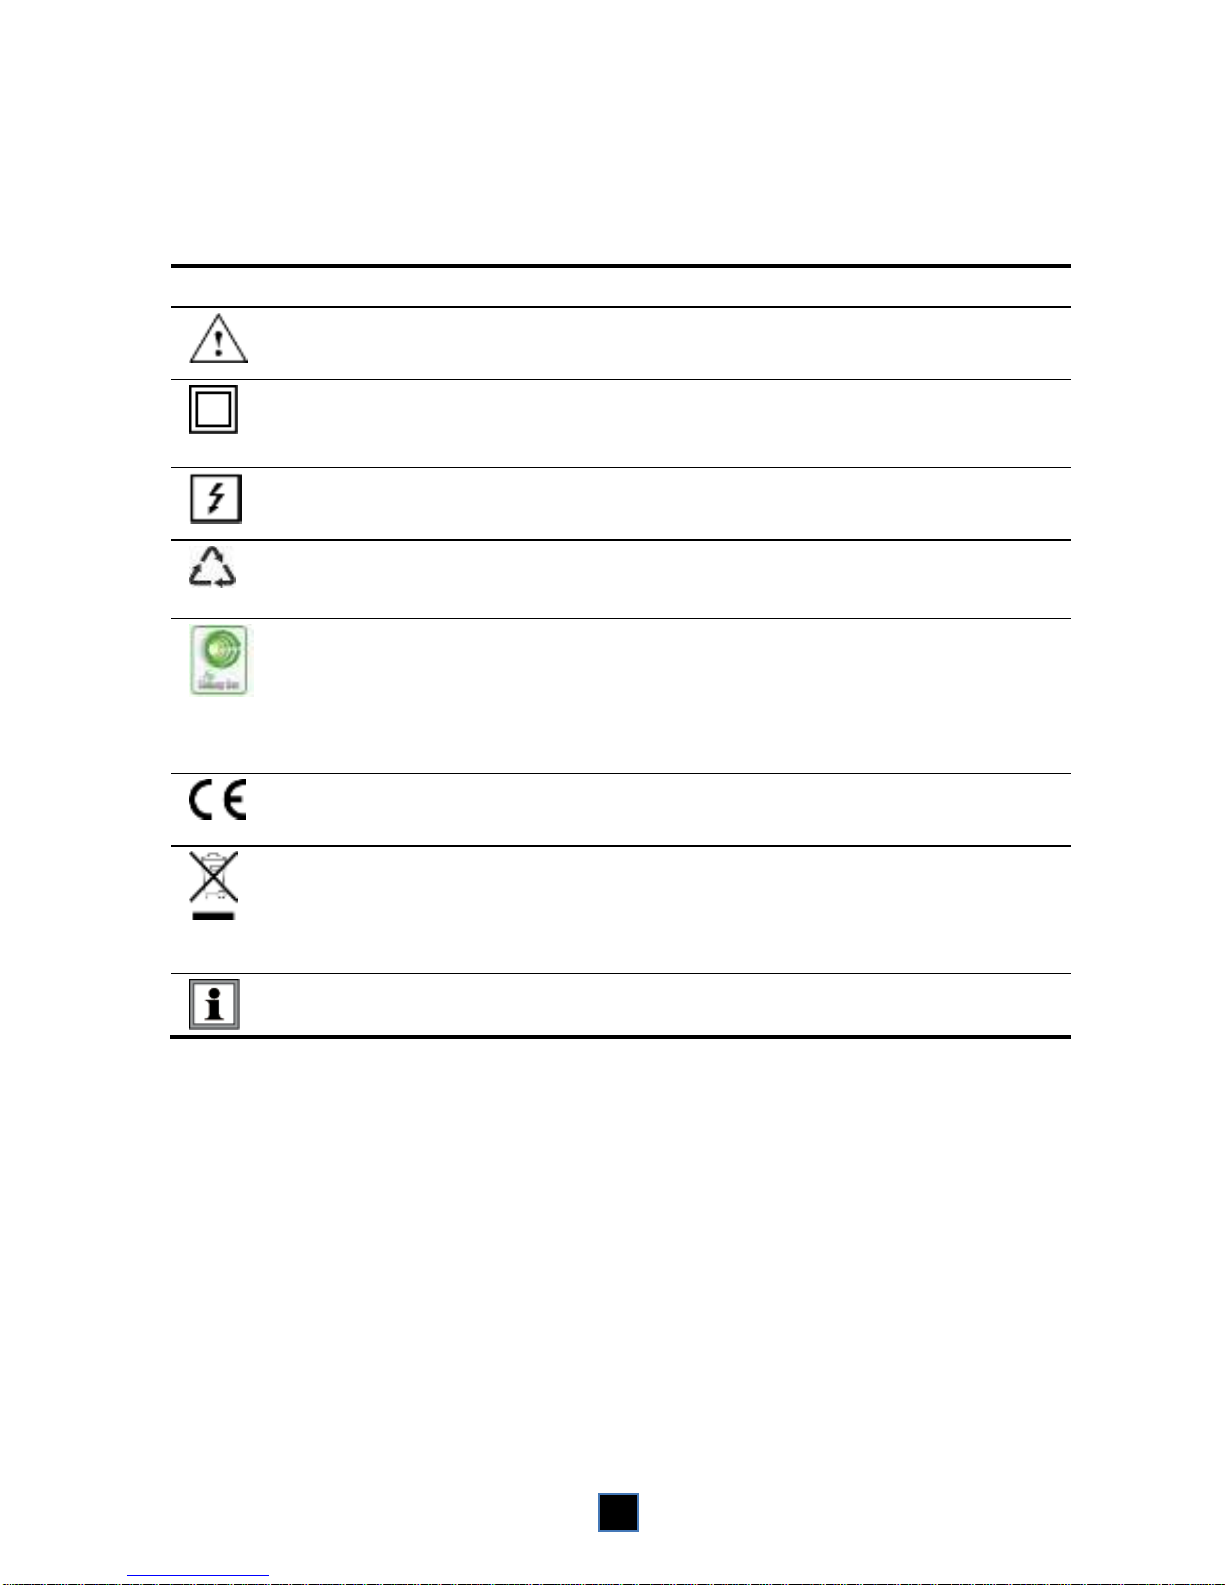
1.4 EXAMPLE OF DISPLAY
The figure opposite shows a
display, upon first use, with the
device set to Ω+A. The measured
current is 30.0 mA and the
impedance is 7.9 Ω.
The buzzer is active and the
memory is empty.
Note: This display corresponds to
the Standard mode. In the
Advanced mode, 2 additional
screens are available; see §5.2.
Fig. 2
The figure opposite shows a
display, upon first use, with the
device set to A. The current
measured is 30.0 mA.
The buzzer is active and the
memory is empty.
Fig. 3
2. DESCRIPTION OF THE DEVICE
The earth clamp is intended for testing the resistances of any conducting system
having the characteristics of a conducting loop. It is used to perform:
■ Earth resistance measurements if the earth is in series in a loop with its
continuity conductor;
■ Other earth measurements: earth extended, for example by means of a guard
wire between power transmission or telecommunication poles;
■ Or the distributed earths of a single earth plane.
Page 9

9
2.1 FUNCTIONS OF THE DEVICE
■ Easy-to-use device intended for measurement of the loop impedance in a
parallel earth network, by a simpler method than the traditional method with 2
auxiliary rods.
Loop ohmmeter: measurement of loop impedances from 0.01 Ω to 1,500 Ω.
The ohmmeter function makes allowance for the presence of inductances
in the loop, making impedance measurements more accurate at low
values.
Ammeter: current measurements from 0.2 mA to 40 A.
Contact voltage: the contact voltage is estimated by calculating the product of
the loop impedance by the leakage current. The value found is an upper
bound on the voltage between the measurement point and earth, since the
impedance taken into account is that of the whole loop.
■ Large multi-function OLED display unit.
■ Display in Standard mode (only 1 screen) or Advanced mode (3 screens).
■ Clamping diameter 35 mm.
■ Storage of measurements ( and/or A, with time-stamping).
METRACLIP EARTH: up to 2000 measurements stored.
■ Possibility of reading out the stored measurements on the clamp itself.
METRACLIP EARTH: Read-out also possible via Bluetooth®
■ Measurement hold by the HOLD key and/or by opening the clamp (PRE-
HOLD mode).
■ Weight limited by the use of powerful magnetic materials.
■ Opening the clamp made easy by a trigger with a force compensation system.
■ Advanced ergonomics (grip and reading of the display unit).
■ Small influence of spurious currents.
Page 10
10
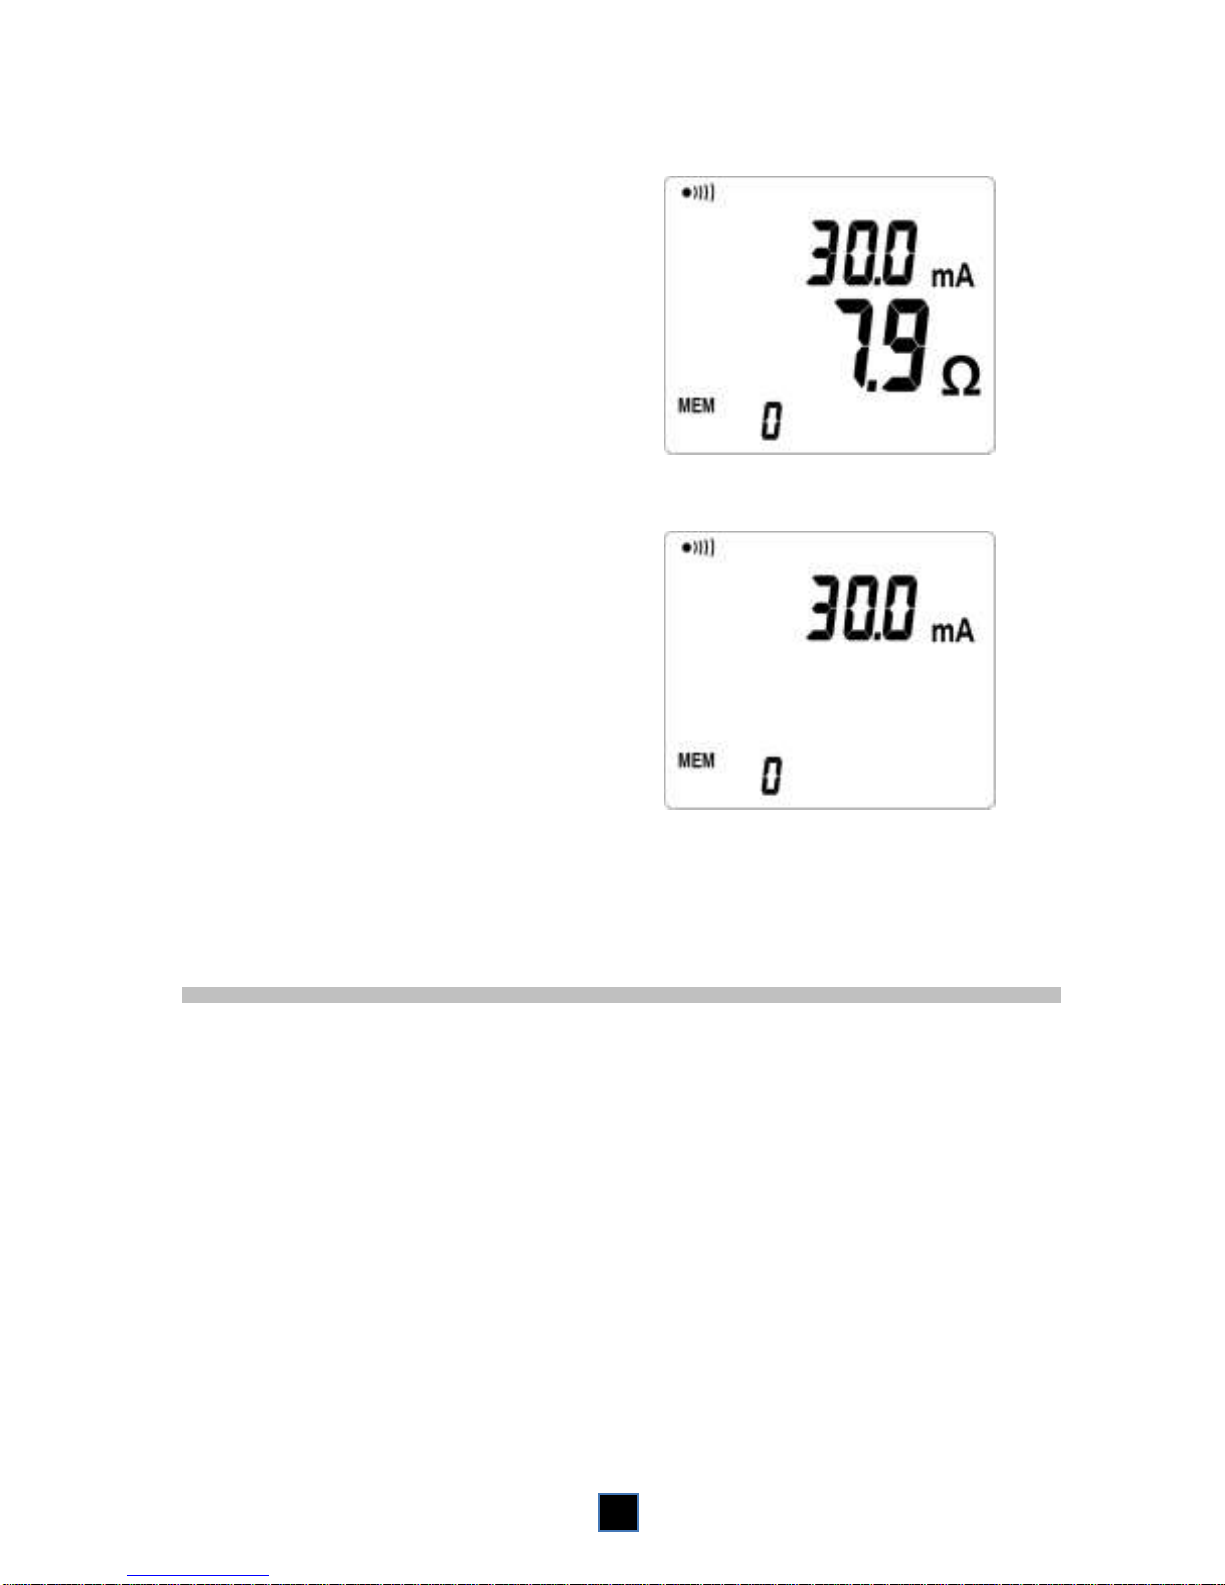
2.2 FRONT PANEL
Measurement
head
1
HOLD key, to freeze
the display
4
Rotary switch used to
select a measurement
function, SET-UP, or
memory read
3
Guard
2
OLED display unit
5
Trigger
6
Display backlight key
7
MEM key, to store
measurements
8
► key, for validation and
browsing in the
measurement screens
9
Fig. 4
Page 11
11
Rep.
Designation
See §
1
Measurement head.
-
2
Guard. The user's hand must be below this zone and not
touch the measurement head (item 1).
-
3
Function switch.
4.5
OFF: device off.
9
Ω+A: simultaneous selection of the Loop impedance
measurement and the Leakage current measurement.
5
A: selection of the Current measurement.
6
MR: (Memory Read) display of the data stored when MEM
(item 8) was pressed.
7
SET-UP: access to configuration of the parameters and to
erasure of the stored measurements.
8
4
HOLD key: freezes the measured and displayed values, at
any time, along with the various functional indications.
4.6
: When the function switch is set to MR or SET-UP,
pressing this key activates or deactivates the Bluetooth®
connection.
5
OLED display unit.
2.4
6
Measurement head opening trigger.
-
7
Dual-function key:
-
(when device is set to Ω+A or A): increases the
brightness of the OLED display unit; makes it easier
to read the display unit in an environment with strong
background illumination. Highlighting activated for 30
seconds.
-
▲ (when device is set to SET-UP or MR): serves as up
arrow when browsing in the menus and values. The
brightness of the display unit does not change when
device is set to SET-UP or MR.
-
8
Dual-function key.
-
MEM (when device is set to Ω+A or A): records the
measured value. All of the data are recorded, in the
Standard or Advanced mode.
4.8
▼ (when device is set to SET-UP or MR): serves as
down arrow when browsing in the menus and
values.
-
Page 12
12
Rep.
Designation
See §
9
► Function that depends on the setting of the function
switch, as follows:
When the device is set to Ω+A (Advanced Mode)
Short press: switches the display through the
following 3 modes, in order:
5.2.5
■ Display of the impedance recalculated at the
selected frequency.
■ Display of the contact voltage (product Z*I).
■ Display of R and L.
Long press: activates or deactivates the audible
alarms.
2.5
when device is set to SET-UP
Validation when browsing in the menus and values.
-
when device is set to MR (Advanced Mode)
Switches the display through the measurement
screens and the measurement date/time.
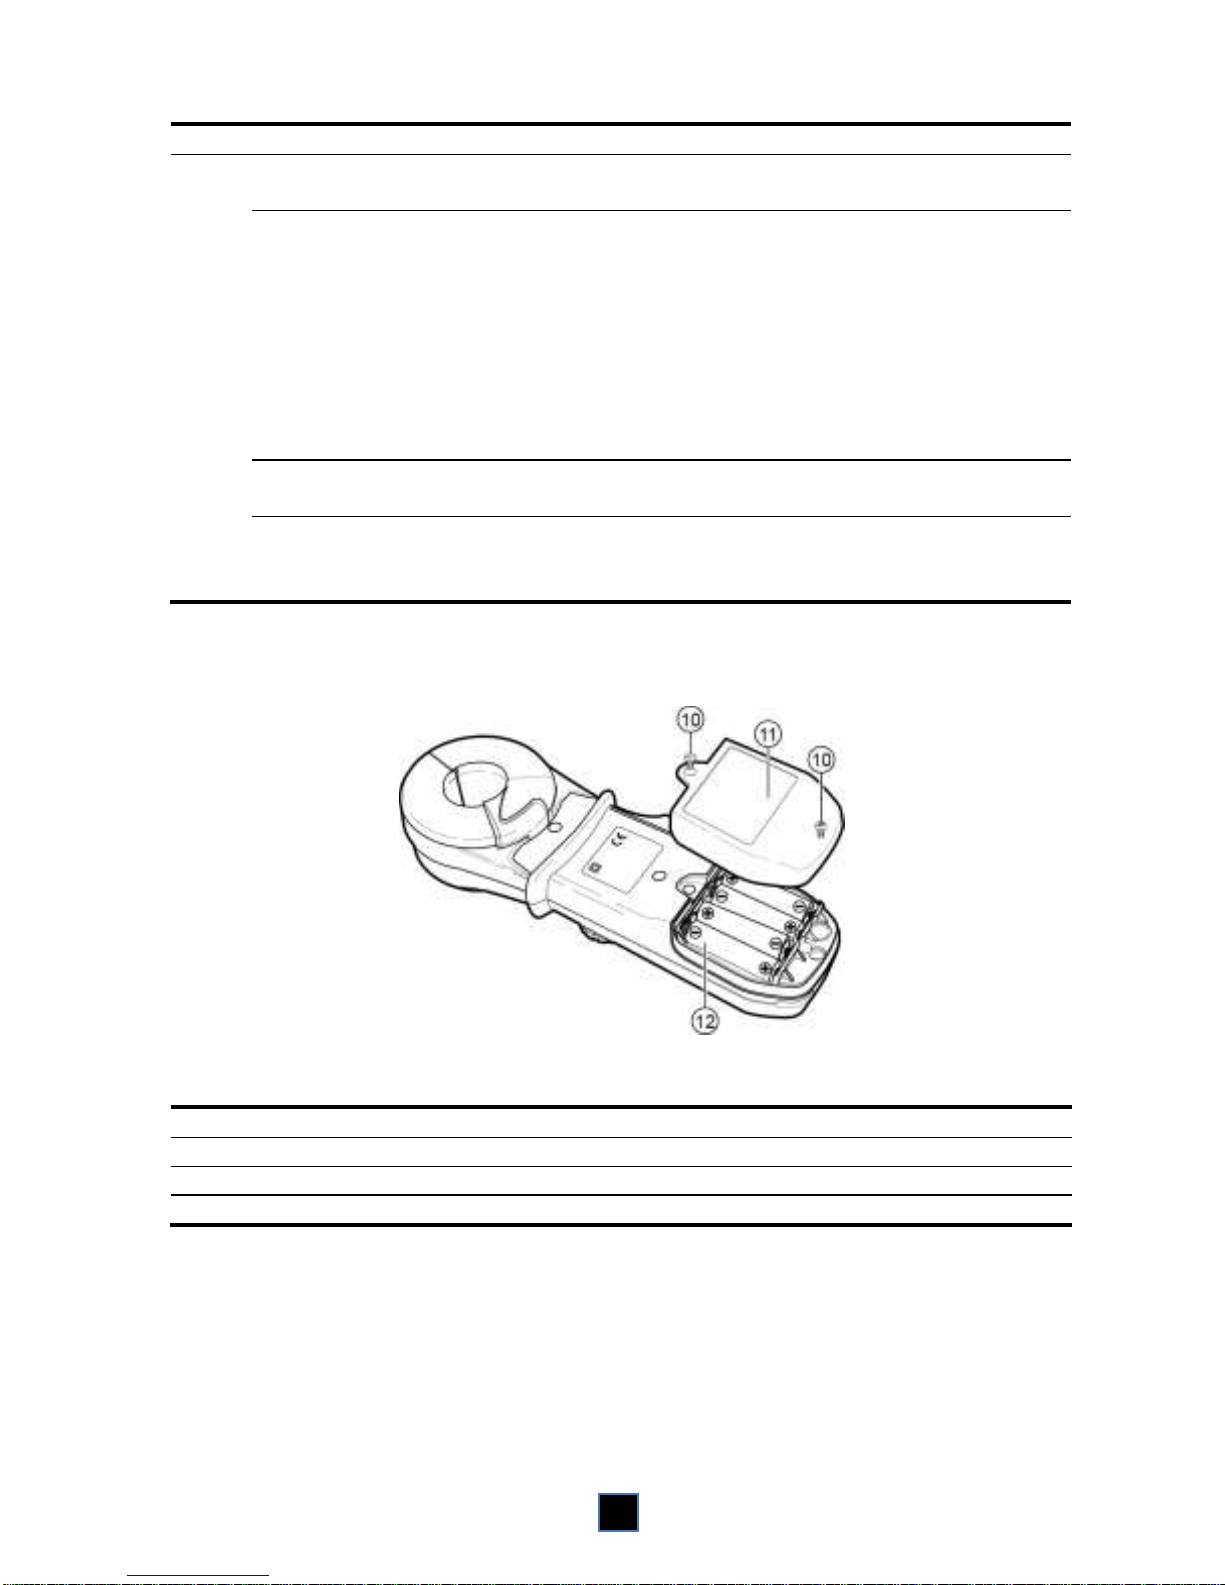
2.3 DEVICE–REAR PANEL
Fig. 5
Rep.
Designation
See §
10
Battery compartment cover locking screws.
11.2
11
Battery compartment cover.
11.2
12
Batteries (4 AA – LR6, 1.5 V).
11.2
Page 13
13
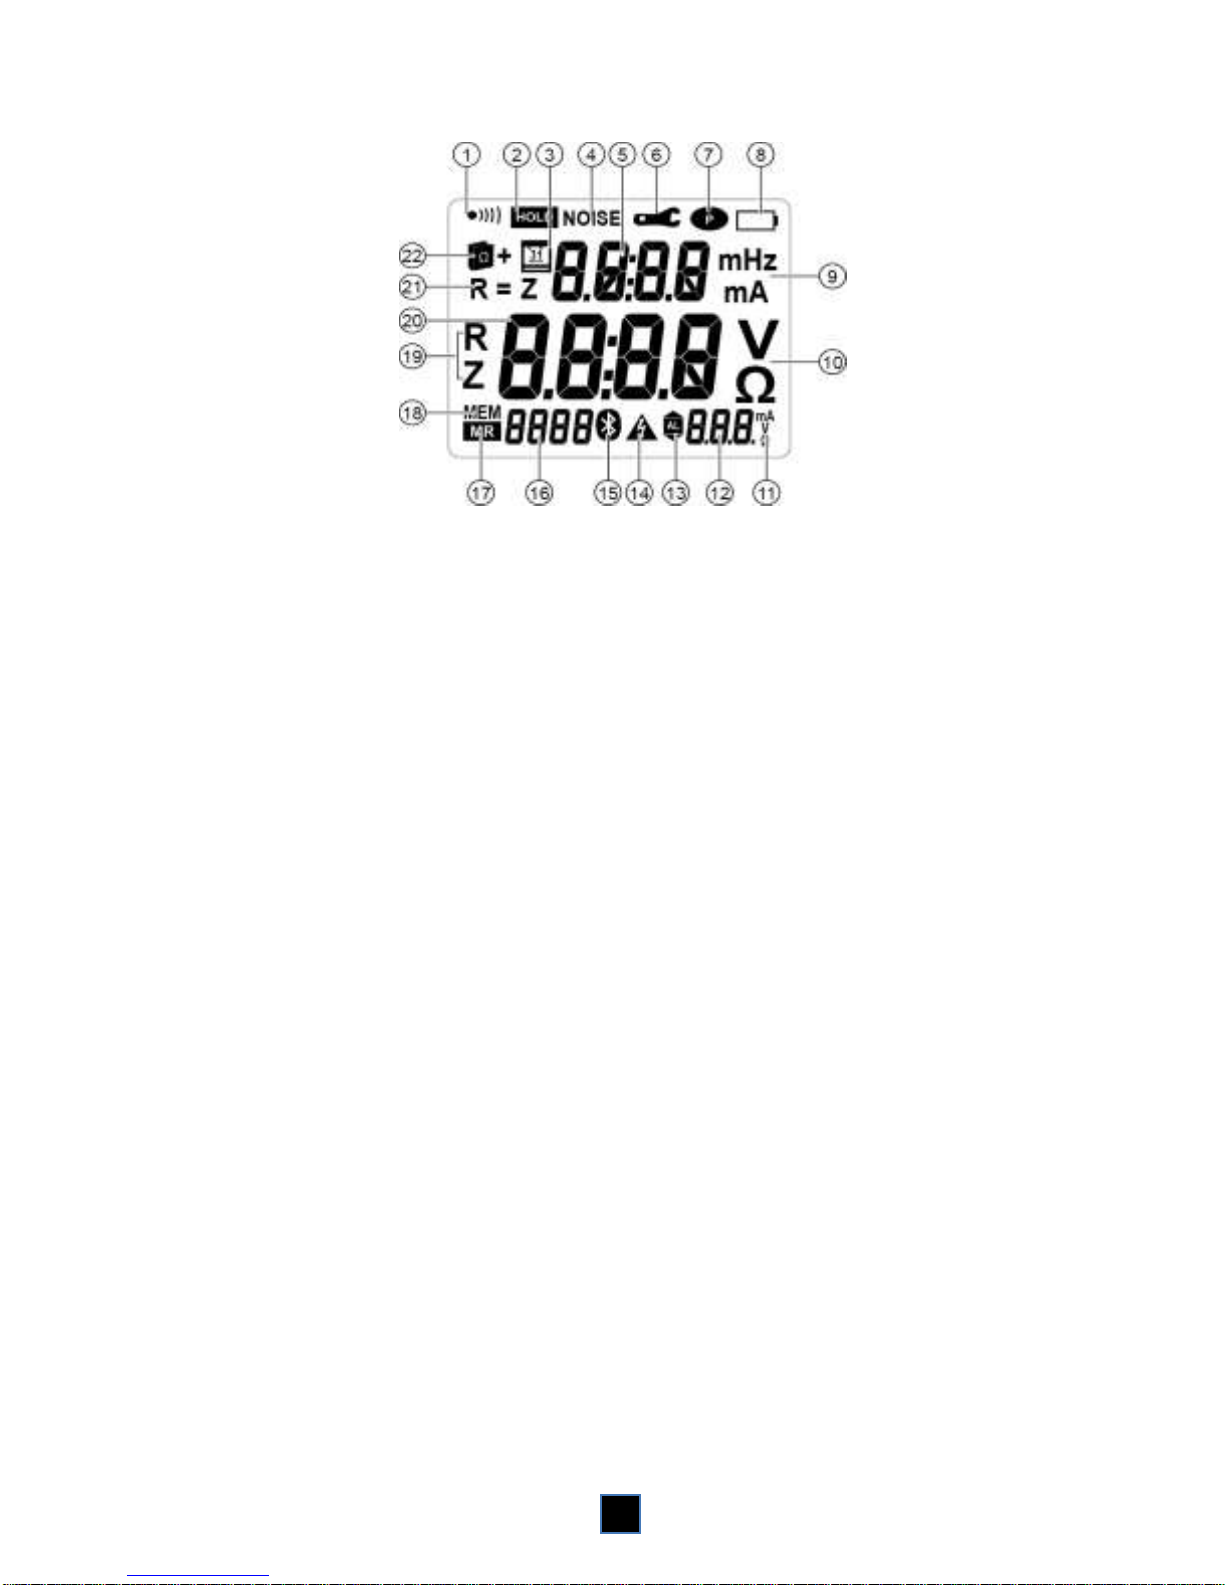
2.4 DISPLAY UNIT
Fig. 6
Rep.
Designation
See §
1
■ Display of the buzzer active state; the icon is masked when
the buzzer is inactive.
8.5
■ Selection of the buzzer operating mode via SET-UP menu 2.
8.5
2
Indicator of freezing of the measurement display when the HOLD
key is pressed or in the Pre-Hold mode
4.6
1.1
3
Indicates that the main display shows the date (with the function
switch set to MR or SET-UP).
7
4
Symbol reporting the presence of perturbations (current) in the
loop making it impossible to be sure of the impedance
measurement.
-
5
Upper display unit. 4,000-counts current measurement and 500-
counts loop inductance measurement (Advanced mode).
-
6
Signalling indicating incorrect closing of the clamp; the
measurement cannot be made in this case. If the Pre-hold mode
is activated, the Hold icon blinks and the measurement is frozen.
4.6
Selection of the Pre-Hold mode via SET-UP menu 11.
8.5
7
Permanent operation of the clamp (automatic switching off
disabled).
Selection of the automatic switching off mode in SET-UP menu 3.
8.5
8
Battery charge indicator with 3 states:
■ Not displayed: batteries charged.
■ Blinking: batteries low. The device remains functional, but the
batteries will have to be replaced soon.
■ Steady: batteries discharged. The display unit indicates Lo
bat. It is impossible to make measurements, read records, or
configure parameters.
11.2.1
9
Units of the top measurements display unit:
■ mH: loop inductance measurement unit.
■ mA or A: current measurement unit (mA or A).
-
Page 14

14
10
Units of the central measurements display unit:
■ V: contact voltage measurement unit.
■ Ω: impedance measurement unit. Symbol used for
impedances at the measurement frequency, for impedances
referred to the network frequency, or for the resistive
component.
-
11
Unit of the alarm displayed. The alarm can be defined on an
impedance, a voltage, or a current, depending on the
measurement chosen (Ω+A or A).
■ A: current measurement alarm.
■ Ω: resistance measurement alarm.
■ V: voltage measurement alarm.
8.5
12
Alarm threshold display unit:
■ Display of one of the alarms (1000-counts display unit) with
the various units.
8.5
■ These 3 digits are also used when configuring the time display
mode (A. for A.M., P. for P.M. or 24H) in SET-UP menu 8.
13
Alarm threshold over(under-)shoot indicator (operational use or
parameterizing):
▲
Alarm threshold overshoot indicator.
AL
Alarm threshold adjustment mode or Alarm function.
▼
Alarm threshold undershoot indicator.
8.5
14
Signal indicating potentially hazardous voltage. Blinks when the
contact voltage exceeds 50V.
-
15
METRACLIP EARTH: Remains displayed while the Bluetooth
connection is being established. Blinks for the duration of the
communication.
-
16
Memory index display unit. 4-digit digital display (0 to 9999
counts):
■ Of the measurement sequence number, of the current memory
in normal operation associated with the Read (MR) or Storage
(MEM) indications.
■ Of the date stamp (year) when the device is parameterized.
-
17
Memory read mode.
7
18
Data storage mode.
4.8
19
In the Advanced mode, these symbols identify the value
displayed (resistance or impedance).
5.2
20
Main display unit:
■ Measurement of the impedance or voltage.
■ Display of the date and time (month-day and hour-minute) in
parameterizing and stored values read mode.
-
21
In Advanced mode, indication displayed when the inductive
component is negligible with respect to the resistive component.
5.2.5
22
Indicates selection of the Advanced mode.
5.2
Remark: when switched on, the device performs a rapid self-test of the entire
display unit. All available segments are displayed briefly. During this stage, a
sustained press on HOLD prolongs the display of all segments.
Page 15
15
2.5 AUDIBLE SIGNALS
The device can generate audible signals of four types:
Type of
sound
Duration
Meaning
Low-pitched
Short
Normal use (key pressed).
Permanent
Over(under-)shoot of a measurement alarm
threshold
(Ω, A).
High-pitched
Short
Abnormal use (for example, memory full).
Permanent
Overshoot of a safety alarm threshold (V).
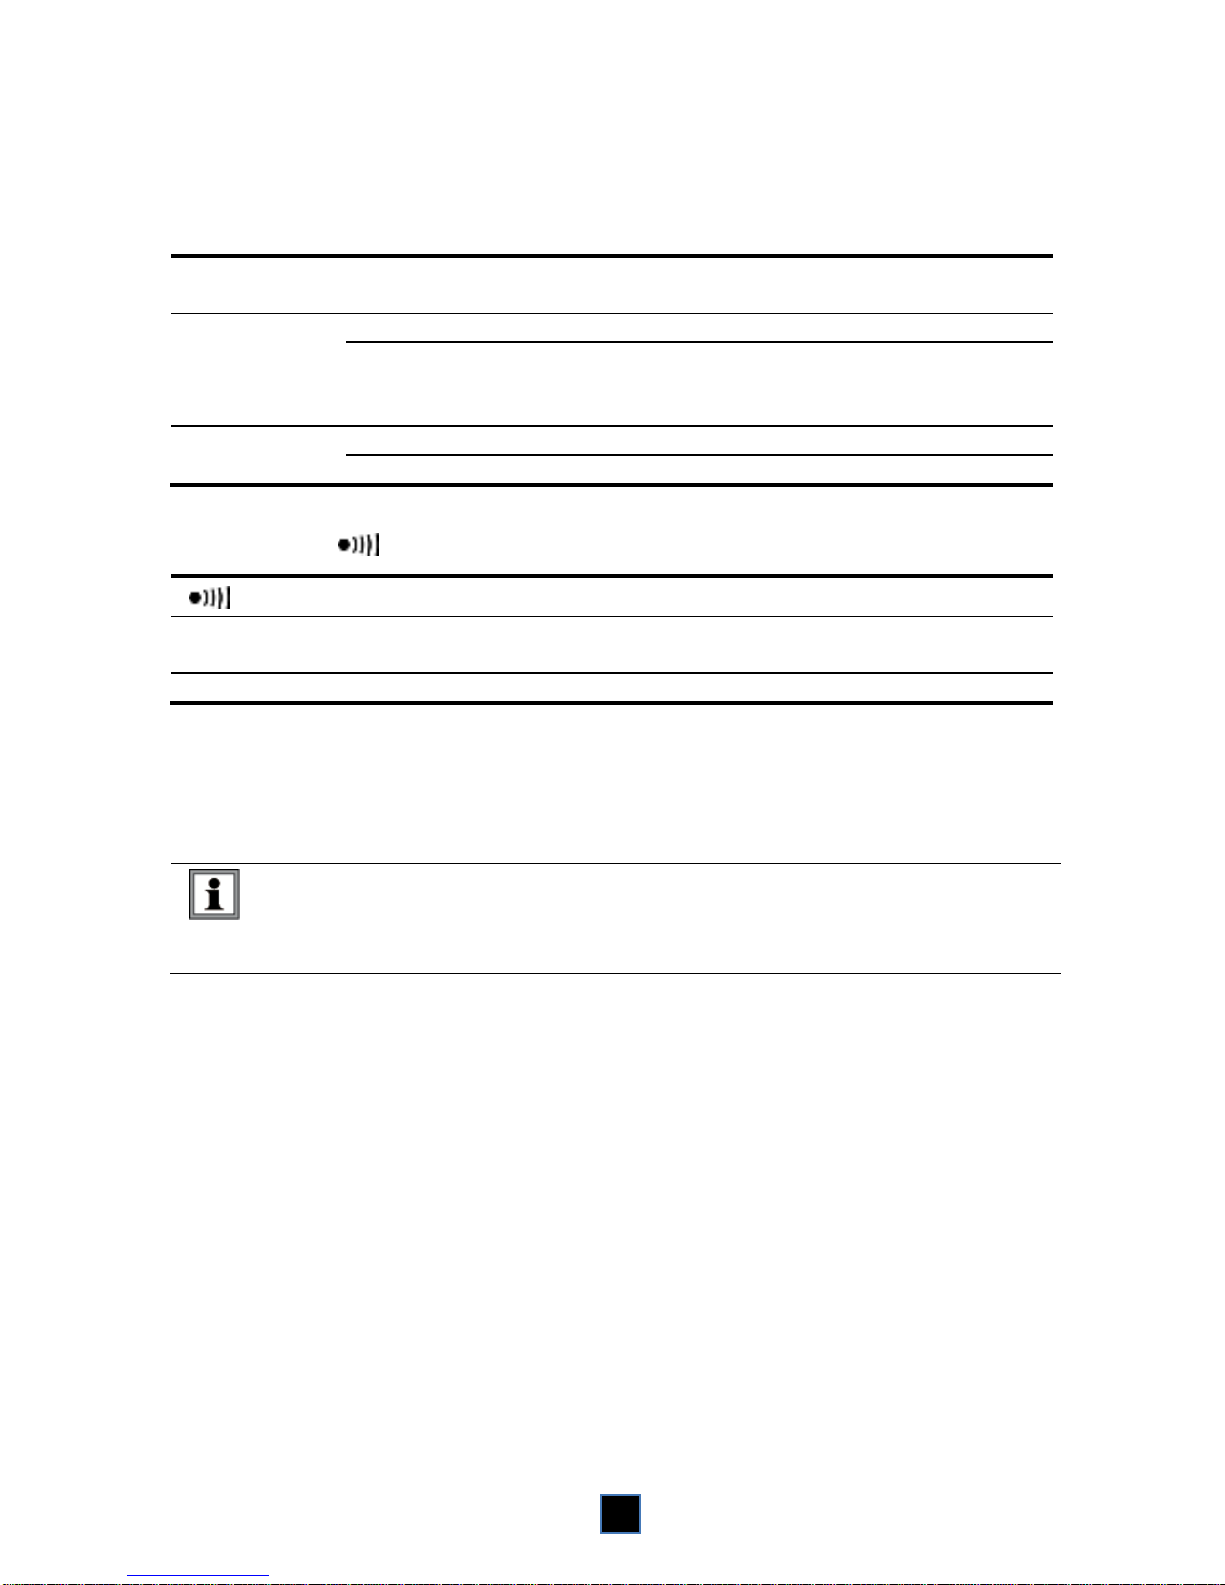
The audible signal can be activated or deactivated in SET-UP (see chapter 8,
menu 2). The
icon (Fig. 6, item 1) behaves as follows:
icon
Meaning
Visible
Buzzer activated; an alarm or a key press causes an audible
signal to be emitted.
Missing
No audible signal is emitted.
This programming is backed-up and retrieved at each reset. The audible alarm
can be de-activated in the SET-UP menu (see chapter 8, menu 2).
During a measurement, a long press on the ► key toggles between activation and
deactivation of the buzzer.
Since the measurement frequency is audible, the operator hears a
discontinuous audible signal (beep-beep). This is neither an operating fault nor
an alarm, and it cannot be eliminated. This audible signal is amplified by the
presence of current in the loop.
Page 16
16
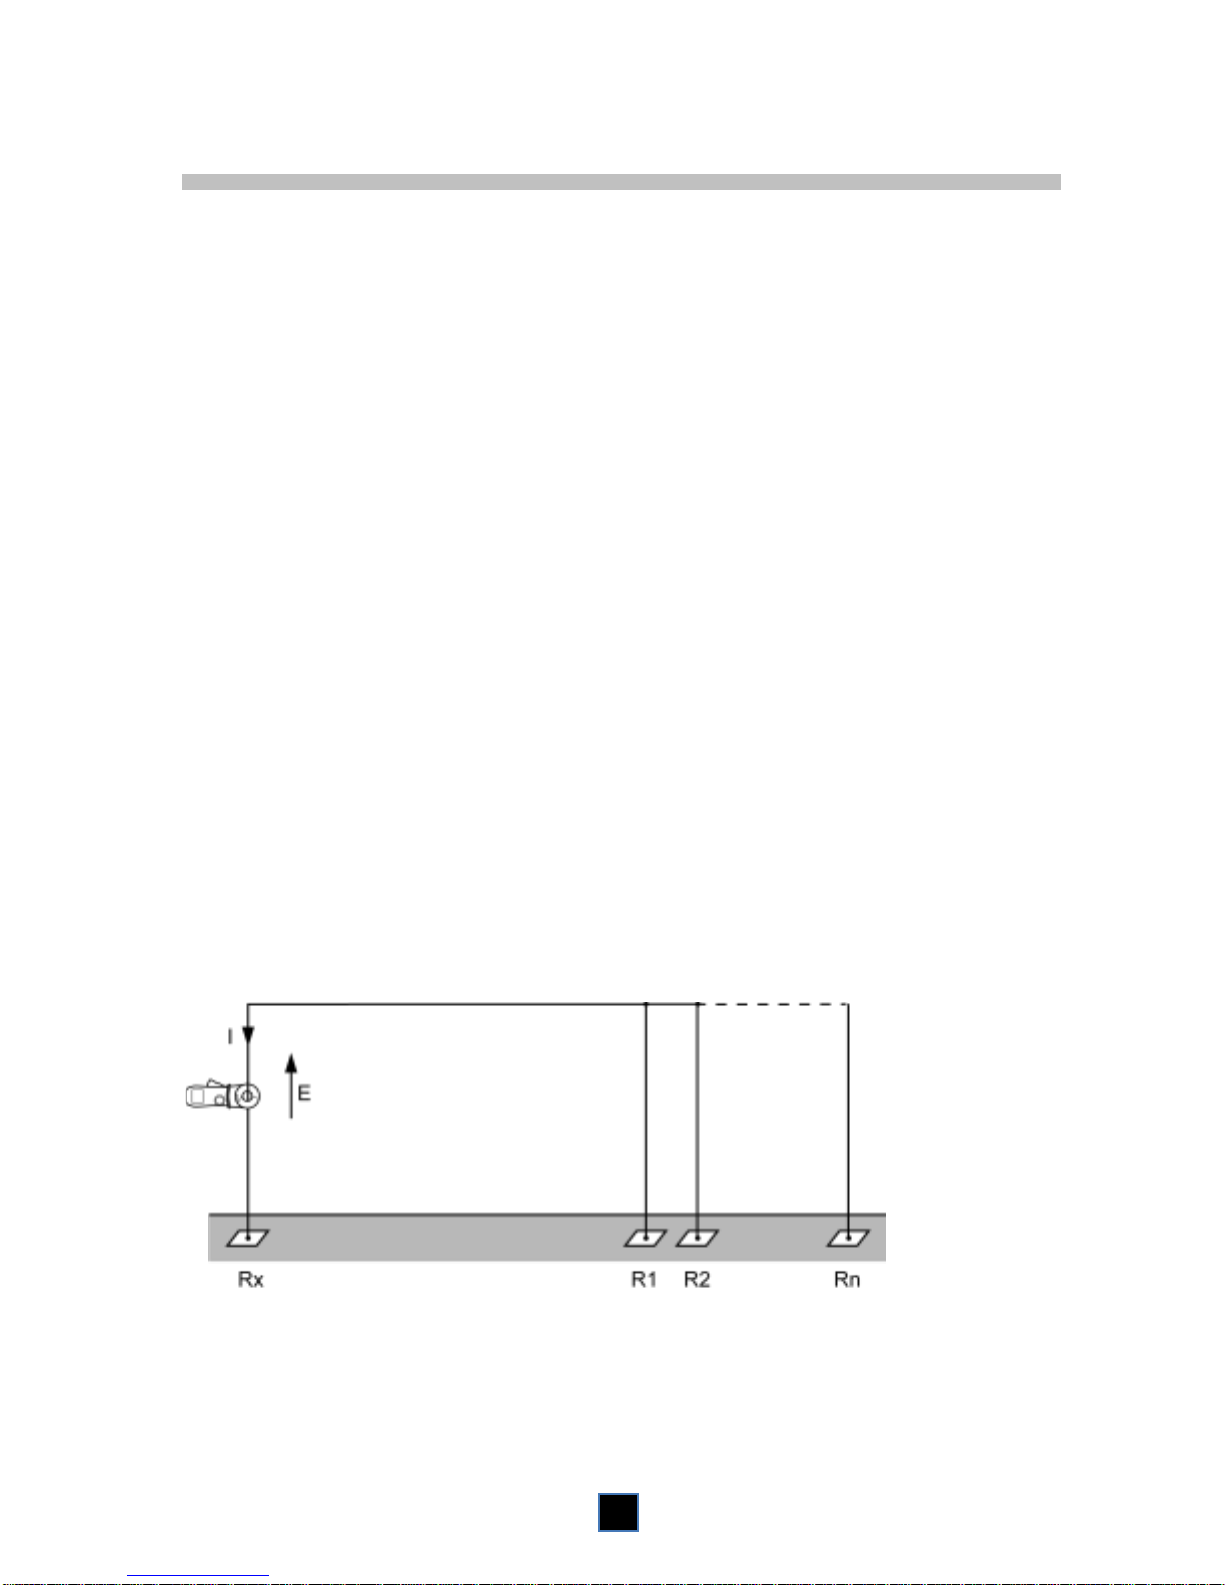
3. MEASUREMENT PRINCIPLE
The schematic diagram below illustrates the general case of measurement of the
resistance of a loop comprising:
■ The earth electrode Rx;
■ The earth;
■ Several earth electrodes of resistance Ri;
■ A guard wire looping all of these earths, introducing an inductive component.
The clamp combines two functions in the measurement head:
■ The generator winding of the clamp emits an alternating voltage having a
constant level E.
■ The receiver winding (current measurement) senses I=E/Z
loop
.
Knowing E imposed by the generator and I measured, the value Z
loop
can be
deduced and displayed on the device. The Advanced mode makes it possible to
distinguish the resistive and inductive parts and to refer the impedance to the
network frequency.
More generally, this principle can be used to search for a defective earth. This is
because the loop resistance comprises:
■ Rx (the value sought);
■ Z
earth
(a value that is normally very low, less than 1 Ω);
■ R1//R2...// Rn (a negligible value: case of multiple earths in parallel);
■ Z
guard wire
(a value that is normally very low, less than 1 Ω).
■ R
loop
=Rx+Z
earth
+(R//R...//R )+Z
guard wire;
As an approximation, Z
loop
can therefore be treated as equivalent to Rx.
If this value is very high, an inspection of this earth electrode is strongly
recommended.
Z
earth
Z
guard wire
Fig. 7
Page 17

17
4. USE
4.1 INSERTING THE BATTERIES
Refer to §11.2.
4.2 COMMISSIONING THE DEVICE
With the clamp closed and not clamping any conductor, set the function switch to a
position other than OFF. All icons of the display unit light for approximately 2 seconds,
before possible entry of the date and time (see next section).
During the first few seconds of operation, the clamp automatically adjusts correction
factors serving to optimize the impedance measurement. This correction makes it
possible to allow for the variations of the measurement head air gap that may occur in
some particular conditions of temperature and humidity.
During this adjustment, the screen displays CAL GAP. If the clamp detects a problem,
it indicates Err CAL when the switch is set to Ω+A. It is then necessary to check the
cleanliness of the air gap, check that no conductor is encircled, and switch off and
back on.
When this adjustment is done, the clamp displays the screen corresponding to the
switch setting.
Note: the switching off of the device is described in chapter 9.
4.3 SETTING THE INTERNAL CLOCK
Setting the clock, which allows time-stamping of the measurements with a view to their
storage, is done only the first time the device is used or after the device has been
without battery power for more than 2 minutes.
Note: if time-stamping is not necessary, because for example a user has no need of timestamped measurement records, this operation can be skipped. To skip setting the date and time,
press the ► key until the measurement screen corresponding to the switch setting (Ω+A, A,
MR or SET-UP) is displayed. The date and time can be set later in the SET-UP position and
the Hour and Date screens; see chapter 8, menus 7 and 8.
Set the date and time. The year, month, date, display mode (AM/PM - display from
01:00 to 12:00, symbol A. or P. or 24-hour, symbol 24H), and time. Modify the
blinking value with ▲ or ▼ and validate by ►. At the end of the procedure, the
display unit displays the screen associated with the function selected (Ω+A, A,
MR or SET-UP).
The operator must change between standard and daylight saving time manually.
Page 18

18
4.4 STANDARD OR ADVANCED MODE
The earth clamp can be used in two ways.
■ The Standard mode makes the standard loop ohmmeter clamp measurements.
■ The Advanced mode is used to refine and complete the measurements:
- Impedance referred to the selected frequency.
- Contact voltage.
- Resistive and inductive fractions of the loop impedance.
The choice of the Standard or Advanced mode and the alarm thresholds are
parameterized in the SET-UP menu. See §8.5, menus 4, 5, 6, and 9 for details.
4.5 USE OF THE FUNCTIONS
Setting of the function switch
See §
OFF
9
Ω+A
5
Use in Standard mode
5.1
Use in Advanced mode
5.2
Complementary information
5.3
Management of the alarms
4.9 A 6
MR
7
SET-UP
8
4.6 USE OF THE HOLD KEY
This function, available in the Ω+A and A measurement modes, freezes the
display of the measurement as soon as the HOLD key is pressed. The NOISE,
clamp open ( ), and alarm overshoot ( ) icons are visible if they were active.
With the HOLD state active:
■ The ► key is active and can be used, in Advanced mode, to display the
various measurement screens.
■ The MEM key is active and can be used to record the values displayed.
■ The HOLD key is used to exit from the HOLD state. The icon goes off
and the device returns to the previous function.
Page 19

19
4.7 USE OF PRE-HOLD
If the Pre-Hold mode was activated in the configuration (see §8.5, menu 11),
opening the clamp places the device in a state identical to the HOLD mode for as
long as the clamp is open. The utility of this function is that it makes it easy to
freeze the measurement with one hand, in particular when access to the HOLD
key is difficult. If necessary, then press the HOLD key to freeze the device and
release the handle.
If the HOLD key is not pressed, closing the clamp automatically causes an exit
from the Pre-hold mode.
4.8 STORAGE OF THE DATA
The values displayed during the measurements can be stored and read out later.
4.8.1 CONDITIONS
Storage of the data is available in both the Ω+A and A measurement modes,
provided that memory locations are free.
4.8.2 EFFECTIVE STORAGE
The data are stored as soon as the MEM key is pressed. A long audible signal
confirms the storage.
4.8.3 INFORMATION CONCERNING THE STORED DATA
All calculated impedance and/or current values, together with the values
accessible in the secondary screens in the Advanced, mode, are stored as soon
as the MEM key is pressed, namely:
■ Current measurement (A);
■ Measurement of the resistance, inductance, and impedance (Z);
■ Contact voltage measurement (V);
■ Present configuration of the clamp;
■ Sequence number of the record;
■ Time and date of the record.
The display unit indicates the sequence number of the last measurement
recorded, or 0 if the memory is empty. The data are preserved when the device is
off or without a battery.
4.8.4 MEMORY FULL
The communicating model METRACLIP EARTH has a larger recording capacity,
2000 measurements. If the circular recording mode is activated, as soon as the
threshold of 2000 values is exceeded, the sequence number is displayed
alternately with FULL in order to report the overwriting of the oldest records. When
the threshold of 9999 records is reached, the sequence number is replaced by
Page 20

20
FULL. The next time the MEM key is pressed, a disablement beep is emitted and
the FULL indication blinks.
4.8.5 READING THE STORED DATA
The data can be looked up using the MR function. See chapter 7.
4.9 MANAGEMENT OF THE ALARMS
The device has 3 distinct alarms that can be parameterized.
The (Ω, V, A) alarm thresholds are defined in the SET-UP menu, lines 4, 5, and
6; see §8.5. The alarms can be activated or deactivated in these same menus.
4.9.1 NO ALARM DETECTION
If no alarm is activated, the alarm icons
are not displayed.
When no alarm is triggered, the alarm
display displays the alarm threshold,
along with the direction of triggering (
,
)
of the impedance, voltage, or
current alarm.
Fig. 8
4.9.2 VOLTAGE ALARM
If the voltage (product ZxI) exceeds the
threshold set, the alarm symbol and
the alarm threshold are displayed and
blink.
If the buzzer is active, the high-pitched
audible warning signal is emitted.
Fig. 9
Page 21

21
4.9.3 CURRENT ALARM
If the current exceeds the threshold
set, the alarm symbol and the alarm
threshold are displayed and blink.
If the buzzer is active, a low-pitched
audible signal is emitted.
Fig. 10
4.9.4 IMPEDANCE ALARM
If there is no voltage alarm, no detection of NOISE, and no current alarm, an
alarm on the impedance may be triggered. If the buzzer is active, the
corresponding audible signal is emitted.
4.9.4.1 Low threshold configuration
An audible signal is emitted when
the impedance is below the
threshold set (continuity type
measurement).
Fig. 11
Page 22

22
4.9.4.2 High threshold configuration
An audible signal is emitted at values
exceeding the threshold (detection of
an earthing impedance that is too
high).
Fig. 12
If the impedance crosses the selected threshold, a low-pitched audible signal is
emitted.
4.9.4.3 Priority of the alarms
If several alarms are triggered simultaneously, a priority rule determines the
display and the corresponding sound:
■ The voltage alarm has priority because it concerns the user's safety.
■ The current alarm is second in priority.
■ The impedance alarm is displayed when no other alarm is triggered.
Page 23

23
5. Ω+A POSITION
Since the measurement frequency is audible, the operator hears a
discontinuous audible signal (beep-beep). This is neither an operating fault nor
an alarm, and it cannot be eliminated. This audible signal is amplified by the
presence of current in the loop.
5.1 USE IN STANDARD MODE
The selection of the Standard mode is described in §8.5, menu 9.
5.1.1 OBJECT
In the Standard, mode, only one measurement screen is proposed. The clamp
measures the loop impedance () at the fixed frequency of 2083 Hz and the
leakage current.
5.1.2 PARAMETERIZING THE MEASUREMENT
If necessary, adjust the alarm thresholds as indicated in §8.5, menus 4, 5, and 6.
5.1.3 MEASUREMENT
■ Place the conductor of the circuit to be measured in the clamp and close the
clamp. If the clamp is incorrectly closed, the icon is displayed.
■ If necessary, use the HOLD key to freeze the measurement. See §4.6,
■ If necessary, use the MEM key to store the measurement. See §4.8.2,
Remark:
If the measured impedance is less than 1Ω, the measurement display alternates
between the value measured and the word LOOP, in order to call the user's
attention to the risk of measuring a local loop at the test point that does not
include the earthing.
Page 24

24
5.1.4 MEASUREMENT RESULT
Once the measurement has stabilized,
the display unit indicates:
■ The leakage current.
■ The impedance of the loop at the
frequency of 2083 Hz.
The impedance is measured only if the
leakage current is less than 10A. In the
10 A–40 A range, only the current is
displayed; the NOISE symbol blinks
and the impedance is replaced by
dashes.
Fig. 13
5.1.5 STORAGE OF THE MEASUREMENTS
Refer to §4.8.2.
5.1.6 PRESENCE OF ALARMS
Refer to §4.8.2 If the contact voltage exceeds 50 V, the display unit indicates the
current/impedance couple and the contact voltage alternately.
5.2 USE IN ADVANCED MODE
5.2.1 OBJECT
In this mode, 3 measurement screens are provided (impedance referred to the chosen
frequency and leakage current, contact voltage, display of R and L). The clamp
measures the loop impedance () at the frequency of 2083 Hz. However, in
addition to what is done in the Standard, mode, the impedance is recalculated at
the frequency defined by parameterizing.
5.2.2 SELECTION
The selection of this mode allows the display of additional measures only with switch
on Ω+A position.
The selection of the Advanced mode is described in §8.5, menu 9.
The selection of the measurement frequency is described in §8.5, menu 10.
5.2.3 PARAMETERIZING THE MEASUREMENT
If necessary, first adjust the alarm thresholds (Ω, V, I); see §8.5, menus 4, 5, and
6.
Page 25

25
5.2.4 MEASUREMENT
■ Place the conducting wire of the circuit to be measured in the clamp and close
the clamp. If the clamp is incorrectly closed, the icon is displayed.
■ If necessary, use the HOLD key to freeze the measurement. See §4.6.
■ If necessary, use the MEM key to store the measurement. See §4.8.2.
5.2.5 MEASUREMENT RESULT
First screen
Once the measurement has stabilized,
the display unit displays the 1st screen,
which indicates:
■ The leakage current.
■ The loop impedance referred to the
chosen frequency.
The impedance is measured only if the
leakage current is less than 10 A. In
the 10 A-40 A range, only the current
is displayed; the NOISE symbol blinks
and the impedance is replaced by
dashes.
Fig. 14
Second screen
Press ► to display the 2nd screen,
which indicates the contact voltage
(product ZxI).
Fig. 15
Third screen
Press ► to display the 3rd screen,
which indicates the values of R and L.
■ The loop inductance and loop
resistance are displayed.
Page 26

26
Fig. 16
■ When the inductive component is
negligible (*) with respect to the
resistive component, the symbol
R=Z is displayed, and only the
impedance is displayed; the
inductance is replaced by dashes.
(*) R > 25 Ω or R[Ω] / L[H] > 105.
Fig. 17
5.3 COMPLEMENTARY INFORMATION
This complementary information is displayed in both the Standard and Advanced
modes.
5.3.1 PRODUCT ZXI GREATER THAN 50V
In this case:
■ The blinking Noise symbol is
displayed.
■ The impedance blinks.
■ The hazardous voltage symbol
blinks.
Fig. 18
Page 27

27
5.3.2 IMPEDANCE GREATER THAN 1500Ω
In this case:
■ The impedance display indicates
O.R (Over range).
Fig. 19
5.3.3 PERTURBING LEAKAGE CURRENT
If the current is greater than 5 A, or if it
is significantly deformed:
■ The blinking Noise symbol is
displayed.
■ The impedance blinks.
Fig. 20
5.3.4 CURRENT GREATER THAN 10A
If the current is greater than 10 A:
■ The blinking Noise symbol is
displayed.
■ The impedance is replaced by - - - -
Fig. 21
Page 28

28
If the current is greater than 40 A, the
current display indicates O.R (Over
Range).
Fig. 22
5.3.5 STORAGE OF THE MEASUREMENTS
Refer to § 4.8.2.
5.3.6 PRESENCE OF ALARMS
Refer to §4.9.
Page 29

29
6. POSITION A
6.1 OBJECT
In this mode, the clamp measures the electric current, independently of any earth
measurement.
6.2 PARAMETERIZING THE MEASUREMENT
If necessary, first adjust the current alarm threshold in accordance with §8.5,
menu 6.
6.3 MEASUREMENT
■ Place the conducting wire of the circuit in which the current is to be measured,
in the clamp and close the clamp. If the clamp is incorrectly closed, the
icon is displayed.
■ If necessary, use the HOLD key to freeze the measurement. See §4.6.
■ If necessary, use the MEM key to store the measurement. See §4.8.2
6.4 MEASUREMENT RESULT
Once the measurement has stabilized,
the display unit indicates the value of the
current in the conductor.
Fig. 23
6.5 PRESENCE OF ALARMS
Refer to §4.9.
Page 30

30
6.6 MANAGEMENT OF THE ALARMS
If the preset alarm threshold is
exceeded, the reminder of the
threshold and the value of the current
measured blink
Refer to §4.9.
Fig. 24
Page 31

31
7. MEMORY READ (MR)
7.1 OBJECT
The MR position (Memory Read, display of stored data) is used to display
measurements previously stored by pressing the MEM key.
7.2 SELECTION OF THE MEMORY READ MODE
Set the function switch to MR. The choice of mode (Standard or Advanced) was
made by parameterizing; see §8.5, menu 9.
7.3 DATA DISPLAYED
This depends on which mode is active, Standard or Advanced, independently of
the mode in which the records were made.
7.3.1 DATA DISPLAYED IN STANDARD MODE
The last measurement is displayed.
The MR memory read symbol and
the sequence number of the record
being read are also displayed.
The figure opposite illustrates an
impedance + current measurement
(Ω+A setting).
Fig. 25
The stored values are displayed as
they were when recorded, namely,
same display range, alarm states,
NOISE signal, battery condition,
etc.
However, the audible alarms are
not reproduced; only the AL icon
and the alarm threshold blink.
The figure opposite illustrates a
current measurement (A setting).
Fig. 26
Page 32

32
Press ► to display the
measurement storage date-time
screen.
To exit from the memory read
mode, set the rotary switch to the
desired mode.
Fig. 27
7.3.2 DATA DISPLAYED IN ADVANCED MODE
The
icon indicates use of the Advanced mode; the user then disposes of 4
distinct screens.
Screen no. 1
The last measurement is displayed,
namely the impedance referred to
the chosen frequency.
The MR memory read symbol and
the sequence number of the record
being read are also displayed.
The figure opposite illustrates an
impedance and current
measurement.
Press ► to display the next screen.
Fig. 28
Screen no. 2
The figure opposite illustrates a
contact voltage measurement
(product ZxI).
Press ► to display the next screen.
Fig. 29
Page 33

33
Screen no. 3
The figure opposite illustrates a
resistance and impedance
measurement (switch set to Ω+A).
Press ► to display the next screen.
Fig. 30
Screen no. 4
The figure opposite illustrates the
date and time of the measurement
(switch set to Ω+A), namely:
■ 12.30: December 30.
■ 15:39: 1539 hours.
Press ► to return to screen no. 1.
To exit from the memory read
mode, set the rotary switch to the
desired mode.
Fig. 31
7.3.3 USE OF THE KEYS
The ▲ and ▼ keys are used to view the various stored measurements. If these
keys are held down, the sequence number is scrolled at a rate of 3 counts per
second; after 5 seconds, the rate is increased to 10 counts per second. Each
time the sequence number changes, the value of the corresponding measurement
is displayed. The MR symbol remains displayed as a reminder that the memory
read function is active.
Since the reading of the buffer is circular, it is possible to scroll past the oldest
recorded value to the most recent, or past the most recent recorded value to the
oldest.
In the METRACLIP EARTH model, with circular recording activated, the sequence
number of the oldest record is not necessarily 1: the remaining records may be
numbered from 44 to 2043, for example.
7.3.4 ERASURE OF THE STORED DATA
Refer to §8.5, menu 1.
Page 34

34
7.3.5 EXITING FROM THE READ MODE
Set the function switch to the desired measurement position (OFF, Ω+A, A or
SET-UP).
Page 35

35
8. SET-UP
8.1 OBJECT
The SET-UP position gives access to the following menus:
No.
Function
1
Erasure of the memory.
2
Activation/Deactivation of the buzzer.
3
Activation/Deactivation of automatic switching off.
4
Setting of the impedance alarm threshold (Ω).
5
Setting of the voltage alarm threshold (V).
6
Setting of the current alarm threshold (I).
7
Setting of the date.
8
Setting of the time.
9
Selection of the Standard or Advanced operating mode.
10
Choice of transposition frequency for the impedance.
11
Activation/Deactivation of the Pre-Hold mode.
12
Display of the version number.
-
Access to the 2 adjustment procedures (menus 13 to 14) and to the
restoration procedure (menu 15).
13
Impedance measurement adjustment procedure.
14
Current measurement adjustment procedure.
15
Restoration of factory values.
8.2 ACCESS TO THE SET-UP MENUS
Set the function switch to SET-UP.
8.3 DISPLAY OF THE SET-UP MENUS
Each of the 15 accessible menus is
clearly identified by its title and
number, as in the example
opposite, voltage alarm threshold
adjustment menu 5 (AL. V).
Fig. 32
Page 36

36
8.4 SELECTING A SPECIFIC MENU
Use the keys as follows.
Key
Action
▲
Move up in the menu tree.
▼
Move down in the menu tree.
►
Select the menu displayed or return to the previous menu.
When changes have been made in one of the SET-UP menus (other than
deletion), the changes can be cancelled by turning the function switch to a
position other than SET-UP, provided that there has not been a return to the main
menu (press on ►).
8.5 DETAILS OF THE SET-UP MENUS
In order to facilitate working with these menus, the procedure for access to
each menu is systematically reproduced.
Menu no.
Indication
Object and use
1
CLr
Erasure of the memory
■ Enter this menu by ►. Clr blinks.
■ Press ▲ and ▼ simultaneously for 6 seconds. The
recorded data are all erased. The meter indicates
MEM 0.
■ Return to the previous menu by ►.
2
Snd
Activation/Deactivation of the buzzer
■ Enter the menu by ►. Snd blinks.
■ Press ▲ or ▼.
The Buzzer is active when the icon is visible
and deactivated when it is masked.
■ Return to the previous menu by ►.
Note: in the Ω+A and A measurement modes, a long
press on ► activates or deactivates the audible
alarms.
3
StOP
Activation/Deactivation of automatic switching off
■ Enter the menu by ►. StOP blinks.
■ Press ▲ or ▼.
Automatic switching off is deactivated when the
icon is visible and activated when it is masked. P
stands for "Permanent".
■ Return to the previous menu by ►.
Page 37

37
Menu no.
Indication
Object and use
4
AL. Ω
Setting the impedance alarm threshold (Ω)
■ Enter the menu by ►. AL. Ω blinks.
Setting the sense of the alarm
■ Press ▲ or ▼ to select the state of the alarm:
- : deactivated.
-
:
activated for a measurement exceeding the
threshold.
:
activated for a measurement below the
threshold.
■ Validate by ►.
Setting the alarm value
■ Press ▲ or ▼ to select the impedance alarm
threshold (Fig. 6, item 12).
■ Validate by ►. The return to the previous menu is
immediate.
5
AL. V
Setting the voltage alarm threshold (V)
■ Enter the menu by ►. AL. V blinks.
Activation/Deactivation of the alarm
■ Press ▲ or ▼ to select the state of the alarm (Fig.
6, item 13):
- : deactivated.
-
:
activated for a measurement exceeding the
threshold.
■ Validate by ►.
Setting the alarm value
■ Press ▲ or ▼ to select the alarm threshold value
(Fig. 6, item 12).
■ Validate by ►. The return to the previous menu is
immediate.
Page 38

38
Menu no.
Indication
Object and use
6
AL. A
Setting the current alarm threshold (I)
■ Enter the menu by ►. AL. A blinks.
Activation/Deactivation of the alarm
■ Press ▲ or ▼ to select the state of the alarm (Fig.
6, item 13):
- : deactivated.
-
:
activated for a measurement exceeding the
threshold.
■ Validate by ►.
Setting the alarm value
■ Press ▲ or ▼ to select the current alarm threshold
(Fig. 6, item 12).
■ Validate by ►. The return to the previous menu is
immediate.
7
dAtE
Setting the date
■ Enter the menu by ►. dAtE blinks.
■ Press ▲ or ▼ to select the year, which blinks.
Validate by ►.
■ Press ▲ or ▼ to select the month, which blinks.
Validate by ►.
■ Press ▲ or ▼ to select the date, which blinks.
■ Validate by ►. The return to the previous menu is
immediate.
Note: in some places, the order of adjustment of
certain fields will be Year, Date, Month.
8
HOUR
Setting the time
■ Enter the menu by ►. HOUR blinks.
■ Press ▲ or ▼ to select the AM/PM (A. or P.) or
24H display mode (24H), which blinks. Validate by
►.
■ Press ▲ or ▼ to select the hour, which blinks.
Validate by ►.
■ Press ▲ or ▼ to select the minutes, which blink.
■ Validate by ►. The return to the previous menu is
immediate.
Page 39

39
Menu no.
Indication
Object and use
9
USE
Selecting the Standard or Advanced operating
mode
■ Enter the menu by ►. USE blinks.
■ Press ▲ or ▼ to select the Standard or Advanced
mode.
- Advanced mode: the icon is displayed.
- Standard mode: Std is displayed.
■ Validate by ►. The return to the previous menu is
immediate.
10
FrEQ
Choice of transposition frequency for the
impedance in Advanced mode
■ Enter the menu by ►. FrEQ blinks.
■ Press ▲ or ▼ to select the transposition frequency
of the measured impedance from among the 4
possible values: 50, 60, 128, and 2,083 Hz.
■ Validate by ►. The return to the previous menu is
immediate.
11
HOLd
Activation/Deactivation of the Pre-Hold mode
■ Enter the menu by ►. HOLd blinks.
■ Press ▲ or ▼ to switch the Pre-Hold mode to
active or inactive.
- Pre-hold mode inactive: only the icon is
displayed.
- Pre-hold mode active: the and icons
are displayed.
■ Validate by ►. The return to the previous menu is
immediate.
12
VER
Display of the version number
■ Enter the menu by ►.
■ The version number is displayed.
■ Return to the previous menu by ►.
Adjusting the clamp
The SET-UP menu enables users to adjust their clamps when they judge it
necessary. In order to avoid activating an adjustment procedure involuntarily,
there are 2 protections:
1. In the SET-UP menu, the CAL menu is placed last. A sustained press on ►
and ▲ and ▼ activates the 3 adjustment menus in SET-UP.
2. Once the adjustment menus have been activated, a long press (3 seconds) on
► is necessary to start each of the procedures.
Page 40

40
Menu no.
Indication
Object and use
-
CAL
Activating the adjustment menus
This function gives access to the following 3 subfunctions:
■ CAL R: adjustment of the impedance measurement.
See menu 13.
■ CAL I: adjustment of the current measurement. See
menu 14.
■ CAL dFL: restoration of the factory values. See
menu 15.
The procedure for access to these 3 sub-functions is
secured; refer directly to the menus concerned for
access to them.
13
CAL.
R
Impedance measurement adjustment procedure
Additional equipment necessary
■ A loop of known resistance, such as the Calibration
loop.
Adjustment of the impedance measurement
■ Press ► for 3 seconds to validate CAL. R function
14.
The sensitivity of the channels used in the
impedance measurement will be recalculated on a
known loop (having a value between 5 and 25 Ω)
and on an open loop.
■ PreS rt is displayed alternately with no LOOP.
■ With the clamp not encircling any conductor, press
► to start the procedure.
■ After approximately 15 seconds, the display unit
indicates SET 25.00 Ω.
■ Open the clamp and in it place a loop of known
resistance, such as the optional Calibration loop, for
example on the 7.9Ω zone.
■ Use the ▲ and ▼ keys to set the value displayed to
match the known resistance.
■ Press ► to validate the value.
■ run CAL is displayed for approximately 10 seconds.
■ The result of the procedure is displayed:
- End CAL.R PASS: valid measurement loop
calibration.
- End CAL.R FAIL: invalid measurement loop
calibration.
■ Storage and return to CAL R menu 13 by ►.
Page 41

41
14
CAL.
I
Current measurement adjustment procedure
Additional equipment necessary
■ A source of stabilized 0.1 and 10 A current.
Adjustment of the current measurement
■ Press ► for 3 seconds to validate CAL. I function
14.
The sensitivity of the channels used in the current
measurement will be recalculated on 2 current
values.
■ PreS rt is displayed followed by 100.0 mA Set.
■ Open the clamp and in it place a conductor carrying
a current between 50 mA and 150 mA from the
current source.
■ Use the ▲ and ▼ keys to set the value displayed to
match the value of the source.
■ Press ► to validate the value.
■ The display unit indicates run CAL.I for
approximately 15 seconds.
■ PreS rt is displayed followed by 10.00 A Set.
■ Set the current source to between 9 A and 10.5 A.
■ Use the ▲ and ▼ keys to set the value displayed to
match the value of the source.
■ Press ► to validate the value.
■ The display unit indicates run CAL.I for
approximately 15 seconds.
■ The result of the procedure is displayed:
- End CAL.I PASS: valid measurement loop
calibration.
- End CAL.I FAIL: invalid measurement loop
calibration.
■ Storage and return to CAL I menu 14 by ►.
15
CAL.
dFLt
Restoration of the factory values
■ Press ► for 3 seconds to validate CAL. dFLt
function 15.
The settings of the device will all be returned to the
factory values. However, the stored configuration
and measurements are not erased.
■ PreS rt is displayed. Press ►.
■ End dFLt PASS is displayed:
■ Storage and return to CAL dFLt menu 15 by ►.
Note: if an adjustment operation fails (FAIL message), check that there is nothing
interfering with the closing of the clamp, then repeat the operation. If the problem
persists, the clamp must be sent back for repair (see 11.5§Fehler! Verweisquelle
konnte nicht gefunden werden.).
Page 42

42
9. OFF POSITION
The device can be switched off manually or automatically.
9.1 MANUAL SWITCHING OFF
Set the function switch to OFF.
9.2 AUTOMATIC SWITCHING OFF
The automatic switching off function acts after 5 minutes of inactivity, meaning no
key pressed, no change of switch setting, and no opening of the clamp.
Fifteen seconds before this stop, a short audible signal is emitted and the display
unit blinks once a second.
Automatic switching off can be deactivated in the set-up menu; see §8.5, menu 3.
The P symbol is then displayed. This function is stored.
9.3 BACKUP OF THE CONFIGURATION
The date and time are kept up to date when the device is off. If the batteries are
replaced or withdrawn with the clamp in the OFF position, the date and time are
saved for at least 2 minutes. Beyond that, the date and time may be lost and have
to be reset. The following data are saved when the device is off or after
withdrawal of the batteries:
■ Stored measurements.
■ Activation/deactivation of the buzzer.
■ Activation/deactivation of automatic switching off.
■ Values of the thresholds and senses of the alarms.
■ Choice of the Standard or Advanced mode.
■ Impedance transposition frequency in Advanced mode.
■ Activation/deactivation of the Pre-hold mode.
9.4 PROLONGED STOP
Withdraw the batteries from the device if a long period of non-use is anticipated.
Page 43

43
10. TECHNICAL CHARACTERISTICS
10.1 REFERENCE CONDITIONS
Quantities of influence
Reference conditions
Ambient temperature
23±3 °C.
Relative humidity
50%RH±10%.
Battery voltage
6 V±0.2 V.
Magnetic field
< 40 A/m DC.
No AC field.
Electric field
< 1 V/m.
Operating position
Clamp horizontal.
Position of the conductor in the clamp
Centred.
Measurement environment
No adjacent conductors carrying
current within 10 cm.
Proximity to magnetic mass
> 10 cm.
Loop resistance
Non-inductive resistance (20 Ω for the
voltage measurement).
Measured current, sinusoidal frequency
Frequency 50 Hz.
Level of distortion < 0.5%.
Spurious current in loop resistance
measurement
Zero for the resistance and inductance
measurements.
< 3.75 A for the voltage measurement.
10.2 ELECTRICAL CHARACTERISTICS
10.2.1 LOOP RESISTANCE MEASUREMENT
Measurement range:
- Loop ohmmeter function: 0.01 to 1500 . 1500-counts display.
Measurement ranges ()
Resolution ()
Intrinsic uncertainty
0.010 to 0.099
0.001
±1.5% ±0.01
0.10 to 0.99
0.01
±1.5% ±2R
1.0 to 49.9
0.1
±1.5% ±R
50.0 to 99.5
0.5
±2% ±R
100 to 199
1
±3% ±R
200 to 395
5
±5% ±R
400 to 590
10
±10% ±R
600 to 1,150
50
About 20%
1,200 to 1,500
50
About 25%
Alarm: range of threshold from 1 to 199 . R=resolution
Page 44

44
Measurement frequency: 2083 Hz.
Transposition frequency: choice of 50, 60, 128, or 2083 Hz for the impedance
calculation.
Maximum overloads: - permanent current 100 A maximum (50/60 Hz).
- transient current (< 5 s) 200 A (50/60 Hz).
10.2.2 LOOP INDUCTANCE MEASUREMENT
Measurement ranges (µH)
Resolution (µH)
Intrinsic uncertainty
10 to 100
1
±5% ±R
100 to 500
1
±3% ±R
10.2.3 ESTIMATE OF THE CONTACT VOLTAGE
Measurement range:
- Contact voltage function: value calculated as the product of the loop impedance
by the leakage current.
Measurement ranges (V)
Resolution (V)
Intrinsic uncertainty
0.1 to 4.9
0.1
±5% ±R
5.0 to 49.5
0.5
±5% ±R
50.0 to 75.0
1
±10% ±R
Alarm: range of thresholds from 1V to 75V.
10.2.4 CURRENT MEASUREMENT
Measurement range:
- Ammeter function: 0.2 to 40A. 4000-counts display.
Measurement ranges (A)
Resolution (A)
Intrinsic uncertainty
0.200 to 0.999 mA
1 µA
±2% ±50 µA
1.000 to 2.990 mA
3.00 to 9.99 mA
10 µA
±2% ±50 µA
10.00 to 29.90 mA
30.0 to 99.9 mA
100 µA
±2% ± R
100.0 to 299.0 mA
0.300 to 0.990 A
1 mA
±2% ± R
1,000 to 2,990 A
3.00 to 39.99 A
10 mA
±2% ± R
Alarm: range of thresholds from 1 mA to 40 A.
Page 45

45
10.3 VARIATIONS IN THE DOMAIN OF USE
The influence is characterized by an Accuracy class number for each quantity of
influence.
Quantity of
influence
Limit of the
Domain
Quantities
influenced
Influence
Typical
Max
Temperature
-20 °C to +55° C
A, Ω
(1)
, Uc
1 ct/10°C
+R
2 ct/10°C
+R
Relative humidity
10% RH to 90% RH
A, Ω
(1)
, Uc
1 ct+R
3 ct+R
Battery voltage
4 to 6.5V
A, Ω
(1)
, Uc
0.1 ct+R
0.25 ct+R
Position of
conductor
from the edge to the
centre
A, Uc
0.1 ct+R
0.2 ct+R
Ω
(1)
0.05 ct+R
0.1 ct+R
Position of clamp
+/-90°, 180°
A
0.2 ct+R
0.4 ct+R
Uc, Ω
(1)
0.1 ct+R
0.25 ct+R
Proximity to
magnetic mass
Steel sheet 1mm
thick against air gap
A, Ω
(1)
, Uc
0.1 ct+R
0.5 ct+R
Magnetic field at
50...60 Hz
30A/m
A
2mA
(2)
4.5mA
(2)
Uc
0.1 ct+R
0,5 ct+R
Frequency of the
current
47 to 800 Hz
A, Uc
1 ct+R
2 ct+R
Leakage current
at 50....60 Hz
I<10 A
RxI<50 V
Ω
(1)
2 ct+R
8 ct+R
(1)
: Ω designates the quantities R, L, and Z.
(2)
: Offset on the current measurement.
10.4 POWER SUPPLY
■ 4 1.5 V LR6 (AA) alkaline batteries or 4 Ni-MH batteries.
■ Mean consumption: approximately 140 mA.
■ Mean life: approximately 12 hours, or 1,440 30-second measurements.
Remark: extreme environmental conditions may perturb the internal
microprocessor. Simply disconnecting the battery may be enough to eliminate this
malfunction.
The batteries will be withdrawn for long-term storage.
Page 46

46
10.5 ENVIRONMENTAL CONDITIONS
Fig. 33
1. Domain of reference (CEI160).
2. Domain of operation.
3. Domain of storage (without batteries). According to CEI359 category II
(equipment for indoor and outdoor use).
10.6 MECHANICAL CHARACTERISTICS
Dimensions: 55x95x262 mm (thickness, width, height).
Max. clamping diameter: 35 mm.
Opening: 35 mm.
Weight: approximately 935 g with batteries.
Display unit: 152-segment OLED. Active surface area 48x39 mm.
Tightness: IP40, group III equipment.
Drop test: according to IEC-61010-1.
10.7 COMPLIANCE WITH INTERNATIONAL STANDARDS
Device fully protected by double insulation .
EN61010-1
EN61010-2-030
EN61010-2-032
10.8 ELECTROMAGNETIC COMPATIBILITY
The device is compliant with standard IEC-61326-1.
Page 47

47
11. SERVICING AND MAINTENANCE
Except for the batteries, the instrument contains no parts likely to be
replaced by personnel who are not specially trained and accredited. Any
unauthorized repair or replacement of a part by an “equivalent” may
gravely impair safety.
11.1 CLEANING
Disconnect everything connected to the device and set the switch to OFF.
Use a soft cloth, dampened with soapy water. Rinse with a damp cloth and dry
rapidly with a dry cloth or forced air. Do not use alcohol, solvents, or
hydrocarbons.
Keep the air gap of the clamp perfectly clean.
11.2 REPLACEMENT OF THE BATTERIES
If the low battery symbol on the screen blinks (Fig. 6, item 8), the batteries must
be replaced promptly. Display of the Lo bat message indicates that the batteries
must be replaced for it to be possible once again to use all functions of the clamp.
11.2.1 PROCEDURE
■ Disconnect everything connected to the device and set the switch to OFF.
■ Use a cross-headed or plain screwdriver to unscrew the 2 attachment screws
(Fig. 5, item 10) and remove the battery compartment cover (Fig. 5, item 11).
■ Withdraw the old batteries and replace them with 4 new batteries having
identical characteristics (LR6, AA, 1.5 V); take care with the polarities.
Note: the alkaline batteries can be replaced by Ni-MH rechargeable batteries
(AA, 1.2 V) having similar characteristics. However, the time between the low
battery message and the automatic switching off of the device will be shorter
with the rechargeable batteries.
Spent batteries must not be treated as ordinary household waste.
Take them to the appropriate recycling collection point.
■ Close the battery compartment cover and screw the two screws back in.
■ Check the proper operation of the device.
Page 48

48
11.2.2 PRESERVATION OF STORED DATA
When the batteries are removed, the data (recorded measurement values, alarm
thresholds) are preserved. The date and time must be reset if the batteries are out
for more than 2 minutes.
11.3 CHECK OF ACCURACY
11.3.1 OBJECT AND EQUIPMENT NECESSARY
Regular checking serves to verify the accuracy of the clamp and thereby detect
any need for an adjustment.
11.3.2 EQUIPMENT
Standard loop resistance available as an accessory. Simulates 5 loop resistance
values.
11.3.3 PROCEDURE
Place the calibration loop in the jaws of the clamp. Set the function switch of the
device to Ω+A, then compare the measurement displayed with the value marked
on the segment placed in the clamp. Repeat this process for each standard value
of the calibration loop.
Depending on the measurement errors found, you may decide that your clamp
must be calibrated. The first step is to carry out the adjustment procedure
described in §11.4, before getting in touch with your supplier.
■ Standard loop values: 7.9 Ω / 12.4 Ω / 22 Ω / 49.5 Ω / 198 Ω.
■ Accuracy of these values 0.3% typical, 0.5% max.
Remark: the accuracy of the device must be added to the accuracy of the
standard values.
11.4 ADJUSTMENT
11.4.1 OBJECT AND EQUIPMENT NECESSARY
Regular adjustment is required; the more intensively the device is used, the more
often it will have to be adjusted.
The user can perform 2 adjustment operations in addition to restoring the factory
settings, directly on the clamp, in the SET-UP position.
11.4.2 EQUIPMENT
Standard loop resistance available as an accessory. Simulates 5 loop resistance
values.
Page 49

49
11.4.3 PROCEDURE
Refer to §8.5, menu no. 13, 14, 15.
11.5 METROLOGICAL CHECK, REPAIR AND REPLACEMENT
PARTS SERVICE, CALIBRATION CENTER
Like all measuring or testing devices, regular instrument verification is
necessary.
If required, please contact:
GMC-I Service GmbH
Service-Center
Thomas-Mann-Strasse 20
90471 Nürnberg • Germany
Phone +49 911 817718-0
Fax +49 911 817718-253
E-Mail
service@gossenmetrawatt.com
www.gmci-service.com
This address is only valid in Germany.
Please contact our representatives or subsidiaries for service in other countries.
11.6 PRODUCT SUPPORT
If required, please contact:
GMC-I Messtechnik GmbH
Product Support Hotline
Phone +49 911 8602-0
Fax +49 911 8602-709
E-Mail
support@gossenmetrawatt.com
Page 50

50
12. WARRANTY
Except as otherwise stated, our warranty is valid for twelve months starting from
the date on which the equipment was sold. Extract from our General Conditions of
Sale, provided on request.
The warranty does not apply in the following cases:
■ Inappropriate use of the equipment or use with incompatible equipment.
■ Modifications made to the equipment without the explicit permission of the
manufacturer's technical staff.
■ Work done on the device by a person not approved by the manufacturer.
■ Adaptation to a particular application not anticipated in the definition of the
equipment or not indicated in the user's manual.
■ Damage caused by shocks, falls, or floods.
Page 51

51
13. TO ORDER
EARTH CLAMP METRACLIP EARTH .......................................... M312N
Supplied in a carrying case with:
- 4 LR6 or AA alkaline batteries
- a test report
- a CD ROM containing the user manuals (one per language)
- a multilingual quick start guide
- a multilingual safety data sheet
- a Calibration loop
Page 52

52
06 - 2015
Code 694302B02 - Ed. 3
Subject to change without notice • A pdf version is available on the Internet
Phone+49 911 8602-111
GMC-I Messtechnik GmbH Fax +49 911 8602-777
Südwestpark 15 E-Mail info@gossenmetrawatt.com
90449 Nürnberg ● Germany www.gossenmetrawatt.com
 Loading...