

Page 1
Outdoor WiFi CameraHD
Quick Start Guide
Mode l: T59 23 HA A
Befor e using t he p rod uc t, pl ea se re ad t he gu id e caref ul ly to a vo id
any dam ages to t he p rod uc t in vi rt ue of f au lty o pe ratio n or misu se .
1
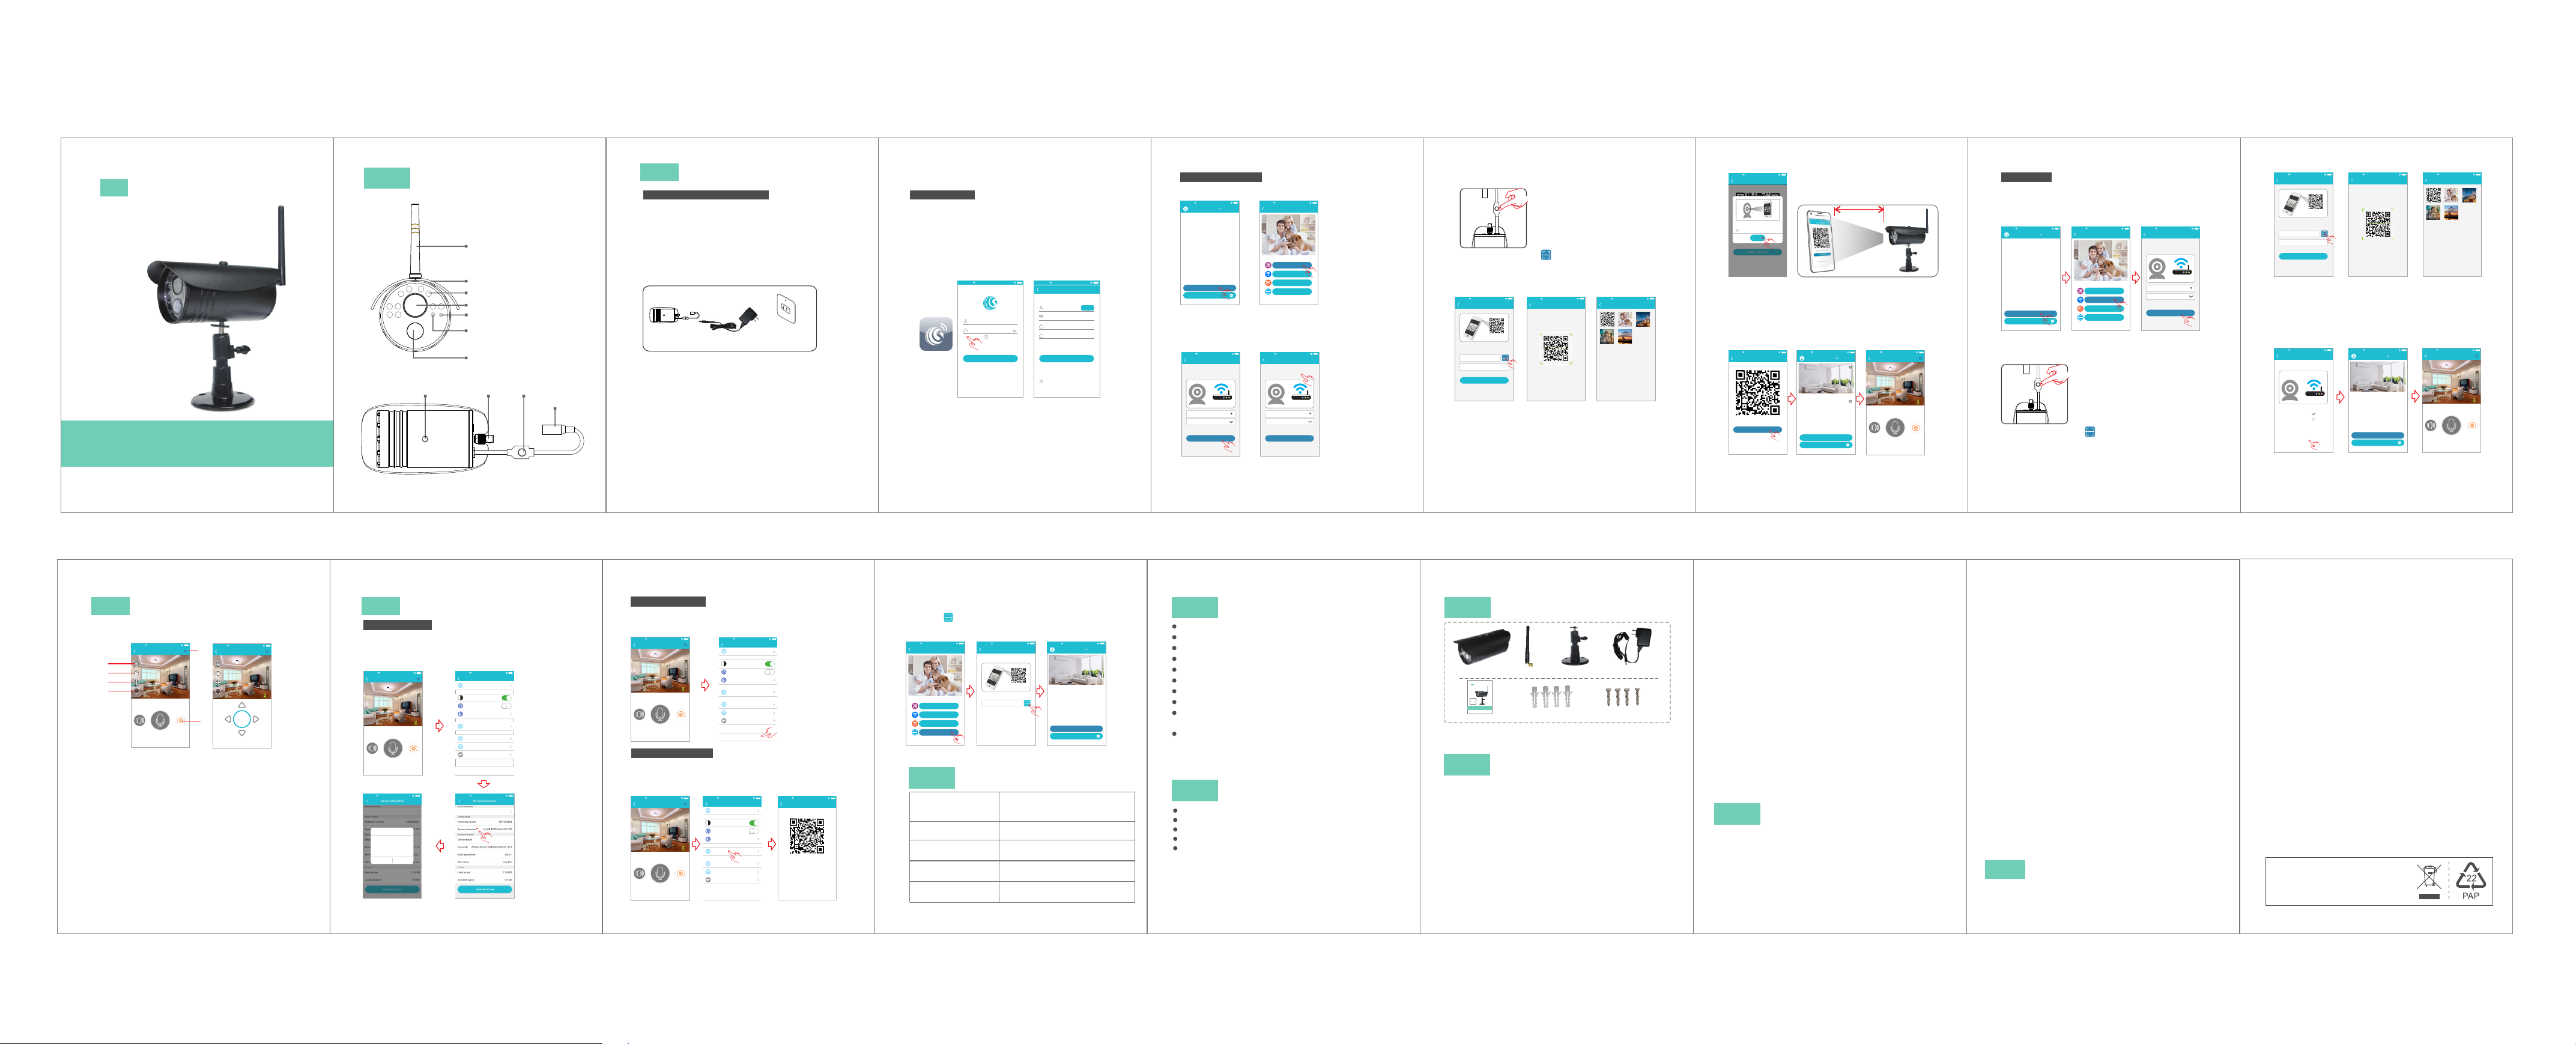
Appearance
Support
hole
(Bottom)
Antenna (wh en i ns ta ll in g
antenna, ti gh te n up a nd
make antenn a up wa rd s)
Rain cover
Infrared li gh t
Camera Lens
Power indicat or l ig ht
Indicator l ig ht o f ne tw or k
link status ( Li nk l ig ht )
Human body infr ar ed s en si ng
Antenna
interface
SET
button
DC 12V
power plug
-1-
2
Inst allatio n
P re par at io n p ri or to In sta ll at io n
1. 2. 4G wire less ro uter is r equir ed.
2. Su pport An droid 4 .4 and ab ove, iOS 8. 0 and a bove
3. Do wnloa d and ins tall th e APP :
A. Op en the App S tore , se arch “G OSCOM ” and ins tall.
B. Op en the Go ogle Pl ay Stor e , searc h “GOSC OM” and i nstal l.
4. He re is an op erati on exam ple of An dro id APP, an d
it ca n serve a s a refer ence fo r the iOS AP P.
5. Po wer-o n camer a and red lin k Ind icato r remai ns,po wer
ind icato r remai ns.
Camera
Power Adapter
Wall Socket
-2-
R eg ist er /L og in
Step 1: Tap the “GOSCOM” APP icon to open it (figure 1);
Step 2: Use email address for user ID registration (figure 2-3);
Step 3: After registration, enter the email address and then
password to log in (figure 2)
(2)
No Servic e 11:50
(1)
Email
Enter pa sswor d
Regist er
Rememb er pass word
Logi n
Forge t passw ord
TIP : For use r ID regi strat ion, pl ease us e an effe ct ive e mai l
add ress, ( examp le XXXX@q q.c om), in o rder to r etrie ve the
pas sword .
(3)
No Servic e 11:50
Quick Re giste r
Enter ad dress
please e nter ve rific ation c ode sen t to
your ema il(ca se sens itive )
Enter pa sswor d
Enter pa sswor d again
Password fo rmat: 8 -16 cha racte rs in len gth, co ntain a t least
two kinds am ong num bers, capit al lett ers and l owerc ase
letters
Regis ter
I have raed this Agreeme nt and agree to the
terms and conditio ns User agreeme nt
Get code
-3-
Sca n QR Code t o Ad d
1.C lick “A dd Came ra” → “sc an the QR c ode to ad d”
(fi gure 5)
No Service 11:50
Devic e List
Add dev ice
Exper ience C enter
(fi gure 4) Cli ck
No Service 11:50
Add dev ice
scan the Q R code to a dd
Add by WiF i
Add by net work ca ble
Add frie nds sha re
(4) (5)
2.C onfig ure WIF I, ente r WiFi na me and pa sswor d, and
“Co nfirm ” after t hat. (f igure 6 )P.S :De vice does n ot su pport 5 G
Wi- Fi netw ork; if t his is no t your de sired n etwork, t ap to t oggle .
(fi gure 7)
No Service 11:50
WiFi se tting
Camera doe s not su pport 5 G Wi-Fi ;if thi s is not th e
network yo u want, click t o chan ge
Reset
PASSWOR D
please confirm the SSID and password arecorrect,
and SSID matches the WiFi of device
Confi rm
No Service 11:50
WiFi se tting
Camera doe s not su pport 5 G Wi-Fi ;if thi s is not th e
network yo u want ,click t o chan ge
Reset
PASSWOR D
please confirm the SSID and password arecorrect,
and SSID matches the WiFi of device
Confi rm
cli ck
(6) (7)
-4-
3.P lease p ress th e “SET” k ey for 1 se cond, a nd then
red l ink ind icato r flash es,powe r ind icato r remai ns.(f igure 8 )
(8)
4.C lick th e QR code i con (Fi gure 9) , s witch t o the QR co de
sca nning m ode, an d scan th e ID QR cod e
●QR Co de on the c amera s ticke r (Figu re 10) ;
●Or ch oose th e QR code p ictur e from th e album f or ID sca nning
(Fi gure 11)
No Service 11:50
Add Dev ice
Press and hold the SET key for 1 second and then
you will hear Start Configurtion Mode
Scan
ID:
Devic e Name:Ca mera
Next
No Service 11:50
Scan QR C ode
Album
No Service 11:50
Album
(9) (10) (11)
5.W hen the AP P sw itc h to the pr ecau tio n pag e befor e scann ing,
ple ase rea d the pro mpts ca reful ly and c lic k "Ne xt step "(Fig ure 12)
Whe n the mob ile pho ne show s a QR code int erf ace, pl ease al ign
the Q R code to t he came ra, wit h a dista nce of ab out 10 ~ 20 cm
(Fi gure 13 ); if sca nning s ucceeds , red l ink ind icato r turns t o green .
-5-
No Service 11:50
Scan QR C ode
Devic e List
Add dev ice
Exper ience C enter
10- 20cm
No Service 11:50
2017/04/2 1 13:00
Sound
Livin g Room
Speak
31°C
Snapsho t
Put this QR c ode at 10 -20cm f rom the
camera, a nd when y ou hear a " beep"
prompt so und, cli ck “I hav e heard i t”
No prompt s ound
Confi rm
I Have Hea rd It
(12) (13)
6. Aft er scan t he QR cod e, and wh en you se e the lin k indic ator tu rns to
gre en ligh t, clic k “I Have H eard It ”(Fig ure 14 ), an d now t he came ra is
con necti ng to the r outer W iFi. Wh en you se e that th e indic ator on t he
dev ice tur ns from b linki ng gree n to be ste ady on, i t indic ates th at the
dev ice is co nnect ed and wi ll auto matic ally sk ip to the d evice l ist.
(Fi gure 15 )Clic k the dev ice to en ter the r eal-t ime mon itori ng inte rface .
(Fi gure 16 )
No Service 11:50
Scan QR C ode
Did you hea r a “beep” s ound?
I have hea rd it
Did not he ar any so und?
No Service 11:50
Living Roo m
(16)(15)(14)
-6-
Add b y WIFI
1.C lick “A dd Came ra” → “Ad d by WIFI ”
Fig ure 18) → Confi gure WI FI, ent er WiFi n ame and p asswo rd,
and c lick “C onfir m” afte r that. (Figu re 19)P.S :D evi ce do es not
sup port 5G W i-Fi ne twork ; if this i s not you r desired n etw ork,
Cli ck to tog gle
No Service 11:50
Devic e List
Add dev ice
Exper ience C enter
(Fi gure 17 ) Cli ck (
No Service 11:50
Add dev ice
scan the Q R code to a dd
Add by net work ca ble
Add frie nds sha re
Add by WiF i
No Service 11:50
WiFi se tting
Camera doe s not su pport 5 G Wi-Fi ;if thi s is not th e
network yo u want ,clic k to chan ge
Reset
PASSWOR D
please confirm the SSID and password arecorrect,
and SSID matches the WiFi of device
Confi rm
(17) (18) (19)
2.P lease p ress an d hold th e “SET” key f or 1 se cond, a nd then
red l ink ind icato r flash es.(Fig ure 2 0)
(20)
3.C lick th e QR code i con (Fi gure 21 ) , switc h to the QR c ode
sca nning m ode, an d scan th e ID QR cod e
●QR co de on the c amera s ticke r (Figu re 22) ;
●Or ch oose th e QR code p ictur e from th e album f or ID sca nning
(Fi gure 23 )
-7-
No Service 11:50
Add Dev ice
Press and hold the SET key for 1 second and then
you will hear Start Configurtion Mode
Scan
ID:
Devic e Name:Ca mera
Next
No Service 11:50
Scan QR C ode
Album
No Service 11:50
Album
(21) (22) (23)
4.
Aft er you cl ick “Co nfirm ”, when r ed link i ndic ato r tur ns to gre en,
ind icate s that th e camer a is conn ecting to t he ro uter.( Figur e 24)
Whe n you see t hat the i ndica tor on th e device tu rns f rom bli nking
gre en to be st eady on , it indi cates t hat the d evice is co nne cted
and w ill aut omati cally s kip to th e device li st. ( Figur e 25)
Cli ck the de vice to e nter th e real- time moni tor ing int erfac e.
(Fi gure 26 )
No Service 11:50
Add by Wi Fi
It will take a bout 1- 2 minut es to WiF i netwo rk,
please wai t
Step 1: Con necti ng
Step 2: Bin ding
Step 3: Con nect su cceed ed
connec ting fa ilde in o ver 2 min utes
No Service 11:50
Devic e List
Living Ro om
Add dev ice
Exper ience C enter
No Service 11:50
2017/04/2 1 13:00
Sound
Livin g Room
Speak
Snapsho t
(24) (25) (26)
-8-
31°C
View Mon itoring a nd Operat e
3
Aft er the de vice is c onnec ted, yo u can vie w real -ti me
mon itori ng, and t ake a pic ture, r ecord a vid eo, s peak, s et
up an d make ot her ope ratio ns on yo ur mo bil e phone .
No Service 11:50
Livin g Room
2017/04/2 1 13:00
2
3
4
HD
5
Sound
Snapsho t
Speak
6
1
No Service 11:50
2017/04/2 1 13:00
HD
Livin g Room
31°C
Rocker
(27) (28)
1. Ca pture b utton : click t o fast ca pture ( save in t he sett ings
dir ector y Alb um Book o ption ).
2. Pl aybac k butto n: Clic k to ente r the pla yback pag e, yo u can
vie w the cam era SD ca rd vide o file.
3. Re cord bu tton: C lick to s tart re cordi ng, cli ck the butt on ag ain
(st ored in t he set th e direc tory of t he albu m option) .
4. PT Z butto n: Clic k this bu tton, AP P po p-u p PTZ con trol in terfa ce
for H ead lev el \ vert ical an gle to ad just (Fig ure 2 8).
5. Sh arpne ss butt on: Cli ck to adj ust the R esol uti on pi xel for
rea l-tim e video m onito ring (HD/ SD)
6.S et butt on: Cli ck this b utton t o set the c amera -rela ted fun ctions.
Feat ures
4
Sof tware U pgrad e
1. Cl ick “Se tting s” icon → C lick “D evice I nform ation ”
(Fi gure 30 ) Cl ick “ Sy ste m Firmw are ” (Figu re 31) Cli ck “Upd ate
Now ” (Figu re 32)( It can on ly be upg rade d if th ere i s a small r ed spot
on th e top rig ht corn er of the a pplic ation fir mwa re)
2017/04/2 1 13:00
No Service 11:50
→ →
No Service 11:50
Livin g Room
Sound
Speak
Update
Can Upd ate to 00. 00.00 .01
1.Optim ize APP n etwor k pairin g
procedu re
2.Optim ize…
3.Optim ize…
Another Ti me
Update Now
(Fi gure 29 )
No Service 11:50
Settin g
Album
Status in dicat or
Rotate vi deo 180 d egree s
31°C
Snapsho t
(29) (30)
Night vis ion
Share wit h frien ds
Camera ti me chec k
WiFi sett ing
Device in forma tion
Delet e devic e
No Service 11:50
(32) (31)
-10--9-
Dev ice Unb indin g
1. “S ettin gs” ico n → “Dele te Devi ce”
Cli ck (Fi gure 33 ) C lick (Fi gure 34 )
APP w il l aut oma tical ly swit ch to cam era lis t, dele te the ca mera you
wan t to Unbu ndled i t from th e APP
No Service 11:50
Livin g Room
2017/04/2 1 13:00
31°C
Sound
Snapsho t
Speak
No Service 11:50
Settin g
Album
Status in dicat or
Rotate vi deo 180 d egree s
Night vis ion
Share wit h frien ds
Camera ti me chec k
WiFi sett ing
Device in forma tion
(33) (34)
Delet e devic e
Add F riend s to Shar e
Gen erate a Q R code fo r shari ng(ca n share thi s QR Co de to
mul ti- use rs)
1. Cl ick”s ettin g” icon (Figu re 35) → Clic k "shar e wit h fr iends "
(Fi gure 36 )→ you can h ave the Q R code( Figur e 37)
No Service 11:50
Livin g Room
2017/04/2 1 13:00
Sound
Speak
No Service 11:50 No Service 11:50
Settin g
Album
Status in dicat or
Rotate vi deo 180 d egree s
Night vis ion
31°C
Share wit h frien ds
Camera ti me chec k
WiFi sett ing
Device in forma tion
Snapsho t
Delet e devic e
(35) (36)
share w ith fri ends
Steps to share wi th friends
Step 1:Open“Add Camera”on the mobile phone of
a friend
Step 2:Select the fourth way to add,and scan QR
code
(37)
-11-
If ot her use rs want t o add the c amera , Click " Add Cam era" →
sel ect "Ad d Frien ds to Sha re" mod e(Fig ure 38)→ C lick th e QR
cod e icon (F igure 3 9) , swit ch to the Q R code sc annin g
mod e→ scan th e QR code s hared b y frien ds→ Ente r the Dev ice
Lis t(Fig ure 40)
No Service 11:50
Add dev ice
scan the Q R code to a dd
Add by net work ca ble
Add frie nds sha re
Add by WiF i
No Service 11:50
Add Dev ice
Scan the QR c ode for s harin g with fr iends
ScanID:
No Service 11:50
Devic e List
Living Ro om
Add dev ice
Exper ience C enter
(38) (39) (40)
5
Camera Indicat or Inst ructi on
Cours e of p ow ering
on star t
Confi gu ra tion mo de /
conne ct io n to rout er
Wifi signal / scan has
been found successful
Conne ct t o ro unter
Succe ss fu l conne ct io n
to netw or k pl atfor m
Red lig ht k ee ps on aft er l in k
light w ai ti ng for 10 s: p ow er
indic at or l ight ke ep s on
Link re d li gh t flash in g, p ower
indic at or l ight ke ep s on
Link re d li gh t keeps o n, p ow er
indic at or l ight ke ep s on
Link gr ee n li ght fla sh in g, powe r
indic at or l ight ke ep s on
Link gr ee n li ght kee ps o n,
power i nd ic ator li gh t ke eps on
-12-
6
Technical paramet ers
Imaging sen so r: 1 /4 i nc h, C MOS
Camera reso lu ti on : 72 0P high def in it io n
Vie w an gl e: 6 1°
Night visio n ra ng e: ≤5 m
Wat er pr oof grade: IP 66
Wor ki ng v ol ta ge : DC +12V /1A
Wor ki ng t em pe ra ture: -10℃~+35
℃
Wor ki ng h um id it y: 15%~85%RH
Product dim en si on ( Lx Wx H):
130x69x56mm (e xc lu di ng s upport)
Product wei gh t: 34 5g ( in cluding suppo rt )
No addition al n ot ic e wi ll b e made in case of any
※
minor chang e. O ur c om pa ny r eserves the rig ht o f
final inter pr et at io n.
7
Func tion Features
24/7 li ve v id eo stre am in g
HD 720P p ro vides e xc el lent vi de o quali ty
Push me ss ag e to your p ho ne w hen PIR s en so r trigg er ed.
Advan ce d vi deo rec or di ng on bui lt -i n 8G micr o- SD card
Night v is io n (5m vis ib il ity)
-13-
Packing list
Outdoor WiFi Cam eraHD
ID QR code
Product Quick Gui de
Model: T5923C
Version No.: 1.0
Before using the product, please read the guide carefully to avoid
any damages to the product in virtue of faulty operation or misuse.
Man ual
Antenn a
Sup port
Wal l plu g
Pow er adapte r
Scr ew
8
Camer a
※Pictu re s ar e for r ef er ence on ly, and th e re al obje ct p re vails .
9
1.Infrared d et ec ti on : wh en thermal radi at io n so ur ce i s
detected wi th in t he s co pe o f camera, the cam er a wi ll
record vide o an d ta ke p ho to s automatical ly. Videos
and photos wi ll b e sa ve d in b ui lt-in micro-S D ca rd .
2.Share your c am er a to f ri en ds: Share QR co de o f th e
device with y ou r fr ie nd s.
3.Cancel "Shar e yo ur c am er a to friends": De le te t he
camera and ca nc el S ha ri ng y our camera to fri en ds .
(You h av e to r e-add the camer a to u se i t ag ai n)
4.Push messa ge : wh en t he rm al source is dete ct ed ,
alarm messa ge c an b e se nt t o se rver and pushed t o
your phone
Tips
-14-
5.Remote mon it or in g: a ft er the camera i s co nn ec te d to
Internet su cc es sf ul ly, app ca n vi ew t he m on it or via
Internet, a ny ti me , an yw here.
6.Special c ha ra ct er s ar e accessible on ly u nd er E ng li sh
mode, and oth er p un ct ua ti on mark used in oth er
language in co ns is te nt w ith that under En gl is h mo de
cannot be inp ut . Ava ilable specia l ch ar ac te rs i nclude
" @, #, &, *, ~, {, }, -, = , +, / , ?, ( , )" , an d unavailable
special cha ra ct er s in cl ude "%", "\", "<> ".
7.When this m ac hi ne h as a c rash fault or o th er a bn or mal
condition s in fl ue ncing the usage , it i s re co mm ended to
cut out the p ow er a nd r es ta rt; or press SE T ke y fo r 5
seconds, wh ic h ca n re st ore factory set ti ng s, a nd t hen
please reco nn ec t th e ro uter.
8.Special N ot e: T his QR code is sa me a s th e on e st ic ked
on the outdoo r ca me ra . It i s us ed when user need t o
re-do the set u p an d sc an t hi s QR c ode to add the
camera. Ple as e sa fe k ee pi ng this camera ID Q R co de
on the manual , in c as e QR c od e on c amera may fall of f
after daily u se u nd er t he s un a nd rain.
10
1.Wi-Fi cann ot b e co nn ec te d
a) Ensure tha t th e an te nn a of c amera is fixe d we ll .
b) Ensure tha t ca me ra i s in r an ge of router. Keep t he
distance le ss t ha n 40 ft s be tween route r an d in do or
camera, les s th an 6 5f ts f or o utdoor came ra .
Troubleshooting
-15-
c) Ensure tha t SS ID a nd p as sw ord of Wi-Fi co nt ai ns n o
special cha ra ct er s. M od ify the SSID an d pa ss wo rd o f
Wi-Fi with on ly E ng li sh c ha racters, no s pe ci al
character s.
d) Ensure tha t SS ID a nd p as sw ord are no longer t ha n
16 characte rs
e) Ensure tha t SS ID i s br oa dc asted.
f ) Ensure that t he D HC P is enabled on rou te r.
g) Ensure tha t Wi -F i en cr yp tion method i s WPA 2- PSK/
WPA- PS K or AE S.
h) Ensure tha t Wi -F i si gn al i s 2.4GHz.
i) Ensure tha t th er e is n o MA C fi lter on router or a dd
MAC address t o ro ut er w hi te list
j) We su gg es t re bo ot ing the route r, an d th e "s ec ur ity
settings, e nc ry pt io n me thod" of WiFi p as sw or d
should neve r ch oo se " au to -select".
k) Reset the cam er a to s et u p co nn ection again. P re ss
and hold SET ke y fo r 5 se conds.
2.Red link In di ca to r re ma ins, network co nn ec ti on i s failed.
a) Ensure tha t th e pa ss wo rd o f Wi-Fi is correc t.
b) Ensure tha t th e ne tw or k co nnects to Int er ne t fr ee ly.
c) Ensure tha t th e ca me ra i s in r ange of Wi-Fi hot sp ot .
3.Green lin k In di ca to r fl ashes, connec ti on t o se rv er failed.
a) Ensure tha t Wi -F i si gn al i s strong enou gh a nd
bandwidth i s en ou gh f or c on nection. Move n ea r to
Wi-Fi hotsp ot o r in cr ea se t he bandwidth.
b) Ensure tha t ca me ra i s no t un der interfe ro n of o th er
2.4GHz sign al .
11
NOTE: This equipment has been tested and found to comply with the limits for a
Class B digital device, pursuant to part 15 of the FCC Rules.
These limits are designed to provide reasonable protection against harmful
interference in a residential installation.
FCC/CE Certifi catio n Infor mation
-16-
This equipment generates uses and can radiate radio frequency energy and, if
not installed and used in accordance with the instructions, may cause harmful
interference to radio communications. However, there is no guarantee that
interference will not occur in a particular installation. If this equipment does
cause harmful interference to radio or television reception, which can be
determined by turning the equipment off and on, the user is encouraged to try to
correct the interference by one or more of the following measures:
- Reorient or relocate the receiving antenna.
- Increase the separation between the equipment and receiver.
- Connect the equipment into an outlet on a circuit different from that to which the
receiver is connected.
- Consult the dealer or an experienced radio/TV technician for help
Changes or modifications not expressly approved by the party responsible for
compliance could void the user's authority to operate the equipment.
This device complies with Part 15 of the FCC Rules. Operation is subject to the
following two conditions:
(1) this device may not cause harmful interference, and
(2) this device must accept any interference received, including interference that
may cause undesired operation.
The Maximum Permissible Exposure (MPE) level has been calculated based
on a distance of d=20 cm between the device and the human body. To maintain
compliance with RF exposure requirement, use product that maintain a 20cm
distance between the device and human body. Hereby, we declares that this
device is in compliance with the essential requirements and other relevant
provisions of Directive 2014/53/EU.
Notice: Observe the national local regulations in the location where the device I
s to be used. This device may be restricted for use in some or all member states
of the European Union (EU)
The o perat ed freq uency i s 2.4G~ 2.483 5G with B /G/N2 0/N40 .
The M ax outp ut powe r on 802. 11b i s 16. 96dBm .
The M ax outp ut powe r on 802. 11g i s 14. 98dBm .
The M ax outp ut powe r on 802. 11n -20 i s 15.12 dBm.
The M ax outp ut powe r on 802. 11n -40 i s 14.67 dBm
EU Environmental Provisions
E-wast e cannot be mixed wi th househo ld
garbag e; corresp onding loc al governm ent
sector or rec ycling sta tions shal l be
respon sible for cir cular proc ess.
-17-
Page 2

RF_061, Issue 02
SIMPLIFIED EU DECLARATION OF CONFORMITY
Hereby, [ShenZhen Gospell Smarthome Electronic Co., Ltd.]
declares that the radio equipment type [T5923HAA] is in
compliance with Directive 2014/53/EU. The full text of the EU
declaration of conformity is available at the following internet
address:(www.goscam.com)
Richie Xiao
 Loading...