

Page 1
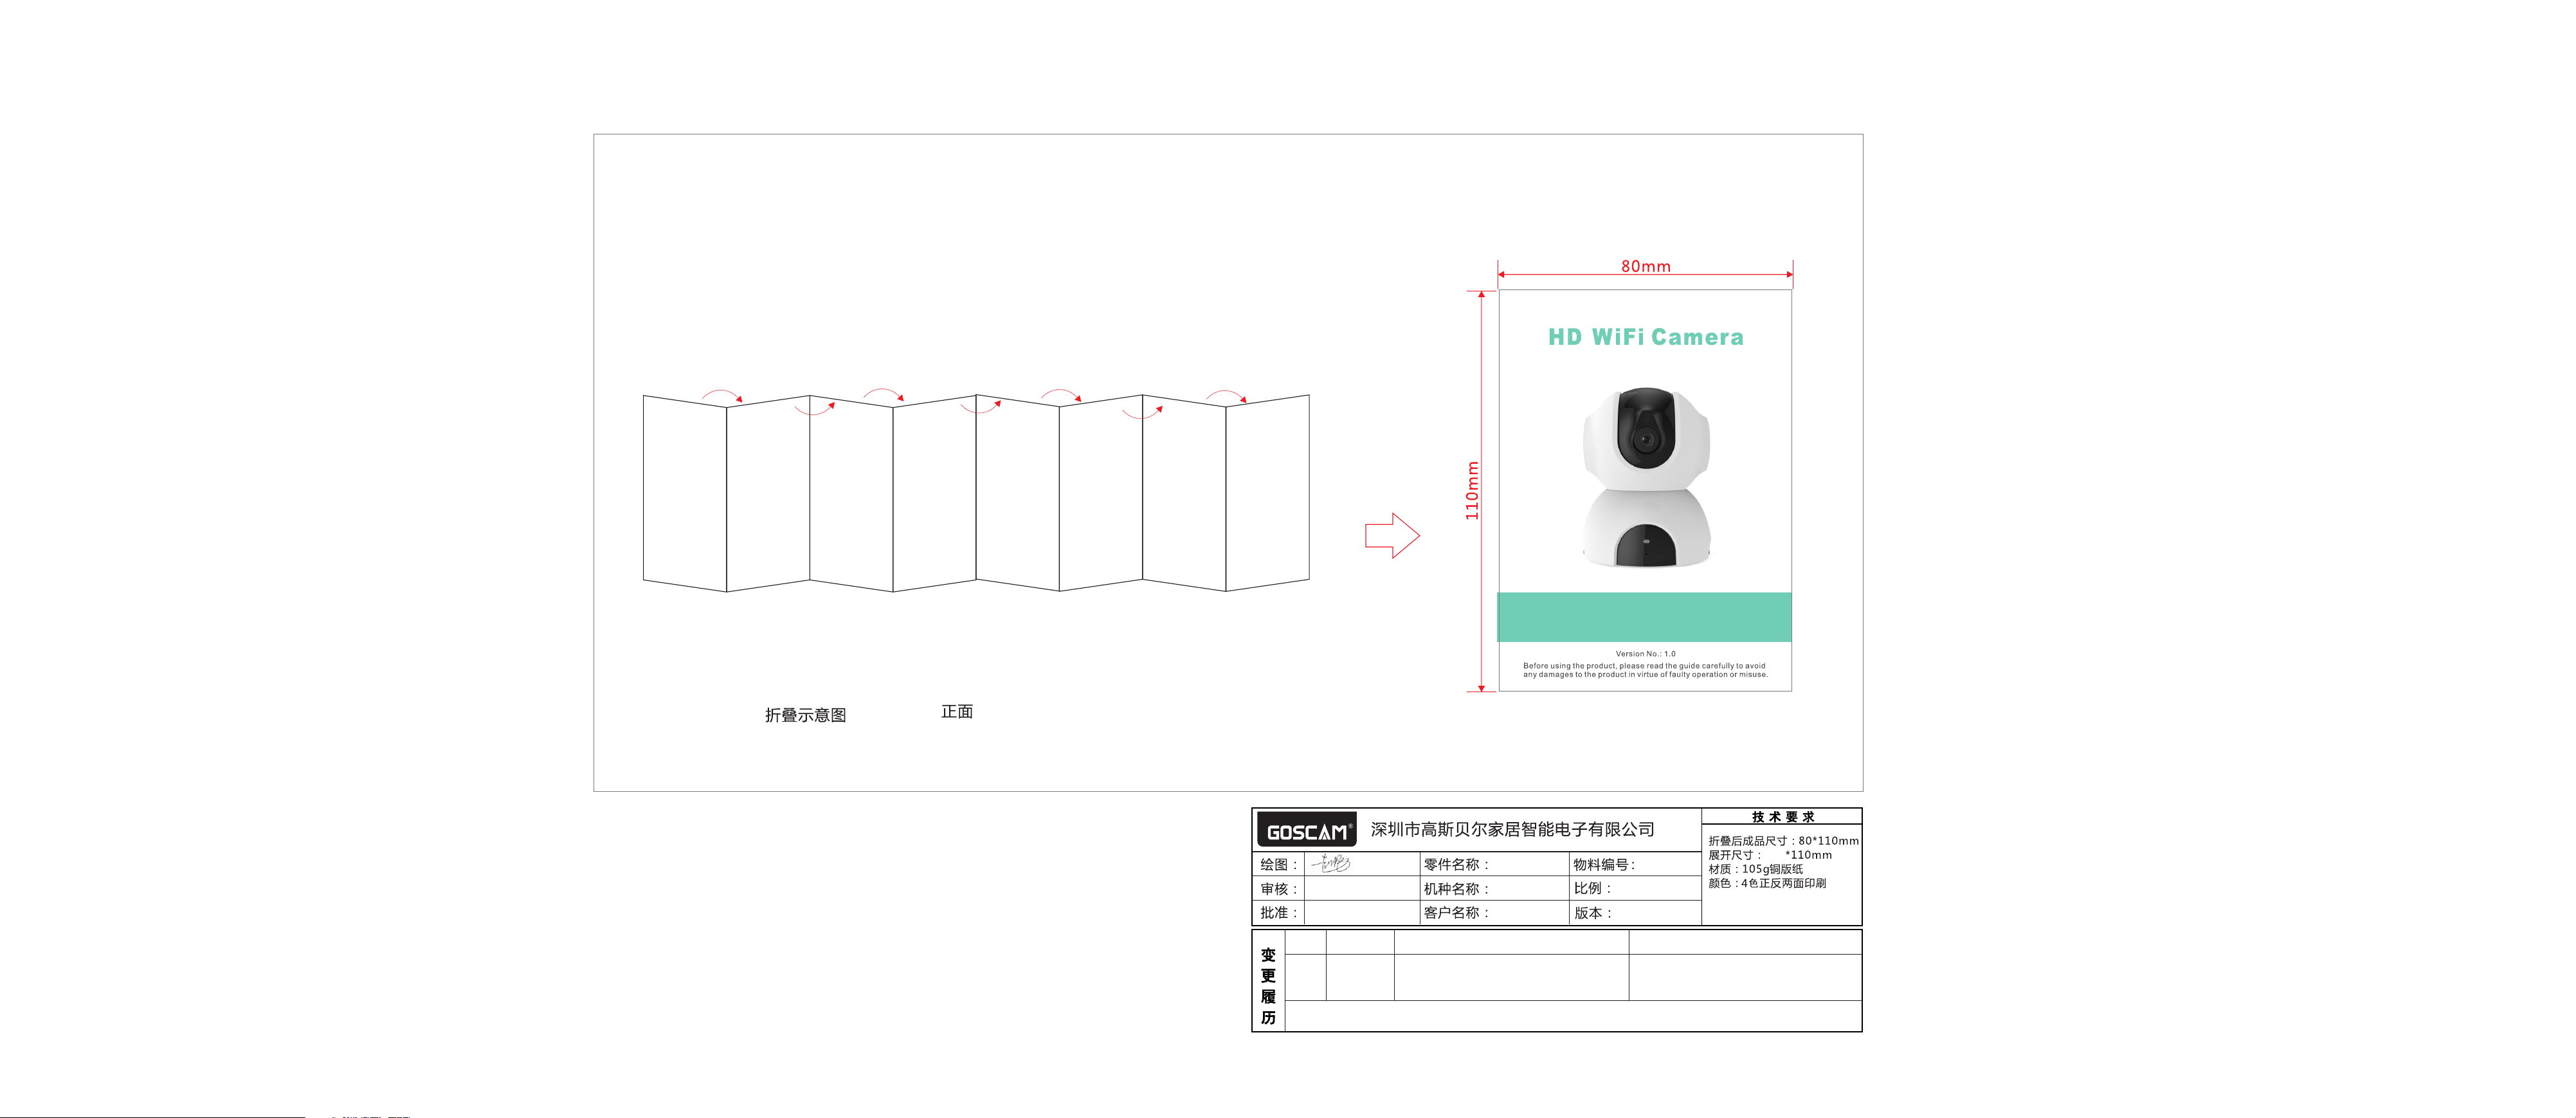
Folding Schematic Front side
Quick Start Guide
Mode l: T5 880 Y/T 588 1
新版 本
说明 :
2016-12- 06
英文 说明 书
T5880
中性
变更 时间 变更 前
电子 档1 : 1
1.0
640
公差 :+/-1 mm
16P
变更 后
Page 2
HD W iF i Camer a
I
Ligh t se nso r
Came ra L ens
Indi ca tor l ig ht
Micr op hon e
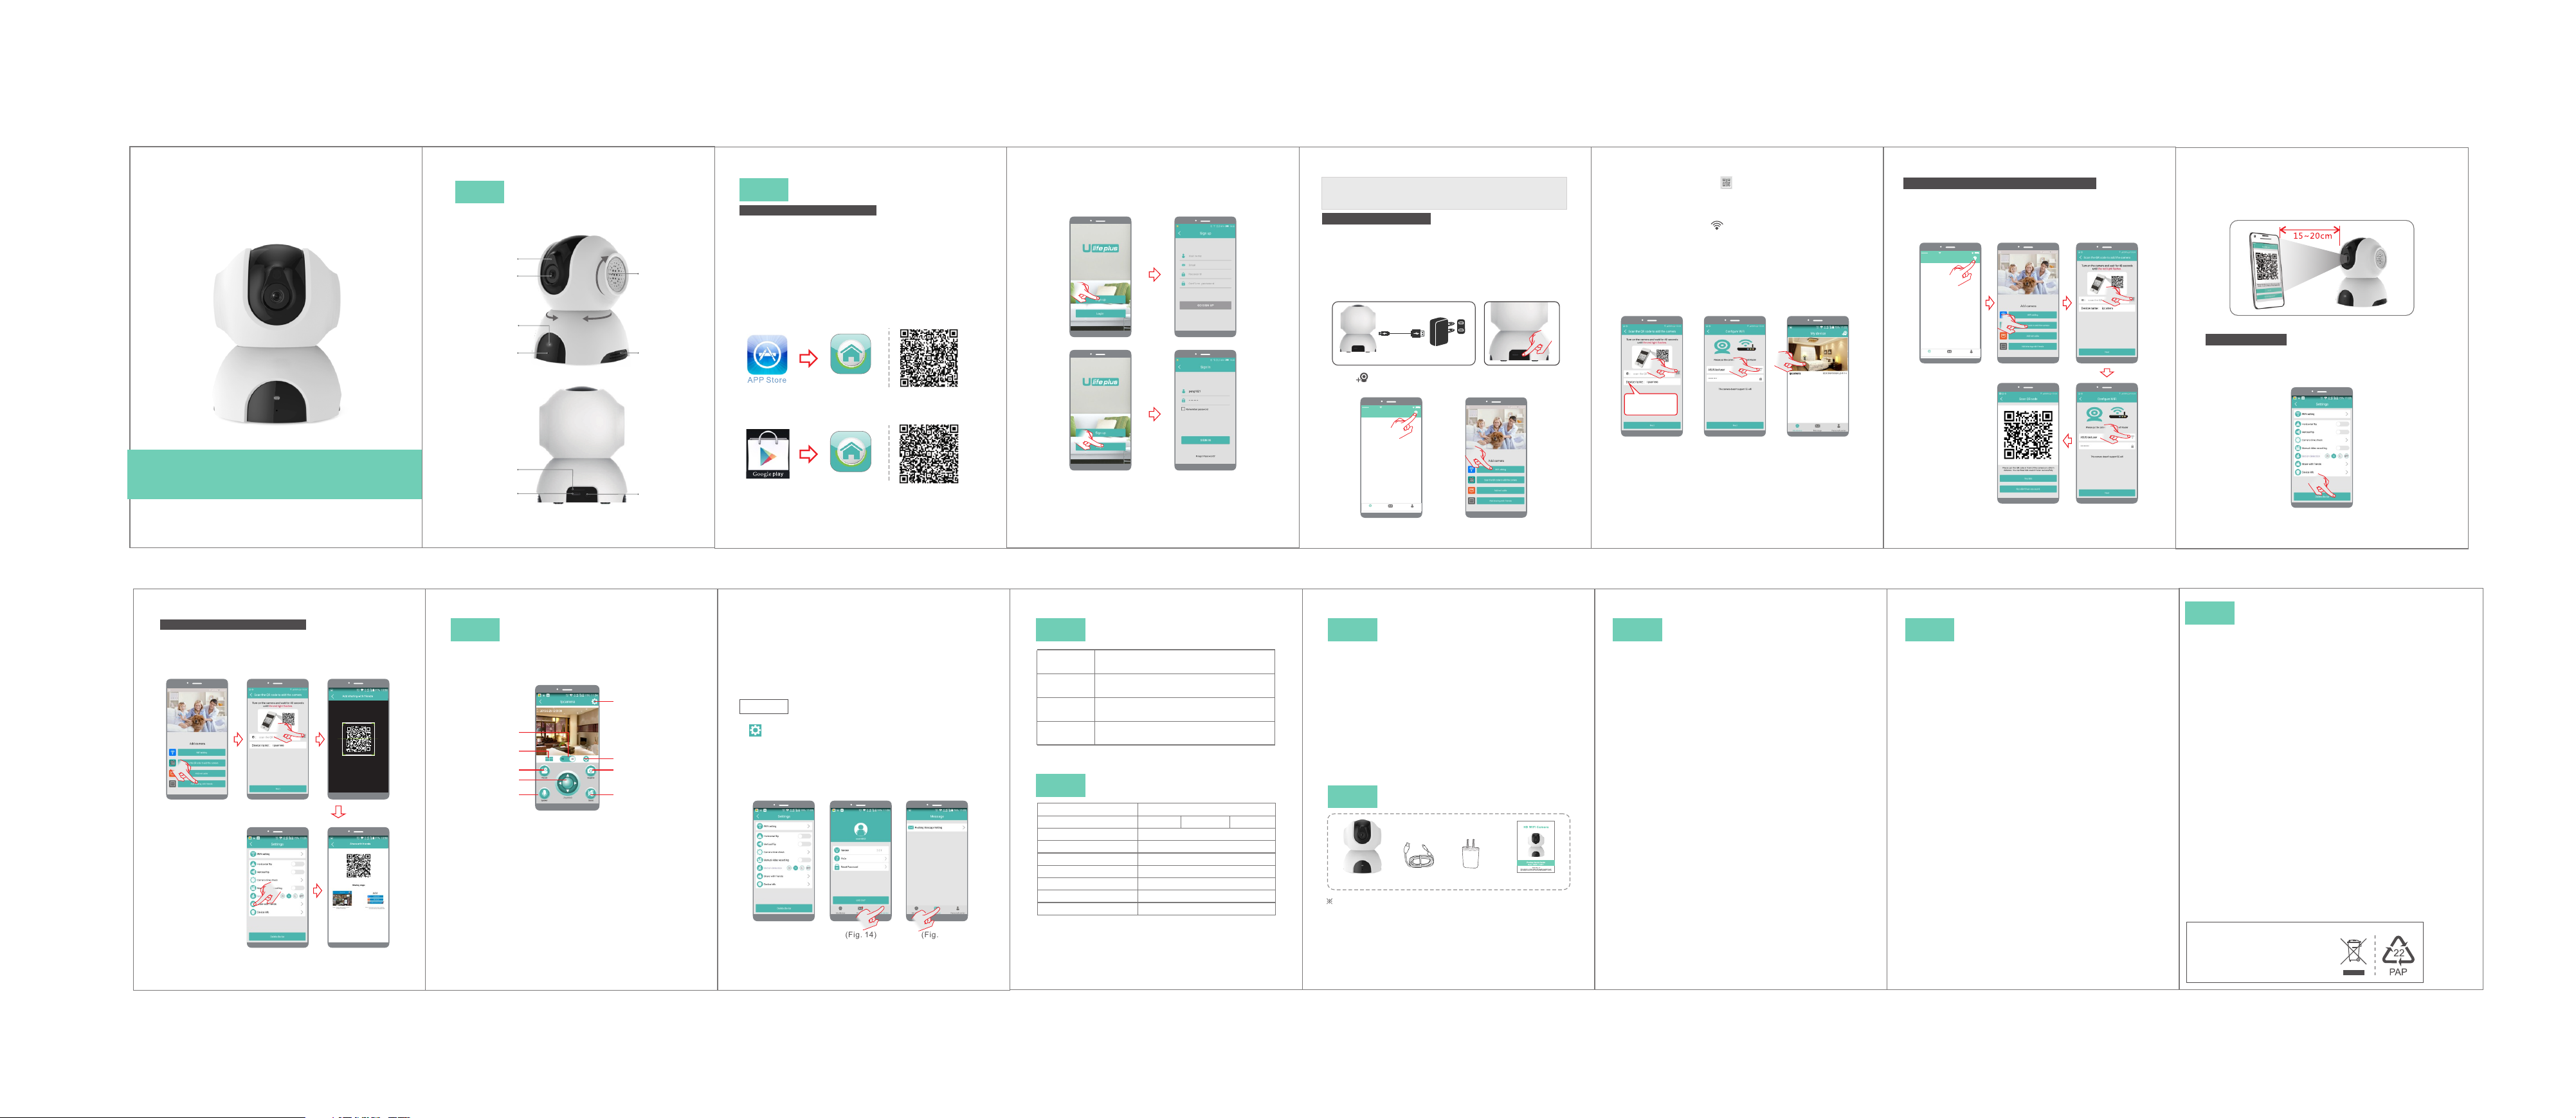
Appea ranc e
90°
340°
Spea ke r
Venti la tio n
hole
II
Insta llat ion
Pre- In sta ll at ion P re parat io n
1.Re qu ire me nt s of ve rs ion: And ro id 4. 4, i OS 8.0, a nd
late r ve rsi on s.
2. 2.4 G wi reles s ro ute r sh ould co nn ect t o th e Inter ne t;
smar tp hon e sh ou ld co nn ect the W i- Fi of t he r outer.
When c on nec ti ng t o the c am era, bo th t he sm ar tphon e
and ca me ra sh ou ld b e wit hi n the ran ge o f thi s
wire le ss ro ut er.
3.Do wn loa d an d in sta ll c lient -e nd APP
A.Ope n th e App St or e on i Pho ne /iPad , se arc h fo r
"U-l if e Plus" a nd i nst al l.Or sc an t he QR c od e to inst al l
it dir ec tly.
U-li fe P lu s
B.Ent er t he "Goo gl e Pla y" s tore on An dr oid s ma rtpho ne .
Sear ch f or "U-l if e Plu s" a nd inst al l.O r sc an the QR
code t o in stall i t di rec tl y.
4.Op en AP P, reg ister a n ID f irs t, t hen ple as e log in .
(spe ci al ch ar ac ter s ( su ch as " %" ," \", "< >" etc. .. )
are no t al low ed .)
Ther e ar e two way s to a dd th e ca mera fu nc tio n in
Mobi le APP, name ly, "ad di ng mo de b y Wi Fi " and
"add in g mode by s ca nni ng t he QR cod e ".
Addi ng m ode by Wi Fi
1. Ple as e con ne ct t he ca me ra to pow er a nd sw it ch it on;
afte r sw itchi ng o n, it s in dicat or l igh t wi ll be tur ne d on
and th e ca mera wi ll s tar t au to-ch ec k. Aft er f inish in g the
auto -c heck, t he re wi ll b e “ding -d ong ” so und rin gi ng.
(Fig . 1)
2.
Pres s SE T fo r 1 secon d, a nd af te r a “beep ” so und , th e
mach in e wil l en te r con fi gurat io n mod e. (Fig. 2 )
Cam era
3. Cli ck t o add equ ip men t; ( Fig. 3)
Power adapter
(Fi g. 1 )
Power source
(Fi g. 2 )
4.Cli ck “ WiFi ad di ng" . (F ig. 4)
中国移动 上午11: 50
My devic e
5.Cli ck t he QR cod e ic on an d sc an the QR c od e of th e
came ra I D on the ca me ra. The d ef ault na me o f the
came ra i s “ipca me ra” a nd c an be mod if ied . Fi nally,
clic k "N ext". ( Fi g. 5)
6.Pl ea se cl ic k th e ico n to c hoose t he n ame o f yo ur
phon e ro ute r, ty pe i n the r ig ht WiFi p as swo rd , then cl ic k
"Nex t" .(Fig .6 )
7.Aft er t wo beep s, c ame ra s tarts t o co nfi gu re the Wi -F i
conn ec tio n. W he n the l ig ht turn s gr een , it i ndica te s the
conn ec tio n is e st abl is hed. Aft er s ucc es sful co nn ect io n,
the ap p wi ll po p up l is t of co nn ected c am era s (F ig. 7).
Choo se t he item t o en ter r ea l-tim e mo nit or.
The d efaul t
ipc amera c an
be mo difie d.
(Fi g. 5 ) (Fi g. 6 ) (Fi g. 7 )
Addi ng m ode by sc an nin g th e QR code
1.Pow er c ame ra o n > Pr ess S ET f or 1 s econd > C li ck Add
by sca nn ing the Q R co de to a dd t he came ra > S can
devi ce I D > Enter t he n ame a nd p asswo rd f or ac ce ss to
WiFi . Pe rform o pe rat io ns as ins tr uct ed . (Figu re 8 s eri es )
中国移动 上午11: 50
My devic e
My Center
Message
Decice Lis t
2.Poi nt c ame ra t o th e two -d imens io n cod e pa ge on cel l
phon e at a d istan ce o f abo ut 1 5~20c m (a s sho wn i n
Figu re 9 ). If it be ep s, sc an ning su cc eed s, a nd then
clic k on I h eard it t o fi nis h de vice bi nd ing o pe ratio ns .
(Fi g. 9 )
Dele te d evi ce
1.In se tt ing pag e of a pp (F ig . 10), cl ic k “De le te devi ce ”
to rem ov e the con ne cte d ca mera, c an r emo ve t he
bond in g wit h th e ac cou nt . then ot he rs ca n ad d the
came ra f ree ly.
Quick Start Guide
Mode l: T5 880 Y/T 588 1
Befor e us in g th e pr od uc t, p le as e re ad t he g ui de c ar ef ul ly t o av oi d
any dam ag es t o th e pr od uc t in v ir tu e of f au lt y op er at io n or m is us e.
Add ca me ra fo r mu lt i-u se rs.
1.If y ou r cell ph on e APP has ad de d camer a an d
conn ec ted suc ce ssf ul ly, next tim e wh en othe rs a dds ,
he/s he n eeds to c li ck “A dd s harin g wi th fr ie nds” to
scan t he Q R code yo u pr ovi de d. (Fig .11 s er ies)
(Fi g. 11 se ri es )
Version No .: 1 .0
Sca nn in g
- 8-
Micr o SD
card s lo t
USB po r t
SET key
- 1-
III
With a s uc cessf ul c onn ec tion, m on ito r vi ew supp or ts
real -t ime m on it ori ng , takin g ph oto s, r ecord in g vid eo s,
inte rc omm un ic ati on , modif yi ng se tt ing and o th er
oper at ion s.
1.Cli ck t o swi tc h be twe en s tanda rd d efi ni tion an d hi gh
defi ni tio n of r ea l-t im e video .
2.Cli ck t o ent er m ul ti- vi deo vie w, mo nit or a t most 4 re al time v id eo.
3.Cli ck t o start r ec ord in g video , cl ick a ga in to sto p
reco rd ing . Vide o wi ll be s av ed in sma rt pho ne .
4.Dra g to a dju st c am era v ie w angle .
5.Cli ck a nd ho ld t he b utt on t o trans mi t voi ce t o camer a.
Whil e ho ldi ng t he b utt on , the aud io f rom c am era wil l be
mute .
6.Cli ck t o ent er s et tin g
7.Cli ck t o vie w an d do wnl oa d photo s & vi deo s sa ved in
came ra m icro- SD c ard .
8.Cli ck t o take a ph ot o. Ph ot o will be s av ed in s ma rtpho ne .
Monit or Vi ew and O pera tion s
6
1
2
3
4
5
(Fi g. 1 2)
7
8
9
- 9-
U-li fe P lu s
※Take the o pe rat io n of An dro id c lient -e nd as e xa mple,
and re fe r to And ro id c lie nt -end fo r IO S cli en t-end .
- 2-
9.Cli ck t o mute th e au dio f ro m camer a. C lic k ag ain to
canc el .
Note s:
1.Pho to s an d vi de os take n in t he a pp w il l be s ave d in
smar tp ho ne .
2.Aut om at ic p ho tos and v id eo s of m ov ement d et ec ti on
will b e sa ve d in m ic ro-SD c ar d of c am er a.
Sett in gs
1.On th e re al- ti me m oni to ring in te rfa ce , click t he s ett in g
icon f or e nteri ng i nto t he c amera s et tin g me nu. Th e
user c an s et up the r el eva nt f uncti on s for t he “ Camer a
time c he ck’ an d other s. (Fi g .1 3)
2.Ope n th e app , en te r “pe rs onal ce nt er” p ag e to chec k
app ve rs ion i nf o et c. (F ig . 14)
3.Ope n th e map , en te r “me ss age” pa ge t o set m es sage
push in g. (Fig . 15 )
(Fi g. 1 3)
※ Thi s cam er a is comp at ibl e wi th univ er sal a pp , ac tua l
func ti on is sub je ct to c am era.
(Fi g. 1 4) (Fi g. 1 5)
- 10-
Prom pt : ple as e us e a val id a nd usea bl e mai lb ox duri ng
user r eg ist ra ti on, f or r ecove ri ng th e pa sswor d.
- 3-
IV
Red indic at or
remai ns
Red indic at or
fla sh es
Gre en
indicat or
fla sh es
Gre en
indicat or
remai ns
Imag e se ns or C MO S
Came ra r es ol ut ion
Rota ti on a ng le 3 40 °ho ri zo nt al , 90°ve rt ic al
Nigh t vi si on r an ge ≤5m
Oper at io n vo lt age DC+5V /2 A
Oper at io n te mp eratu re
Oper at io n hu mi dity 15 % ~ 85 % RH
Size ( Lx Wx H) 8 0x 80 x1 06 mm
Net we ig ht 2 45 g
No add it ion al n ot ice w il l be made i n ca se of a ny
※
mino r ch ang e. O ur c omp an y reser ve s the r ig ht of
fina l in ter pr et ati on .
Camer a Indi cato r Inst ruct ion
Ind icate s that po wer fai lure or n etwor k not
con necte d.
Ind icate s that ca mera is c onnec ting to
net work.
Ind icate s that ne twork c onnec ted
suc cessf ully (n o Inter net).
Ind icate s the cam era is co nnect ed to ser ver
and w orkin g well.
V
Techn ical P aram eter s
1280x720
-10℃ ~ + 50℃
1280x960
1920x1080
- 11-
My Center
Message
Decice Lis t
(Fi g. 3 ) (Fi g. 4 )
V I
24/7 l iv e vi deo s tr ea min g.
●
● Hig h re solut io n provi de s excel le nt pict ur e quali ty.
● Smar t mo ti on al er ts o n you r ph on e so yo u kn ow i f
anyt hi ng h app en s.
● Advan ce d video r ec ordin g on t he micr o SD c ar d.
(Max im al ly su pp or t the c yc li c rec or di ng of 3 2G B mi cro
SD car d. )
● Moto ri ze d Pan /Tilt.
● Nigh t vi si on up t o 5 me te rs.
● Talk & Li ste n. S ee y our d og o n th e cou ch a nd t ell h im
to get o ff .
● Quic k, e as y set up .
VII
The p ic tu re i s on ly f or r ef erenc e and the r eal obj ect sha ll prev ail
Funct ion Fe atur es
Packi ng Lis t
Camer a
USB cab le
- 4-
Power a da pt er
Qui ck G ui de
- 12-
- 5-
VII I
1.Sug ge st us in g qu ali fi ed micr o- SD ca rd t o avoid
inco mp ati bi li ty. Form at m icro- SD c ard b ef or e usi ng .
2.Mov em ent d et ec tio n: w hen mov em ent i s de tecte d
with in t he scop e of c ame ra , the cam er a wil l re cord vi de o
and ta ke p hotos a ut oma ti cally. Vi deo s an d photo s wi ll
be sav ed i n mic ro -S D car d.
3.Sha ri ng wi th F ri end s: S hare tw o- dim en sion co de o f the
devi ce w ith you r fr ien ds .
4.Can ce l sha ri ng w ith f ri ends: D el ete t he c amera a nd
canc el s har in g wi th fr ie nds. (You h ave t o re -add th e
came ra t o use it ag ai n)
5.Pus h me ssa ge : wh en mo ve ment is d et ect ed , alarm
mess ag e can b e se nt t o ser ve r and pus he d to yo ur
phon e.
6.Rem ot e mon it or ing : af ter the c am era i s co nnect ed t o
Inte rn et succ es sfu ll y, ap p can vie w th e mon it or v ia
Inte rn et, any ti me, a ny where .
7.Sp ec ial c ha ra cte rs a re acce ss ibl e on ly unde r En gli sh
mode , an d other p un ctu at ion mar k us ed in o th er
lang ua ge in co ns ist en t with th at u nde r En glish m od e
cann ot b e inp ut . Ava il abl e sp ecial c ha rac te rs incl ud e
" @, #, &, * , ~, {, }, - , =, +, /, ?, ( , )" , and u na va ila bl e
spec ia l cha ra ct ers i nc lude "% ", " \", " <> ".
8.Wh en t hi s mac hi ne h as a cr as h fault o r ot he r abn or ma l
cond it io ns in fl ue nci ng t he u sag e, i t is r eco mm en ded t o
cut ou t th e po wer a nd r es tar t; o r pr ess S ET k ey f or 5
seco nd s, whic h ca n re sto re f actor y se tting s, a nd then
plea se r econn ec t the rou te r.
Tips
- 13-
(Fi g. 8 se ri es )
- 6-
IX
1. Wi- Fi c annot b e co nne ct ed
a) Ens ur e tha t th e anten na o f cam er a is fixe d we ll.
b) Ens ur e tha t ca mera is i n ra nge o f ro uter. Ke ep t he
dist an ce less t ha n 40f ts b etwee n ro ute r an d indoo r
came ra , less th an 6 5ft s fo r outdo or c ame ra .
c) Ens ur e that SS ID a nd pa ss word of W i- Fi co nt ains no
spec ia l chara ct ers . Mo dify th e SS ID an d pa sswor d of
Wi-F i wi th only E ng lis h ch aract er s, no s pe cial
char ac ters.
d) Ens ur e that SS ID a nd pa ss word ar e no l ong er t han
16 cha ra cters
e) Ens ur e tha t SS ID is bro ad cas te d.
f ) Ensu re t hat the D HC P is e nab le d on rout er.
g) Ens ur e tha t Wi -F i enc ry ption m et hod i s WPA2- PS K/
WPA- PSK o r AES .
h) Ens ur e tha t Wi -Fi sig na l is 2. 4G Hz.
i ) Ensu re t hat the re i s no MA C fi lter on r ou ter o r ad d
MAC ad dr ess to ro ut er wh it elist
j) We su gge st r eboot in g the r ou ter, and t he " sec ur it y
sett in gs, enc ry pti on m ethod " of W iFi p as sword
shou ld n eve r ch oo se "a ut o-sel ec t".
k) Rese t th e camer a to s et up c on necti on a gai n. P ress
and ho ld S ET key for 5 se co nds .
2. Red i nd ica to r re mai ns , netwo rk c onn ec tion is f ai led .
a) Ens ur e that th e pa ssw or d of Wi-F i is c orr ec t.
b) Ens ur e that th e ne two rk c onnec ts t o Int er net fre el y.
c) Ens ur e that th e ca mer a is i n range o f Wi -Fi h ot spot.
3. Gre en i ndi ca to r fla sh es, con ne cti on t o serve r fa ile d.
a) Ens ur e that Wi -F i sig na l is stro ng e nou gh a nd
band wi dth i s en ou gh fo r co nnect io n. Mo ve n ear to
Wi-F i ho tspot o r in cre as e the ban dw idt h.
b) Ens ur e that ca me ra is n ot u nder in te rfe ro n of othe r
2.4G Hz s ignal .
Troubl esho otin g
- 14-
Fig .1 0
- 7-
X
FCC/C E Cert ific atio n Info rmat ion
NOTE: This equipment has been tested and found to comply with the limits for a Class
B digital device, pursuant to part 15 of the FCC Rules.
These limits are designed to provide reasonable protection against harmful interference
in a residential installation. This equipment generates uses and can radiate radio
frequency energy and, if not installed and used in accordance with the instructions, may
cause harmful interference to radio communications. However, there is no guarantee
that interference will not occur in a particular installation. If this equipment does cause
harmful interference to radio or television reception, which can be determined by turning
the equipment off and on, the user is encouraged to try to correct the interference by
one or more of the following measures:
- Reorient or relocate the receiving antenna.
- Increase the separation between the equipment and receiver.
- Connect the equipment into an outlet on a circuit different from that to which the
receiver is connected.
- Consult the dealer or an experienced radio/TV technician for help
Changes or modifications not expressly approved by the party responsible for
compliance could void the user's authority to operate the equipment.
This device complies with Part 15 of the FCC Rules. Operation is subject to the
following two conditions:
(1) this device may not cause harmful interference, and
(2) this device must accept any interference received, including interference that may
cause undesired operation.
The Maximum Permissible Exposure (MPE) level has been calculated based on a
distance of d=20 cm between the device and the human body. To maintain compliance
with RF exposure requirement, use product that maintain a 20cm distance between the
device and human body. Hereby, we declares that this device is in compliance with the
essential requirements and other relevant provisions of Directive 2014/53/EN.
Notice: Observe the national local regulations in the location where the device is to be
used. This device may be restricted for use in some or all member states of the
European Union (EU)
EU Env iro nme nta l Pro vis ion s
E-w as te c an no t be m ix ed w it h
house ho ld g ar ba ge ; co rr es po nd in g
local g ov er nm en t se ct or o r re cy cl in g
sta ti on s sh al l be r es po ns ib le f or
circu la r pr oc es s.
 Loading...