

Page 1
Wi Fi
Ca me ra M an ua l
Bo re sc op e
For eword
Thanks for selection of WiFi camera supplied by our company. Before using this product, you are
requested to carefully read the instruction manual. Wish you a wonderful and delightful experience!
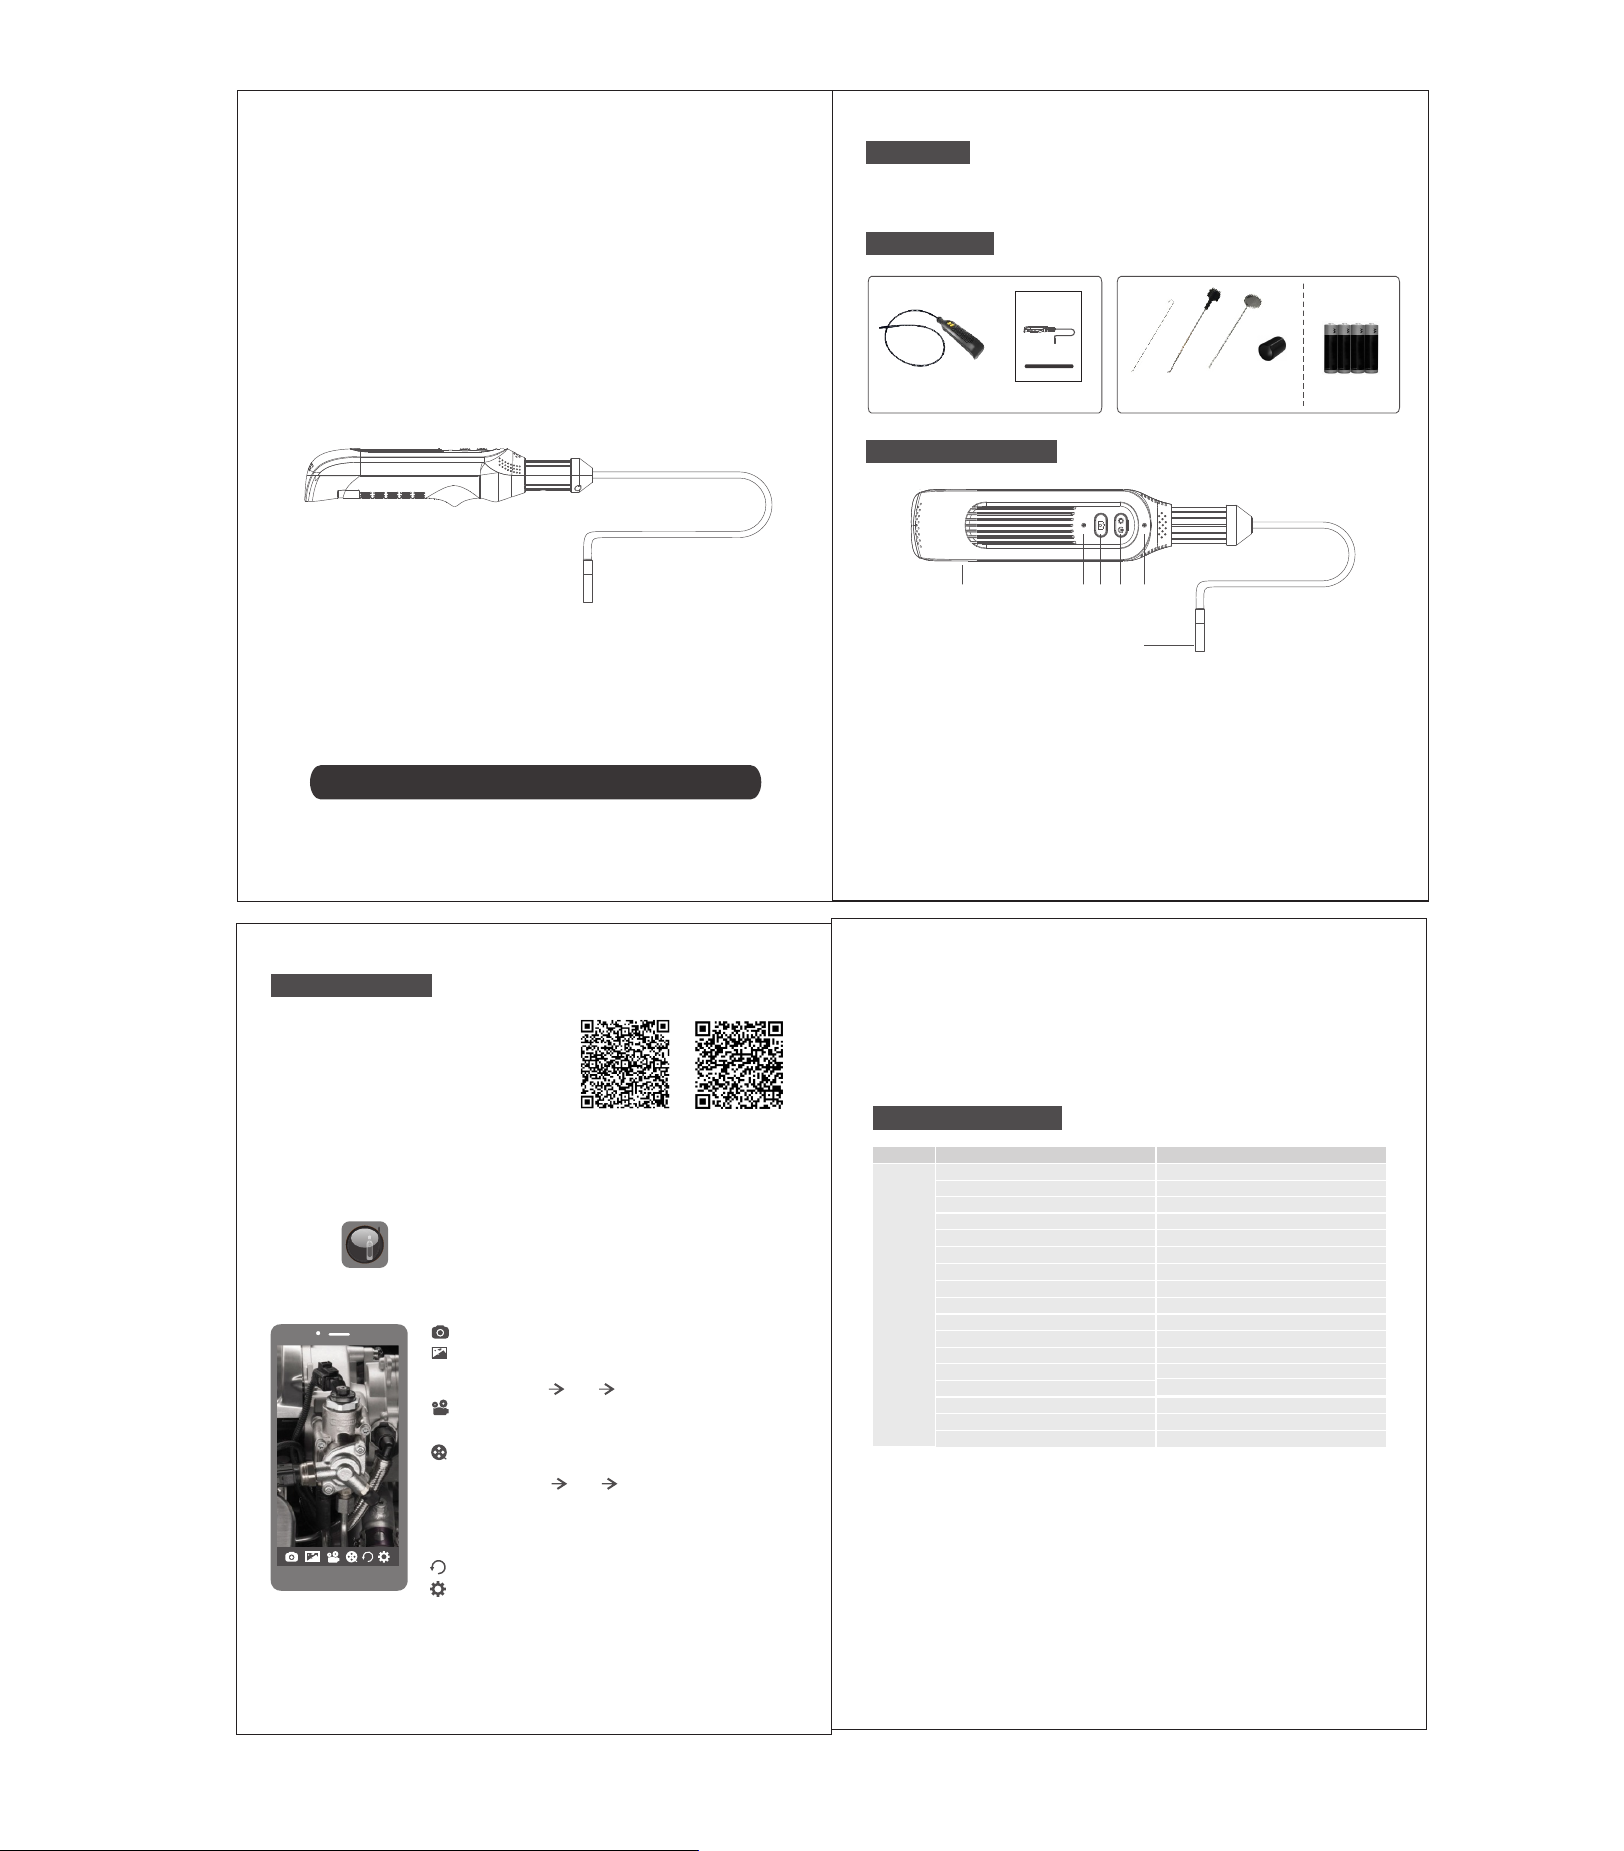
I. Packi ng List
Model No.:GD9001
Prior to using this product, you are requested to carefully read this manual to avoid any damage to
the product resulting from wrong operation or inappropriate use.
Optional
AA batteries x4
WiFi Camera
Bores cope
WIFI
Camer a Manua l
Model No.:GD9001
Prior to using this product, you are requested to carefully read this manual to avoid any damage to
the product resulting from wrong operation or inappropriate use.
Manual
Hook
magnet
Mirror
rubber ring x2
II. Stru ctura l Descr iptio n
5
1243
6
1.Power switch: long press to switch on, long press again for over 3 seconds to switch off; short
press to adjust brightness, with 8 gears, cyclically adjustable.
2.Photo & record key: short press for photo, long press for recording.
3.Indicator lights: When powering on, green light remains steady on; when powering off, green light
goes out. When the device fails to connect with handset, green light quickly flashes (3 times per
sec.); when connected, green light remains steady on. Recording: green light steadily blinks (once
per sec.); Photo: press once, green light blinks once. Orange light indicates low battery level, blinks
once per second, and power off after 60s blinking.
4.RESET Key: Restore to factory default.
5.Battery case: 4 #5 batteries inserted.
6.Camera: Ø8mm, Endoscope waterproof grade IP67.
-1-
III . APP Int roduc tion
1.APP installation
Version requirement: support Android 4.0 or latest only;
support iOS 8.0 or latest.
IOS: “APP Store”, download “WiFi Borescope ”;
Android: “Google Play" to download “WiFi Borescope”.
Or scan the QR code to install it directly.
2.
APP operation
IOS QR code Android QR code
Step 1: Long press handle power key for 3 sec., open camera and green light blinks.
Step 2: Open phone setting, select WiFi hotspot, initial SSID is “WIFICAMERA****”, (XXXXXX as
WiFi module coding), input its password (88888888 as default), successful WiFi connection and
green light remains steady on.
Step 3: Click for real-time video watch.
WiFi Borescope
3.APP functional introduction
Photo:Click this icon to take a picture.
Gallery:Click this icon to view pictures taken
The image storage path of the Android phone, creat folder in
the App: Memory DCIM image(Storage APP image)
Record:
Click this icon to record. While recording, the
recording time is
re-click it to stop recording.
Video:
The video storage path of the Android phone, creat folder in
the App: Memory DCIM record Storage APP video( )
For IOS, the recording video create folder, it can be viewed
on the APP, it can not be storaged in the mobile phone photo
folder, the path to storage on the mobile phone for IOS,
connect the Ituns store to download the recording video.
Turn:
Settings:
Note:
The zoom function can be activated via double clicking mobile device screen.
There are two zoom levels available.
Double click on the mobile screen,the image will zoom in with 1st level.
Double click again,the image will zoom in with 2nd level.
Double click for the 3rd time,the image will be back to default size.
displayed on top left corner of the screen,
Click this icon to view video files recorded.
Click this icon to turn pictures.
Click this icon to enter menu settings
-2-
Important prompt:
After SSID or password having been changed, users are requested to delete the network from
Main Interface Setting, and reconnect it; otherwise “No Connection” will be always displayed.
In case of too low battery level when powering on, orange light blinks for 60 sec. before powering off.
When forgetting device SSID and password, using a tiny rod to press the Reset key for 5 seconds
will restore to factory default.
IV. Technical Para meter s
Name
Sensor size
Display resolution
Visual angle
Probe length
Endoscope waterproof grade
Diameter of camera head
Wireless transmision
Camera
System
*
Actual transmission range varies with climate, location, environmental disturbance and
architectural structure.
Power supply
Working time
Operating current
Picture format
Video format
Operating temperature
Storage temperature
Operating humidity
Product Size
Weight
-3-
Par amete r
1/9 "inch C MOS
640 X480
Horizonta l view ing an gle 48°
1m
IP67
8mm
30M (max)
AA( )1.5 Vx4
3.5 ±10% H
300 mA±10 (max)
.JPG
.AVI
-10 ~+45℃ ℃
﹣20 ~+ 60 ℃ ℃
15% ~85% RH
220 46 44mmx x
244 g
Page 2

FCC caution
The device has been evaluated to meet general RF exposure requirement, The
device can be used in portable exposure condition without restriction
Federal Communication Commission (FCC) Radiation Exposure Statement
Power is so low that no RF exposure calculation is needed.
FCC statements:
This device complies with part 15 of the FCC rules. Operation is subject to the
following two conditions: (1) this device may not cause harmful interference, and
(2) this device must accept any interference received, including interference that
may cause undesired operation.
NOTE: The manufacturer is not responsible for any radio or TV interference
caused by unauthorized modifications or changes to this equipment. Such
modificationsorchangescouldvoidtheuser’sauthoritytooperatethe
equipment.
NOTE:Thisequipmenthasbeentestedandfoundtocomplywiththelimitsfora
Class B digital device, pursuant to part 15 of the FCC Rules. These limits are
designed to provide reasonable protection against harmful interference in a
residentialinstallation.Thisequipmentgeneratesusesandcanradiateradio
frequency energy and, if not installed and used in accordance with the
instructions, may cause harmful interference to radio communications. However,
there is no guarantee that interference will not occur in a particular installation.
If this equipment does cause harmful interference to radio or television reception,
which can be determined by turning the equipment off and on, the user is
encouraged to try to correct the interference by one or more of the following
measures:
‐ Reorient or relocate the receiving antenna.
‐ Increase the separation between the equipment and receiver.
‐Connect the equipment into an outlet on a circuit different from that to which
the receiver is connected.
‐Consult the dealer or an experienced radio/TV technician for help.
 Loading...