

Page 1

EU E nv ir on me nt al P ro te ct io n
Was te electr ic al p roducts s ho uld
not be disp os ed o f with ho us eh old
waste. Pl ea se recycl e wh er e
facilit ie s exist. Ch ec k wi th your
local aut ho ri ty or ret ai le r for
recycli ng a dv ice.
720P Digital Color Video Baby
720P Digital Color Video Baby
Monitor with 5" HD LCD
Monitor with 5" HD LCD
Model No.: 8203KF
Please read this user manual carefully before using this product. Failure to
understand operation procedures may result in injury.
Version 1.0
Page 2
Introduction
Than k you for choosin g our baby moni tor. Before us in g the
prod uct please re ad t he instruct ion careful ly in case of damag e
to the p roduct due to imp roper opera tion.
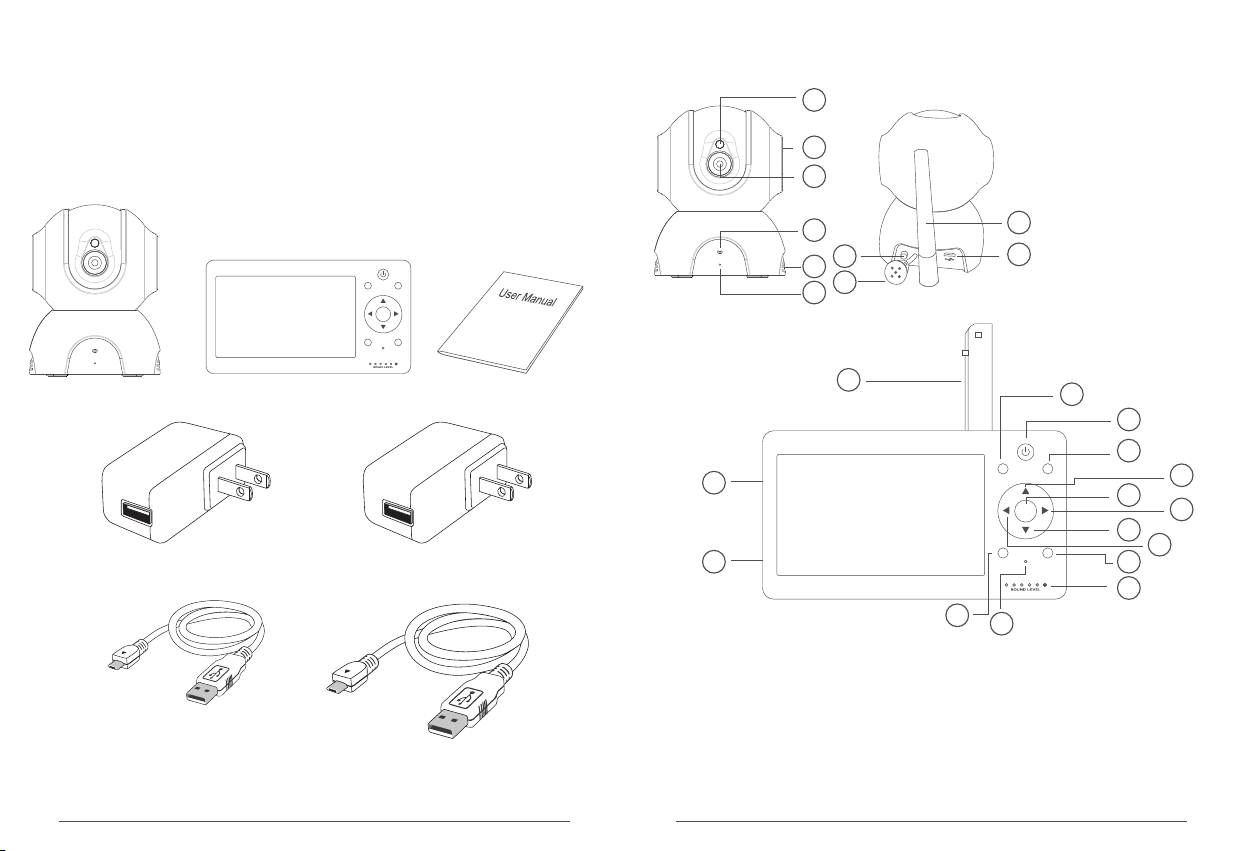
Parts in the package
MENU
SLEEP
OK
TALKSHORT CUT
product structure
1
2
3
4
7
5
8
6
1. Phot os ensit iv e senso r
2. Horn
3. Lens
4. Indica tor LED
5. Louv er
6. Micr op hone
9
7. SET bu tton
8. Temp er ature s en sor
10
9. Anten na
10. USB i nt erfac e
Camer a
Monit or
Instr uc tion
11
12
13
14
MENU
Power a da pter (f or c amera , 5V 1 A)
Power a da pter (f or m onito r, 5V 2 A)
24
25
SLEEP
OK
TALKSHORT CUT
16
18
20
15
17
19
21
23
22
21. Sta tu s indic at or
22. Mic ro phone
23. Sho rt cut but to n
24. SET b utton
25. USB i nt erfac e
Power c ab le for ca me ra (1m) Power c ab le for re ce iver (3 m)
11. Ant en na
12. Men u bu tton/ Re turn
13. On/ off but to n
14. Sle ep b utton
15. Shi ft u p/Bri gh tness +
16. Con fi rmati on b utton /
Zoom bu tt on
17. Shi ft r ight/ Vol ume+
18. Shi ft d own/B ri ghtne ss -
19. Shi ft l eft/Vo lu me-
20. Dia lo gue key
01 02
Page 3

Function introduction of buttons for camera
Indi cator LED. When g reen LED flas hes slowly,
star tup is successf ul, or the came ra is disconn ec ted
with t he monitor. When g reen LED flas he s quickly,
the ca mera and moni to r are being pai red. When
gree n LED is on constan tly, the came ra a nd monitor
are pa ired succes sfully.
SET button . Short press it fo r 1s, jump to pai ri ng
mode ; long press for 5s , factory res et .
Function introduction of buttons for monitor
Tur n on/off the displa y (press for 2s )
Pres s the button to jum p to Menu, pres s the button agai n,
MEN U
exit f rom Menu. The butto n al so has the func tion of
retu rning to prev io us step.
Slee p button. Press t his button, t he screen is off, pre ss i t
agai n, the screen t ur ns on. (this bu tton does not
SLE EP
infl uence autom at ic sleep setu p. Auto matic sleep sti ll
func tions norma ll y.)
In rea l-time view in g, by pressin g this button , th e camera
can be c ontrolled t o tu rn left.
In men u interface, by p ressing thi s button, the men u
curs or shifts left.
In sho rtcut interfa ce, press thi s button to turn do wn
volu me.
In rea l-time view in g, by pressin g this button , th e camera
can be c ontrolled t o tu rn right.
In men u interface, by p ressing thi s button, the men u
curs or shifts right .
In sho rtcut interfa ce, press thi s button to turn up v olume.
OK
SHO RT CUT
TALK
In rea l-time view in g, by pressin g this button , th e camera
can be c ontrolled t o tu rn upward.
In men u interface, by p ressing thi s button, the men u
curs or shifts upwar d.
In sho rtcut interfa ce, by pressi ng this button, b rightness
of the d isplay is inc re ased
In rea l-time view in g, by pressin g this button , th e camera
can be c ontrolled t o tu rn downward .
In men u interface, by p ressing thi s button, the men u
curs or shifts downw ard.
In sho rtcut interfa ce, by pressi ng this button, b rightness
of the d isplay is dec re ased
In rea l-time view in g, by pressin g this button , th e image
size i s doubled.
In men u interface, pr essing this b utton to confir m.
Shor tcut button. By p ressing thi s button, short cut
inte rface pops up, vo lume and brig htness of
+
+
the mo nitor can be adju sted.
In rea l-time view in g, by pressin g this button , ju mp to
talk back function ; releasing t he button, talk back functi on
is off. The voice fr om camera end c annot be hear d ti ll the
butt on is released.
Stat us indicator LE D:
The fi rst green LED lig hts constantl y: indicate s that
the ca mera and moni to r are connect ed successf ully
The fi rst green LED fla shes slowly (on ce per second ):
indi cates that it is st arting, wit ho ut connecti ng the camera
The fi rst green LED fla shes quickly (3 t imes per
seco nd): indicate s code matchi ng
03 04
Page 4
From t he second to fift h green LEDs flas h from low to
high : Qu antity of fla shing LED ind icates sound vo lume
rece ived
From t he second to fift h green LED s flash
simu ltaneously (o nce per second) : indicates t hat alert
sign al is receive d.
The si xth LED constan tly gives off red l ight: indic ates
that t he lithium batt ery is being ch arged; (it al wa ys be
show n whether it is o n or o ff )
The si xth LED is off: ind icates that t he b attery is
char ged fully
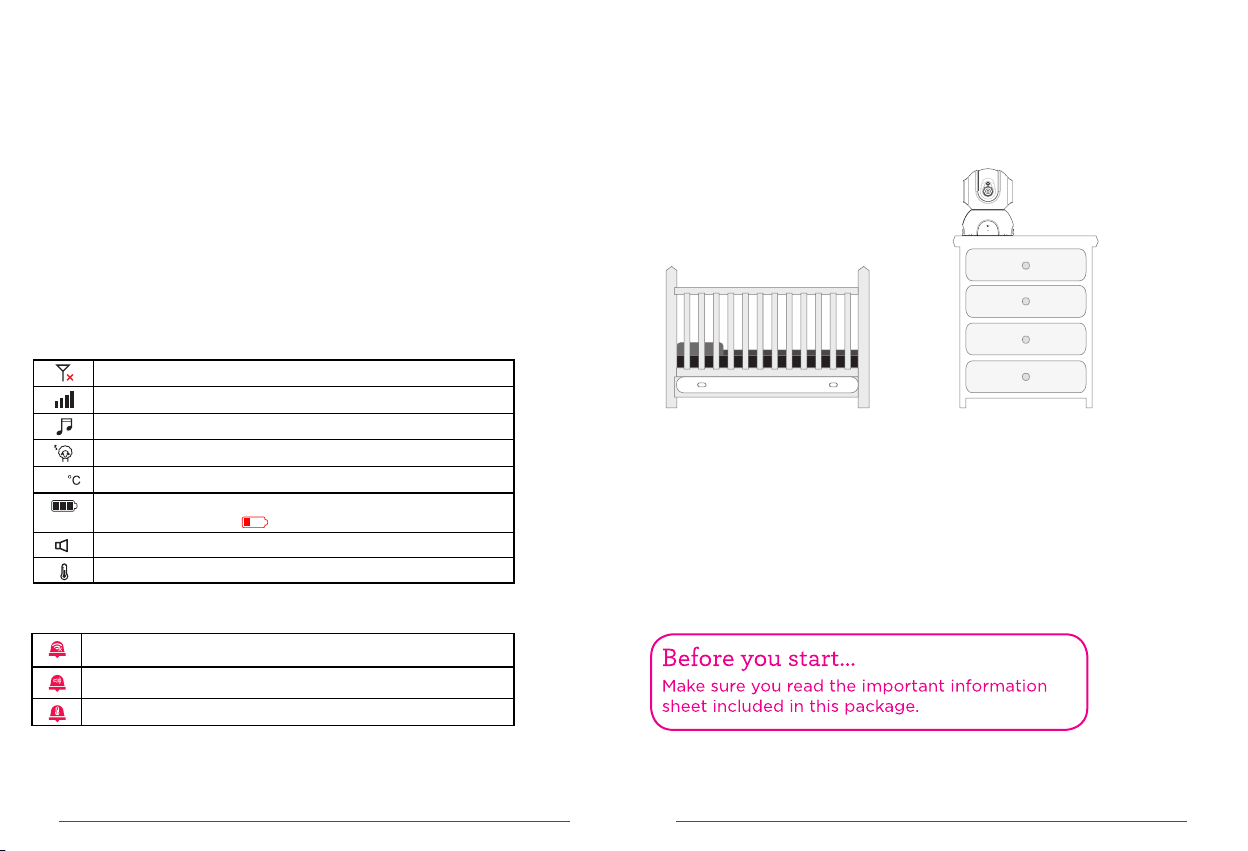
Explanation for icons
Icon of status bar
No sign al c onnec ti on betw ee n the mon it or and ca me ra
Signa l st rengt h be tween t he m onito r an d camer a
Cradl es ong ena bl ed
Sleep s et up of mon it or enab le d
Show cu rr ent roo m te mpera tu re
27
Show cu rr ent bat te ry leve l. W hen bat te ry leve l is t oo low,
the ico n wi ll beco me a nd flas h
Sound a la rm enab le d
!
Tempera tu re alar m en abled
Icon for message push
Camer a is n ot adde d or c amera a nd m onito r ar e disco nn ected
Sound a la rm prom pt
Tempera tu re alar m pr ompt
Equipment installation
1.Po sition the came ra(s)
Find a l ocation for the c amera
that g ives you the best v iew of
your b aby in his or her c ri b.
Plac e the camera on a f la t surface,l ike a dresser.
IMPO RTANT:N EVER place th e ca mera or cords o f any kind
insi de the crib.N EV ER place the ca mera or cords w ithin reach
of the b aby.
05 06
Page 5
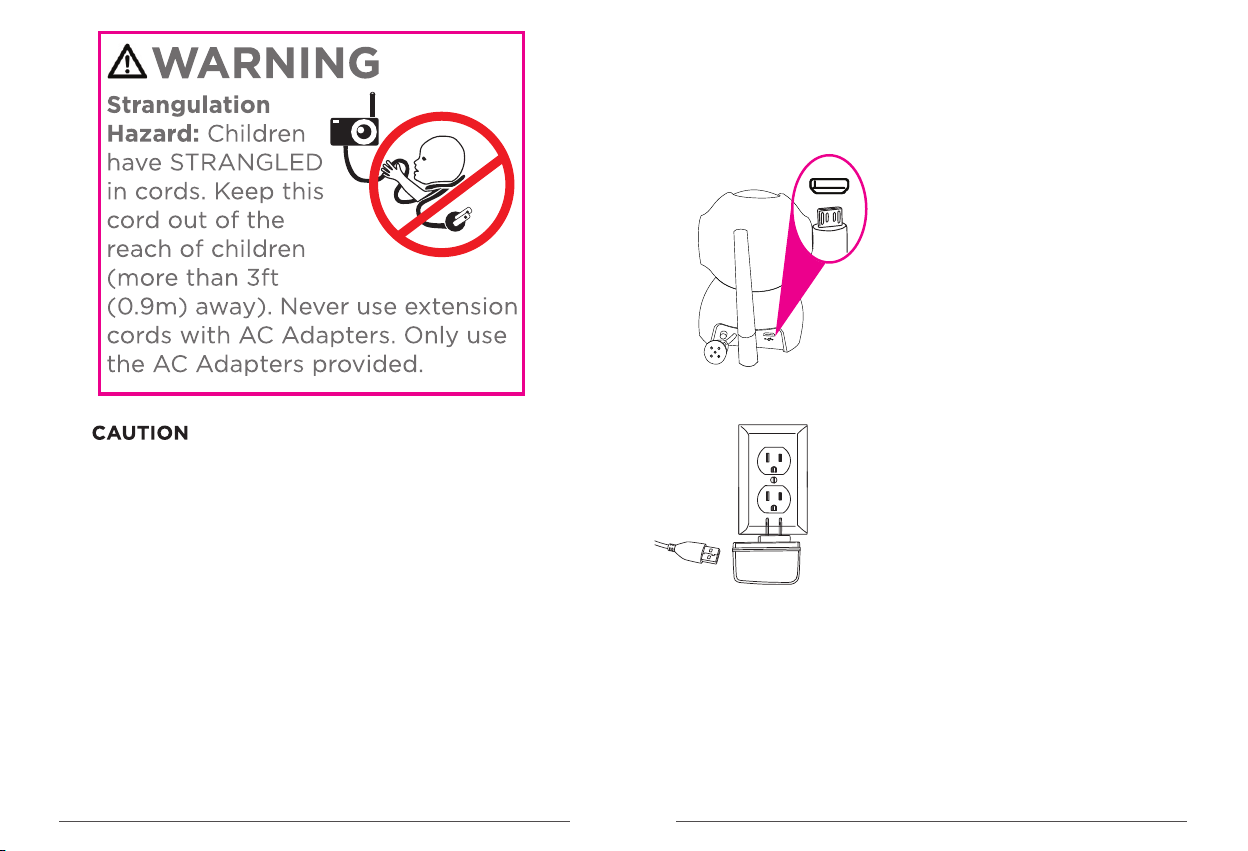
The monitor shall be installed and used such that parts of the user's body
other than the hands are maintained at a distance of approximately
8 inches(20cm) or more.
The camera should be installed and operated with a minimum distance
of 20cm between the radiator and your body.
1. Installation of camera
1. Cha rge the camera
Plug a n end of the acco mp anying
char ging cable in to t he USB port in
the ba ck of camera.
Plug t he other end in to t he accompan ying
powe r adapter. Then plug t he adapter into
a sock et.
Afte r the camera is pow ered on it will s tart up autom at ically. (the
came ra automati ca lly swings up -down ward or f rom side to side,
the in dicator LED o n ca mera base lig hts and the gre en LED
flas hes slowly. Now, the ca me ra starts up su ccessfull y).
07 08
Page 6

2. Installation of monitor
1. Pow er on monitor (th e monitor has a bui lt-in lithium
batt ery, if i t has enough powe r, please implem ent the secon d
step o peration dire ctly.
Function setting of the monitor
You can define func tions for you r baby monitor to m eet your
dema nds better. So un d and tempera ture alarm wi ll inform you
auto matically. In the ch ap ter every set up that can be de fi ned by
you wi ll be explain ed one by one.
Plug a n end of the char gi ng cable into t he USB
char ging port in th e si de of monitor. P lug the
othe r end of the char gi ng cable into t he power
adap ter. Th en plug the ada pter into a power
sock et.
2. Sta rting up of monit or
Pres s on t he monitor fo r 2s
27
MENU
SLEEP
OK
TALKSHORT C UT
Now, re al-time vid eo w ill be shown on m onitor
Note : The equipment had been paired before leaving
factory. If no video is shown on the monitor after above
operation, please complete equipment pairing operation
again. For detailed procedure please see p10, Camera
Pairing.
Monitor acce ss menu
In rea l-time view in g, press the bu tton on the monit or to return
to men u bar. In non-re al -time case, p ress button for m ultiple
time s till the screen j umps to menu ba r.
CAM ERAS
LUL LABIE S
MEN U
SOU ND
DET ECTIO N
SLE EP MODE
27
MEN U
MENU
TEM PERAT URE
ALA RM
SET TINGS
SLEEP
OK
TALKSHORT CUT
27
09 10
Page 7
Setting of camera
(camera pairing and deletion)
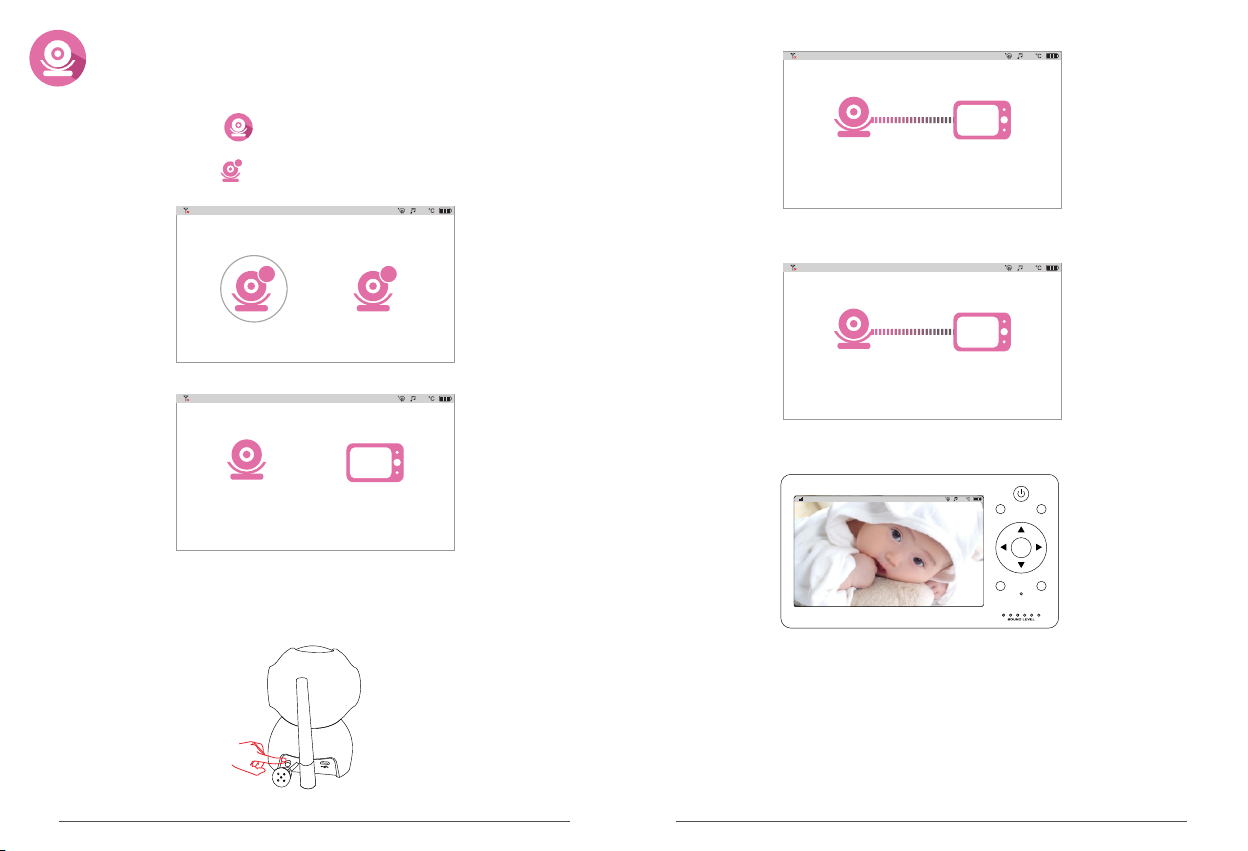
1. Ad d camera
1. Sel ect the " " icon, the n press the "OK " button of the
moni tor.
2. Sel ect the " " icon, the n press the "OK " button of the
moni tor.
+
27
+
-
5. Now, t he camera and m on itor start pa iring mode.
27
Start p air in g.. .. ..
6. Whe n the monitor pro mpts "pairi ng is OK", it indic ates that
equi pment is pair ed s uccessful ly.
27
3. Now, t he equipmen t wi ll prompt "ca mera is no pair ed"
27
Pairi ng is O K.
7. The monit or will jump to m onitoring scr een, and gree n indicator
LED of t he camera wil l li ght constan tly.
Camer a is No p ai red .
27
MENU
SLEEP
OK
4. Pre ss the yellow S ET but to n behind came ra base for
1s, gr een indicat or L ED of the camer a will flash qu ickly,
TALKSHORT CUT
now, th e equipment j um ps to pairing m ode. Then, press
the "O K" button of the mo nitor.
11 12
Page 8

2. Del ete camera
1. Sel ect the " " icon, the n press the "OK " button of the mon itor.
2. Sel ect the " " icon, the n press the "OK " button of the mon itor.
-
27
5. The monit or will retur n to m onitoring s creen and sho w no
came ra added. Gre en i ndicator LE D of the camera w ill turn to
flas h.
27
MENU
SLEEP
OK
+
-
3. Now, t he equipmen t wi ll prompt "ca mera is paire d. Can be
dele ted". Press the " OK" button of t he monitor.
27
Cam era is pa ired. C an be del eted.
4. Whe n the monitor pro mpts "Delet ing is OK", it indi cates that
came ra has been del eted successf ully.
27
Del eting i s OK.
TALKSHORT CUT
Setting of sound alarm
Set al arming range of s ound sensitiv ity. Th e function
will i de ntify loudn es s of baby's cry, when it e xceeds
set ra nge, the monito r will send off ala rm sound.
1. Sel ect the " " icon, the n press the "OK " button of the
moni tor.
2. Sel ect " 、 、 " icon as deman ded, press th e
Low
"OK" b utton of the moni tor to comple te setting of sou nd
alar m.Press butto n on the monito r fo r 2 times, it wil l
MEN U
retu rn to real-time s creen. (if is sel ected, when " OK"
butt on of the monitor i s pressed, th e monitor wil l no t push
soun d alarm any mor e)
Low
Defa ult
Defa ult
Hig h
Hig h
OFF
27
OFF
13 14
Page 9

Note : The alarm sound will last for 1 minute. Notice for
27
sound alarm can be closed by pressing any button on the
monitor, and it will not receive the notice within 3 minutes
af ter closing.
°c
°F
ON
OFF
Setting of temperature alarm
When b aby's room is too h ot or too cold, tem perature
alar m will push notic e to your monitor.
1. Sel ect the " " icon, the n press the "OK " button of the
moni tor.
Cels ius degree sett ing
Set as C elsius degr ee : select icon , pr ess the "OK"
°c
butt on of the monitor.
Temper ature switc h: S elect press t he OK button of
ON
the mo nitor, indic at ing tempera ture alarm fu nc tion
enab led.
Afte r setting is OK, pr ess the button of t he monitor fo r
2 time s, it returns to re al-time scr een.
°c
°F
MEN U
27
ON
OFF
Fahr enheit degree
Set as C elsius degr ee " select icon , pr ess the OK
°F
butt on of the monitor.
Temper ature switc h: S elect , press the O K button of
ON
the mo nitor, indic at ing that temp erature ala rm f unction
enab led success fu lly.
Afte r setting is OK, pr ess the button of t he monitor fo r
2 time s to return to real -time scree n.
MEN U
15 16
Note : Default normal temperature is 15 - 30℃ (59℉ - 86℉).
When the temperature of baby's room is beyond the range,
the monitor will receive the sound of temperature alarm. The
sound will last for 1 minute. Notice for temperature alarm
can be closed by pressing any button of the monitor, and it
will not receive the notice again within 3 minutes after
closing.
Cradlesong
The ba by m onitor has fi ve cradlesong s to help you
with c oa xing the baby t o sleep.
1. Sel ect the " " icon, the n press the "OK " button of the
moni tor to jump to setu p page.
2. Sel ect the music you w ant to play, press the O K button
of the m onitor and the ca mera will pla y the cradles ong
sele cted by you. After s etting is OK, p re ssing the OK
butt on of the monitor a gain, the cra dlesong pau ses.
When s electing "A LL ", all cradle songs will be p layed in
loop . After setting is O K, press button o f the monitor
and it w ill return to rea l-time scre en.
MEN U
Page 10

27
Note : There will be a " "ic on below the op tion of current s ong.
If the c radlesong p au ses, the icon w ill become " ".
Sleep mode
You can set you r monitor as auto matic sleep mod e.
The se tup will automa tically jump to s leep mode
acco rding to the time s et by you.
1. Sel ect " "icon and pre ss the "OK" but ton of the
moni tor, it will jum p to s etup page.
2. Sel ect the time of sle ep as demande d. Press OK but to n
of the m onitor. Now, th e mo nitor will au tomatical ly jump to
slee p mode. After sett ing is OK, pres s bu tton of the
moni tor two times to re turn to real- time screen .
MEN U
27
Setup
The se tup includes ti me setting, fac tory reset an d
view ing of hardware v ersion.
1. Time sett ing
Cali brate the time of m onitor
1. Sel ect " "icon and pre ss the "OK" but ton of the
moni tor, to jump to setu p page.
2. Sel ect " " icon and pres s the OK button o f th e
moni tor to jump to setu p page.
3. You can p ress the button o f the monitor t o se lect
the it em to be adjusted ; press the butto n of the
moni tor to edit the sel ected item. Af ter setting is OK ,
pres s button of the mon itor 3 times, t he n it will retur n
MEN U
to rea l-time scre en .
27
27
ON
5min s
30m ins 60m ins
OFF
O S D:
DATE :
TIME:
201 6-12-5
18: 25:23
Note : There are 3 optio ns includin g 5 minutes, 30 m inutes and 60
minu tes for sleep tim e. You can make a cho ice accordi ng to your
own de mand. By sele ct ing OFF and pre ssing "OK" butt on of the
moni tor, sleep mod e wi ll be closed.
17 18
Page 11
2.Fa ctory reset
Form at all setting of t he monitor and de lete camera .
1.Se lect " "icon and pr ess the "OK" bu tton of the monit or, it will
jump t o setup page.
2. Sel ect " "icon and pre ss the OK butto n of the monitor, it w ill
jump t o setup page.
27
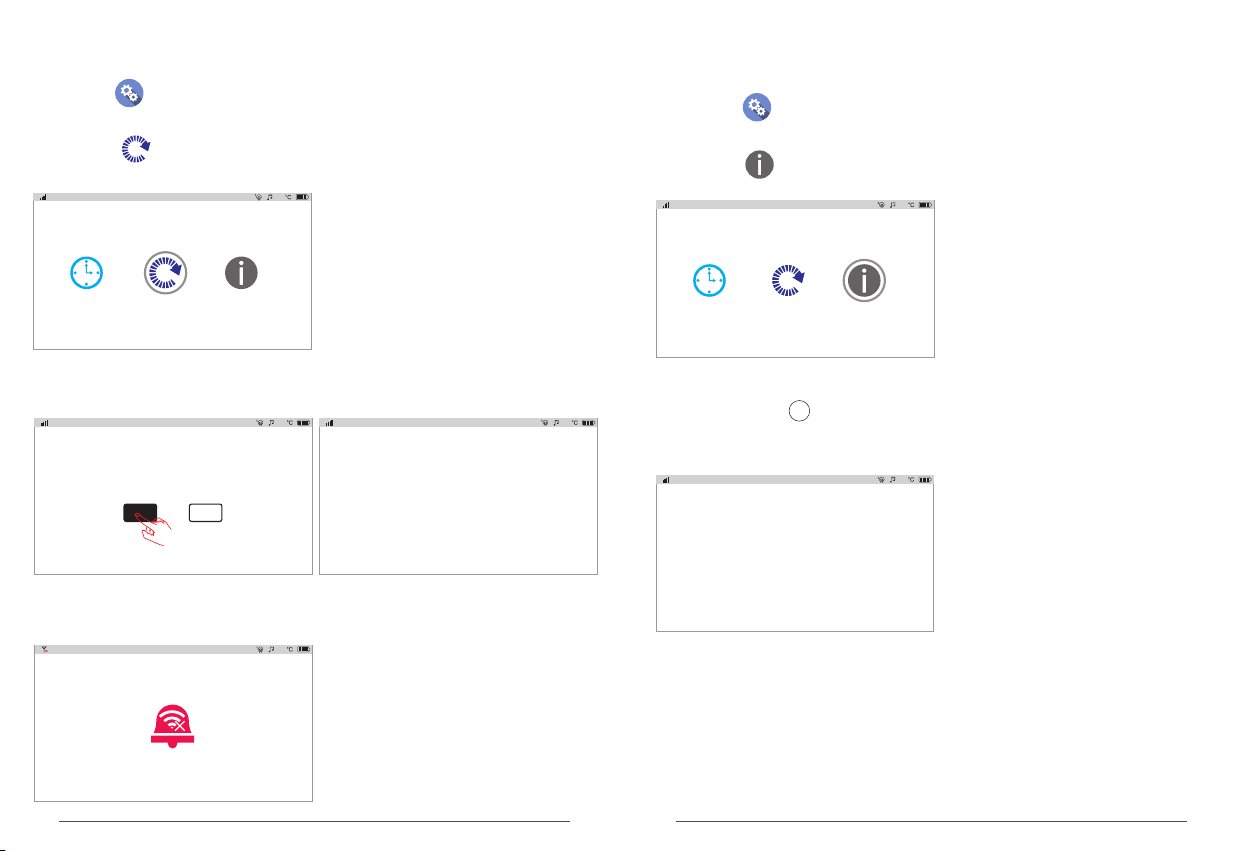
3.In formation on ve rsion
Chec k receiver ve rs ion informa tion
1, Sel ect " " icon, press " OK" button of t he m onitor to jum p to
setu p page.
2. Sel ect " " icon and pres s the OK button o f th e monitor to
jump t o setup page.
27
Now, th e equipment w il l prompt you of " Restore to de fa ult
sett ings?" Select " YES", press t he "OK" button of t he monitor.
3. Now, t he receiver w il l show versio n related inf ormation. Af te r
The eq uipment beg in s to implemen t factory res et .
27
Restore to default settings?
YES NO
Start restoring......
4. Afte r factory reset i s OK, the monit or w ill automat ically jump t o
27
view ing, press butt on of the monit or 3 t imes to retur n to
real -time scree n。
Rx:
SN:
Tx:
SN:
MEN U
27
moni toring scre en a nd show the pro mpt icon of no ca mera added.
Mean while, the gr ee n indicator L ED of camera wi ll flash.
27
19 20
Page 12

Specifications
Image sensor
Video resolution
Rotation angle
Night visual range
Power supply
Came ra
Operation temperature
Storage temperature
Operation humidity
Dimensions(W*D*H)
Weight
LCD
Number of pixels
Wireless transmission Way
Power supply
Operation temperature
Storage temperature
Rece iver
Operating humidity
Dimensions(W*D*H)
Weight
All the specifications are subject to minor change without prior notice.
1/4" CMOS
1280 x 720P/25fps
Pan: 340° Tilt:90°
5m
5V 1A
-10℃~50℃
-20℃~60℃
15~85%
84x84x105mm
242g
5"
720*3RGB(H)x1280(V)
2.4GHz FHSS
DC 5V/2A
0℃~50℃
-20℃~60℃
0~75%RH
164x98x28 (mm)
262g
CEa ndF CC Cert if icati on I nform at ion
NOTE: This equipment has been tested and found to comply with the limits for a Class B digital device,
pursuant to part 15 of the FCC Rules. These limits are designed to provide reasonableprotection against
harmful interference in a residential installation.
This equipment generates uses and can radiate radio frequency energy and, if not installed and used in
accordance with the instructions, may cause harmful interference to radio communications. However,
there is no guarantee that interference will not occur in a particular installation. If this equipment does cause
harmful interference to radio or television reception, which can be determined by turning the equipment off
and on, the user is encouraged to try to correct the interference by one or more of the following measures:
- Reorient or relocate the receiving antenna.
- Increase the separation between the equipment and receiver.
- Connect the equipment into an outlet on a circuit different from that to which the receiver is
connected.
- Consult the dealer or an experienced radio/TV technician for help
Changes or modifications not expressly approved by the party responsible for compliance could void the
user's authority to operate the equipment. This device complies with Part 15 of the FCC Rules. Operation
is subject to the following two conditions:
(1) This device may not cause harmful interference
(2) This device must accept any interference received, including interference that may cause undesired
operation.
The Maximum Permissible Exposure (MPE) level has been calculated based on a distance of d=20 cm
between the device and the human body. To maintain compliance with RF exposure requirement, use
product that maintain a 20cm distance between the device and human body.
Hereby, we declares that this device is in compliance with the essential requirements and other relevant
provisions of Directive 2014/53/EU.
Notice: Observe the national local regulations in the location where the device Is to be used.
This device may be restricted for use in some or all member states of the European Union (EU)
EU Environmental Provisions
E-wast e cannot be mixed wit h househol d
garbag e; corresp onding loca l governmen t
sector or rec ycling sta tions shall be
respon sible for circ ular proce ss.
21 22
 Loading...