

Page 1
EU Environmental Protection
ste elec tri cal produ cts shoul d
Wa
not be dis pos ed of with ho usehold
waste. P lea se recycl e where
facili tie s exist. Ch eck with yo ur
local au tho rity or ret ailer for
recycl ing a dvice.
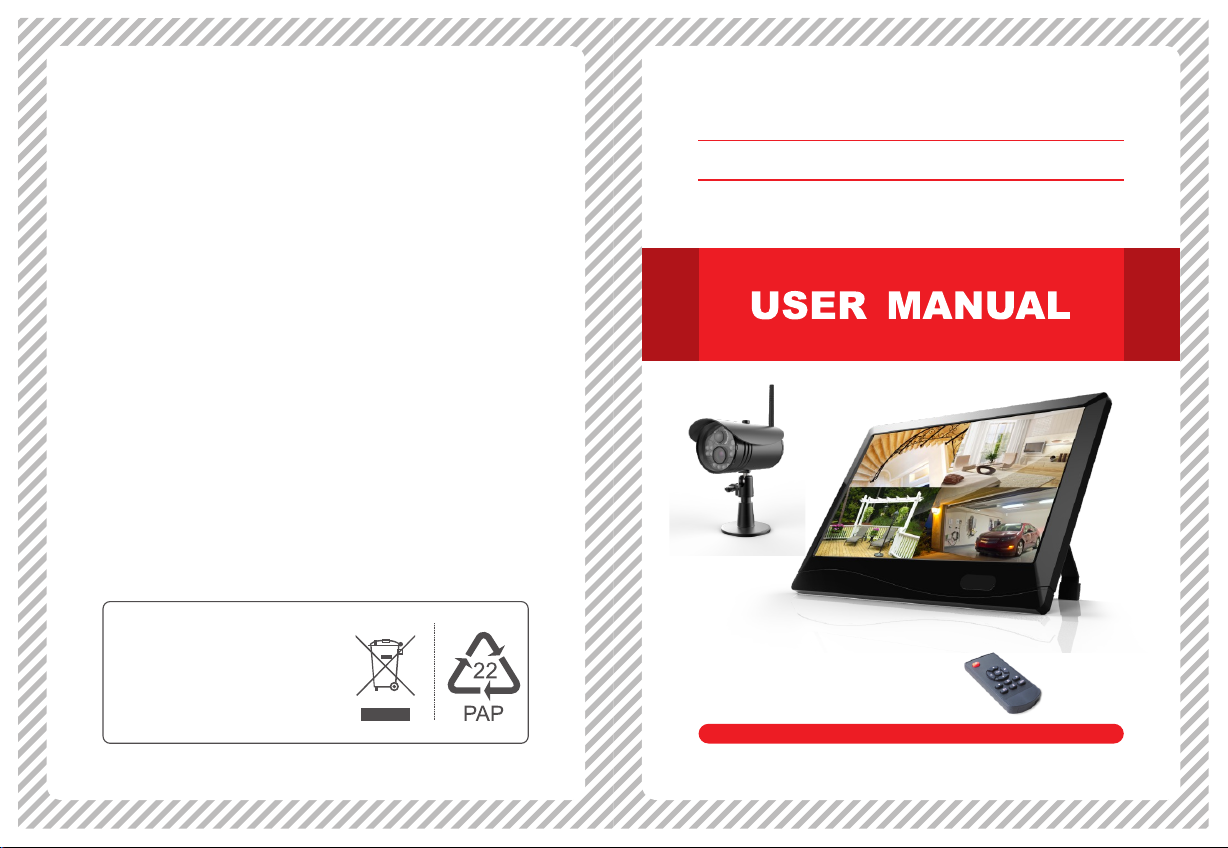
Full HD Remote Home Surveillance
Model:
GD7122
Please read this user manual carefully before using this product. Failure to
understand operation procedures may result in injury.
Version 1.0
Page 2

General information
1.
1.1 Welcome ............................................................................................. 02
1.2 Precautions ........................................................................................ 02
1.3 Packing list ........................................................................................ 02
esignations
2. D ...................................................................................... 03
3. Installation ........................................................................................... 04
4. Operation
4.1 Basic operation ................................................................................... 05
4.2 Record mode ...................................................................................... 07
4.3 Video playback ................................................................................... 09
4.4 Video deletion .................................................................................... 10
4.5 Video output ..................................................................................... 10
5. Main Menu Setting
CONTENTS
5.1 System settings .................................................................................. 10
Network .............................................................................................. 11
Date/time ............................................................................................. 12
Language ............................................................................................ 12
Record mode ...................................................................................... 12
Format SD/USB ................................................................................. 12
Storage for recording
.......................................................................... 12
Display items ...................................................................................... 13
System information ............................................................................. 13
System upgrade ................................................................................. 13
Scan mode period .............................................................................. 13
Mute ................................................................................................... 13
Load default
....................................................................................... 14
Brightness ........................................................................................... 14
Volume ................................................................................................ 14
Alarm volume ...................................................................................... 14
Power saving mode ........................................................................... 14
About ................................................................................................... 15
5.2 Recording settings ............................................................................. 15
5.3 Video playback ................................................................................... 16
5.4 Camera settings ................................................................................. 16
Pairing ............................................................................................... 16
Activation
............................................................................................ 18
PIP settings ......................................................................................... 18
Latency vs quality
................................................................................ 18
brightness ........................................................................................... 18
5.5 Alarm settings ...................................................................................... 19
Operations for iOS Apple Client
6. .................................................. 21
Operations for Android Client
7. ...................................................... 24
8. Specifications ..................................................................................... 28
9. Functional Characteristics ........................................................... 29
10. Fault Diagnosis
10.1 FAQ ................................................................................................. 30
10.2 Fault diagnosis ................................................................................ 31
10.3 Elimination of common diesel engine malfunctions .........................
01
812 2HE=G D8122 +GD7122
1. General information
1.1 Welcome
Thank yo u for p urchasi ng our prod uct s. The p rod uct is a high -qualit y fin epositi oni ng digita l monitor ing p roduct de signed an d dev eloped fo r the
securi ty an d protect ion field . Ple ase read th e instruc tio n of produc t
carefu lly b efore use .
1.2 Precautions
1. The rec eiv er shall no t be placed i n the p osition w here it's e asy t o drop or
splash ed wi th liquid ;
2. Pleas e tur n off th e power swi tch o f camera/ receive r whe n don't use t he
produc t for a l ong time;
3. The pow er su pply can be d isconne cte d complet ely only wh en th e charger
is unplu gge d.
4. Do not to uch t he power sw itch and re cei ver with we t hands or go ods t o
avoid el ect ric shock ;
5. If soli d or li quid ente rs the chas sis , please di sconnec t the m achine po wer
and ask qu ali fied tech nicians t o che ck before r estart;
6. When th e rec eiver is sh ut down, do n ot un plug the po wer suppl y dir ectly.
Instea d, pl ease enab le the powe r sup ply of rece iver to be cl ose d
automa tic ally by usi ng the shut dow n button on t he panel so a s to av oid
damage t o mob ile HDD.
7. If the de scr iption of t he produc t or pa rameter s in the inst ruc tion is
incons ist ent with th e materia l obj ect, plea se in kind pr eva il. We r eserve
all the ri ght f or the fina l explana tio n.
1.3 Packing list
① Camera ×(1 -4)
② Receiv er× 1
③ Receiv er po wer×1
④ Camera p owe r×(1-4)
⑤ Remote c ont rol×1
⑥ Wall nai l×4 ×(1-4)
⑦ Screw× 4×( 1-4)
⑧ SD card (o pti onal)×1
⑨ Cable (o pti onal)×1
⑩
32
HDMI lin e (op tional) ×1
① ③② ④ ⑤
(optional)
⑦
※ The p ictu res in t he ins truc tion a re for r efer ence o nly,
ple ase in kind prevail.
9
10
02
Page 3
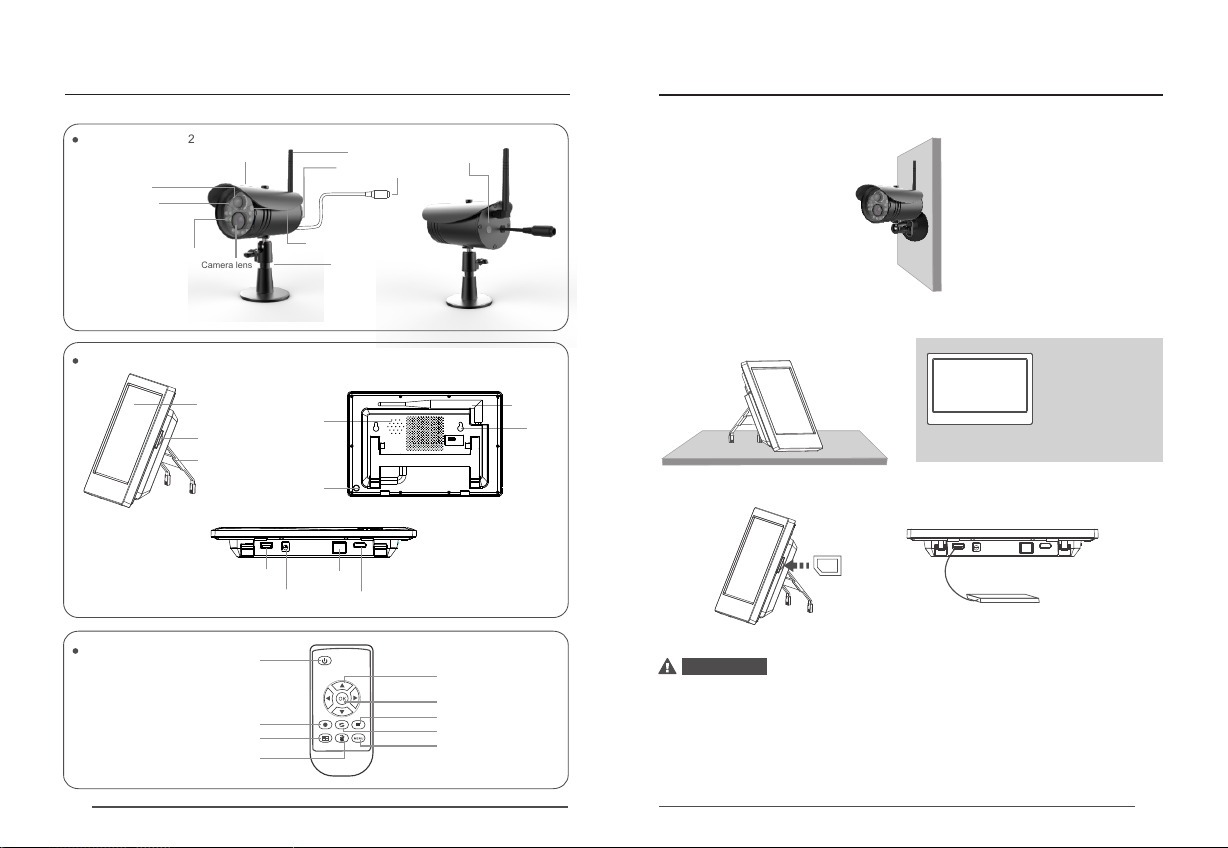
2. esignationsD
Camera GD GD8122
PIR sensor
Photosensitive
induction
Infrared lamp
Camera lens
Rain cover
Indicator
MIC hole
Support
Antennas
3. Installation
1. Insta ll th e camera in a s uitable m oni toring po sition an d fix i t with scre ws.
Pair key
Supply hub
2. Insta ll th e receive r in a suitab le ho rizonta l positio n (or h ang it on the w all).
Receiver
Remote control
03
10.1-inch touch screen
SD card slot
Support
USB port
Startup /shutdown
Record
Four-image
Del/LCD, TV change-over switch
Loud speaker
Power switch
Network port
Supply hub
HDMI interface
(Bo ttom)
Navigation
OK
Playback
Display mode
Menu
Antennas
Hanging
hole
Nail scr ew in to
the appr opr iate
place on t he wa ll,
and then h ang t he
receiv er on t he
screw
3. Inser t the S D card or ext ernal sto rag e device su ch as mobil e HDD .
SD card
Mobile H DD
Attent ion
※ SD card an d ext ernal sto rage devi ce do n ot suppor t hot plug.
※ Extern al st orage dev ice or SD car d onl y support s the Fat32 f orm at.
※ If the SD ca rd or e xternal s torage de vic e used for th is machin e is us ed
before , ple ase forma t it firstl y whe n using.
※ Please u se Cl ass 4 SD card o r above, or i t can not be iden tified.
※ Data in th e SD ca rd or mobil e HDD canno t be re stored af ter forma tti ng,
please b e car eful.
04
Page 4
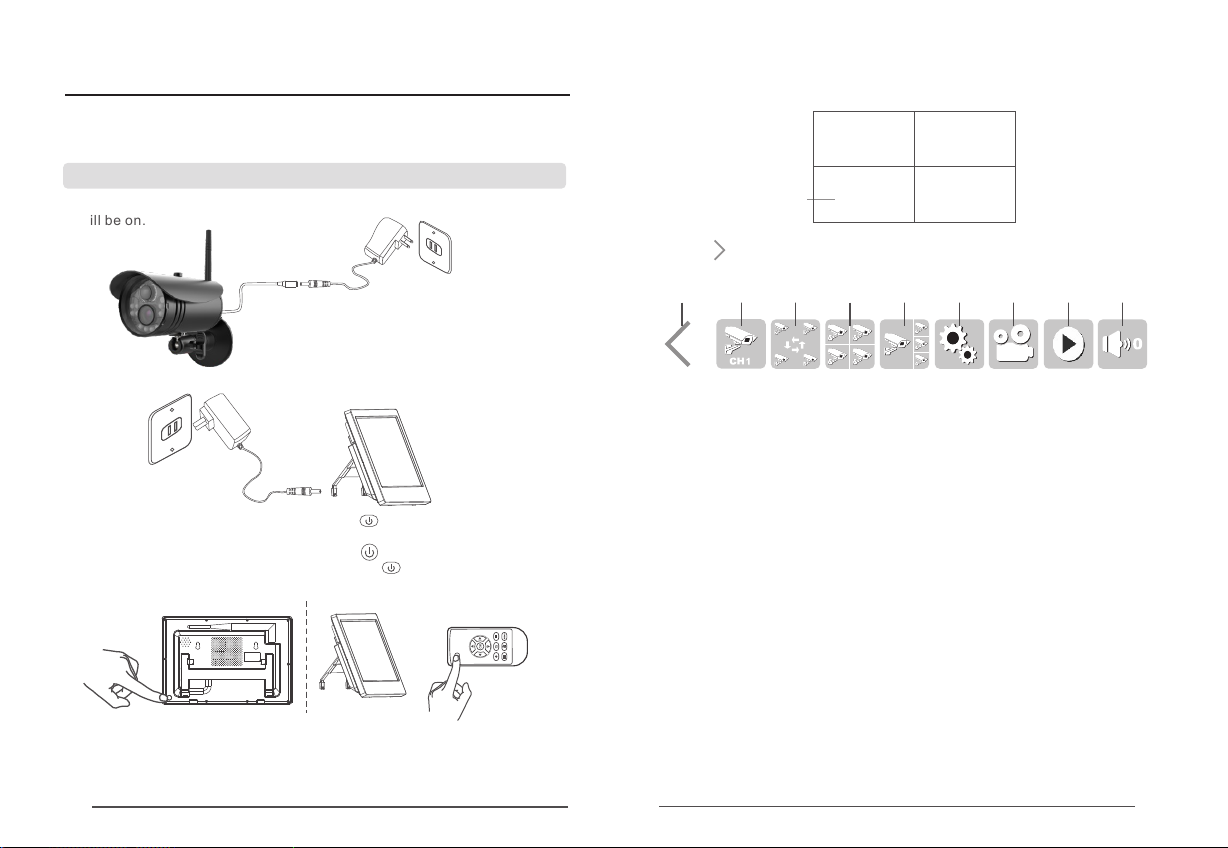
4. Operation
(The fol low ing mainl y introdu ces t he operat ing metho d for r emote con trol,
and oper ati on settin gs can also b e con ducted by c licking o n the t ouch
screen .)
4.1 Basic operation
1. Conne ct th e camera wi th power su ppl y so that the i ndex lamp o f cam era
will be on .
5. After su cce ssful cod e matchin g, th e real-ti me monito rin g image wil l
occur as f oll ows
V
Picture display area Picture display area
2016/01/15/09:30 2016/01/15/09:30
Time stamp
6. Click a t the l eft botto m of the touc h scr een with fi nger to pop u p a
settin g men u, and clic k a single ic on to e nter the se tting:
A B C D E F G H I
2016/01/15/09:30 2016/01/15/09:30
Picture display area Picture display area
2. Conne ct th e receive r with powe r sup ply.
3. Start up: U nder the sh utdown st ate , press on th e receive r or re mote
contro l and r elease it a fter abou t 2s to s tart up the r eceiver.
Shutdo wn: U nder the st artup sta te, p ress on the r eceiver a nd re lease
it after 5 s to sh ut down the r eceiver. O r pre ss on th e rem ote contr ol
and rele ase i t after 2s to s hut down th e rec eiver.
4. Match t he co des of came ra and rece ive r (4 camera s can be conn ect ed
simult ane ously at mo st). Th e codes hav e been matc hed a lready as
factor y def ault. If no t, please m atc h the codes a ccordin g to th e "Code
matchi ng" d escript ion on Page 1 6.
05
A: A setting m enu w ill be popp ed up by a sing le cl ick and pac ked up when
clicki ng ag ain;
B: Full im age d isplay of a s ingle cam era : Sequent ial click w ill c irculat e
from CH1 , CH2 , CH3 and Ch4 ;
C: Circu lat ion displ ay: switc hov er is trigg ered betw een c irculat ion
displa y and d is enable d circula tio n after cli cking;
D: Click t o ent er the four -image di spl ay; (Only d isplay wh en co nnectin g
multip le ca meras)
E: Click t o ent er the one- large thr ee- small ima ge displa y; (O nly displ ay
when con nec ting mult iple came ras )
F: Setti ng: C lick to ent er the main m enu s etting;
G: Vi deo r ecordin g: Video re cording w ill s tart by a sin gle click a nd st op
when cli cki ng again.
H: Playb ack : Click to en ter the pla yba ck interf ace;
I: Volume : The volum e will be circul arly set fr om 0, 1 , 2, 3, 4 an d 5 by
sequen tia l click, bu t it defaul ts to b e 3.
Note: App ly a li ttle forc e when swip ing o r clickin g the touch s cre en with fin ger.
(Since t he pr oduct ado pts resis tan ce screen , gentle fo rce m ay have no
reacti on on t he touch sc reen, but l arg e force may h urt your fi nge r or damage
the scre en, s o please ap ply appro pri ate force .)
06
Page 5
7. Press o n the r emote con trol to swi tch a mong the 3 di splay mod es:
V
Picture display area Picture display area
2016/07/15/09:30
2016/07/15/09:30
Picture display areaPicture display area
2016/07/15/09:302016/07/15/09:30
Four pictures
8. Press o n the r emote con trol to ent er the circula tion mode d isp lay.
The c irc ulation i nterval t ime i ncludes 5 , 10, 15, 20 an d 30s a nd can be set
under th e "Sy stem sett ings".
V
2016/07/15/09:30
One picture
Picture display area
V
Picture display area
2016/07/15/09:30
One large and three small
C2
Picture display area
2016/07/15/09:30
C3
Picture display area
2016/07/15/09:30
C4
Picture display area
2016/07/15/09:30
Meanin gs of i cons on the r eal-tim e mon itoring s creen:
Suc cessful mobile HDD
insertion
Suc cessful SD card inser tion
Pro mpt app ears wh en SD car d
or mo bile HD d oes not a ccess
Pro mpt appears when S D
Ful l
car d or mobi le HD is full
Pro mpt ap pear s when S D
car d or mobi le HD is lo cked
UPn P is not s tart ed or router
fir ewall is blocke d
Network switch failure
Suc cessful network swi tch
Suc cessful network swi tch
The c amera is the
cur rent camera
Vid eo rec ordi ng sta te
Sig nal intensity
Camera name
Sil ence
1080 P
720P
1080P
720P
4.2 Record mode
Manual recording
1. Under t he re al-time m onitori ng st ate, pres s and on the re mot e control
to choos e the c amera rec ording vi deo s as the curr ent camer a;
2. Press t he re cording /stop rec ord ing key on th e remote co ntr ol. Th e
record ing i con will oc cur on the di spl ay screen t o indicat e the
record ing s tarts;
3. Press o n rem ote contr ol again to s top r ecordin g.
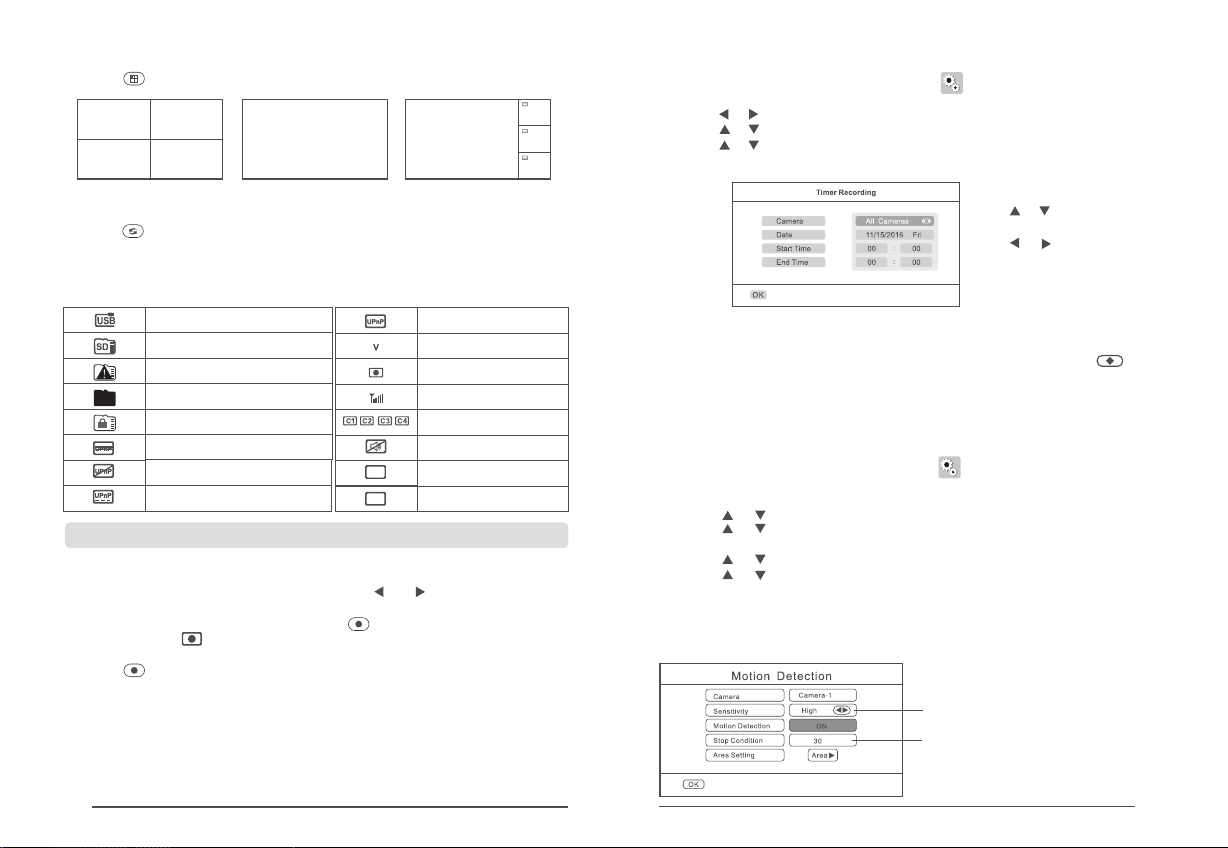
Timer recording
Users ca n set t he starti ng and endi ng ti me of recor ding on the m enu
"Recor d", t he device w ill make re cor ding auto matical ly ac cording t o the
set star tin g and endin g time, and v ide os will be sa ved autom ati cally aft er
record ing . Specifi c steps are a s fol lows:
1. Press M ENU o n remote co ntrol or cl ick o n the touch s creen to en ter
the sett ing i nterfac e;
2. Press o r to ch oose "Rec ord", and t hen p ress OK to en ter;
3. Press o r to ch oose “Time r rec ording" a nd th en press "O K" to enter ;
4. Press o r to ch oose "New s chedule " and t hen press " OK" to ente r
and set th e sta rting and e nding tim e:
5. After s ett ing, the de vice will r eco rd automa tically a cco rding to th e set
starti ng an d ending ti me.
6. Durin g rec ording, i f pressin g the r ecordin g/stop re cor ding key on t he
device , the r ecordin g will stop .
Press or t o cho ose the
items to b e set ;
Press or t o set ;
Press OK t o con firm the
settin g and e xit.
Motion detection
When an ob jec t moves in th e visual an gle r ange of cam era, the de vic e
record ing c an be trigg ered. Spe cif ic steps ar e as follow s:
1. Press M ENU o n remote co ntrol or cl ick o n the touch s creen to en ter
the sett ing i nterfac e;
2. Press ◄ o r ► to ch oose "Rec ord", and t hen p ress OK to en ter;
3. Press o r to ch oose "Mot ion detec tio n " and then pr ess "OK" to e nte r;
4. Press o r to ch oose the ca mera to be se t;
5. Press ◄ o r ► to ch oose "ON" ;
6. Press o r to ch oose the it ems to be cha nge d;
7. Press o r to ma ke adjust ment;
8. Press O K to co nfirm the s etting an d exi t.
"Sensi tiv ity", "St op condit ion " and "Area s etting" c an al so be set in th e
motion d ete ction set ting:
Sensit ivi ty: "High , medium
and low" a re ad justabl e
The time c an be s et in secon d
07
08
Page 6

Please c lic k the range t o be set:
V : Indica tin g to choose t he
curren t ran ge
Yell ow "V": Ind ica ting to act ivate
region al mo tion dete ction
The spac e unt icked rep resents
closed .
Area set tin g
4.3 Video playback
1. Under t he re al-time m onitori ng st ate, pres s the playb ack k ey on the
remote c ont rol or clic k on the touc h scr een to ente r the playb ack
interf ace :
2. Press o r on th e remote co ntrol to ch oos e the date fo lder; Pre ss OK t o
confir m it an d enter;
3. Press o r on th e remote co ntrol to ch oos e camera; P ress OK to co nfi rm
it and ent er;
4. When SD c ard a nd mobile H DD coexis t, pl ease clic k the icon on t he to p
right co rne r to switch t he storag e dev ice.
SD Card
07/2 2/201 6
07/2 3/201 6
SD
1 / 2
07/22/ 2016
C1 06- 11
C2 06- 11
1 / 1
6. Press ◄ o r ► for R EW or FF; Pre ss or to adju st th e volume; P ress
OK again t o pau se the vide o; Press ME NU to e xit the pla y mode.
4.4 Video deletion
1. Under t he re al-time m onitori ng st ate, pres s the playb ack k ey on the
remote c ont rol or clic k on the touc h scr een to ente r the playb ack f older:
2. Press o r on th e remote co ntrol to ch oos e the video o r video fol der t o
be delet ed;
3. Press o n the e quipmen t to delete i t.
Attention
Folder s can b e deleted o nly when th ey ar e empty.
4.5 Video output
Connec t the r eceiver t o a larger di spl ay /TV to see t he monito rin g video
clearl y.
HDMI lin e
5. Main Menu Setting
DELE TE
5. Press o r on th e remote co ntrol to ch oos e the video t o be played ; Pre ss
OK to play i t;
Click th is ic on on
the scre en to
pop up the p lay
menu
09
Exit
Play/P aus e
REW
FF
DELE TE
Click to enter the
full-scree n disp lay,
click again to e nter
the 1-big & 3-sm all
screen displ ay
5.1 System settings
(The fol low ing mainl y introdu ces t he operat ing metho d for r emote con trol,
and oper ati on settin gs can also b e con ducted by c licking o n the t ouch scre en.)
Under th e rea l-time mo nitorin g sta te, press " MENU" on th e rem ote contr ol
or click o n the t ouch scre en to enter t he fo llowing i nterfac e:
10
Page 7

Press ◄ or ► o n the r emote con trol to cho ose " System " an d press OK to
enter th e sys tem setti ng interf ace :
System
Network
Date / Time
Language
Record Mode
Format SD/USB
Date/time
After ch oos ing "Time/dat e" on the int erface "S yst em " and pres s OK to enter
the time /da te settin g interfa ce;
2016
Date / Time
/ /
20
Date
Time
11
:
15
11
Press or t o sel ect items t o
be chang ed;
Press ◄o r ► key t o make chan ges;
Press OK t o con firm the ch anges;
Press th e MEN U to exit the
time/d ate s etting in terface ;
Network
Date/time
Language
Record mode
Format SD/USB
Storage for recording
Display items
Sys tem in form ation
Sys tem up grade
Sca n mode period
Mut e
Load default
Bri ghtness
Volume
Alarm volume
Power saving mode
About GPL Decl arat ion
Set a nd check the network in form atio n;
Set s yste m time and date;
Set s yste m language;
Set w hether to stop record ing or c over t he ear lier v ideo
when the storage medium is f ull;
For mat th e storage medium or not ;
Set t he storage medium;
Whe ther th e signal intensi ty, SD car d stat e, cam era na mes an d
the l ike are displayed on the d ispl ay scr een an d vide o reco rded ;
Check the system information;
Sys tem upgrade:
Set interval time displa yed in c ycle o n the ca mera m onit orin g scre en;
On or o ff of lou dspe aker o n the re ceiv er;
Restore the default settings o r not;
Adjust the brightn ess of L CD scr een;
Adjust the volume;
Adjust the alarm volume;
Adjust the power-savin g mode ;
Press or t o cho ose an item , and press O K to co nfirm it.
Network
1. After c hoo sing "Net work" on th e int erface "S ystem ", pr ess O K to enter
and chec k;
2. Press M ENU t o exit;
Net work Pa sswor d
Net work Add ressi ng
Pus h Notif icati on
Net work In forma tion
11
Network
Press ◄ or ► t o sel ect items t o
bechan ged ;
Press OK t o con firm the ch anges;
Modify n etw ork param eters;
Press OK t o sav e and confi rm;
Press ME NU to e xit.
Language
1. After c hoo sing "Lan guage" on t he in terface " System ", p res s OK to enter
the lang uag e setting i nterfac e;
2. Press o r to se lect the ap propria te la nguage, a nd press OK t o con firm
the sett ing a nd exit.
Record mode
1. After c hoo sing the "R ecord mod e" on t he interf ace "Syst em" , press OK
to enter ;
2. Press o r to ch oose "Ord inary" or " Ove rwritin g", and the n pre ss OK to
confir m the s etting an d exit.
Prompt
Ord inary: When SD car d or mob ile HD D is ful l, rec ordi ng wil l stop a utom atic ally ;
Ove rwrit ing: The system will dele te the m ost pr evio us vid eos au toma tica lly wh en the S D
car d or mobile HDD is fully oc cupi ed to cl ear en ough s tora ge spa ce to en sure t his
rec ording.
Format SD/USB
1. After c hoo sing “ SD /US B " on the inte rface "Sy ste m ", press OK t o
enter;
2. Press o r to ch oose "Can cel", "SD c ard " or "USB dev ice";
Cancel : Can cel the for matting ;
SD card: F orm at SD card;
USB devi ce: F ormat mob ile HDD.
3. Press O K for f ormatti ng;
4. After t he fo rmattin g is comple ted , the hint "F ormat suc ces sful" wil l prompt.
Format
Storage for recording
1. After c hoo sing the "S torage fo r rec ording" o n the inter fac e "System " ,
press OK t o ent er;
2. Press o r to ch oose "SD ca rd" or "USB d evi ce";
3. Press O K to co nfirm the s etting an d exi t.
12
Page 8

Display items
1. After c hoo sing the "D isplay it ems " on the inte rface "Sy ste m ", press OK
to enter ;
2. Press o r key t o make sele ction;
3. Press O K to ch eck wheth er the item d isp lays. If th e item is dis pla yed, the
icon " " beh ind t he item wil l appear.
RSSI: Ic on of s ignal int ensity. Ic on:
SD/USB s tat e: Whethe r SD card or mo bil e HDD is inse rted. Ico n:
Camera : Cam era name. I con:
Networ k: St ate of netw ork conne cti vity. Icon:
4. Press t he ME NU to confi rm the sett ing a nd exit.
C3
C2
C4
UPnPUPnP UP nP
System information
1. After c hoo sing "Sys tem infor mat ion" on the i nterfac e "Sy stem ", pre ss OK
to enter a nd ch eck;
2. Press M ENU t o exit.
System upgrade
1. After c hoo sing the "S ystem upg rad e" on the int erface "S yst em ", press O K
to enter ;
2. Press o r to ch oose the ca mera to be up gra ded;
3. Press O K to ma ke adjust ments;
4. Press t o mak e upgrade s;
5. Press O K to co nfirm or pr ess the MEN U to ex it.
Scan mode period
1. After c hoo sing the "S can mode pe rio d" on the int erface "S yst em ", press
OK to ente r;
2. Press o r to ch oose time ;
3. Press O K aga in to confi rm the sett ing a nd exit.
4. Scann ing c an start on ly when sho t pre ssing on th e remote co ntr ol
and will s top a fter pres sing agai n.
Mute
1. After c hoo sing "Mut e" on the int erf ace "Syst em ", press O K to en ter and
check;
2. Press o r to ch oose "OFF " or "ON";
3. Press O K aga in to confi rm the sett ing a nd exit.
Load default
1. After c hoo sing the "L oad defau lt" o n the inter face "Sys tem " , press OK to
enter;
2. Press o r to ch oose "Can cel" or "Co nfi rm";
Cancel : Can cel resto re defaul ts;
Confir m: Re store the d efaults ;
3. Press O K to co nfirm the s etting an d exi t.
Brightness
1. After c hoo sing the "B rightne ss" o n the inter face "Sys tem " , press OK to
enter;
2. Press ◄ o r ► to ma ke adjust ments;
3. Press O K to co nfirm the s etting an d exi t.
Volume
1. After c hoo sing "Volu me" on the in ter face "Sys tem ", pres s OK to e nter
and chec k;
2. Press ◄ o r ► to ma ke adjust ments;
3. Press O K to co nfirm the s etting an d exi t.
Prompt
Under th e rea l-time mo nitorin g sta te and play back mode , vol ume can als o
be adjus ted b y pressin g or .
Alarm volume
1. After c hoo sing the "A larm volu me" o n the inter face "Sys tem " , press OK
to enter ;
2. Press ◄ o r ► to ma ke adjust ments;
3. Press O K to co nfirm the s etting an d exi t.
Power saving mode
1. After c hoo sing the "P ower savi ng mo de" on the in terface " Sys tem ",
press OK t o ent er;
2. Press o r key t o make sele ction;
3. Press O K to en ter;
4. Press o r key t o make sele ction;
5. Press O K to co nfirm the s etting an d exi t.
13
14
Page 9

About
1. After c hoo sing the "A bout" on th e int erface "S ystem ", pr ess O K to enter;
2. Press O K to co nfirm the s etting an d exi t.
5.2 Recording settings
(The fol lowing ma inl y intr odu ces th e ope rati ng me thod for re mote cont rol,
and oper ation set tings can a lso b e cond uct ed by cl ick ing on the to uch scree n.)
1. Under t he re al-time m onitori ng st ate, pres s "MENU" on t he re mote cont rol
or click o n the t ouch scre en to enter t he se tting int erface:
2. Press ◄ o r ► to ch oose "Rec ord";
3. Press O K to en ter the fol lowing in ter face:
Timer Recording
Motion Detection
Record
5.3 Video playback
See Page 9 f or sp ecific st eps.
5.4 Camera settings
(The fol lowing ma inl y intr odu ces th e ope rati ng me thod for re mote cont rol,
and oper ation set tings can a lso b e cond uct ed by click ing on the to uch scree n.)
1. Under t he re al-time m onitori ng st ate, pres s "MENU" on t he re mote cont rol
or click o n the t ouch scre en to enter t he se tting int erface:
2. Press o r to ch oose "Cam era ";
3. Press O K to en ter the fol lowing in ter face:
Camera
Pairing
Activation
PIP Setting
Latency VS Quality
Timer recording
Set the be gin ning and en ding time o f vid eo record ing, and th e equ ipment
will mak e vid eo record ings in acc ord ance with t he se t time . Afte r recordi ng,
the vide o wil l be saved au tomatic all y (see Page 8 f or specif ic st eps).
Motion detection recording
When an ob jec t moves in th e visual an gle r ange of cam era, the de vic e
record ing c an be trigg ered. See P age 8 f or specif ic steps.
Infrared detection recording
When a hum an bo dy moves in t he visual a ngl e range of ca mera, the d evi ce
record ing a nd intell igent lin kag e alarm can b e trigger ed. S pecific s teps are
as follo ws:
Inf rare d detection recordi ng
ON
ON
ON
ON
Press of to select "ON or OFF",
press OK key to confirm:
15
Came ra-1
Came ra-2
Came ra-3
Came ra-4
Pairing
The came ra wi ll not be int erfered b y oth er freque ncy point s aft er
1. Press o r to se lect "pai ring". Pr ess O K key to ente r;
Pairing
Camera-1
Camera-2 Paired 0xe01f0007
Camera-3 Paired 0xe01f0006
Camera-4 Paired 0xe01f0005
2. Press o r to ch oose the ca mera to be pa ire d;
3. Press O K to en ter pairi ng:
Camera-1
Camera-2 Paired 0xe01f0007
Long press the PAIR button on TX for 2 seconds
Camera-3 Paired 0xe01f0006
Camera-4 Paired 0xe01f0005
Paired
Pairing
Paired
Pairing.....
0xe01f0008
0xe01f0008
35
pairin g
16
Page 10

4. doubl e-c olor LED re d light fli cke rs.
(The cam era i s on power- on and star tup s tate)
5. After s ucc essful , th e dis play scre en on t he receiv er will pop u p the
follow ing p rompts:
Prompt
pairin g
Pairing OK
Congratulations!!!
If pairing fails, the system prompts “Pairing f ailed”.
perform pairing again.Please
Activation
1. Press o r to ch oose "Act ivation " and t hen press " OK" to ente r;
Activation
Camera-1
Camera-2
Camera-3
Camera-4
2. Press o r to ch oose the ca mera to be se t;
3. Press ◄ o r ► to ch oose "ON" o r "OFF";
4. Press O K to co nfirm the s etting an d exi t.
Attent ion
In the cas e of "O FF", the ca mera will n ot pe rform any a ction suc h as th e
displa y of mo nitorin g screen, v ide o recordi ng and auto mat ic alarm.
Off
On
Paired
On
Paired
On
Paired
PIP settings
Set the re sol ution rat io and pixe l of vi deo recor ding.
1. Press o r to ch oose "PIP setti ng" a nd press OK t o enter;
2. Press o r to ch oose the ca mera to be se t;
3. Press O K to en ter the fol lowing in ter face:
PIP s etti ngs
Reso lutio n size
Press or to choose "resolu tion r atio " or "im age qu alit y";
Press or to choose "Pr emiu m", "H igh" , "Med ium" o r "Low ";
Press OK to change;
Press MENU to confirm the setting and ex it.
Top High
High
Medi um
Low
qual ity
Latency vs quality
1. Press o r to ch oose "Lat ency vs qua lit y” and pres s OK to enter ;
2. Press o r to ch oose the im age quali ty to b e set;
3. Press O K to co nfirm the s etting an d exi t.
Latency VS Quality
Low Latency, Normal Quality
Medium Latency, Better Quality
High Latency, Best Quality
17
18
Page 11

Brightness
1. After choosing the "Brightness" on the interface "System ", press OK to enter;
2. Press ◄ or ► to make adjustments;
3. Press MENU to confirm the setting and exit.
Brightness
Cam era-1
Cam era-2
Cam era-3
Cam era-4
1 2
5
3
4
7
6
8
5.5 Alarm settings
The item is to set whether the device will alarm automatically when someone
moves in the visual angle range of the camera.
1. Under the status of real-time monitoring, press the MENU key on the
equipment to enter the setting interface:
2. Press ◄ or ► on the remote control to choose "Alarm " and press OK to
enter;
3. Press or to choose "Motion detection" or "Infrared detection" and press
OK to enter;
4. Press or to choose "ON" or "OFF";
5. Press OK to confirm the setting and exit.
▲
Prompt
▼
Prompt The alarm can make effect only when the infrared
detection or motiondetection recording functions.
Connect network
1. Conne ct th e cable to th e receive r and o pen the rec eiver as sh own i n the
figure b elo w:
Note: Th e cable con nection r equ ires Clas s 1 rou ter
2. After s ucc essful co nnectio n, en ter "Main m enu"=>" Sys tem setti ngs"=>
"Netwo rk" =>"Netw ork infor mat ion". The follo win g interfa ce will occ ur on
the disp lay s creen:
Networ k
Gol bal IP
Loc al IP
Por t
Dev ice ID
Download the client program
1. Turn on the intelligent mobile device terminal and enter “App Store”,then search
and download “ ” software. as the following interface:
2. Install the software, as the following interface:
GoCamPro
5003
Netw ork rea dy!
19
App Store
20
Page 12

6. Operations for iOS Apple Client
View image
1. Click the APP and enter “Device list” interface.
Click the icon to add new camera.
2.When RX and mobile phone can normally connect to outer net. you just need to set
network password in the receiver, and then input to the mobile phone. Then input the
Device ID in the receiver to the Device ID in the mobile phone or scan the QR code to
get the Device ID.
Network information
Global IP
Intranet IP
Port
Device ID
The network is ready!
Network
Network password
Network Addressing
Push Notification
Network information
Scan to the client
Input to the client
Set the password and enter it to the client
ipad
Devi ces New Devi ce
NAME
Devi ce name
ID
Devi ce ID
PASSWO RD
Devi ce passw ord
4:40 PM
58%
Save
3. To view the video image, you need to choose the right title in the Device list,
then click the line to enter the monitoring mode.
4. Click on the bottom icon. APP will try to connect the RX of the previous
selected title, if connection is successful, the video image will display on the
client.
21
2013/11/15/16:43
Take a photo
22
Page 13

Setting Push Notification
1. Turn on the push notification function on the receiver, enter Main Menu System
=> Network => Push Notification, the receiver screen displays the following:
Push Not ific ation
Turn o n/off
Min imum Pu sh inte rval
Time P eriod
Reg ister ed Mobi les
Record
Time r recor ding
Mot ion Det ectio n
=>
7. Operations for Android Client
Connect network
1. Conne ct th e cable to th e receive r and o pen the rec eiver as sh own i n the
figure b elo w:
Note: Th e cable con nection r equ ires Clas s 1 rou ter
Users can set according to the situation
of Minimum Push interval and time period
2. Click "PUSH" to Register an account. When there is a movement in front of
camera, it will send a push message to your smart phone. As below shown:
Notice: Only when the motion detection is
open, push notification function will be effective.
123 4
After successful registration,
the monitor will receive the
registered account name.
the
Reg ister ed Mobi les
1234
Remote viewing video on receiver side
When cli cki ng on clien t-side, y ou ca n check
the vide o dat a of SD card or m obile har d dis k of
the rece ive r.
Note
: The picture took by mobile client-side shall be
automatically stored in the phone.
Remarks:
1. Only when the receiver in the real-time state, to view the image.
2. If the Device ID was unable to get to the RX, indicates that RX did not normally
connect outer net, need to check your network.
3. If everything is normal, but still not in the mobile phone client to view images,
please close the client software running always in the background, please try it
again.
4. The network adapter does not support hot-swappable, Before open the RX, The
network is connected with the RX.
23
2. After s ucc essful co nnectio n, en ter "Main m enu"=>" Sys tem setti ngs"=>
"Netwo rk" =>"Netw ork infor mat ion". The follo win g interfa ce will occ ur on
the disp lay s creen:
Networ k Inf ormatio n
Gol bal IP
Loc al IP
Por t
Dev ice ID
5003
Netw ork rea dy!
Download the client program
1. Turn on the intelligent mobile device terminal and enter “Google play” store,
then search and download “ ” software.GoCamPro
2. Install the software, as the following interface:
Goog le play
24
Page 14

View image
1. Click the Settings and enter device list. add new camera.
3. Click the icon, the image will display on the smart phone.
2. When RX and mobile phone can normally connect to outer net. you just need to
input Device ID to the client. or scan the QR code to get the Device ID. the password
is set up in the receiver, and then input to the mobile phone. and saving.
Networ k Info rmation
Golb al IP
Loca l IP
5003
Port
Devi ce ID
Netwo rk read y!
Or sc an
Inp ut
Networ k
Net work Pa sswor d
Net work Add ressi ng
Pus h Notif icati on
Net work In forma tion
Set
pas sword
and i nput
25
4. Press and hold the device ID to enter the setting interface.
26
Page 15

Setting Push Notification
1. Turn on the push notification function on the receiver, enter Main Menu System
Network tion,
=> => Push Notifica the receiver screen displays the following:
Push Not ific ation
Turn o n/off
Min imum Pu sh inte rval
Time P eriod
Reg ister ed Mobi les
Users can set according to the situation
of Minimum Push interval and time period
Notice: Only when the motion detection or PIR
Recording is open, push notification function
will be effective.
Record
Time r recor ding
Mot ion Det ectio n
PIR R ecord ing
2. Click "Notification push setting" to register an account. When there is a movement
in front of camera, it will send a push message to your smart phone. As below
the
shown:
Pus h notif icati on sett ing
After successful registration,
the monitor will receive the
registered account name.
=>
Reg ister ed Mobi les
555
Remote viewing video on receiver side
When cli cki ng o n client- side, you c an ch eck
the vide o dat a of SD card or m obile har d dis k of the
receiv er.
Note:
The picture took by mobile client-side shall be
automatically stored in the phone.
Remarks:
1. Only when the receiver in the real-time state, to view the image.
2. If the Device ID was unable to get to the RX, indicates that RX did not normally
connect outer net, need to check your network.
3. If everything is normal, but still not in the mobile phone client to view images,
please close the client software running always in the background, please try it
again.
4. The network adapter does not support hot-swappable, Before open the RX,
The network is connected with the RX.
27
Playba ck
8. Specifications
Items
Image sensor
Effective pixel
Horizontal view angle
The lowest illuminance
Night Vision Distance
Waterproof Capacity
Power Supply
Operating Temperature
Operating Humidity
Camera Resolutio n
Dimensions(W*D*H)
Weight
Dimension of the Display Storage Format
Screen resolution
Storage Format
SD card capacity
Hard disk capacity
Video frame rate
Data output
Monitor
Power supply
Operating Temperature
Operating Humidity
Dimensions(W*D*H)
Weight
Frequency range
Modulation method
Wireless transmission distance
Frequency response characteristic
30fps (one path) / 15fps (four paths)
All the specifications are subject to minor change without prior notice.
1/2.7",CMOS
DC 12V/1A
-10 ~50℃ ℃
69x59x130mm
10.1 TFT LCD"
1024(R.G.B.) X 600
At most support 128GB
At most support 3TB.
DC 12V/2A
15~85%RH
255 x37x173 (mm)
Outdoor 300 meters (Maximun)
8122HE
1080P
85 5± °
≤3Lux
10M
IP66
15~85%
238g
AVI
USB 2 0 .
0 ~40℃ ℃
832g
2 4GHZ.
16QAM
28
Page 16

9. Functional Characteristics
Suppor t sim ultaneo us access , rec ording an d browsin g of 4 pa ths wirel ess
*
HD camer as;
Free of wi rin g and easy to i nstall;
*
Safe dig ita l wireles s, free of in ter ference a nd able to av oid p rivacy di sclosure;
*
10.1-i nch t ouch disp lay scree n and i ntegrat ed camera ;
*
Suppor t 128 GB SD card an d can exter nal ly connec t mobile HD D of up t o 3TB;
*
Vari ous r ecordin g modes ava ila ble; Manu al re cording , timing re cor ding and
*
motion d ete ction rec ording;
Up to 20m of n igh t visual ra nge;
*
Outdoo r rai nproof ca mera with a b arr ier-fre e transmi ssi on distan ce of 300m;
*
With vid eo tr ansmiss ion funct ion , and exter nal large r dis play scre en
*
access ibl e;
With IR- CUT funct ion.
*
Remote v iew ing of real -time mon ito ring avai lable thr oug h iPhone/ Android
*
device ;
Please n ote t he monito r is not a comp ute r, so some mem ory devic es
cannot o per ate on it.
10. Fault Diagnosis
10.1 FAQ
1. Why the screen doesn’t display any monitoring picture after the camera is
connected?
Answer: 1. Please check whether “Active” is set to “ON”.
2. Please check whether pairing succeeds.
2. The recording time is set already or the motion detection recording is enabled,
but the receiver does not start recording when the time comes or a motion is
detected. Why?
Answer: 1. Check whether the storage medium is inserted.
2. Check whether the storage medium is full.
3. The system does not respond when the playback button is pressed. Why?
Answer: Please check whether the current camera is in the recording status.
If it is in the recording status, the system will not respond when this button is
pressed.
4. Why cannot see human body in the picture area, when the alarm occurs?
Answer: of lens. For the product, the angle of sensor is greater than that
When human body moves beyond the angle of lens and within the angle of
senor, an alarm can also occur on the device. However, the display device cannot
display human body's move in the picture area.
29
30
Page 17

10.2 Fault Diagnosis
Problems
the LED does not
display monitoring
picture
There is no video
Poor
picture quality
Check whether "Active" is set to "ON".
Re-pair.
Whether the storage medium is inserted.
Whether the storage medium is full.
If the SD card connection fails, it is suggested to use SD card with
brand like Kingston, SanDisk, Panasonic, Kingmax, etc.
Failure in Mobile Hard Disk connection. It is suggested to use Mobile
Hard Disk with brand like IBM, Toshiba or Seagate, etc.
Whether there is interference, such as WiFi or other wireless devicees.
Whether the antennas of the receiver and camera are installed.
Whether infrared night-vision light is on, which leads to the color cast?
Solutions
10.3 Eli min ation of co mmon dies el engine m alf unction s
1.Start u p UPn P poti on of route r
If there a ppe ars “netw ork is norm al (U PnP is n ot starte d up) ” in main
menu>> sys tem setti ng>>net wor k>>netw ork infor mat ion, it is st rongly
recomm end ed to start t he UPnP pot ion of the ro uter to whi ch th e receive r
is conne cte d. Whethe r UPnP poti on of the rou ter to whic h the r eceiver
is conne cte d is starte d up? If yes, t he re ceiver wi ll have a bet ter
perfor man ce, and if no t, it just ha s an or dinary pe rforman ce.
2.Conne ct re ceiver to t he outmos t rou ter:
If there a ppe ars “Too de ep RX path” i n mai n menu>>s ystem set tin g>>
networ k>> network i nformat ion , that mean s too many ro ute rs are conn ected
in serie s and t he router t o which the r ece iver is con nected is n ot th e
outmos t one . Please co nnect the r ece iver to the o utmost ro ute r.
3.Route r fir ewall
If there a ppe ars “UPnP is star ted u p, but not av ailable ” in ma in menu>>
system s ett ing>>Ne twork>> net work info rmation , it is r ecommen ded to
close th e rou ter firew all.
4.The ic on on m onitori ng screen o f the r eceiver ( RX) refer s to th at the
networ k is no t ready yet .
The rece ive r is in the mon itoring s cre en and the ne twork opt ion i s display ed
as open. T he possib le re asons are a s follows i f abo ve icon sti ll appear s
after 30 s eco nds of star ting up:
A.Netwo rk se tup is not fi nished.
B.Abnor mal n etwork ca rd.
C.Abnor mal n etwork ca ble.
D.Abnor mal r outer
E.Abnor mal AD SL cab le
Please e lim inate abo ve abnorm al re asons.
5.The ic on on m onitori ng screen o f the r eceiver ( RX):
UPnP opt ion Th e rec eiver is in t he monito rin g screen an d the netwo rk op tion
is displ aye d as open. The possibl e reasons f or ab ove icon ar e:
A.UPnP of t he router t o which the r ece iver is con nec ted is not st arted up;
please s tar t it. See the i nstruct ion m anual of ro uter for th e det ailed sit uation
and sett ing m ethods.
B.UPnP of t he router t o which the r ece iver is con nec ted has bee n started u p,
but its fu nct ion is stop ped by the fi re wa ll. It is rec ommende d to cl ose the
31
32
Page 18

router f ire wall. See t he instru cti on manual o f router fo r the d etailed s ituatio n
and sett ing m ethods.
C.The rec eiv er cannot u se the func tio n of UPnP and the cli ent c an connec t
to the rec eiv er (RX), bu t in bad perf orm ance and sm all clien t fps .
D.There a re ma ny router s whose UPn P has been st arted up an d fir e wall
has been c los ed, but the r eceiver s til l cannot us e the funct ion o f UPnP, i.e.
the situ ati on that “ne twork is no rma l (UPnP is not star ted u p)” or “UPn P is
starte d up, b ut not avai lable” ma y app ear.
6.The ic on on m onitori ng screen o f the r eceiver r efers to th e opt imal
networ k sta tus.
The rece ive r is in the mon itoring s cre en and the ne twork opt ion i s display ed
as open. I f the a bove icon a ppears wh en no c lient is co nnected t o, yo ur
networ k has r eached th e optimal s tat us.
7.The ic on on m onitori ng screen o f the r eceiver r efers to nu mbe rs of
client c onn ected
The rece ive r is in the mon itoring s cre en and the ne twork opt ion i s display ed
as open. I f one m ore clien t is connec ted , one more do t will be app ear ed at
the bott om of t he icon. The abov e ico n indicat es three cl ien ts are conn ected
to the rec eiv er.
8. Wrong inf orm ation of th e client (c ell p hone or pad ):
A.“Unabl e to re solve hos t 'ns.dav dns .com'”, “ Cannot ac ces s Interne t”:
the clie nt ca nnot conn ect to the In ter net. Plea se check wh eth er Wi-Fi or
3G/4G of t he cl ient has be en opened a nd en sure the cl ient can no rma lly
surf the I nte rnet.
B. “Cann ot co nnect to se rver (ns. dav dns.com ) (1)”: the c lie nt cannot
connec t to th e server. Pl ease chec k whe ther the se rver can no rma lly work.
C.“Devi ce is o ffli ne at ns.da vdn s.com (00 0601561043 1129) ”:
the poss ibl e situati ons are: th e rec eiver is no t started u p; th e receive r is
not conn ect ed to netwo rk; the rec eiv er is not reg istered i n the s erver;
the rece ive r softwar e and clien t AP P do not u se the same s erv er. Please
check wh eth er the rece iver can no rma lly work; w hether th e net work is
ready; w het her the sof tware is ap pli ed in a corre ct approa ch.
D.Conne cti on timeou t: the rece ive r has been re gistere d in th e server, bu t
the clie nt (c ell phone o r pad) cann ot co nnect to th e receive r. The possi ble
proble ms ar e: insufficie nt ne twork ban dwidth, n etw ork jam, or n etwork
is block ed by t he firewa ll or NAT.
The name and content of hazardous substances in the product
To meet the related regulations and requirements of Chinese Controlling and Administrative
Measures for Pollution of Electronic Information Products (The 39th Order Issued by Ministry
of Industry and Information Technology of the People's Republic of China), the toxic and
harmful substances in the products manufactured and marketed by the company are classified
by the components, proclaimed as follows:
Name and Content of the Toxic and Harmful Substances or Elements in the Products
Component name
Machine
Power components
Cables and cable sets
Accessories
Ind icate s that co ntent of this toxic and harmfu l subs tanc e in all h omog eneo us
material lof this compone nt is un der li mit re quir emen t of the S J/T11363-2006
sta ndard.
X: In dicates that content of this toxic and har mful s ubst ance i n all ho moge neou s
material of this compone nt is un der li mit re quir emen t of SJ/ T11363-2006 standar d.
All components lab eled w ith "X " indi cate t hey co mply w ith th e RoHS r egul atio ns of
the E uropean Union .
Machine: It includes pri nted c ircu it boa rd and t he com pone nts, e lect roni c
com ponents, etc.
In ac cordance with the diff eren t prod uct mo del, t he pur chas ed product may not
contain all the abov e comp onen ts.
Electronic & informati on pro duct s sold w ithi n the Pe ople 's Rep ubli c of Chi na mus t
have this mark label ed; th e figu re in it r efer s to its s ervi ce lif e unde r norm al
con ditions.
Toxic and harmful substances or elements
Pb
Hg
×
Cd Cr (VI) PBB PBDE
33
34
Page 19

Federal Communication Commission (FCC) Radiation Exposure Statement
When using the product, maintain a distance of 20cm from the body to ensure compliance with RF
exposure requirements.
FC
C statements:
This device complies with part 15 of the FCC rules. Operation is subject to the
following two conditions: (1) this device may not cause harmful interference, and (2)
this device must accept any interference received, including interference that may
cause undesired operation.
NOTE: The manufacturer is not responsible for any radio or TV interference caused
by unauthorized modifications or changes to this equipment. Such modifications or
changes could void the user’s authority to operate the equipment.
NOTE: This equipment has been tested and found to comply with the limits for a
Class B digital device, pursuant to part 15 of the FCC Rules. These limits are designed
to provide reasonable protection against harmful interference in a residential
installation. This equipment generates uses and can radiate radio frequency energy
and, if not installed and used in accordance with the instructions, may cause harmful
interference to radio communications. However, there is no guarantee that
interference will not occur in a particular installation. If this equipment does cause
harmful interference to radio or television reception, which can be determined by
turning the equipment off and on, the user is encouraged to try to correct the
interference by one or more of the following measures:
‐ Reorient or relocate the receiving antenna.
‐ Increase the separation between the equipment and receiver.
‐Connect the equipment into an outlet on a circuit different from that to which the
receiver is connected.
‐Consult the dealer or an experienced radio/TV technician for help.
 Loading...