

Page 1
Page 2

Contents
1. Packing List
2. Diagram
3. Structure
4. Installation
5. Specification
6. FCC and EU
1
1
2
3
8
9
Page 3
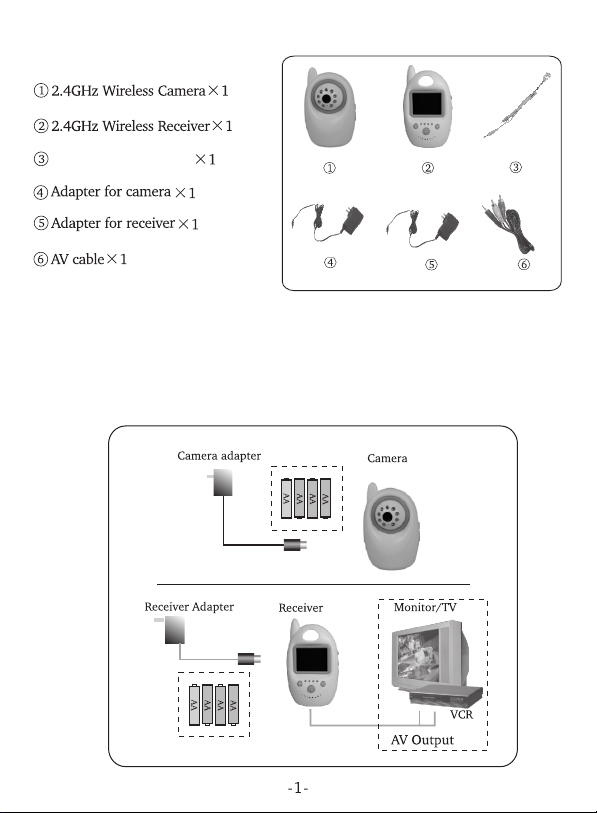
1. Packing List
Sensor for camera
* 8209AW means GB8209 + GB7609
2. Diagram
Page 4

3. Structure
3-1. Structure of Camera
Antenna
IR LEDs
Lens
Power
Socket
Sensor
Socket
Power
On/Off
Channel
Switch
3-2. Structure of Receiver
Antenna
TFT-LCD
Channel
Indicator
Sleep
Button
Channel
Button
Eliminate
Alarm
Button
Speaker
Battery
Cover
AV Out
Power
Socket
Alarm
Switch
Sensitivity
Switch
Battery
Cover
Volume
Switch
Power
On/Off
Page 5

4. Installation
4-1. Installation of Camera
4-1-1. Basic installation of Camera
2. Connect the camera to the adapter and then slide the power
switch to ON position.
Note:
This camera can also use dry battery as power supply. Please load
4 AA batteries to the battery compartment at the back of camera
with their polarities matched.
The AC adapter will work instead of batteries after it is plugged.
If the camera is not used for a long period of time, please unplug
the adapter and remove the batteries.
Avoid short circuit of the battery.
* Continue working for 5 hours(IR OFF)
Page 6

3. Rotate the rounded head of camera to a suitable angle for
surveillance.
30
30
4-1-2. Camera channel setup
1. Check out the right side of the camera and there is the channel
switch marked as CH1, CH2, CH3, CH4. Each of them can be
selected separately for the purpose of the multi-camera working
situation or interference avoidance.
2. Press channel button of the receiver to select the same channel as
the camera, The pictures will be displayed on the screen.
Ch1: 2,414MHz
Ch2: 2,432MHz
Ch3: 2,450MHz
CH4 CH3 CH2 CH1
Ch4: 2,468MHz
4-1-3. Camera alarm setup
1. The camera provides Motion Detection, Sensor Detection, Sound
Detection. Each mode can separately be selected by 3 sensitivity levels
as Low, Middle, High.
Sensitivity
Alarm
Low Middle High
Off Motion Sensor Sound
Page 7

2. Connect the sensor jack to the camera sensor socket, put the sensor
end in cotton diaper if you select the Bed-wetting Sensor detection.
* Specialists recommend the sensor is not suitable
for disposable panty diaper; and not suitable for
touching skin directly.
Motion Alarm Setup:
It refers to the alarm against various movements. If you slide the
alarm setting switch to Motion position, and select Sensitivity
switch. Afterward, the system enters the motion alarm mode. When
a movement is actually detected, the alarm begins until you press
the Eliminate Alarm Button. After less than 1 minute, the motion
alarm enters the next alarm circle.
Sound Alarm Setup:
It refers to the alarm against sound . If you slide the alarm setting
switch to Sound position, and select Sensitivity switch. Afterward,
the system enters the sound alarm mode. When the sound is actually
detected, the alarm begins until you press the Eliminate Alarm Button.
After less than 1 minute, the sound alarm enters the next alarm circle.
Sensor Alarm Setup:
It refers to the alarm against bedwetting. If you slide the alarm
setting switch to Sensor position, and select Sensitivity switch.
Connect the sensor to camera and diaper. Afterward, the system enters
the sensor alarm mode. When the bedwetting and water is actually
detected, the alarm begins until you press the Eliminate Alarm Button.
After less than 1 minute, the motion alarm enters the next alarm circle.
Off Alarm Setup:
It refers to the abandonment of the alarm function. If you slide the
alarm setting switch to Off position. The alarm function is disabled.
Note:
When the camera is powered on by dry batteries and directly plugged
in by the adapter, the alarm function fails to work. If this is the case,
please slide the power Off and back again to On, the alarm function
is successfully activated.
Page 8

4-2. Installation of Receiver
4-2-1. Basic installation of Receiver
1. Connect the receiver to the adapter and then slide the power
switch to ON position.
Note:
This receiver can also work on dry battery. Please load 4 AA
batteries to the battery compartment at the back of receiver with
their polarities matched.
The AC adapter will work instead of batteries after it is plugged.
If the receiver is left unused for a long period of time, please unplug
the adapter and remove the batteries.
Avoid short circuit of the battery.
* Continue working for 5 hours
2. Adjust the volume control to a desired level.
Page 9

3. Set the channel of receiver to be the same as camera by pressing the
channel button continuously, and the pictures will display on the
screen.
Note:
For more clear pictures, please connect the receiver to a monitor/TV
with AV cable (yellow for video and red for audio).
AV cable
4-2-2. Operation of Receiver
1. Volume adjustment
Slide Volume Switch to adjust the volume of the receiver.
2. Channel selection
Press CH button to select the appropriate channel.
3. Channel Looping
Hold the CH button for three seconds to enter the loop mode. All
the available channels will be displayed one by one (default
interval is 5 seconds).
4. Sleep Mode
Press the Sleep Button to shut down the LCD display and keep
the voice function. Press the button again and recall the normal
working mode. It can save energy and help your sleeping.
5. Eliminate Alarm button
Press Eliminate Alarm button to eliminate alarm voice . Less
than 1 minute, the alarm enters again next circle automatically.
Page 10

5. Specification
Item Value
Transmission Frequency
Transmission Power
Operating Frequency
Unobstructed Effective Range
Modulation Mode
GENERAL
Operating Temperature
Operating Humidity
Imaging Sensor Type
Picture Total Pixels
Minimum Illumination
Night Vision Distance
Bandwidth
Battery Working Time
CAMERA
Motion Alarm Distance
Sound Detection Sensitivity
Consumption Current(Max.)
Power Supply
Dimensions(W D H)
Weight(About)
LCD Screen Type
Effective Pixels
Receiving Sensitivity
Consumption Current(Max.)
Battery Working Time
RECEIVER
Power Supply
Dimensions(W D H)
Weight(About)
ISM 2,400~2,483 MHz
10mW/CE; 2mW/FCC
2,414MHz; 2,432MHz;
2,450MHz; 2,468MHz
100m(Min.)
FM
-10 ~ +50 / +14 ~ +122
85%
CMOS
PAL: 720 480Pixels;
NTSC: 724 576 Pixels
0Lux (IR ON)
5m
18M
5 hours (IR Off)
5m
>63dB
120mA(IR OFF) & 220mW(IR ON)
DC+8V/500mA
86 48 135 mm
146g
2.4 TFT-LCD
480 240
-85dBm
200mA
5 hours
DC+8V/500mA
86 54 143 mm
142 g
Page 11

6. FCC information
This device complies with part15 of the FCC Rules. Operation is subject
to the following two conditions:
(1) this device may not cause harmful interference,
(2) this device must accept any interference received, including
interference that may cause undesired operation.
Changes or modifications not expressly approved by the party responsible
for compliance could void the user s authority to operate the
equipment.
Page 12

War ni n g:
Changes or modifications to this unit not expressly approved by the
party responsible for compliance will void the user’s authority to
operate the equipment. Any change to the equipment will void FCC grant.
This equipment has been tested and found to comply with the limits
for a Class B digital device,pursuant to part 15 of the FCC Rules. These
limits are designed to provide reasonable protection against harmful
interference in a residential installation. This equipment generates,
uses and can radiate radio frequency energy and, if not installed
used in accordance with the instructions, may cause harmful interference
to radio communications. However, there is no guarantee that
interference will not occur in a particular installation. If this equipment
does cause harmful interference to radio or television reception, which
can be determined by turning the equipment off and on, the user is
encouraged to try to correct the interference by one or more of the
following measures:
--Reorient or relocate the receiving antenna.
--Increase the separation between the equipment and receiver.
--Connect the equipment into an outlet on a circuit different from that to which the
receiver is connected.
--Consult the dealer or an experienced radio/TV technician for help.
The equipment compliance with FCC radiation exposure limit set forth for
uncontrolled Environment
 Loading...