

GoShockFree GSFS16, GSFS18, Traveler User Manual

GSFS16 & GSFS18
The Traveler and Traveler+
http://stores.ebay.com.au/Goshockfree

Thanks for purchasing this product. Please read the instructions carefully
before using this product.
• FCC Compliance Statement:
This device complies with Part 15 of the FCC Rules.
Operation is subjected to the following two conditions: (1)
this device may not cause harmful interference, and (2)
this device must accept any interference received,
including interference that may
cause undesired
operation.
This equipment has been tested and found to comply with limits for a Class B
digital device, pursuant to Part 15 of the FCC rules. These limits are designed
to provide reasonable protection against harmful interference in residential
installations. This equipment generates, uses, and can radiate radio frequency
energy, and if not installed and used in accordance with the instructions, may
cause harmful interference to radio communications.
However, there is no guarantee that interference will not occur in a particular
installation. If this equipment does cause interference to radio or television
equipment reception, which can be determined by turning the equipment off
and on, the user is encouraged to try to correct the interference by one or more
of the following measures:
- Reorient or relocate the receiving antenna.
- Move the equipment away from the receiver.
- Plug the equipment into an outlet on a circuit different from that to which the
receiver is connected.
- Consult the dealer or an experienced radio/television technician for
additional suggestions.
You are cautioned that any change or modifications to the equipment not
expressly approved by the party responsible for compliance could void your
authority to operate such equipment.
The symbol of the crossed out wheeled bin indicates this product
should not be placed in municipal waste. Instead, you need to dispose
of the waste equipment by handing it over to a designated collection
point for the recycling of waste electrical and electronic equipment.

Page 2
Caution
1. Do not drop, puncture or disassemble the device; otherwise the
warranty will be voided.
2. Avoid all contact with water, and dry hands before using.
3. Use the device with care.
Avoid pressing hard on the device
body.
4. Use only the accessories supplied by the manufacturer.
5. Keep the device out of the reach of children.
6. For your own safety, don’t operate the device while driving.
7. Do not block your drivers view when mounting this device on the
windscreen, we (the seller) do not take responsibility of improperly
positioned units.
8. Please follow the instructions in this manual and use only the
supplied accessories to avoid unpredicted damages to the device.
Failure to follow the instructions will invalidate the warranty and may
also endanger personnel safety, for which the seller assumes no
responsibility.
9. Due to on-going road development, map data on this device may not
be consistent or up to date. Please follow current traffic regulations,
traffic signals and drive according to the current road situation.
10. Operation the GPS navigator device while driving may cause serious
injuries or accidents. Do NOT operate while driving the vehicle. Set
all routes prior to departure. The seller assumes no responsibility for
accidents and loss due to improper use.
If your cigarette lighter draws power while the car is off, please
disconnect this device to avoid draining the car battery.
This device will turn off if the max/min temp is reached.

Contents
INTRODUCTION 4
INCLUDED ACCESSORIES .............................................................................................................................................................. 4
GETTING STARTED. 5
MOUNTING THE DEVICE ............................................................................................................................................................... 5
PRODUCT OVERVIEW .................................................................................................................................................................. 6
POWER SUPPLY & CHARGING ........................................................................................................................................................ 7
CHARGING USING USB CONNECTION .............................................................................................................................................. 7
CHARGING USING THE CAR CHARGER............................................................................................................................................... 7
BASIC USE ..................................................................................................................................................................... 8
POWERING ON ........................................................................................................................................................................... 8
POWERING OFF & SLEEP ............................................................................................................................................................... 8
RESTARTING THE SYSTEM .............................................................................................................................................................. 8
SYSTEM MAIN INTERFACE AND MAJOR FUNCTIONS............................................................................................................................ 9
NAVIGATOR ................................................................................................................................................................... 10
DVR MODE ................................................................................................................................................................... 10
USING THE SD CARD ................................................................................................................................................................. 10
OPERATION.............................................................................................................................................................................. 11
INTERFACE OF DVR。 ................................................................................................................................................................ 11
SETTINGS INTERFACE OF DVR ....................................................................................................................................................... 12
PLAYBACK INTERFACE OF DVR ...................................................................................................................................................... 13
PLAYBACK ON COMPUTER ........................................................................................................................................................... 14
OTHER FUNCTIONS .................................................................................................................................................................. 15
MUSIC PLAYER ......................................................................................................................................................................... 15
VIDEO PLAYER .......................................................................................................................................................................... 19
PHOTO BROWSER ..................................................................................................................................................................... 21
E-BOOK READER ....................................................................................................................................................................... 23
THEME ................................................................................................................................................................................... 27
WALLPAPER ............................................................................................................................................................................. 28
FAVORITES ............................................................................................................................................................................... 30
EXPLORER ................................................................................................................................................................................ 31
CALENDAR ............................................................................................................................................................................... 32
SYSTEM RESOURCE .................................................................................................................................................................... 32
CALCULATOR ............................................................................................................................................................................ 33
UNIT ...................................................................................................................................................................................... 33
GPS INFO ................................................................................................................................................................................ 34
VOLUME ................................................................................................................................................................................. 35
BACKLIGHT .............................................................................................................................................................................. 36
LANGUAGE .............................................................................................................................................................................. 37
DATE& TIME ............................................................................................................................................................................ 37
◆ SETTING THE SYSTEM DATE AND TIME ....................................................................................................................................... 37
◆ SETTING THE SYSTEM TIME ZONE ............................................................................................................................................. 37
CALIBRATION............................................................................................................................................................................ 38
RESTORE FACTORY SETTING ........................................................................................................................................................ 39
USB SETTING ........................................................................................................................................................................... 40
◆ MASS STORAGE ................................................................................................................................................................ 40
SYSTEM INFO ........................................................................................................................................................................... 41
NAVIGATION PATH .................................................................................................................................................................... 41
APPENDIX TROUBLESHOOTING .................................................................................................................................................... 43
Page 4
Introduction
This device acts as both a ‘blackbox’ or Digital Video Recorder (DVR) and also a
GPS navigation unit. It is controlled via the 5” touch screen. The unit features a
wide 120° lens capable of recording in 720P. The device includes up to date
Australian Maps with an option of having offroad maps installed.
It is suggested that when using this device, to have it always connected to USB
adapter/car charger. Battery life from the unit using GPS only is expected to be
approximately 1.5 hours however enabling the DVR function increases power
consumption. A full battery is also recommended so that in an event of a crash,
and the power is cut from the car, the DVR will still be able to record.
Included Accessories
Adjustable window mount
USB Cable
Car Charging adapter
AV Cable
Page 5
Getting started.
It is your sole responsibility to place, secure and use your Navigation unit in a manner that will
not cause accidents, personal injury or property damage. Always observe safe driving
practices.
Do not mount your Navigation unit in a way that may interfere with the safe operation of the
vehicle, the deployment of air bags or other safety equipment.
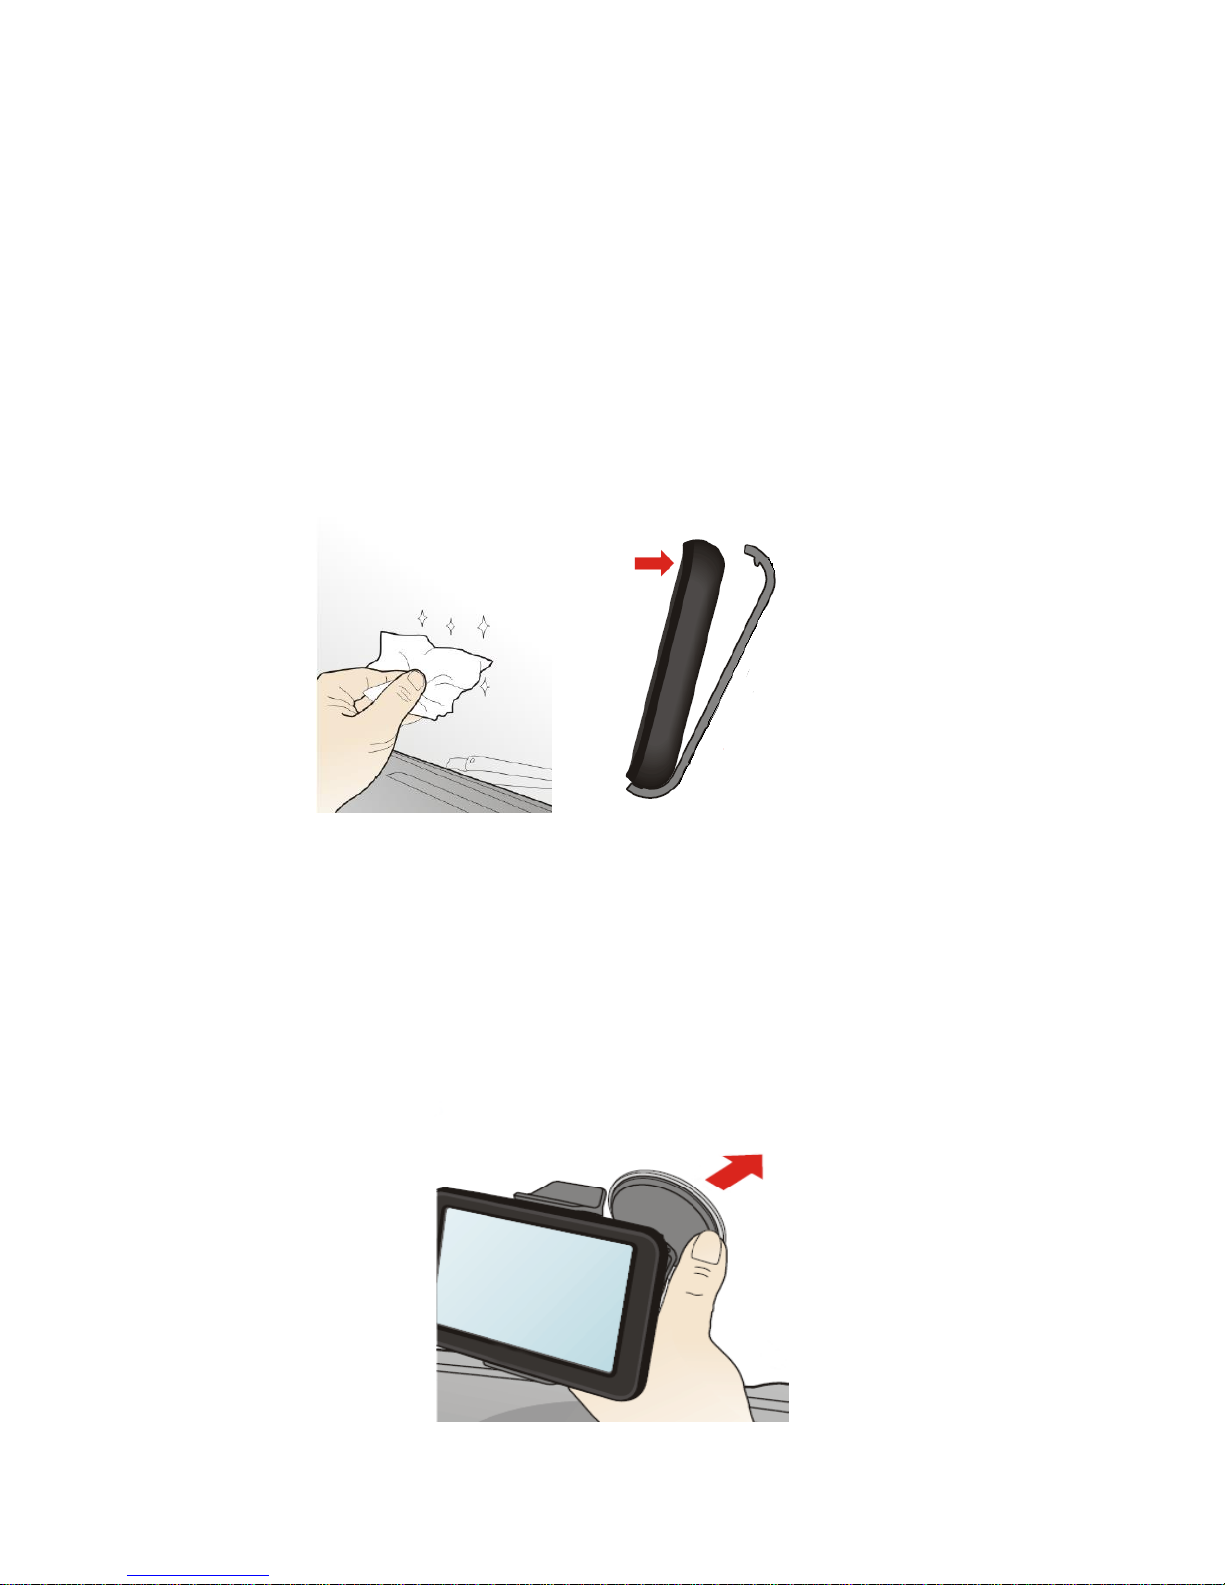
Mounting the Device
Ensure the surface has been cleaned, free of dust and oils. Clip the device
into the first bracket then assemble both brackets together.
Mount the device onto your windscreen in a position free from airbags, and so
that the device is not restricting the drivers view. Ensure that the lens is in a
position which has a clear view of the road.
If you have purchased the Navigator+, plug the rear camera lead into the main
unit and stick the rear camera onto your rear windscreen.
Page 6
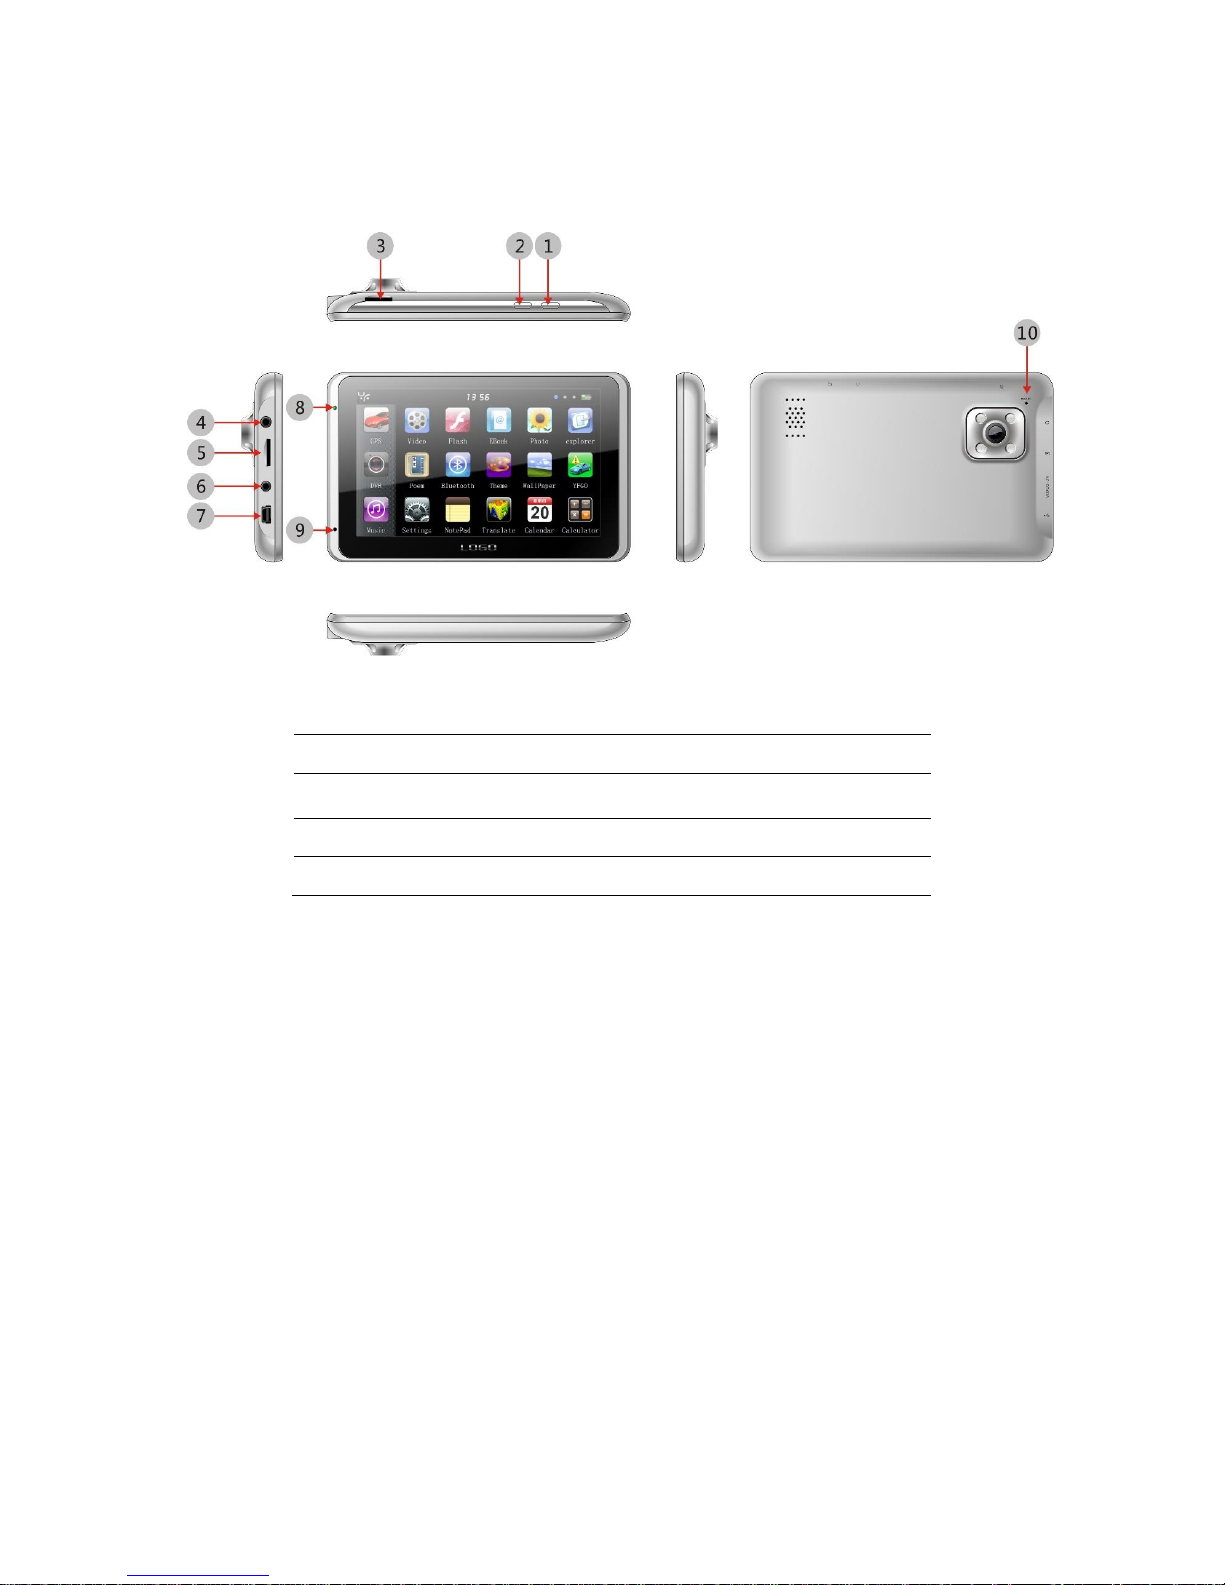
Product Overview
1. Lock Key
6. VIDEO-IN Port
2. Power key
7. MINI USB Port
3. T-Flash slot for DVR only
8. Indicator light
4. Earphone Port
9. Microphone
5. T-Flash Port
10. Reset key

Page 7
Power Supply & Charging
Charge the device with the charger before first use.
This device can be powered by the built-in battery or external power supply.
When the GPS navigator is unconnected to the charger, it is powered by the Lipolymer battery. The battery capacity icon in the system main interface
shows current residual battery capacity. When the GPS navigator is connected to
the charger, it is powered by external power and the battery is charged.
The GPS navigator adopts internal non-removable Li-polymer battery. To avoid
battery rupture, explosion, release of hazardous substance or burn, do not
unpack, pierce, strike on or discard the battery in fire or water.
Charging using USB connection
The GPS navigator must be charged with the DC charger before first use.
Plug the USB terminal of the DC charger into the USB port of the GPS navigator
and the other to the power socket to supply power and charge the GPS navigator.
The charging indicator light is red during charging. Do not unplug the charge until
the battery is fully charged and the indicator light turns green. Please charge the
GPS navigator when the battery is low or completely used.
Charging using the Car Charger
Plug one terminal of the car charger into the USB port of the GPS navigator and
the other to the charging port to supply power and charge the GPS navigator.
Page 8
Basic Use
Powering on
Press the power key of the GPS navigator and let go after at least two seconds to
power it on.
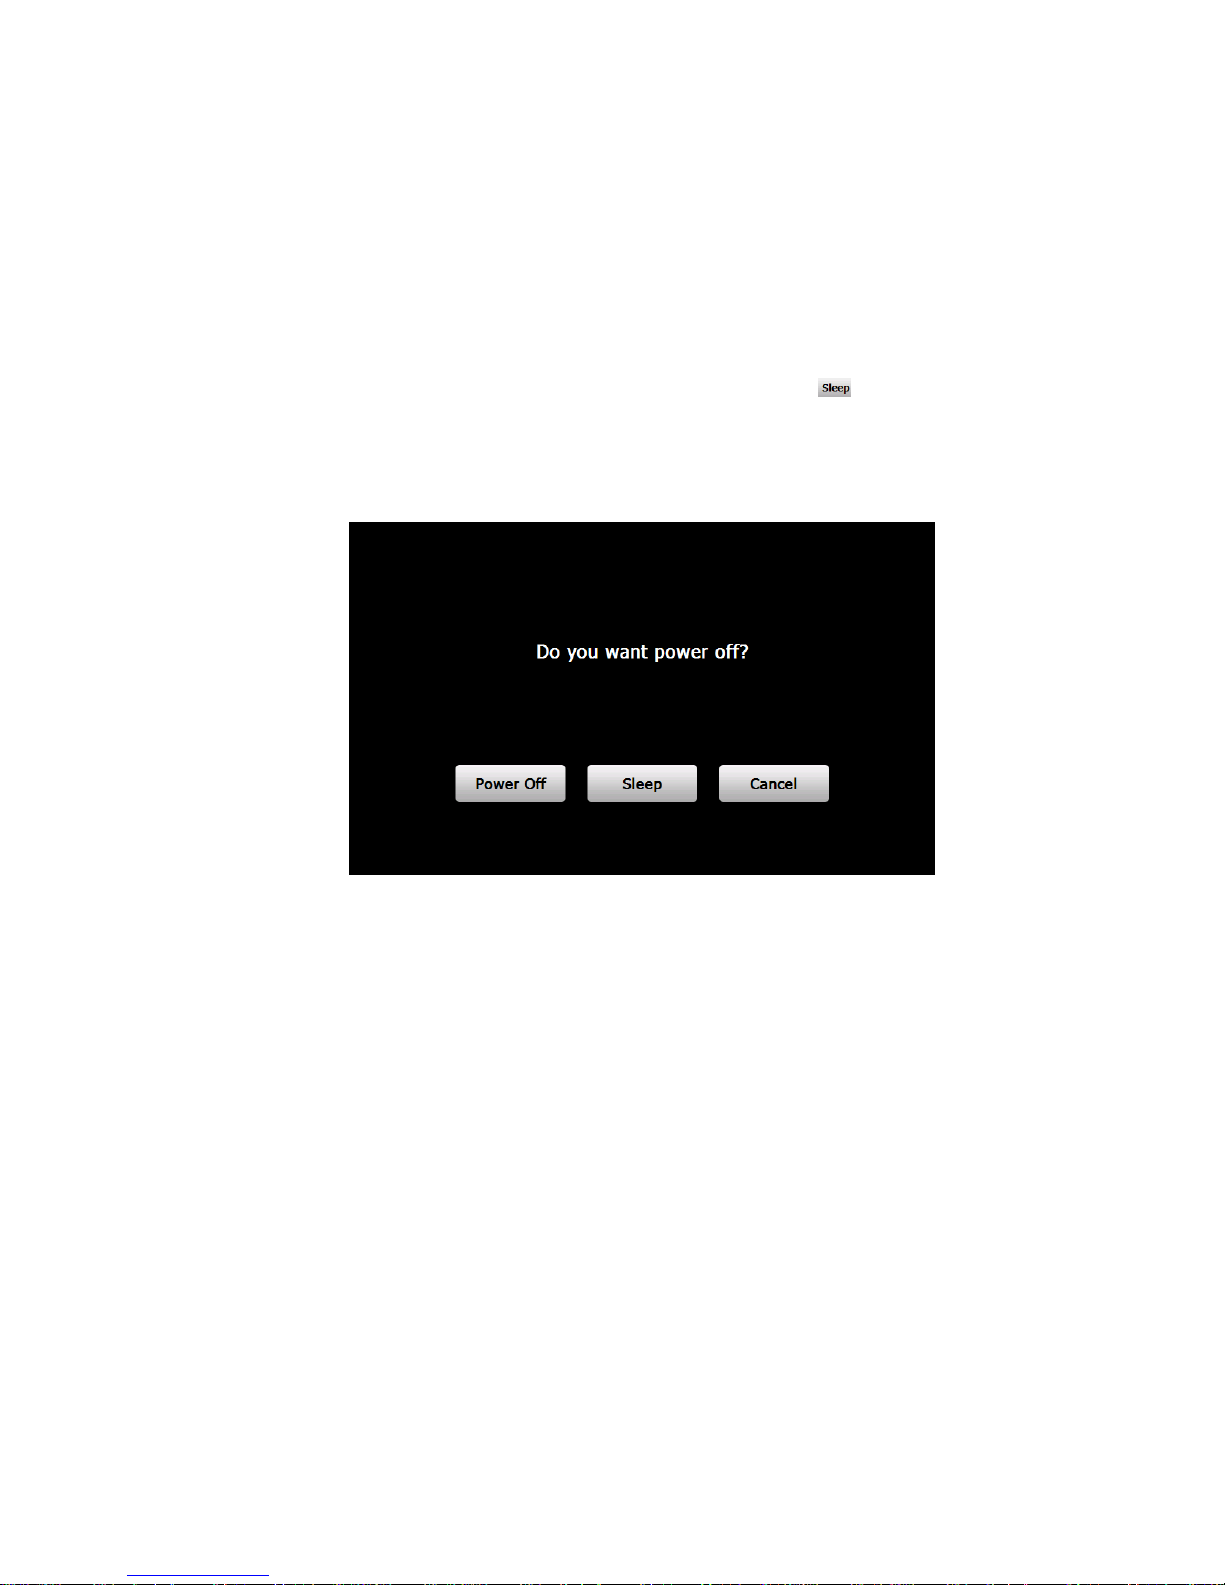
Powering off & Sleep
Press the power key and let go after at least two seconds to power off the GPS
navigator. The following interface will be prompted. If is selected, the
navigator will automatically resume the state before entering sleep mode when
it is powered again.
Restarting the System
When the system does not response, press the reset key on the back of the GPS
navigator to restart the system.
The following situations might lead to no response of the system.
1. Delay or pause in interface switching;
2. Failure of function activation with overlong execution;
3. Failure to power on/off the GPS navigator by pressing the power key.
Restarting the system by pressing the reset key will result in loss of unsaved data.
Please backup your data regularly.
Page 9
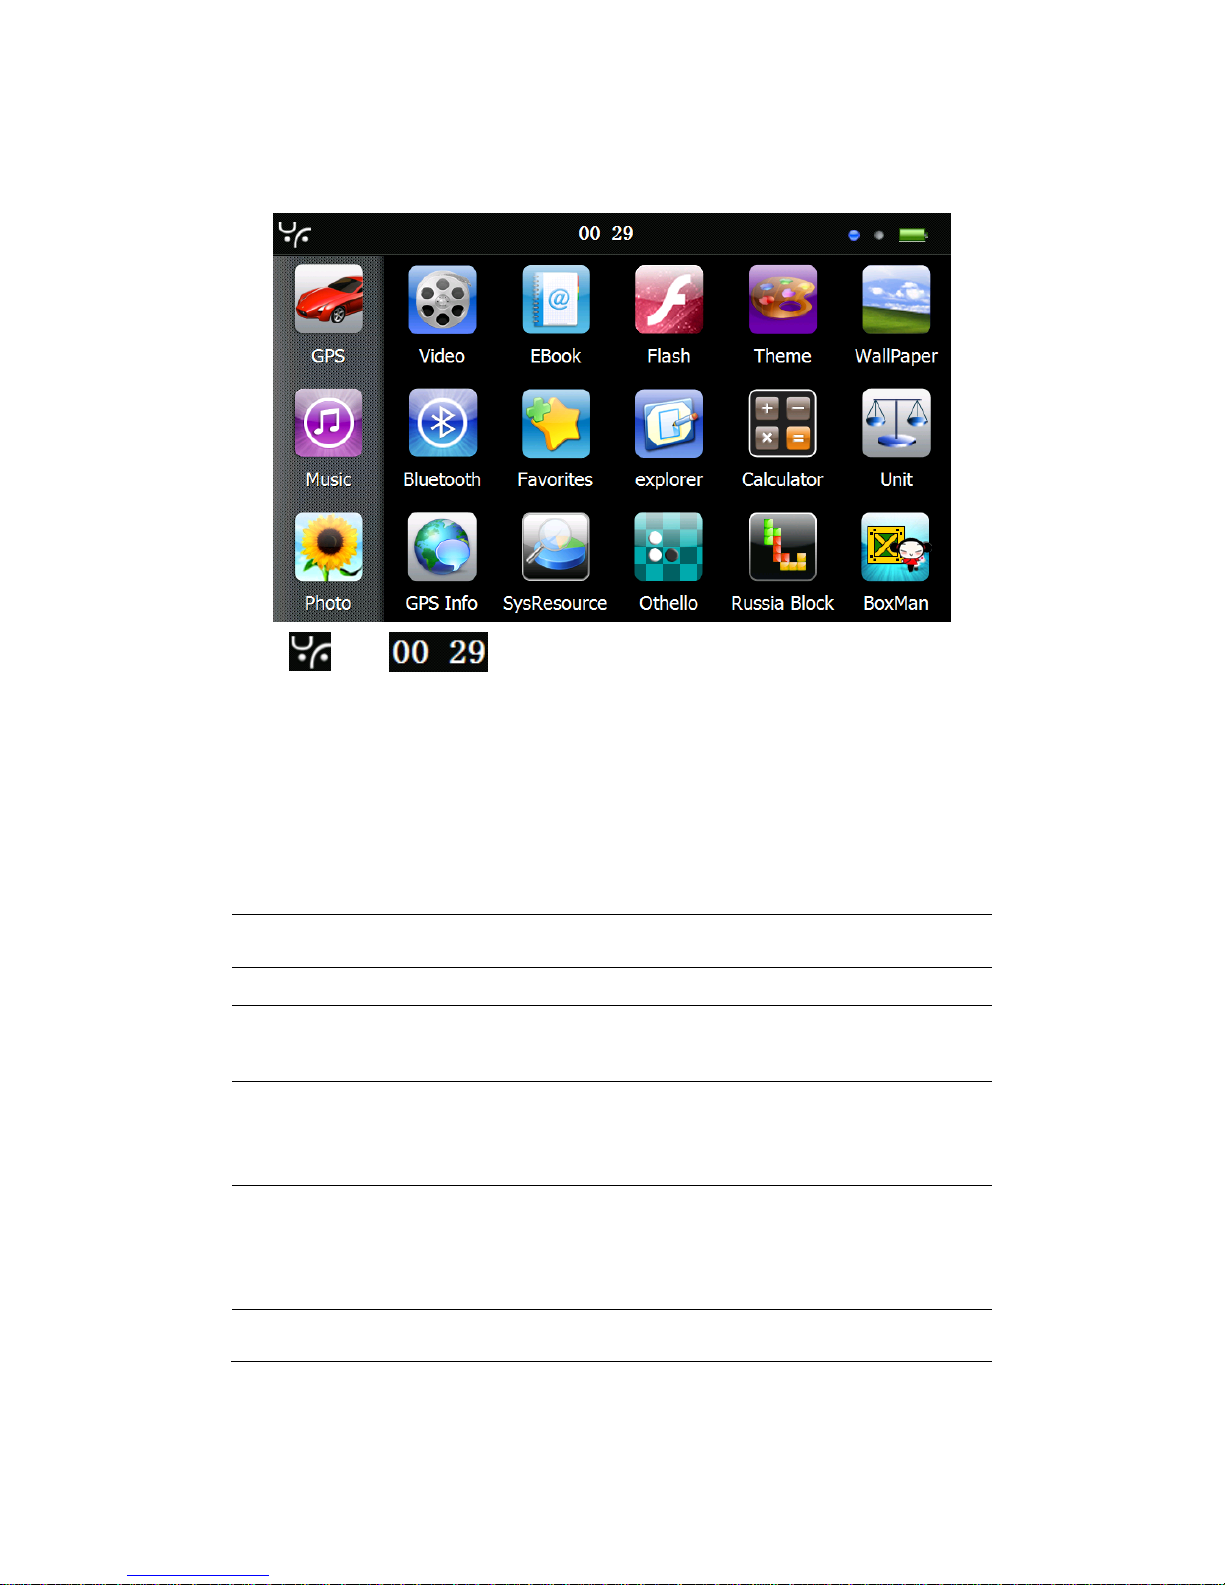
System Main Interface and Major Functions
The system main interface is shown below.
The icon and are shortcuts to view system information and set
time & date for the device.
For details, please refer to relevant chapter and section.
To rearrange icons at will, tap on an icon and stay until a four-way arrow appears
at the upper left of it, and then drag the icon to a wanted place.
Function
Explanation
GPS
Tap to enable navigation function
DVR
Tap to enable DVR function
Tool
Calculator , Unit, system information, favorite,
calendar ,GPS information
Media
JPG,GIF,BMP and PNG files supported;
Photo rotation, zoom in/out and auto play
supported
Setting
Volume, backlight, language, date& time,
calibration, system info, FM Transmitter, USB
setting and Factory reset
Game
Othello, DuiDuiPeng, Russia Block
Navigator
To enter the Navigation app, select the GPS icon in the system main
interface to start the navigation program.
Please visit http://manuals.goshockfree.com/ for detailed navigator specific
instruction
If the navigator fails to load. See page 41 Navigation path.
DVR Mode
This section introduces the usage of the DVR.
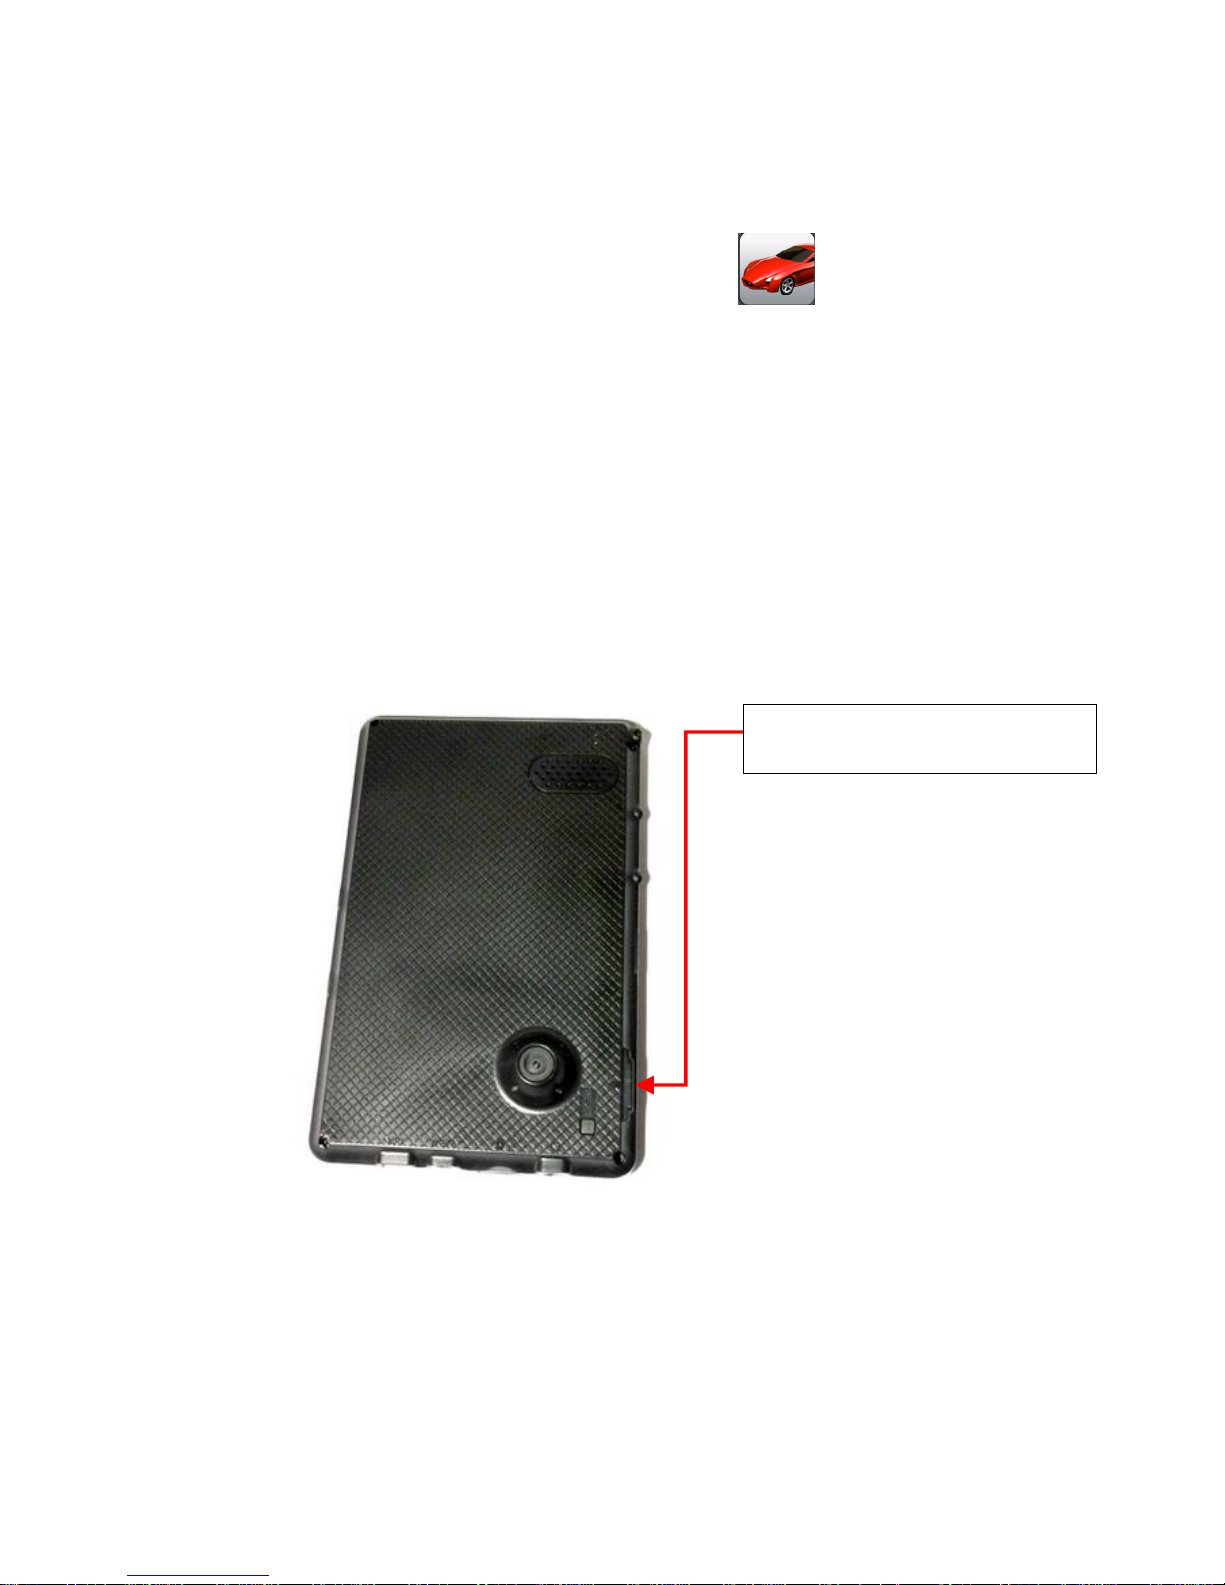
Using the SD Card
Insert the SD card for the DVR recording as per the picture above.
Requirement of TF card is grade 6, Capacity should be 8GB at least to
ensure no footage is lost.
Format the TF by special form at 1
st
time usage,, you can choose it under
the format setting
Ensure the DVR SD card is inserted
into the slot ABOVE the camera
Page 11
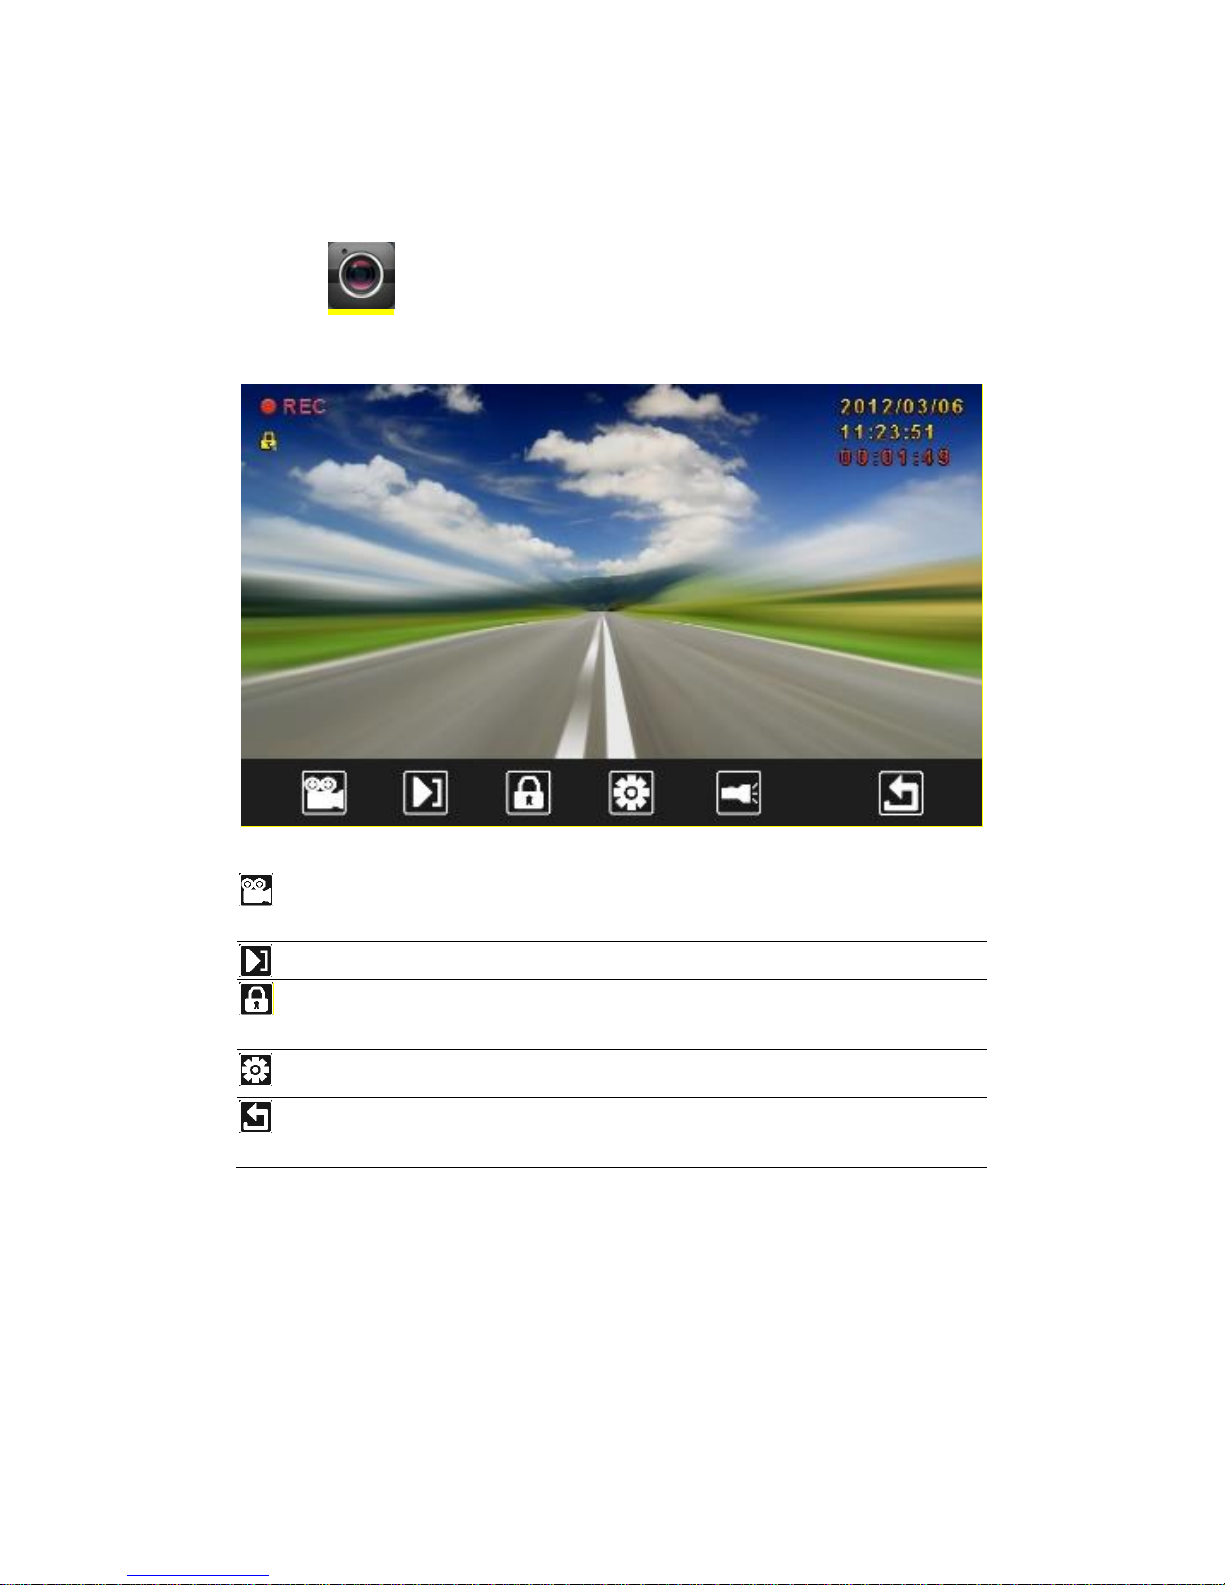
Operation
Interface of DVR。
Tap the icon in the system main interface to enter the DVR interface as
follows:
Turn
No/off
Start-up & turn off video
Playback
Player for the recorded video
Lock
Lock the recording video (Avoid erased during the
period of cycling video)
Setting
Enter settings
Return
Quits the DVR interface, If you did not stop the
recording, the program will record in the background
Page 12
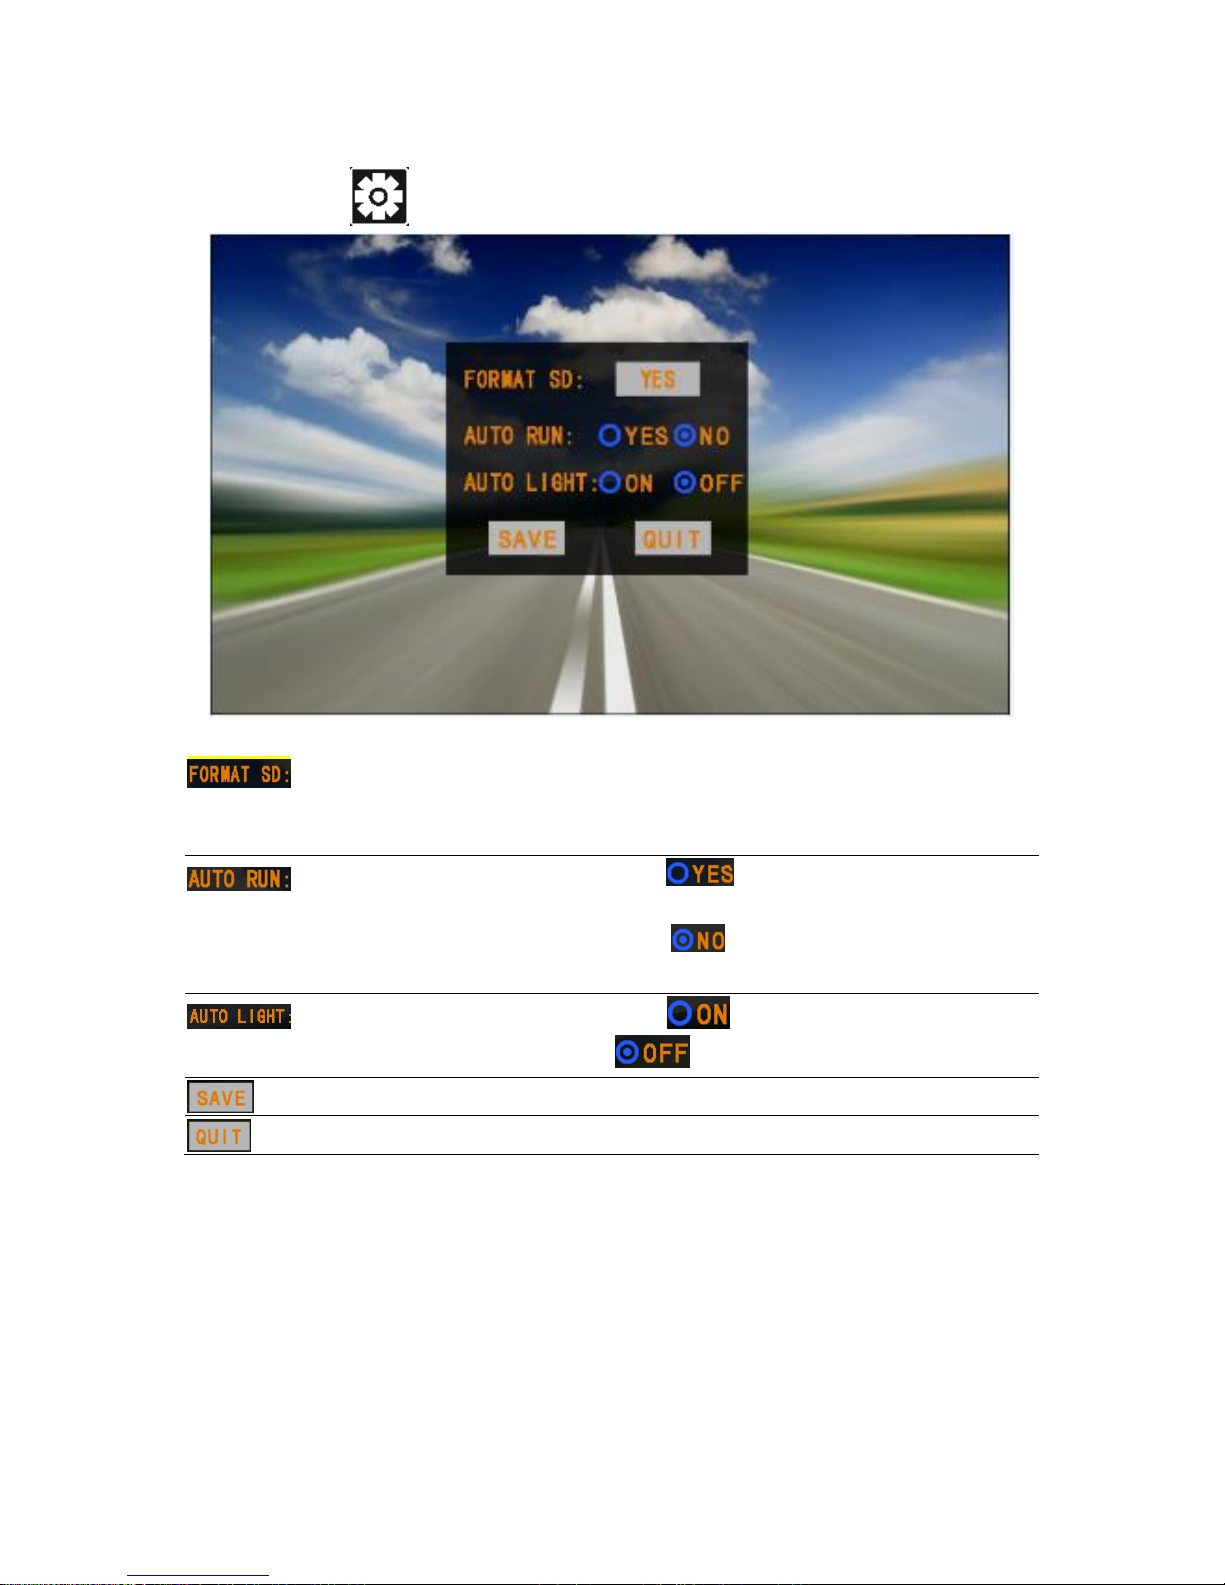
Settings interface of DVR
Select the icon in the DVR main interface to enter the setting interface.
Formatting
It is always recommended to format the
SD card to ensure complete
compatibility with the unit
Start video manner
Tap and Save, it will running
behind automatically when power on
/Tap and Save, it will running by
manually to turn on video.
Light
Tap to turn no the light Tap
to turn off
Save
Tap to save current video
Quit
Tap to Quit setting interface

Page 13
Playback interface of DVR
Tap the icon in the DVR main interface to enter the player interface as
follows:
Previous
Play the previous video
Play/ Pause
Pause/continue playing
Stop
Stop playing the current video
Next
Play the previous video
Lock
Tap to lock & unlock current video
Return
Tap to return the main interface
 Loading...