

Page 1
ABCDH
OM-01505-OB01
January 20, 1981
Rev. D 10/27/99
INSTALLATION, OPERATION,
AND MAINTENANCE MANUAL
WITH P ARTS LIST
DSERIESPUMP
4D --- B
THE GORMAN-RUPP COMPANY D MANSFIELD, OHIO
GORMAN-RUPP OF CANADA LIMITED D ST. THOMAS, ONTARIO, CANADA Printed in U.S.A.
eCopyright by the Gorman-Rupp Company
Page 2

TABLE OF CONTENTS
INTRODUCTION PAGE I --- 1...................................................
WARN ING S - SE CTI ON A PA GE A --- 1.........................................
IN STA L LAT ION --- S ECT ION B PA GE B --- 1.....................................
Pump Dimensions PAGE B --- 1........................................................
PREINSTALLATION INSPECTION PAGE B --- 1...............................................
ELECTRIC MOTOR INSTALLATION PAGE B --- 2.............................................
POSITIONING PUMP PA GE B --- 2..........................................................
Lifting PA GE B --- 2....................................................................
Mounting PA GE B --- 2................................................................
SUCTION AND DISCHARGE PIPING PAGE B --- 2............................................
Materials PA GE B --- 2.................................................................
Line Configuration PAGE B --- 2.........................................................
Fixed, Rigid Piping P AGE B --- 3........................................................
Gauges PA GE B --- 3..................................................................
SUCTION LINES PAGE B --- 4..............................................................
Fittings PA GE B --- 4..................................................................
Strainers PA GE B --- 4.................................................................
Sealing PAGE B --- 4..................................................................
DISCHARGE LINES PA GE B --- 4...........................................................
Siphoning PA GE B --- 4................................................................
Valves PA GE B --- 4...................................................................
ALIGNMENT PAGE B --- 5.................................................................
ELECTRICAL CONNECTIONS PAGE B --- 5..................................................
OPER AT IO N --- S EC T IO N C PA GE C --- 1.......................................
STARTING PA GE C --- 1...................................................................
Rotation PA GE C --- 1.................................................................
OPERATION PAGE C --- 1.................................................................
Priming PA GE C --- 2..................................................................
OPERATION CHE CKS PA GE C --- 2.........................................................
Gearbox Check PAGE C --- 2...........................................................
Leakage Check PAGE C --- 2...........................................................
Strainer Check PAGE C --- 2............................................................
Accumulator Chamber Check PAGE C --- 2..............................................
STOPPING PA GE C --- 2...................................................................
Cold Weather Preservation PAGE C --- 2.................................................
GEARBOX TEMPERATURE CHECK PAGE C --- 2.............................................
TR OUB LES HOO TI NG --- SE C TIO N D PA GE D --- 1...............................
PUMP MAINTENANCE AND REPAI R - SECTION E PAGE E --- 1..................
STANDARD PERFORMANCE TEST DATA PAGE E --- 1.......................................
PARTS LISTS:
Pump Model PA GE E --- 3.............................................................
i
Page 3

TABLE OF CONTENTS
(continued)
Diaphragm Pot Assembly PAGE E --- 5..................................................
Plunger Rod Assembly PAGE E --- 7....................................................
Gearbox Assembly PAGE E --- 9........................................................
PUMP AND SEAL DISASSEMBLY AND REASSEMBLY PAGE E --- 10...........................
Suction And Discharge Flap Valve Removal PAGE E --- 10.................................
Diaphragm Removal PAGE E --- 10......................................................
Plunger Rod Removal And Disassembly PAGE E --- 11....................................
Gearbox Removal And Disassembly PAGE E --- 11........................................
Gearbox Reassembly And Installation P AGE E --- 12......................................
Plunger Rod Reassembly And Installation PAGE E --- 14...................................
Diaphragm Installation PAGE E --- 15....................................................
Suction And Discharge Flap Valve Installation P AGE E --- 15...............................
LUBRICATION PA GE E --- 15...............................................................
Plunger Rod Assembly PAGE E --- 15...................................................
Gearbox PA GE E --- 16................................................................
Motor PAGE E --- 16...................................................................
ii
Page 4
DSERIES
OM--01505
INTRODUCTION
This Installation, Operation, and Maintenance
manual is designed to help you achieve the best
performance and longest life from your GormanRupp pump.
This is a DSeries, positivedisplacement pumputilizing a single-action diaphragm to produce a
straight-through flow of liquid. The pump is provided with an explosion-proof electric motor and
ideallysuitedtoindustrial andcontractor’s applications since it will handle liquids ranging from clear
water to construction-site muck. The basic material of construction for wetted parts is aluminum,
with neoprene flap valves and diaphragm.
If there are any questions regarding the pump or
its application which are not covered in this manual or in other literature accompanying this unit,
please contact your Gorman -Rupp distributor, or
write:
The Gorman-Rupp Company
P.O. Box 1217
Mansfield, Ohio 44901--1217
or
Gorman-Rupp of Canada Limited
70 Burwell Road
St. Thomas, Ontario N5P 3R7
The following are used to alert maintenance personnel to procedures which requirespecial attention, tothose whichcould damage equipment, and
to those which could be dangerous to personnel:
Immediate hazards whichWILL result in
severe personal injury or death. These
instructions describe the procedure required and the injury which will result
from failure to follow the procedure.
Hazards or unsafe practices which
COULDresult in severe personal injury
or death. These instructions describe
the procedure required and the injury
which could result fromfailure to follow
the procedure.
Because pump installations are seldom identical,
this manual cannot possibly provide detailed in structions and precautions for every aspect of
each specific application. Therefore, it is the responsibility of the owner/installer of the pump to
ensure that applications not addressed in this
manual are performed only after establishing that
neither operator safety norpumpintegrity arecompromised by the installation. Pumps and related
equipment must be installed and operated ac-
cording to all national, local and industry stan dards.
HazardsorunsafepracticeswhichCOULD
result in minor personal injury or product
or property damage. These instructions
describe the requirements and the possibledamage which couldresult from failure
to follow the procedure.
NOTE
Instructions to aid in installation, operation,and
maintenance, or which clarify a procedure.
PAGE I -- 1INTRODUCTION
Page 5
DSERIES
SAFETY- SECTION A
These warnings apply to D Series Basic
Diaphragm pumps. Gorman-Rupp has
no control over or particular knowledge
of the power source which will be used.
Refer to the manual accompanying the
power source before attemp ting to b egin operation.
Beforeattempting toopenorservic e the
pump:
1. Familiarize yourself with this manual.
2. Lock out incoming power to the
power source to ensure that the
pump will remain inoperative.
3. Allowthe pump to completelycool
if overheated.
4. Close the discharge valve (if
used).
5. Drain the pump.
This pump is designed to handle nonvolatile non-flammable liquids containing specified entrained solids. Do not
attempt to pump volatile, corrosive, or
flammable liquids which may damage
the pump or endanger personnel as a
result of pump failure.
Afterthe pump hasbeeninstalled,block
the wheels and secure the pump to prevent creeping. Make certain that the
pump and all piping or hose connections are tight, properly supported and
secure before operation.
OM--01505
Donot operate the pump without the eccentric and coupling guards in place
over the rotating parts. Exposed rotating parts can catch clothing, fingers, or
tools, causing severe injury to personnel.
The gearbox provided on this pump is
designed for operation at 1750 RPM
maximum input speed. If operated at a
higher RPM, pump componentsmay be
destroyed.
Install and operate only an explosion
proof motor in an explosive atmosphere. Install, connect, and operate
the motor in accordance with the National Electric Code and all local codes.
Ifthereisa conflictbetween the instructions in the manual accompanying the
unit and the National Electric Code or
the applicable local code, the National
or local code shall take precedence.
Never install a positive shut-off valve inthe
discharge line; discharge restrictions will
cause excessive friction loss resulting in
overloading and destruction of pump and
drive components. It is strongly recommended that unless absolutelynecessary,
nopositiveshut-off valvebe installedinthe
suction line; excessive restriction will
cause incomplete filling of the diaphragm
chamber and result in shortened diaphragm life.
PAGE A -- 1WARNINGS
Page 6
DSERIES OM--01505
INSTALLATION --- SECTION B
Review all SAFETY information in Section A.
Since pump installations areseldom identical,this
section offers only general recommendations and
practices required to inspect, position, and arrange the pump and piping.
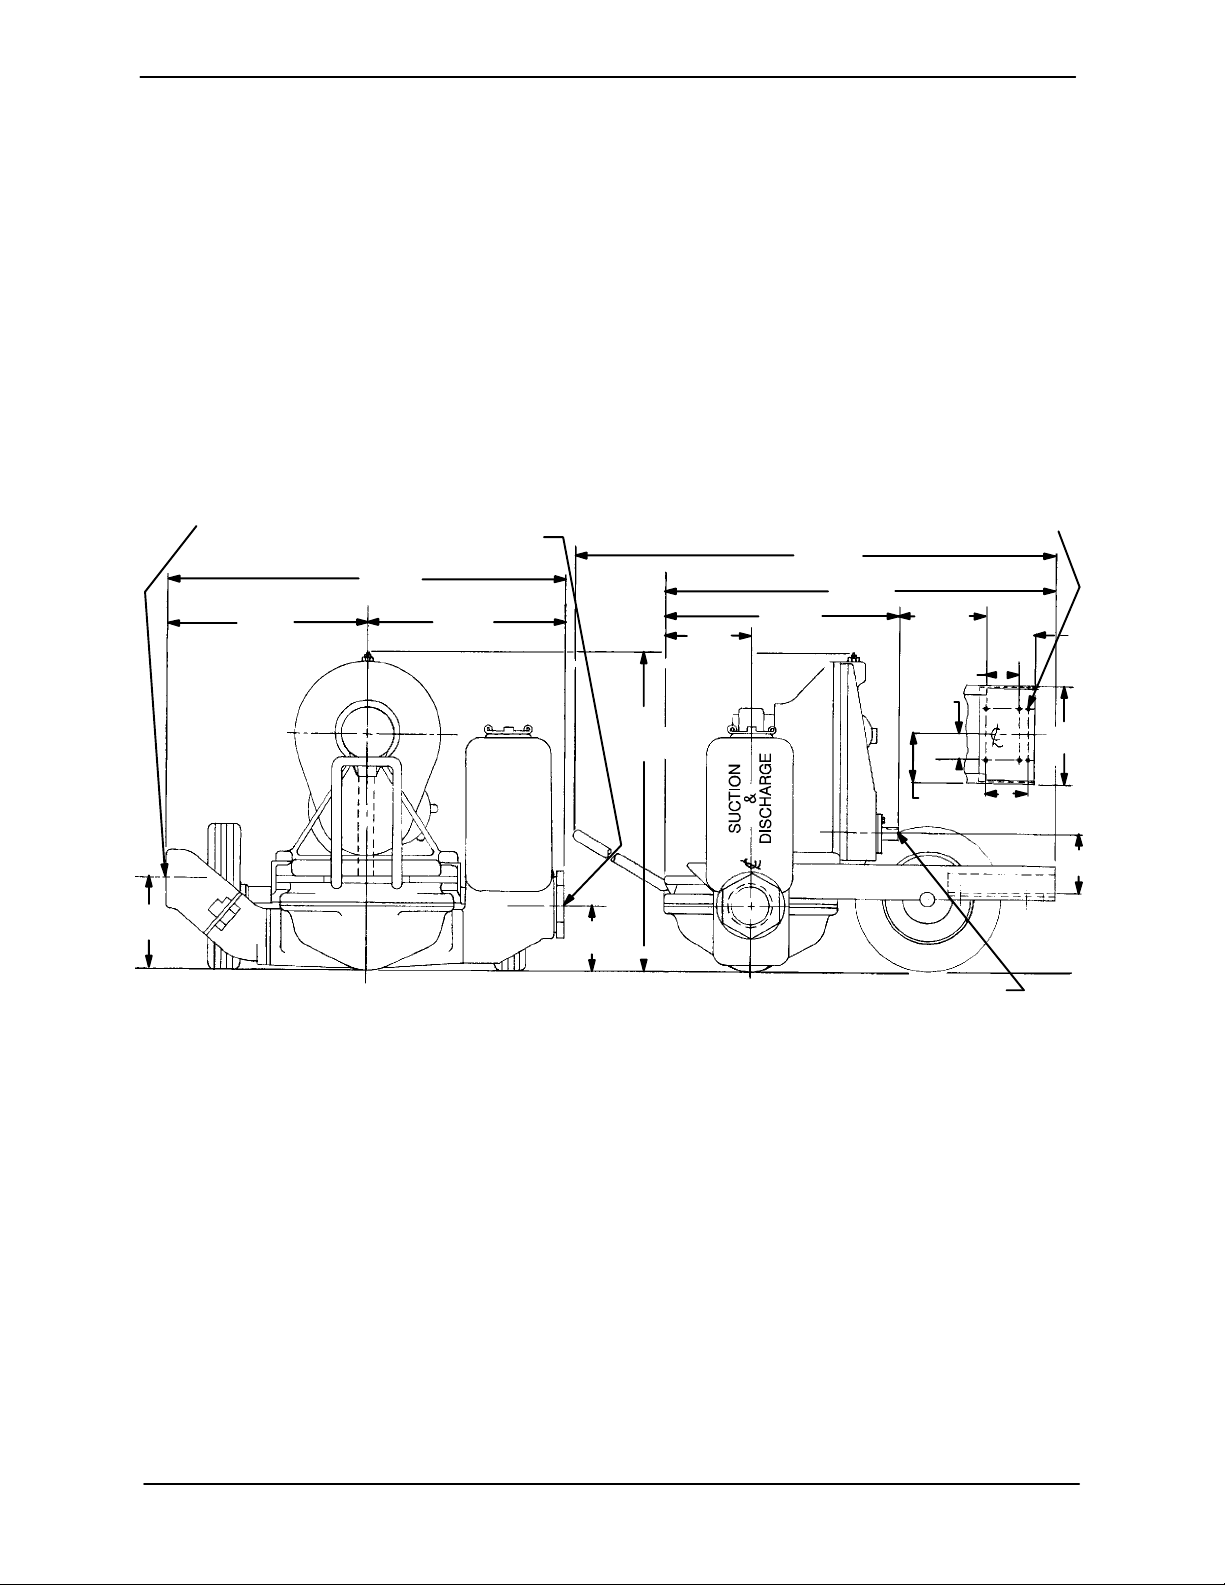
OUTLINE DRAWING
DISCHARGE - 4” NPT
16.88
[428,75]
SUCTION - 3” (OR 4”) NPT
33.88
[860,55]
17.00
[431,80]
Forfurther assistance,contact yourGorman-Rupp
distributor or t he Gorman-Rupp Company.
Pump Dimensions
SeeFigure1fortheapproximatephysicaldimensionsofthispump.
APPROX
26.62
[676,15]
7.31
[185,67]
[1370,08]
19..69
[500,13]
53.94
34.94
[887,48]
.44
[11,18]
7.25
[184,15]
5.50
[139,70]
4.25
[107,95]
8.25
[209,55]
-(6)HOLESDIA
7.00
[177,80]
1.00
[25.40]
16.25
[412,75]
7.00
[177,80]
DIMENSIONS: INCHES
[MILLIMETERS]
Figure 1. Pump Model 4D-B
PREINSTALLATION INSPECTION
Thepump assembly wasinspected and tested beforeshipment fromthe factory. Beforeinstallation,
inspect the pump fordamage which may have occurred during shipment. Check as follows:
a. Inspect the pump forcracks,dents, damaged
threads, and other obvious damage.
b. Check for and tighten loose attaching hard-
ware. Since gaskets tend to shrink after drying, check for loose hardware at mating sur faces.
5.31
[134,87]
[133,35]
.75 DIA SHAFT W/ .19 X .09 X 1..06 LONG
[19,05] [4,83][2,29][26,92]
USEABLE KEYWAY
c. Carefully read all tags, decals, and markings
onthepumpassembly,and performallduties
indicated.
d. Check levels and lubricate as necessary. Re-
fer to LUBRICATION in the MAINTENANCE
AND REPAIR section of this manual and perform duties as instructed.
e. If the pump and motor have been stored for
more than 12 months, some of the components or lubricants may have exceeded their
maximumshelflife.Thesemustbeinspected
or replaced to ensure maximum pump service.
5.25
PAGE B -- 1INSTALLATION
Page 7
OM--01505 DSERIES
If the maximum shelf life has been exceeded, or if
anything appears to be abnormal, contact your
Gorman-Rupp distributor or the factory to determinethe repairor updating policy. Donotputthe
pump into service until appropriate action has
been taken.
ELECTRIC MOTOR INSTALLATION
The pump is designed tobe flex-coupledto a1750
RPMsynchronousspeed electricmotor.The pump
basewillaccepteither a182Tor184T motorframe.
Be sure the motor tobe used meets these specifications and is compatible with the intended application.
Install and operate only an explosion
proof motor in an explosive atmosphere. Install, connect, and operate
the motor in accordance with the National Electric Code and all local codes.
Ifthereisa conflictbetween the instructions in the manual accompanying the
unit and the National Electric Code or
the applicable local code, the National
or local code shall take precedence.
POSITIONING PUMP
andmovetheunitareimproperlywrapped
around the pump.
Mounting
Locatethepumpinanaccessibleplaceascloseas
practicalto the liquid being pumped. Levelmounting is essential for proper operation.
The pump may have to be supported or shimmed
to provide for level operation or to eliminate vibration.
After the pump has been positioned, block the
wheels and secure the pump t o prevent creeping.
SUCTION AND DISCHARGE PIPING
Pump performance is adversely effected by increased suction lift, discharge elevation, and friction losses. See Page E-1 to be sure your overall
application allows the pump to operate within the
safe operation range.
Materials
Either pipe or hose maybe used for suction and
discharge lines; however, the materials must be
compatiblewith theliquidbeingpumped.If hoseis
used insuction lines, it mustbe the rigid-wall, reinforcedtype toprevent collapseunder suction.Using piping couplings in suction lines is not recommended.
Lifting
This pump is designed to be easily positioned for
operationusing the drawbar and wheels. The total
pump weight is approximately295 pounds (133,8
kg), not including accessories or motor.Customer
installed equipment such as suction and dischargepipingmustberemovedbeforeattempting
to lift.
Thepumpassemblycanbeseriously
damaged ifthecables or chains used tolift
PAGE B -- 2 INSTALLATION
Line Configuration
Keep suction and discharge lines as straight as
possible to minimize friction losses. Make minimum use of elbows and fittings, which substantiallyincreasefriction loss.If elbowsarenecessary,
use the long-radius type to minimize friction loss.
Never pull a line into place by t ightening connectionsatthe pump.Lines near thepump mustbe independently supported to avoid strain on the
pump which could cause excessive vibration and
increased diaphragm and gear train wear. If hosetype lines are used, they should have adequate
support to secure them wh en filledwith liquidand
under pressure.
Page 8

DSERIES OM--01505
Fixed, Rigid Piping
This pump is equipped with an integral suction accumulator chamber which promotes an efficient
flow of liquid and acts as an air cushion against
shock. Since the air in this chamber will leak away
during pump operation, the air must be replenished periodically. To introduce air into the chamber, stop the pump and remove the suction accumulator plug and integral gasket; this will break
prime and allow the liquid in the chamber to drain
away through the suction line.
AIR CHAMBERS
(18TO24INCHLENGTHSOF
6 TO 8 INCH DIAMETER PIPE
WITH WELDED CAPS)
DISCHARGE
CHAMBER
If the pump is mounted in a system with fixed, rigid
piping, it is recommended that a flexible connectionbeinstalledatornearthesuctionanddischarge ports to absorb shock which would otherwise be transmitted through the drive train and
greatly accelerate pump wear.
In a fixed piping installation, properly sized surge
suppressorsmust be installed in both suction and
discharge lines. If commercial surge suppressors
are not readilyavailable, air chambers may be fabricated from pipe as shown in Figure 2.
1/2-INCH VALVE FOR
RECHARGING AIR
CHAMBER WITH
COMPRESSED AIR
(ALSO ON DISCHARGE
CHAMBER)
DISCHARGE
FLEXIBLE JOINT
NOTE: INSTALL AIR CHAMBERS OFF FLOW LINE TEES
TO AVOID SURFACE TURBULENCE WITHIN CHAMBERS.
Figure 2. Fixed Piping Installation
Notethat the airchambers have not been installed
directly in the flow line, but have been installed off
tees to avoid turbulence within the chambers. The
airchambersarefittedwithvalvestopermitintroductionof small amounts of compressed air to further dampen shock; this compressed air will leak
away during operation, and should be replaced
from time to time. If the suction chamber floods,
open the suction chamber valve to break prime
and allow the liquid in chamber to drain through
the suction line.
SUCTION
CHAMBER
FLEXIBLE JOINT
SUCTION
Gauges
Ifdischarge pressure and vacuum suction gauges
aredesired, drilland tapthesuctionanddischarge
lines not less than 18 inches (457,2 mm) from the
suction and discharge ports and install the lines.
Installationcloserto the pump may result in erratic
readings.
PAGE B -- 3INSTALLATION
Page 9
OM--01505 DSERIES
SUCTION LINES
To avoidairpockets whichcould affect pumppriming, the suction line must be as short and direct as
possible.When operationinvolvesasuctionlift,the
line must always slope upward to the pump from
the source of the liquid being pumped; if the line
slopes down to the pump at any point along the
suction run, air pockets will be created.
NOTE
Maximumpumpperformanceis realized atsuction
lifts of 5 feet or less. Use the shortest possible
lengthof suction hose or piping; lengths of 25 feet
or longer will reduce the capacity of the pump.
It is strongly recommended that no positive shutoff valve be installed in the suction line; excessive
restrictions will cause incomplete filling of the diaphragm chamber and result in short diaphragm
life.
Fittings
Suction lines shouldbe the same size as the pump
inlet. If reducers are used in suction lines, they
should be the eccentric type, and should be installedwith the flat part ofthe reducers uppermost
to avoid creating air pockets. The suction line
shouldnot be restricted morethan 1 inch belowthe
nominal suction size.
The use of pipe couplings in the suction line is not
recommended.
of solids larger than the solids handling capability
of the pump.
This pump is designed to handle up to 2-1/4 inch
(57,2 mm) diameter spherical solids.
Sealing
Since even a slight leak will affect priming, head,
and capacity, especially when operating with a
high suction lift, all connections in the suction line
should be sealed with pipe dope to ensure an airtight seal. Follow the sealant manufacturer’s recommendations when selecting and applying the
pipe dope. The pipe dope should be compatible
with the liquid being pumped.
DISCHARGE LINES
Thedischargelinemustbethesamesize
as,or largerthan,thesuctionline. Neverinstall or operate thepump with a discharge
line smaller than the suction; a restricted
dischargeline will cause excessive friction
loss resulting in overloading and destruction of pump and drive components.
Siphoning
Donot terminate the discharge lineat a level lower
than that of the liquid being pumped unless a siphon breaker is used in the line. Otherwise, a siphoning action causing damage to the pump
could result.
Valves
Strainers
If a strainer is furnished with the pump, be certain
touseit; any sphericalsolidswhichpass througha
strainer furnished with the pump will also pass
through the pump itself.
If a s trainer is not furnished with the pump, but is
installed by the pump user, make certain that the
total area of the openings in the strainer is at least
three or four times the crosssection of the suction
line,and that the openings will not permit passage
PAGE B -- 4 INSTALLATION
Thepumpisprovidedwithintegralsuctionanddischarge check valves.
Never install a positive shut-off valve inthe
discharge line; discharge restrictions will
cause excessive friction loss resulting in
overloading and destruction of pump and
drive components. It is strongly recom-
Page 10

DSERIES OM--01505
mended that unless absolutely necessary,
nopositiveshut-off valvebe installedinthe
suction line; excessive restriction will
cause incomplete filling of the diaphragm
chamber and result in shortened diaphragm life.
ALIGNMENT
Beforeattempting toopenorservic e the
pump:
1. Familiarize yourself with this manual.
2. Shut off incoming powertothemotorand lock itouttoensurethatthe
pump will remain inoperative.
3. Allowthe pump to completelycool
if overheated.
4. Close the discharge valve (if
used).
5. Drain the pump.
To check parallel adjustment, lay a straightedge
acrossbothcouplinghalvesatthe top, bottomand
sides. The horizontal parallel adjustment is correct
when the straightedge rests evenlyon both halves
ofthe couplingatall points.Use afeeler gaugebetween the coupling to measure any misalignment.
Donot operate the pump without the eccentric and coupling guards in place
over the rotating parts. Exposed rotating parts can catch clothing, fingers, or
tools, causing severe injury to personnel.
ELECTRICAL CONNECTIONS
Beforeconnecting the motorto the incomingpower, check that the electrical service available
matches the pump motor requirements stamped
on the motor nameplate.
It is imperative that alignment be checked
before the pump is operated.
The pump and gearbox were aligned andsecured
at the factory, but fastening hardware may have
loosenedduring shipment. It is imperative thatthis
hardware and the alignment be checked after the
pump is installed and before operation. Adjustments may be made by loosening the securing
hardware and shifting or shimming components
as required.
This pump is designed to be driven by a flexcoupled electric motor.
Tocheck couplingalignment,use a feelergaugeor
taper gauge between the coupling halves every
90_. The coupling is in alignment when the hubs
are the same distance apart at all points.
The pump must be operated in the direction indicated bythe arrow on thegearbox
andon the accompanying decals.Reverse
rotationcould causepumpcomponentsto
be destroyed.
Install and operate only an explosion
proof motor in an explosive atmosphere. Install, connect, and operate
the motor in accordance with the National Electric Code and all local codes.
Ifthereisa conflictbetween the instructions in the manual accompanying the
unit and the National Electric Code or
the applicable local code, the National
or local code shall take precedence.
PAGE B -- 5INSTALLATION
Page 11

DSERIES
OM--01505
OPERATION --- SECTION C
Review all SAFETY information in Section A.
Follow the instructions on all tags, labels and
decals attached to the pump.
This pump is designed to handle nonvolatile non-flammable liquids containing specified entrained solids. Do not
attempt to pump volatile, corrosive, or
flammable liquids which may damage
the pump or endanger personnel as a
result of pump failure.
Afterthe pump hasbeeninstalled,block
the wheels and secure the pump to prevent creeping. Make certain that the
pump and all piping or hose connections are tight, properly supported and
secure before operation.
Pump applicationwill affectits performance,especially discharge velocities. Consult the GormanRupp factory for actual performance levels for the
pump.
Install the pump and piping as described in IN-
STALLATION. Make sure that the piping connections are tight, and t hat the pump is securely
mounted. Check that componentsare properly lubricated (see LUBRICATION in MAINTENANCE
AND REPAIR).
valve should be installed in the discharge
line.
STARTING
Consult the operations manual furnished with the
motor before starting the pump. Open any valves
installed in the suction line and start the pump.
Rotation
The correct direction of rotation is indicated by an
arrowon the gearboxaccompanying decals. If the
pump is operated in the wrong direction, pump
components may be seriously damaged or destroyedsince the integral check valves permit flow
in only one direction.
The pump must be operated in the direction indicated bythe arrow on thegearbox
andon the accompanying decals.Reverse
rotationcould causepumpcomponentsto
be destroyed.
If an electric motor is used to drive the pump, remove V-belts, couplings, or otherwise disconnect
the pump from the motor before checking motor
rotation. Operate the motor independently while
observingthe direction of the motor shaft, or cooling fan.
Ifrotationisincorrect on athree -phase motor,have
a qualified electrician interchange any two of the
three phase wires to change direction.If rotationis
incorrect on asingle-phase motor,consult theliterature supplied with the motor for specific instructions.
OPERATION
Make certain that any positive shut-off
valve installed in the suction line is open
before operating the pump; excessive restriction will cause incomplete filling of the
diaphragm chamber and result in shortened diaphragm life. No positive shut-off
OPERATION PAGE C -- 1
The pump is designed to operate at approximately 52 cycles per minute through
Page 12

OM--01505 DSERIES
a gearbox with A 33.34:1 ratio and a 1750
RPM maximum input drive. Make certain
that the electric motor installed does not
exceed this rpm; otherwise, pumpcomponents may be destroyed.
Priming
Thepumpmaynotprimeimmediatelybecausethe
suction linemust firstfill with liquid. Ifthe pumpfails
to prime within five minutes, stop the motor and
check the suction line for leaks.
OPERATION CHECKS
Gearbox Check
Check that the gearbox is properlylubricated (see
LUBRICATION in MAINTENANCE AND REPAIR).
Leakage Check
Ifthepumpwillbeidleformorethanafew hours,or
if it has been pumping liquids containing a large
amount of solids, flush it with clean water .
Cold Weather Preservation
The primary construction materials of this
pump are aluminum, with neoprene flap
valves and diaphragm. Do not attempt to
clean or flush this pump with any liquid
which would attack pump fittings or components. avoid cleaning with cleaning solvent.
In below freezing conditions, drain the water from
thepump and thelineswhen the pump isnotinoperation.Also,cleanoutanysolidsbyflushingwitha
hose.
No leakage should be visible at pump matingsurfaces,connectionsor fittings. Keepalllineconnections and fittings tight to maintain maximum pump
efficiency.
Strainer Check
If a suction strainer has been installed, check and
cleanit as necessary. It shouldbe cleanedif pump
flowbeginsto drop. Ifa vacuum suction gaugehas
been installed, monitor and record the readings
regularly to detect strainer blockage.
Accumulator Chamber Check
Check periodicallyto ensure that there is sufficient
air in the integral suction accumulator chamber.
Replenish as required (see Fixed, Rigid Piping in
Section B for details).
STOPPING
After stopping the pump, shut off incoming power
tothemotorand lockitouttoensurethat thepump
will remain inoperative.
GEARBOX TEMPERATURE CHECK
The gearbox runs higher than ambient temperatures because of heat generated by friction. Temperatures of approximately 200_F(93_C) are con-
sidered normal, and can operate intermittently at
250_F (121_C).
Checking gearbox temperatures by hand is inaccurate. Place a contact-type thermometer against
the housing and recordthis temperature for future
reference.
A sudden increase in gearbox temperature is a
warningthat thebearings are at the pointof failing.
Make certain that the bearing lubricant is of the
proper viscosity and at the correct level (see LU-
BRICATION in Section E). Bearing overheating
can also be caused by shaft misalignment and/or
excessive vibration.
When pumps are first started, the bearings may
seem to run at temperatures above normal. Continued operation should bring t he temperatures
down to normal levels within 20 minutes or less.
OPERATIONPAGE C -- 2
Page 13

DSERIES OM--01505
TROUBLESHOOTING --- SECTION D
Review all SAFETY information in Section A.
Beforeattemptingto open orservicethe
pump:
1. Familiarize yourselfwith this manual.
2. Shut off incoming power to the motor
and lock it out to ensure that the
pump will remain inoperative.
3. Allow the pump to completely cool if
overheated.
4.Closethedischargevalve(ifused).
5. Drain the pump.
TROUBLE POSSIBLE CAUSE PROBABLE REMEDY
PUMP FAILS TO
PRIME
PUMP STOPS OR
FAILS TO DELIVER
RATED FLOW OR
PRESSURE
Air leak in suction line. Correct leak.
Lining of suction hose collapsed. Replace suction hose.
Integral suction or discharge check Clean valves, check that flange nuts
valve clogged, binding, or not seating are tight.
properly.
Cracked or broken diaphragm. Replace diaphragm.
Diaphragm not securely in place. Secure diaphragm.
Strainer clogged. Checkstrainerandcleanifnecessary.
Air leak in suction line. Correct leak.
Suction intake not properly submerged. Check installation.
Lining of suction hose collapsed. Replace suction hose.
Cracked or broken diaphragm. Replace diaphragm.
Diaphragm not securely in place. Secure diaphragm.
Strainer clogged. Checkstrainerandcleanifnecessary.
Integral suction or discharge check Clean valves, check that flange nuts
valve clogged, binding, or not seating are tight.
properly.
TROUBLESHOOTING PAGE D -- 1
Page 14

OM--01505 DSERIES
TROUBLE POSSIBLE CAUSE PROBABLE REMEDY
PUMP REQUIRES
TOO MUCH
POWER
PUMP
CLOGS FREQUENTLY
EXCESSIVE NOISE
BEARINGS
RUN TOO HOT
Liquid solution too thick. Dilute if possible.
Integral discharge check valve clogged Clean valve.
or binding.
Bearings in motor or gearbox Check bearings.
worn or binding.
Integral suction or discharge check Clean valves, check that flange nuts
valve clogged, binding, or not seating are tight.
properly.
Liquid solution too thick. Dilute if possible.
Pump, gearbox, or motor not Check and tighten mounting bolts.
securely mounted.
Gearbox or motor not properly See LUBRICATION in MAINTE-
lubricated. NANCE AND REPAIR.
Bearing temperature is high, but within Check bearing temperature regularly
limits. to monitor any increase.
Low or incorrect lubricant. Check for proper type and level of
lubricant.
Drive misaligned. Align drive properly.
TROUBLESHOOTINGPAGE D -- 2
Page 15

DSERIES OM--01505
PUMP MAINTENANCE AND REPAIR - SECTION E
MAINTENANCE AND REPAIROF THEWEARING PARTSOFTHEPUMP WILLMAINTAINPEAKOPERATING PERFORMANCE.
INGALLONSPERMINUTEAT52STROKESPERMINUTE
STATIC
LIFT
IN FEET
5 150 119 113 112
10 126 108 105 105
20 94 74 73 66
STATIC
LIFT
IN METERS
1,5 567,8 450,4 427,7 423,9
3,0 476,9 408,8 397,4 397,4
4,6 370,9 283,8 280,1 276,3
6,1 355,8 280,1 276,3 249,8
0101520
IN LITERS PER MINUTE AT 52 STROKES PER MINUTE
0 3,0 4,6 6,1
STATIC DISCHARGE HEAD IN FEET
5
125
118
97
82
82
STATIC DISCHARGE HEAD IN METERS
1,5
473,1
446,6
367,1
310,3
25
104
100
7374759815
6066707425
70
63
52
7,6
393,6
378,5
264,9
238,4
7,6 280,1 264,9 249,8 227,1
STANDARD PERFORMANCE TEST DATA FOR PUMP MODEL 4D-B
Based on 70_ F(21_ C) clear water at sea level
with minimum suction lift, using 3 inch (7,62 cm)
suctionhoseand4inch(10,16cm) non-collapsible
discharge hose. Since pump installations are seldom identical, your performance may be different
due to such factors as viscosity, specific gravity,
MAINTENANCE & REPAIR PAGE E -- 1
310,3
elevation, temperature, and impeller trim.
If your pump serial number is followed by an “N”,
your pump is NOT astandardproductionmodel.
Contact the Gorman-Rupp Company to verify performance or part numbers.
196,8
Page 16

SECTION DRAWING
DSERIESOM--01505
Figure 1. Pump Model 4D-B
MAINTENANCE & REPAIRPAGE E -- 2
Page 17

DSERIES OM--01505
PARTS LIST
Pump Model 4D-B
(From S/N 461594 up)
Ifyour pump serialnumber is followedbyan “N”,your pumpis NOT a standard production model. Contact
the Gorman-Rupp Company to verify part numbers.
ITEM
PART NAME PART
NO.
NUMBER
MAT’L
CODE
QTY ITEM
NO.
PART NAME PART
NUMBER
MAT’L
CODE
QTY
1 COUPLING DRIVE SHAFT 34355---105 --------- 1
2 COUPLING MTR SHAFT 24355---112 --------- 1
3
SPIDER 24355---267 ------ --- 1
4 COUPLING GUARD 34613---045 15020 1
5 KEY N0405 15990 1
6 MOTOR NOT FURNISHED
7 BASE 13485 24000 1
8 AXLE 6619 15990 1
9 SPACER 6619A 15070 2
10 COTTER PIN M0306 15990 2
11 FLAT WASHER S1532 -- ------- 4
12
PN EU MATIC WHE EL S263 --- --- --- 2
13 U---BOLT 6945 15000 2
14 HEX NUT D06 15991 4
15 LOCKWASHER J06 15991 4
16 HEX HD CAPSCREW B0404 15991 2
17 FLAT WASHER K04 15991 2
18 LOCKWASHER J04 15991 2
19 HEX NUT D04 15991 2
20 DIAPHRAGM RING 6621 13010 1
21 DRAW BAR 5438 15990 1
22 PLUNGER ROD ASSY 6959 --- --- - -- 1
23 LU B FIT TIN G S19 1 --- --- --- 1
24 END CAP 6643 10010 1
25 GEARBOX ASSY 44161---009 --- --- --- 1
26 HEX HD CAPSCREW B1010 15991 4
27 LOCKWASHER J10 15991 4
28 HEX HD CAPSCREW B1211 15991 4
29 LOCKWASHER J12 15991 4
30 HEX NUT D12 15991 4
31 DIAPHRAGM POT ASSY 46475---702 - -------- 1
32 U---BOLT 5495 15991 2
33 HEX NUT D06 15991 4
34 LOCKWASHER J06 15991 4
35 HEX HD CAPSCREW B0402 1/2 15991 2
36 T TYPE LOCK WASHER AK04 15991 2
37 FLAT WASHER K04 15991 2
38 LUBE DECAL 38817---066 --- --- --- 1
39 ECCENTRIC GUARD 38861- --504 23200 1
40 NYLOCK CAP SCREW BT0403 15991 1
41 WA SH ER S1 57 --- --- --- 1
42 FLAT WASHER K04 15991 1
43 GUARD WARNING STKER 38816---063 --------- 1
NOT SHOWN:
NAME PLATE 2613BP 13990 1
DRIVE SCREW BM#04---03 17000 4
STRAINER 4917 24001 1
DISCHARGE STICKER 6588BJ --- --- --- 1
SUCTION STICKER 6588AG --------- 1
INSTRUCTION TAG 38817---031 --------- 1
OPTIONAL:
STATIONARY BASE 8283 24000 1
INDICATES PARTS RECOMMENDED FOR STOCK
MAINTENANCE & REPAIR PAGE E -- 3
Page 18

DISCHARGE
30
29
28
25
27
26
SECTION DRAWING
NOTE:
FLAP VAL VE ASSEMBLY SHOWN IN POSITION ON DISCHARGE SIDE. SUCTION SIDE
TO OPEN IN SAME DIRECTION.
32
37
36
35
34
DSERIESOM--01505
SUCTION
23
22
21
20
24
33
31
2
1
3
1213141516171819
Figure 2. 46475---702 Diaphragm Pot Assembly
MAINTENANCE & REPAIRPAGE E -- 4
,,,,,,
4567891011
Page 19

DSERIES OM--01505
PARTS LIST
46475---702 Diaphragm Pot Assembly
ITEM
NO.
1 DIAPHRAGM POT 6622 13010 1
2 SUCT ACCUMULATOR PLUG AND GASKET S591A --- --- --- 1
3 SUCTION ACCUMULATOR 6625 13010 1
4 REDUCER PIPE BUSHING AP6448 11990 1
5 HEX HD CAPSCREW B0504 15991 2
6 LOCKWASHER J05 15991 2
7 STUD C1013 15991 2
8 FLAT WASHER KE10 15991 2
9 HEX NUT D10 15991 2
10
11 DIAPHRAGM POT DRAIN PLUG P06 11990 1
12
13 STUD C1010 15991 2
14 FLAT WASHER KE10 15991 2
15 HEX NUT D10 15991 2
16 HEX HD CAPSCREW B0504 15991 2
17 LOCKWASHER J05 15991 2
18 DISCHARGE FLANGE 6627 13040 1
19
20 STUD C1013 15991 2
21 FLAT WASHER KE10 15991 2
22 HEX NUT D10 15991 2
23 DISCHARGE ELBOW 6626 13040 1
24 VALVE SEAT 6635 10010 1
25 DISCHARGE FLAP VALVE ASSY 46413---007 --------- 1
26 ---VALVE WEIGHT 6801 15990 1
27
28 ---VALVE WEIGHT 6642 15990 1
29 ---RD HD MACHINE SCREW X0402 1/2 17090 4
30 ---LOCKWASHER J04 17090 4
31 VALVE SEAT 6635 10010 1
32 SUCTION FLAP VALVE ASSY 46413---007 ------ --- 1
33 ---VALVE WEIGHT 6642 15990 1
34 ---VALVE WEIGHT 6801 15990 1
35 ---RD HD MACHINE SCREW X0402 1/2 17090 4
36 ---LOCKWASHER J04 17090 4
37
PART NAME
SUCTION ACCUMULATOR GASKET 6625G 19100 1
DISCHARGE FLANGE GASKET 6625G 19100 1
DISCHARGE ELBOW GASKET 6625G 19100 1
---FLAP VALVE 6925 19100 1
---FLAP VALVE 6925 19100 1
PART
NUMBER
MAT’L
CODE
QTY
INDICATES PARTS RECOMMENDED FOR STOCK
MAINTENANCE & REPAIR PAGE E -- 5
Page 20

13
DSERIESOM--01505
SECTION DRAWING
234
,,
1
5
10
12
8.00 REF
10.78 HOLD
11
Figure 3. 6959 Plunger Rod Assembly
6789
MAINTENANCE & REPAIRPAGE E -- 6
Page 21

DSERIES OM--01505
PARTS LIST
6959 Plunger Rod Assembly
ITEM
NO.
1 BEARING CAP 6560 10010 1
2 ---HEX HD CAPSCREW B0813S 15991 2
3 ---HEX NUT D08S 15991 2
4 ---LOCKWASHER J08 15991 2
5 PLUNGER ROD ASSEMBLY 6633 15990 1
6
7 LUBRICATION FITTING S194 --- --- --- 1
8 DIAPHRAGM PLATE 6629 15990 1
9 DIAPHRAGM PLATE 6628 10010 1
10 HEX NUT D08 15991 4
11 SPRING WASHER 6639 15000 1
12 SPRING 6547 16080 1
13 SPRING RETAINING NUT 6638 11000 1
INDICATES PARTS RECOMMENDED FOR STOCK
PART NAME
DIAPHRAGM S1017 --- --- --- 1
PART
NUMBER
MAT’L
CODE
QTY
MAINTENANCE & REPAIR PAGE E -- 7
Page 22

SECTION DRAWING
DSERIESOM--01505
Figure 4. 44161---009 Gearbox Assembly
MAINTENANCE & REPAIRPAGE E -- 8
Page 23

DSERIES OM--01505
PARTS LIST
44161---009 Gearbox Assembly
ITEM
PART NAME PART
NO.
NUMBER
MAT’L
CODE
QTY ITEM
NO.
PART NAME PART
NUMBER
MAT’L
CODE
QTY
1 GEAR HOUSING 6624 13040 1
2 CR AN KSHAF T B EARIN G S 37 4 --- --- --- 1
CRANKSHAFT GEAR 6641 15060 1
3
4
GEAR HOUSING GSKT 6624G 18000 1
5 AIR VENT FITTING S2162 --------- 1
6 HEX HD CAPSCREW B0803 15991 1
7 GEAR COVER 6623 13010 1
8
CRANKSHAFT GEAR KEY N0605 15990 1
9 CRANKSHAFT BEARING S1080 --------- 1
10 HEX HD CAPSCREW B1004 15991 1
11 FLAT WASHER 21161---442 ------ -- - 1
12 WASHER 6637 15000 1
13
PINION BUSHING S1016 --- ------ 1
14 GEAR COVER PLUG S1053 --- --- --- 1
15 HEX HD CAPSCREW B0504 15991 4
16 LOCKWASHER J05 15991 4
17
DRIVE SHAFT KEY N0304 15990 1
18 DRIVE SHAFT 6631 15010 1
19
OIL SEAL S1012 --- --- --- 1
20 ECCENTRIC HOUSING 6632 10010 1
21
ECC HOUSING GSKT 6632G 18000 1
22 DRAIN PLUG P04 15079 1
23
DRIVE SHAFT BEARING S1044 --- - ----- 2
24 RETAINING R IN G S2 04 --- --- --- 1
25 DRIVE GEAR 6558 16040 1
INDICATES PARTS RECOMMENDED FOR STOCK
26
SNAP RING S1004 --- --- --- 1
27 INTERNAL GEAR S1014 --- --- -- - 1
28 PINION SHAFT 6634 16070 1
29 GEAR HOUSING PLUG S1054 --------- 1
30
PINION SHAFT BUSHING S1015 --- --- --- 1
31 WASHER 6636 15990 1
32
SN AP RI NG S24 4 --- --- --- 1
CRANKSHAFT ROLLER S1011 --- --- --- 1
33
BEARING
34 RETAINING R IN G S44 2 --- --- --- 1
35
CRANKSHAFT 6550 11000 1
36
SNAP RING S1010 --- --- --- 1
37 HEX HD CAPSCREW B0511 15991 5
38 LOCKWASHER J05 15991 5
39 HEX NUT D05 15991 5
40 SHOULDER BOLT S1018 ------ --- 1
41 LOCKWASHER J05 15991 1
42 HEX NUT D05 15991 1
43 HEX HD CAPSCREW B0518 15991 3
44 LOCKWASHER J05 15991 3
45 HEX NUT D05 15991 3
46 O IL CU P S61 7 --- --- --- 1
47 SHOULDER BOLT S1019 ------ --- 1
48 LOCKWASHER J05 15991 1
49 HEX NUT D05 15991 1
MAINTENANCE & REPAIR PAGE E -- 9
Page 24

DSERIESOM--01505
PUMP AND SEAL DISASSEMBLY
AND REASSEMBLY
Review all SAFETY information in Section A.
Followthe instructionsonall tags, label anddecals attached to the pump.
This pump requires littleservice due to its rugged,
minimum-maintenance design. However, if it becomesnecessarytoinspectorreplacethewearing
parts, followthese instructions which are keyed to
the sectional views (see Figures 1, 2, 3 and 4) and
the accompanying parts lists.
Most service functions may be performed without
separating the pump and gearbox from t he motor.
If major repair is required, the pump, gearboxand
motor must be disconnected.
Before attempting to service the pump, shut off incomingpower tothemotorandlockitouttoensure
that it willremain inoperative. Close allvalves in the
suction and discharge lines.
For motor disassembly and repair, consult the literature supplied with the motor,orcontact your local motor representative.
Beforeattempting toopenorservic e the
pump:
1. Familiarize yourself with this manual.
2. Shut off incoming powertothemotorand lock itouttoensurethatthe
pump will remain inoperative.
3. Allowthe pump to completelycool
if overheated.
4. Close the discharge valve (if
used).
5. Drain the pump.
Before attempting to service the pump, drain the
pump by removing the drain plug (11, Figure 2).
Clean and reinstall the drain plug.
Suction And Discharge Check Valve Removal
(Figure 2)
To servicethesuctionand dischargecheck valves,
remove the suction and discharge piping.
To service the suction check valve assembly (32),
removethe suctionaccumulator(3)bydisconnecting the hardware (8 and 9) securing it to the diaphragmpot(1).Removethehardware(5and6)securing the valve seat (31) and check valve assembly to the diaphragm pot. Pull t he check valve assembly from the suction port.
To service the discharge check valve assembly
(25), loosenthe hardware (21 and 22) and remove
theassembledoutboarddischargeelbow(23),
check valve, and seat (24). Remove the gasket
(19).
Remove the hardware (16 and 17) securing the
valve seat (24) and discharge check valveassembly to the discharge elbow.
To remove the inboard dischargeflange (18),loosen the hardware (14 and15) securingthe flangeto
the diaphragm pot. Remove the gasket (12).
Thesuctionand dischargecheckvalveassemblies
are identical parts and operate in the same direction. For removal and/or replacement, remove the
hardware (29, 30, 35 and 36) securing the check
valve weights (26, 28, 33 and 34) to the check
valves (27 and 37). Inspect and replace as required.
If no further disassembly is required, see Suction
And Discharge Check Valve Installation.
Diaphragm Removal
(Figure 1)
To remove the diaphragm (6, Figure 3), disengage
the hardware (28, 29 and 30) and remove the diaphragm pot assembly(31). Inspect thediaphragm
ring (20) for wear or damage. If replacement is required, the gearbox assembly (25) and the eccentric guard (39) must be removed.
(Figure 3)
Remove the nuts (10). Separate the lower diaphragmplateassembly (8) fromthe diaphragm(6)
MAINTENANCE & REPAIRPAGE E -- 10
Page 25

OM--01505DSERIES
andtheupperdiaphragmplate(9).Inspect thediaphragm and replace a required.
If no further disassembly is required, see Dia-
phragm Installation.
Plunger Rod Removal And Disassembly
(Figure 3)
With the diaphragm pot assembly and diaphragm
removed, disengage the hardware (35, 36, 37,40,
41, and 42, Figure 1) and remove the eccentric
guard (39, Figure 1).
Loosen the hardware (2, 3 and 4) and remove the
endcap (24,Figure1). Slidethe bearingcap (1)off
the crankshaft roller bearing (33, Figure 4), and remove the plunger rod assembly.
Useasocketwrench to holdtheplungerrod(5)securely,and unscrew the bearingcap assembly(1).
Unscrewthespringretainingnut(13).Use caution
when unscrewing the retaining nut; tension on the
spring (12) will be released.
Remove the spring (12) and spring washer (11).
Slidetheplungerrod assembly(5)out of theupper
diaphragm plate (9).
Inspect t he component parts for excessive wear
and replace as required.
Gearbox Removal And Disassembly
(Figure 1)
Whenproperlyoperatedand maintained, thegearboxassembly(25)shouldnotrequiredisassembly.
Disassemble the gearbox only when there is evidenceofwearordamage.
Shaft and bearing disassembly in the field
is not recommended. These operations
should be performed only in a properly
equipped shop by qualified personnel.
remove the diaphragm ring. Inspect the diaphragmringforwearordamageandreplaceas
necessary. It is not necessary to remove the drawbar (21) from the diaphragm ring unless replacement is required.Disengage the hardware (33 and
34) from the U-bolts (32) to remove the drawbar.
Disengage the hardware (16, 17, 18 and 19) and
remove the coupling guard (4). Loosen the hardware securing the coupling(1). Separatethe gearbox assemblyfromthe couplingby pullingstraight
away. Remove the shaft key (17, Figure 4).
(Figure 4)
Before attempting to disassemble the gearboxassembly, drain the lubricant by removing the drain
plug(22)andturningthegearboxonitsside.Clean
and reinstall the drain plug.
Removethehardware(15and16)securingtheeccentrichousing(20) and housinggasket (21) tothe
gear cover (7). Pull the complete drive shaft subassembly from the gear cover.
To disassemble the drive shaft subassembly, remove the snap ring (26) and slide the drive gear
(25) off the drive shaft (18). Remove the retaining
ring(24), and press the drive shaft and assembled
bearings (23) out of the eccentric housing. Press
the oil seal (19) from the housing bore. Cover the
shaft and bearing with a clean cloth until ready to
clean and inspect the gearbox components.
Foraccess tothe remaining gearboxdrivecomponents, the gear cover (7) and gear housing gasket
(4)mustbeseparated fromthegearhousing(1)by
removing the t wo close-tolerance s houlder bolts
(40and 47), which act a s pilots to ensure accurate
concentric positioning of the cover, and the remaininghardware(37, 38,39, 41,42, 43,44, 45,48
and 49).
NOTE
The shoulder bolts and capscrews securing the
gearbox cover to the gearbox housing are of different lengths. For ease of reassembly, record the
positions of the shoulder bolts and capscrews at
thetimeofremoval.
Remove the gear housing gasket and clean allthe
mating surfaces.
Support the diaphragm ring (20) with wooden
blocks. Disengage the hardware (26 and 27), and
MAINTENANCE & REPAIR PAGE E -- 11
If the gear cover does not readily separate from the
NOTE
Page 26

DSERIESOM--01505
housing, removethe hardware(10 and11), install a
5/8-11 UNC by 4-inch long capscrew,and jack the
cover from the housing. Removethe jacking screw
and replace the hardware (10 and 11).
Afterthegearcoverhasbeenremoved,inspectthe
pinion shaft bushing (13). If replacement is required, remove the cover plug (14) and press the
pinionshaft bushing(14)fromthe coverbore.Slide
thepinionshaftwasher(12)offthepinionshaft (28)
and tag it for reference during reassembly.
Use a bearing puller to remove the crankshaft
bearing (9) from the crankshaft (35). Remove the
spacer (31).
Install two 5/8-11 UNC capscrews in the tapped
holes in the crankshaft gear (3), and use a gear
pullertoslidethegearoffthecrankshaft.Retainthe
crankshaft gear key (8). Remove the capscrews
from the gear.
Removethe snapring(36)and slide the crankshaft
and crankshaft bearing (2) out of the gearbox
housing.
To disassemble the pinion shaft and components,
slidethe shaft and assembled piniongear (27) out
of the shaft bushing (30). The pinion gear is retained on the shaft by tight friction fit and does not
normally require removal. If removal is required,
press the pinion gear from the shaft.
in cleaning solvent. Inspect the parts for wear or
damage and replace as necessary.
Most cleaning solvents are toxic and
flammable. Use themonly in a well ventilated area free from excessive heat,
sparks, and flame. Read and follow all
precautions printed on solventcontainers.
Clean the bearings thoroughly in fresh cleaning
solvent.Dry the bearings with filteredcompressed
air and coat with light oil.
Bearings must be kept free of all dirt and
foreign material. Failureto do sowillgreatly shorten bearing life. Do not spin dry
bearings. This may scratch the balls or
races and cause premature bearing failure.
Rotate the bearings by hand to check for roughnessorbinding and inspect the bearing balls.If rotation is rough or the bearing balls are discolored,
replace the bearings.
Inspect the pinion shaft bushing and, if replacement is required, remove the plug (29) and press
the bushing from the gear housing bore.
After removing the shafts and bearings, clean a nd
inspect the bearings in place as follows.
To prevent damage during removal from
the shaft, it is recommended that bearings
be cleaned and inspected in place.Itis
strongly recommended that the bearings
be replaced any time the shaft and bearings are removed.
Clean t he gear housing, shaft and all component
parts(exceptthebearings)withasoftclothsoaked
The bearing tolerances provide a tight press fit
onto the shafts and a snug slip fit into the gear
housing. Replace the bearings, shafts, eccentric
housing,or gear housingif the proper bearingfit is
not achieved.
If the bearings require replacement, remove the
bearing retaining ring (34). Remove the bearing
snap ring (32) and use a bearing puller to remove
the bearings (2, 23, and 33).
Gearbox Reassembly And Installation
(Figure 4)
Inspect the shafts (18, 28 and 35) for distortion,
nicks or scratches. Dress small nicks and burrs
with a fine file or emery cloth. Replacethe shafts if
defective.
MAINTENANCE & REPAIRPAGE E -- 12
Page 27

OM--01505DSERIES
To prevent damage during removal from
the shaft, it is recommended that bearings
be cleaned and inspected in place.Itis
strongly recommended that the bearings
be replaced any time the shaft and and
bearings are removed.
The bearings may be heated to ease installation.
An induction heater, hot oil bath, electric oven, or
hotplatemaybeusedtoheatthebearings.Bearings should never be heated with a direct flame or
directly on a hot plate.
NOTE
Ifahotoil bathisused toheatthebearings, both the
oil and the container must be absolutely clean. If
the oil has been previously used, it must be thor-
oughly filtered.
Heat the bearings to a uniform temperature no
higher than250_F(120_C), andslidethebearings
onto the shafts, one at a time, until they are fully
seated. This should be done quickly, in one continuous motion, to prevent the bearings from cooling and sticking on the shaft.
When installing the bearings onto the
shaft, never press or hit against the outer
race, balls, or ball cage. Press only onthe
inner race.
Secure the bearing (2) with the snap ring (36). Secure the crankshaft roller bearing (33) with the
snap ring (32).
Ifremoved,press thepinionshaft bushing (30)into
the gear housing until fully seated.
Use a hydraulicpress toinstallthe piniongear (27)
onto the pinion shaft (28).
NOTE
Thepinion gear is a tight interferencefit on thepinion s haft. To ease installation, the gear may be
heated (and the shaft cooled) to a temperature differentialof350_F (177_C).Ifthegearisheated,use
caution when handling the gear to prevent burns.
Slidethe assembled pinionshaft and gear into the
pinion shaft bushing until fully seated.
Slide the crankshaft and assembled bearing (2)
intothe gearhousingand secure withthesnapring
(36).
Use caution when handling hot bearings to prevent burns.
When installing the shaft and bearings into
the bearing bore, push against the outer
NOTE
The crankshaft bearing (9) must be installed after
the crankshaft gear (3).
Afterthe bearingshave beeninstalled and allowed
to cool,check to ensure that they have notmoved
out of position in shrinking. If movement has occurred, use a suitable sized sleeve and a press to
reposition the bearings.
If heating the bearings is not practical, use a suitablesizedsleeve andan arbor(or hydraulic)press
to install the bearings on the shaft.
MAINTENANCE & REPAIR PAGE E -- 13
race. Never hit the balls or ball cage.
Install the crankshaft gear key (8) in the shaft keyway. Alignthe crankshaft gear teeth with those on
thepinionshaft,andpress the gearontothecrankshaft until fully seated against the shoulder. Install
the spacer (31), and press the bearing (9) ontothe
shaft until fully seated against the spacer.
Tap theend ofthecrankshaft witha soft-facedmallet to ensure that all components are fully seated.
Ifremoved,press thepinionshaft bushing (13)into
the gear cover (7). Slide the pinion shaft washer
(12) onto the pinion shaft (28). Install the gear
Page 28

DSERIESOM--01505
housinggasket (4). Position the gearcover so that
the respective bores slip over the crankshaft bearingandpinionshaft. Tapthecover intoplace with a
soft-faced mallet.
Install the two close-tolerance shoulder bolts (40
and 47) (which act as pilots to ensure accurate
concentric positioning of the cover) through their
respective holes, and secure them with the hardware (41, 42, 48 and 49). Secure the gear cover to
thegearhousingbytighteningtheremaininghardware (37, 38, 39, 43, 44, and 45) evenly.
Installthe gear cover plug (14) and the gear housingplug(29).
Press the drive shaft and assembled bearings into
the eccentric housing (20), and secure with the retaining ring (24).
When installing the shaft and bearings into
the bearing bore, push against the outer
race. Never hit the balls or ball cage.
(Figure 1)
Position the gearbox on the base (7). Position the
diaphragm ring (20) under the base, and secure
thegearboxanddiaphragmringwith the hardware
(26 and 27).
If the drawbar (21) was removed, secure it to the
diaphragmringwith theU-bolts(32) andhardware
(33 and 34).
Reinstall the drive coupling (1), and connect the
halves. Check the coupling alignment as described in ALIGNMENT,SectionB.
Lubricate the gearbox as described in LUBRICA-
TION.
Plunger Rod Reassembly And Installation
(Figure 3)
Slide the plunger rod (5) through the upper diaphragmplate (9). Slidethe spring washer (11) and
spring (12) down over the plunger rod. Install the
springretainingnut (13),andtightenittoobtainthe
dimension shown in Figure 3.
Cleanthebearingcap(1)withaclothsoakedin
cleaning solvent.
Lubricatethe lipof the oilseal(19)withlightoil,and
position it on the drive shaft with the lip positioned
as shown in Figure4. Press the oil seal intothe eccentric housing bore untilthe face of the oil seal is
just flush with the face of the eccentric housing.
Be careful not to roll or cut the lip of the oil seal on
the shaft keyway.
Installthedrivegear(27)onthedriveshaft,andsecure with the snap ring (26).
Clean the mating surface ofthe eccentric housing
andreplace theeccentric housinggasket (21). Position the assembled eccentric housing and drive
shaftinthegearcoverborewiththeword“top”on
the eccentric housing flange facing up. Slide the
housing and drive shaft into the gearbox, making
certain the drive gear teeth fully engage those of
the pinion gear. Secure the eccentric housing to
the gear housing with the hardware (15 and 16).
Install the drive shaft key (17).
Most cleaning solvents are toxic and
flammable. Use themonly in a well ventilated area free from excessive heat,
sparks, and flame. Read and follow all
precautions printed on solventcontainers.
Inspect the bearing cap for wear or damage and
replace if necessary.
NOTE
Thebearingcapconsistsofanupperandlowerhalf
securedwith the hardware (2, 3 and 4). The cap is
machinedasonepiecebeforebeingsplittoensure
concentricityof thebore,andisavailableonlyasan
assembly.
MAINTENANCE & REPAIRPAGE E -- 14
Page 29

OM--01505DSERIES
Screw the bearing cap assembly onto the plunger
rod until fully seated against the spring retaining
nut.
Loosen the hardware (2, 3 and 4), and position the
bearing cap overthe crankshaft rollerbearing (33,
Figure 4). Secure the plunger rod assembly by
tightening the hardware (2, 3 and 4).
Secure the eccentric guard (39, Figure 1) with the
hardware (35, 36, 37, 40, 41, and 42, Figure 1).
Lubricate the plunger rod assembly as described
in LUBRICATION,SectionE.
Diaphragm Installation
(Figure 3)
Position the diaphragm (6) on the upper diaphragm plate (9), making sure the lip is properly
seated. Slide the studs in the lower diaphragm
plate(8) through the holesinthe upper diaphragm
plate, and secure with the nuts (10).
(Figure 1)
Cleanthematingsurfacesofthe valveseatanddischarge flange. Install the gasket (19) and secure
assembleddischarge elbow,check valve,andseat
to the discharge flange with the hardw are (21 and
22).
Check the operation of the check valve to ensure
proper seating and free movement.
Subassemble the suction check valve (32). Clean
the mating surfaces, and position the gasket (10),
check valveassembly,and valve seat (31)against
the diaphragm pot with the weights positioned as
shown in Figure 2. Secure with the hardw a re (5
and 6).
Check the operation of the check valve to ensure
proper seating and free movement.
Secure the suction accumulator (3) to the diaphragm pot with the hardware (8 and 9).
Connect the suction and discharge piping as described in INSTALLATION,SectionB.
Refer to OPERATION, Section C before starting
the pump.
Securethe diaphragm potassembly (31)to the diaphragm ring (20) with the hardware (28, 29 and
30).
SuctionAndDischargeCheckValveInstallation
(Figure 2)
Inspect the check valve components and replace
asrequired.Subassemblethecheckvalveweights
(26, 28, 33 and 34) and check valves (27 and 37)
with the hardware (29, 30, 35 and 36).
If the inboard discharge flange (18) was removed,
clean the mating surfaces and install the gasket
(12). Secure the flange to the diaphragm pot (1)
with the hardware (14 and 15).
Subassemble the valve seat (24) and discharge
check valve (25) to the discharge elbow (23) with
the weights positioned as shown in Figure 2, and
secure with the hardware (16 and 17).
LUBRICATION
Plunger Rod Assembly
(Figure 1)
The crankshaftroller bearing (33, Figure4)
shouldbelubricated thoroughly aftereach
8 hours of operation. Failure to do so may
cause the bearing to overheat and fail.
ApplyNo. 2 lithiumbase grease to the upper lubricationfitting(23)untilgreaseescapesfromtheend
cap (24).
Apply No. 2 lithium base grease tothe lower fitting
(7, Figure 3) until grease escapes from the top of
the upper diaphragm plate inside the spring.
MAINTENANCE & REPAIR PAGE E -- 15
Page 30

Gearbox
(Figure 4)
The gearbox was fully lubricated when shipped
fromthe factory. Check the oil level regularlyat the
oilcup(46),andkeep the oil cup full.Lubricate with
SAE No. 30 non-detergent when lubrication is required. Do not over-lubricate. Over-lubrication can
causethebearingstooverheat,resultinginpremature bearing failure.
Under normal conditions, change the oilaftereach
5000 hours of operation, or at 12 month intervals,
whichever occurs first. Change the oil more frequently if the pump if operated continuously or installed in a dirty or humid environment with rapid
temperature change.
DSERIESOM--01505
Monitor the condition of the bearing lubricantregularly for evidence of rust ormoisture condensation. This is especially important in areas where variable hot and
cold temperatures are common.
When lubricating a dry (or overhauled) gearbox,
add one ounce of ‘Molykote M Gear Guard’ and
‘top off’ with clean oil.
Forcold w eather operation,consultthefactoryora
lubricant supplier for the recommended grade of
oil.
Motor
Refer to the motor manufacturer’ s recommendations or contact your local motor representative.
MAINTENANCE & REPAIRPAGE E -- 16
Page 31

For U.S. and International Warranty Information,
Please Visit www.grpumps.com/warranty
or call:
U.S.: 419−755−1280
International: +1−419−755−1352
For Canadian Warranty Information,
Please Visit www.grcanada.com/warranty
or call:
519−631−2870
THE GORMAN-RUPP COMPANY D MANSFIELD, OHIO
GORMAN-RUPP OF CANADA LIMITED D ST. THOMAS, ONTARIO, CANADA
 Loading...