

1
World’s Most Versatile Home Gym
View Newest Owner’s Manual: https://gorilla-gym.com/owners-manual/
Assembly Instructions Video: http://gorilla-gym.com/gorilla-gym-assembly-video/
Installation Videos: http://gorilla-gym.com/how-it-works/installation-video/
https://gorilla-gym.com/how-it-works/videos/
PLEASE CONTACT US DIRECTLY WITH ANY
QUESTIONS OR CONCERNS!
Please don’t contact Amazon.com, or a web or
retail merchant; you’ll get much faster and better
results from us—after all, it’s our product!
Contact Gorilla Gym directly:
(617)-444-9438 or Service@Gorilla-Gym.com

2
Contents
Important Safety Information
Equipment Warning Label
Parts List
Assembly Instructions
Installation
To ensure safe operation, please review this Owner’s Manual before using your
Gorilla Gym. Save this instruction manual for as long as you own this product.
Include this instruction manual when giving or reselling this product to others. Use
this instruction manual if you need to contact the manufacturer for any reason.
Distributed by Velex Corporation, 1151 Massachusetts Avenue, Cambridge, MA. 02138 USA.
Gorilla Gym. Copyright 2015.
PLEASE CONTACT US DIRECTLY WITH ANY QUESTIONS OR CONCERNS!
Please don’t contact Amazon.com, or a web or retail merchant; you’ll get much faster and
better results from us—after all, it’s our product!
Contact us directly: +1-617-444-9438 or Service@Gorilla-Gym.com

3
Important Safety Information
Check with your physician before beginning any fitness training, including Gorilla Gym. Serious
injury or death can result from improper use of fitness devices. Follow all warnings and
instructions, including those in the instruction manual.
To minimize risk of death or serious injury, observe the following precautions for all modes of
Gorilla Gym use:
• Follow all instructions given in this manual, and insist that others follow them as well. Do not
alter Gorilla Gym, substitute parts, or use Gorilla Gym for any purpose or in any matter other than
as described in this manual.
• Do not use more than one accessory at a time. Use only Gorilla Gym accessories. Gorilla Gym
is not tested to work with third-party accessories.
• Gorilla Gym is intended for home use only. Do not use Gorilla Gym in public gymnasiums, health
clubs, hotels, or any other non-residential environment.
• Gorilla Gym is intended for indoor use only. Avoid extreme temperatures or conditions that could
weaken or compromise Gorilla Gym’s installation or usage.
• Consult your physician before beginning any exercise program.
• Do not install or use Gorilla Gym without the safety shim installed and wedged between your
door frame and the fitness plastic bar.
• Do not allow more than one person to use Gorilla Gym, or any of its accessories, at the same
time
• Children should always be supervised by an adult when using Gorilla Gym
• Every time before starting your exercise or swinging program, have an adult check the Gorilla
Gym platform and mounted door frame for parts that might be loose, damaged, or worn.
Specifically examine the door frame. If any such problems are found, do not use this equipment.
• Reduce your risk of injury by exercising safely with attention to proper techniques and practices
• Observe the weight limits provided in this manual for Gorilla Gym and each accessory. Different
accessories have different weight limits. Do not overload Gorilla Gym or its accessories with
weight beyond the specified amount.
• To avoid property damage, do not over-tighten the vice grip attachments on Gorilla Gym.
• Ask your physician about performing stretching exercises before and after each workout to
prevent muscle injury.
• Before use, review warning labels placed on Gorilla Gym vice grip and its components.
Go to www.gorilla-gym.com or e-mail us at service@gorilla-gym.com should you have questions
about the safety information or if you need a replacement user manual.
4
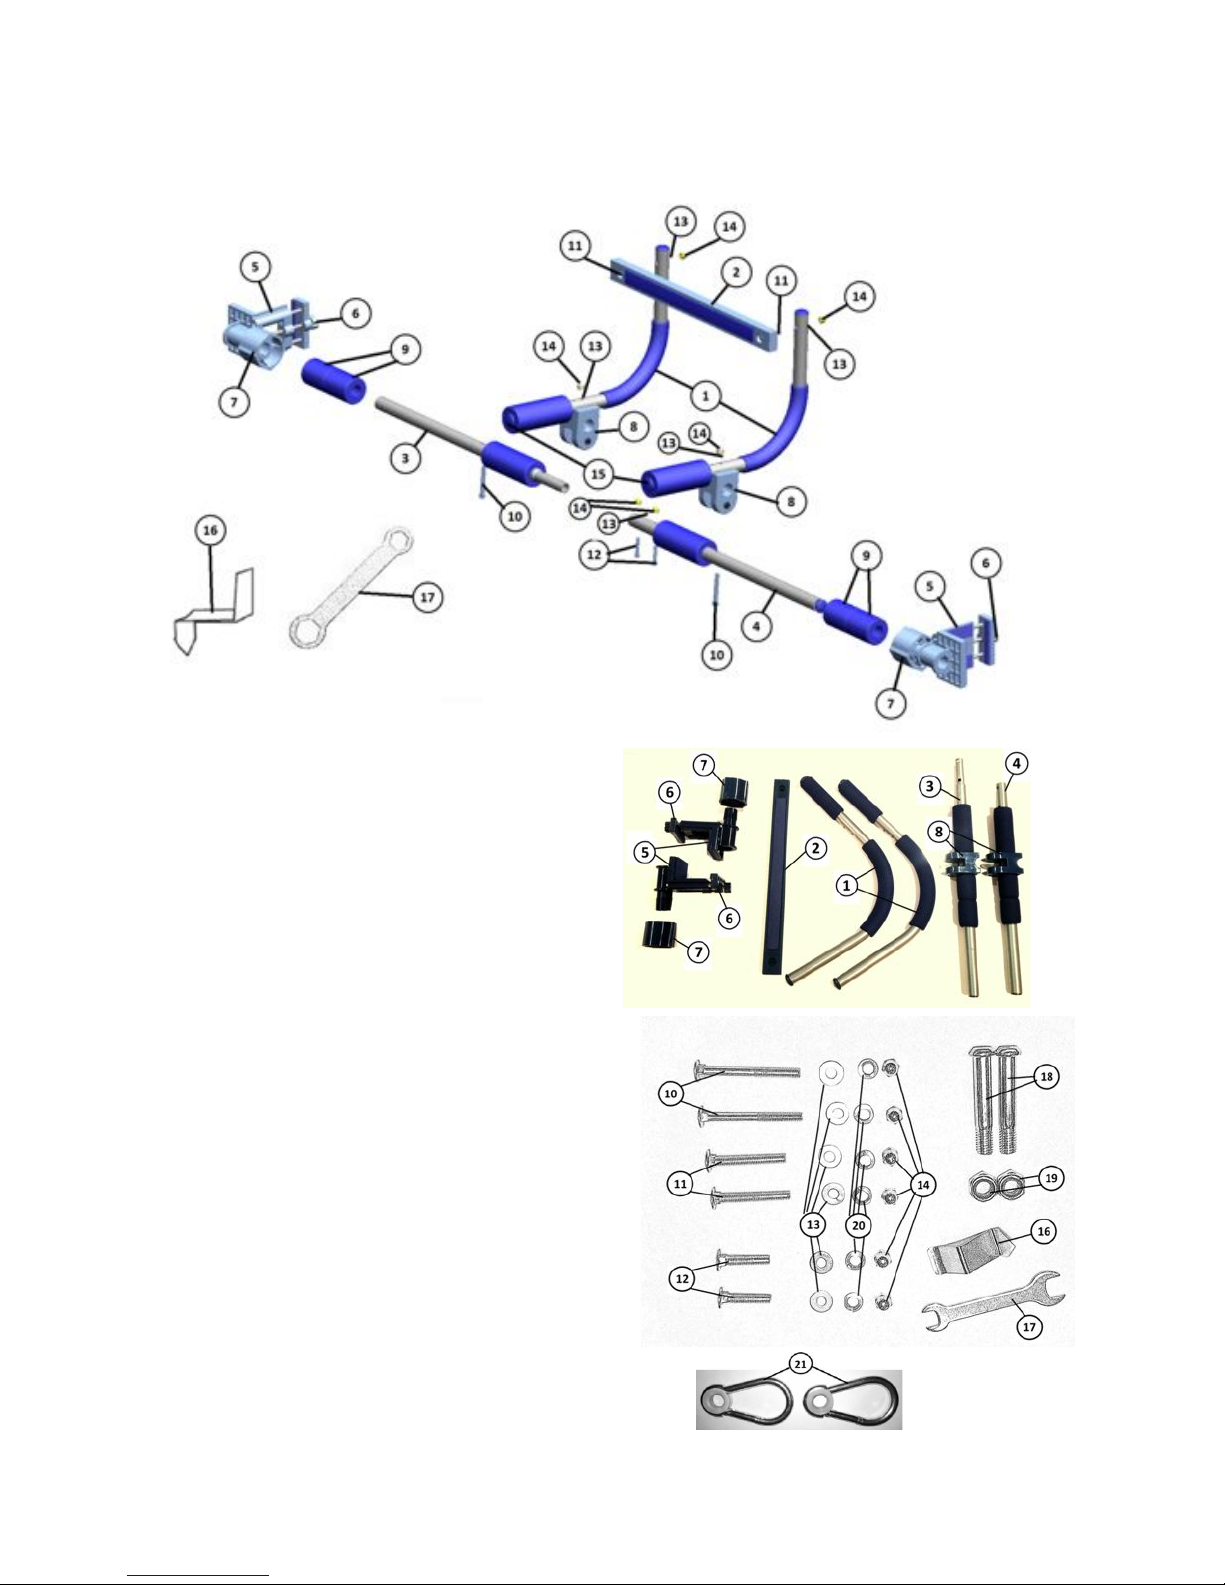
Parts List
1. Curved Handle Bars (qty 2)
2. Horizontal Plastic Bar (qty 1)
3. Main Support Bar (Left Half)
4. Main Support Bar (Right Half)
5. Gorilla Gym Vice-Grip (qty 2)
6. Vice-Grip Adjuster (qty 2)
7. Vice-Grip Tightener (qty 2)
8. Stabilizer (qty 2)
9. Removable Short Padded Grips (qty 4)
10. Long Bolts (qty 2)
11. Medium Bolts (qty 2)
12. Short bolts (qty 2)
13. Washers (qty 6)
14. Locking Nut (qty 6)
15. End Caps (qty 2)
16. Safety Shim
17. Assembly wrench - open or closed version
18. Medium Thick Bolt (qty 2)
19. Nut with Rubberized Threading (qty 2)
20. Locking washers* (qty 6)
21. (Kids Package only) Silent carabiners (qty 2)
* Some units include 4 bent washers that
conform to the curved bar instead of locking
or flat washers. All types work equally well.
5
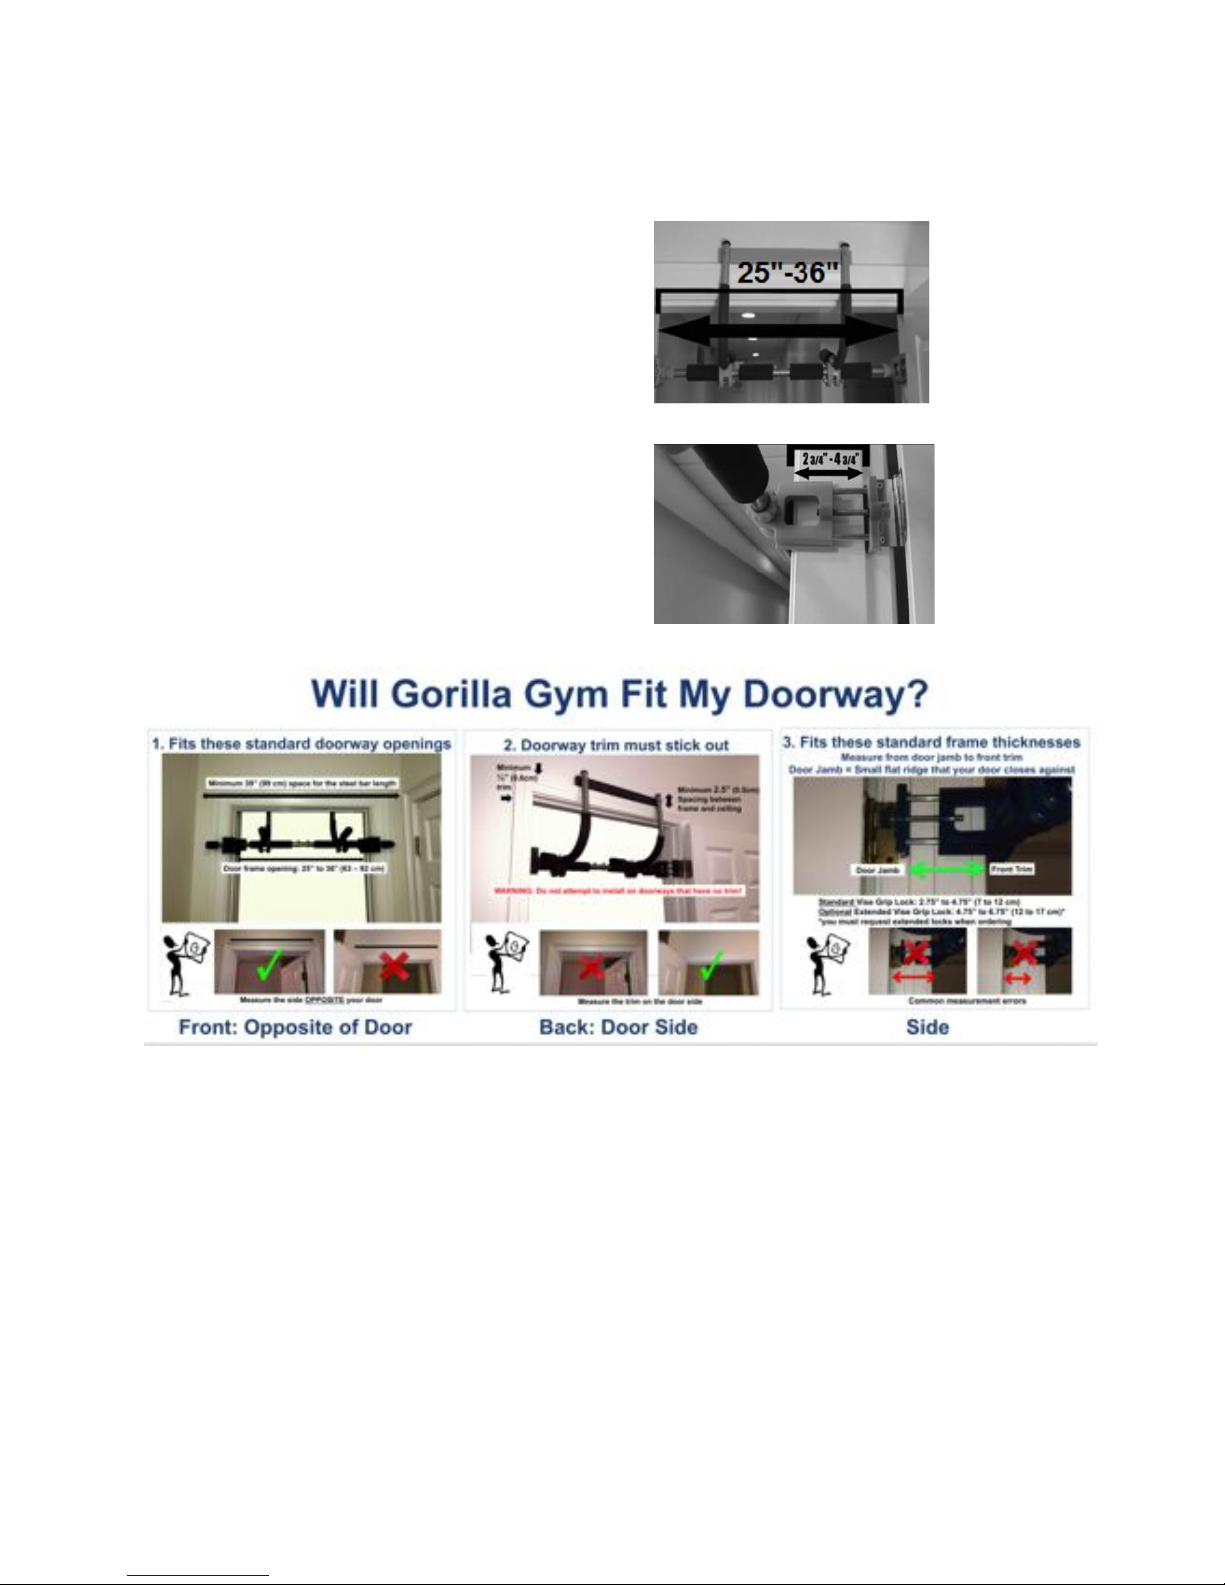
Specifications
• Fits standard door frames: 25” to 36” wide
• Door trim width (see picture): 2 ¾ - 4 ¾ inch*
* Use the extended vise grip locks (sold separately)
for doorways with door trim width: 4 ¾ - 6 ¾ inch
*Door trim width is measured from the Door Jamb
(ridge where your door closes against) to the front of
your front trim).
• Maximum supported weight (Gorilla Gym): 300 lbs
• Maximum supported weight for attachments:
o Pull-up extender: 240lbs
o Ab straps: 200lbs
o Fight station: 80lbs
o Swing: 200lbs
o Toddler swing: 30lbs
o Swing deluxe: 30lbs

6
Assembly Instructions
CAUTION: Carefully read and understand all of the following directions for proper installation
before you begin.
Watch the assembly instructions video: http://gorilla-gym.com/gorilla-gym-assembly-video/
Tighten nuts and bolts with the enclosed assembly wrench
1) Attach the two Main Support Bar halves (3 and 4) together with the two Short Bolts (12),
washers (13), and nuts (14).
Note: Use of the locking washers here is optional
Match the head (square base) of the
bolt with the square opening.
Note: When assembled, the two screws
connecting the horizontal bar will be off
center.

7
2) Attach the two curved bars to the
horizontal plastic bar using the medium
bolts (11), washers (13), locking
washers* (20), and nuts (14). Don’t
over-tighten because it is just plastic.
Make sure the head (square base) of
each bolt goes on the padded side of
the plastic bar.
3) Connect the two curved bars (1) to
the Main Support Bar using the Long
Bolts (12). The curved bars (1) should
be nested in the plastic stabilizers (8) on
the main support bar (3,4).
Use the Long Bolts (12) to connect all three
of these surfaces together with the head
square base of the bolt threaded through
underneath so the square hole matches
with the square base of the bolt. Then use
the washers (13), nuts (14), and locking
nuts (20) to finish the attachment
connection at the top. When finished, all the
nuts/washer end points should be facing
upward.
Note: You must match the head (square
base) of the Long Bolts (12) to the square
openings on the main support bar to ensure
proper fit.

8
4) Connect each Vice-Grip (5) with the
shallower end of the tightener (7) turning
onto the threads of each Vice-Grip. The
deeper end of the tightener should be on
the outside.
Note: Make sure you double check that the
deeper end of the tightener is on the outside
and the shallower end is on the inside.
5) Slide the Vise-Grips (5) onto each end of
the long horizontal bar (3 + 4) so that the
bar tightener (7) is on the inside.
Note: You can place the removable padded
grips (9) either inside or outside the ViceGrips depending on your door frame width.
6) Put the thick bolts (18) through the
stabilizers (8) with the nut with rubberized
threading (19) on the inside part. Handtightening the nut is enough and a little
extra space on the thick bolt is okay. Since
the nut features rubberized thread, there is
no need to use a wrench to over-tighten.
7) Once you have assembled your Gorilla Gym, make sure all the nuts and bolts have been
securely fastened with the enclosed assembly wrench, tighten wherever necessary.
Installation
(watch the installation demo video: http://gorilla-gym.com/how-it-works/installation-video/)

9
Gorilla Gym attaches and removes from most standard door frames in seconds but make sure
your door frame and the moldings around it are safe, secure, and solid. If you see any breaks or
weakness in the frame or surrounding moldings, your Gorilla Gym should not be used as serious
injury may result. Once you are sure that the doorway you chose has the correct door moldings
around it, you are ready to install.
1) Place the ‘Safety Shim’ (16) with the sharp
end behind the middle door frame molding on
the same side as the door hinge. Make sure it
is inserted and secure behind the molding.
Note: In some occasions, the space between
the wall and the door trim may be painted over
so you won’t be able to slide in the safety
shim. In this case, you can press down the
safety shim and the sharp tip will penetrate the
paint or you can choose to install Gorilla Gym
without the safety shim. The Safety Shim helps
keep the Gorilla Gym in place while you
secure the Vice-Grips on the sides of the
doorway moldings. (See figure A).If installed
correctly, Gorilla Gym is safe to use without
the safety shim with most attachments. You
must install the safety shim when using the
Speed Bag.
2) Place the bottom of the Gorilla Gym’s
plastic bar (2) into the grasp of the Safety
Shim while moving the Gorilla Gym to rest
onto the top of the door frame. (See fig. B).
This allows the long horizontal bar (3 + 4) to
rest momentarily on the outside of the doorway
trim with the Vice-Grips (5) hanging in
between.
Note: The horizontal bar must be installed on
the opposite side of the door (see figure C).
Figure A
Figure B
Figure C

10
3) Make sure Vice-grips (5) are open wide
enough (unscrew the adjuster if needed to open
the vise grips wider). Next guide the open ViceGrips on both sides to fully slide flush against the
interior door molding trim (See figure D).
First on one side, make sure the Vice grips align
with the interior doorway trim.
Remember: The vise grips only need to attach
from door jamb (little ridge your door closes
against) to outer trim NOT from outer trim to
outer trim
Tighten the Vice-Grips with the Adjuster (6) until
contact is tight with the interior doorway trim.
Repeat with the other Vise-Grip on the other side
of doorway. (See Figure E). DO NOT
OVERTIGHTEN with the Adjusters (6) as this
might damage your interior doorway trim.
After both vise-grips are secured on each side,
tighten each vise grip with the Tightener (7) to
secure their position on the long horizontal bar.
(See figure F).
Note: IT IS IMPORTANT that you tighten each
Vise-Grip so no side-to-side movement by the
Vice-Grips is possible.
CHECK: Hold and shake the Gorilla Gym for any
evidence of loose movement and to make sure
the unit is securely installed into the door frame. If
it is loose, recheck your steps and make sure
Vise-grips are correctly aligned and tighten with
the adjustor and tightener.
Figure G shows how Gorilla Gym should be
mounted properly.
There, you are done! It takes 10 minutes to
assemble the Gorilla Gym and seconds to install.
Figure G
Figure D
Figure E
Figure F

11
Congratulations on purchasing the Gorilla Gym! Get fit and have fun in the comfort and
convenience of your own home. Install the Gorilla Gym Family Fitness Hub in your own doorway
in seconds without tools or drilling. Our patented Vice-Grips add stability to allow you to perform a
wider variety of exercises with a larger range of motions such as pull-ups, chin-ups, swinging arm,
ab, and shoulder exercises. Add multiple attachments for additional exercises and activities for
men, women, and children such as boxing, yoga, and swinging. Gorilla Gym is an affordable,
compact multi-function home gym designed for busy people who don’t want to fill up their home
with expensive single-function exercise equipment. Compact, lightweight, professional quality
steel frame supports up to 300 pounds (weight limits vary for optional attachments). Gorilla Gym
provides something for everyone in the family.
Gorilla Gym Attachments (sold separately)
Pullup Extender
The Pullup Extender allows additional space
away from the door plane for taller people and
allows for a wider variety of pull-ups and hand
positions.
Assembly
Connect each half of the extender bars with the
2 sets of nuts, bolts, and washers. (See Figure
H)
Installation (see demo video)
http://gorilla-gym.com/pullup-extender-installation/
Remove the plastic pipe end caps of the Gorilla
Gym’s curved pipes. Align and attach the two
connector pipes into the ends of the curved
Figure H
Figure I

12
Gorilla Gym pipes until the locking metal
buttons snap into place (see fig. I).
Note: Check to see that all connections are solid and that nuts, bolts, washers etc. have been
tightened properly. Check to see that the connections are solid by holding, pulling, and swaying
the connected pipes back and forth.
Ab Straps
The Ab Straps allow hang and swing for a complete core workout
Assembly and use
The Ab Straps are hung over the curved handle bars (figure J). To use, insert your arms in the ab
straps with your upper arm (just above the elbow) resting on the ab straps while you hold tightly
the curved bars handles (see figure K).
Figure J Figure K
Air Straps
(see how to attach: http://gorilla-gym.com/airstraps-installation/)
Air Straps allows for an anti-gravity workout
that engages all 11 of your muscle groups.
They attach right onto the stabilizers with a
simple snap of the carbineer. Simply attach
the short straps to the carabiner of the long
strap. Then clip the carabiner to the thick
bolts on the stabilizers. Next, you can adjust
to your desired arm and foot length by
pulling on the loose ends of the straps.
Just adjust to your desired arm and foot lengths, put your hands and feet through our patented
straps. You will be airborne and able to perform multiple non-impact exercises that engage all
muscle groups. Use extreme caution when doing these cardio intensive exercises and make sure
your doctor has approved such cardio exercises.

13
Fight Station Attachment
Designed to hold a 50+ pound (20 kg)
boxing heavy bag as well as a speed bag
assembly.
Installation
demo video:
http://gorilla-gym.com/fight-station-installation/
Remove the pipe end caps of the Gorilla
Gym’s curved pipes. Align and attach the
Fight Station Attachment pipes into the
ends of the curved Gorilla Gym pipes until
the locking metal buttons snap into place.
(See Figure M)
Check to see that the connections are solid
by holding, pulling, and swaying the
connected pipes back and forth.
Attach the heavy bag with a carabiner to the
hook at the tip of the fight station (see figure
N).
Figure L: Fight Station attachment
Figure M Figure N below
Figure N

14
NOTE: Ensure that the vise grips tighteners
(7) are tightened all the way (see figure F)
Optional Silent Carabiner Installation (Kids Package Only):
2 Silent Carabiners are included with most
Kids Packages to facilitate quick swaps of
the different kids attachment (swing, ladder,
rings, trapeze). Each carabiner is fitted with a
nylon silencer to minimize noise when using
the attachments.
To install, you need to remove the nuts and
bolts on each stabilizer and thread the each
carabiner through the stabilizer bolts.
Hand-tighten each rubberized nut (you do
not need to use tools)
Kids attachments can be snapped on or off
the carabiner.

15
Swing
Figure O: Swing
Assembly
The swing is attached by passing the swing
rope through the stability blocks (8) and is
secured with the tightening pins/bolts
(13,14). See figure R.
(watch the installation demo video:
http://gorilla-gym.com/swing-installation/)
(see how to adjust the swing height:
http://gorilla-gym.com/swing-height-adjustment/)
(Attach to the optional silent carabiners)
If you have purchased the kids package,
you may also attach the swing by snapping
the rope to the silent carabiners (see
installation instructions above)
http://gorilla-gym.com/silent-carabiners-use/
Figure R

16
Trapeze
The trapeze attaches right onto the
stabilizers by taking out the thick bolt and
putting in the rope in place then putting the
thick bolt & nut back in place. Kids can
practice gymnastics or just hang and swing
with their arms.
Please follow the instructions below before
assembling the trapeze for the first time:
Extend both rope straps
Pinch the rope with one hand
Thread the pinched rope through the
metal latch
Close the steel latch separator
Repeat for the other rope strap

17
Attach to stabilizers through loops created by
the latch
You need to remove the nuts and bolts on
each stabilizer and thread the rope loops for
each trapeze through the bolts.
Hand-tighten each rubberized nut (you do
not need to use tools)
Rope
(Installation demo: http://gorilla-gym.com/rope-installation/)
Simply swing the side of the rope with the
carabiner side over the main horizontal bar
and then pinch the rope with the carabiner
thus securing the rope. Test the connection
and your child is ready to practice climbing,
swinging, and playing jungle indoors.
Rings
The rings attach right onto the stabilizers by
taking out the thick bolt and putting in the
rope in place then putting the thick bolt &
nut back in place. Your kids are ready to
start with some fun gymnastics.
(Attach to the optional silent carabiners)
If you have purchased the kids package, you may also attach the trapeze by snapping the
rope loops to the silent carabiners (see installation instructions above)
(Installation demo: http://gorilla-gym.com/trapeze-installation/)
(Attach to the optional silent carabiners)
If you have purchased the kids package, you
may also attach the rings by snapping the
rope loops to the silent carabiners (see
installation instructions above)

18
Ladder
(installation video: http://gorilla-gym.com/ladder-installation/)
The ladder attaches right onto the
stabilizers by taking out the thick bolt and
putting in the rope in place then putting the
thick bolt & nut back in place. Now your kids
are ready to climb around and have fun
indoors.
(Attach to the optional silent carabiners)
If you have purchased the kids package, you may also attach the ladder by snapping the
rope to the silent carabiners (see installation instructions above)
(installation video: http://gorilla-gym.com/ladder-carabiners-installation/)

19
Yoga Swing
(watch the installation demo video: http://gorilla-gym.com/yoga-swing-installation/)
The Yoga Swing consists of 3 separate pieces:
- Yoga Swing Straps with 3 different lengths (2 sets). Each sets is attached to a carabiner
- Body Hammock (each of the 2 ends has a carabiner
1. Attach the Yoga Swing Straps by snapping the carabiner to the thick bolts on the
stabilizers.
2. Attach the Body Hammock by snapping the carabiners on the thick bolts on the stabilizers
next to the carabiners for the Yoga Swing Straps.
Other Gorilla Gym Attachments
Refer to the specific installation instructions enclosed with attachment.

20
PLEASE CONTACT US DIRECTLY WITH ANY QUESTIONS OR CONCERNS!
Please don’t contact Amazon.com, or a web or retail merchant; you’ll get much faster and
better results from us—after all, it’s our product!
Contact us directly: +1-617-444-9438 or Service@Gorilla-Gym.com
Distributed by Velex Corporation, 1151 Massachusetts Avenue, Cambridge, MA. 02138 USA.
Gorilla Gym. Copyright 2015.
Tel. 617-444-9438 www.Gorilla-Gym.com Service@Gorilla-Gym.com
 Loading...