

Option Wi-Fi
MDE-option_Wi-Fi_horloges_HANDI_LEDI-1103V1.1
HORLOGES
HANDI® / LEDI
®
MODE D’EMPLOI - PAGE 3
HANDI® / LEDI® CLOCKS
USER GUIDE - PAGE 17
FRANCAIS
2
MDE-option_Wi-Fi_horloges_HANDI_LEDI-1103V1.1
ATTENTION ! Avant de commencer l’installation de votre matériel, lisez attentivement la
section suivante qui décrit les consignes de sécurité à respecter au cours de l’installation.
L’installation électrique sur laquelle le matériel est raccordé doit être réalisée conformément
à la norme NF C 15-100 .
Cet appareil ne comporte pas d’interrupteur d’alimentation primaire : un dispositif de coupure (disjoncteur ou interrupteur sectionneur), rapidement accessible, doit être incorporé
dans l’installation de câblage. Ce dispositif doit supporter les valeurs de tension et courant
nominales indiquées sur l’appareil.
En Europe : dans le cadre de la protection des individus et de l'environnement, il vous incombe de vous débarrasser de cet équipement dans un site de collecte prévu à cet effet
(séparément des ordures ménagères). Pour de plus amples informations, contactez votre
revendeur, votre site de collecte ou les autorités locales compétentes.
Toute modication ou ouverture du produit sans l’accord du SAV entraîne la perte de la
garantie.
Toute opération de maintenance doit être effectuée hors-tension, y compris pour les systèmes reliés aux éventuelles sorties sur relais.
D’une façon générale, les câbles de puissance (alimentation 220V) et de signaux (information horaire) ne doivent pas être trop proches les uns des autres, pour éviter toute perturbation. (garder quelques centimètres de distance)
Gorgy Timing décline toute responsabilité en cas d’accidents ou de dommages provoqués
par une mauvaise utilisation du produit.
Les produits GORGY TIMING sont conformes aux normes : CE, EN 60950, EN 55022,
EN 50024.
Consignes de sécurité importantes
MDE-option_Wi-Fi_horloges_HANDI_LEDI-1103V1.1
3
Danger général – Si les instructions ne sont pas suivies, il y a un risque de dommages aux
équipements.
Danger électrique – Si les instructions ne sont pas suivies, il y a un risque d’électrocution et
de dommages corporels.
Appareil entièrement protégé par une double isolation
Avertissements
Suivez les précautions et instructions indiquées ci-dessous an de garantir votre sécurité ainsi que celle
de votre environnement et de prévenir votre appareil de tout dommage éventuel.
AVERTISSEMENT : Un sectionneur conforme à la norme EN60947 sert de dispositif de
sectionnement. Il doit être aisément accessible et installé à proximité de l’alimentation. Il doit
déconnecter tous les pôles actifs
L’utilisation du PRODUIT est destinée uniquement en intérieur, à une altitude inférieure à
2000 mètres.
Élimination des déchets par les utilisateurs dans les ménages privés au sein
de l'Union Européenne
Ce symbole sur le produit ou sur son emballage indique que ce produit ne doit pas être
jeté avec vos autres ordures ménagères. Au lieu de cela, il est de votre responsabilité de
vous débarrasser de vos déchets en les apportant à un point de collecte désigné pour le
recyclage des appareils électriques et électroniques. La collecte et le recyclage séparés de
vos déchets au moment de l'élimination contribuera à conserver les ressources naturelles et
à garantir un recyclage respectueux de l'environnement et de la santé humaine. Pour plus
d'informations sur le centre de recyclage le plus proche de votre domicile, contactez la mairie
la plus proche, le service d'élimination des ordures ménagères ou le magasin où vous avez
acheté le produit.
Caractéristiques techniques
Alimentation (si prise secteur)
Tension 230Vac
Fréquence 50-60Hz
Courant 0,1 A Max
Condition de fonctionnement
Température max d’utilisation 40°C
Hygrométrie (non condensée) 90 %
Le produit contient une batterie lithium, non remplaçable.
EXPLICATION DES SYMBOLES PRÉSENTS SUR LE PRODUIT
FRANCAIS
4
MDE-option_Wi-Fi_horloges_HANDI_LEDI-1103V1.1
1. FONCTIONNEMENT GÉNÉRAL ................................................................................... 5
2. CONFIGURA
TION AVEC TABLETTE ANDROID
+ GT NETWORK MANAGER MOBILE ............................................................................. 6
3. CONFIGURATION MANUELLE .................................................................................... 9
3.1. Connexion à l’horloge ........................................................................................................... 9
3.2. Accès à l’interface Web de l’horloge ....................................................................................11
3.3. Conguration Réseau ..........................................................................................................11
3.4. Conguration NTP .............................................................................................................. 12
3.5. Conguration Wi-Fi ............................................................................................................. 13
3.6. Option chronomètre ............................................................................................................ 14
4. FONCTIONNALITÉS AVANCÉES ............................................................................... 15
4.1. Conguration de plusieurs horloges ................................................................................... 15
4.2. Reconguration des horloges ............................................................................................. 15
4.3. Sauvegarde de la conguration (GT NETWORK MANAGER MOBILE) .......................................... 15
4.4. Conguration itinérante (GT NETWORK MANAGER MOBILE) ........................................................ 15
SOMMAIRE
MDE-option_Wi-Fi_horloges_HANDI_LEDI-1103V1.1
5
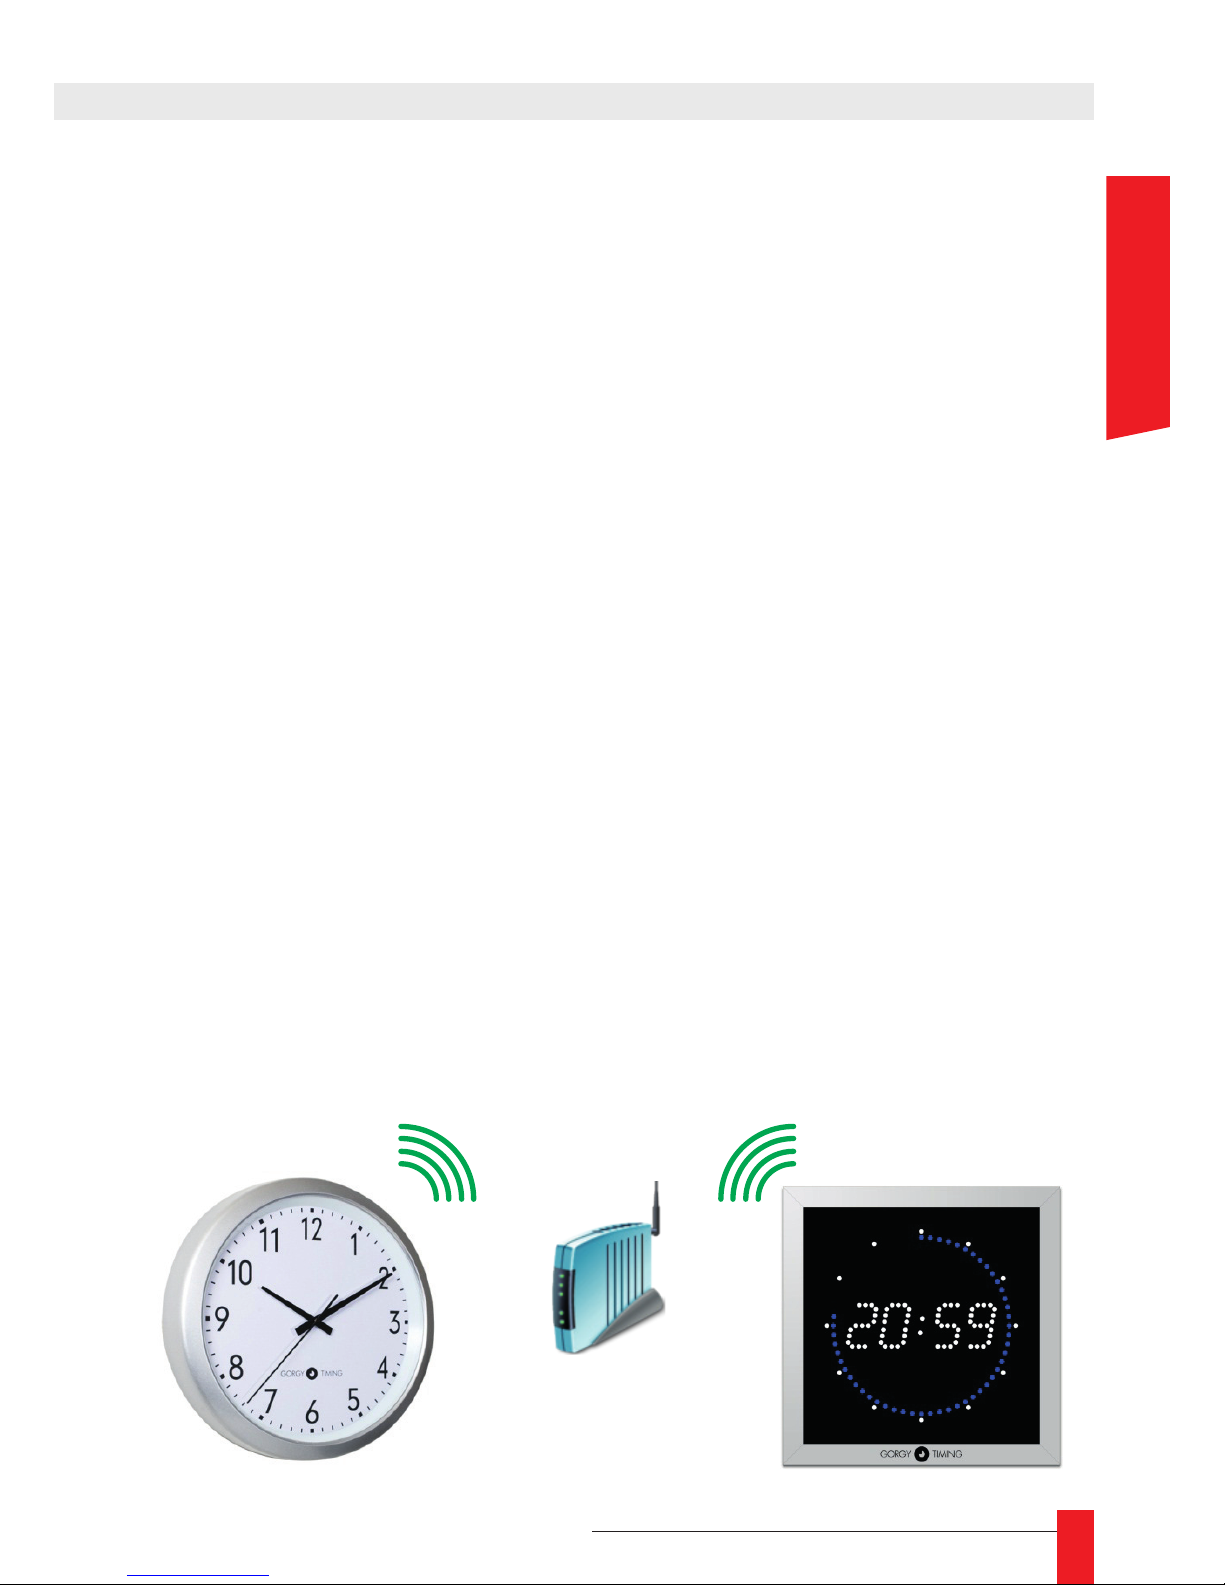
1. FONCTIONNEMENT GÉNÉRAL
Les horloges LEDI/Handi avec option Wi-Fi peuvent se connecter sur tout type de réseau
Wi-Fi existant. An de se connecter au réseau, une horloge a besoin de deux informations :
► Le SSID (nom) du réseau Wi-Fi auquel se connecter
► La clef de cryptage du réseau
Lorsqu’une horloge Wi-Fi Gorgy Timing ne parvient pas à se connecter à un réseau pour
toute raison ( Pas de conguration, réseau absent, mauvais clef de cryptage… ) celle-ci va
créer un point d’accès Wi-Fi avec les caractéristiques suivantes :
GT_TYPE_xxxxxx
Où « TYPE » est « LEDI » ou « HANDI », et « xxxxxx » le numéro de série de l’horloge.
Par exemple, une horloge LEDI que l’on vient d’alimenter après déballage ne sait pas où
se connecter. Elle va donc créer un point d’accès Wi-Fi avec ce nom :
GT_LEDI_120053
Le paramétrage de l’horloge va donc consister à lui fournir les informations de connexion
au réseau Wi-Fi en utilisant son mode point d’accès :
► Connexion au point d’accès généré par l’horloge
► Transfert de la conguration à l’horloge
► Déconnexion du point d’accès de l’horloge
Ces opérations sont détaillées dans les sections suivantes.
☛ Dans certains cas particuliers (en fonction de la commande), l’horloge
est programmée pour rester en point d’accès.
Dans ce cas là, la partie 2 ne vous concerne pas.
FRANCAIS
6
MDE-option_Wi-Fi_horloges_HANDI_LEDI-1103V1.1
2. CONFIGURATION AVEC TABLETTE ANDROID
+ GT NETWORK MANAGER MOBILE
La tablette Android avec l’application GT NETWORK MANAGER MOBILE est le moyen le
plus rapide de congurer les horloges.
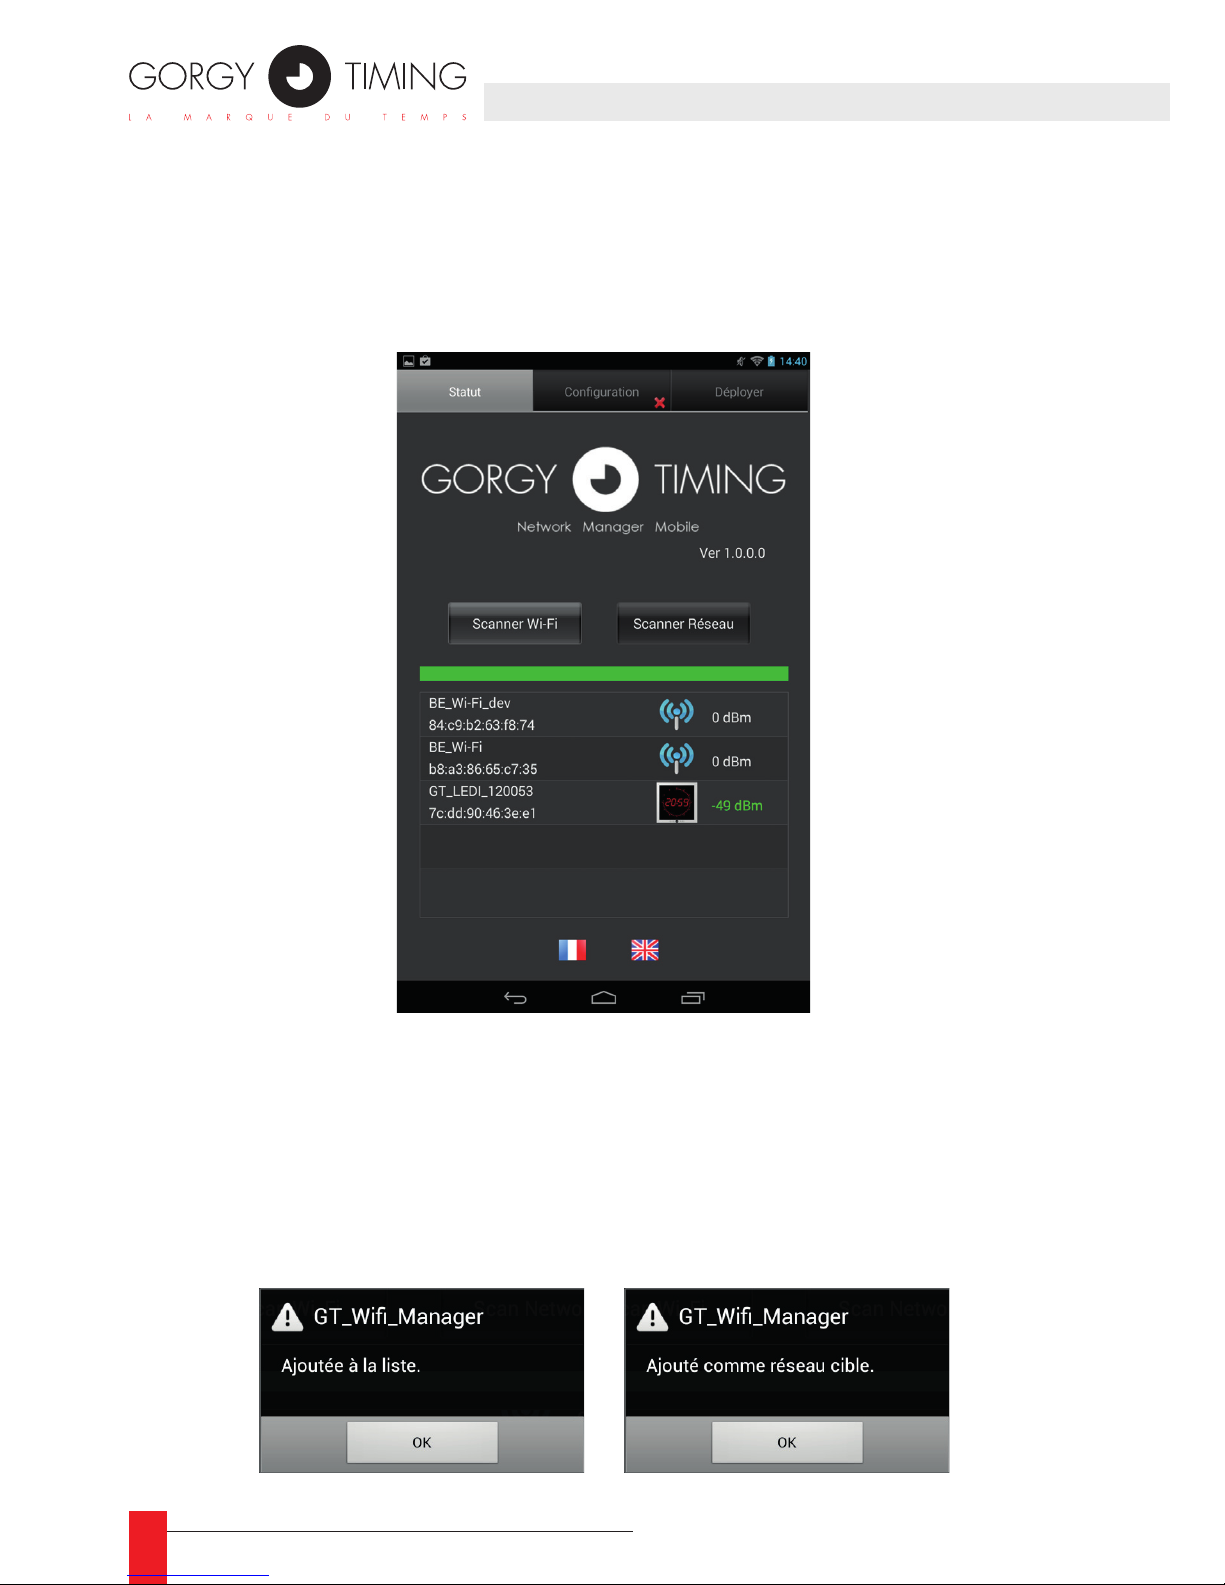
Une fois l’application démarrée, dans l’onglet « statut », un bouton « Scanner Wi-Fi »
permet de rechercher les réseaux Wi-Fi aux alentours.
Onglet Statut
Sur l’exemple ci-dessus, on peut voir une horloge LEDI dont le numéro de série est 120053,
ainsi qu’un réseau Wi-Fi.
► Pour signier à l’horloge que l’on souhaite qu’elle se connecte au réseau, il suft de cliquer
sur l’horloge (l’application comprendra qu’on souhaite la congurer), et de cliquer sur le
nom du réseau. (L’application comprendra qu’on souhaite l’utiliser comme réseau cible).
MDE-option_Wi-Fi_horloges_HANDI_LEDI-1103V1.1
7
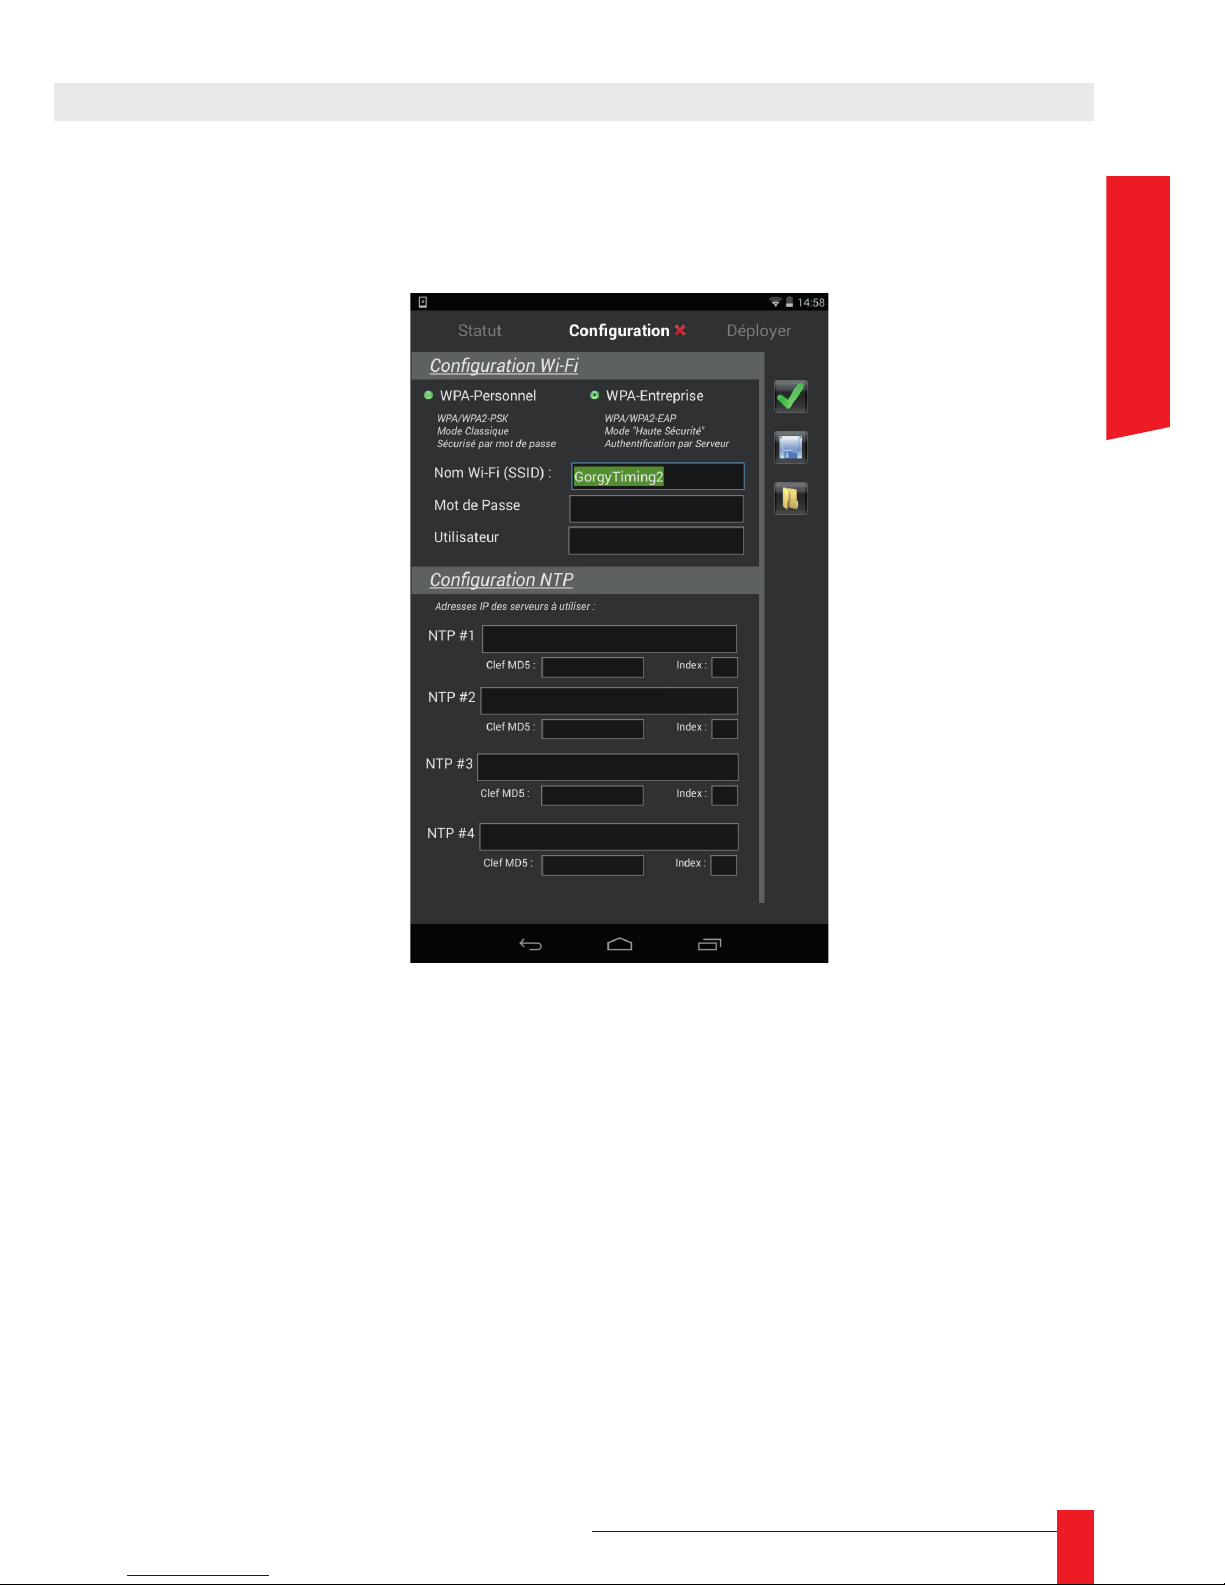
► Dans l’onglet "Conguration", il faut d’abord choisir le type de réseau (personnel
ou entreprise), puis il faut renseigner la clef de cryptage du réseau choisi, ainsi que
l’adresse IP du serveur qui sera utilisé pour la synchronisation. .
► Cliquer ensuite sur valider pour conrmer cette conguration. Un Tick vert apparaît
dans l’onglet.
FRANCAIS
8
MDE-option_Wi-Fi_horloges_HANDI_LEDI-1103V1.1
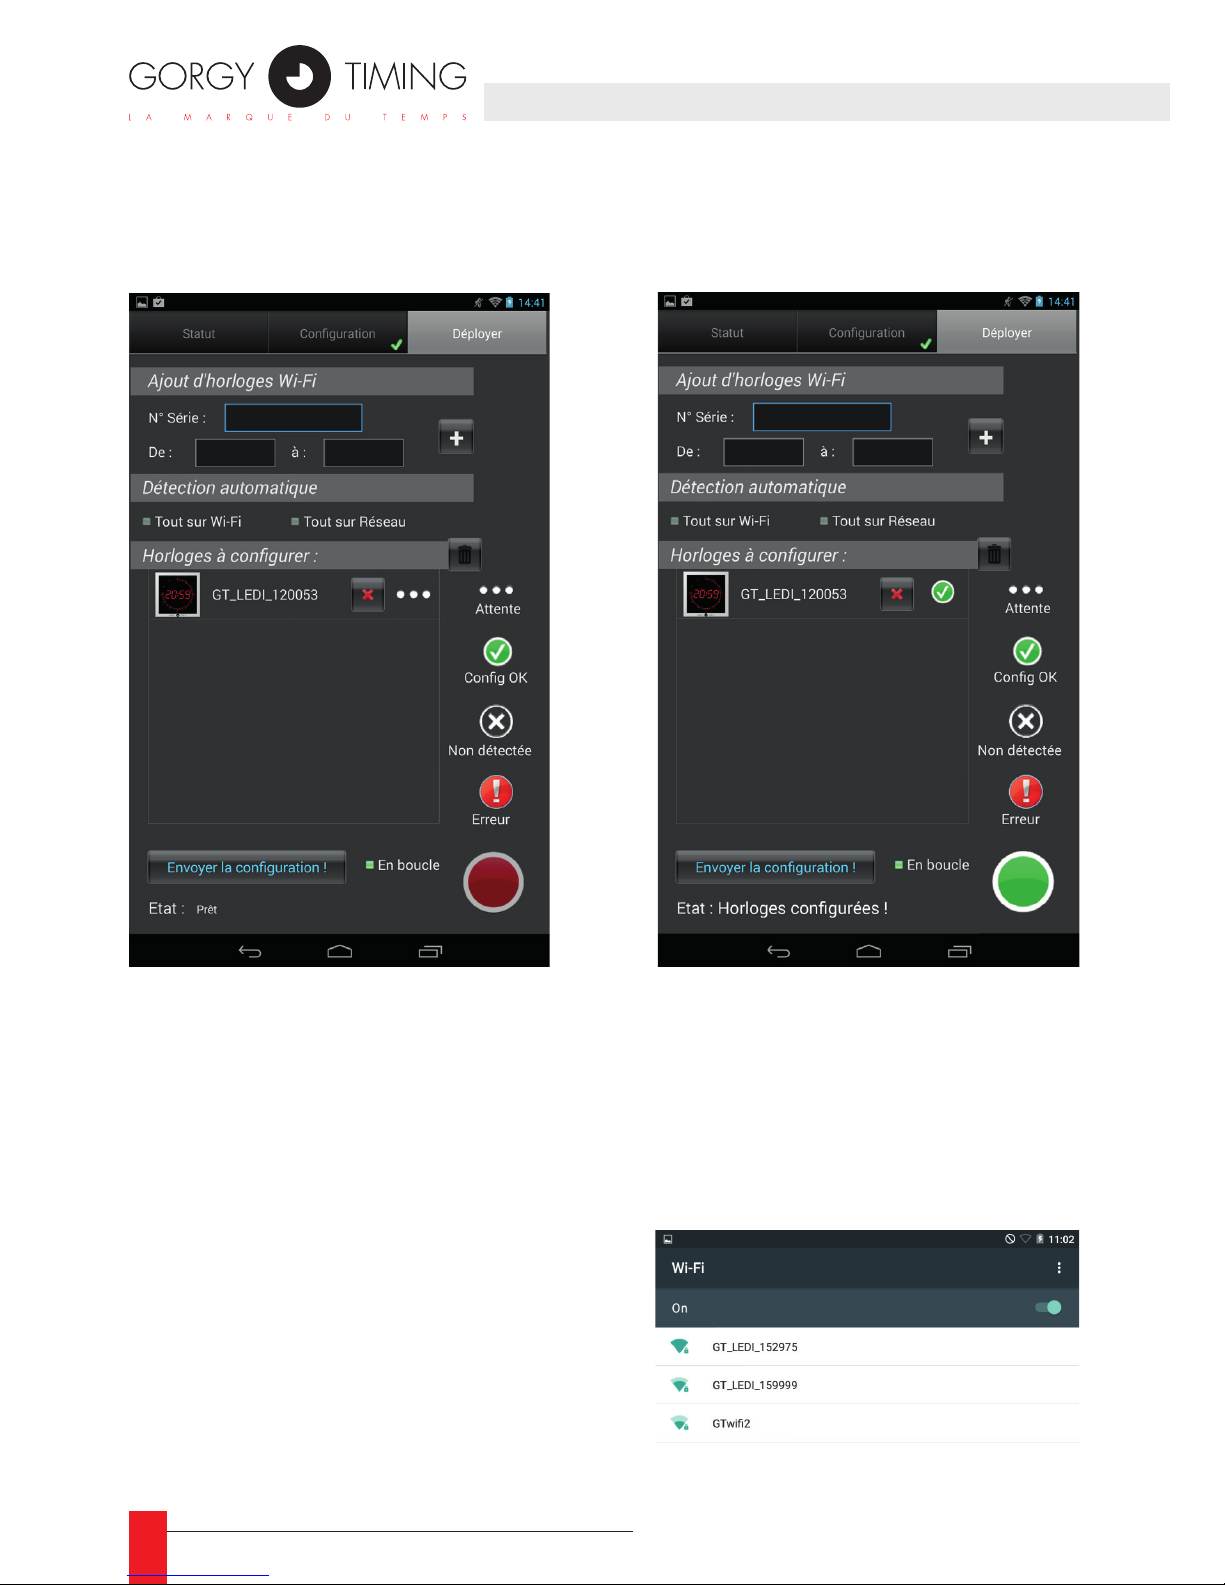
► La dernière étape consiste à déployer la conguration sur les horloges. Il suft pour cela de
se rendre dans le 3
ème
onglet « Déployer » et de cliquer sur « Envoyer la conguration ».
☛ Une fois l’horloge congurée, un signe apparait
La conguration principale est terminée, l’horloge va ensuite automatiquement essayer
de se connecter au réseau désigné. Si elle échoue, elle repassera en mode point d’accès
pour recevoir une nouvelle conguration mais toutefois, elle retentera périodiquement de
se connecter avec les paramètres fournis.
Exemple de connexion à l’horloge par une
tablette :
► Aller dans les paramètres wi de la tablette :
MDE-option_Wi-Fi_horloges_HANDI_LEDI-1103V1.1
9
3. CONFIGURATION MANUELLE
La conguration manuelle des horloges consiste à reproduire les étapes automatisées par
l’application GT Network Manager mobile .
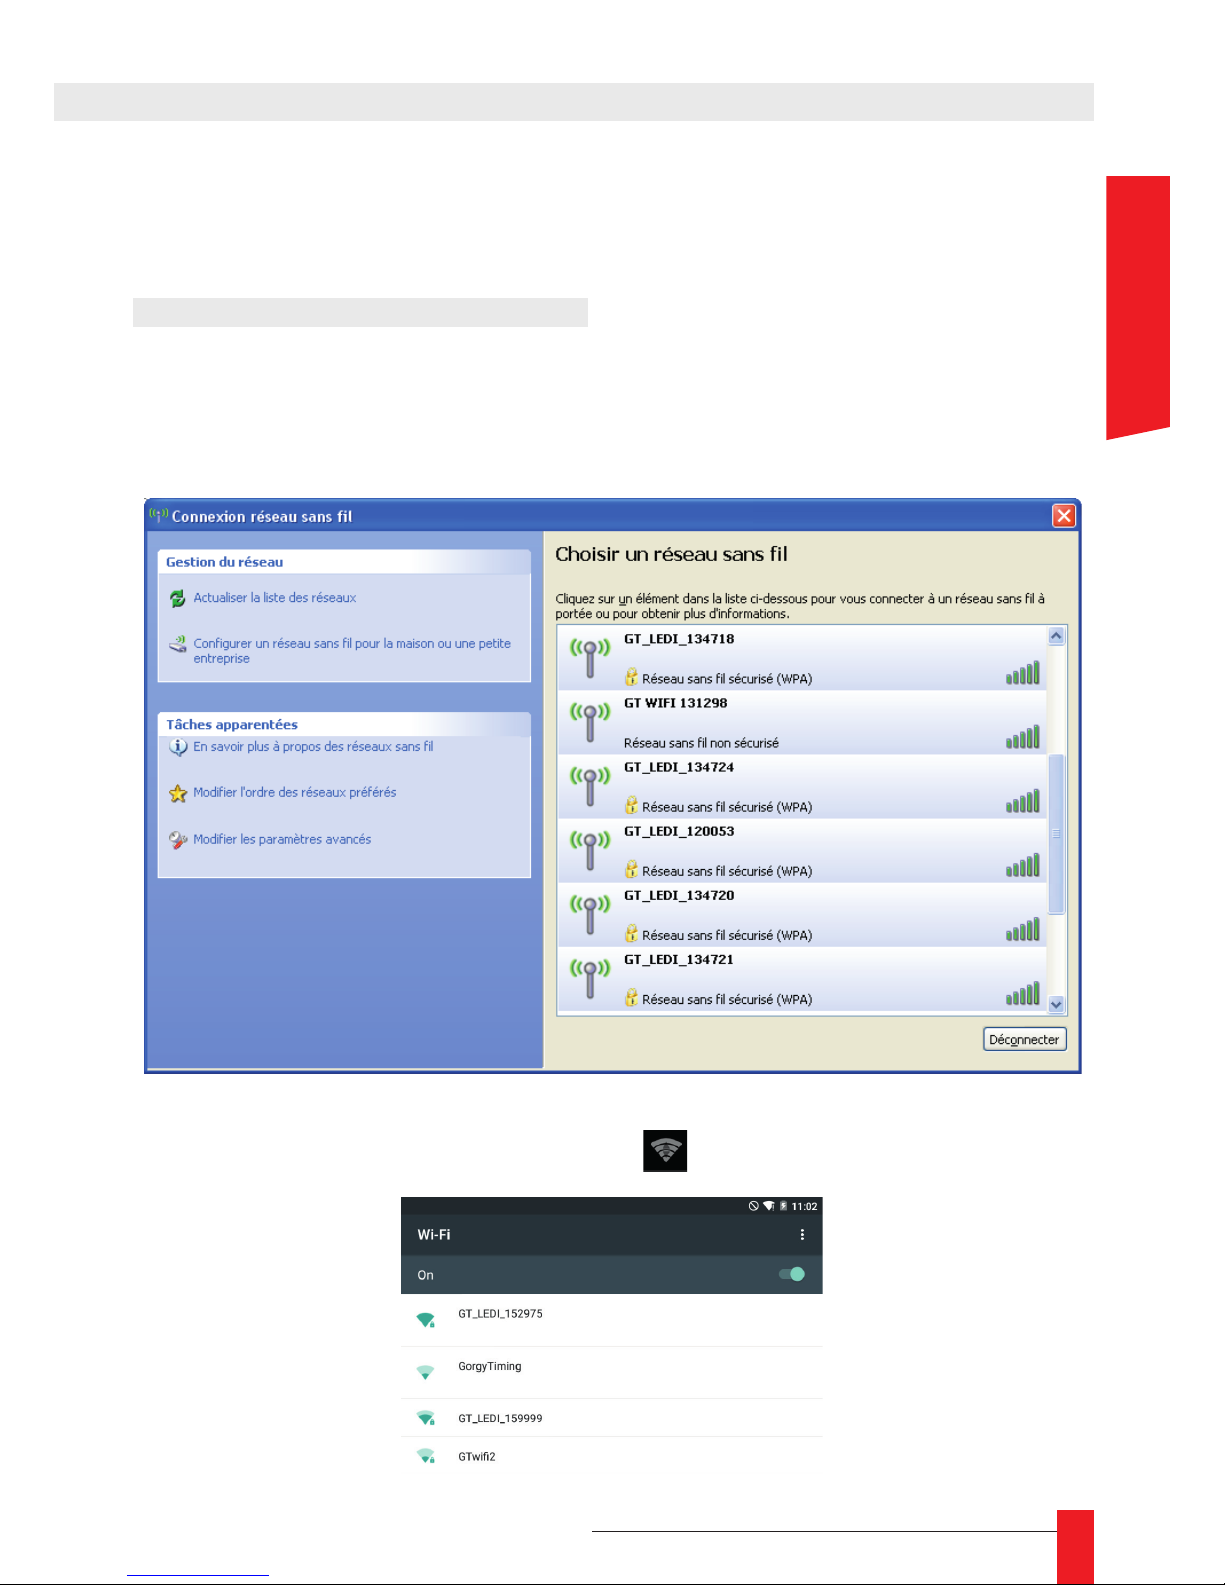
3.1. CONNEXION À L’HORLOGE
► Dans un premier temps, il faut connecter un terminal (Ordinateur portable, Smartphone,
Tablette . . ) à l’horloge.
► En utilisant les outils du système, effectuer une détection des réseaux Wi-Fi à portée.
Exemple de détection sur Microsoft Windows
► Sur la tablette cliquer sur le symbole Wi-Fi
et choisir le produit LEDI dans la liste.
FRANCAIS

10
MDE-option_Wi-Fi_horloges_HANDI_LEDI-1103V1.1
► Choisir l’horloge à congurer et utiliser la clef de cryptage fournie pour s’y connecter.
► Une fois le mot de passe validé, la tablette se connecte à l’horloge :

MDE-option_Wi-Fi_horloges_HANDI_LEDI-1103V1.1
11
3.2. ACCÈS À L’INTERFACE WEB DE L’HORLOGE
Lorsque la connexion est établie, l’horloge attribue automatiquement une adresse IP à
l’équipement connecté. Cette adresse est de la forme 192.168.2.xx .
► Pour accéder à l’interface de conguration, ouvrir un navigateur web (Internet Explo-
rer, Chrome, Firefox,...) et entrer l’adresse IP suivante : 192.168.2.1 dans la barre
d’adresse.
► Le navigateur va alors demander à l’utilisateur de s’identier. Les codes d’accès sont :
Utilisateur : root
Mot de passe : gtmt
3.3. CONFIGURATION RÉSEAU
► Pour fournir à l’horloge une conguration IP, ouvrir la page « Paramètres réseau ».
► L’horloge peut fonctionner en mode adresse IP automatique (fournie par un serveur
DHCP) ou manuelle. (Spéciée par l’utilisateur)
FRANCAIS

12
MDE-option_Wi-Fi_horloges_HANDI_LEDI-1103V1.1
3.4. CONFIGURATION NTP
► Pour indiquer à l’horloge quel serveur NTP utiliser pour la synchronisation, ouvrir la
page « Paramètres NTP ».
► Renseigner les champs, puis cliquer sur « Apply » pour valider cette conguration.

MDE-option_Wi-Fi_horloges_HANDI_LEDI-1103V1.1
13
3.5. CONFIGURATION WI-FI
► Pour indiquer à l’horloge à quel réseau Wi-Fi se connecter, ouvrir la page « paramètres
Wi-Fi » et renseigner les champs SSID (nom du réseau Wi-Fi) et Shared Key (Clef de
cryptage)
☛ Attention !
Respecter les majuscules / minuscules lors de la saisie de ces deux
champs. Une erreur empêchera l’horloge de se connecter au réseau.
Une fois cette conguration validée, l’horloge va automatiquement essayer de se connecter au réseau spécié. Le mode point d’accès est donc immédiatement coupé, et l’utilisa-
teur est déconnecté de l’horloge. (Interface Web non accessible)
Si la conguration est valide, l’horloge se connecte au réseau Wi-Fi, et l’interface Web de
conguration devient accessible en utilisant l’adresse IP de l’horloge Wi-Fi sur le réseau
Wi-Fi.
☛ Dans le cas contraire, après avoir essayé pendant 1 minute de se
connecter, l’horloge repasse en mode point d’accès pour recevoir une
nouvelle conguration.
FRANCAIS

14
MDE-option_Wi-Fi_horloges_HANDI_LEDI-1103V1.1
3.6. OPTION CHRONOMÈTRE
► Si l’horloge possède l’option chronomètre, vous pouvez congurer le chronomètre à
l’aide de la page web. La page «Stopwatch», rapporte un état instantané du chrono-
mètre et permet de le congurer.
► La section "Status" donne l'état du chronomètre à la dernière actualisation.
► La section "Conguration" rapporte l’état actuelle de la conguration du chrono (dates
et heures de départ, de n).
► La section "Controls" permet de lancer manuellement les actions de base du chronomètre.
► La section "Display Conguration" permet de choisir la façon dont le chronomètre est
afché sur le produit.
► Cette conguration peut être appliquée à tout moment, même lorsque le chronomètre
est en marche.
► Le bouton "Display/Mask stopwatch on clock(s)" est utilisé pour basculer entre
l'afchage du temps réel et l'afchage du chronomètre. Ce bouton n'a aucune incidence
sur l'état du chronomètre. En effet le chronomètre peut compter en arrière-plan, sans
être afché sur le produit.
► La section "Border Dates/Values Conguration » permet de choisir la "Valeur de départ"
et la "Valeur de n" ainsi que la "Date de début" et la "Date de n". Cette conguration
ne peut être appliquée uniquement lorsque le chronomètre est arrêté, soit après une
réinitialisation ou une n sans l'option "Continuer après la n du décompte".
► Après chaque changement, cliquer sur « Apply » pour l’appliquer.

MDE-option_Wi-Fi_horloges_HANDI_LEDI-1103V1.1
15
4. FONCTIONNALITÉS AVANCÉES
4.1. CONFIGURATION DE PLUSIEURS HORLOGES
► En utilisant la tablette + GT Network Manager mobile : il suft de cliquer sur chaque
horloge que l’on veut congurer dans la liste de l’onglet « statut ».
► Dans l’onglet « Déployer » un clic sur « Envoyer la conguration » congure auto-
matiquement toutes les horloges de la liste.
Si les horloges ne sont pas à portée, il est aussi possible d’utiliser leur numéro de
série pour les ajouter à la liste. ( voir onglet « Déployer » )
► En conguration manuelle : répéter toutes les opérations décrites en 3) pour chaque horloge.
4.2. RECONFIGURATION DES HORLOGES
► En utilisant la tablette + GT Network Manager mobile : Connecter la tablette au
même réseau Wi-Fi que les horloges, puis utiliser la fonction « scan réseau » pour
choisir les horloges à recongurer.
► En conguration manuelle : répéter toutes les opérations décrites en 3)b pour
chaque horloge.
4.3. SAUVEGARDE DE LA CONFIGURATION (GT NETWORK MANAGER MOBILE)
► Dans l’application GT Network Manager mobile , il est possible de sauvegarder les
paramètres an de les réutiliser ultérieurement. Pour ce faire, utiliser les boutons :
: Enregistrer la conguration
: Charger la conguration
4.4. CONFIGURATION ITINÉRANTE (GT NETWORK MANAGER MOBILE)
► Dans l’application GT Network Manager mobile , en cochant l’option « en boucle »
de l’onglet « déployer », la phase de conguration des horloges va se répéter
jusqu’à ce que toutes les horloges soient congurées.
Ceci permet de déployer la conguration automatiquement à l’échelle d’un bâtiment,
simplement en se déplaçant avec la tablette. Dès que les horloges sont à portée,
elles sont automatiquement congurées.
FRANCAIS

support@gorgy-timing.fr
GORGY TIMING SAS
Quartier Beauregard
38350 La Mure d'Isère (Grenoble France)
Tél: +33 4 76 30 48 20 Fax: +33 4 76 30 85 33
email: gorgy@gorgy-timing.fr - www.gorgy-timing.com
GORGY TIMING RC 74 B 38 Toutes modications d'ordre technique ou esthétique peuvent être apportées sans préavis - MDE-LEDI-option-Wi-Fi-1100V1.0
SUPPORT TECHNIQUE
depuis la France sur un poste xe :
RADIO TIMING®, LEDI®, LEDICA®, HANDI® sont des marques déposées GORGY TIMING.
Numéro de déclaration d’activité de prestataire de formation : 82 38 04877 38

17
MDE-option_Wi-Fi_horloges_HANDI_LEDI-1103V1.1
HANDI®/LEDI® CLOCKS
Option Wi-Fi
USER GUIDE
ENGLISH

18
MDE-option_Wi-Fi_horloges_HANDI_LEDI-1103V1.1
WARNING! Read the section that follows very carefully before installing your equipment. It gives the safety instructions to follow during installation.
The electrical installation to which the equipment is connected must comply with the
NF C 15-100 standard.
This device does not have a primary power switch. A power protection system (cir-
cuit-breaker or disconnecting switch), that is easy to access must be built into the
wiring installation. This device must support the nominal voltage and current values
specied on the clock.
In Europe: to comply with European regulations on the protection of persons and
the environment, you must dispose of this equipment in a collection site provided
for this purpose (separately from household waste). Contact your reseller, collection
site or the competent lcoal authorities for more information.
Modifying or opening the product without the consent of the Customer service
department will void the warranty.
All maintenance operation shall be conducted with power shut off, including systems connected on relay outputs if any.
Generally, the power cable (220V) and transmission cable (of time signal) shall not
be very close to each other, so as to avoid interference (keep the distance of a few
centimeters).
Gorgy Timing disclaims all responsibility in case of accident or damage caused by
an improper use of the product.
GORGY TIMING products are compliant with the following standards: CE, EN 60950,
EN 55022, EN 50024
IMPORTANT SAFETY INSTRUCTIONS

19
MDE-option_Wi-Fi_horloges_HANDI_LEDI-1103V1.1
Danger – risk of damage to equipment if the instructions are not followed.
Electrical Hazard – Failure to follow the instructions may result in electric shock and injury
to persons.
The equipment is completed protected through double insulation.
Warning
Follow the precautions and instructions as indicated below in order to ensure your safety and that of
your environment, and to prevent your device from any possible damage.
Warning: a Switch-Isolator compliant with EN60947 standards is used as disconnect device.
It must be easily accessible and be installed close to the power. It shall disconnect all active
polarities.
The PRODUCT is intended for use indoors only, at an altitude below 2000 meters.
Disposal of waste by users in private household in the countries of European Union.
This symbol on the product or on its packaging indicates that the product must not be
disposed into household waste. Instead, it shall be your responsibility to bring the waste to a
collecting station especially provided for recycling of electric and electronic components. The
separate collection and recycling of your waste will contribute to conserve natural resources
and to ensure a recycling that is safe, environmentally and health friendly.
Technical features
Power supply
Voltage 230Vac
Frequency 50-60Hz
Current 0,1 A Max
Operating conditions
Maximum Operating Tempature 40°C
Humidity 90 % non condensing
The product contains a non-replaceable lithium battery.
NOTICE OF SAFETY SIGNS ON THE PRODUCT
ENGLISH

20
MDE-option_Wi-Fi_horloges_HANDI_LEDI-1103V1.1
1. GENERAL DESCRIPTION .......................................................................................... 21
2. CONFIGURATION USING THE ANDROID TABLET
+ GT NETWORK MANAGER MOBILE ........................................................................... 22
3. MANUAL CONFIGURATION ....................................................................................... 25
3.1. Connection to the clock ...................................................................................................... 25
3.2. Clock Web interface ........................................................................................................... 27
3.3. Network Settings ................................................................................................................ 27
3.4. NTP Conguration .............................................................................................................. 28
3.5. Wi-Fi conguration .............................................................................................................. 29
3.6. Timer option ........................................................................................................................ 30
4. ADVANCED FEATURES ............................................................................................. 31
4.1. Conguring many clocks .................................................................................................... 31
4.2. Re-congure the clocks ...................................................................................................... 31
4.3. Saving the conguration (GT Network Manager Mobile) .................................................... 31
4.4. Roaming conguration (GT Network Manager Mobile) ...................................................... 31

21
MDE-option_Wi-Fi_horloges_HANDI_LEDI-1103V1.1
1. GENERAL DESCRIPTION
The Wi-Fi LEDI/Handi clocks are able to connect to any existing WI-Fi network. In order to
connect to a network, a clock requires two elements:
► The SSID (name) of the Network it wants to join
► The encryption key of this network
When a Gorgy Timing Wi-Fi clock fails to connect to the specied network for any reason,
(No conguration, network down, bad key...) it will create an access point with the following
characteristics:
GT_TYPE_xxxxxx
Where « TYPE » is « LEDI » or « HANDI » and « xxxxxx » is the serial number of the clock.
For instance, an out of the box LEDI clock won’t know where to connect. It will then create
an access point with this name :
GT_LEDI_120053
Setting the clock means giving to it the information it requires to connect to the Wi-Fi
network.
► Connection to the Access point generated by the clock
► Conguration is transferred to the clock
► Disconnection from the clock
These operations are detailed in the next sections .
☛ In some particular cases (according to the command), the clock is
programmed to remain in the access point. In this case, the part 2 does not
apply to you
ENGLISH

22
MDE-option_Wi-Fi_horloges_HANDI_LEDI-1103V1.1
2. CONFIGURATION
USING THE ANDROID TABLET
+ GT NETWORK MANAGER MOBILE
The Android tablet and GT Network Manager Mobile are the quickest way to congure the clocks.
Once the application is started, in the « status » tab, a « Scan Wi-Fi » button allows the user
to search for any Wi-Fi network in the area.
Status tab
On this example, we can see a LEDI clock, whose serial number is 120053 and another
Wi-Fi Network.
To tell the clock you want it to connect to the network, you just have to tap it, (The application will understand that you want to set it up) and to tap the network’s name. (The application will understand that you want to use it as a target network).

23
MDE-option_Wi-Fi_horloges_HANDI_LEDI-1103V1.1
► In the « Settings » tab, you must rst select the type of network (Personnal or enter-
prise), then you have to ll in the encryption key of the chosen network and the IP
address of the server that will be used for synchronization.
► Then, click on « validate » to conrm this conguration. A green tick will appear in the
tab.
ENGLISH

24
MDE-option_Wi-Fi_horloges_HANDI_LEDI-1103V1.1
The last step is to transfer the conguration to the clocks.
► To do this, go to the third tab (« deploy ») and tap “send the conguration”.
☛ Once the clock is congured, a green sign appears
The main conguration is done; the clock will then automatically try to connect to the specied network. Should it fail, it will switch back to access point mode to receive a new
conguration. However, it will periodically try to connect with the last sent conguration.
► Example of connection to the clock by a tablet:
Go to the wi settings of the tablet:

25
MDE-option_Wi-Fi_horloges_HANDI_LEDI-1103V1.1
3. MANUAL CONFIGURATION
The manual conguration is the succession of the steps that are automatically done with
the GT Network Manager Mobile software.
3.1. CONNECTION TO THE CLOCK
► To begin, you have to connect a Wi-Fi device to the clock.
(Laptop, smartphone, tablet ...)
► Using the system tools, detect the Wi-Fi networks, and identify which one you want to
connect to.
Detection on Microsoft Windows
► On the tablett , click on the Wi-Fi symbol
and choose the LEDI product in the list.
ENGLISH

26
MDE-option_Wi-Fi_horloges_HANDI_LEDI-1103V1.1
► Use the provided encryption key to connect to the clock.
► Once validated the password, the tablet will connect to the clock:

27
MDE-option_Wi-Fi_horloges_HANDI_LEDI-1103V1.1
3.2. CLOCK WEB INTERFACE
When the connection is established, the clock will automatically give an IP address to the
connected device. This address is 192.168.2.xx.
► To reach the conguration interface, open a web browser ( Internet Explorer, Chrome,
Firefox, . . . ) and use the following IP address : 192.168.2.1 in the address bar.
► The browser will then ask the user for authentication. The access codes are :
User : root
Password : gtmt
3.3. NETWORK SETTINGS
► To modify the clock’s IP conguration, open the « Network Settings » page.
► The clock can work in automatic IP mode (address delivered by a DHCP server) or
manual IP mode. (User specied)
ENGLISH

28
MDE-option_Wi-Fi_horloges_HANDI_LEDI-1103V1.1
3.4. NTP CONFIGURATION
► To tell which NTP server to be used for synchronization, open the « NTP Settings »
page.
► Fill in the elds and click « Apply » to save the settings.

29
MDE-option_Wi-Fi_horloges_HANDI_LEDI-1103V1.1
3.5. WI-FI CONFIGURATION
► To tell the clock which Wi-Fi network to use, open the « Wi-Fi Settings » page and ll the
“SSID” (Name of the Wi-Fi Network) and “shared Key” (Encryption key) elds.
☛ Warning! These elds are case sensitive. A mistake would prevent the
clock from connecting to the Wi-Fi network.
Once these settings are done and saved, the clock will automatically try to connect to the
specied Wi-Fi network. The Access point mode is immediately switched off and the user’s
device is disconnected from the clock. The Web interface is not reachable anymore as
long as the user has not reconnected.
If the conguration is right, the clocks connects to the Wi-Fi network and the web interface
becomes available by typing the clock’s new IP address on the Wi-Fi network.
☛ If the conguration is wrong, after trying to connect unsuccessfully
for 1 minute, the clock will revert to Access point mode to eventually get
new settings. In that situation, it will try to connect with the last submitted
settings every 5 minutes.
ENGLISH

30
MDE-option_Wi-Fi_horloges_HANDI_LEDI-1103V1.1
3.6. TIMER OPTION
► If the clock has the timer option, you can set the timer using the web page. The
"Stopwatch" page reports an instantaneous state of the Stopwatch and allows
conguring and commanding it.
► The "Status" section gives the Stopwatch state at the last refresh.
► The "Conguration" section report the validated border dates/values conguration.
Moreover, it displays the defaults and computed dates/values.
► The "Controls" section allows to manually initiate the stopwatch basic actions.
► The "Display Conguration" section allows to choose the way the stopwatch is dis-
played on the product.
► This conguration can be applied anytime, even when the stopwatch is running.
► The button "Display/Mask stopwatch on clock(s)" is used to switch between the real
time display and the stopwatch display. This button has no incidence on the state of the
stopwatch. Indeed the stopwatch can count in background without being displayed on
the product.
► The "Border Dates/Values Conguration" section allows to choose the "Start Value" and
"End Value" as well as the "Start Date" and "End Date". This conguration can only be
applied when the stopwatch is stopped, i.e. after a reset or an end without the "Continue
after end of count" option.
► After each change, click "Apply"

31
MDE-option_Wi-Fi_horloges_HANDI_LEDI-1103V1.1
4. ADVANCED FEATURES
4.1. CONFIGURING MANY CLOCKS
► Using the tablet + GT Network Manager Mobile: You just have to tap every clock you
want to congure in the list of detected clocks in the “status” tab.
► In the « Deploy tab », tap the « Send this conguration » button to automatically con-
gure all the clocks in the list. If the clocks are not within range (and so not detected),
you can also use their serial number to add them to the list. ( See the « deploy » tab )
► Without the tab (manual settings): repeat all the steps described in 3 for each clock.
4.2. RE-CONFIGURE THE CLOCKS
► Using the tablet + GT Network Manager Mobile: Connect the tablet to the same Wi-Fi
network as the clocks, and use the « Network scan » feature to add them to the list.
► Without the tab (manual settings) : repeat all the steps described in 3.2. for each clock.
4.3. SAVING THE CONFIGURATION (GT NETWORK MANAGER MOBILE)
► In the GT Network Manager Mobile application, it’s possible to save the conguration to
use it back later. Use these buttons:
: Save the conguration
: Load the saved conguration
4.4. ROAMING CONFIGURATION (GT NETWORK MANAGER MOBILE)
► In the GT Network Manager Mobile application, you can check the « loop » checkbox
in the « deploy » tab. The conguration of the clocks will repeat itself until all the clocks
on the list are congured.
This enables the user to deploy a conguration at a large scale (building), just by moving
with the tablet. As soon are the clocks are in range, they are automatically congured.
ENGLISH

32
MDE-option_Wi-Fi_horloges_HANDI_LEDI-1103V1.1
GORGY TIMING SAS
Quartier Beauregard
38350 La Mure d'Isère (Grenoble France)
Phone: +33 4 76 30 48 20 Fax: +33 4 76 30 85 33
email: gorgy@gorgy-timing.fr - www.gorgy-timing.com
RADIO TIMING®, LEDI®, LEDICA®, HANDI® are trademarks by GORGY TIMING.
Number of statement for training provider activity : 82 38 04877 38
Gorgy Timing RC74B38 - Any technical, aesthetic, color modications can be made without notice.
TECHNICAL SUPPORT
+33 476 30 48 20
support@gorgy-timing.fr
 Loading...