

Gorenje GV68260, GV64160, GFS622, GV66260, GI67260 Operating Instructions Manual
...
EN
OPERATING
INSTRUCTIONS
DISHWASHER
www.gorenje.com

Contents
2
Front panel ................................................................................................
3
Safety instructions .....................................................................................
4
Before washing for the first time ...............................................................
6
Loading the dishwasher ............................................................................
8
Using the dishwasher ................................................................................
13
Settings .....................................................................................................
16
Care and cleaning .....................................................................................
19
Troubleshooting ........................................................................................
26
Installation .................................................................................................
28
Service ......................................................................................................
29
Information for test institute .......................................................................
32
Technical information ................................................................................
Front panel
3
21 4 75 6
9
8
10 12
11
13
14
15
1 Main power switch
2 Auto wash
3 Intensive wash
4 Eco wash
5 Quick wash
6 Rinse
7 SpeedWash
8 Auto open
9 Extra hygiene
10 Delayed start
11 Display
12 Rinse aid indicator
13 Salt indicator
14 ION
15 Self-cleaning programme
2

Safety instructions
General
•
Read the operating instructions and
keep them in a safe place!
•
Never use the dishwasher for any
purpose other than that specified in
these operating instructions.
•
Do not load the dishwasher door or
dishwasher baskets with anything other
than dishes.
•
Never leave the dishwasher door open
as someone may trip on it.
•
Use only dishwasher detergent!
•
This machine can be used by children
aged 8 and upwards, and by people
with reduced physical capacity, mental
ability, memory loss or lacking
experience and knowledge. These
individuals must be supervised when
using the machine or have instructions
on how to use the machine and
understand the risks that can occur.
Cleaning of the machine must not be
carried out by children without
supervision.
•
Children must be watched to ensure
they do not play with the dishwasher.
•
Damaged mains cables must only be
replaced by a qualified electrician.
•
Only use the dishwasher in
household-type environments for
dishwashing household dishes. All
other use is prohibited.
•
Never place dishes with solvent
residues in the dishwasher due to the
risk of explosion. Nor may dishes that
contain ash, wax or lubricants be
washed in the dishwasher.
WARNING!
Knives and other pointed items must be
placed horizontally in the dishwasher's
special cutlery baskets.
Installation
See the section Installation.
Child safety
•
Always start the dishwasher
immediately after adding detergent.
•
Keep children away from the
dishwasher when the door is open.
Some detergent may remain inside!
•
Do not allow children to use or play with
the dishwasher. Be especially vigilant
when the door is open.
WARNING!
Children must be supervised –
dishwasher detergent is corrosive!
Winter storage/transport
•
Store the dishwasher where the
temperature remains above freezing.
•
Avoid long transport distances in very
cold weather.
•
Before transporting a used dishwasher
all water must be pumped from the
machine. Run the Rinse programme.
•
Transport the dishwasher upright or
laying on its back.
Overflow guard function
The overflow protection starts pumping
out the machine and turns off the water
supply if the water level in the dishwasher
exceeds the normal level. If the overflow
protection is triggered, turn off the water
supply and call the service department.
Packing material
The packaging protects the product during
transport. The packaging material is
recyclable. Separate the different
packaging materials to help reduce raw
material use and waste. Your dealer can
3

take the packaging for recycling or direct
you to the nearest recycling centre. The
packaging is comprised of:
•
Corrugated cardboard made from up
to 100% recycled material.
•
Expanded polystyrene (EPS) with no
added chlorine or fluorine.
•
Supports made from untreated wood.
•
Protective plastic made from
polyethylene (PE).
Disposal
•
When the dishwasher has reached the
end of its service life and is to be
disposed of, it should immediately be
made unusable. Pull out the power
cable and cut it as short as possible.
•
The dishwasher is manufactured and
labelled for recycling.
•
Contact your local authority for
information about where and how your
dishwasher should be correctly
recycled.
Before washing for the first time
The water softener
In order to achieve good dishwashing
results, the dishwasher needs soft water
(water with low mineral content). Hard
water leaves a white coating on dishes
and the dishwasher.
Water hardness is specified using the
following scales: The German water
hardness scale (°dH) and the French
water hardness scale (°fH). A water supply
with a water hardness in excess of 6°dH
(9°fH) must be softened. This is done
automatically with the aid of the built-in
water softener. In order for the softener
to function optimally, it must be adjusted
to the hardness of the water supply.
Contact the local waterworks to check the
water hardness in your area.
Adjusting the water softener
Chapter Settings on page 14 describes
how to adjust the water softener.
Fill up the salt
Before you begin using a dishwasher with
a water softener, you must fill the salt
compartment with salt for the water supply
to be softened automatically. Use large
grain salt or special dishwasher salt.
WARNING!
In order to avoid rust stains a
dishwashing programme must be started
immediately after adding salt.
Never pour dishwasher detergent into
the salt compartment. This destroys the
water softener!
Do as follows the first time:
1
Unscrew the lid as illustrated.
4
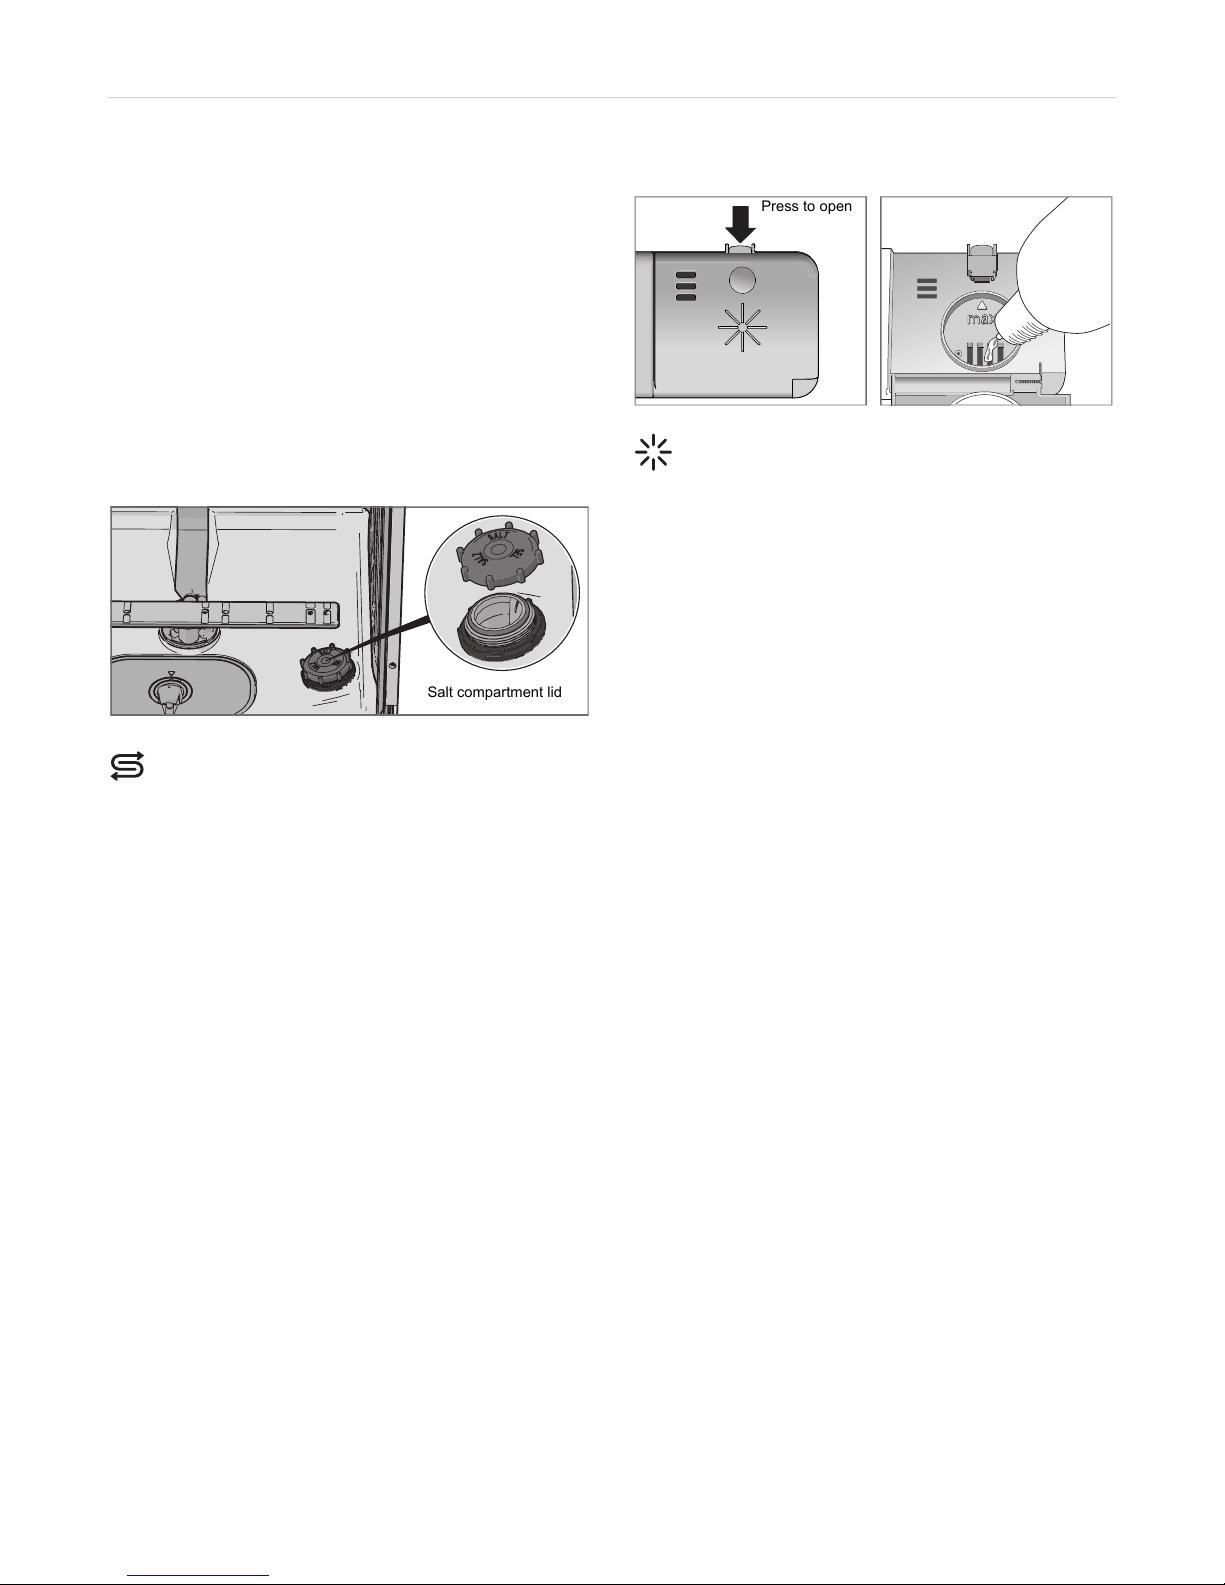
2
Place the funnel supplied with the
dishwasher in the salt compartment
top-up hole. First, pour in about 1 l of
water.
3
Then add salt, a maximum of 1.5 kg,
until the compartment is full.
4
Wipe up any excess salt so that the lid
can be screwed on firmly.
5
Run a programme to ensure that any
salt in the dishwasher is rinsed away.
Salt compartment lid
Refill salt indicator
When the salt needs topping up, the
above symbol lights on the display.
When the salt runs out, unscrew the cap
and fill the container with salt. Water is
only needed the first time! Wipe clean and
tighten. Run a programme to ensure that
any salt in the dishwasher is rinsed away.
After topping up, it may take a while
before the symbol goes out.
Top up with rinse aid
Drying is faster and a better result is
achieved if you use rinse aid. You will also
achieve a better dishwashing result with
clear and spotless dishes.
1
Open the rinse aid compartment lid.
2
Carefully top up with rinse aid. Only add
rinse aid to the level marked max.
3
Wipe up any splashes of rinse aid
around the compartment.
4
Close the lid firmly.
Press to open
Refill rinse aid indicator
When the rinse aid needs topping up, the
above symbol lights on the display.
After topping up, it may take a while
before the symbol goes out.
Setting the rinse aid dosage
The section Settings describes how to set
the rinse aid dosage. Rinse aid dispensing
can be set from 0 (Off) to 5 (High dose).
(Factory settings: 5)
Decrease the rinse aid dosage:
•
If the dishes have a sticky white/blue
film.
•
If the dishes are streaked.
•
Build-up of foam. If you have very soft
water, the rinse aid can be diluted
50:50 with water.
5
Loading the dishwasher
Energy-efficient dishwashing
•
Do not start the dishwasher until it is
fully loaded to save energy.
•
Do not rinse under running water.
Simply scrape off large food particles
before loading the dishwasher.
•
Choose an environmentally-friendly
detergent. Read the environmental
declaration on the packaging!
•
If the dishes are only slightly dirty, you
can select a programme with a low
temperature.
•
Better drying results are achieved if you
use the Auto open option, which
automatically opens the dishwasher
door at the end of the programme. (If
the dishwasher is built-in the
surrounding furnishings must be
resistant to any condensation.)
Fragile dishes
Some cookware is not dishwasher safe.
This can be for several reasons. Some
materials cannot withstand strong heat,
others can be damaged by dishwashing
detergent.
Exercise caution with, for example,
handmade items, fragile decoration,
crystal/glassware, silver, copper, tin,
aluminium, wood and plastic. Look for the
"Dishwasher safe" marking.
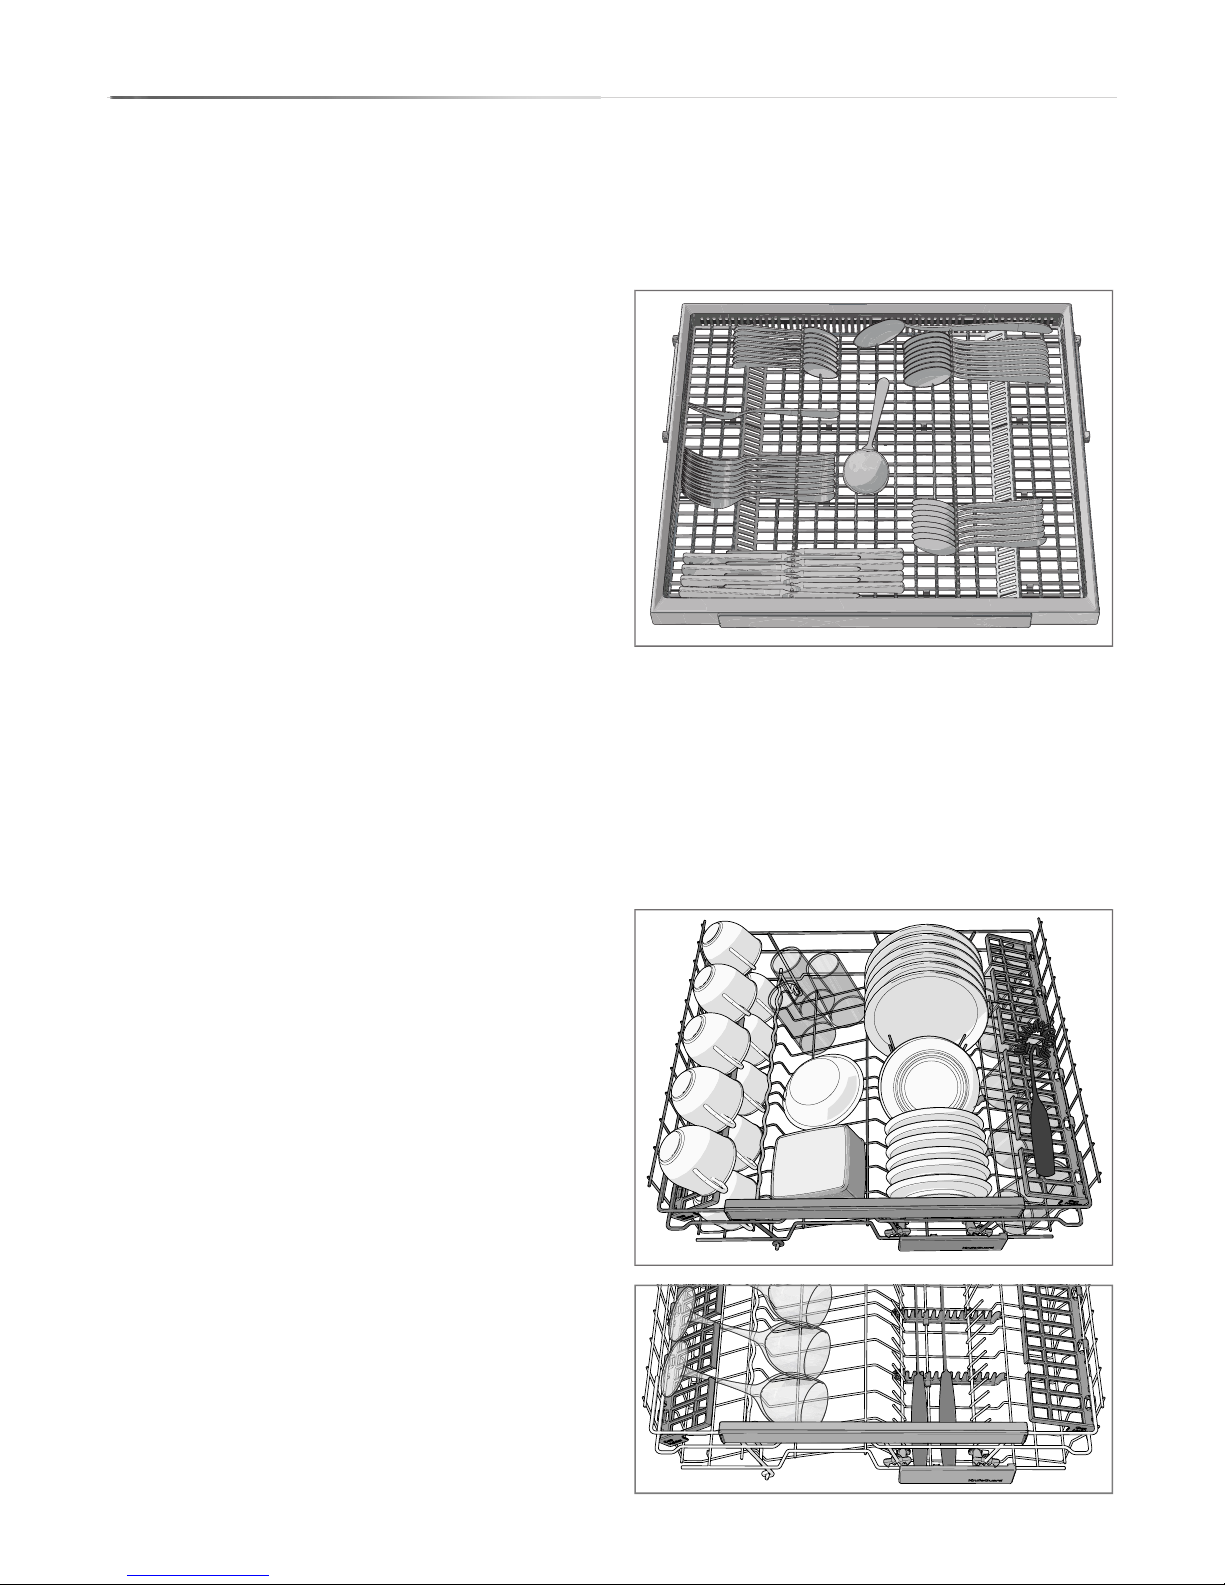
The dishwasher's baskets
The dishwasher is equipped with a top
cutlery tray, an upper basket and a lower
basket.
Top cutlery tray
The top cutlery tray has space for cutlery,
ladles, whisks, serving cutlery and similar
items.
Upper basket
Place glasses, cups, bowls, side plates
and saucers in the upper basket. All dirty
surfaces should face inwards and
downwards! Wine glasses are placed on
the wine glass shelf and knives are placed
in the knife stand on the right (if fitted).
6

Raising and lowering the upper basket
1
Pull out the upper basket.
2
Grab the sides of the upper basket with
both hands and lift it up.
3
Repeatedly lift the basket with both
hands to change its position. (The
upper basket can be set in three
positions.) When the upper basket is in
the highest position lifting it will return
it to the lowest position. Note that both
sides of the basket must always be set
to the same height.
Foldable tines
The foldable tines can be folded up or
down to make it easier to load pots, bowls
and glasses. Release the foldable tines
by pressing the catch inwards before
adjusting their position.
Lower basket
Place plates, side plates, serving dishes
and pots in the lower basket.
Foldable tines
Fold down the foldable tines (plate
supports) when dishwashing pots.
Release the foldable tines by pressing the
catch inwards before adjusting their
position.
Points to consider
•
All dirty surfaces should face inwards
and downwards!
•
Dishes should not be placed in or on
each other.
•
Angle dishes with hollows, such as
cups, so that the rinse water will run off.
This is also important for plastic items.
•
Make sure small items cannot fall
through the dishwasher basket; place
them in the top cutlery tray.
NOTE!
Check that the spray arms can rotate
freely.
7
Using the dishwasher
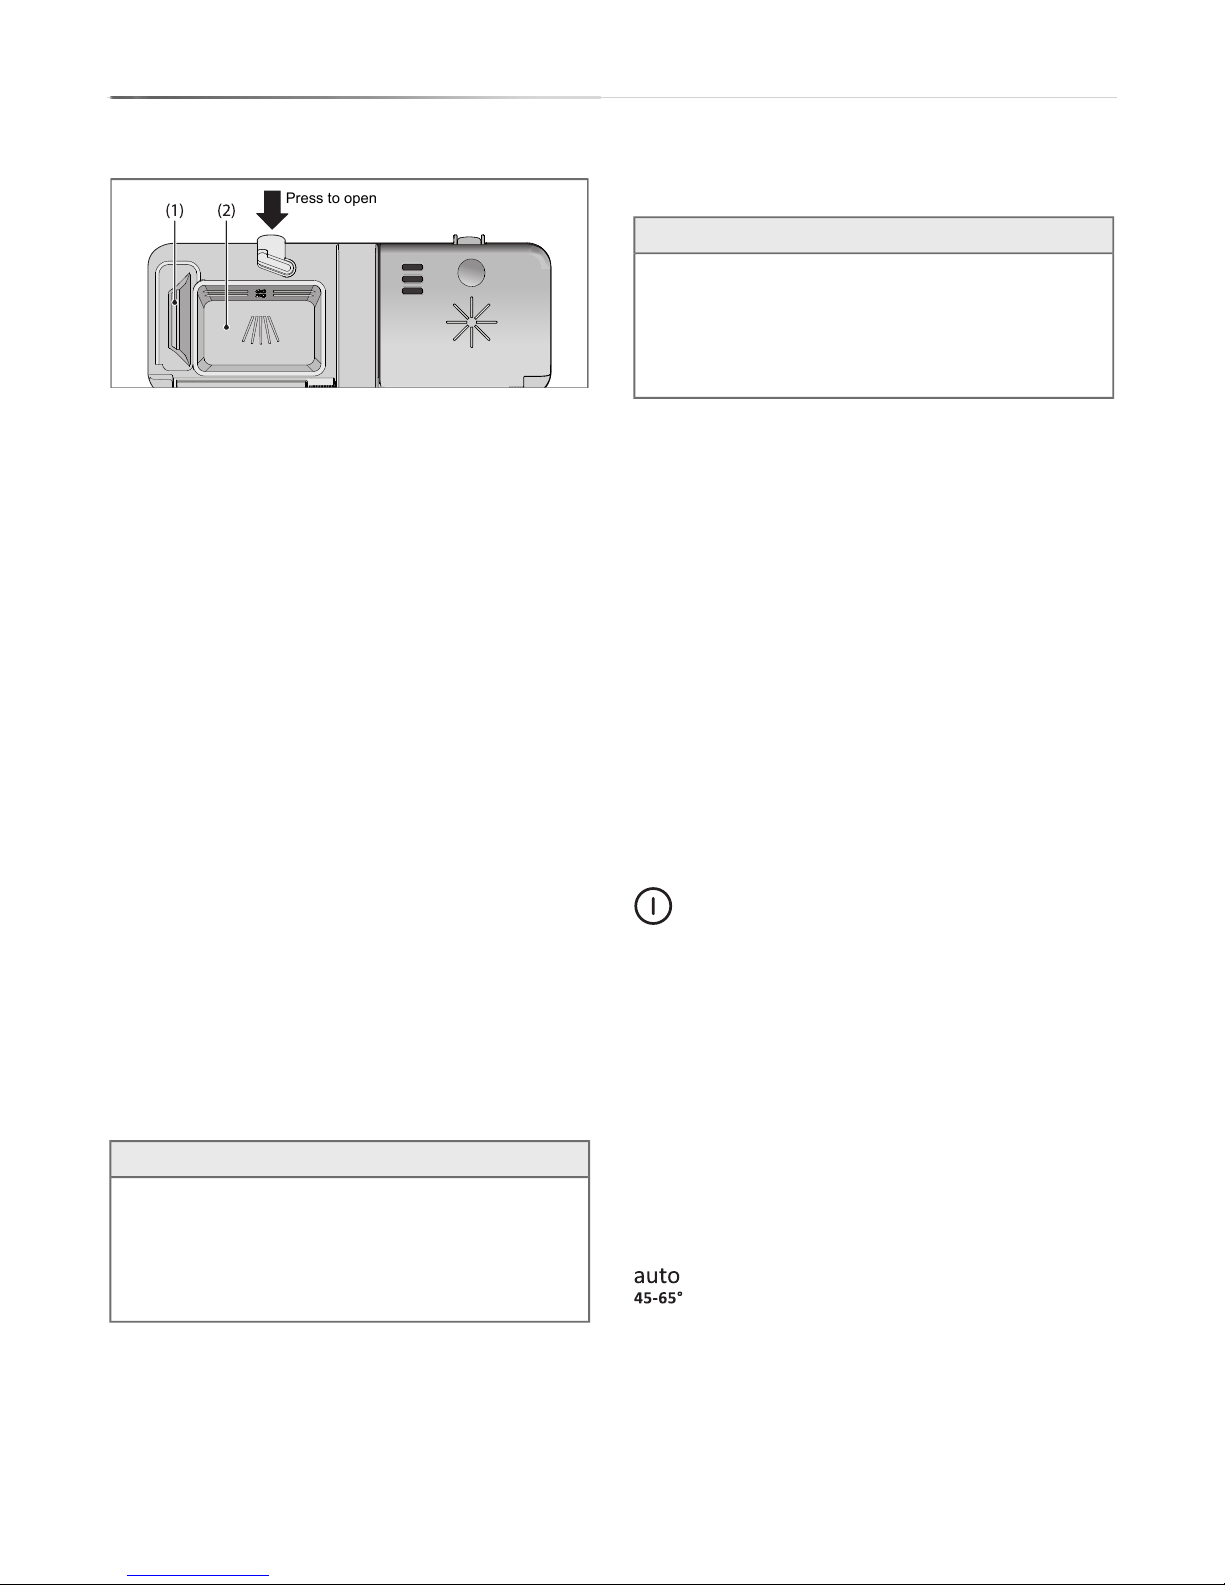
Add detergent
Press to open
1
Prewash detergent compartment
2
Main wash detergent compartment
Detergent is added according to water
hardness.
Follow the instructions on the detergent
packaging. This dishwasher is fitted with
a water softener, so use detergent and
rinse aid doses suitable for soft water.
Too much detergent can result in less
effective dishwashing and also entails
greater environmental impact.
The detergent compartment must be dry
when adding detergent. There is one
compartment for the prewash and one for
the main wash. If powder or liquid
dishwasher detergent is used, add a small
amount of the detergent to the prewash
compartment. Contact the detergent
manufacturer if you have questions about
the detergent.
NOTE!
Use only dishwasher detergent! Washing
up liquid must not be used as the foam
that forms prevents the dishwasher from
operating effectively.
Dishwasher tablets
Halve the tablet if it is difficult to close the
dispenser lid. There is a risk that the
detergent will not be released properly if
the lid is tight and will not open correctly.
NOTE!
Dishwasher tablets are not
recommended for short programmes
(less than 75 minutes). Use powder or
liquid dishwasher detergent instead.
3-in-1/All-in-one detergent
Chapter Settings describes how to
activate TAB (3-in-1/ All-in-one detergent).
Note that salt must be put in the salt
compartment. If you are not satisfied with
the dishwashing or drying results,
deactivate the setting TAB (3-in-1/
All-in-one detergent) and top up with salt,
detergent and rinse aid. See Chapter
Before washing for the first time.
Read through the directions for these
products carefully. If anything is unclear,
contact the detergent manufacturer.
The main power switch
Press and hold the main power switch
until the display turns on. Also check that
the water tap is on.
PROGRAMS - Choose programme
Choose a programme to suit the type of
dishes and how dirty they are.
Press the desired programme until the
programme symbol is activated.
Auto wash
The dishwasher can measure how dirty
the dishes are and adjust water
consumption and temperature accordingly.
When newly installed, the programme
needs to be run five times before it is fully
adapted and can provide the best results.
8
Auto wash1)+ SpeedWash +
Auto open
An effective programme for daily use for
slightly dried leftovers. (This programme
is not intended for burnt food, such as on
oven dishes.)
Intensive wash
Programme for very dirty dishes, such as
pans, casserole dishes and oven dishes.
If these dishes do not completely fill the
dishwasher, you can add plates and the
like.
Eco wash
This programme is intended for cleaning
normally dirty dishes and is the most
effective programme in terms of combined
energy and water consumption.
Quick wash
This programme is used for glasses and
porcelain that is slightly dirty, such as
coffee cups.
In combination with SpeedWash, a shorter
programme is achieved (15 minutes).
Rinse
Used to rinse dishes while you wait for the
dishwasher to become fully loaded.
EXTRA - Selecting Options
To select an option, press one of the
option buttons until the option is activated.
The available options vary between
programmes and some options cannot be
combined (available options glow dimly).
SpeedWash
This option shortens the programme time,
but uses more energy and water.
Auto open
The dishwasher door opens automatically
at the end of the programme, which
improves the drying results. (If the
dishwasher is built-in the surrounding
furnishings must be resistant to any
condensation.)
NOTE!
The dishwasher door must not be
blocked when set to open automatically.
This can disrupt door lock functionality.
Extra hygiene
This option is intended for situations
where demands on hygiene are especially
high, such as when dishwashing baby
bottles and cutting boards. The
temperature is increased in both the main
wash and the final rinse.
Delayed start
When you select Delayed start the
dishwasher will start 1-24 hours after you
close the door.
1
Press the button once to activate
Delayed start. Press the button several
times – or hold it in – to set the desired
number of hours.
2
Close the door and the dishwasher
counts down 1 hour at a time and starts
after the selected delay.
1)
This combination (Auto wash + SpeedWash + Auto open) is also known as QuickIntensive (90 minutes).
9
If you want to cancel the Delayed start
option, open the door and press and hold
the main power switch until the display
turns off.
Starting the dishwasher
Close the door to start the dishwasher. If
the main power switch is on the
dishwasher will start automatically when
the door is closed.
TIME - Time remaining
Once you have chosen a programme and
options, the time the programme took
when last used is displayed.
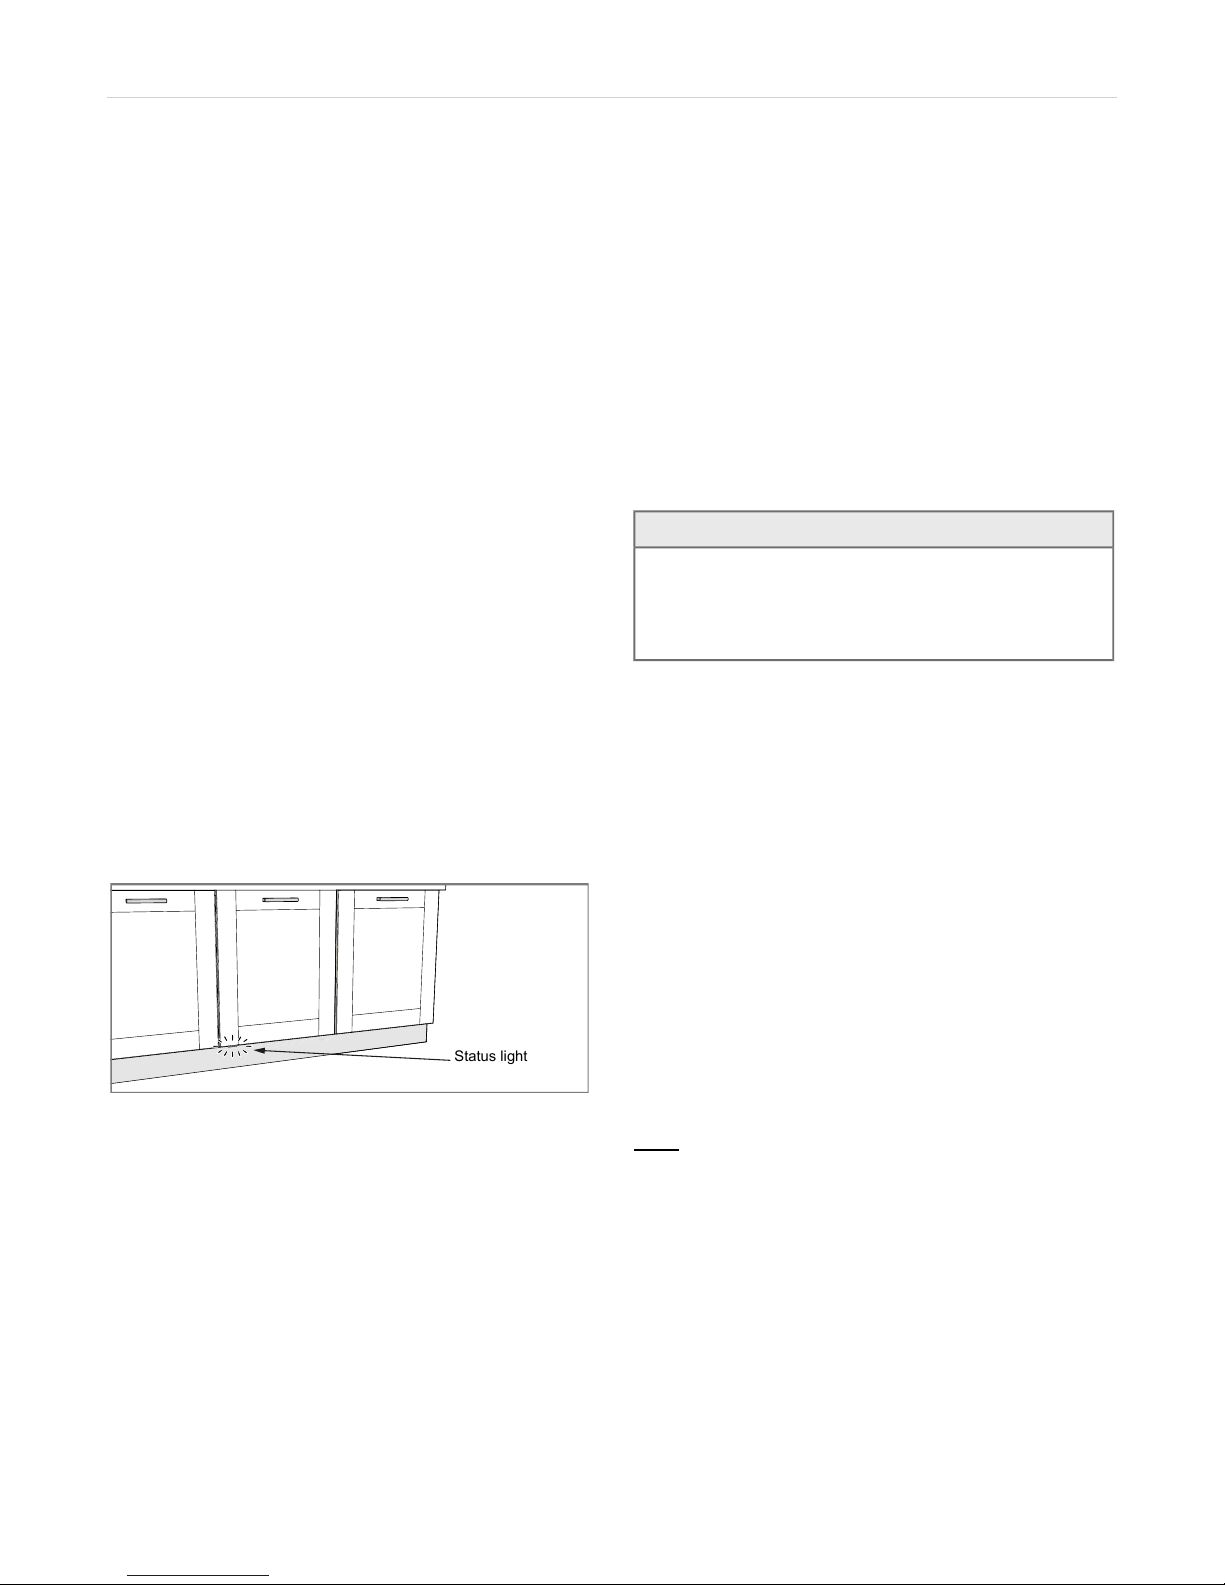
Status light
The status light on the bottom part of the
dishwasher indicates that a programme
has started.
Flashing light
This indicates a fault. See further in the
section Troubleshooting.
Status light
Stopping or changing a programme
If you want to change programme after
starting the dishwasher, open the door
then press and hold the main power
switch until the display turns off. Add more
detergent if the lid of the detergent
dispenser has opened. Then press the
main power switch, choose a new
programme and close the door.
Do you want to add more dishes?
Open the door. The dishwasher stops
automatically. Add the dishes and close
the door. After a while, the dishwasher
continues the programme.
If the dishwasher is turned off due
to a power failure
If the dishwashing programme was not
finished, the interrupted programme
continues when power is restored.
NOTE!
During drying, the programme is
interrupted if the power is cut or the door
is open for more than 2 minutes.
How to get the best drying results
•
Fully load the dishwasher.
•
Angle dishes with hollows, such as
cups, so that the rinse water will run off.
This is also important for plastic items.
•
Top up with rinse aid or increase the
rinse aid dosage level.
•
Activate the Auto open option.
•
Allow the dishes to cool before
unloading the dishwasher.
Once the programme has finished
The end of the programme is indicated by
one short signal from the buzzer. The
chapter Settings describes how to change
this function.
Moreover, the end of the programme is
indicated by the status light turning off.
See Status light in the chapter Using the
dishwasher.
The dishwasher switches off automatically
after the programme ends. Shut off the
water tap after each use.
10
 Loading...