

Gorenje GCS131B User Manual

EDITORIAL
GB 2
Dear Customer,
You have just acquired a new GORENJE steamer and we would like
to thank you.
Our research teams have created this new generation of appliances to let
you show off your culinary talents and create delicious meals every day.
With pure lines and modern aesthetics, your new GORENJE steamer will
blend harmoniously into your kitchen and will perfectly combine cooking
performance and ease of use.
In the GORENJE line of products, you will also fi nd a wide range of
cookers, hobs, ventilation hoods, dishwashers, microwave ovens and
built-in refrigerators, which can be coordinated with your new GORENJE
steamer.
A specialist in all things cooking-related, GORENJE helps to improve
your culinary success, providing shared pleasure and user-friendliness
with products that are ever more effective, easy to use, environmentally
friendly, attractive and reliable.
The GORENJE brand.

CONTENTS
GB 3
Contents
Note to user
Steam cooking 4
Description
The Appliance 5
Close-up of control panel 5
Accessories 6
Removable tank 7
Installation
Before connecting the steamer 8
Electrical connections 8
Build-in 9
Demo mode 10
Use
Setting the clock 11
Programming for immediate steaming 12
Locking display 15
Water tank control 15
Using the timer 16
Cooking chart
Steaming chart 18
Maintenance
Caring for your steamer 21
Changing the interior lighting 22
Handling malfunctions 23

NOTE TO USER
GB 4
Steam cooking
Overview
Steam cooking presents nothing but advantages if you follow the
instructions for use. Healthy and natural, steam cooking preserves the full
fl avour of foods. A delicate sauce or aromatic herb seasonings add that
something extra that makes the difference.
This kind of cooking releases no odours. There is no need to season
the cooking water with salt, herbs or spices; however, you can fl avour a
fi sh by placing it on a bed of seaweed or make a savoury poultry dish by
adding a bunch of rosemary or tarragon.
You can simultaneously cook meat, fi sh and vegetables.
Compared to boiling, steaming offers nothing but advantages:
Cooking starts immediately whereas for food in a water-fi lled pan, the
cook time only begins counting down once the water returns to a full boil.
It is healthy: vitamins (those that are water soluble) and minerals are well
preserved because they scarcely dissolve in the condensation water that
touches the food.
Moreover, no fats are used for this type of cooking.
The steam maintains the taste of food. It does not add odours, nor the
taste of the grill or the pan. Furthermore, it takes nothing away because
the food is not diluted in the water.
Steam does not spread tastes or odours therefore do not hesitate to save
both time and money by cooking items at the same time, but without
touching. For example, you can cook a fi sh next to a dessert.
Cut into pieces, food cooks faster and more evenly than if left whole.
Steam is also appropriate for blanching, defrosting and reheating or even
keeping foods warm, especially sauces.
First use a very small amount of fat to heat meats like poultry, veal and
pork so that they take on an appetizing browned appearance. Then fi nish
cooking them using the steam method.
Words of advice: there is no point in using this cooking method to prepare
fi sh that is not fresh or vegetables left in the refrigerator for a week: the
results will be catastrophic!
DESCRIPTION
GB 5
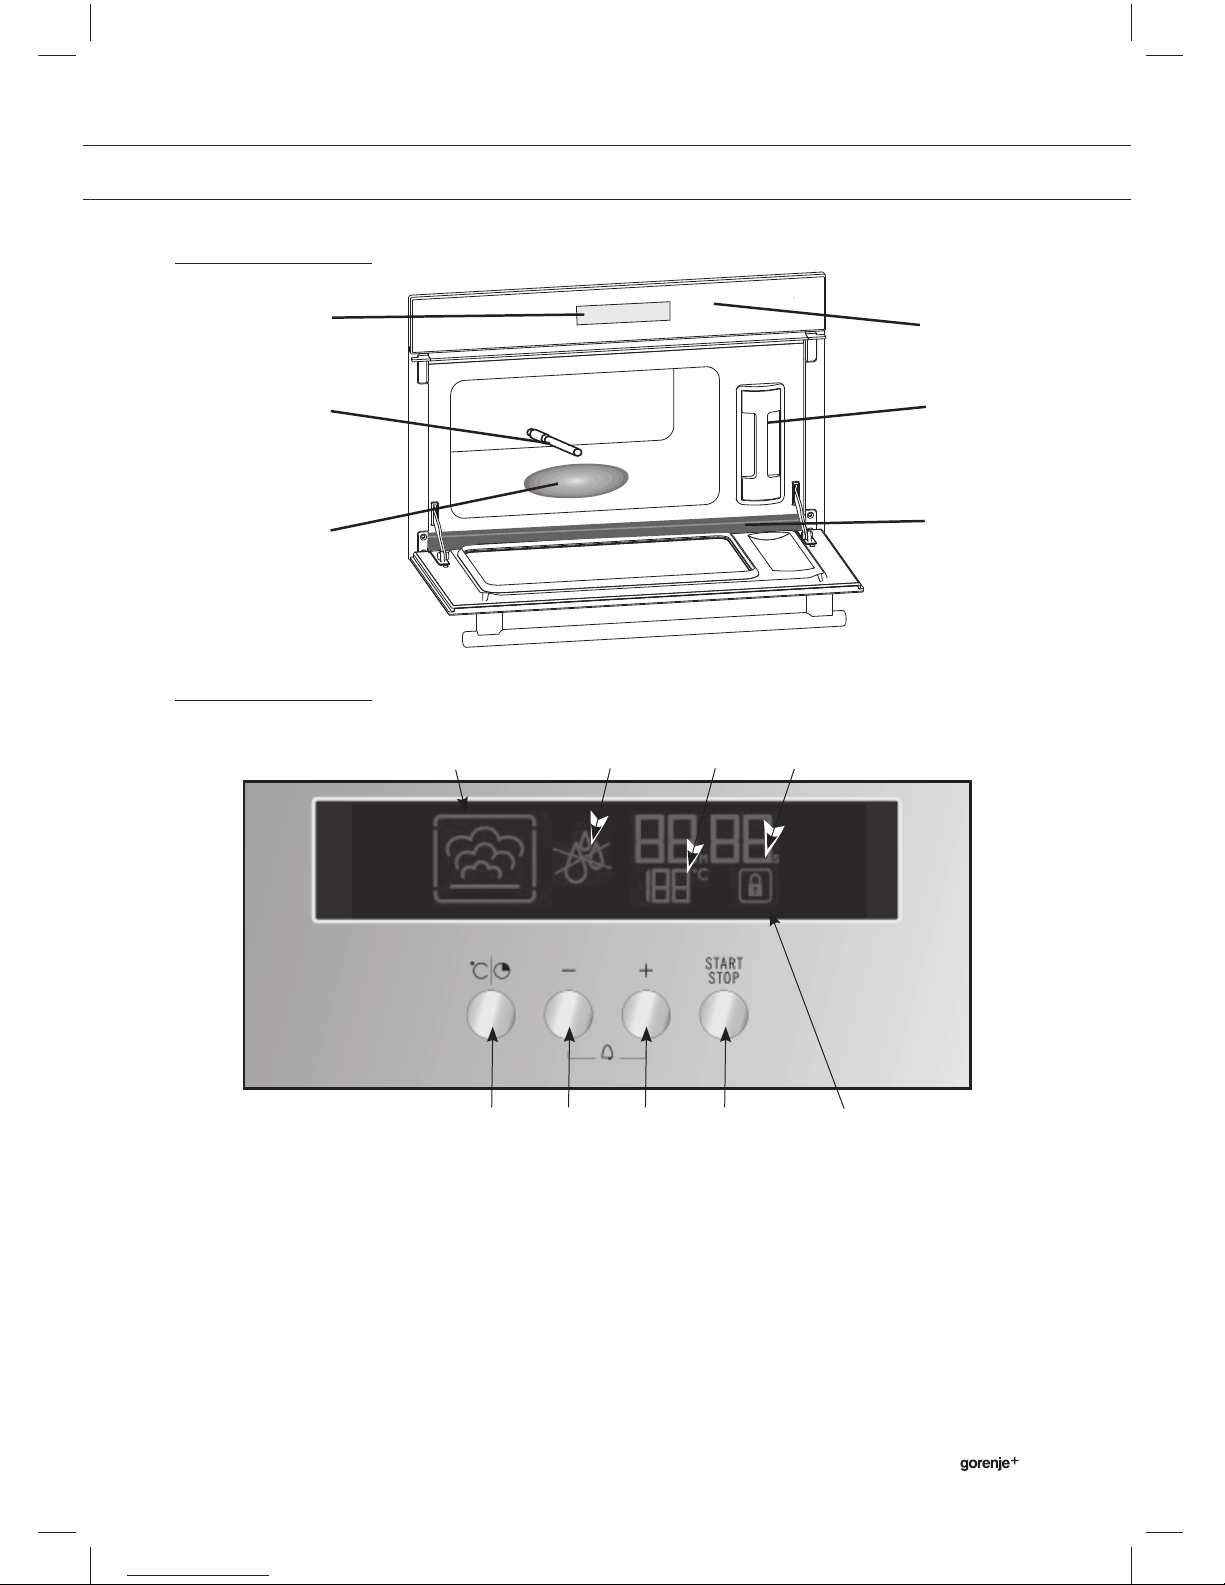
The Appliance
Display Control
panel
Water intake
tube
Steam
generator
Tank
Gutter
Close-up of control panel
1. Duration and temperature selection button
2. Time and temperature adjustment button (-)
3. Time and temperature adjustment button (+)
4. Start/Stop button
5. Keypad locking
6. Steam cooking symbol
7. Water circuit problem indicator
8. Temperature indicator
9. Duration and time
6 7 89
13452
DESCRIPTION
GB 6
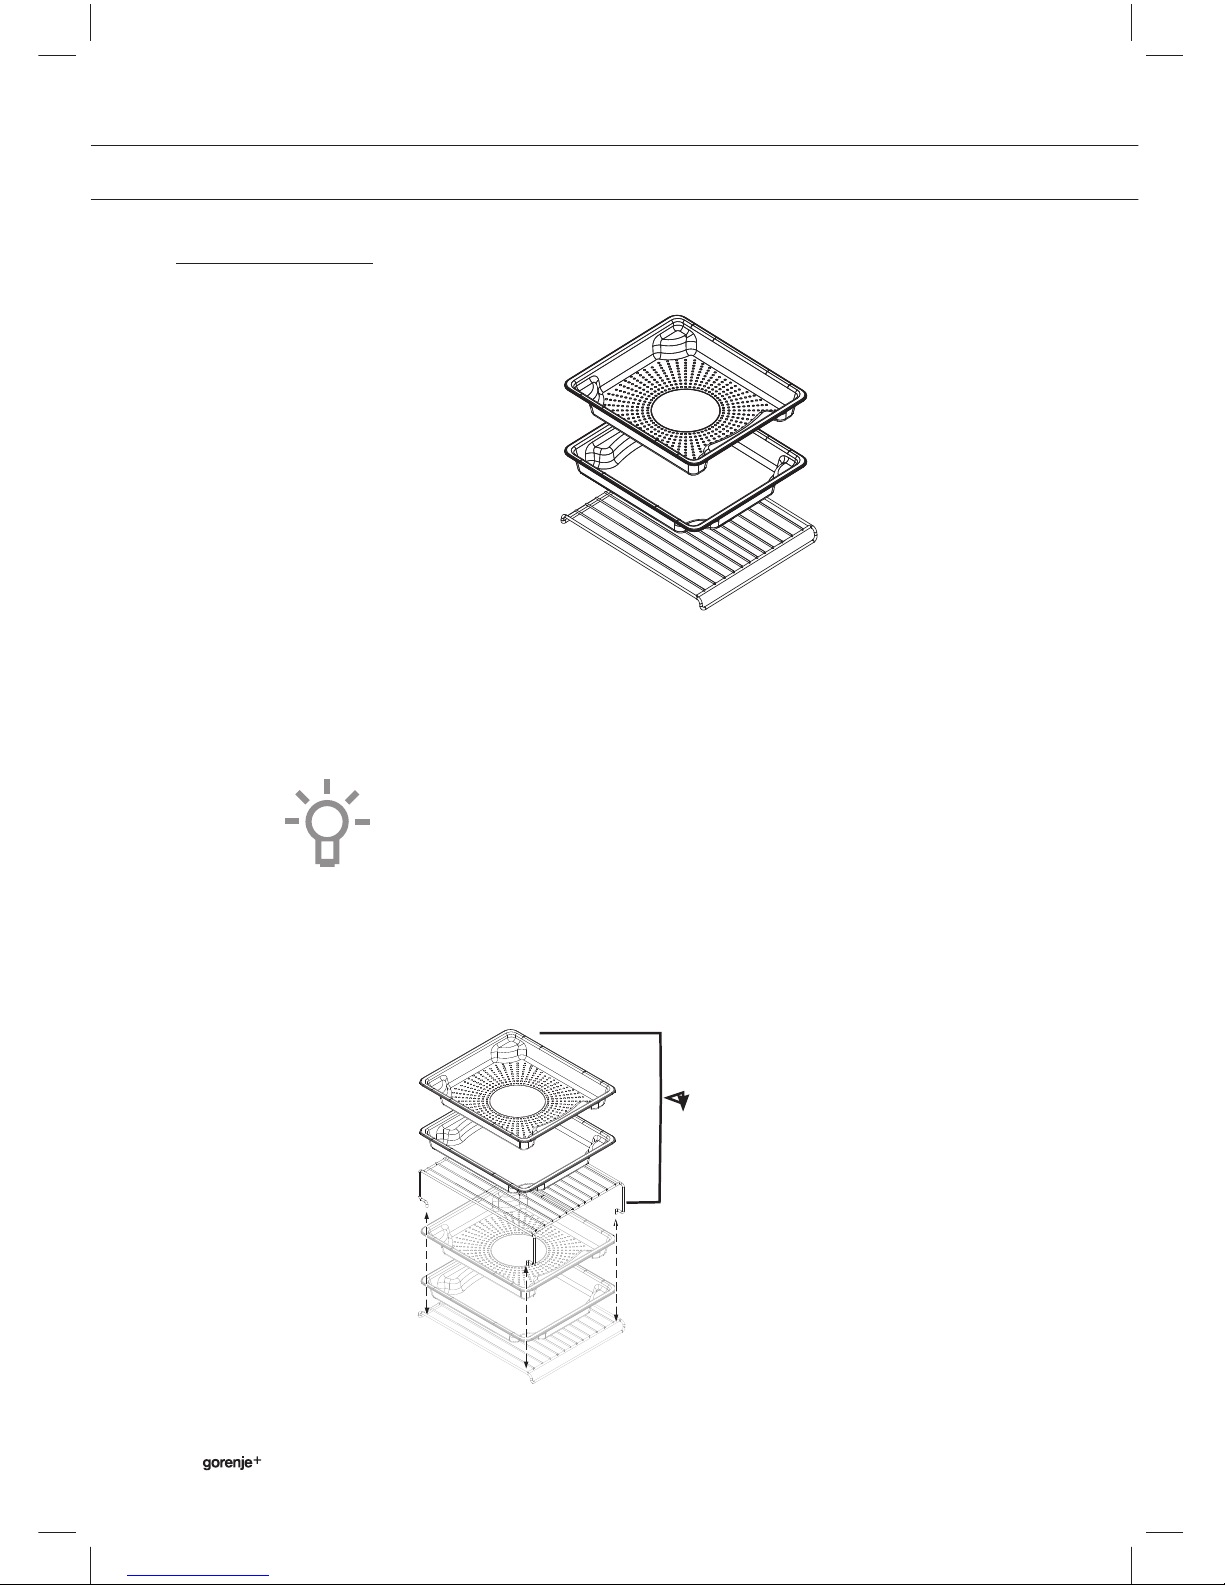
Accessories
Perforated stainless steel dish (Fig. 1)
Pierced stainless steel cooking dish to prevent contact between food and
the condensation water.
Stainless steel dish (Fig. 2)
Stainless steel dish for recovering condensation water.
Comments:
When steaming vegetables, potatoes. fi sh or meat: place the dish (Fig. 1)
on the dish (Fig. 2) in reverse order so that they do not fi t into each other
(see diagram). When storing, place the dish (Fig. 1) on the dish (Fig. 2)
in the same order so that they fi t into each other.
Stainless steel removable support grid (Fig. 3):
it must be placed in the oven.
KITVAPIX (Optional accessory)
The 2-dish kit for steamer includes:
1 x rack.
1 x perforated stainless steel dish.
1 x condensation dish.
The dishes and the rack may be cleaned in the dishwasher.
Fig. 1
Fig. 2
Fig. 3
DESCRIPTION
GB 7
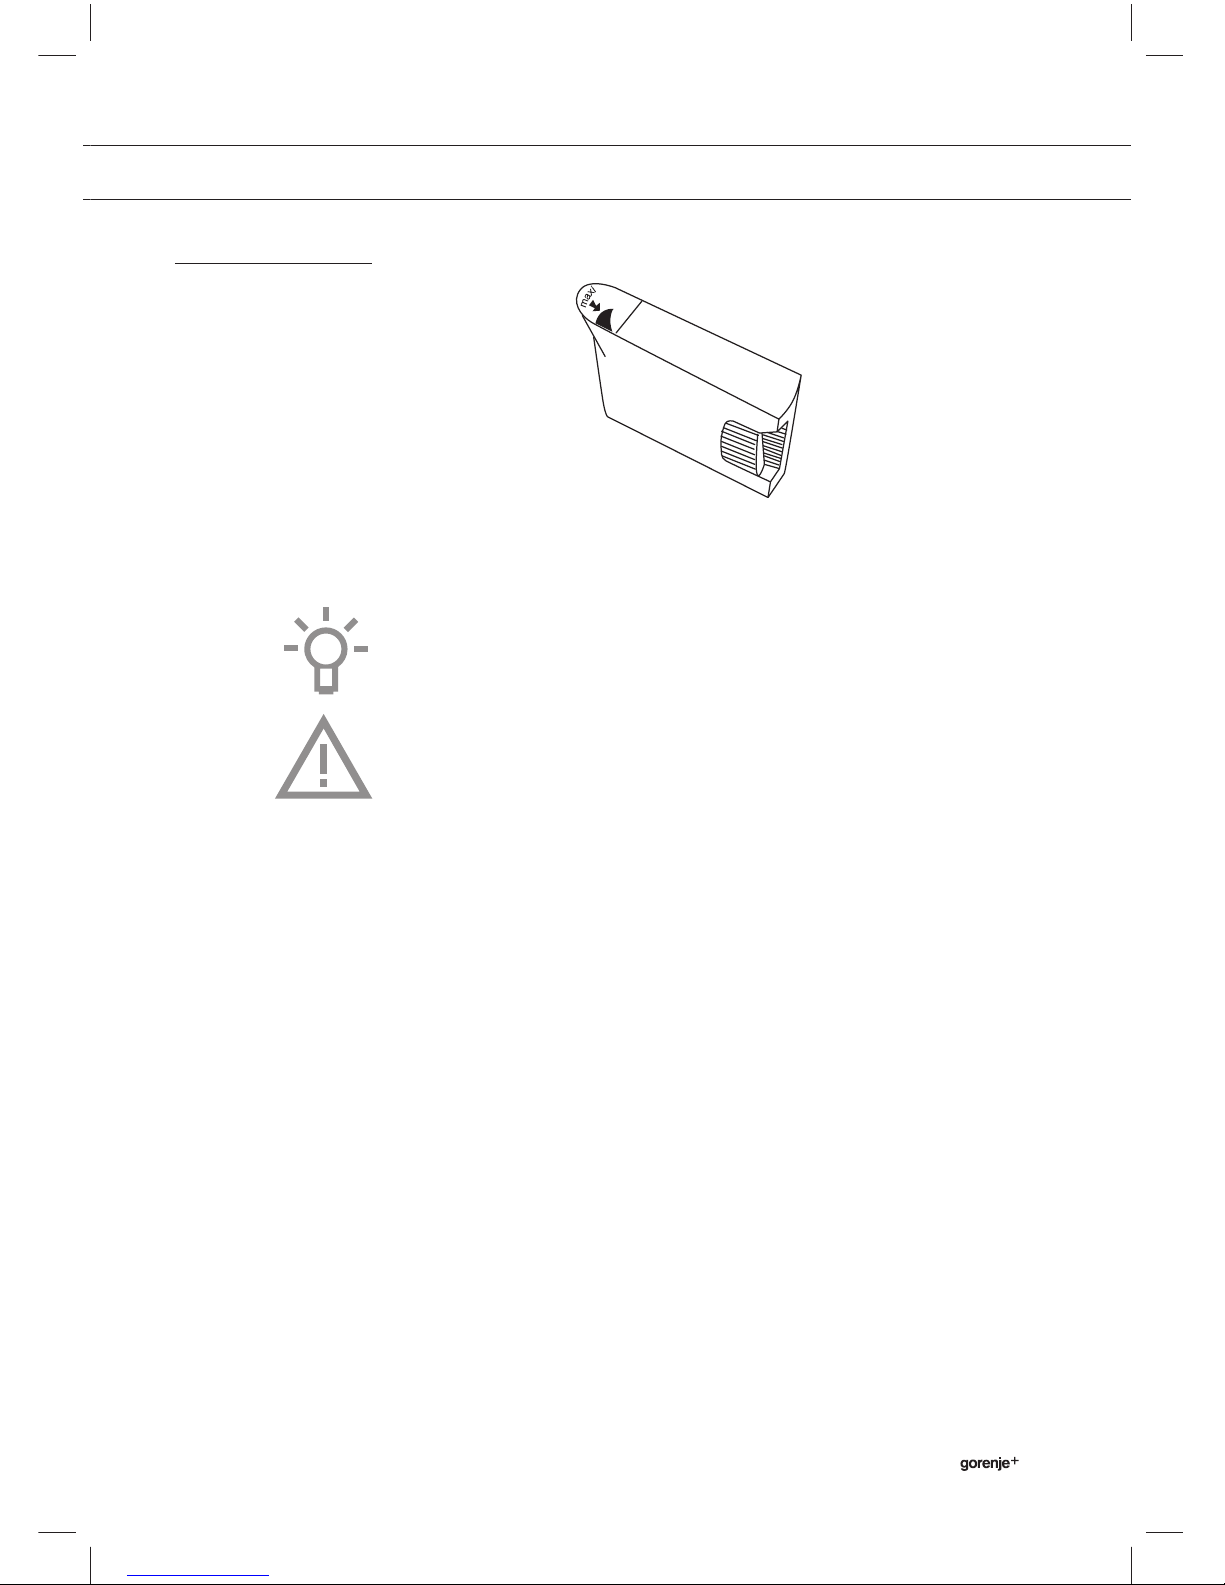
Removable tank
Tank that allows for independent water supply to the steamer. Its capacity
is approximately one litre (maximum level).
Tap water can sometimes be too hard. Lightly mineralised, still, bottled
water will be more effective in cleaning your oven.
Using demineralised water is prohibited (not for human consumption).
Please do not use decalcifi ed water or water treated by a water decalcifi er.
This can cause damage to the steam generator.

INSTALLATION
GB 8
Before connecting the steamer
Warning
Ensure that your appliance has not suffered any damage during
transport (deformed seal or door, etc.). If you see any kind of
damage, before doing anything else, contact your retailer.
In order to easily locate the reference information for your appliance, we
recommend that you note this information on the “After-Sales Service
Department and Customer Relations” page.
Electrical connections
Ensure that:
• the electrical installation has suffi cient voltage;
• the electrical wires are in good condition;
• the diameter of the wires complies with the installation requirements;
• your electrical installation is equipped with 16-ampere thermalsensitive protection.
In case of doubt, consult your electrician-installer.
The electrical connections are made before the appliance is installed in
its housing.
The appliance must be installed correctly to ensure electrical safety.
During installation and maintenance operations, the appliance must be
unplugged from the electrical grid; fuses must be cut off or removed.
The oven must be connected with a power cable (standardised) with
three 1.5 mm² conductors (1 ph + 1 N + ground) that must be connected
to a monophase 220-240 V network via a CEI 60083 standardised
receptacle (1 ph +1 N + ground lead) or in accordance with installation
rules. The safety wire (green/yellow) is connected to the appliance’s
terminal and must be connected to the installation earth.
In the case of connections with an electric receptacle, it must remain
accessible after installation of the appliance.
The oven’s neutral conductor (blue wire) must be connected to the
network’s neutral conductor.
In the electrical connection, ensure there is a means available to the user
to ensure they are able to disconnect the appliance from the outlet, either
by pulling the plug from the outlet or by turning off a switch, in compliance
with installation rules.
If the power cable is damaged, it should be replaced by the manufacturer,
its after-sales service department or by a qualifi ed person to avoid
danger.
Warning
We cannot be held responsible for any accident resulting from a
non-existent, defective or incorrect earth lead.
INSTALLATION
GB 9
If the steamer malfunctions in any way, unplug the appliance or remove
the fuse corresponding to the sector where the oven is hooked up.
It is dangerous for anyone other than a qualifi ed person to perform
maintenance operations or repairs.
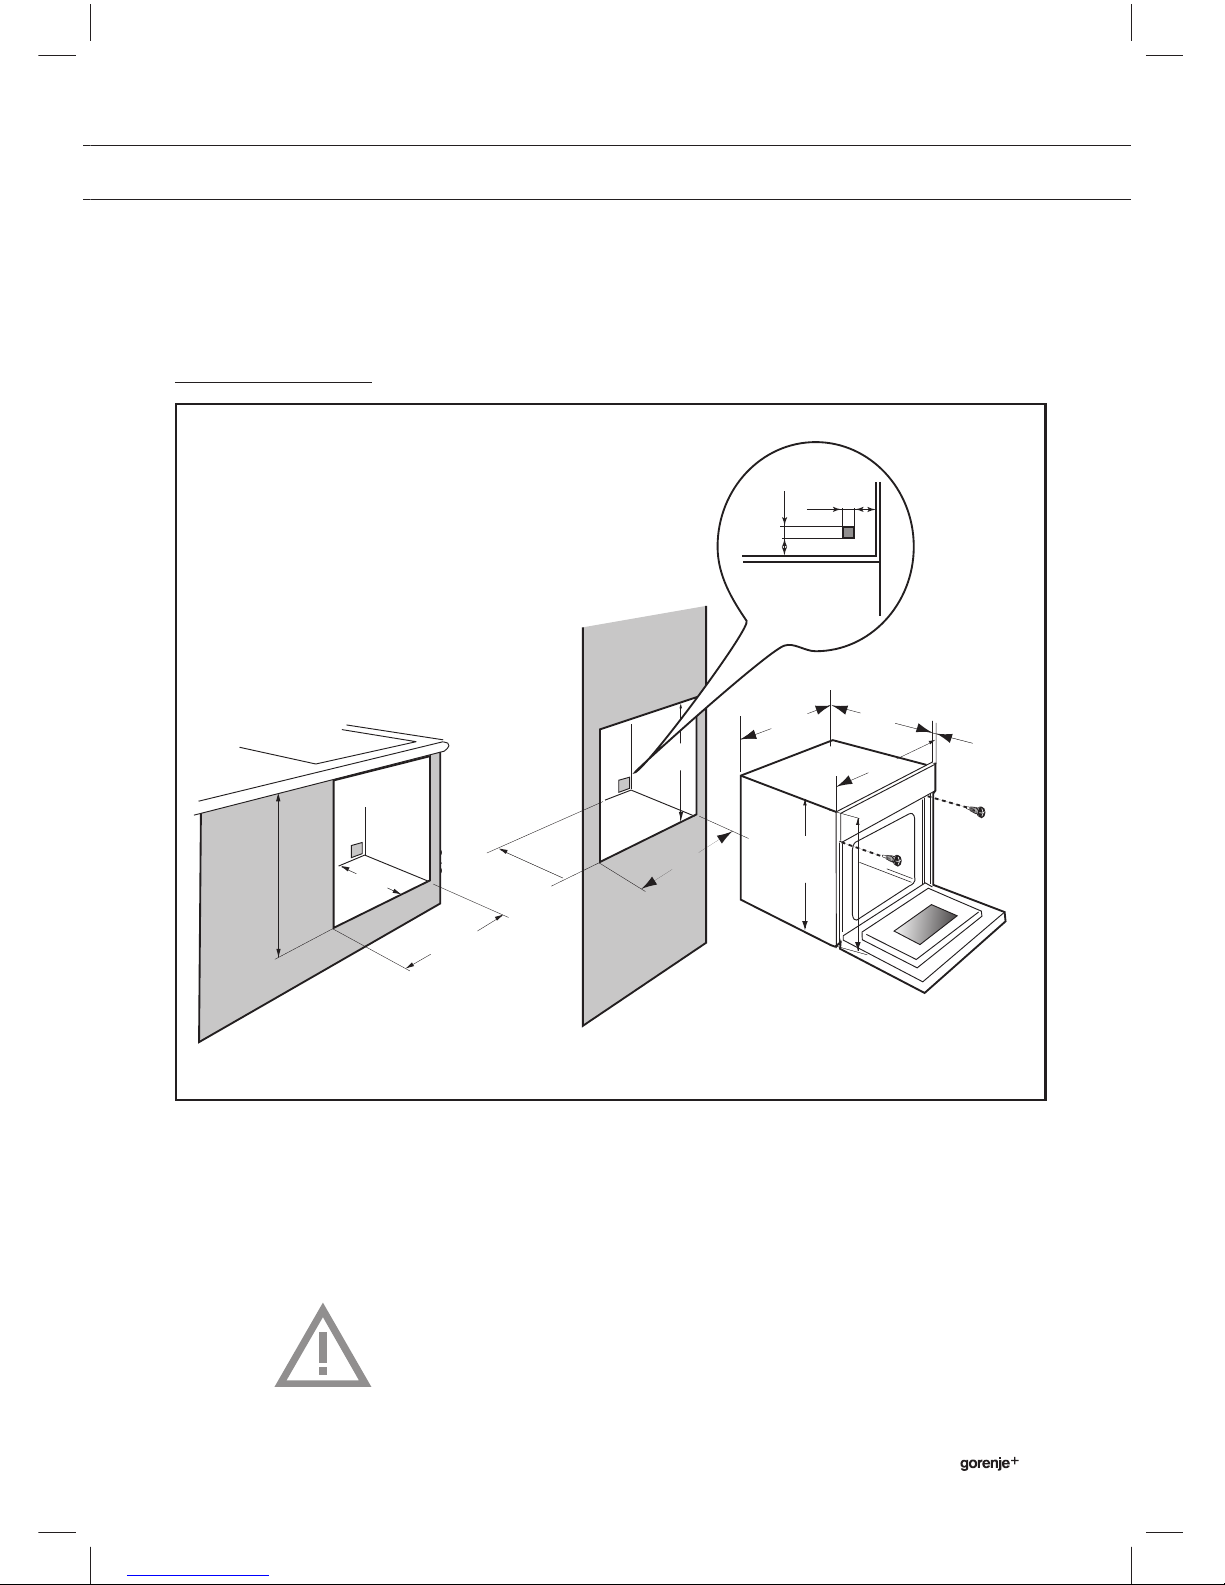
Build-in
1. Place the appliance in the nook. The appliance must be horizontal.
Check the position.
2. For greater stability, attach the steamer in the cabinet with two screws
through the holes provided for this purpose on either side of the front
inner panels.
3. Make the electrical connection.
Ensure that the plug will be accessible after installation.
550
592
400
23
378
450
560
550
mini
560
550 mini
450
456
445
20
50
10
50
 Loading...