

Page 1
Page 2

Dear customer!
Thank you for purchasing a new combined
electric and gas cooker. The following
information will help you understand the
features of the appliance and use it safely.
We hope the appliance will serve you
successfully for a long period of time.
IMPORTANT PRECAUTIONS
This appliance is not connected to a kitchen
hood. It must be installed and connected
according to the standing regulations and
relevant installation instructions. Special
attention is drawn on room ventilation
requirements.
Make sure the technical information
regarding gas type and voltage indicated on
the rating plate agree with the type of gas
and voltage of your local distribution
system.
The product is assembled and set up by the
manufacturer for use of natural gas G20
/20mbar.
An omni - polar curcuit - breaker must be
installed before the appliance, with a
between - contact spacing of 3 mm or
more (mark in the following text as main
switch).
Before cleaning or reparing of appliance
switch off main switch.
Installation, repairs, adjustments or
resetting of the appliance to another type of
gas may be performed by authorized
persons only (see Certificate of Warranty)
Installation of the appliance and resetting to
another type of gas must be endorsed in
the Certificate of Warranty by the
authorized service. Failure to do so would
render the warranty void.
The appliance must not be used for any
other purposes other than for the
preparation of food. Using the appliance for
any other purposes may result in life
threatening concentration of combustion
by-products, or cause malfunction. The
warranty does not apply to faults resulting
from the incorrect use of the appliance.
It is recommended to have the appliance
checked by the authorized service
personnel every two years. Such
professional maintenance will extend the
useful life of the appliance.
If you should smell gas, immediately shut
the gas pipe cock and cut the gas supply.
In such cases the appliance may be used
only after the cause of such gas escape is
discovered and removed by qualified
personnel and the room thoroughly
ventilated.
When using gas for cooking, heat and
moisture are generated into the room, so
make sure it gets sufficient air supply: keep
a window open or install a mechanical
ventilation device (a vapor hood with
mechanical extraction). Prolonged
operation of the appliance may require
extensive ventilation, for instance opening
the window or boosting the performance of
the hood with a mechanical fan.
The appliance requires a minimum air
admission of 2m3/h for every kW of power
input.
Never use naked light to detect gas
leakage!
If you detect a flaw on the gas installation of
the appliance, never attempt to repair it by
yourself. Switch the appliance off, cut the
gas supply and call authorized personnel to
make the repair.
If you plan an absence exceeding 3 days,
turn off the gas pipe cock and shut the gas
supply. If the appliance is out of service for
more than 3 months, it is advised to retest
and reset all functions of the appliance.
In change of the environment for which the
appliance is designed, with a transient risk
of fire or blast (e.g. at linoleum or PVC
gluing, working with paints, etc.), the
appliance must be put out of service in
time, prior to the risk.
Do not place any combustible objects on
the appliance or at a distance shorter than
its safety distance (the shortest distance of
an appliance from combustible items is 750
mm in the direction of main radiation and
100 mm in other directions).
Do not put any flammable objects close to
hob burners, oven heating elements, or in
accessory space.
Do not use cookware with damaged
surface coating or otherwise defective due
to wear or handling.
Do not place the appliance on a pedestal.
Manufacturer does not recommend using
any additional accessories, for instance
flame extinguishing protectors, or efficiency
increase gadgets.
Do not move the cooker by holding the hob.
Do not close the hob cover while gas
burners or hot plates are still hot.
The manufacturer declines responsibility for
any damage caused by violating the
EN 1
Page 3

instructions and recommendations set
herewith.
Do not use pressure vapor cleaner for
cleaning the appliance.
Cooker may only be installed against non
inflammable back wall.
The surface of storage shelf could be
heated up up to a high temperature. At
pulling out of hot shelf the surfaces and
objects coming into contact or being in a
close distance can be damaged. Do not
operate the appliance with pulled out shelf.
The objects stored in the shelf can be hot,
therefor it is not allowed to put in this
storage shelf flammable or easily
flammable objects.
This appliance can be used by children
aged from 8 years and above and persons
with reduced physical, sensory or mental
capabilities or lack of experience and
knowledge if they have been given
supervision or instruction concerning use of
the appliance in a safe way and understand
the hazards involved. Children shall not
play with the appliance. Cleaning and user
maintenance shall not be made by children
without supervision.
Life of the appliance: 10 years
Solely an authorised, skilled person may
install the range. The authorised person is
obliged to set the range cooking plate in
horizontal position, to connect it to the mains
and to check up on its duty. Installation of the
range must be confirmed in the certificate of
warranty.
CONTROL ELEMENTS OF THE RANGE
Prior to usage it is necessary to remove any packing
material from the range.
Various parts and components of the range and
package are recyclable. Handle them in compliance
with the valid instructions and national decrees.
Before first use we must clean appliance and
accessories. After drying cleaned surfaces switch on
main switch and keep following instructions.
Warning: Do not clean and disassemble other parts
of cooker, than mentioned in chapter CLEANING.
OVEN
Before first use of the oven turn the control knob
to the top and bottom heater position. Set the
temperature selector to 250°C and leave the oven
in operation with the door shut for 1 hour. Provide
proper room ventilation. This process will remove
any agents and odors remaining in the oven from
the factory treatment.
Be sure that the power cords of adjacent or other
appliances do not come into contact with
hotplates, oven door or other hot parts of the
range while in operation.
CAUTION
The appliance is not a toy and may be operated
only by adult persons in accordance with these
instructions. Do not leave small children without
supervision in a room where the appliance is
installed.
Electric and gas combined cooker is an appliance
whose operation requires supervision.
The maximum baking pan load inserted in guides
is 3 kg, and the maximum baking pan load placed
on a grid is 7 kg.
The baking plates and roasting pans are not
designed for a long-term storage of food
(exceeding 48 hours). For longer storage use
convenient dishes.
BEFORE FIRST USE
OPERATION
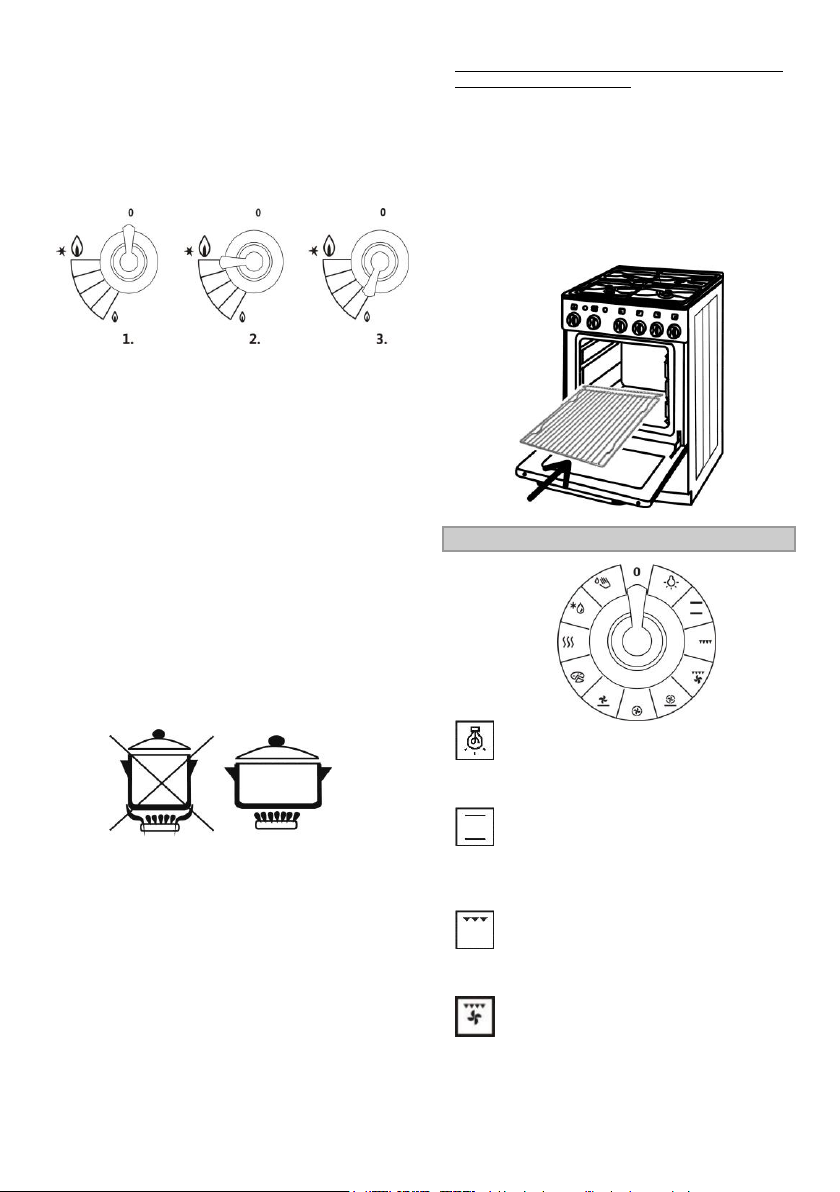
LIGHTING THE HOB BURNERS
Press the appropriate burner control knob slightly
towards the appliance and turn it anti-clockwise to
the „MAXIMUM POWER“ position. Light the gas
using a match or any gas ignition device.
After firing the burner hold the knob pressed to a
limit position to the panel for about 3 seconds till
1. Control knob of the left front burner
2. Control knob of the left rear hot plate
3. Control knob of the right rear burner
4. Control knob of the right front burner
5. Oven thermostat knob
6. Oven function knob
7. Thermostat function signal lamp
8. Digital timer
the flame sensor heats up.
Release the knob and check whether the burner
is on.
If the flame dies after releasing the knob, repeat
the ignition procedure.
LIGHTING THE BURNERS WITH HIGH
VOLTAGE GAS IGNITION KNOB
Press the appropriate burner control knob slightly
towards the appliance and turn it anti-clockwise to
the „MAXIMUM POWER“position. Then push the
EN 2
Page 4
knob towards the panel to a limit position. High
voltage ignition device starts firing the burner.
After firing the burner hold the knob pressed to a
limit position to the panel for about 3 seconds till
the flame sensor heats up.
Release the knob and check whether the burner
is on.
If the flame dies after releasing the knob, repeat
the ignition procedure.
Forcible overturning of the zero position will lead
to the thermostat damage!
WARNING!
Do not cover oven bottom with aluminum foil, place
on bottom oven tray, baking pan, container, food or
food products. Coverage causes local overheating of
the bottom surface of the bottom of the furnace and
the furnace can be irreparably damaged by this
behavior.
INSERTING OF GRID IN THE OVEN
1. OFF
2. Maximum power
3. Saving
SHUTTING THE HOB BURNERS OFF
Turn the selected knob to the “OFF” position and
check whether the flame is extinct
CAUTION
Before opening the hob lid any spilled liquid must be
removed from the lid surface.
Do not close the hob lid if the burners are still hot!
COOKING
OVEN FUNCTIONS AND APPLICATIONS
Use low and wide cookware for preparing food on
gas burners. Make sure the burner flames heat the
dish bottom and do not go beyond its rim.
The appliance is fitted with different size burners.
For optimum (economical) consumption of gas use
the recommended cookware bottom diameters:
- small burner from Ø 120 to Ø 160 mm,
- medium burner from Ø 160 to Ø 220 mm,
- large burner from Ø 220 to Ø 280 mm.
Oven illumination being on in setting up all the oven
functions.
OVEN INSIDE
Oven is fitted with three level side guides for
inserting the grid.
There is an upper heating element with grill element
inside of the oven. The lower heating element is
situated under the oven bottom. In the rear part of
the oven – under the distributing cover – the circular
heating element and the ventilator are situated.
Oven is heat by top and bottom heating element.
The thermostat can be set to a temperature within
50-250°C.
Grilling by infrared radiation. The temperature
selector is set to the maximum position.
OVEN SWITCHING ON AND OFF
Select the desired function of the oven by the oven
function knob. The knob can be turned in both
directions. Set the temperature for food preparation
by the thermostat knob within 50-250°C.
You must turn right by the thermostat knob - setting
higher temperature. Turning back, the set
temperature is reduced.
Grilling assisted with oven fan.
Temperature inside the oven is higher towards the
top. The temperature selector is set between the
150-250°C range.
EN 3
Page 5

Tip: This function is also used for grilling or baking
bulky meat chunks at high temperature. Oven door
is closed.
Bottom heater are in operation, enhanced by the
circular heater and a fan. Temperature is set with
the temperature selector.
Tip: This function is used to preheat the oven
before baking. When the oven reaches the selected
temperature, switch the knob to the desired baking
position.
Oven is heated by the circular heater, with the fan in
service, generating even temperature around the
entire oven. The temperature selector can be set
anywhere between 50-250°C.
Tip: this function is used for simultaneous baking on
two levels (high and bulky pastry, or roasting large
amounts of meat).
Bottom heater in operation, assisted by the fan.
Interior temperature is uniformly spread around the
oven. The temperature selector can be set
anywhere from 50-250°C.
»PIZZA SYSTEM«
This new cooking mode is ideal for making pizza.
Pizza is baked in a preheated oven at a temperature
of approx. 190-210°C. Baking tray with pizza is
placed in bottom guide level for 15 – 20 minutes,
depending on the size of pizza. Noticed baking time
is for information only (depends on sort of pizza).
Warming zone – keep warm of done dish
(baking grid is in second level)
Use this function to heat ready made food. Set the
temperature to 70 °C and place the food onto the
support grid inserted in the second guide level.
Reheating time is a matter of your choice, but make
sure it is not too short, or the food will not be
thoroughly reheated.
Fan without heater is in operation. Temperature
selector is out of service. There is an intensive air
flow in the oven.
Tip: This function is used for defrosting food prior
final preparation.
Applying lower heater/ Aqua Clean
Heat is applied only by the bottom side of the oven.
Use this option for browning the bottom side of the
food (baking heavy, moist pastry with fruit dressing).
The temperature selection button in such cases may
be selected as required. Lower heater may also be
used for the cleaning of oven. You will find details in
the section Cleaning and maintenance.
RECOMMENDATIONS AND ADVISES
For your guide we give the recommended
temperatures of the oven space for typical food
preparation.
50-70°C drying
130-150°C stewing
150-170°C preservation
180-220°C baking of daught
220-250°C meat roasting
It is necessary to try out a precise temperature value
for every sort of food and the baking or roasting
method. Before putting the food in, it is necessary to
preheat the oven in some instances. If the selected
temperature is not reached, the thermostat signal
light is on. If the selected temperature is exceeded,
the thermostat signal light goes out.
Slide best the oven shelf, on which a baking plate or
pan is laid down, into the second groove from below
on sides of the oven. If possible, do not open the
oven door in the process of baking. The thermal
regime of an oven will thus be disturbed, the baking
time prolonged and the food can be burnt.
FOOD GRILLING
Laid down the prepared food to the grate.
Insert the grate to the grooves on the side walls of
baking oven.
Insert a baking tray for capturing of dripping fluids
into the lower grooves on the side walls of the
baking oven or put a pan on the baking oven
bottom.
The grilling is provided at closed oven doors.
ATTENTION
When using a grill, the accessible parts (oven door,
etc.) may become very hot, so make sure that
children are well away at a safe distance from the
oven.
GRILLING MEAT ON A GRID
Open the oven door.
Put the prepared food on a grid.
Slide a shallow baking pan filled with water one
level below the grid to catch the dripping gravy
from the grid.
EN 4
Page 6

ELECTRONIC PROGRAM TIMER
2
3
A
5
1
4
A Function selection knob
1 Oven delayed start
2 End oven operation
3 Minute minder
4 Time display
5 Clock
Select the time settings by consecutively pressing
the (A) knob. Selected symbol will flash on the
display. Rotate the (A) knob to set the function
and press to confirm. Clock hands will
automatically move to time display. The set
symbols will remain lit.
Each time you press the (A) knob, this will be
confirmed by a short acoustic signal.
Press and hold the (A) knob for 2 seconds to
delete the set function.
SETTING THE TIME OF DAY
If the time display symbol (4) is flashing (after
connecting the appliance for the first time or
following a power failure), press the (A) knob and
hold it for two seconds until the flashing stops.
Then select the time display (4) by consecutively
pressing the (A) knob. Time display will flash
when selected.
Rotate the (A) knob to set the time.
Confirm the setting by pressing the (A) knob
again. If nothing is pressed, the setting will be
stored automatically after a few seconds.
OVEN OPERATION WITHOUT TIMER
SETTINGS
After connecting the appliance to the power
mains for the first time or after a power supply
failure, time display symbol (4) will flash.
In order for the oven to operate, press the (A)
knob and hold it for two seconds. Time display will
stop flashing.
The oven can be used without restrictions if no
timer settings are made.
OVEN OPERATION WITH PROGRAM
TIMER SETTINGS
Program timer can be used to program oven
operation in two ways:
EN 5
Setting the stop time - the oven will stop
operating at the preset time.
Setting delayed start - the oven will
automatically start and stop operating at a preset
time.
SETTING THE STOP TIME
This mode allows you to set the time at which you
wish the oven to stop operating. The longest
possible setting is 15 hours from the current time.
Check if the clock is set accurately to current
time.
Select the (2) symbol by consecutively pressing
the (A) knob until the symbol starts to flash.
Rotate the (A) knob to set stop time.
Confirm the setting by pressing the (A) knob
again. Clock hands will move to time display. The
oven stop symbol will light up.
Switch on the oven (use the oven knobs to set the
operating mode and temperature). The oven will
start operate at the set time and stop and the
selected stop time.
When the clock reaches the selected stop time,
the oven will be switched off, which will also be
indicated by an intermittent acoustic signal. The
acoustic signal can be switched off by pressing
the (A) knob; otherwise, it will switch off
automatically after 1 minute. The symbol (2) will
flash. To continue cooking, press the (A) knob
and hold it for 2 seconds, and set a new cooking
time if necessary.
SETTING THE DELAYED START
This mode allows you to specify the time when the
oven should start to operate (cooking start time) and
the time when you wish the cooking process to stop
(end time). Stop time may be delayed by a maximum
of 12 hours relative to the current time of day;
cooking duration may be set to a maximum of 3
hours.
Check if the clock is set accurately to current
time.
Setting the start time: Select the (1) symbol by
pressing the (A) knob. Rotate the (A) knob to set
the start time and confirm it by pressing the (A)
knob. The symbol for the end of operation will
start to flash (2).
Set the stop time: Rotate the (A) knob to set the
stop time and confirm it by pressing the (A) knob.
The clock hands will turn to clock display.
Symbols (1) and (2) will be lit up.
The timer will wait for the start of the cooking
process.
Set the oven – use the oven knobs to set the
operating mode and temperature.
The oven will start to operate at the start time,
and stop operating at the stop time.
When the clock reaches the selected stop time,
the oven will be switched off, which will also be
indicated by an intermittent acoustic signal. The
acoustic signal can be switched off by pressing
the (A) knob; otherwise, it will switch off
automatically after 1 minute. The symbol (2) will fl
ash. To continue cooking, press the (A) knob and
Page 7

hold it for 2 seconds, and set a new cooking time
if necessary.
SETTING THE MINUTE MINDER
The clock can also be used as a minute minder
which will sound an alarm upon expiry of a set
amount of time. The minute minder can only be
selected when the program timer is not programmed
or in use.
Select the (3) symbol by consecutively pressing
the (A) knob until the symbol starts to flash.
Rotate the (A) knob to set the time when you wish
the minute minder to sound the alarm. The
longest possible setting is 3 hours.
Confirm the setting by pressing the (A) knob
again. Clock hands will automatically turn to lock
display and the symbol (3) will be lit up.
When the time you set runs out, an intermittent
acoustic signal will be sounded. The acoustic
signal can be switched off by pressing the (A)
knob and holding it for 2 seconds; otherwise, it
will switch off automatically after 1 minute.
DISPLAYING THE SETTING
Whenever a timer function is set, you may check it
by pressing the (A) knob. The clock hands will briefly
move to the set value and then return to display the
current time.
DELETING A SETTING
Delete the setting by pressing the (A) knob and
holding it for 2 seconds. The symbol of the deleted
function will be switched off.
CLEANING AND MAINTENANCE OF THE
COOKER
Keep to the following principles while cleaning or
maintaining the cooker:
Set all knobs in off position.
The main curcuit - breaker placed before
appliance must be in OFF position.
Wait until the cooker is cool.
LACQUER-COATED AND PLASTIC
SURFACES
Clean the buttons / knobs and the door handle with
a soft cloth and liquid detergents intended for
cleaning smooth lacquer-coated surfaces. You may
also use the cleaners made especially for this type
of surfaces; in this case, follow the manufacturer’s
instructions.
WARNING
The above surfaces should never come into contact
with oven cleaning sprays, as these will permanently
damage the aluminum parts.
COOKER SURFACE
Use a damp sponge with detergent for cleaning.
Fatty stains can be removed with warm water and
special detergent for enamel.
Never clean enamelled surfaces with abrasive
means producing irremovable damage to the
appliance surface.
HOB GRID
Remove the cooking grid from the hob and wash it
separately or place it into the dishwasher. After
washing replace it to fit the appropriate groves in the
hob.
Remove burner parts (cover, distributor) from the
hob and soak them in warm water with added
detergent for 10 minutes.
After washing dry the burner parts carefully and
check whether all burner notches are clean, then
return them back to their position.
NOTICE
Since the burner distributor caps are made of
aluminum alloy, we discourage you from cleaning
them in a washing machine.
OVEN
Clean the oven walls with a damp sponge with
detergent or special cleaner for ovens. If there are
baked ends on the wall, water them, use the bursh
and then clean with damp sponge. Do not use
sharp, metal instruments. Following cleaning,
carefully dry up the oven. Clean the oven only when
cold. Never use abrasive means scratching the
enamelled surface.
Wash the oven appurtenances with a sponge and
detergent or employ the dish wash machine (shelf,
pan, etc.) or use suitable detergent to remove rough
impurities or burns as the case may be.
AQUA CLEAN
The oven may be cleaned in a traditional mode
(using ovencleaners and sprays).The following
procedure is recommended for regular cleaning of
the oven (after each use):Turn the mode selection
button to the position . Set temperature control
button of the cold oven to 50°C. Pour 0,4 lof water
into the baking pan and insert it into the bottom level
guide. After thirty minutes the food residues upon
the enamelcoating are softened, and may be easily
wiped off with a moist cloth.
EN 6
Page 8

CHANGE OF AN OVEN LAMP
Set all the control knobs to "off" and disconnect
the cooker from the mains.
Unscrew the lamp glass cover in the oven by
turning left.
Unscrew the faulty bulb.
Put and screw a new bulb in.
Mount the bulb glass cover.
NOTE
For illumination it is necessary to use a bulb
T 300°C, E14, 230 V, 25 W.
1. Glass cover
2. Lamp
3. Sleeve
4. Oven rear wall
OVEN
Procedure for cleaning of internal glass door.
EN 7
Page 9

CLAIM
If there is any defect on the cooker within the period
of warranty, do not repair it by yourself. Make a
claim at a shop in which you bought the cooker or at
service representatives.
METHODS OF UTILISATION AND
LIQUIDATION OF PACKAGES
Deliver the disposed packaging material to your
local collecting point for recycling.
Corrugated cardboard, wrapping paper
- sale to the collecting places;
- in waste paper containers;
Wooden parts
- other use;
- to the municipal disposal facility;
Wrapping foil and bags
- in waste plastic containers;
LIQUIDATION OF AN APPLIANCE
FOLLOWING ITS LIFE EXPIRATION
The appliance contains valuable materials which
ought to be reused or recycled, so once your
appliance is of no use to you deliver it to the
authorized scrap dealer for further treatment.
This appliance is marked in accordance with
Directive 2012/19/EU on waste electrical and
electronic equipment - WEEE.
After the expiry of its useful life deliver the appliance
to the collecting place for used electric and
electronic equipment.
INSTALLATION INSTRUCTIONS AND
SETTINGS
The appliance must be installed in accordance with
valid local regulations, and shall be placed only in
well vented spaces.
IMPORTANT PRECAUTION
Any movement of the appliance from the existing
installation requires shutting gas supply and
disconnecting the appliance from electric mains
power.
After installation the qualified personnel should
perform the following:
Leakage test on gas couplings, and correct electric
connection to the mains.
Check gas burners and their adjustment (oven
burner prime air, saving power input, thermoelectric
sensors).
Explain to the customer all functions of the appliance
and particulars regarding its servicing and
maintenance.
LOCATION OF THE RANGE
The appliance is designed for installation in the line
of kitchen cabinets. The cooker can be located in the
standard kitchen with a minimum space of 20
screwed in.
If the kitchen is smaller (but not less than 15 m3 as a
minimum) it is necessary to provide a hood.
Regarding thermal resistance the cooker can be
positioned on any floor, as long as it is not located
on a pedestal.
Thermal stability of the walls, surrounding elements
and spaces (material of floor, partitions and walls
around the cooker) must be at least 100 ° C.
A minimum distance of 750 mm, in line with the
manufacturer’s instructions.
CONNECTION TO GAS SUPPLY
GAS SUPPLY
The appliance may be connected to gas supply by
only by the authorized personnel. Connection must
comply with the local standards and requirements.
The gas supply pipe must be fitted with the
accessible gas shut-off cock, located before the
coupling with the cooker.
WARNING
In handling the gas line (e.g. connection to the gas
distribution system or flexible gas hose) always use
a wrench to hold the gas line terminal, in order to
avoid deformations.
FLEXIBLE HOSE CONNECTION
For safety reasons use only the certified hose
complying with local standards and with
recommended length of 1000 – 1500 mm. Heat
resistance of the connection hose should be at
least 100° C.
Each hose must contain instructions regarding the
method of connection, allowed heating, inspections,
service life, etc. These instructions must be
unconditionally adhered to.
We recommend the use of metal gas hoses.
EN 8
Page 10

IMPORTANT PRECAUTION
Burner
Small
Medium
Rapid
Input power (kW)
1,0
1,75
2,7
Natural gas G 20 – 20 mbar
Nozzle diameter
(mm)
0,77
1,01
1,22
Natural gas G 20 – 13 mbar
Nozzle diameter
(mm)
0,83
1,12
1,37
Propane-butane G 30 – 30 mbar
Nozzle diameter
(mm)
0,50
0,66
0,83
Nominal flow (gram
/ hour)
72,8
127,3
196,5
In case of left side connection (seen from the front)
the hose must be connected by means of a clamp
fixed in the back cover opening. You will find the
fixing clamp in the accessory kit.
CONNECTION TO THE NATURAL GAS
NETWORK
Connection must be made in accordance with
standing local regulations. In case of excessive gas
pressure use pressure regulator.
CONNECTION TO THE LPG NETWORK
Special LPG coupling must be installed at the 1/2"
pipe connection.
CAUTION
Make sure that the power cord is installed in such
way to avoid touching hot parts of the cooker
(exhaust at the back side, bottom part of the hob).
High temperature could cause damage to the
insulation.
BURNER SETTINGS
MINIMUM OUTPUT ADJUSTMENT
Before starting any adjustments disconnect the
appliance from the mains power supply.
Adjustments must be carried out with the tap at the
"SAVING" position.
The minimum gas output is correctly adjusted when
the inner cone of the flame arrives at the height of 3
to 4 mm.
If this is not the case, first remove the tap knob and
then tighten or loosen the screw C, depending on
whether the flame is to be reduced or increased.
For butane/propane the screw C must be fully
screwed in.
1. Connection ending
2. Knee
3. Connection hose (connection from the right)
4. Connection hose (connection from the left)
5. Fixing clamp
6. Back cover of the cooker
IMPORTANT PRECAUTION
In case of left side connection (seen from the front)
the hose must be connected by means of a clamp
fixed in the back cover opening. You will find the
fixing clamp in the accessory kit.
CONNECTION TO THE MAINS POWER
NOTE
The combined cooker is a Class I appliance
according to the electric shock prevention degree
and must be connected to the earthed mains power
installation. The connections must be carried out by
qualified personnel only.
The appliance is fitted with power cord plug for
connection to the mains.
For appliances exceeding 2 kW of power it is
recommended to use extra feed circuit with a 16A
circuit breaker.
Power socket to which the appliance is connected
must be accessible at all times.
Faulty power cord must be immediately replaced
with a new one.
EN 9
CONVERSION TO ANOTHER
TYPE OF GAS
Conversion of cooker to another type of gas can be
performed only by qualified technician.
Adhere to the following procedure:
Change nozzles of all burners.
Adjust or change gas pressure regulator if
installed.
Adjust SAVING power position of hob.
Stick new gas setting label with relevant nozzle
information.
To conduct this operation, make the appropriate
entry in "The warranty card."
Page 11

LEVELING THE APPLIANCE
TECHNICAL DATA
COMBINED ELECTRIC AND GAS COOKER
K57CLI1
K57CLB1
Dimensions: height / width / depth (mm)
850 / 500 / 605
Package dimensions: height/ width / depth (mm)
950 / 570 / 716
Cooking plate
Left rear burner (kW)
1,75
Right rear burner (kW)
2,70
Right front burner (kW)
1,75
Left front burner (kW)
1,0
Oven
Top heater (kW)
0,75
Bottom heater (kW)
1,10
Grill heater (kW)
1,85
Circular heater (kW)
2,0
Oven light (kW)
25
Oven fan (W)
30-40
Electric ignition (W)
2
Min. / max. oven temperature
50 / 250° C
Voltage
230 V ~, 50 Hz
Input power (kW)
3,2
Input power – gas (kW)
7,20
Gas type - Natural gas
G 20 – 20 mbar
Gas connection standard
ISO 228-1/ G ½
Appliance category
II
2H3B/P (RU)
Class of protection against moisture
IP 20
Class of protection against electric shock
I
Cooker hob must be leveled in horizontal position by
means of 4 leveling screws supplied with the
appliance.
PROCEDURE
Remove the range receptacle;
Tilt the cooker on one side;
Screw plastic screws into the bottom crossbar
front and rear openings on one side;
Tilt the cooker on the opposite side and fix the
screws into the openings on the other side;
Level the cooker using a screwdriver from the
receptacle area, or by turning the leveling screw
with a hexagon wrench;
The procedure is less complicated if performed by
using leveling screws.
NOTE
Leveling screws are unnecessary if the appliance
height and horizontal position are acceptable.
NOTE
The manufacturer reserves the right to make minor
changes in the Instructions for Use resulting from
relevant technological modifications or
improvements of the product.
EN 10
Page 12

ACCESSORIES
K57CLI1
K57CLB1
Grid
+
Backing tray
+
Gril pan
+
Adjustable feet
+
Fixing clamp
+
Grid for small vessels
+
Nozzle - Natural gas G 20 – 13 mbar
+
Nozzle - Propane-butane G30 – 30 mbar
+
INFORMATION TABLE
Model
K57CLI1
K57CLB1
A – More efficient
B
C
D
E
F
G – Less efficient
A
Energy consuption (kWh)
0,79
Time to cook standard load (min)
53,1
Energy consuption (kWh) /
0,78
Time to cook standard load (min)
43,4
Usable volume (litres)
48
Usable volume:
SMALL
MEDIUM
LARGE
Noice (dB)
46
Min. energy consuption (standby) (W)
0,9
The area of the largest baking sheet (cm2)
1230
MORA MORAVIA, s.r.o., Hlubočky– Mariánské Údolí, Czech republic SAP 456932en
EN 11
Page 13

 Loading...