

Gorenje Classico EC55CLB1, Classico EC52CLI1, Classico EC55CLI1 Instructions For Use Manual
Page 1
Page 2

Dear customer,
You have purchased a product of our new series of appliances. We hope
that our product will serve you well and for a long time.
Read this manual before installation and use of this appliance. It contains
important information concerning how safely and economically operate the
appliance. Save the manual together with the appliance for an eventual
further use.
IMPORTANT INFORMATION
Safety measures
This appliance can be used with children older than 8 years and persons
with decreased physical or mental ability or lack of experience and
knowledge only in cases, when they are under supervision or when they
were introduced to the use of appliance and they understand the
possible dangers. The children should not play with this appliance.
Cleaning and user maintenance shall not be made with children without
supervision.
WARNING: The appliance self and its accessible parts will be hot during
the use. You should prevent the contact with heating elements. Do not
allow the access for small children.
WARNING: Danger of fire: do not lay down objects on the cooking
surfaces.
WARNING: The cooking without supervision with fat or oil on the
cooking surface could be dangerous and could cause the ignition of fire.
NEVER extinguish the fire here with water, but switch out the appliance
first and then cover the flames for instance with pot lid or with a wet
cloth.
NOTICE: The cooking process should be provided under supervision.
Also a short time cooking should be provided under constant
supervision.
WARNING: If the hotplate surface shows cracks, switch out the
appliance and the circuit breaker for to prevent an electric shock.
Use the temperature probe recommended for this oven only.
WARNING: For to prevent the electric shock ensure the switching off of
the appliance before replacing the light bulb.
Do not use rough abrasive cleaning agents or sharp metal scrapes for
cleaning of oven door glass, as they could crack the surface and cause
the breaking of glass.
Never use steam or pressure cleaners for cleaning of the appliance. A
danger of electric shock is threatening here.
EN 1
Page 3

The appliance is not adapted for control with help of external timers or
other special control devices.
WARNING: Stabilizing elements should be mounted for to prevent the
overturn of the appliance. See the installation manual.
WARNING: Use the protection of cooking panel designed with the
producer of cooking appliance or marked with the appliance producer as
suitable in the user's manual only, or protection devices directly built in in
the appliance. The use of incorrect protection devices could cause
accident.
Caution
Only authorized service worker or similar authorized person can connect
the appliance to the electric mains.
Verify whether the data on the nominal supply voltage, indicated on the
type plate, agree with the voltage of your mains.
The cooker is coupled to mains according to the connection diagram.
Please let confirm the date of provided installing in the Guarantee sheet.
Manipulation with the appliance or unprofessional service could lead to
risk of serious injury or to damaging of appliance, eventually. The
installation, the all repairs, modifications or interventions into the
appliance should be provided with an authorized serviceman or similarly
authorized person only.
A device for disconnecting of all poles of the appliance from the mains
into the electric wall circuit before the appliance should be inserted,
where the contacts distance in disconnected state is 3 mm as minimum
(thereafter called in the text as mains switch).
The product is designed exclusively for cooking. Do not use for other
purposes, for instance for room heating. Do not put empty pots on the
cooking zones.
The strangulation of feeding cable in the oven doors could lead to short
circuit and damage the appliance. Mind the correct placing of electric
feeding cables in a safe distance.
The electric feeding cables of the appliance or other appliances should
not come in contact with the cooking plate or with other hot parts of the
cooker.
Switch off the mains switch before providing cleaning or repairs.
Do not use the glass-ceramic surface as a shelf. Cracks or other
damaging of surface can be caused so. Do not heat up food covered
with aluminum foil, plastic pots or similar materials. The danger of
melting, fire or the damaging of hotplate threatens in such cases.
EN 2
Page 4

Give your special attention when cooking in the oven. The pans, sheets,
gratings and the oven walls could be very hot. Use cooking gloves.
Never cover the internal oven walls with aluminum foil and do not put
down the baking pots directly on the oven bottom. The aluminum foil
hinders the air circulation, significantly worsens the baking process and
damages the surface layer of internal cover.
The oven doors could be hot during the baking. Some models have
therefor a third glass installed on the doors, which significantly prevents
the overheating of external door surface.
For prevention of overheating the appliance should not be installed
behind a decoration door.
Never store inflammable or explosive objects, objects aggressive to skin
(paper, wipers, cleaning agents, plastic bags, detergents, sprays) in the
storage shelf of the oven. You prevent so the risk of fire during operation
of the appliance. Only the given accessories (pans, drainage pots and
similar) can be stored there.
The oven door hinges could be damaged when overloaded. Do not put
heavy objects on the opened doors. Do not lean on the opened doors.
Do not sit down nor set foot on the opened oven doors (Mind the
children!) Take off the doors before cleaning of the oven.
The appliance is designed for location directly on the floor. Do not use
any base or pedestal.
The surface of storage shelf could be heated up to a high temperature.
At pulling out of hot shelf the surfaces and objects coming into contact or
being in a close distance can be damaged. Do not operate the appliance
with pulled out shelf. The objects stored in the shelf can be hot; therefor
it is not allowed to put flammable or easily flammable objects in this
storage shelf.
It is unallowable to put any combustible matters near the oven cooking
plates, oven heaters or in the cooker compartment.
If the cooker is not in service, see that all of its switches are off.
We recommend you to turn once every two years to an authorized repair
shop in order to check on the cooker function and to make a
professional maintenance. Thus you prevent contingent troubles and
prolong the cooker service life.
When detecting a flaw on the appliance compartment, do not repair it by
yourself but put the appliance out of operation and ask an authorized
person to make the repair.
The producer bears no responsibility for contingent damages caused by
violating the binding instructions and recommendations set forth in these
instructions.
EN 3
Page 5

Do not use any accessories whose surface finish is damaged or
otherwise defective due to wear or handling.
Life of the appliance: 10 years.
The symbol on the product or on its packaging determines that this
appliance should not be given into the domestic waste. It should be
delivered to collection spot for recycling of electric and electronic
devices. With correct liquidation of this product you can help at
prevention of negative consequences for the environment and for
the human health, which could be else caused with improper
liquidation of this product. More detailed information on recycling of
this product you can receive at competent local authority, service for
liquidation of domestic waste or in the shop, where you had bought
the product.
THE PURPOSE OF THE APPLIANCE
The appliance is designed for usual preparation of food in households and
it should not be used for other purposes. The individual possibilities of its
use are fully described in this manual.
ATTENTION!
If the glass ceramic surface should brake or crack, do not use it.
Disconnect the appliance and call Service immediately.
EN 4
Page 6
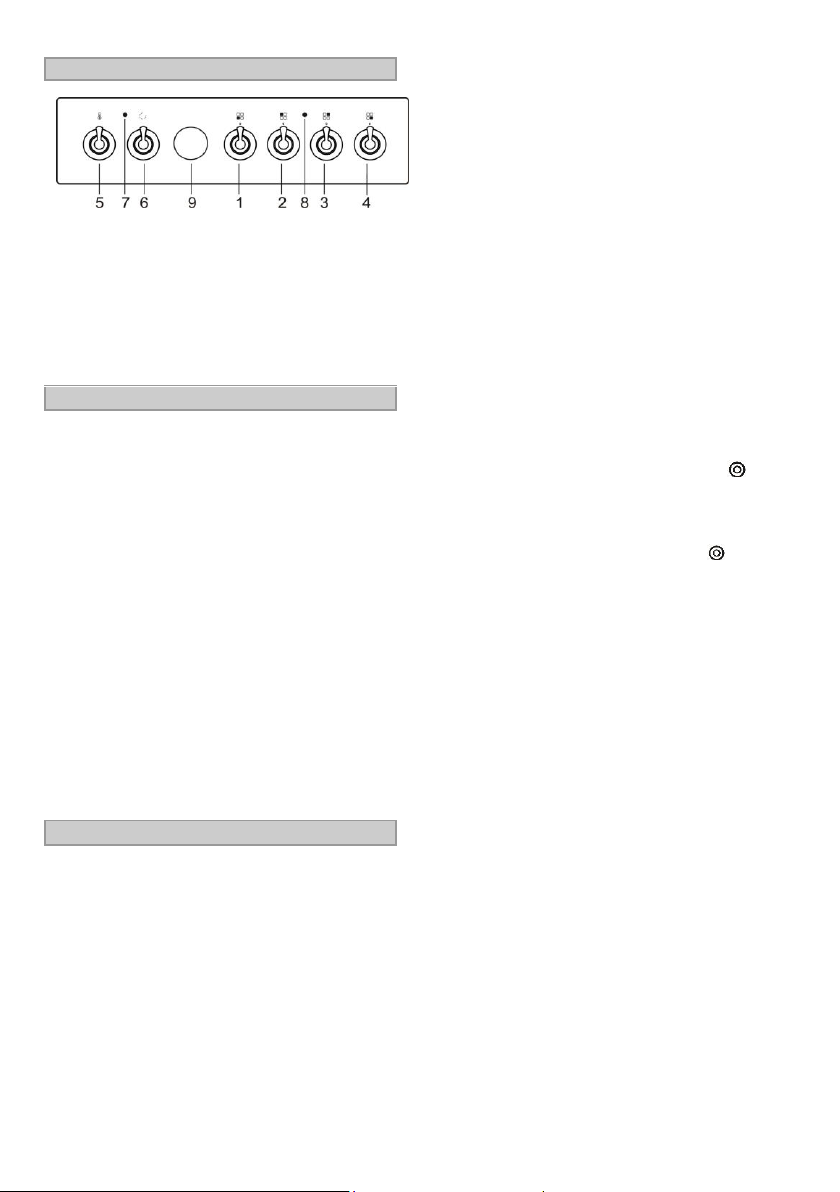
CONTROL PANEL
hours). For longer storage, store the food in a
convenient dish.
THE GLASS CERAMICS COOKING PLATE
WITH COOKING ZONES
The cooking zones of a standard cooker have 9
level capacity levels regulations. The highest
capacity is at regulation level “9”, the smallest one
on the level “1”.
1. Left front hot plate control knob
2. Left rear hot plate control knob
3. Right rear hot plate control knob
4. Right front hot plate control knob
5. Temperature selector
6. Oven function knob
7. Thermostat function signal lamp
8. Power on indicator
9. Electronic timer
BEFORE FIRST USE
Before using the appliance for the first time,
remove the protective and packing material from
the cooker.
Various parts and components of the cooker and
package are recyclable. Handle them in
compliance with the valid regulations and national
legislation.
We recommend the cleaning of cooker and
accessories before first use.
After drying of cleaned surfaces switch on the
main switch and observe the instructions bellow.
It is not allowed clean and dismount parts which
are not mentioned in the paragraph concerning
cleaning.
OVEN
Turn the control knob to the top and bottom heater
position before first use of the oven. Set the
temperature selector to 250°C and leave the oven in
operation with the door shut for 1 hour. Provide
proper room ventilation. This process will remove
any agents and odors remaining in the oven from
the factory treatment.
COOKING WITH THE APPLIANCE
NOTICE
Solely adults may operate the appliance in
accordance with these instructions. It is not
allowed to leave small children without
supervision in a room where the appliance is
installed.
Children should be supervised to ensure that they
do not play with the appliance.
An electro cooker is an appliance whose
operation requires supervision.
The baking plate in grooves can be loaded up to
3 kg as maximum. The gridiron with a pan or
baking plate can be loaded up to 7 kg as
maximum.
The baking plates and pans are not designed for
a long-term storage of foodstuffs (longer than 48
We can use the electric cooking zones for cooking,
roasting and similar; we recommend the use of pots
with even bottom for these purposes.
The overheating of zone under the glass ceramics
plate is prevented with help of a temperature limiter.
The signal light of residual heat in the front part of
glass ceramics plate is signaling the increased
temperature of cooking zone surface, even when the
heating element is switched off already.
The energy of hot cooking zone can be used for
other purposes. This signal light switches off after
cooling down of cooking zone, when no burning
danger exists more here.
The so called "Hi-light" and the double cooking zones
have a stepless control of capacity.
GLASS CERAMIC HOB - DUOZONE
The middle part of cooking zone with diameter Ø
120 mm is controlled with turning of the button for
regulation of energy to the right. The capacity can be
adjusted smoothly from 0 to 700 W.
At turning of button to the right up to maximal
capacity the cooking zone with Ø 180 mm diameter
is switched on. The cooking zone is then working on
maximal capacity 1700 W according to selected
level 1 (min.) up to 9 (max.). The both parts of the
zone will be switched off at turning the button to its
zero position.
The overheating of zone under the glass ceramics
plate is prevented with help of a temperature limiter.
The signal light of residual heat in the front part of
glass ceramics plate is signaling the increased
temperature of cooking zone surface, even when the
heating element is switched off already.
The energy of hot cooking zone can be used for
other purposes. This signal light switches off after
cooling down of cooking zone, when no burning
danger exists more here.
BASIC RULES FOR USING OF GLASS
CERAMIC HOBS
Do not switch on the cooking zone before puting
a pot on it and never use the hotplate for heating
up the room.
Whatever fat or oil on the cooking zones could
ignite. Therefore be careful at using of such
materials during food preparation (e.g. chips) and
always watch the whole cooking process.
Use pots with even bottom only; the bottom
surface should be without impressed impurities,
which could cause scratches.
The grains of sand could cause scratches, which
could not be removed. Put pots with clean bottom
on the cooking surface only. Lift the pot before
changing its position on the hotplate.
Do not use pots from clay (crockery); they could
scratch the surface of hotplate.
EN 5
Page 7

Do not use the glass-ceramic surface as a shelf.
Cracks or other damaging of surface can be
caused so. Do not heat up food covered with
aluminum foil, plastic pots or similar materials.
The danger of melting, fire or the damaging of
hotplate threatens in such cases.
Do not allow the overrunning of pots. The
hotplate is protected against overheating, but a
pot with overflown content could be heated so
much that it could damage the plate. Such
damage is not covered with the warranty.
Never use vessels with deformed bottom. A
convex or concave bottom can have impact the
overheating protection and the appliance could
be excessively hot. This could cause the rupture
of glass-ceramic plate and the damaging of the
bottom.
The glass-ceramic plate is very solid but it is not
unbreakable. The plate can break when an object
falls with its edge on the plate. Such damage
comes out immediately or after a while.
Disconnect the damaged hotplate from the main
immediately and do not use it.
Never put on the cooking zones pots with humid
bottom or lids with condensed water. The cooking
zones could be damaged with it.
Never let cool down the utensils directly on the
cooking zone. Moisture could be created under
the vessel and this can cause of its corrosion.
At cleaning remove the rests of food from the
cooking surface first and this immediately during
the cooking and provide the final cleaning after
finishing of cooking. Special care should be
devoted to removing of sugary burnt-on rests;
they can at long impact affect the structure of
glass-ceramic plate.
Make you sure that all rests after cleaning agents
OVEN INSIDE
Oven is fitted with three level side guides for
inserting the grid.
A top and bottom heating elements are inside of the
oven. An air distributor and oven a nd a fa n ar e
si tu at ed i n th e re ar o f th e ov en .
OVEN OPERATION
The oven function mode is selected with the oven
function knob. The knob can be turned in both
directions.
Operation temperature is set with the temperature
selector, ranging from 50 - 250°C. Clockwise
rotation of the selector sets higher temperature, and
vice versa, anticlockwise turning reduces the
temperature.
Forcible overturning of the zero position will lead
to the thermostat damage!
WARNING!
Do not cover oven bottom with aluminum foil, do not
place directly on the bottom an oven tray, baking
pan, container, food or food products. Such
coverage causes local overheating of the bottom
surface of the bottom of the furnace and the furnace
can be irreparably damaged.
INSERTING OF GRID IN THE OVEN
are completely removed after cleaning, as they
could damage the glass-ceramic plate after
heating up of cooking zones.
Metal shining stains appear after using of
aluminum vessels or after use of unsuitable
cleaning agent; the stains can be removed after
repeated cleaning only.
The scratches of glass-ceramic plate can be
caused for instance with grains of sand caught on
vegetables, with the rests of unsuitable cleaning
powder or of a cleaning agent containing abrasive
particles.
Wipe off gently with humid clout the plate
contaminated with earth, sand or similar abrasive
agents and then clean it with a liquid cleaning
agent designed for glass-ceramic surfaces.
Never use steel wool, washing sponge or other
OVEN FUNCTIONS AND THEIR USE
cleaning matters with rough surface. We do not
recommend also the agents supporting corrosion,
as for instance sprays for cleaning of roasters
and for removing of stains.
During cooking the borders of vessels should not
come in contact with or put on the frame of the
glass-ceramic plate.
The producer is not responsible for defects of
glass-ceramic plate caused with unsuitable type
of used vessels or for defects caused with
unsuitable or inappropriate manipulation.
The oven illumination can work at all oven functions.
EN 6
Page 8

Statical oven heating with the top and botton
heaters.
The thermostat can be set to a temperature within
50-250°C.
Use this function to heat ready made food. Set the
temperature to 70°C and place the food onto the
support grid inserted in the second guide level.
Reheating time is a matter of your choice, but make
sure it is not too short, or the food will not be
thoroughly reheated.
Bottom heater in operation. The temperature
selector can be set anywhere between 50-250°C.
Tip: This function is used for baking which requires
high temperature from below.
Top heater in operation. The temperature selector
can be set anywhere 50-250°C.
Tip: This function is used for baking which requires
high temperature from above (crusting).
Grilling by infrared radiation. The temperature
selector is set to the maximum position.
Grilling assisted with oven fan.
Temperature inside the oven is higher towards the
top. The temperature selector is set between the
150-250°C range.
Tip: This function is also used for grilling or baking
bulky meat chunks at high temperature. Oven door
is closed.
Grilling assisted with oven fan.
Temperature inside the oven is higher towards the
top. The temperature selector is set between the 50250°C range.
Tip: This function is also used for grilling or baking
bulky meat chunks at high temperature. Oven door
is closed.
»PIZZA SYSTEM«
This new cooking mode is ideal for making pizza.
Pizza is baked in a preheated oven at a temperature
of approx. 190-210°C. Baking tray with pizza is
placed in bottom guide level for 15 – 20 minutes,
depending on the size of pizza. Noticed baking time
is for information only (depends on sort of pizza).
Warming zone – keep warm of done dish
(baking grid is in second level)
Applying lower heater/ Aqua Clean
Heat is applied only by the bottom side of the oven.
Use thisoption for browning the bottom side of the
food (baking heavy,moist pastry with fruit dressing).
The temperature selectionbutton in such cases may
be selected as required.Lower heater may also be
used for the cleaning of oven. Youwill find details in
the section Cleaning and maintenance.
BAKING AND ROASTING CHART
Below are some recommended temperatures for the
preparation of typical food for your help.
50-70°C Drying
130-150°C Stewing
150-170°C Preservation
180-220°C Baking of risen dough
220-250°C Meat roasting
It is necessary to try out a precise temperature value
for every sort of food and baking or roasting method.
Before putting the food in, it is necessary to preheat
the oven in some cases.
If the selected temperature is not reached, the
thermostat signal light is on. If the selected
temperature is exceeded, the thermostat signal light
goes out.
The best results are with inserted gridiron, on which
a baking plate or pan is laid down, into the second
groove from bellow on sides of the oven.
If possible, do not open the oven door during the
process of baking. The thermal regime of an oven
will thus be disturbed, the baking time prolonged and
the food can be burnt.
FOOD GRILLING
Grilling with the oven door shut.
The position of grid depends on the mass and the
type food.
As a general rule the grid should be placed in top
level guide.
ATTENTION
When using a grill, the accessible parts (oven door,
etc.) may become very hot, so make sure that
children are well away at a safe distance from the
oven.
GRILLING MEAT ON A GRID
Put the prepared food on a grid.
Slide the grid into the side guides in such way that
loose portion of the grid (with fewer cross bars) is
turned towards you.
Slide a shallow baking pan filled with water one level
below the grid to catch the dripping gravy from the
grid.
EN 7
Page 9

ELECTRONIC PROGRAM TIMER
2
3
A
5
1
4
A Function selection knob
1 Oven delayed start
2 End oven operation
3 Minute minder
4 Time display
5 Clock
Select the time settings by consecutively pressing
the (A) knob. Selected symbol will flash on the
display. Rotate the (A) knob to set the function
and press to confirm. Clock hands will
automatically move to time display. The set
symbols will remain lit.
Each time you press the (A) knob, this will be
confirmed by a short acoustic signal.
Press and hold the (A) knob for 2 seconds to
delete the set function.
SETTING THE TIME OF DAY
If the time display symbol (4) is flashing (after
connecting the appliance for the first time or
following a power failure), press the (A) knob and
hold it for two seconds until the flashing stops.
Then select the time display (4) by consecutively
pressing the (A) knob. Time display will flash
when selected.
Rotate the (A) knob to set the time.
Confirm the setting by pressing the (A) knob
again. If nothing is pressed, the setting will be
stored automatically after a few seconds.
OVEN OPERATION WITHOUT TIMER
SETTINGS
After connecting the appliance to the power
mains for the first time or after a power supply
failure, time display symbol (4) will flash.
In order for the oven to operate, press the (A)
knob and hold it for two seconds. Time display will
stop flashing.
The oven can be used without restrictions if no
timer settings are made.
EN 8
OVEN OPERATION WITH PROGRAM
TIMER SETTINGS
Program timer can be used to program oven
operation in two ways:
Setting the stop time - the oven will stop
operating at the preset time.
Setting delayed start - the oven will
automatically start and stop operating at a preset
time.
SETTING THE STOP TIME
This mode allows you to set the time at which you
wish the oven to stop operating. The longest
possible setting is 15 hours from the current time.
Check if the clock is set accurately to current
time.
Select the (2) symbol by consecutively pressing
the (A) knob until the symbol starts to flash.
Rotate the (A) knob to set stop time.
Confirm the setting by pressing the (A) knob
again. Clock hands will move to time display. The
oven stop symbol will light up.
Switch on the oven (use the oven knobs to set the
operating mode and temperature). The oven will
start operate at the set time and stop and the
selected stop time.
When the clock reaches the selected stop time,
the oven will be switched off, which will also be
indicated by an intermittent acoustic signal. The
acoustic signal can be switched off by pressing
the (A) knob; otherwise, it will switch off
automatically after 1 minute. The symbol (2) will
flash. To continue cooking, press the (A) knob
and hold it for 2 seconds, and set a new cooking
time if necessary.
SETTING THE DELAYED START
This mode allows you to specify the time when the
oven should start to operate (cooking start time) and
the time when you wish the cooking process to stop
(end time). Stop time may be delayed by a maximum
of 12 hours relative to the current time of day;
cooking duration may be set to a maximum of 3
hours.
Check if the clock is set accurately to current
time.
Setting the start time: Select the (1) symbol by
pressing the (A) knob. Rotate the (A) knob to set
the start time and confirm it by pressing the (A)
knob. The symbol for the end of operation will
start to flash (2).
Set the stop time: Rotate the (A) knob to set the
stop time and confirm it by pressing the (A) knob.
The clock hands will turn to clock display.
Symbols (1) and (2) will be lit up.
The timer will wait for the start of the cooking
process.
Set the oven – use the oven knobs to set the
operating mode and temperature.
The oven will start to operate at the start time,
and stop operating at the stop time.
When the clock reaches the selected stop time,
the oven will be switched off, which will also be
indicated by an intermittent acoustic signal. The
Page 10

acoustic signal can be switched off by pressing
the (A) knob; otherwise, it will switch off
automatically after 1 minute. The symbol (2) will
flash. To continue cooking, press the (A) knob
and hold it for 2 seconds, and set a new cooking
time if necessary.
SETTING THE MINUTE MINDER
The clock can also be used as a minute minder
which will sound an alarm upon expiry of a set
amount of time. The minute minder can only be
selected when the program timer is not programmed
or in use.
Select the (3) symbol by consecutively pressing
the (A) knob until the symbol starts to flash.
Rotate the (A) knob to set the time when you wish
the minute minder to sound the alarm. The
longest possible setting is 3 hours.
Confirm the setting by pressing the (A) knob
again. Clock hands will automatically turn to lock
display and the symbol (3) will be lit up.
When the time you set runs out, an intermittent
acoustic signal will be sounded. The acoustic
signal can be switched off by pressing the (A)
knob and holding it for 2 seconds; otherwise, it
will switch off automatically after 1 minute.
DISPLAYING THE SETTING
Whenever a timer function is set, you may check it
by pressing the (A) knob. The clock hands will briefly
move to the set value and then return to display the
current time.
DELETING A SETTING
Delete the setting by pressing the (A) knob and
holding it for 2 seconds. The symbol of the deleted
function will be switched off.
MAINTENANCE AND CLEANING
OF THE COOKER
Keep to the following principles while cleaning
or maintaining the cooker:
Set all knobs in off position.
The mains circuit - breaker placed before the
appliance must be in OFF position.
Wait until the cooker is cool.
LACQUER-COATED AND PLASTIC
SURFACES
Clean the buttons / knobs and the door handle with
a soft cloth and liquid detergents intended for
cleaning smooth lacquer-coated surfaces. You may
also use the cleaners made especially for this type
of surfaces; in this case, follow the manufacturer’s
instructions.
WARNING
The above surfaces should never come into contact
with oven cleaning sprays, as these will permanently
damage the aluminum parts.
COOKING PLATE
Clean the cold hob after each use. Rest impurities
could be singed during next cooking.
Never use abrasive means scratching the hob. For
cleaning use only special detergents for glass
ceramic hobs (for instance Vitroclean).
Do not use abrasive detergents, spring matters or
sponge with rough side. These things can scratch
the glass ceramic hob. For cleaning use only special
detergents specified for cleaning of glass ceramic
hobs.
LIGHT IMPURITIES
Use damp sponge and after cleaning dry up the
surface. Water stains caused by boiling over can be
removed by lemon juice or vinegar.
HARD IMPURITIES
Remove them with help of concentrated cleaning
detergent which should be spread on the hob.
Remove singed pieces by a scraper and let
detergent working for a few minutes. Than clean
carefully the surface with cold water and dry out.
The cleaning detergent could be aggressive during
the next operation.
SUGAR IMPURITIES (JAM, JELLY...)
Remove immediately with a scraper in hot stage
already. In other case permanent traces can appear.
Clean with usual method after cooling down.
METAL GLISTENING SPOTS
They can appear when using aluminum utensils or
impropriate cleaning detergent. Removing such a
spots is possible with repeating of cleaning process.
Color stains on the hob surface are usually caused
with not removed singed impurities. These stains
have no influence to the function of the glass
ceramic hob.
RUB DOWN OF DECOR
This can be caused with abrasive cleaners or long
time grazing of a pan on the hob. Dark stains can
appear on the hob.
NOTICE
Remove rest of meals from hob during cooking and
final cleaning make when finish cooking. Sugar
stains (jam, jelly,..) remove immediately by scraper.
In other case permanent traces can appear.
OVEN
Clean the oven walls with a damp sponge with
detergent. If there are baked rests on the wall, use a
special detergent for enamel. Carefully dry up the
oven after cleaning.
Clean the oven only when cold. Never use abrasive
means scratching the enameled surface.
EN 9
Page 11

Wash the oven appurtenances with a sponge and
detergent or employ a washing-up machine
(gridiron, pan, etc.) or use suitable detergent to
remove the rough impurities or burns as the case
may be.
AQUA CLEAN
The oven may be cleaned in a traditional mode
(using ovencleaners and sprays).The following
procedure is recommended for regular cleaningof
the oven (after each use):Turn the mode selection
button to the position . Set thetemperature
control button of the cold oven to 50°C. Pour 0,4 lof
water into the baking pan and insert it into the
bottom gridlead. After thirty minutes the food
residues upon the enamelcoating are softened, and
may be easily wiped off with a moistcloth.
CHANGE OF THE OVEN LAMP
Set all the control knobs to "off" and disconnect
the cooker from the mains
Unscrew the lamp glass cover in the oven by
turning left
Unscrew the faulty bulb
Put and screw a new bulb in
Mount the bulb glass cover.
NOTE
For illumination it is necessary to use a bulb of type
T 300°C, E14, 230 - 240 V, 25 W.
1. Glass cover
2. Lamp
3. Sleeve
4. Oven rear wall
OVEN
Procedure for cleaning of internal glass door.
EN 10
Page 12

CLAIMS
In case of any defects of the appliance during
warranty period, do not attempt to repair it by
yourself. Make a claim at an authorized dealer or at
place of purchase and ensure that you are in
possession of the Certificate of warranty. Beware
that in the absence of duly completed Certificate of
warranty your claim is null and void.
NOTE
The appliance will be delivered to you with the
appropriate protective wrapping. This packaging
material is valuable and can be recycled if such
facilities are available in your locality.
METHODS OF UTILISATION AND
LIQUIDATION OF PACKAGES
The collection of packages at collecting places in
your locality guarantees their recycling.
Corrugated board, wrapping paper
- sale to the collecting places
- in garbage containers for collection paper
Wooden parts
- other utilization
- to with the municipality destined place for refuse
dumping
Wrapping foil and bags
- in garbage containers for plastic parts
LIQUIDATION OF AN APPLIANCE
FOLLOWING ITS LIFE EXPIRATION
The appliance comprises valuable materials, which
ought to be newly utilized. Dispose the appliance on
the collecting place or on with the municipality
destined place for refuse dumping.
This appliance is marked in accordance with the
Directive 2012/19/EU on waste electrical and
electronic equipment - WEEE.
After expire of life time give the appliance to the
collecting place for used electric and electronic
equipment.
INSTRUCTIONS AND SETTINGS
INSTALLATION
CONNECTION OF THE COOKER TO THE
ELECTRIC MAINS
A device disconnecting the appliance from mains,
whose off contacts of all poles are in a minimum
distance of 3 mm, must be built in the stable
electrical energy distribution before the appliance.
There is the recommended three-phase connection
of the cooker with the aid of an H05RR-1.5 type
connecting cord (previously CGLG 5Cx1.5) whose
ends are to be adjusted to figure 4.
It is necessary to brace the conductor ends with
pressed terminals against fraying.
For single-phase connection use an H05RR-F3G-4
(previously GGLG3Cx4) type connecting cord and
brace the conductor ends to figure 5.
After bracing the conductor ends beneath the
terminal board screw heads place a cord in the
terminal board and secure it by a clip against tearing
(figure 5). Eventually close the terminal board cover.
Solely an authorised, skilled person may install the
cooker. The authorised person is obliged to set the
cooker cooking plate in horizontal position, to
connect it to the mains and to check up on its duty.
Installation of the cooker must be confirmed in the
certificate of warranty. The electric cooker is a heat
consumer, the installation and location of which
must correspond with local standards in force.
For the cooker connection we advise using a
connecting cable:
- Cu 3 x 4 mm2 as minimum - for single-phase
connection (circuit breaker 35 – 38 A to the type)
- Cu 5 x 1.5 mm2 as minimum - for three-phase
connection (circuit breaker 3x16A)
IMPORTANT NOTICE
At any electric cooker disassembly or assembly
besides its current use it is necessary to disconnect
the appliance from mains and to keep it out of
service.
In installation of the appliance, it is necessary to
do in the light of its duty chiefly the following:
Verification of the correctness of mains
connection,
A check on the duty of heaters, control and
governing elements,
Presentation to the client of all functions of the
appliance and familiarisation with its service and
maintenance.
NOTICE
The electric cooker is a Class I appliance according
to the electric current injury prevention degree and
must be interconnected with the mains protective
conductor.
EN 11
Page 13

Solely company authorized to provide such
activities may perform the installation of this
hotplate and it should be installed in compliance
with local standards and regulations.
This appliance is intended for installation into a
normal internal environment (for instance kitchen,
dwelling space, etc.).
This appliance can be not installed in a bath room
and similar rooms with higher humidity.
It can be mounted in a kitchen line without side gap
(the minimal space in the furniture is 500 mm).
To the appliance close walls and furniture (floor,
kitchen rear wall, side walls) should be resistant
against temperatures up to 100°C or a suitable
thermal insulation should be used.
The distance between the cooking plate and the
kitchen hood should be minimally 650 mm („X“), or
according to recommendation of the hood producer.
The appliance is designed for location directly on the
floor. Do not use any base or pedestal.
LOCATION
LEVELING THE APPLIANCE
Cooker hob must be leveled in horizontal position by
means of 4 leveling screws supplied with the
appliance.
Remove the cooker receptacle;
Tilt the cooker on one side;
Screw plastic screws into the bottom crossbar
front and rear openings on one side;
Tilt the cooker on the opposite side and fix the
screws into the openings on the other side;
Level the cooker using a screwdriver from the
receptacle area, or by turning the leveling screw
with a hexagon wrench;
The procedure is less complicated if performed by
using leveling screws.
NOTE
Leveling screws are unnecessary if the appliance
height and horizontal position are acceptable.
WARNING
In order to prevent tipping of the appliance, this
stabilizing means must be installed.
INSTALLATION
The stabilizing agent against overturning appliances
- console - is as shown attached to the wall using
dowels and screws. Subsequently, the appliance is
placed against the wall so that the attached bracket
is inserted into the hole in the rear wall.
INSTALLATION PROCEDURE
Set the cooker to the designated place, or align
with adjustability.
Pull out the cooker and measure the distance "A"
from the floor.
Screw the wall bracket as shown (one screw into
the center of the slot).
Push the cooker into place and verify the
functionality of the console (or height-adjustable
bracket).
Pull out the cooker and attach the second bracket
screw.
Slide the cooker into place.
EN 12
Page 14

NOTE
TECHNICAL DATA
ELECTRIC COOKER
EC55CLB1
EC55CLI1
EC52CLI1
Dimensions
Height / Depth / Weight (mm)
850 / 500 / 605
Left rear (kW)
1,20
1,20
1,20
Left front (kW)– Ø 180 / 120 mm
1,70 / 0,70
1,70 / 0,70
1,70 / 0,70
Right rear (kw)
1,80
1,80
1,80
Right front (kW)
1,20
1,20
1,20
Oven
Top heating (kW)
0,75
0,75
0,75
Bottom heating element (kW)
1,10
1,10
1,10
Grill heater (kW)
1,85
1,85
1,85
Circular heater (kW)
- - -
Oven fan (W)
30 - 40
30 - 40
-
Oven light (W)
25
Min. / max temperature oven
50 / 250°C
Nominal power supply voltage
230 / 400 V ~
Total power of the appliance (kW)
7,90
7,90
7,8
INFORMATION TABLE
MODEL
EC55CLB1
EC55CLI1
EC52CLI1
A – More efficient
B
C
D
E
F
G – Less efficient
A
A
A
Energy consuption (kWh)
0,79
0,79
0,94
Time to cook standard load
53,1
53,1
56,7
Energy consuption (kWh) /
0,79
0,79
Time to cook standard load
47
47
Usable volume (litres)
48
48
51
Usable volume:
SMALL
MEDIUM
LARGE
Noice (dB)
46
46
Min. energy consuption (standby) (W)
0,9
0,9
0,9
The area of the largest baking sheet
1230
The producer reserves the right of minor
modifications in the instructions resulting from
innovations or technological changes of the product.
EN 13
Page 15

ACCESSORIES
EC55CLB1
EC55CLI1
EC52CLI1*
Grid + +
+
Fat pan + +
Backing tray + +
+
Scraper + +
+
Adjustable feet + +
+
Console + +
+
* Cookers are equipped with new secure door hinges COMFORT. These special hinges guarantee very quiet
and gentle closing of the oven door.
SERIAL NUMBER
X XX X XXXX
X………………….Year of production
XX………………Week of the year
X…………..Purpose of usage of appliance
XXXX…..Sequence of product in the week
Lifetime – 10 years
Does not contain harmful substances - RoHS
Earthing sign
MORA MORAVIA, s.r.o., Hlubočky– Mariánské Údolí, Czech republic SAP 457196en
EN 14
Page 16

Page 17

 Loading...