

Page 1
Page 2

2
Page 3

3
EN
Dear customer!
This electric integrated gas cooker is manufactured for household use.
Our appliances are packed in the environmentally friendly materials which may be
recycled, deposited or destroyed without any hazard to the environment. Such packaging
materials are also labeled accordingly.
Once the life cycle your appliance is over, make sure not to pollute the environment, and
deliver it to the authorized collectors of old household appliances.
Instructions for use
Instructions for use have been prepared for the user, and describe the appliance and the
way it is handled. These instructions are intended for various types of the appliance, so
you may find some descriptions for the functions that your
particular appliance may not have.
These instructions are only valid of the country symbol is indicated on the appliance. If
there is NO county symbol in the appliance, technical instructions should be observed for
adapting the appliance to comply with the requirements and regulations for use in your
country.
Instructions for
connection
The appliance must be connected in compliance with the instructions attached to it, as
well as in compliance with relevant regulations and standards. The connection may only
be performed by a qualified person.
Rating plate
The rating plate indicating the basic information on the appliance is attached to the lower
side of the hob.
Store these instructions in a place where they are always readily accessible; if pas
the appliance on to another person, the instructions should also be included.
The Manufacturer strives for continuous improvements. For this reason, the text
and illustrations in this book are subject to change without notice.
Important warnings 4
Installation 5
Connecting to the power mains 7
Connecting to the gas supply 8
Technical informations 9
Operation 11
Cleaning and maintenance 12
Special warnings and fault reporting 14
Page 4
4
IMPORTANT WARNINGS
• Installation of the appliance (installation class:3) into a kitchen worktop and its connection to the power mains and the
gas supply may only be performed by an adequately qualified technician.
• When the appliance is in use, additional heat and moisture are emitted into the room. When the appliance is used for a
prolonged period of time at a high performance level, intensive ventilation or use of kitchen hood may is required in the
room where the appliance is installed.
• Do not use the gas burners, if the flame seems unstable.
• If you smell gas in the room, immediately close the gas supply valve either on the gas bottle or gas pipeline, extinguish
all sources of open fire (including cigarettes), aerate the room, do not turn on any electric appliances, and call a natural
gas expert.
• The main gas supply valve should also be closed if gas burners will be out of use for a long period of time (e.g. when
going on holiday).
• The appliance and its accessible parts become hot during use. Care should be taken to avoid touching heating elements.
Children less than 8 years of age shall be kept away unless continuously supervised.
• Prevent the children to hang around the appliance and warn them properly against the danger of burns.
• This appliance can be used by children aged from 8 years and above, and persons with reduced physical, sensory or
mental capabilities or lack of experience and knowledge if they have been given supervision or instruction concerning
use of the appliance in a safe way and understand the hazards involved.
• Children shall not play with the appliance.
• Cleaning and user maintenance shall not be made by children without supervision.
• WARNING: Unattended cooking on a hob with fat or oil can be dangerous and may result in fire.Be sure have the
preparation of such food (fries) under constant control. Never try to extinguish a fire with water, but switch off the
appliance and then cover flame e.g. with a lid or a fire blanket.
• WARNING: Danger of fire: do not store items on the cooking surfaces.
• WARNING: If the surface is cracked, switch off the appliance to avoid the possibility of electric shock.
• Do not use high-pressure steam cleaner or hot steam to clean the appliance.
• Never place any metal objects upon the hob surface, such as knives, forks, spoons, pot lids, and the like, as they may
get very hot.
• The hob can not be activated by external timers or remote controls systems.
• Do not use the cooking hob for room heating.
• Do not place empty pans on the hob.
• Make sure that the parts of the burners are correctly positioned / installed.
• Hob surface should not be used as a worktop. Sharp objects may cause scratches.
• Preparing food in thin aluminum of plastic containers on hot cooking zones is not allowed. Do not place any plastic
objects or aluminum foil on the hob surface.
• If there is a wall power outlet located near the hob and another appliance is plugged into it, make sure the power cord
does not come into contact with the hot cooking zones.
• Do not store any temperature-sensitive objects, materials, or substances underneath the hob, e.g. detergents, sprays,
etc.
• In case of a failure of the appliance, immediately disconnect the appliance from the power mains and contact the service
center.
• The appliance is manufactured in compliance with the relevant effective safety standards.
• After a prolonged use of cast iron plates, the area of the plate and the edge of the cooking zone may discolour. Repair
service is not covered by the warranty.
• Don't connect the hob to the power supply with an extension cable or multiple sockets, because they don't assure a
sufficient safety (e.g. overheating risk of multiple sockets).
• Connect the equipment to a permanent connection.
• Don't use pan, pots, grills or grilled stones, of bigger size than the maximum specified for every single
burner; in particular you must not cover more burners simultaneously. The accumulation of heat could damage
the appliance.
The symbol on the product or on its packaging indicates that this product may not be treated as
household waste. Instead it shall be handed over to the applicable collection point for the
recycling of electrical and electronic equipment. By ensuring this product is disposed of
correctly, you will help prevent potential negative consequences for the environment and human
health, which could otherwise be caused by inappropriate waste handling of thisproduct. For
more detailed information about recycling of this product, please contact your local city offi ce,
your household waste disposal service or the shop where you purchased the product.
Page 5
5
INSTALLATION
Important warnings
x Installation of the appliance into a kitchen worktop must be performed by an adequately qualified technician.
x Veneer or other finish of the piece of kitchen furniture into which the hob is to be built in should be treated with heat
resistant glue (100°C); otherwise, the worktop finish may be discolored or deformed.
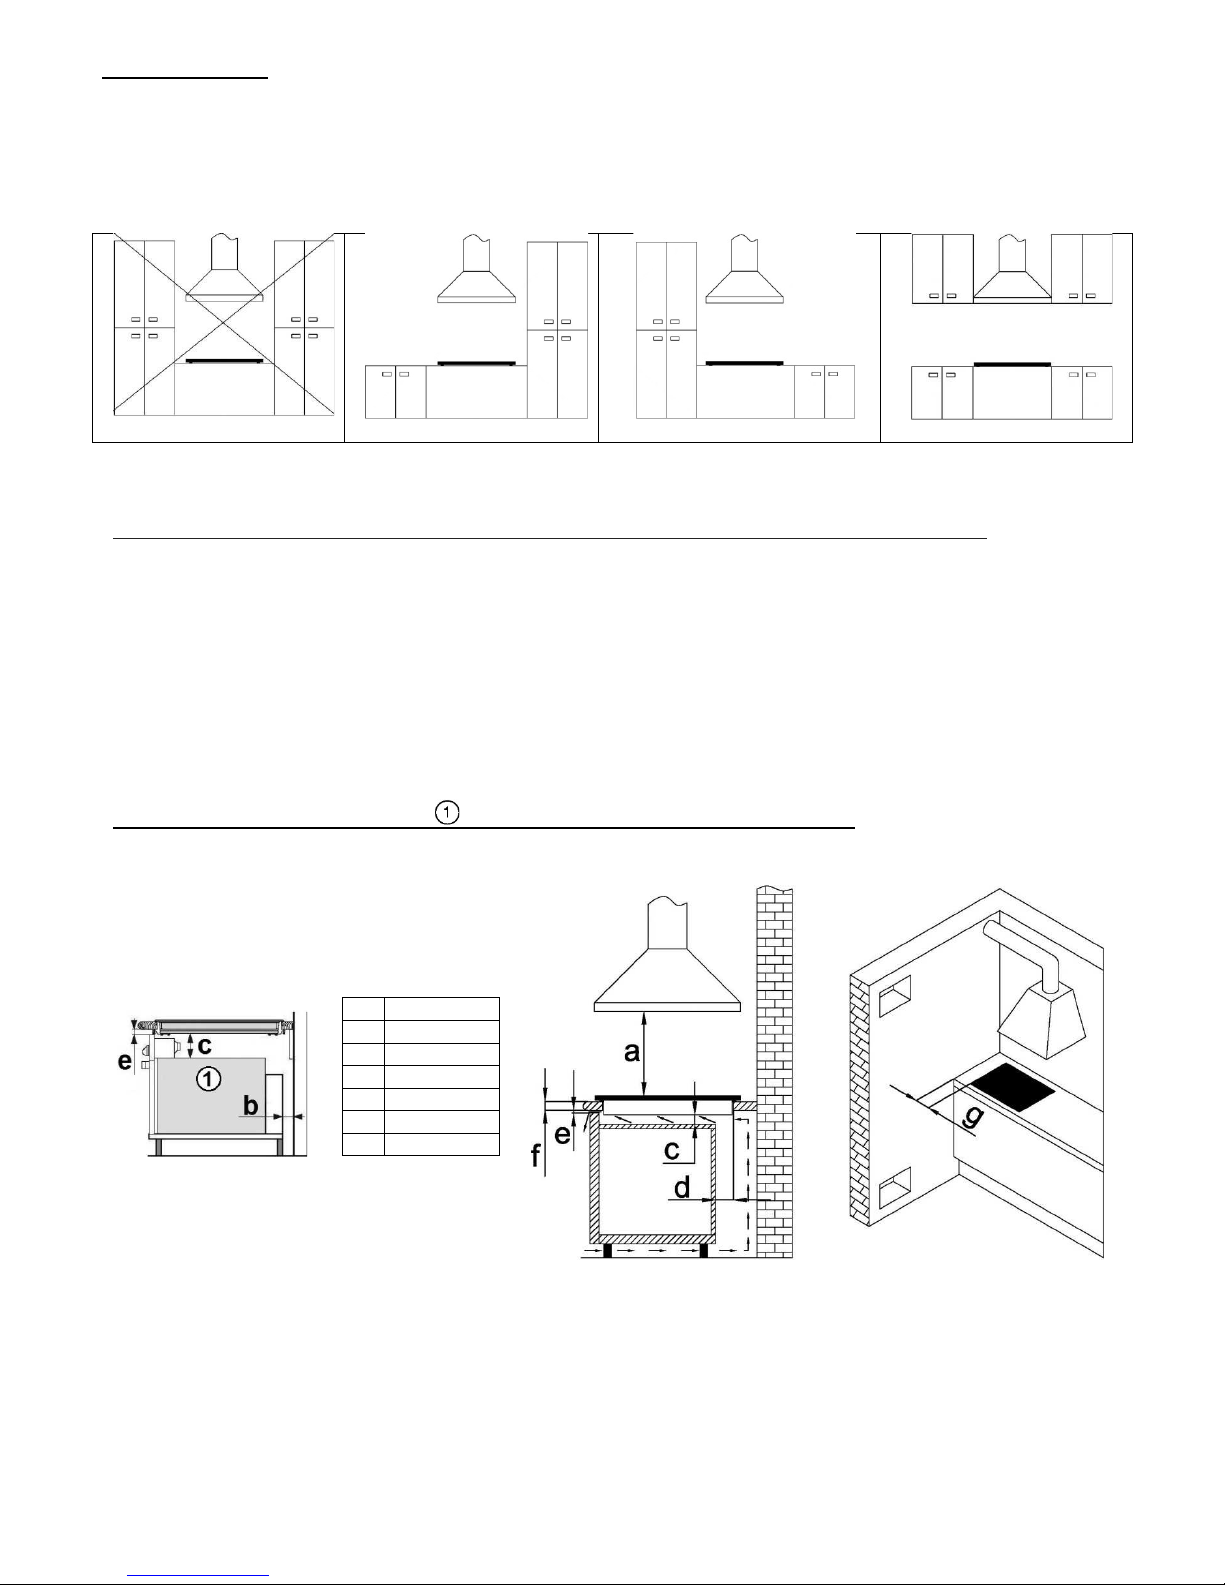
x Ideally the appliance should be installed with plenty of space on either side. There may be a wall at the rear and a tall
unit or wall at one side. On the other side, however, no unit or divider should stand higher than the appliance.
NOT ALLOWED NOT RECOMMENDED NOT RECOMMENDED RECOMMENDED
x Use of massive wood decoration plates or boards on the worktops behind the appliance is not permitted.
x The distance between the appliance edge and the adjacent tall kitchen furniture element should amount to no less than
250 mm.
x All sizes and distances to be taken for the proper functioning of the appliance are shown in figures below.
x The kitchen furniture element underneath the hob should not be fitted with a drawer. If the kitchen furniture element as a
horizontal partition wall, it should be installed no less than min 20mm from the lower surface of the appliance. The space
between the partition wall and the appliance must be empty; no objects should be placed into that gap.
x Hanging, or wall-mounted kitchen elements should be installed high enough not to interfere with the work process.
x A minimum safety distance must be maintained between the appliance and the cooker hood above it. See the cooker
hood manufacturer's operating and installation instructions for details. If the manufacturer's instructions are not available
or, if there are any flammable objects (e.g. utensil rails, wall units etc) above the appliance, a minimum safety distance of
at least 800 mm must be maintained between them and the appliance below.
x Fit the wall units and cooker hood before fitting the appliance to avoid damaging it.
x The front part must have an opening of no less than 5 mm.
x The appliance must not be installed over a fridge, fridge-freezer, freezer, dishwasher, washing machine, washer-dryer or
tumble dryer.
x Only ovens fitted with a cooling fan may be installed underneath this appliance.
x Before installing an oven, the rear wall of the kitchen furniture element should be removed in the area of the appliance
cut-out. Furthermore, a gap of at least 5 mm should be left at the front side.
a 800 mm
b 50 mm
c 20 mm
d 80 mm
e 5 mm
f 25-40 mm
g 250 mm
Page 6

6
A (mm) B (mm) C (mm) D (mm) E (mm) F (mm) G (mm) H (mm)
426147-439193
426149-439421
439422
600 510 560 480 45 3 50 600
426153-450420
453969-429255
453969
750 510 720 480 45 3 50 600
426150-426152
439425-429253
439427-429254
585 510 560 480 40 9 50 600
426166-426167 885 510 860 480 40 9 50 600
426160-426164
426162-567006
663459-663463
880 510 860 480 45 3 50 600
439192-426158
426159
750 510 720 480 40 9 50 600
Installing the foam
gasket
(for glass appliances)
Before inserting the appliance into the opening in the kitchen worktop, the supplied foam
gasket must be attached to the lower side of the glass.
Do not install the appliance without the foam gasket!
The gasket should be attached to the appliance in the following way:
x Remove the protective film from the gasket.
x Attach the gasket to the lower side approximately A=2-3 mm from the edge. The gasket
must be attached along the entire length and should not overlap at the corners.
x When installing the gasket, make sure that the glass does not come into contact with
any sharp objects.
Fit the insulating gasket
(for Stainless steel
appliances)
X
10mm
Y
15mm
Fit carefully the provided insulating gasket around the outside edge of the hole made in
the top as shown below, pressing it down with your hands so that its entire surface fits
snugly (follow the dimensions shown).
After fastening the appliance to the top (see “Installation procedure”) carefully trim off
the excess of the gasket . The dimensions in the drawing below refer to the hole and
to the outside edge of the gasket.
Page 7

7
Installation procedure
(with springs)
x Worktop must be absolutely horizontal;
x Seal the cut surfaces with a suitable sealant to avoid swelling caused by moisture. The
sealant must be heat resistant;
x Put the supplied springs in their places;
x Feed the mains connection cable down through the cut-out;
x Insert the appliance into the cut-out;
x Press the appliance firmly towards the worktop from above.
Installation procedure
(with fixing brackets)
x Worktop must be absolutely horizontal.
x Seal the cut surfaces with a suitable sealant to avoid swelling caused by moisture. The
sealant must be heat resistant.
x Feed the mains connection cable down through the cut-out.
x Insert the appliance into the cut-out.
x Centre the appliance in the cut-out.
x Fix the appliance to the worktop by means of the brackets and accessories provided.
Holes are provided in the bottom of the tray where you can attach the screws C that
hold the brackets B in place.
CONNECTING TO THE POWER MAINS
x The appliance may ONLY be connected by an authorized qualified technician.
x Electric system protection should comply with all relevant regulations.
x The connection clips can be accessed when the connection clip covers are opened /
removed.
x Before connecting the appliance, make sure the voltage indicated on the rating plate is
consistent with the voltage in your home network. Connection voltage should be
checked by a qualified technician using a corresponding measuring device!
x The rating plate with basic information is attached on the lower side of the appliance.
x In order to make a fixed connection to the mains, insert an all-pole circuit breaker
between the appliance and the mains. This device shall have a contact separation in all
poles, providing full disconnection under overvoltage category III conditions.
x The current conducting and isolated parts must be protected from any possibility of
direct contact.
WARNING!
x Before any intervention, disconnect the appliance from the power mains. Connect the
appliance in compliance with the electric connections diagram supplied; make sure the
relevant network voltage is observed!
x The ground wire should be connected to the clip indicated by the earth symbol.
x The mains cable should be fed through the fastening clip which protects it from being
accidentally pulled out.
x After connecting the appliance, turn on all cooking zones / heaters for approximately
three minutes to make sure they are operating correctly.
x Incorrect connection may destroy parts of the appliance, making the warranty void.
x Connection cable on the back of the appliance should be led in such way that it does
not touch the appliance back wall, as this part will get very hot during operation.
Wiring diagram
The following cables must be used for connection:
x H05RR-F , 3x0,75mm
2
x H07RN-F , 3x0,75mm
2
x H05V2V2-F , 3x0,75mm
2
LIVE L BROWN
EARTH GREEN / YELLOW
NEUTRAL N BLUE
Page 8

8
CONNECTING TO THE GAS SUPPLY
x Connection to the gas supply, or conversion from one type of gas to another, should only be undertaken by an approved
and registered gas installer in strict accordance with local and national safety and building regulations.
x Check with your local gas supplier about the type of gas and its calorific value, and compare this information with the type
of gas quoted on the cooktop data plate.
x This appliance is not suitable for connection to a burning fumes exhaust system (i.e. a chimney).
x WARNING: Special care must be taken to ensure adequate ventilation / aeration (a = min. 100 cm
2
). The gas cooking
appliance use may cause heat, humidity and products of combustion in the room where is installed. Ensure that the
kitchen is well ventilated especially when the appliance is in use: keep open any natural ventilation holes or install a
mechanical ventilation device (mechanical extractor hood). Prolonged intensive use of the appliance may call for
additional ventilation, for example opening of a window, or more effective ventilation, for example increasing the level of
mechanical ventilation where present.
Connection
x Also supplied with the appliance is an adapter for liquid gas, a taper male, and a non-
metal gasket (only with some models).
x On the lower side, the appliance is fitted with a gas connection plug with a thread.
x When connecting, the knee should be held firmly to prevent it from rotating.
x For sealing of the connection joints, use a non-metal approved gaskets and approved
sealants.
x The gaskets should only be used once. The thickness of the flat non-metal gaskets
should not be deformed more than by 25 percent.
x To connect the appliance to the gas supply, use a tested and certified flexible hose.
x The flexible connection hose should be able to move freely, it should not come into
contact with the movable parts of the furniture or the bottom of the appliance.
x After connecting the appliance, check the joints for any leaks.
A ISO7-1 R1/2 connection plug
B Non-metal gasket with thickness of 2 mm
C Pipe adapter for liquid gas (depending on the model)
Only use pipes and seals in accordance with the Standards. These pipes must be
installed so that, when fully extended, their length does not exceed 2000 mm. For easier
installation and to prevent gas leaks, attach the swivel coupling to the appliance first, and
then to the gas mains pipe. Inverting this sequence may hamper the gas seal between
the pipe and the appliance.
When the installation is complete:
x Check that all couplings are completely sealed by using a soapy solution, never
use a flame;
x Ensure that the flexible pipe cannot come into contact with any moving part of the
cooktop (e.g. drawer) and that it is not in a position where it could be damaged;
x Check the burners for correct operation. The flames must be clearly visible, and
should be blue and green at the center. If the flame is unstable, increase the
minimum power.
Page 9

9
Conversion to another
type of gas
(only with some models)
x
The appliance should not be removed from the worktop.
x Before converting, disconnect the appliance from the power mains and close the gas
supply valve.
x Remove the support grid and burner covers with respective crowns.
x Replace the existing nozzles for nominal thermal load with corresponding nozzles for
the new gas type and supplied provided (see Nozzle table). In double burners,
adjustment elements are accessible behind the main nozzle protective plate.
x After finishing this sequence, replace the old setting label with the new one provided for
the new injectors.
x The category with the related types of gas can be used are included in ފConversion to a
different type of gasފ table.
Minimum flow adjustment
Instructions for town (G110, G120, G150.1) and methane gas (G20, G25)
1. Light the burner and bring it to the minimum position.
2. Remove the control knobs, including the gaskets.
3. Turn the adjustment screw on the side of the tap rod until a regular minimum flame is
obtained:
x anti-clockwise to increase the gas flow;
x clockwise to reduce the gas flow.
4. Re-assemble the knob and verify burner flame stability (when quickly rotating the hand
from maximum to minimum position the flame must not shut off).
5. Repeat the operation on all gas taps.
Instructions for liquid gas (LPG: G30, G31)
Tighten the screw on the side of the tap, rod clockwise completely.
TECHNICAL INFORMATIONS
426150
429254
429253
439193
426152
426160
426167
439192
426164 - 426162
426166 - 450420
426153 - 567006
426149
A: Auxiliary
SR: Semirapid
R: Rapid
MW: Mini-Wok
TC: Triple Crown
Operating voltage 220-240 V~ ; 50/60 Hz
Regulated for gas G20=20mbar G30=30mbar G30=30mbar G30=30mbar G20=20mbar
Qn
TOT
7500 W 7800 W 11300 W 11300 W 7500 W
426147
426158 - 453969
453969 - 429255
439422 439421
439427
439425
A: Auxiliary
SR: Semirapid
R: Rapid
MW: Mini-Wok
TC: Triple Crown
Operating voltage 220-240 V~ ; 50/60 Hz
Regulated for gas G30=30mbar G20=20mbar G20=13mbar G20=13mbar G20=13mbar
Qn
TOT
7500 W 11300 W 7500 W 7800 W 7500 W
426159 663459 - 663463
A: Auxiliary
SR: Semirapid
R: Rapid
MW: Mini-Wok
TC: Triple Crown
Operating voltage 220-240 V~ ; 50/60 Hz
Regulated for gas G20=20mbar G30=50mbar
Qn
TOT
11300 W 11300 W
Page 10

10
NOZZLE TABLE
Burner A SR R MW TC
Rated heat output (kW) 1,00 1,75 3,00 3,30 3,80
Reduced Rate (kW) 0,45 0,70 1,00 1,50 1,80
Ø INJECTOR (mm)
G30/G31 28-30/37mbar 0,50 0,65 0,85 0,85 0,98
G30 50 mbar 0,43 0,58 - M 0,80 - H6 0,80 - S 0,77 - F4
G20 20mbar 0,72 - X 0,97 - Z 1,28 - H3 1,28 - T 1,35 - K
Ø BY-PASS (mm)
G30/G31 28-30/37mbar 0,27 0,34 0,42 0,55 0,62
G30 50 mbar 0,27 0,34 0,42 0,55 0,62
G20 20mbar REG. REG. REG. REG. REG.
ADAPTATION TO A DIFFERENT TYPE OF GAS
ART.NO. COUNTRY OF DESTINATION CATEGORY GAS AND SUPPLY PRESSURE
426158
453969
GB II2H3+ G30/G31=28-30/37mbar ; G20=20mbar
Burners
x The gas burners are fitted a candle as flame failure device. If the burner flame is
extinguished accidentally or unintentionally, e.g. when some liquid boils over or
when there is draught in the room, gas supply is automatically cut off, thus
preventing the gas from being emitted into the room.
x Gas burner cover should always be placed on the burner crown very carefully. Make
sure the slots on the burner crown are never obstructed.
1. Burner crown cover
2. Burner crown with the support for the burner cover
3. Candle flame failure device
4. Ignition candle
5. Nozzle
Coffe reductor
(only available with some models)
Use the extension when using a pan of a smaller diameter.
Place the extension on the grid above the auxiliary burner.
Pans
x Correctly selected cookware will enable optimum cooking time and gas consumption.
Pan diameter is the most important parameter.
x Use pans which have the right size for each burner.
x Do not use small pans on large burners. The flame should not touch the sides of the
pan.
x For smaller diameter pots and pans (coffee and tea pots, etc.), the power of the burner
being used has to be regulated in order to ensure that the flame laps the bottom of the
pot without spilling over.
x For combustion, the gas also needs air. If a pan is too large, air supply to the burner is
insufficient; as a result, combustion effect is lesser.
x Do not use pots with concave or convex bottoms.
x Always place the pan right over the burner, not to one side. Otherwise it could tip over.
x Place the pans on the pan supports, never directly on the burner. Make sure that the
pan supports and burner caps are correctly positioned before using the appliance.
x Do not place large pans on the burners near the control knobs. These may be damaged
by the very high temperatures.
x Never use two burners or heat sources to heat one single pan.
x Do not use cast iron plates, griddles, earthenware casserole dishes, etc. for a long
period of time on maximum power especially on crystal glass gas hobs.
x Pans should be placed on the hob carefully. Do not strike the hob and do not place
excessive weight on it.
x Stainless steel working table can burnish when subjected to excessive heat. Therefore
we don’t recommend prolonged cooking with soapstone, earthenware pans or cast iron
plates. Avoid the use of aluminum foil to protect the working table during cooking
operation.
x Don't use pan, pots, grills or grilled stones, of bigger size than the maximum
specified for every single burner; in particular you must not cover more burners
simultaneously. The accumulation of heat could damage the appliance.
Page 11

11
BURNER A SR R MW TC
MIN-MAX PAN DIAMETER (cm)
12-18 18-22 22-24 22-24 22-26
OPERATION
Control knob
Gas valve closed
Ignition
Maximum power
Minimum power
Ignition and operation of
the burners
User’s instructions
This appliance must be used for the purpose it was designed for, i.e. domestic cooking.
Any other use is considered to be improper and therefore dangerous.
The manufacturer will accept no liability for any damage caused by improper, incorrect or
irrational use.
Using the burners
• If the burners are not used for several days, wait a few seconds before lighting them in
order to release any air from the pipes.
• As the burners are fitted with an automatic ignition, to light them simply press and turn th
e
handle to the small star. The appliance uses a spark ignition generator.
• If the flame does not ignite within five seconds, turn the knob back to the “Gas valve
closed” position and repeat the procedure; if the electric ignition should not work due to
a power failure or damp spark plugs, the gas can also be ignited using a match or a gas
lighter.
• For models with a safety tap (which interrupt the gas flow should the flame accidentally
go out) the burners are ignited as described above, but ensure the knob is pressed in
for 5 to 6 seconds after the flame has ignited. After this time, which gives the safety
device enough time to cut-in, the flame will be on permanently.
• The flame can then be set between the maximum and minimum level. Any setting
between “Gas valve closed” and the large flame is not recommended, as the flame is
not stable in this interval and may be extinguished.
• To extinguish the flame and close the burner gas supply, rotate the control knob to the
“Gas valve closed” position.
WARNING: once the appliance has been cleaned, ensure that the burners are firmly in
their seats and do not interfere with the igniter.
WARNING: if the burner flame is extinguished accidentally, turn off the knob and leave it
for at least one minute before trying to re-ignite it.
WARNING: The gas cooking appliance use may cause heat, humidity and products of
combustion in the room where is installed. Ensure that the kitchen is well ventilated
especially when the appliance is in use: keep open any natural ventilation holes or install
a mechanical ventilation device (mechanical extractor hood). Prolonged intensive use of
the appliance may call for additional ventilation, for example opening of a window, or
more effective ventilation, for example increasing the level of mechanical ventilation
where present.
Page 12

12
CLEANING AND MAINTENANCE
Do not use a steam cleaning appliance to clean this appliance. The steam could
reach the electrical components and cause a short circuit.
x The appliance should be cleaned regularly, preferably after each use, after cooling
down.
x To avoid water marks and limescale deposits, use a soft cloth to dry surfaces that have
been cleaned with water.
x Food that has boiled over can cause discolouration of the burner parts and the
stainless steel cooktop. Remove any soiling immediately.
To avoid damaging the outer surfaces of your appliance, do not use:
x cleaning agents containing soda, alkalines, ammonia, acids or chlorides
x cleaning agents containing descaling agents
x stain or rust removers
x abrasive cleaning agents, e.g. powder cleaners and cream cleaners
x solvent-based cleaning agents
x dishwasher cleaner
x grill and oven cleaners
x glass cleaning agents
x hard, abrasive brushes or sponges, e.g. pot scourers, brushes or sponges which have
been previously used with abrasive cleaning agents
x sharp pointed objects (these can damage the seal between the frame and the
worktop).
Stainless steel surfaces
Clean stainless steel surfaces using a microfibre cloth or with a solution of warm water
and a little washing-up liquid applied with a soft sponge. In the case of stubborn dried-on
soiling, soak first.
Finally, dry with a soft cloth.
The stainless steel cooktop cleaner can be used to clean the frame when required. Apply
with an even pressure following the direction of the "grain".
The care product for stainless steel can be used after cleaning to help keep your
appliance looking good and to hinder resoiling.
Apply sparingly with a soft cloth following the instructions on the packaging.
Printed surfaces
The printing can be damaged if soiling (e.g. food or fluids that contained salt, olive oil) is
not removed immediately.
Remove any soiling immediately.
Do not use any stainless steel cleaner on printed surfaces. This would rub off the print.
Knob/s
Remove the knob and clean it with a solution of warm water and a little washing-up liquid
applied with a soft sponge. Stubborn soiling should be soaked first.
After cleaning, dry all surfaces with a clean cloth.
Pan support/s
Remove the pan support and clean it with a solution of warm water and a little washingup liquid applied with a soft sponge. Stubborn soiling should be soaked first and then any
soiling can be removed using a soft brush.
After cleaning, let it dry completely.
Do not clean the pan support in a dishwasher.
Burner/s
The burner should be dismantled and then cleaned by hand using a solution of warm
water and a little washing-up liquid applied with a soft sponge.
Parts of the burner that cannot be removed should be wiped clean with a damp cloth
only.
The ignition candle and the candle flame failure device should be very carefully wiped
clean using a well wrung out cloth.
Do not let the ignitor get wet. If it gets wet, it will not spark.
After cleaning, dry all surfaces with a clean cloth.
Make sure that the flame slits are clean and completely dry.
The surface of the burner crown cover will become more matt with time. This is quite
normal and will not affect the operation of the cooktop.
Do not clean any parts of the burner in a dishwasher.
Page 13

13
Glass surface
After each use of the glass surface, wait for it to cool down and clean it; otherwise, even
the smallest food residue will be burnt onto the hot surface next time you use the
appliance.
For regular cleaning and maintenance of the glass surface, use special conditioning
agents that form a protective layer on the surface, shielding it from dirt.
Before each use wipe any dust or other particles from the surface and pan bottom as
these could scratch the surface (Fig.1).
x
steel wool;
x
abrasive sponges;
x
abrasive detergents;
x
aggressive sprays;
x
decalcification agents;
can scratch the surface (Fig.1 and Fig.2).
Stubborn and burnt residues can be removed:
x
using special agents and utensils for cleaning the glass surface. When using these
products, follow the instructions provided by their respective manufacturers;
x
using a scraper. Make sure the plastic part of the scraper does not come into contact
with a hot cooking zone. Be careful not to cut yourself with the scraper!
Light stains can be removed by a damp soft cloth; then, wipe the surface dry (Fig.3).
Water stains can be removed using a mild solution of vinegar however, do not use this
solution to clean the frame (only with some models), as it may become dull.
WARNING: Make sure any residues of cleaning agents are thoroughly removed, as they
could damage the glass.
Sugar and sugar-laden food may permanently damage the glass surface (Fig.5);
therefore, they should be removed from the glass surface as soon as possible, although
the cooking zone may still be hot (Fig.4).
Signs and indications on the glass surface may be worn (Fig.2) if are used:
x
aggressive cleaning aids;
x
steel wool;
x
pans with damaged bottom;
Any change in the color of the glass surface:
x
does not affect its operation or the stability of the surface;
x
is mostly a result of burnt food residues or use of cookware made of materials such as
aluminum or copper;
Warning: All damages described above predominantly relates to the aesthetics, i.e.
appearance of the appliance and do not affect its functionality directly and cannot be the
subject of a warranty claim.
Fig.1
Fig.2
Fig.3
Fig.4
Fig.5
Page 14

14
SPECIAL WARNINGS AND FAULT REPORTING
ƒ During the warranty period, only a service center authorized by the manufacturer may carry out any repairs.
ƒ Before making any repairs, make sure the appliance is disconnected from the power mains either by removing the fuse
or by disconnecting the power plug from the wall outlet.
ƒ Unauthorized tampering with and repairs of the kitchen range (cooking hob) can result in electric shock or short circuit;
hence, do not attempt to perform any repairs by yourselves. Leave such tasks to an expert or an authorized service unit.
ƒ In case of minor faults or problems with the appliance operation, check the following instructions to see whether you can
eliminate the causes by yourselves.
ƒ Elimination of any errors or warranty claims that resulted from improper connection or use of the appliance is not covered
by our warranty. In such cases, the costs of repair are borne by the user.
Following is some advice on rectifying some common problems.
PROBLEM POSSIBLE CAUSE ELIMINATION
The flame is uneven / unstable Wrong gas power setting. Have an expert check he gas pipeline!
The flame from the burners
suddenly changes
Wrongly assembled parts of the kitchen
hob
Assemble the burner correctly.
Burner ignition takes more time Wrongly assembled parts of the kitchen
hob
Assemble the burner correctly.
The flame is extinguished
shortly after ignition
Knob pressed too short or to weakly. Keep the knob depressed for a longer
period of time. Before releasing it, pres
it harder.
The grid has discolored in the
burner area
This is a commonplace
phenomenon resulting from high
temperature
Clean the grid with a metal care
detergent.
Electric power supply in general
is interrupted
The fuse may be blown Check the fuse in the fuse box and
replace it if it is blown
Electric ignition of the burners
no longer works
There are food or detergent residues
between the spark
plug and the burner
Open and carefully clean the opening
between the spark plug and the burner
If the burner cover looks
unappealing
Regular dirt Clean the burner covers with a metal
care detergent.
Coffee reducer has changed
color
This is a commonplace phenomenon
resulting from high temperature and has
no effect on quality.
Use coffee reducer only on auxiliary
burner and only when necessary
If the problem persists despite observing the instructions above, call an authorized service technician.
 Loading...