

User Manual
Please read the manual carefully before using the headset and keep it nicely for
your future reference

Contents
Product Specifications.................................... 1
Product Overview ........................................ 2
Instructions
Wearing Method................................... ...... 2
Power on/off and Pairing Instructions......................... 3
Earbuds Re-pairing / Bluetooth Connections.................. 4
Buttons Using / Charging Case Instructions / Low Battery Reminder........5
Charging Instructions...................................... 6
Warning ..................................................6
Hazardous Substances Statement ...........................7
Warranty Card ............................................8
1
Thank you for purchasing and using this product!
Product Name
TWS Bluetooth Headset
Model/Bluetooth Name
S2
Material
Plastics, Silicon and Aluminum
Alloy
Bluetooth Transmission
Range
>10m
Bluetooth Version
V5.0
Net Weight
≈68g
Power Bank Capacity
850mAh
Earbuds Battery Capacity
45mAh*2
Input
5V=1A
Transmission Frequency
(2400-2483.5)MHz
For your better experience, please kindly read the user manual.
Product Specifications:
All technical specifications come from the laboratory, and the actual
specifications will be different by products or other factors,should
be subjected to practical performance.
Pictures are for reference only, please taking actual objects as the
criterion.
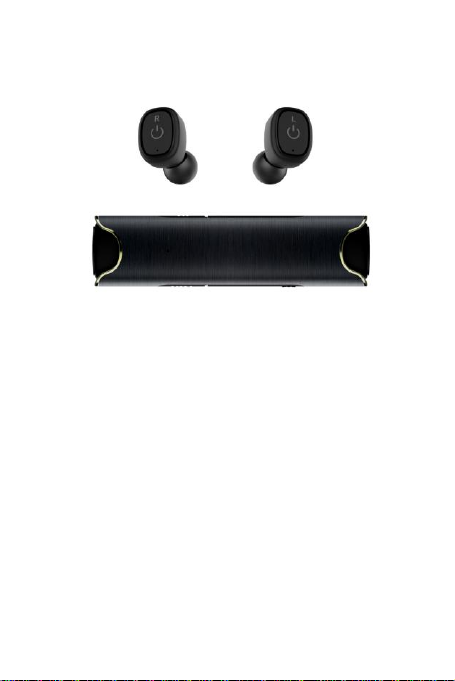
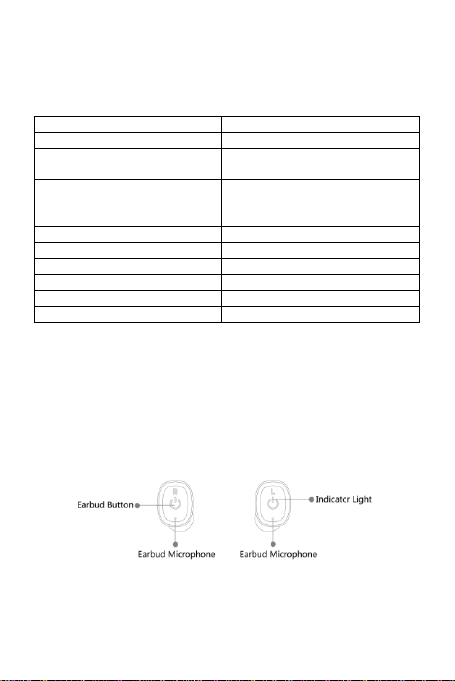
Product Overview:
2
Wearing Method
1.Please wear earbuds as shown and adjust them to the most
comfortable position.
2.Each pair of earbuds come with three sizes of eartips, please
choose the right eartips to ensure comfort according to your ears.

3
Power on/off
1.Press and hold the buttons (about 2 seconds ) until the indicator
lights flash blue,then you will hear voice prompt“power on”.
*Take out the earbuds from the charging case,they will power on
automatically.
*Please ensure the power of the earbuds is sufficient before turn
them on.
2.Press and hold the buttons (about 5 seconds) until the indicator
lights flash red,then you will hear voice prompt“power off”.
*When two earbuds are paired, if any one earbud power off, the
other one will also power off automatically.
3.As shown,put back the earbuds into the charging case, then they
will automatically turn off and enter into charging state.
4. Earbuds will power off automatically to save power once be
unconnected for 5 minutes.

4
Pairing Instructions
1. This item is TWS headset,the right and left earbuds should be
paired with each other to get a stereo sound effect.
2.The earbuds will be paired automatically once they are turned
on.In default setting,the right earbud(R) is the main earbud.
During paring,the indicator lights flash red and blue slowly and
alternately.If the earbuds are paired successfully,the indicator lights
flash red once,then turn off.
(Note:With the earbuds off, press and hold the button,the one
earbud will be connected to the cellphone,the one earbud will enter
the pairing state.At this point,if connect your phone to the earbud , it
may cause your phone connect with the one earbud preferentially ,
then cannot use stereo functions .Once enter this state,please
resume the operation according to the following re-pairing
operation instructions.)
Earbuds Re-pairing
1.Please ignore the pairing record of the headset in your cellphone.
2.Press and hold the buttons of the left and right earbuds for 15
seconds to delete all pairing record.
3. Press and hold the buttons of the left and right earbuds for 2
seconds,they will pair to each other automatically. About 3-5
seconds later, the indicator lights on the earbuds will flash red and
blue alternately then turn off. At this point, the pairing between the
earbuds is successful.
4.After successful pairing, the main earbud (right) flashs red and
blue automatically, and it enters the state of searching Bluetooth
signal.
Bluetooth Connection
1.For the first time,after the two earbuds power on , search the
Bluetooth name of“S2-R”on the cellphone,tap it to connect.Then
the indicator light will not flash any more.
2.Earbuds connecting back (Cellphone should have an automatic
connecting back function)
After the earbuds and the mobile phone are successfully
connected,once beyond the Bluetooth connection range,they will
be automatically disconnected. If return to the connection range

5
within 60 seconds, the earbuds and the phone will automatically
connect back. If the connection is unsuccessful, please tap “S2-R”
on the phone to resume the connection or restart the earbuds and
they will connect to the phone automatically.
Button Using
When listening to music:
1.Press each button once to pause or play the music;
2.In the multimedia status, double click on L for Previous music and
R for the next one;
3.Click the button three times (L minus volume, R plus volume).
4.Voice Assistant: Press and hold the button for 2 seconds(one
sound du-) to activate voice assistant.
When dual calling:
The left and right earbuds will enter the call state, and the indicator
light flashes blue quickly with a prompt voice when a call comes in.
1. Press the button once to answer an incoming call.
2. ress and hold the button for 2 seconds to reject an incoming
call.
3. During calling,press the button once to end the current call.
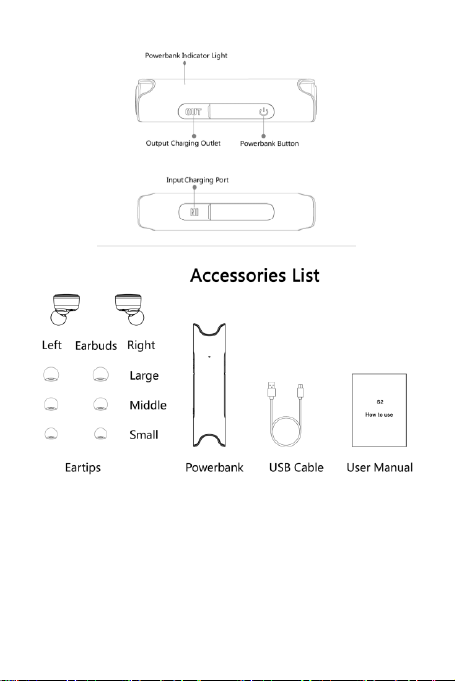
Charging case instructions
1.When the charging case charges the earbuds, the red indicator
light of the case is always on. After being full charged,the light turns
off.
2.The charging box can be used to charge other mobile devices
through the charging output port (labeled "OUT")while
emergency .The red indicator light is always on when uesed to
output.
3. During being charged,the indicator light on the case will flash
blue slowly, and the light will be solid blue after being fully
charged.Remove the USB cable, the indicator will be off.
4.Click the button of the charging case, the indicator light will turn
on to show the power status.
Low battery Reminder
1.When the power of the headset is insufficient, the indicator light
flashes red and there is a voice prompt.
2.The headset will automatically power off after the battery is
exhausted.

6
*If two earbuds are paired, any earbud is off, another one will power
off automatically.
Charging Instructions
1. Place the earbuds into charging case , they will power off and
enter the charging status. At this moment,the indicator light will be
solid red.If the red light is not on,maybe the earbuds are not in
correct position , please place them again .
2. When the headset is fully charged or the power is sufficient,and
does not need to be charged,the indicator light will be solid
blue,one minuter later,it will turn off.
Warning
1 . Do not use corrosive detergent to clean this product.
2 . Do not allow the product to be heated or close to the source of
fire, such a cooking stove.
3 . Do not allow the product to be exposed to direct sunlight for a
long time.
4 Do not dispose of this product in the fire to avoid an explosion
5 . Do not attempt to disassemble this product for any modification
since it does not include any maintenance components .
6. If you do not intend to use this product for a long period of
time ,Please put the headset back into the portable charging
case,store it in a dry environment and charge the headset at least
once a month to prolong its life.
7.Please turn to the modest volume to avoid noise and damage
hearing.
8 .Do not charge in sub-zero temperatures , charging below zero
may result in battery damage.
9 .Do not disassemble 、trike 、squeeze or put into fire . Once it is
bulging ,do not continue to use.Do not put it in high temperature
environment.
China Hazardous Substances Statement
To meet the laws, regulations and other requirements related to the
restrictions on hazardous substances in electrical and electronic
products in China,
For hazardous substances in this product, the parts are classified
as follows:

7
Part
Name
hazardous substance
(
Pb
)
(Hg)
(Cd)
(Cr
(VI))
(PBB) (PBD
E)
Metal
Parts
X O O O O
O
Printed
circuit
boards
and
compone
nts
X O O O O
O
Plastic
Parts
X O O O O
O
Wire
X O O O O
O
Silicon
X O O O O
O
Other
X O O O O
O
This form is made by SJ/T 11364 regulation.
Some models may not include some of the parts in the form.
O : means that hazardous substance content in the homogene us
materials of this part is within the limitsof GB /T 26572 regulation .
X : means that hazardous substance content in , at least , one
certain homogeneous material of this part is beyond the limits of
GB /T 26572 regulation. Parts marked “X” are unable to replace
harmful substances due to global technological development limits.
"Printed circuit board assemblies include printed boards and their
components, capacitors and connectors.
Electronic products sold in China must be identified this 10-point
mark.
The figure in the circle indicates the environmentally friendly use
period of the product under normal use.

8
FCC Statement
This device complies with Part 15 of the FCC rules. Operation is
subject to the following two conditions: (1)this device may not
cause harmful interference, and (2) this device must accept any
interference received,including interference that may cause
undesired operation.
The manufacturer is not responsible for any radio or TV
interference caused by unauthorized modi-cations or change to this
equipment. Such modi-cations or change could void the user’s
authority to operate the equipment.
This radio transmitter (identify the device by certi-cation number or
model number if Category II) has been approved by Industry
Canada to operate with the antenna types listed below with the
maximum permissible gain indicated. Antenna types not included in
this list, having a gain greater than the maximum gain indicated for
that type, are strictly prohibited for use with this device.
This equipment has been tested and found to comply with the limits
for a Class B digital device, pursuant to part 15 of the FCC Rules.
These limits are designed to provide reasonable protection against
harmful interference in a residential installation. This equipment
generates, uses and can radiate radio frequency energy and, if not
installed and used in accordance with the instructions, may cause
harmful interference to radio communications. However, there is no
guarantee that interference will not occur in a particular installation.
If this equipment does cause harmful interference to radio or
television reception, which can be determined by turning the
equipment off and on, the user is encouraged to try to correct the
interference by one or more of the following measures:
• Reorient or relocate the receiving antenna.
• Increase the separation between the equipment and receiver.
• Connect the equipment into an outlet on a circuit dierent from
that to which the receiver is connected.
• Consult the dealer or an experienced radio/TV technician for
help.
The device has been evaluated to meet general RF exposure
requirement

9
Caution:
Any changes or modifications to this device not explicitly approved
by manufacturer could void your authority to operate this
equipment.

10
Warranty Card
Contact Nanme : _________________________________
Contact Number : ________________________________
Contact Address: _______________________________
Product Model: __________________________________
Brief description of the problem: _______________________
Maintenance instructions
Thank you for purchasing this product. In order to ensure your legal
rights, please read the instructions as following:
This card is the product warranty certificate. When the product
needs maintenance, please provide this card with the product to
our company.
This card is only valid for products under warranty, details are as
below:
1. Purchasing the products through legal and formal channels;
2. Non-human damage products, including but not limited to private
disassembly, improper use,In case of natural disasters, etc., it is
not covered by the warranty;
3. Not exceeding product warranty period.
It includes and is not limited to the above.The company reserves
the right of final interpretation.
Product certification
Inspectors: ___________________________________
Production and inspection date: __________________________
 Loading...