

Page 1
®
g
ordon
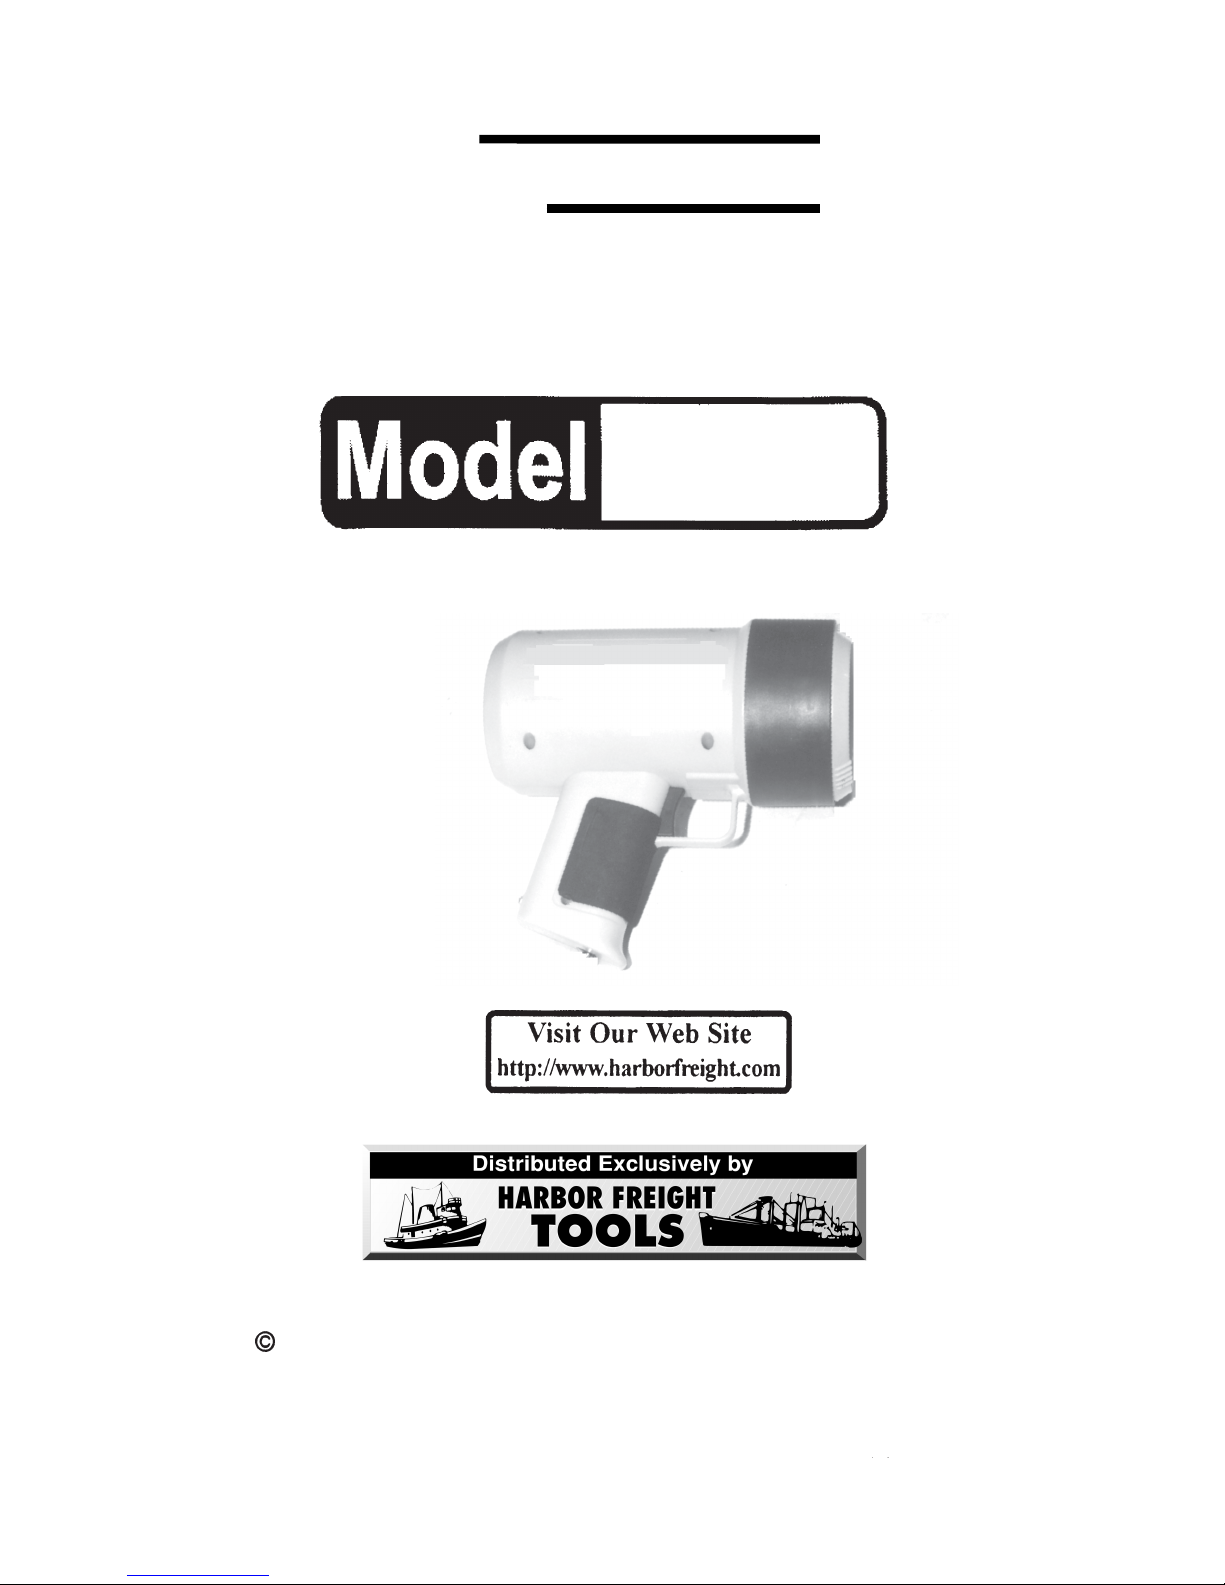
PISTOL SHAPE SPOTLIGHT
500,000 CANDLE POWER
46103
ASSEMBLY & OPERATING INSTRUCTIONS
3491 Mission Oaks Blvd., Camarillo, CA 93011
Copyright 2001 by Harbor Freight Tools. All rights reserved. No portion of this manual or
any artwork contained herein may be reproduced in any shape or form without the express
written consent of Harbor Freight Tools.
For technical questions and replacements parts, please call 1-800-444-3353.
Page 2
THANK YOU f or choosing a HARBOR FREIGHT TOOLS product. For future reference, please complete the
owner’s record belo w:
Model__________ Serial No.___________ Purchase Date______________
SA VE THE RECEIPT , WARRANTY AND THESE INSTRUCTIONS. It is important that you read the entire
manual to become familiar with the unit BEFORE you begin assemb ly.
Technical Specifications
Product Name: Pistol Shape Spotlight, 500,000 Candle P ower
Item Number: 46103
Input V oltage: 120-V olts
Acc: 60-HZ
Output Voltage: 12-V olts-DC , 500 MA
Amps Output: 4.5 AH
Battery: Sealed Lead-Acid
Overall Dimensions: 7-5/8” L x 3-7/8” D x 7-5/8” H
Construction: High-Impact Yellow Poly Plastic with Rubberized Handle
Wire Gauge: 24 x AWG
Candle Power 500,000
Includes Adapter and Cigarette Lighter Plug Connection
Safety Warnings and Precautions
WARNING: When using this product, basic safety precautions should always be followed to
reduce the risk of personal injury and damage to equipment.
Read all instructions before using this product!
1. Av oid w orking alone. If an accident happens, an assistant can bring help.
2. Keep work area clean. Cluttered areas invite injuries.
3. Keep children away. Children must never be allow ed in the work area. Do not let them handle
machines, tools, or extension cords .
4. Store idle equipment. When not in use, tools must be stored in a dry location to inhibit rust. Always lock
up tools and keep out of reach of children.
6. Use the right product for the job. Do not attempt to force a small tool or attachment to do the work of a
larger industrial tool. There are certain applications for which this tool was designed. Do not modify this
tool and do not use this tool for a purpose for which it was not intended.
6. Stay alert. Watch what you are doing, use common sense. Do not operate an y tool when y ou are tired.
7. Check for damaged parts. Before using any product, any part that appears damaged should be
carefully checked to determine that it will operate properly and perform its intended function. Any part that
is damaged should be properly repaired or replaced by a qualified technician. Do not use the tool if an y
switch does not turn On and Off properly.
#46103 Page 2
Page 3

8. Replacement parts and accessories. When servicing, use only identical replacement parts. Use of any
other parts will void the warranty. Only use accessories intended for use with this tool. Approved
accessories are available from Harbor Freight Tools.
10. Do not operate tool if under the influence of alcohol or drugs. Read warning labels on prescriptions to
determine if your judgment or reflexes are impaired while taking drugs. If there is any doubt, do not operate
the tool.
11. Never look directly into the Spotlight.
12. Avoid touching the Lens as it may become hot during operation.
13. Do not dissassemb le the Battery or remove any parts from the Battery and surrounding connections.
14. Do not allo w the Spotlight to be e xposed to fire or high heat as this may result in an explosion.
15. Disconnect po wer. Unplug charger when not in use.
16. Maintenance. F or y our saf ety, maintenance should be performed regularly by a qualified technician.
17. Spotlight is not waterproof.
Warning: The warnings, cautions, and instructions discussed in this instruction manual
cannot cover all possible conditions and situations that may occur. It must be
understood by the operator that common sense and caution are factors which
cannot be built into this product, but must be supplied by the operator.
Warning: Operation of equipment in close proximity to a heart pacemaker could cause
interference or failure of the pacemaker.
WARNING: This product contains or, when used, produces a chemical known to the State
of California to cause cancer and birth defects or other r eproductive harm. (California Health &
Safety Code 25249.5, et seq.)
Note: Performance of this tool (if powered by line voltage) may vary depending on
variations in local line voltage. Extension cord usage may also affect tool
performance.
Grounding/V oltage Warning
Common household current is 110-120 volts. As long as the outlet used with the tool is rated from 110-120V
there will be no complications using it with household receptacles. Plug the tool into a 110-120V properly
grounded outlet protected by a 15-amp, dual element time delay or circuit breaker.
NEVER try to plug a 110-120V tool into a 220-240V circuit or serious complications and possible injury to the
operator may occur . The plugs hav e diff erent shapes to prevent this.
Assembly
Your Pistol Shape Spotlight comes completely assembled.
To assist you with operating your Spotlight please refer to the Operational Figures as w ell as the Parts List and
Assembly Diagram.
Step 1) Push on the Trigger (#4) to turn the Spotlight ON. Pressing on the Trigger (#4) again to turn
the Spotlight OFF.
#46103 Page 3
Operation
T urning the Spotlight On and Off
Page 4
Charging
Your Spotlight Battery (#9) is rechargeable. To recharge your Battery (#6) your Spotlight comes with a Power
Adapter (#11). The battery capacity will be reduced if the Spotlight is not used for 3 months. It is
recommended that the battery be re-charged at least one time every 3 months.
Note: The battery should be char ged before the first use.
Step 1) Insert the cord end of the Power Adapter (#11) into the plug on the back of the Spotlight.
Plug the Po wer Adapter (#11) into electrical outlet.
Step 2)
The red light indicates the unit is properly plugged in. Leav e the P ower Adapter (#11)
plugged in for approximately 10 hours then unplug the P ower Adapter (11) from the wall
outlet. Recharging time is 8 to 10 hours .
Note: The charging light will not turn off when the
battery is fully charged. Always unplug the P ower Adapter (#11) from the Spotlight after
the Spotlight is charged. The Spotlight will not function while the P o wer Adapter is plugged
into the Spotlight.
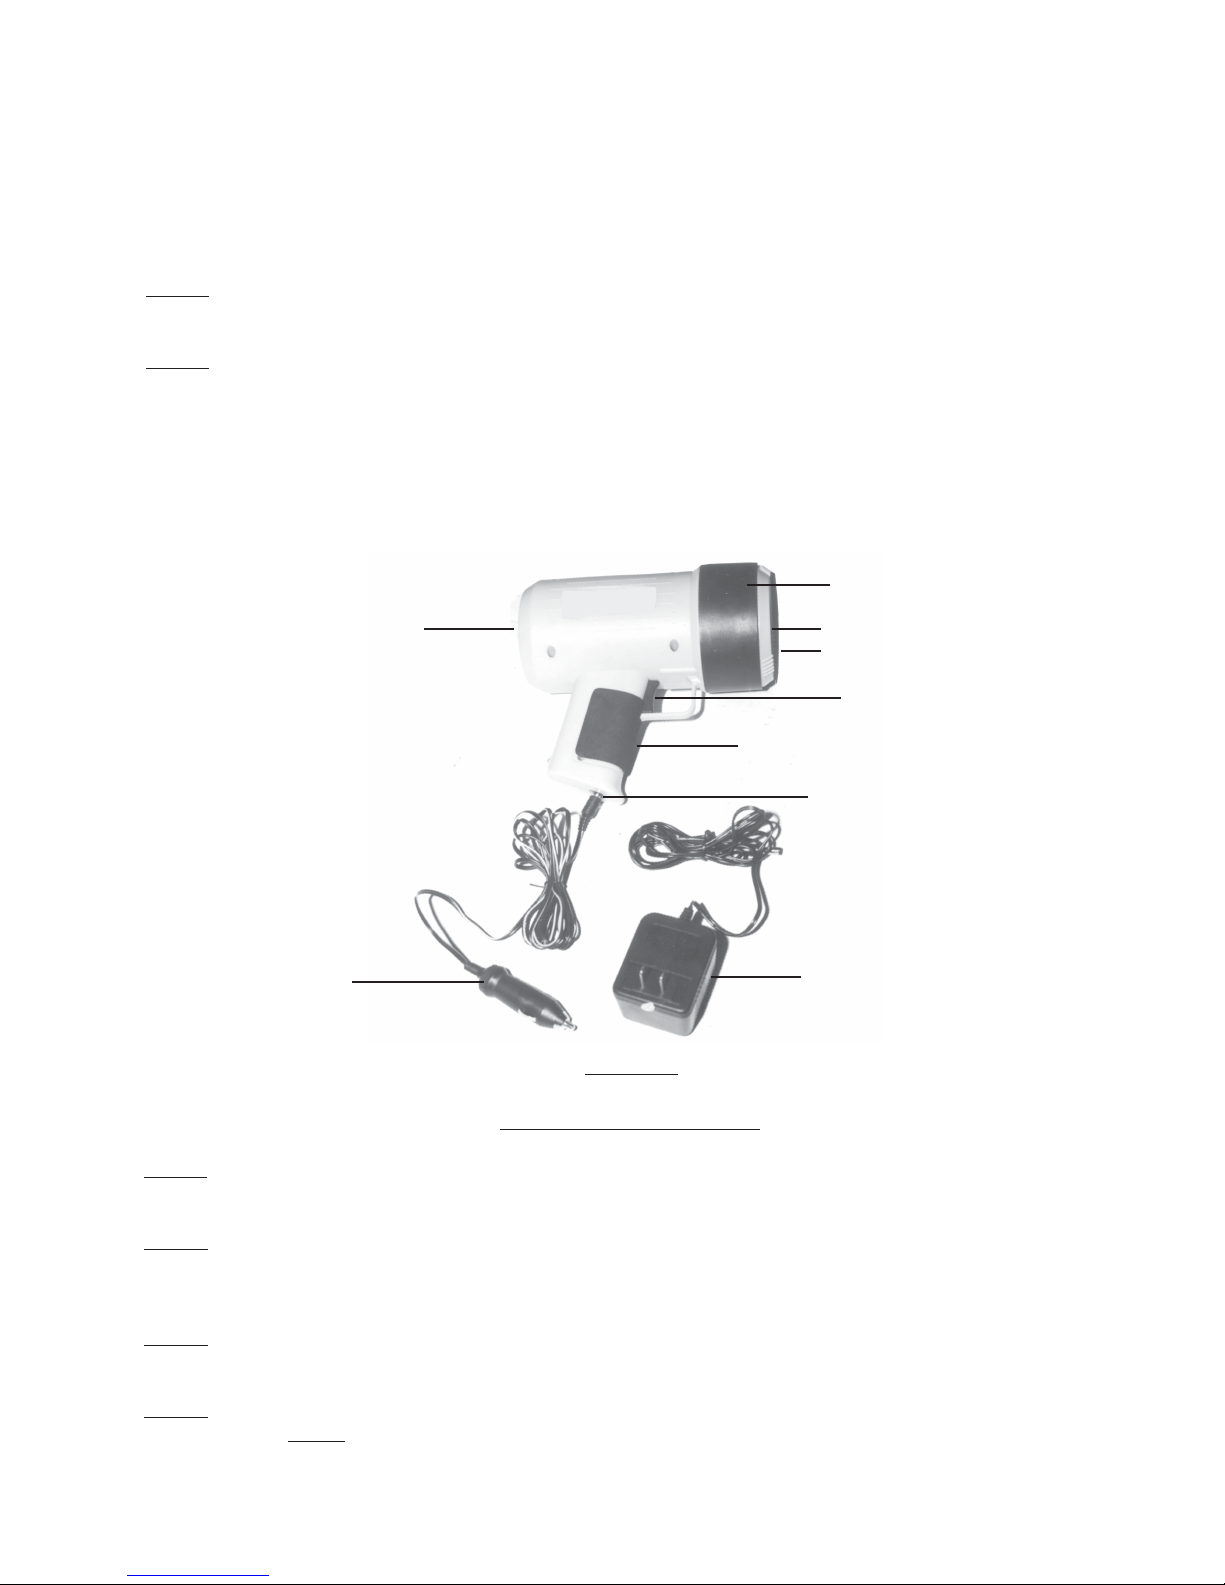
Plastic Body/Bulb Housing (#1)
Lamp Body (#7)
PC Lens (#2)
Halogen Bulb (#3)
Trigger (#4)
Switch (#8)
DC Socket (#5)
Car Adapter (#12)
AC/DC Adapter (#11)
Figure 1
Replacing the Halogen Bulb
Step 1) Lightly grasp the Plastic Body/Bulb Housing (#1) and turn counterclockwise to remove it from
the Lamp Body (#7).
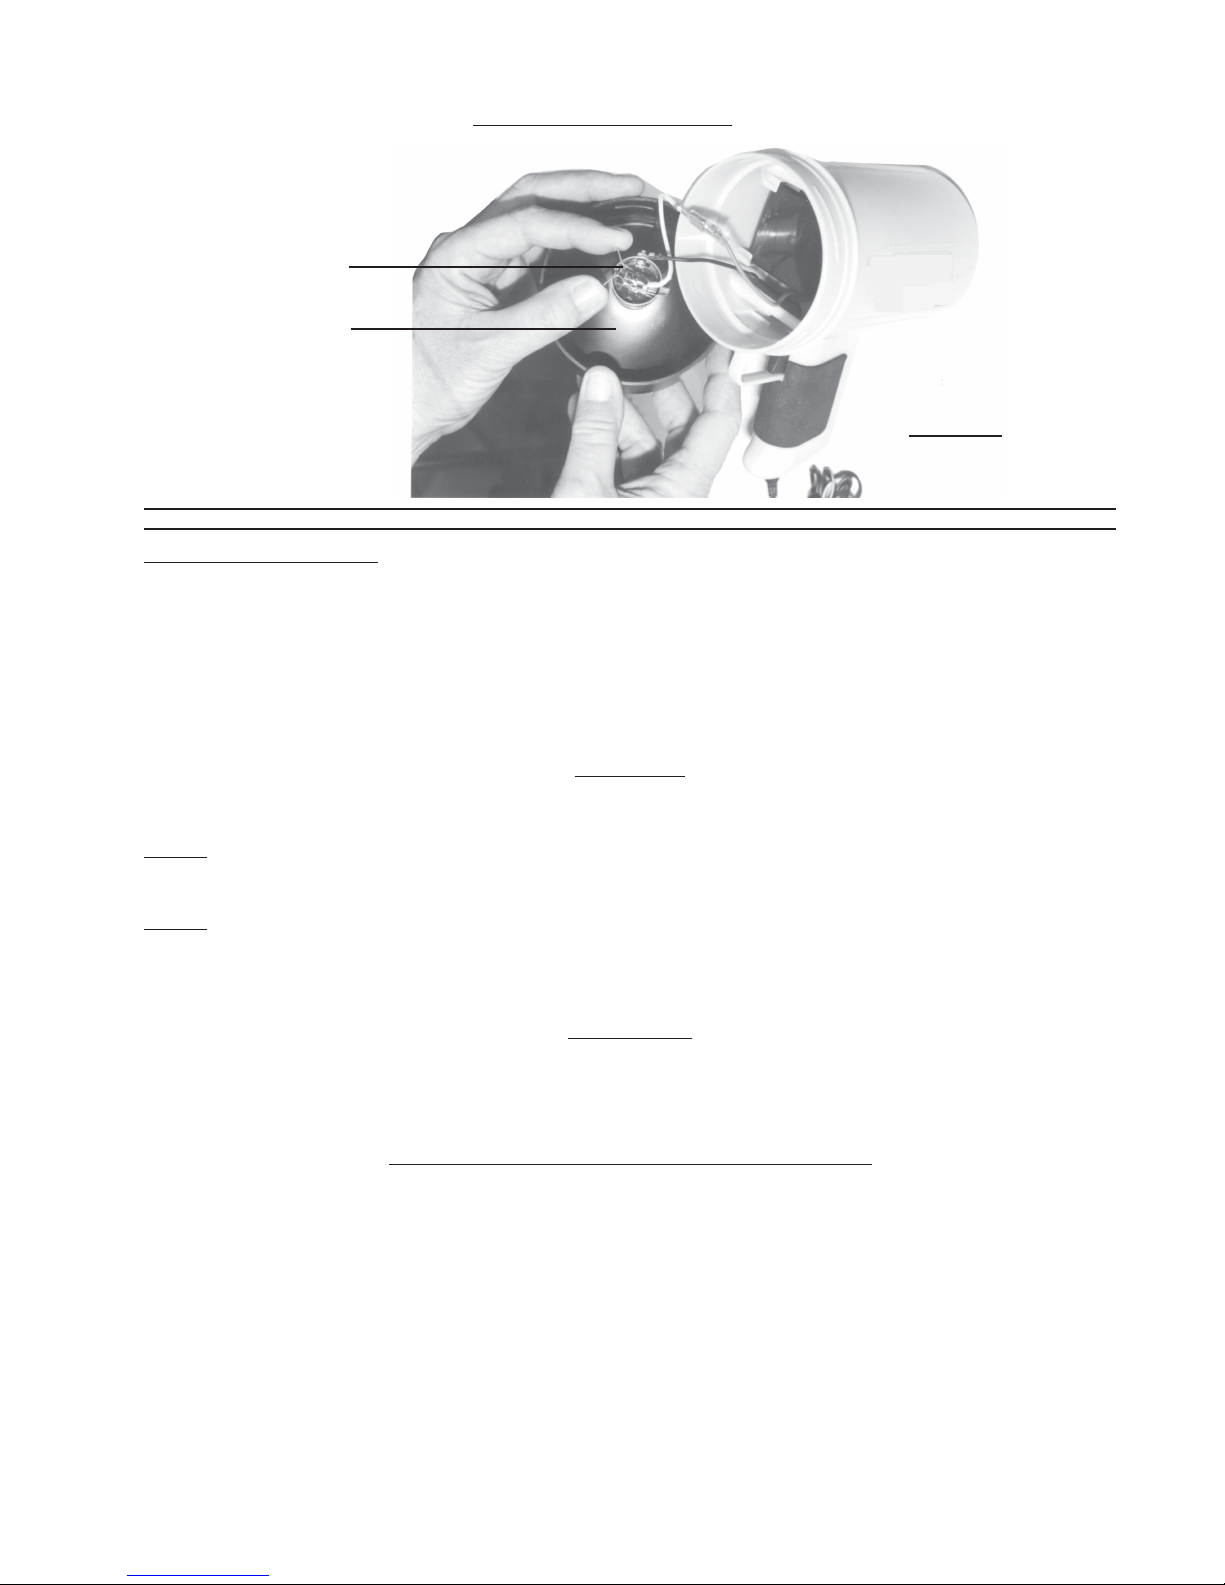
Step 2) On the underside of the PC Lens (#2) are two prongs. Pinch the prongs together and lift them
up to remove the Halogen Bulb (#3) from the Plastic Body (#1)-see Figure 2 on the f ollowing
page.
Step 3) Remove the Halogen Bulb (#3). Replace with a fresh Halogen Bulb (available from Harbor
Freight Tools).
Step 4) Place the Halogen Bulb (#3) back into place by pinching the prongs together as in
Step 2 and placing the prongs back into the slot. Screw the Plastic Body/Bulb Housing (#1)
clockwise back onto the Lamp Body (#7).
#46103 Page 4
REV 06/03 REV 05/06
Page 5
Replacing the Halogen Bulb
Pinch prongs together
and pull up.
PC Lens (#2) and
Bulb housing
Figure 2
IF THERE IS ANY QUESTION ABOUT A CONDITION BEING SAFE OR UNSAFE, DO NOT OPERATE THE TOOL.
Warning-Battery Disposal
The Spotlight is powered by a battery which will have a long life span. When the battery is no longer
functioning, the battery and Spotlight should be properly recycled. Many states require
recycling. Contact your local solid waste authority for information on recycling.
WARNING: NEVER EXPOSE THE BATTERY TO HIGH HEAT OR FIRE; BA TTER Y MAY EXPLODE UNDER
THESE CONDITIONS.
Car Adapter
Your Spotlight comes with a Car Adapter (#12). To operate your Car Adapter follow the steps listed below .
Step 1) Insert the cord end of the Car Adapter (#12) into the DC Socket (#5) on the bottom of the
Spotlight. Plug the Car Adapter (#12) into y our car’ s lighter (shown on Figure1, page 4).
Step 2) Charge the Spotightusing the instructions on the top of page 4.
Note: When charging the Spotlight, only place the Spotlight on a non-flammable surf ace.
Unpacking
When unpacking your Spotlight with Pistol Shape, chec k to mak e sure the f ollowing parts are included. If an y
parts are missing or broken, please call HARBOR FREIGHT TOOLS at 1-800-444-3353.
Parts Listing (Assembly Diagram located on page 6)
Part # Description Quantity Part # Description Quantity
1 Plastic Body/Bulb Housing 1 8 Switch 1
2 PC Lens 1 9 Inside Electric Cord 1
3 Halogen Bulb 1 10 Recharge Indicator 1
4 Trigger 1 11 AC/DC Adapter 1
5 DC socket 1 12 Car Adapter 1
6 Rechargeable Battery 1
7 Lamp Body 1
Note: Some parts are listed and shown for illustration purposes only and are not available
individually as replacement parts.
#46103 Page 5
Page 6
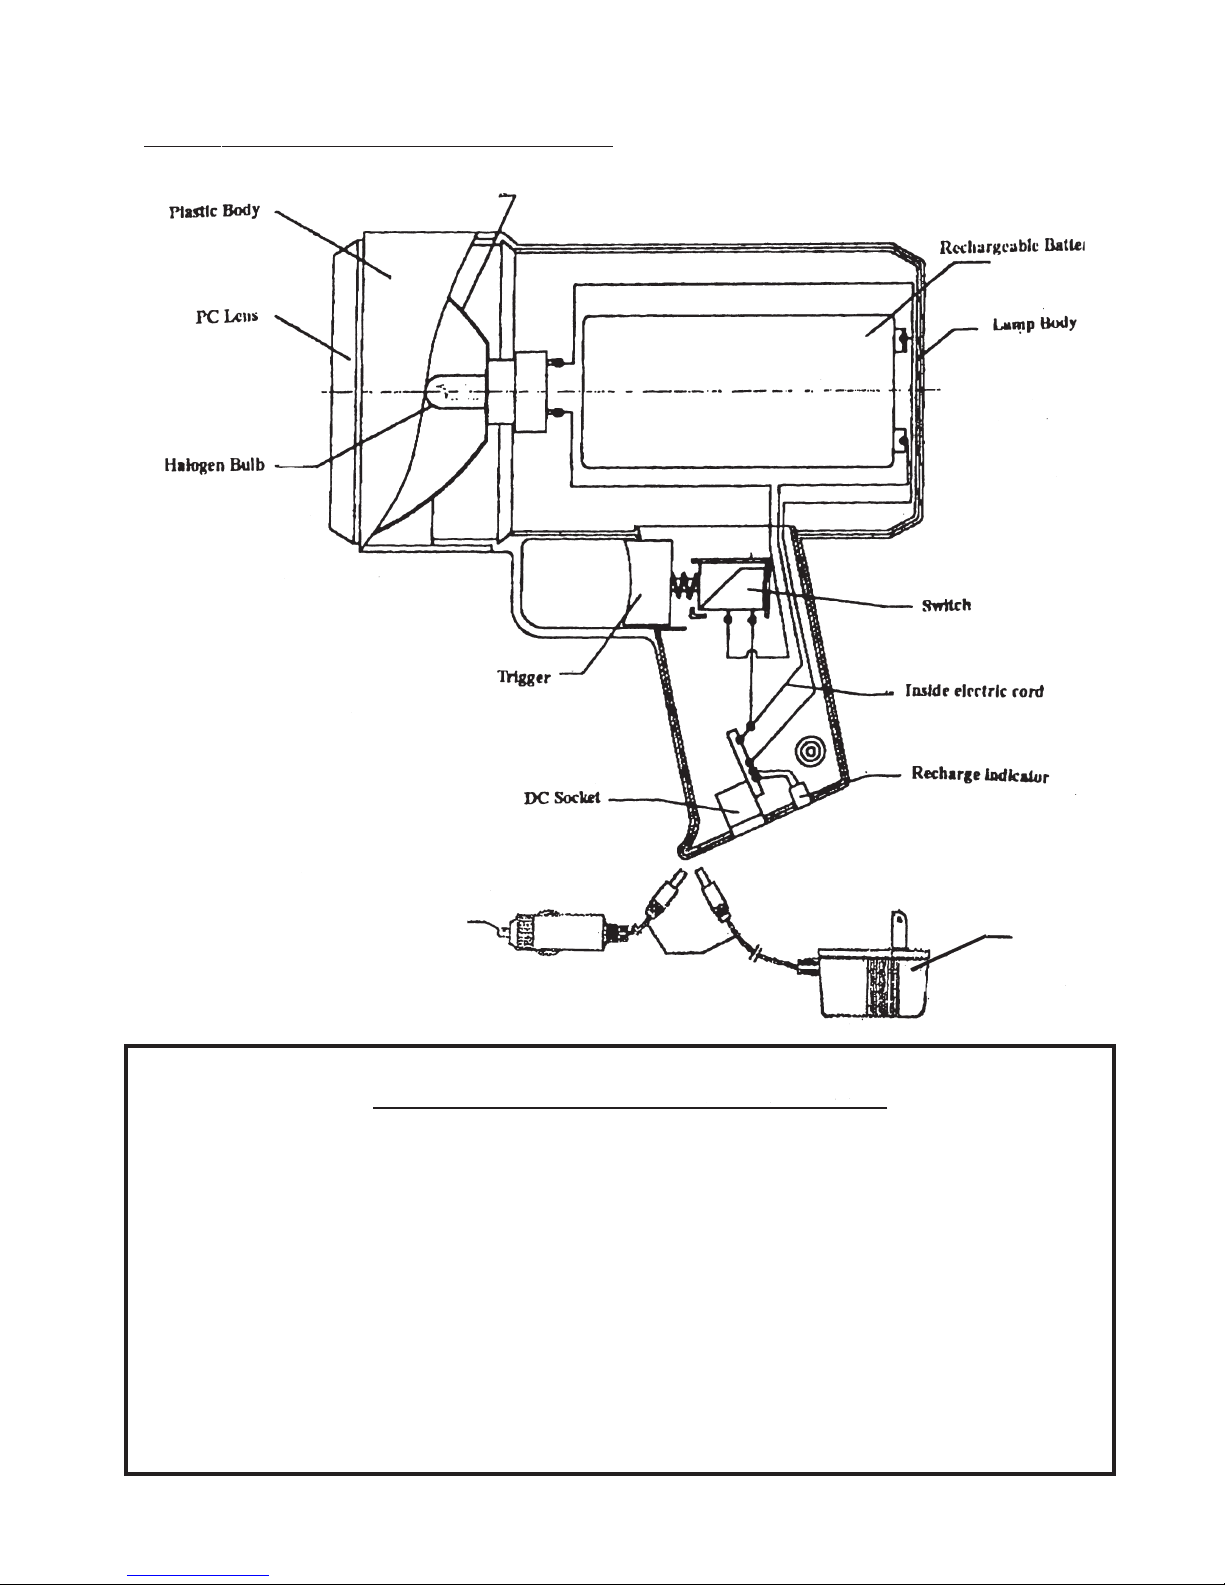
Assembly Diagram-#46103 Spotlight-Pistol Shape
(1)
(6)
(2)
(3)
(4)
(7)
(8)
(9)
(10)
(5)
Car Adapter (11)
AC/DC Adapter (12)
PLEASE READ THE FOLLOWING CAREFULLY
THE MANUFACTURER AND/OR DISTRIBUTOR HAS PROVIDED THE PARTS DIAGRAM
IN THIS MANUAL AS A REFERENCE TOOL ONLY. NEITHER THE MANUFACTURER
NOR DISTRIBUTOR MAKES ANY REPRESENTATION OR WARRANTY OF ANY KIND TO
THE BUYER THAT HE OR SHE IS QUALIFIED TO MAKE ANY REPAIRS TO THE
PRODUCT OR THAT HE OR SHE IS QUALIFIED TO REPLACE ANY PARTS OF THE
PRODUCT. IN FACT, THE MANUFACTURER AND/OR DISTRIBUTOR EXPRESSLY
STATES THAT ALL REPAIRS AND PARTS REPLACEMENTS SHOULD BE UNDERTAKEN
BY CERTIFIED AND LICENSED TECHNICIANS AND NOT BY THE BUYER. THE BUYER
ASSUMES ALL RISK AND LIABILITY ARISING OUT OF HIS OR HER REPAIRS TO THE
ORIGINAL PRODUCT OR REPLACEMENT PARTS THERETO, OR ARISING OUT OF HIS
OR HER INSTALLATION OF REPLACEMENT PARTS THERETO.
#46103 Page 6
 Loading...