

Gordius LG, Little Giant User Manual
User Manual
GGOORRDDIIUUSS LLGG
Little Giant MIDI foot controller

GGOORRDDIIUUSS LLiittttllee GGiiaanntt
Table of contents 2/180
Table of Contents
1
Introduction.......................................................................................................................................9
1.1 A personal “thanks”...................................................................................................................9
1.2 About this manual.....................................................................................................................9
2 The Little Giant : a quick overview.................................................................................................10
2.1 The Little Giant Rear Panel.....................................................................................................10
2.2 The Little Giant Top View........................................................................................................12
2.3 The Little Giant Control Center...............................................................................................13
3 Getting started using Little Giant Control Center...........................................................................14
3.1 Before reading this chapter.....................................................................................................14
3.2 Making the connections..........................................................................................................14
3.3 Turning on the power..............................................................................................................15
3.4 Installing and launching Little Giant Control Center ...............................................................16
3.5 Showing the Help buttons.......................................................................................................17
3.6 Global settings........................................................................................................................18
3.7 Expression pedal setup...........................................................................................................18
3.8 Patch setup.............................................................................................................................20
3.8.1 Creating patches..............................................................................................................21
3.8.2 Specifying MIDI messages for each patch......................................................................22
3.8.3 Specifying MIDI messages for stomp boxes and momentary effects .............................25
3.8.4 What do we have up till now ?.........................................................................................27
3.9 Preset setup............................................................................................................................28
3.9.1 Creating the presets........................................................................................................28
3.9.2 Specifying the initial stomp box states.............................................................................29
3.9.3 Specifying the expression pedal behavior for each preset..............................................29
3.9.4 What do we have up till now?..........................................................................................30
3.10 Bank setup..............................................................................................................................31
3.10.1 Creating banks.................................................................................................................31
3.10.2 Defining the bank content................................................................................................31
3.11 Downloading the setup to the Little Giant...............................................................................32

GGOORRDDIIUUSS LLiittttllee GGiiaanntt
Table of contents 3/180
3.12 Testing the setup....................................................................................................................33
3.12.1 Checking LED and display behavior...............................................................................33
3.12.2 Changing display mode...................................................................................................34
3.12.3 Monitoring the MIDI messages.......................................................................................35
4 Getting started with the Little Giant ...............................................................................................37
4.1 Before reading this chapter....................................................................................................37
4.2 Making the connections..........................................................................................................37
4.3 Turning on the power ............................................................................................................. 38
4.4 Entering setup mode..............................................................................................................38
4.5 Global settings........................................................................................................................ 39
4.6 Patch setup.............................................................................................................................39
4.6.1 Creating your first patch.................................................................................................. 40
4.6.2 Editing the patch name ...................................................................................................40
4.6.3 Specifying MIDI messages..............................................................................................41
4.6.4 Creating more patches.................................................................................................... 43
4.6.5 Creating stomp boxes..................................................................................................... 43
4.6.6 Creating momentary effects............................................................................................44
4.6.7 What do we have up till now ?........................................................................................45
4.7 Preset setup ...........................................................................................................................46
4.7.1 Creating stompbox presets............................................................................................. 46
4.7.2 Creating momentary effect presets................................................................................. 47
4.7.3 Creating patch presets....................................................................................................47
4.7.4 What do we have up till now ?........................................................................................49
4.8 Bank setup..............................................................................................................................50
4.9 Expression pedal setup..........................................................................................................51
4.10 Testing the setup....................................................................................................................52
5 Overview of the Little Giant connections....................................................................................... 53
5.1 USB........................................................................................................................................53
5.2 MIDI IN / MIDI OUT................................................................................................................ 53
5.3 FROM FCB / TO FCB ............................................................................................................ 54
5.4 EXPR 1 / EXPR 2 / SW 1 / SW 2...........................................................................................54
6 USB and MIDI routing / filtering..................................................................................................... 55
6.1 Generated MIDI message routing.......................................................................................... 55

GGOORRDDIIUUSS LLiittttllee GGiiaanntt
Table of contents 4/180
6.2 Incoming MIDI message routing.............................................................................................56
6.3 FCB control port configuration................................................................................................56
6.4 MIDI message filtering............................................................................................................57
7 Extending the Little Giant...............................................................................................................58
7.1 Slave controllers .....................................................................................................................58
7.2 Other external controllers........................................................................................................60
7.3 External switches....................................................................................................................61
7.4 Expression pedals...................................................................................................................61
8 The Little Giant setup structure......................................................................................................63
8.1 Overview.................................................................................................................................63
8.2 Patches, stomp boxes and momentary effects.......................................................................65
8.3 Expression pedal setups.........................................................................................................66
8.4 Presets....................................................................................................................................68
8.5 Banks......................................................................................................................................70
8.6 Setlists and songs...................................................................................................................71
9 Making a setup dynamic ................................................................................................................72
9.1 Preset dependency rules........................................................................................................72
9.2 MIDI channel variables ...........................................................................................................72
9.3 MIDI data variables.................................................................................................................73
9.4 Patch content variants ............................................................................................................73
9.5 Random MIDI data..................................................................................................................74
9.6 Wrap-up ..................................................................................................................................74
10 The LEDs and the graphical display ..............................................................................................75
10.1 Switch LED dimming modes...................................................................................................75
10.2 Extra functionality for the switch LEDs ...................................................................................75
10.3 Indicator LEDs ........................................................................................................................76
10.4 The graphical LCD display......................................................................................................77
10.4.1 Details display..................................................................................................................78
10.4.2 Bank & Preset display......................................................................................................78
10.4.3 Preset name display........................................................................................................78
10.4.4 Setlist & Setlist-XL display...............................................................................................79

GGOORRDDIIUUSS LLiittttllee GGiiaanntt
Table of contents 5/180
10.4.5 Banklist & Banklist-XL display.........................................................................................80
10.4.6 MIDI monitor display ....................................................................................................... 80
10.4.7 Extra display options.......................................................................................................81
11 The rotary button : also a realtime MIDI control knob ................................................................... 83
12 MIDI clock, metronome, and tap tempo ........................................................................................84
12.1 The metronome / Sync Master function.................................................................................84
12.2 Tap tempo ..............................................................................................................................85
12.3 Sync slave..............................................................................................................................86
13 Using “keypad mode” for random navigation ................................................................................ 87
13.1 “Direct ProgramChange” keypad mode ................................................................................. 88
13.2 “Direct Preset Select” keypad mode ......................................................................................89
13.3 “Direct Bank Select” keypad mode......................................................................................... 89
13.4 “Direct Song Select” keypad mode ........................................................................................ 89
14 Advanced features: delays, sweeps and loops.............................................................................90
14.1 Customizable delay................................................................................................................ 90
14.2 ControlChange sweeps.......................................................................................................... 90
14.3 Message loops .......................................................................................................................91
14.4 Temporary blocking of MIDI transmission.............................................................................92
15 How to use LG Control Center ......................................................................................................93
15.1 The File menu ........................................................................................................................94
15.2 The Tools menu ..................................................................................................................... 95
15.3 The Help menu.......................................................................................................................95
15.4 The QuickConnect and QuickDump buttons.......................................................................... 96
15.5 The Communication tab.........................................................................................................96
15.5.1 MIDI interface setup........................................................................................................ 97
15.5.2 Little Giant Info field ........................................................................................................ 97
15.5.3 Setup Info field................................................................................................................98
15.5.4 Patch dump..................................................................................................................... 98
15.5.5 Firmware upgrade........................................................................................................... 98
15.6 The MIDI monitor tab..............................................................................................................99
15.7 The 6 setup tabs.....................................................................................................................99
16 How to use the built-in Little Giant menus...................................................................................100

GGOORRDDIIUUSS LLiittttllee GGiiaanntt
Table of contents 6/180
16.1 Navigating the menus...........................................................................................................100
16.2 Managing lists of items .........................................................................................................101
16.3 Property menus.....................................................................................................................102
16.3.1 Editing string properties.................................................................................................102
16.3.2 Editing numeric properties............................................................................................103
16.3.3 Single item selection......................................................................................................103
16.3.4 Multiple item selection ..................................................................................................104
16.3.5 Toggling the state of listed items...................................................................................105
17 The Little Giant setup reference...................................................................................................106
17.1 Basic global settings.............................................................................................................106
17.1.1 Board layout...................................................................................................................106
17.1.2 General LED settings.....................................................................................................110
17.1.3 General behavior when scrolling through banks or songs............................................111
17.1.4 Avoiding unintentional scrolling or menu activation.......................................................113
17.1.5 Program Change display range.....................................................................................113
17.1.6 “Bank Preset” display mode options..............................................................................114
17.1.7 Patchname display ........................................................................................................114
17.1.8 Expression pedal display...............................................................................................115
17.1.9 Rotary knob assignment................................................................................................115
17.1.10 Screen saver..................................................................................................................116
17.1.11 Scrolling through display modes....................................................................................116
17.1.12 Patch message resend..................................................................................................117
17.1.13 Disable sending stompbox initialization messages.......................................................117
17.1.14 Special stompbox behavior : “GuitarRig compatible” mode..........................................118
17.1.15 FCB Relay behavior.......................................................................................................119
17.1.16 Switch 9/D1 and 10/D2 behavior...................................................................................119
17.1.17 Keypad mode.................................................................................................................120
17.1.18 BankSelect messages...................................................................................................120
17.2 MIDI routing and filtering.......................................................................................................121
17.2.1 Generated message routing..........................................................................................121
17.2.2 MIDI IN message routing...............................................................................................121
17.2.3 FCB Control port configuration......................................................................................122
17.2.4 External MIDI control messages....................................................................................123
17.2.5 MIDI filtering...................................................................................................................124
17.3 Expression pedal setup.........................................................................................................125
17.3.1 Expr.pedal setup name..................................................................................................125
17.3.2 MIDI Channel.................................................................................................................126

GGOORRDDIIUUSS LLiittttllee GGiiaanntt
Table of contents 7/180
17.3.3 Message type................................................................................................................126
17.3.4 Control Number.............................................................................................................127
17.3.5 Input range.................................................................................................................... 127
17.3.6 Output range.................................................................................................................128
17.3.7 Engage value................................................................................................................128
17.3.8 Tip and Heel presets.....................................................................................................129
17.3.9 Used sweep curve.........................................................................................................130
17.3.10 Expression pedal sweep curve setup ........................................................................... 131
17.3.11 Default expression pedal assignment...........................................................................132
17.3.12 External trigger assignment ..........................................................................................133
17.4 Patch setup...........................................................................................................................134
17.4.1 Managing patch lists .....................................................................................................135
17.4.2 Patch name................................................................................................................... 135
17.4.3 First / Second message stream ....................................................................................136
17.4.4 Adding MIDI messages.................................................................................................136
17.4.5 Grouped stompboxes setup..........................................................................................140
17.4.6 Relay settings................................................................................................................ 141
17.4.7 Delayed activation......................................................................................................... 141
17.4.8 Patch variants setup......................................................................................................142
17.5 Preset setup .........................................................................................................................143
17.5.1 Managing preset lists....................................................................................................144
17.5.2 Preset name..................................................................................................................145
17.5.3 Main patch..................................................................................................................... 145
17.5.4 External trigger assignment ..........................................................................................145
17.5.5 Stomp boxes.................................................................................................................146
17.5.6 Momentary effects.........................................................................................................147
17.5.7 Extra patches................................................................................................................147
17.5.8 Use preset as trigger..................................................................................................... 148
17.5.9 Expression pedal behavior............................................................................................ 149
17.6 Bank setup............................................................................................................................150
17.6.1 Bank name................................................................................................................... 151
17.6.2 Default switch................................................................................................................151
17.6.3 Preset assignments.......................................................................................................152
17.6.4 «next», «previous», «previously active» switches........................................................153
17.6.5 Preset dependency rules for banks ..............................................................................153
17.7 Song setup ...........................................................................................................................155
17.7.1 Song name...................................................................................................................156

GGOORRDDIIUUSS LLiittttllee GGiiaanntt
Table of contents 8/180
17.7.2 Song bank......................................................................................................................156
17.7.3 Default preset for a song...............................................................................................157
17.8 Setlist setup ..........................................................................................................................158
17.8.1 Setlist name..................................................................................................................159
17.8.2 Setlist content................................................................................................................159
17.9 The use of variables..............................................................................................................161
17.9.1 MIDI Channel variables.................................................................................................161
17.9.2 MIDI Data variables.......................................................................................................162
17.9.3 Patch content variants...................................................................................................163
17.10 Metronome, TapTempo, and MIDI Clock..............................................................................164
17.10.1 Global metronome.........................................................................................................164
17.10.2 Global TapTempo settings ............................................................................................165
17.10.3 Settings for incoming MIDI Clock ..................................................................................166
18 Doing firmware upgrades.............................................................................................................167
18.1 Checking your current firmware version...............................................................................167
18.2 Preparing for a firmware upgrade.........................................................................................168
18.3 Downloading the new firmware from PC to LittleGiant.........................................................169
18.4 After the download................................................................................................................169
19 Troubleshooting ...........................................................................................................................170
Appendix A : supported MIDI and GORDIUS messages....................................................................173
Appendix B : Little Giant Menu Structure............................................................................................175
Appendix C : Little Giant technical specifications................................................................................180
Copyright © 2007-2009 GORDIUS. All rights reserved.
All information in this document is subject to change without notice.

GGOORRDDIIUUSS LLiittttllee GGiiaanntt
Introduction 9/180
1 Introduction
1.1 A personal “thanks”
I know, many user manuals start with it. The obligatory "thank you for buying this product" paragraph.
In this case however, I would like you to accept this small introductory note as a personal and sincere
word of appreciation for the interest you are showing in the GORDIUS products. Today, as I write this
note, GORDIUS is celebrating its first anniversary. In this first year, the Little Giant has taken its first
steps on stage, and we were excited to learn about the wide range of applications where the product
proved its usefulness and versatility. Thanks to the very-small-scale approach of GORDIUS, we were
able to fine-tune our product designs, based on the invaluable user feedback we received from the
“early adopter” users. Today we are proud of the result, and we’re convinced that you will be surprised
by the tremendous amount of possibilities this little gorgeous MIDI controller will open up for your rig.
I wish you lots of fun with the Little Giant
Xavier De Donder
GORDIUS
September 15, 2008
1.2 About this manual
Since the Little Giant is a highly complex MIDI controller, we do expect the reader to have some
background knowledge about MIDI in general, and the way devices are being controlled through
MIDI. This manual does not contain an introductory guide on MIDI. However, lots of info on this topic
can be found on the internet.
The first part of the manual contains 2 “getting started” guides. The first one leads you through the
first steps of programming your controller by use of the Little Giant Control Center, the PC editor
which can be freely downloaded from the GORDIUS website. The second guide leads you through
exactly the same user scenario, but this time the setup is done using the Little Giant as a standalone
device, that is, without a PC connected to it.
Different important concepts of the setup are being introduced in those getting started guides. More in
depth info about the different parts of a Little Giant setup is given in the succeeding chapter.
The second part of the manual is a detailed reference guide of each of the programmable options of
the controller. Only after browsing through this reference, you will obtain a good view on the extended
possibilities of your controller. As you will learn in that part of the manual, several advanced controller
features are accessible through the PC editor only, and cannot be edited through the local menu
structure of the unit.
Finally, the manual concludes with a few appendices which give you a short overview of the
possibilities and specifications of the product.

GGOORRDDIIUUSS LLiittttllee GGiiaanntt
The Little Giant : a quick overview 10/180
2 The Little Giant : a quick overview
2.1 The Little Giant Rear Panel
1. +9V DC po wer input with power switch
Make sure to always use the included power adapter, or an equivalent regulated adapter with +9V
DC output and supplying at least 500 mA DC current (2.1 / 5.5 mm jack - positive center).
2. USB connection
The USB connection can be used to connect the Little Giant to a Windows, Mac, or Linux PC. The
LG will be recognized as a standard USB-audio device. It is compatible with built-in drivers on all
supported operating systems, so no additional driver installation is required.
3. Main MIDI IN / MIDI OUT conne ctor pair
The MIDI OUT port is the main connection to all the gear you want to control using your Little
Giant. The MIDI IN port can be used to merge an additional MIDI signal with the messages
generated by the Little Giant. The LG can also do some extra processing on the incoming MIDI
signal, like MIDI Channel filtering, or MIDI Clock processing.
4. FloorControlBoard connector pair
These ports can be used for connecting an external “slave” controller which provides extra
switches (up to 32 switches per bank). When not using an external foot controller, the ports can
be reconfigured to be an extra pair of regular MIDI IN/OUT ports.
GGOORRDDIIUUSS LLiittttllee GGiiaanntt
The Little Giant : a quick overview 11/180
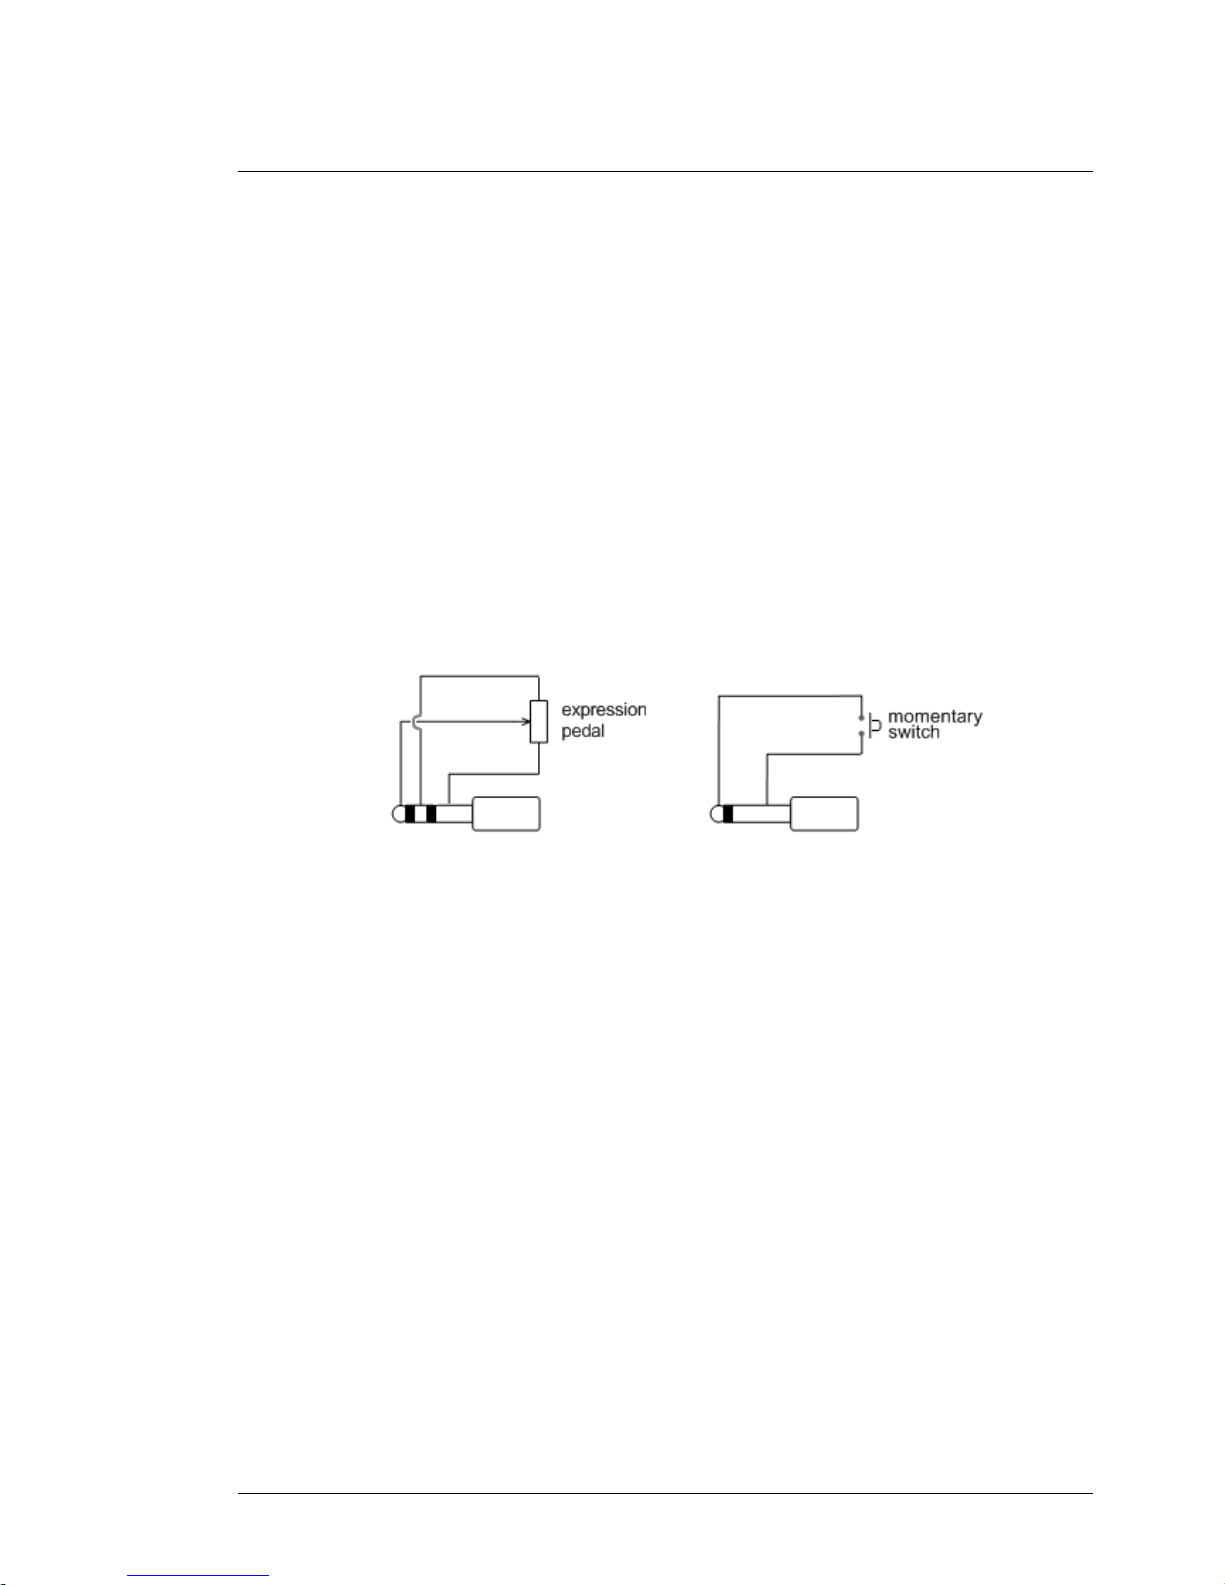
5. Expressio n pedal inputs
The high quality Neutrik stereo jack connectors can be used to connect 2 expression pedals (*) to
the LG. The expression pedals can be regular resistive type pedals (containing a potentiometer
which is turned when rocking the pedal), the wiper of the potmeter needs to be connected to the
tip of the stereo jack. The value of the potmeter is not critical, an auto-calibration circuit in the LG
supports a wide range of possible resistance values. Moreover, the Little Giant contains the
necessary digital processing logic to modify the “sweep curve” of the expression pedal. Therefore,
it is not important if the used potmeter is a linear type or a log type, the LG can convert it into any
desired curve type.
6. External switch inputs
The high quality Neutrik mono jack connectors can be used to connect 2 extra external switches
to the LG (*). The switches need to be momentary, normally open switches, connected to a mono
jack.
(*) As an option, the Little Giant can also be ordered with 4 expression pedal inputs, instead of 2
pedal inputs + 2 switch inputs. That product version is called the “LG/4”.
GGOORRDDIIUUSS LLiittttllee GGiiaanntt
The Little Giant : a quick overview 12/180
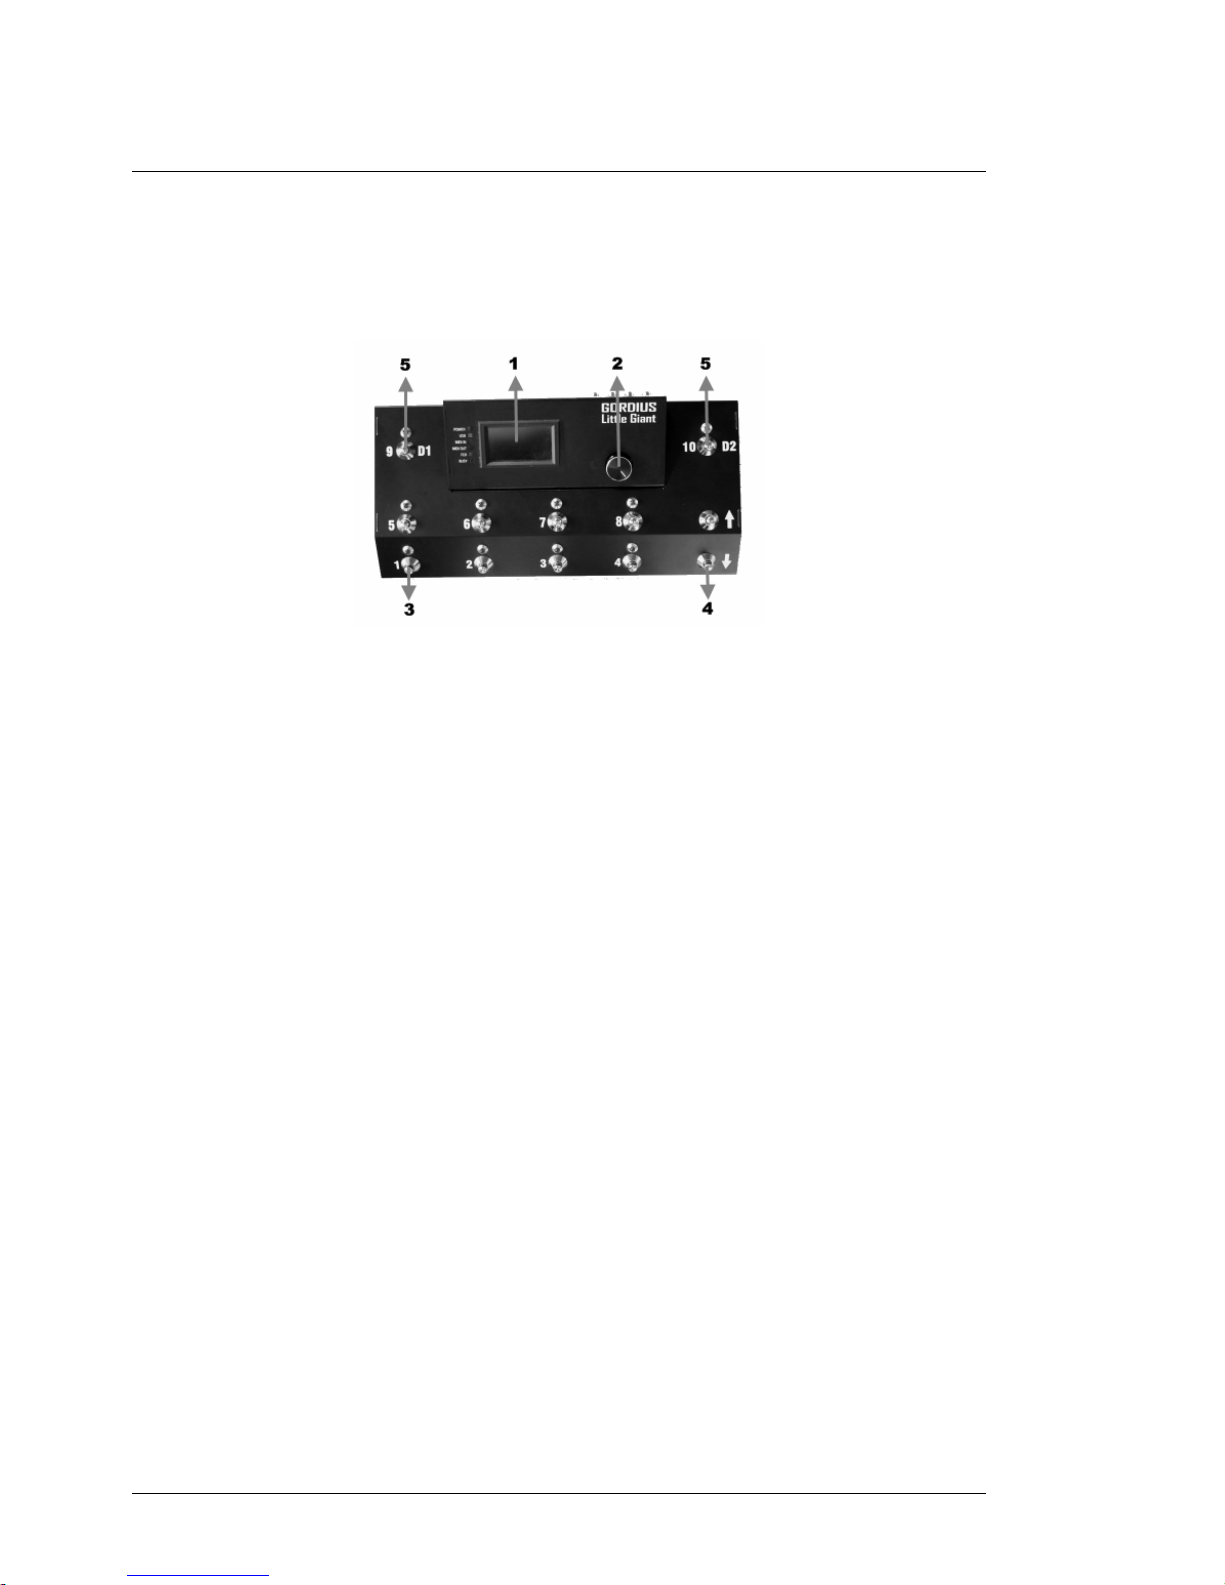
2.2 The Little Giant Top View
1. PLED graphical display
The graphical display allows a user friendly menu setup, along with different runtime display
modes with adjustable font sizes. The PLED tech nology re quires no backlight, ea ch pixe l acts lik e
a small LED on its own, resulting in a very bright display with extremely high contrast, suitable in
highly varying ambient lighting conditions.
2. Rotary control knob
Turning and clicking this digital knob allows for menu navigation, data entry, and display mode
selection.
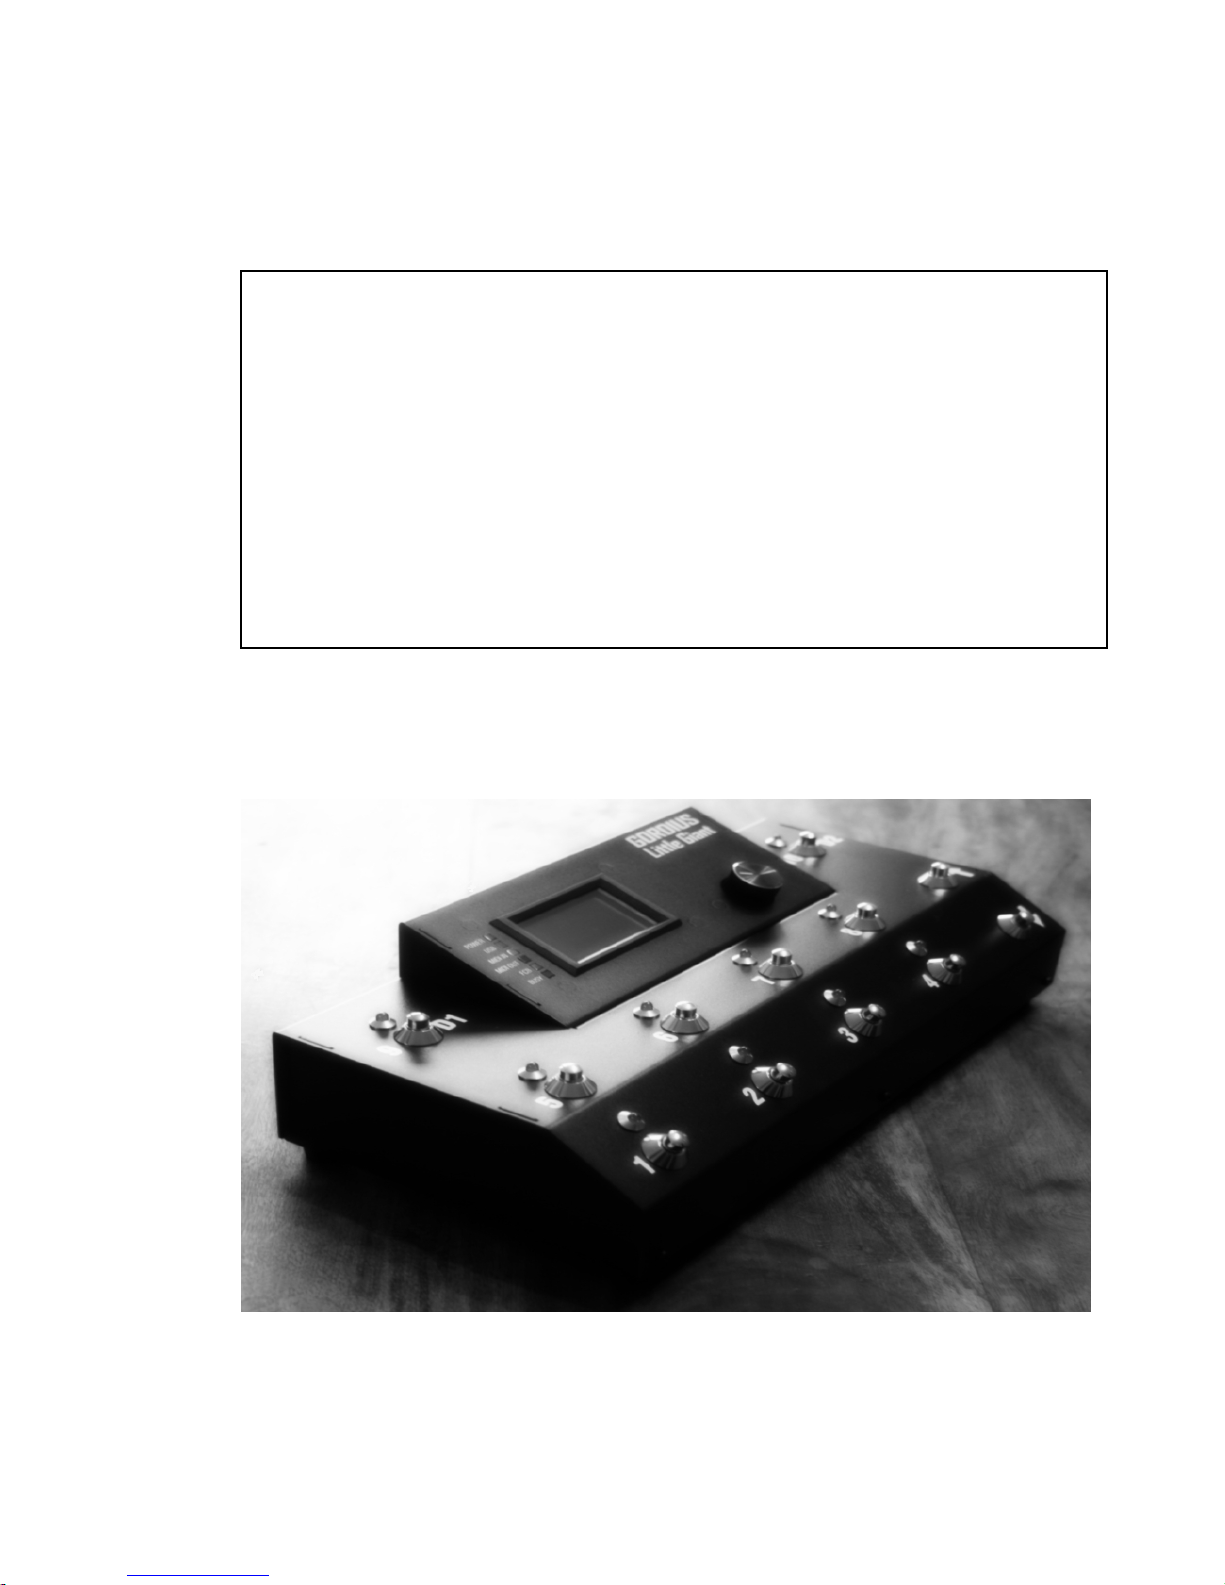
3. Preset foot switches
The foot switches used for preset selection. The unique design of the switches allows them to be
used both as foot switch or as “manual” switch for desktop use. Although rugged all-metal
switches, they are more silent than regular metal foot switches used for this type of application.
4. Up/down foot switches
Used for scrolling through all banks, or for scrolling through a set list. Keeping the up or down
switch pressed for a second engages auto-scrolling.
5. “Preset 9 / DirectBank1” and “preset 10 / DirectBank2” foot switches
The LittleGiant can be configured to have 2 Direct Bank switches. These allow direct single-click
access to 2 banks, containing a set of commonly used presets. It is also possible to configure the
Little Giant to have 24 presets per bank. In this “extended bank” mode, the D1 and D2 switches
are providing single-click access to any of the 3 subsets of 8 presets within each bank.
GGOORRDDIIUUSS LLiittttllee GGiiaanntt
The Little Giant : a quick overview 13/180
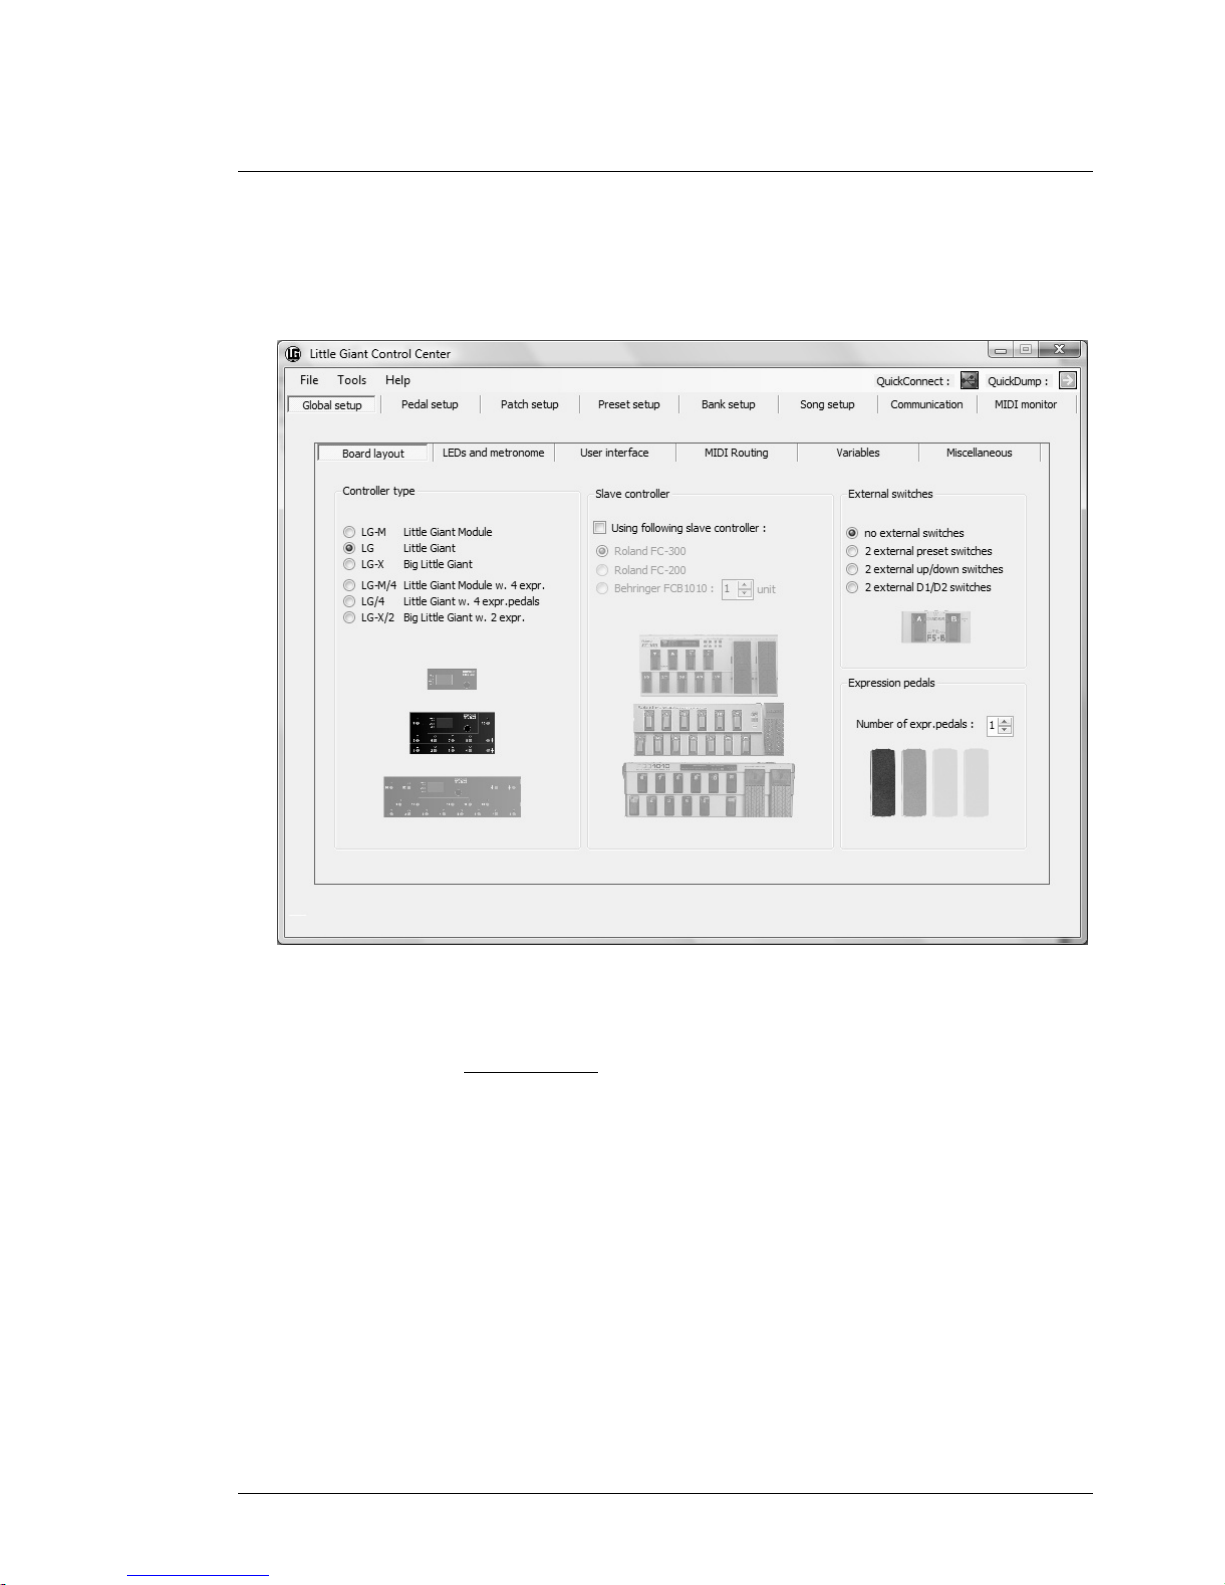
2.3 The Little Giant Control Center
LG Control Center screenshot
The Little Giant Control Center is a Windows application, which can be downloaded from the
GORDIUS website at www.gordius.be
. It is a very powerful and user friendly tool, which allows
you to manage every single aspect of your Little Giant. It lets you create and backup patchdumps,
upgrade LG firmware, monitor MIDI traffic of your unit, etc.
You might be surprised to see this tool mentioned in this early overview chapter, as if it were a
major part of your unit. Actually, it is! Although it is perfectly possible to program your Little Giant
from scratch using the built-in menus, we still prefer to consider this PC application as an integral
part of your rig during initial setup. The tool really helps in giving a good overview on your current
patch setup, and, more important, it opens up highly advanced features, which are too complex to
manage through the local setup menus. Of course, once your setup has been finalized, you no
longer depend on the PC in order to use all advanced features in your live setup. And the internal
menus can still be used at all time to do late minute “offline” setup changes.
Throughout this manual, we will go into detail about each and every option of your Little Giant,
and we will clearly indicate which options can be programmed both locally and through the PC
application, and which options can only be programmed using the LG Control Center.
GGOORRDDIIUUSS LLiittttllee GGiiaanntt
Getting started using Little Giant Control Center 14/180
3 Getting started using Little Giant Control Center
3.1 Before reading this chapter
This chapter guides you through the first use of your Little Giant foot controller. It shows you how to
get started and do a first simple MIDI setup, using the Little Giant Control Center. As mentioned
before, using the Control Center highly increases the ease of use when doing an initial setup from
scratch. If you are currently not equipped to use the Windows PC editor, you can skip this chapter and
follow the getting started guide in the next chapter instead. That one describes exactly the same
scenario, but depends solely on the built-in menus of the Little Giant, withouth any use of Control
Center.
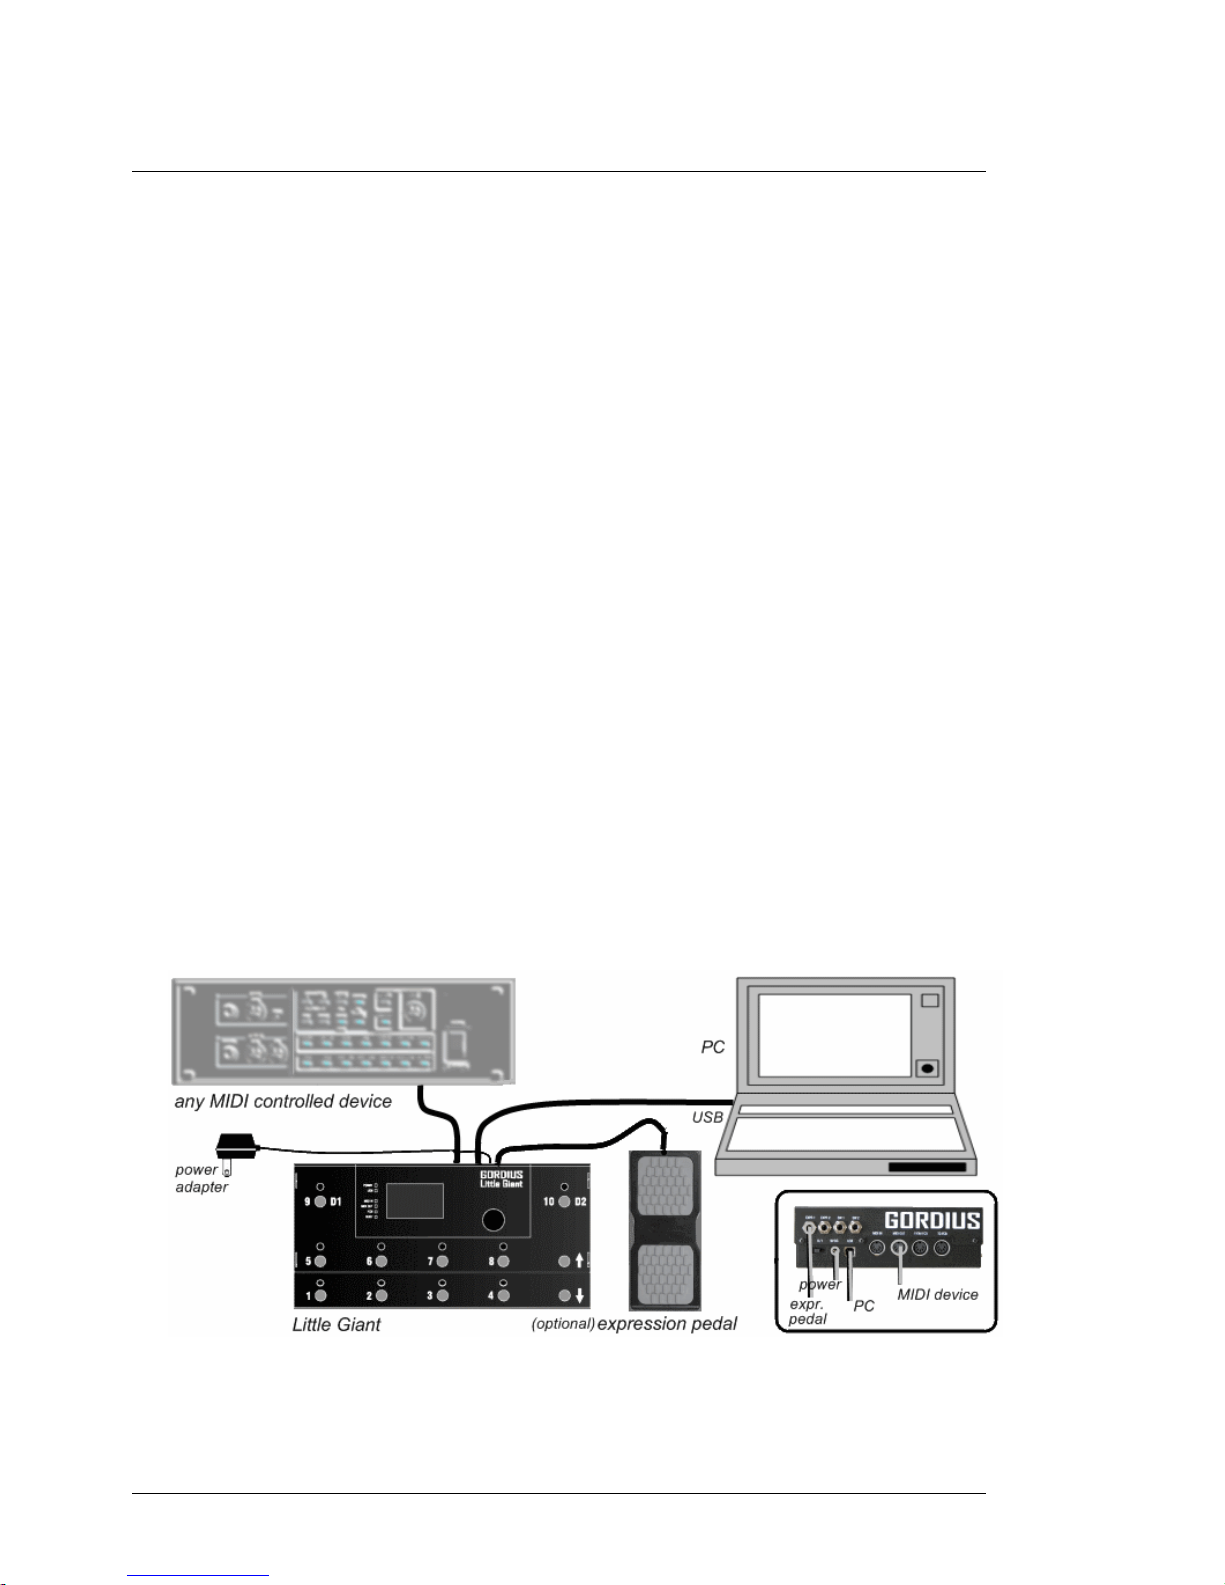
3.2 Making the connections
Thanks to the MIDI monitor capabilities of ControlCenter (and of the Little Giant controller itself), it is
not necessary to connect any gear to the MIDI OUT port of the LG in order to check the dummy setup
which you will create here. If you do connect one of the devices which you want to control with your
LG, you might want to replace the example MIDI messages in this guide with the control messages
your specific gear expects.
GGOORRDDIIUUSS LLiittttllee GGiiaanntt
Getting started using Little Giant Control Center 15/180
- Connect the power adapter to the Little Giant, check if the power switch is off, and plug it
into a wall outlet.
- While the LG power is off, use the USB cable to make a connection between LG and PC.
- If you have an expression pedal available, you can plug it in the jack marked “EXPR.1”.
- Optionally, you can already connect any gear to the MIDI OUT connector of the LG.
3.3 Turning on the power
Make sure your PC is up and running. Switch on the LG power. After the initial splash screen, which
shows the installed firmware version, an overview screen is shown on the LG display. We will come
back on the content of this screen later, first let’s concentrate on what happens on the PC right after
power up of the Little Giant.
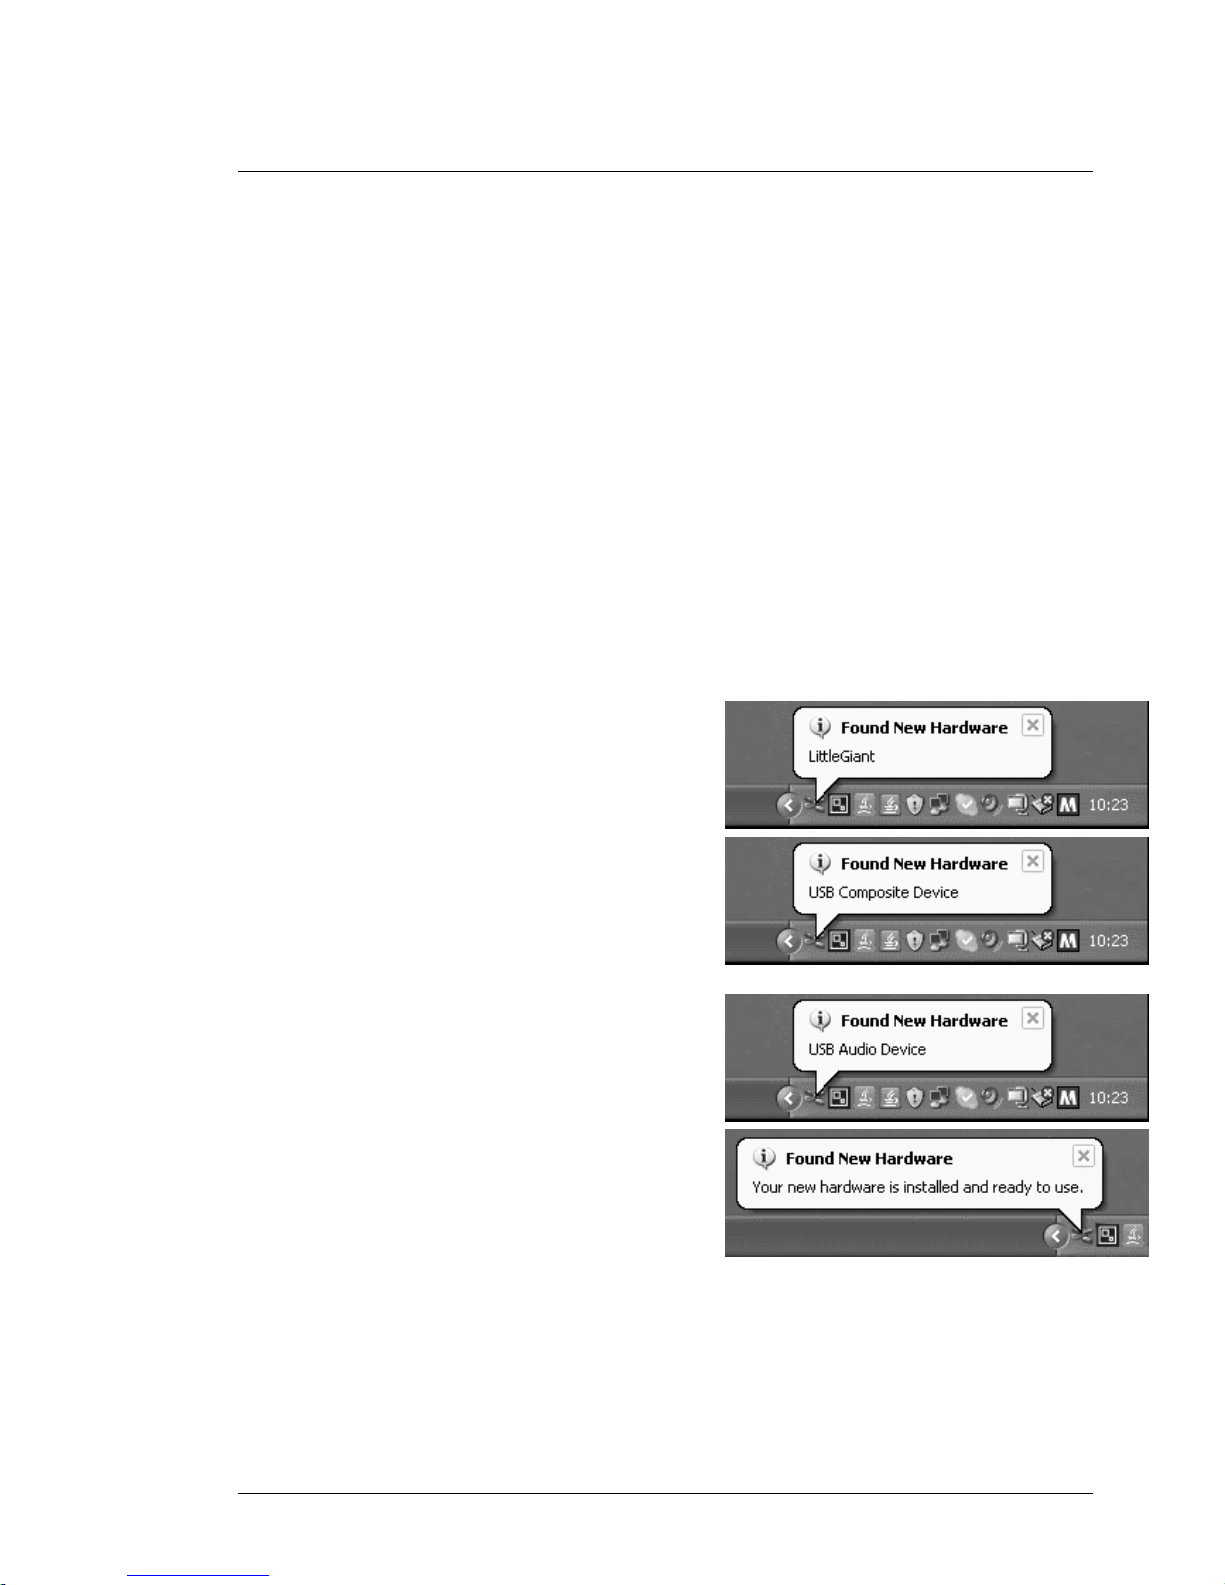
The PC detects the new hardware, connected to
one of its USB ports. It recognizes it as a
standard audio and MIDI device, and activates
the necessary drivers for it. Those drivers are
part of the operating system, so there’s no need
for any additional driver installation. As with any
USB device which is connected for the first time,
a few text balloons near the icon tray at the right
lower corner of the screen show the progress of
the hardware detection. Just give the PC the
time to completely finalize this procedure.
By the way, although the Control Center
application is currently still Windows only, the
Little Giant unit can be used as MIDI-USB
interface for Windows PCs as well as for Linux
or Mac
PCs.
The
proced
ure for
detecti
ng the
unit as
MIDIUSB
device
is
completely similar for those other operating systems.
Now let’s have a look at the Little Giant LCD screen. The
display shows you an overview of the current setup. But,
as the Little Giant is shipped with empty setup memory,
the screen doesn’t contain much information yet.
GGOORRDDIIUUSS LLiittttllee GGiiaanntt
Getting started using Little Giant Control Center 16/180
Initial overview screen
No set list or song name is shown. As there are no banks defined yet, the “<Global>” bank is shown
as currently selected, and since no presets exist yet, “[none…]” is shown as currently selected preset.
The lower part of the screen shows the preset, connected to each of the LG switches. When you turn
the rotary knob, you can scroll from Switch 01 to Switch 10 and back to show the preset linked to
each of the switches. But again, no presets are defined yet, so for now they all will show “[none…]”.
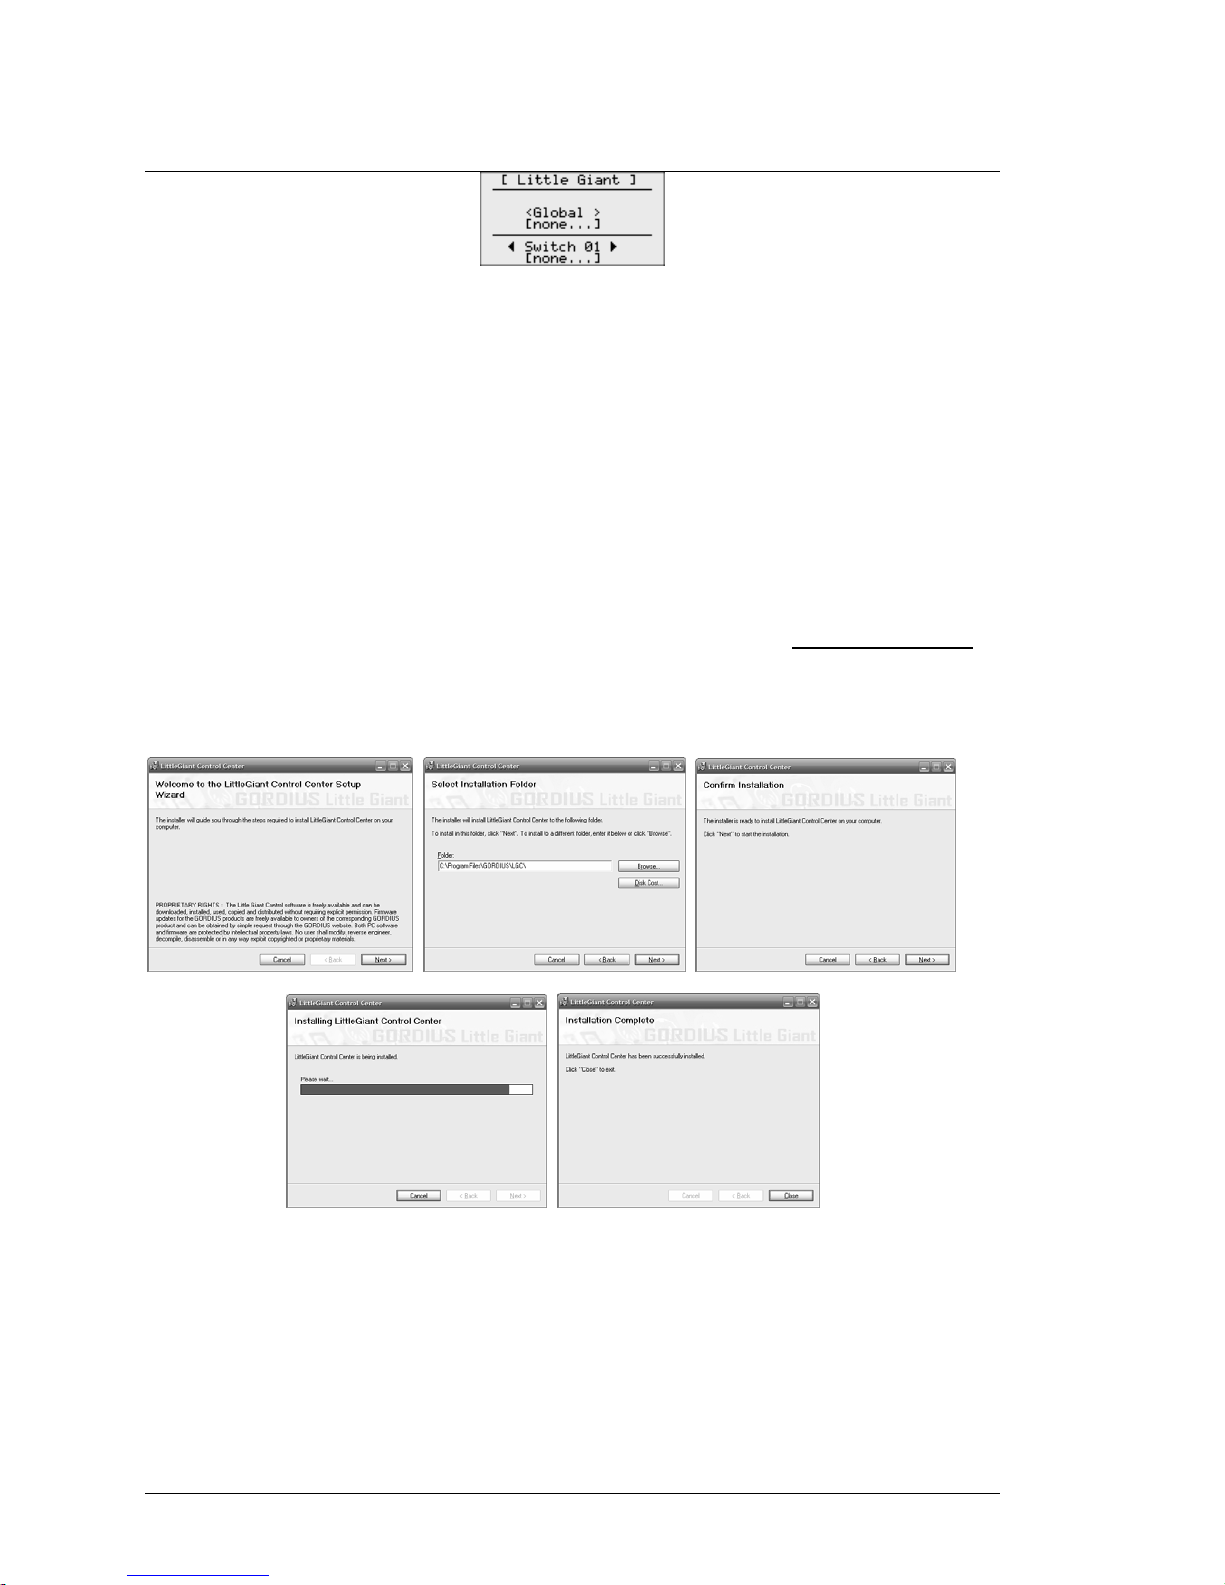
3.4 Installing and launching Little Giant Control Center
The LGCC installation file can be downloaded from the GORDIUS website ( http://www.gordius.be
) .
Double-click the .msi file in order to start the application installation. This will guide you through the
typical installation steps :
Little Giant Control Center installation
GGOORRDDIIUUSS LLiittttllee GGiiaanntt
Getting started using Little Giant Control Center 17/180
After install, you can launch the editor by selecting
or Start -> All Programs -> GORDIUS -> Little Giant Control Center.
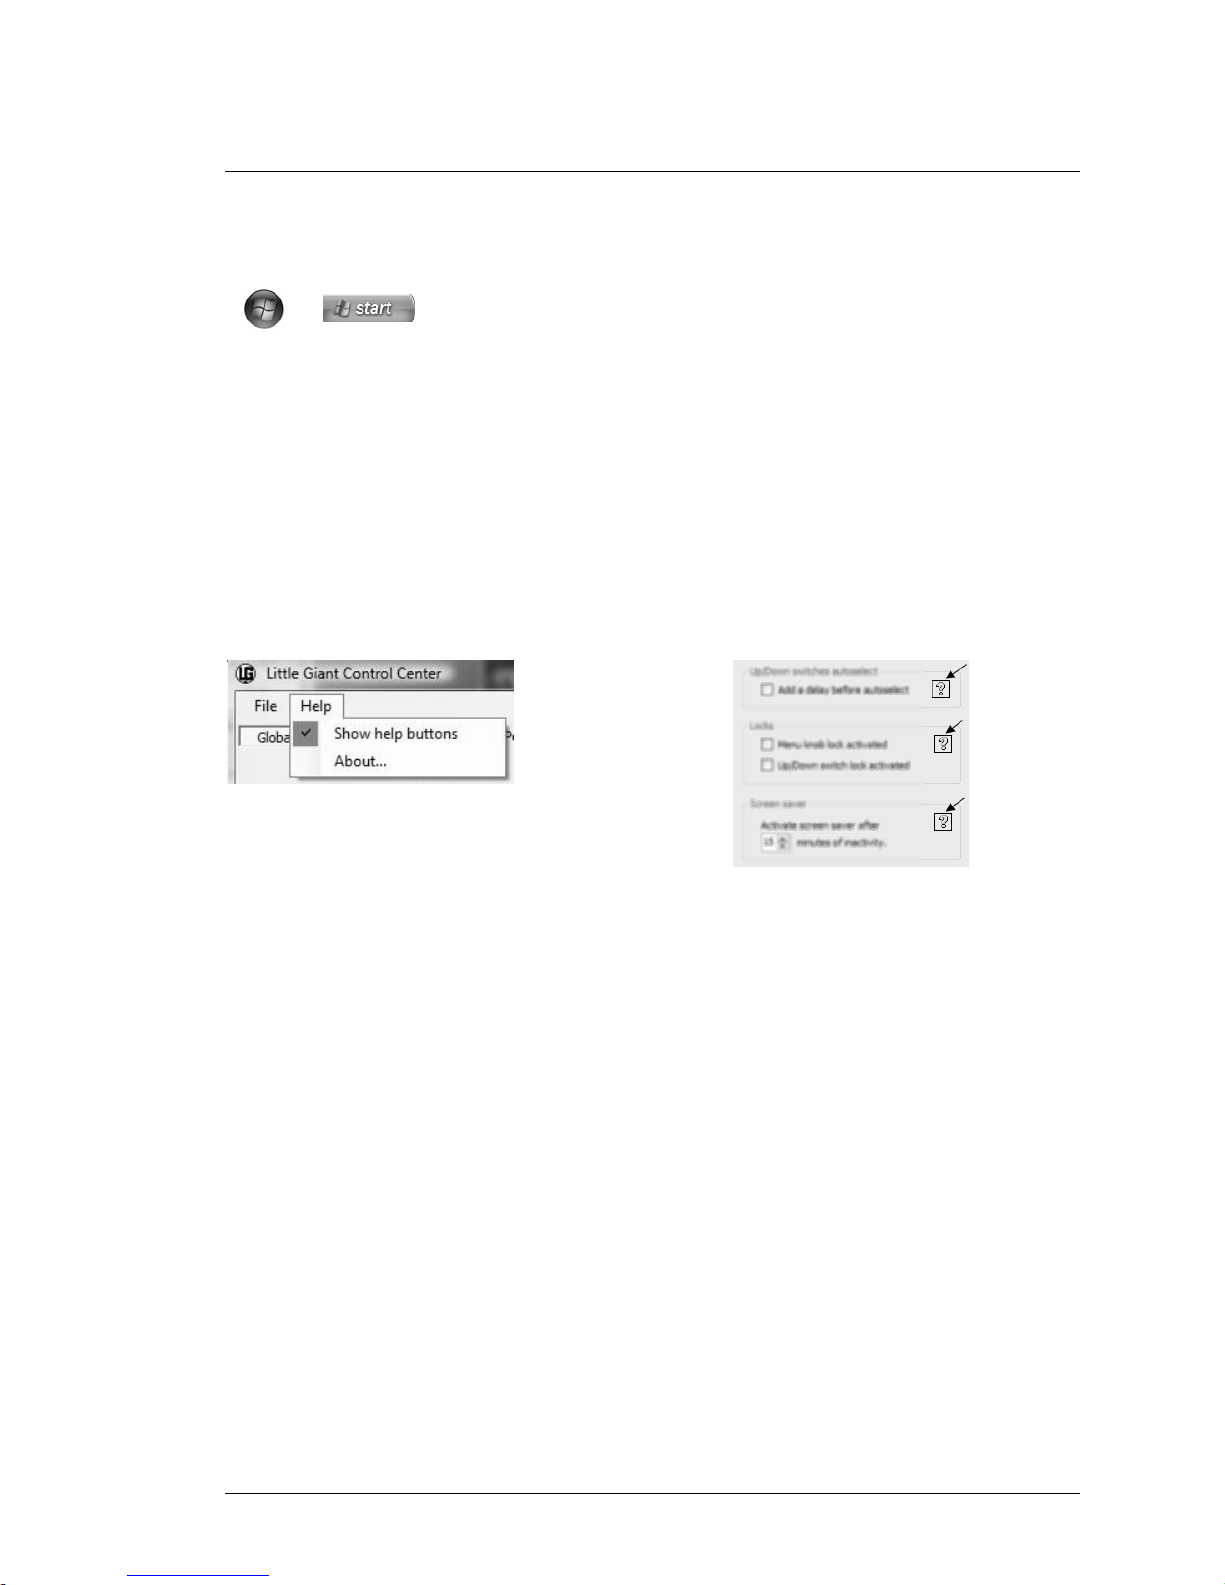
3.5 Showing the Help buttons
As you can see in the Help menu, the option “Show help buttons” is activated by default. This option
activates a large number of help buttons on different locations in the user interface. A context
sensitive help text will be displayed when clicking any of those help buttons. When, after some time,
you feel comfortable with each part of the setup, you might prefer to hide the help buttons again, in
order to have a less cluttered user interface.
Help menu
context sensitive help buttons
on the different application screens
The editor application consists of one main screen, which contains several tabs. Each tab takes care
of one particular part of the setup – the “Global setup” tab controls a large number of global settings,
so it again contains a number of sub-tabs for the different topics within global setup. In general, the
best approach is to build up your setup by running through the different tab screens from left to right.
Two tabs don’t contain info belonging to the current setup :
the Communication tab (as you will see later in this chapter) is the place where you select your
Little Giant as MIDI-USB interface, and where you can initiate setup downloads or uploads, and
firmware downloads.
The “MIDI monitor” tab gives you the possibility to inspect the MIDI messages sent by your Little
Giant. We will be using this monitor at the end of this chapter in order to test our demo setup.

GGOORRDDIIUUSS LLiittttllee GGiiaanntt
Getting started using Little Giant Control Center 18/180
3.6 Global settings
For this demo setup, we will suppose that you have 1 external expression pedal at your disposal. So
the first thing you need to do, is specify that one expression pedal will be connected to your Little
Giant. You do this at the lower right part of the “Board Layout” tab, which is part of the Global setup,
and which is active at first startup of the application. In this same tab, just verify that the Little Giant
(LG) is selected as the Gordius product you want to create this setup for. With these settings, the
screen should look exactly the same as the Control Center screenshot shown in the previous chapter.
In this demo setup we will not alter any of the other global setup items, everything can keep its default
value.
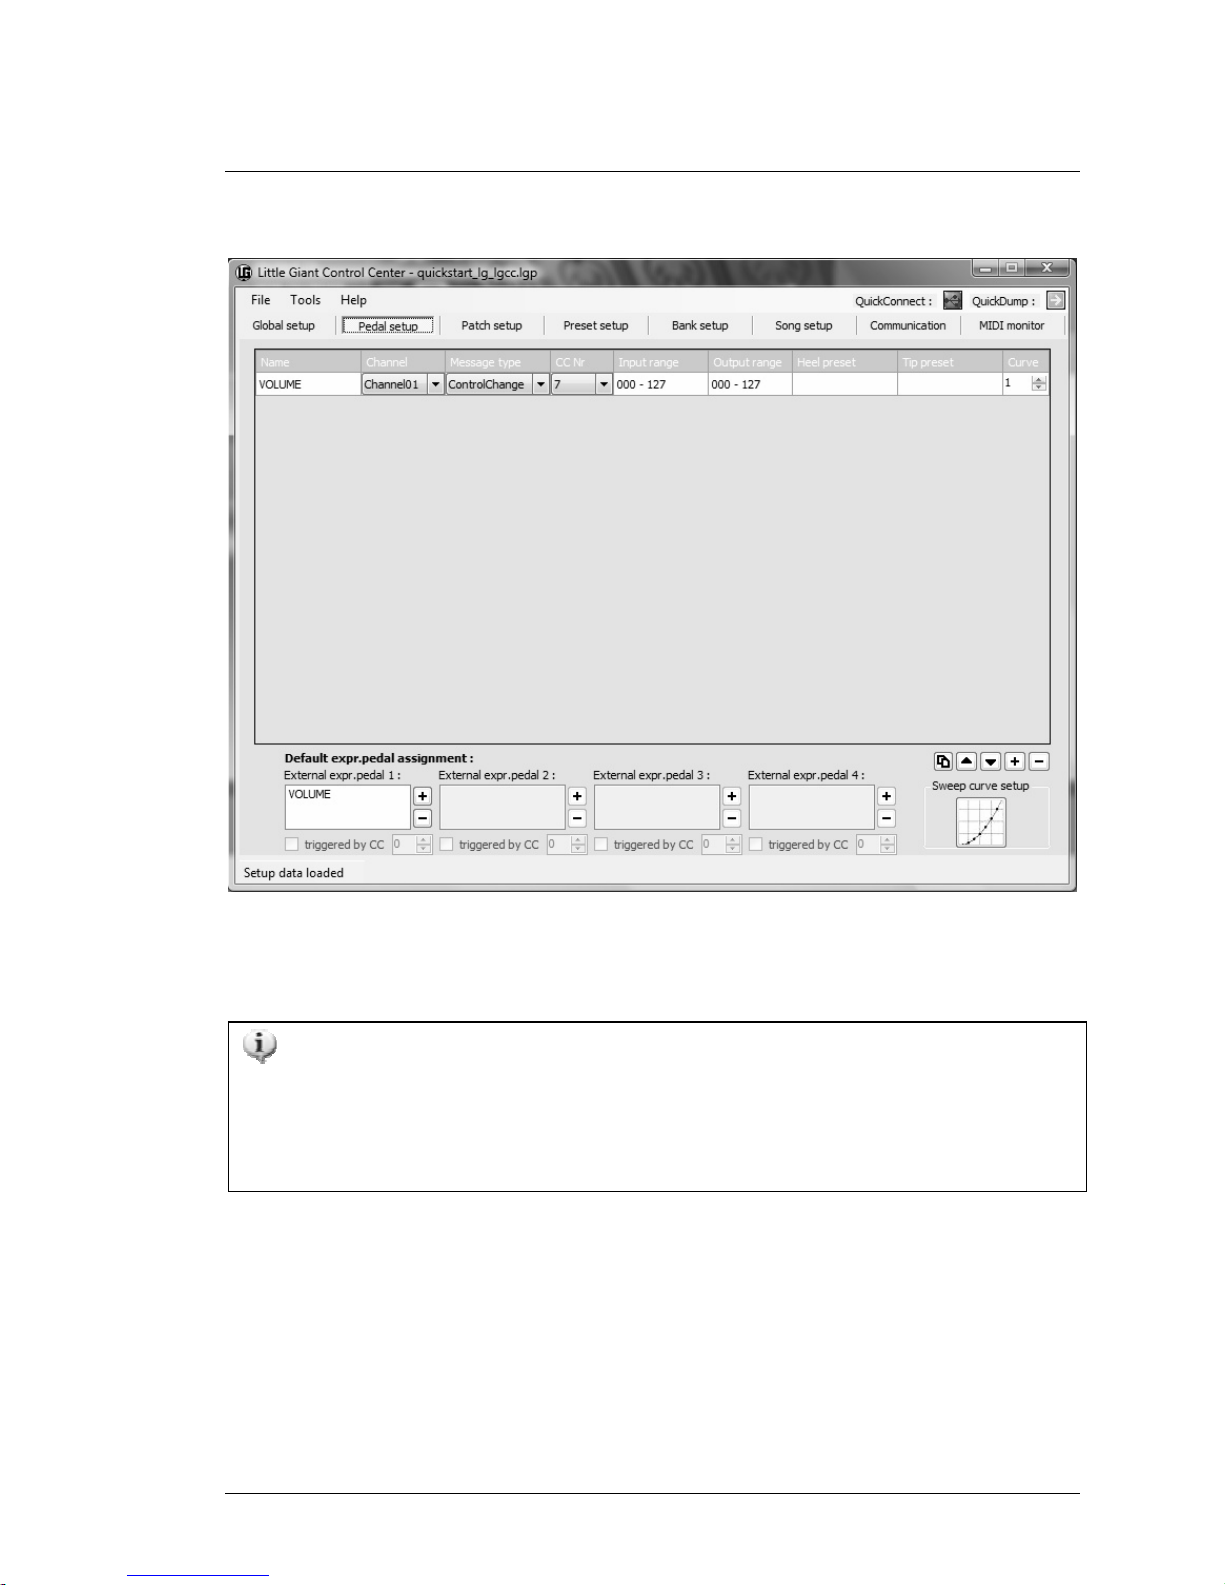
3.7 Expression pedal setup
Next tab in the Little Giant Control Center user interface is the „Pedal setup“ tab. Here, up to sixteen
different setups can be created, which can be used by a maximum of 4 externally connected
expression pedals. We will create one setup for the most commonly used continuous control : volum e.
Click the “+” button below the empty list in order to create a pedal setup. You can change the name of
the newly added pedal setup by doubleclicking the “EXPRPEDAL 01” default name. It sounds logical
to name the new setup “VOLUME” instead. The used message type for this continuous control is
“ControlChange”. Other supported message types are PitchBend or ChannelPressure.
Next, change the value in the “CC Nr” column to 7. ControlChange number 7 is the “de facto” MIDI
standard for main volume adjustment. All other settings can keep their default values. Double-clicking
the input or output range field will pop up a dialog, which shows some of the more advanced
programming possibilities for an expression pedal setup, which will be covered in a later chapter. Also
the sweep curve setup, which can be accessed by clicking the large graph like button in the lower
right corner, is advanced functionality, out of scope for this “getting started” chapter.
In the lower part of the „Pedal setup” tab, you can assign one or more expression pedal setups as the
default setup for each of the 4 expression pedals. Assign the “VOLUME” setup, which you just
created, to external expr.pedal 1 by clicking the “+” button next to the first listbox. (If this button is
disabled, you probably didn’t specify in your global setup that you will be using 1 external expression
pedal : see previous topic )
GGOORRDDIIUUSS LLiittttllee GGiiaanntt
Getting started using Little Giant Control Center 19/180
expression pedal setup tab
It is even possible to assign more than 1 expr.pedal setup to a single pedal. The result is the
same as if you would rock 2 or more expression pedals at the same time. A typical example where
this could be useful, is for adjusting volume on different devices simultaneously, while these
devices are listening to different MIDI channels. You could even create a fader control which fades
between 2 sound sources, by giving the two individual volume adjustments an opposite adjustment
slope…

GGOORRDDIIUUSS LLiittttllee GGiiaanntt
Getting started using Little Giant Control Center 20/180
3.8 Patch setup
As an example, we will now create 4 regular patches, 2 stomp boxes and 1 momentary effect.
The Little Giant provides 3 types of patches, called “(regular) patches”, “stomp boxes”,
and “momentary effects”. The main difference between the 3 types is the behavior of the LED
accompanying the patch switch :
- the currently selected patch is indicated at all time with an illuminated LED. Only one
patch at a time can be active, so when selecting a new patch, the LED of the previous
patch will turn off.
- A stomp box represents a certain effect (chorus, delay,…) It can have 2 states : ON or
OFF. Its LED reflects this state, it is ON when the stomp box is activated and OFF when
it is not active. Each click on a stomp box switch will toggle its state between active and
not active. While only one patch can be active at the same time, many stomp boxes can
be activated simultaneously. Selecting a stomp box will not deselect the currently active
patch.
- A momentary effect is only active as long as its switch is being pressed. A good
example is the sustain pedal for a synth. As the LED indicates the effect activation, it
will only be ON as long as the switch is being pressed. Just like stomp boxes, selecting
a momentary effect does not deselect the currently active patch.
GGOORRDDIIUUSS LLiittttllee GGiiaanntt
Getting started using Little Giant Control Center 21/180
3.8.1 Creating patches
Go to the “Patch setup” tab, and click the “+” button below the different (currently empty) patch lists :
click the Add button 4 times on the patch list, 2 times on the stomp box list, and 1 time on the
momentary effects list. Each click will create a new patch, give it a unique default name, and add it to
the respective lists of patches, stomp boxes and momentary effects.
The result should look like the screenshot below :
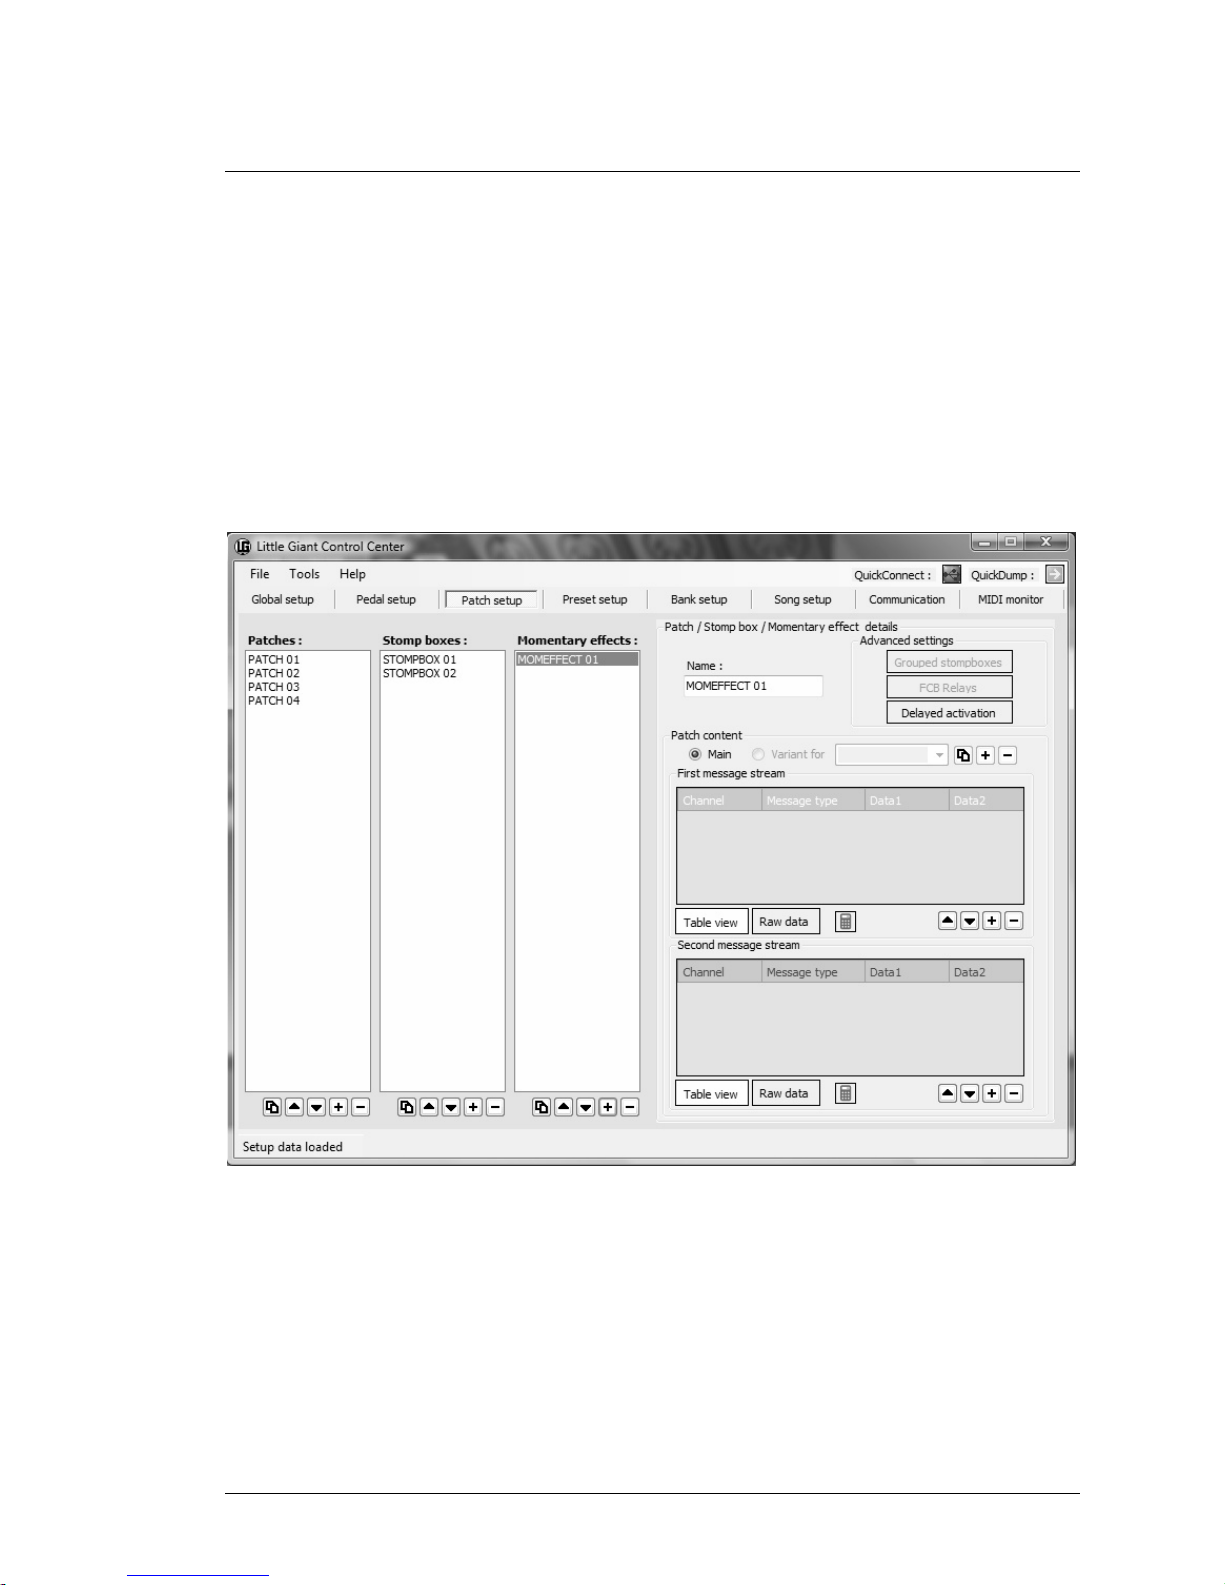
Patch setup : creating new patches
As soon as you select an item in one of the 3 left hand lists, the details for this patch are displayed in
the rightside details panel. The only patch data available right now is the name of each patch.

GGOORRDDIIUUSS LLiittttllee GGiiaanntt
Getting started using Little Giant Control Center 22/180
While leaving the names “PATCH 01”… “PATCH 04” unchanged, let’s give the stomp boxes a more
meaningful name. Select “STOMPBOX 01”, and overwrite its name in the textbox of the details pane:
name this stomp box “CHORUS”. Remark that you need to leave the textbox editing field (for instance
by clicking the tab button) in order to confirm the change. This is the case for any edit field in the
editor user interface: as long as you don’t leave an edit field, the editor doesn’t “see” any change.
It is a good idea to save your setup to harddisk every now and then, while doing this demo setup. This
way you don’t risk to lose your work. You can do this through the menu item File -> Save setup (as…)
You will see later that you can easily download your setup to the Little Giant, using the “QuickDump”
button in the menu bar. You can even send a modified setup without first saving it to disk – this can
be a very quick way to test out small setup changes.
After modifying the first stomp box name into “CHORUS”, also rename the second stomp box to
“DISTORTION”, and name the momentary effect “SUSTAIN” (a typical example for a “momentary”
effect, which is only active as long as the switch is being pressed).
Next, let’s go to the most important part of the patch setup : the MIDI message stream content.
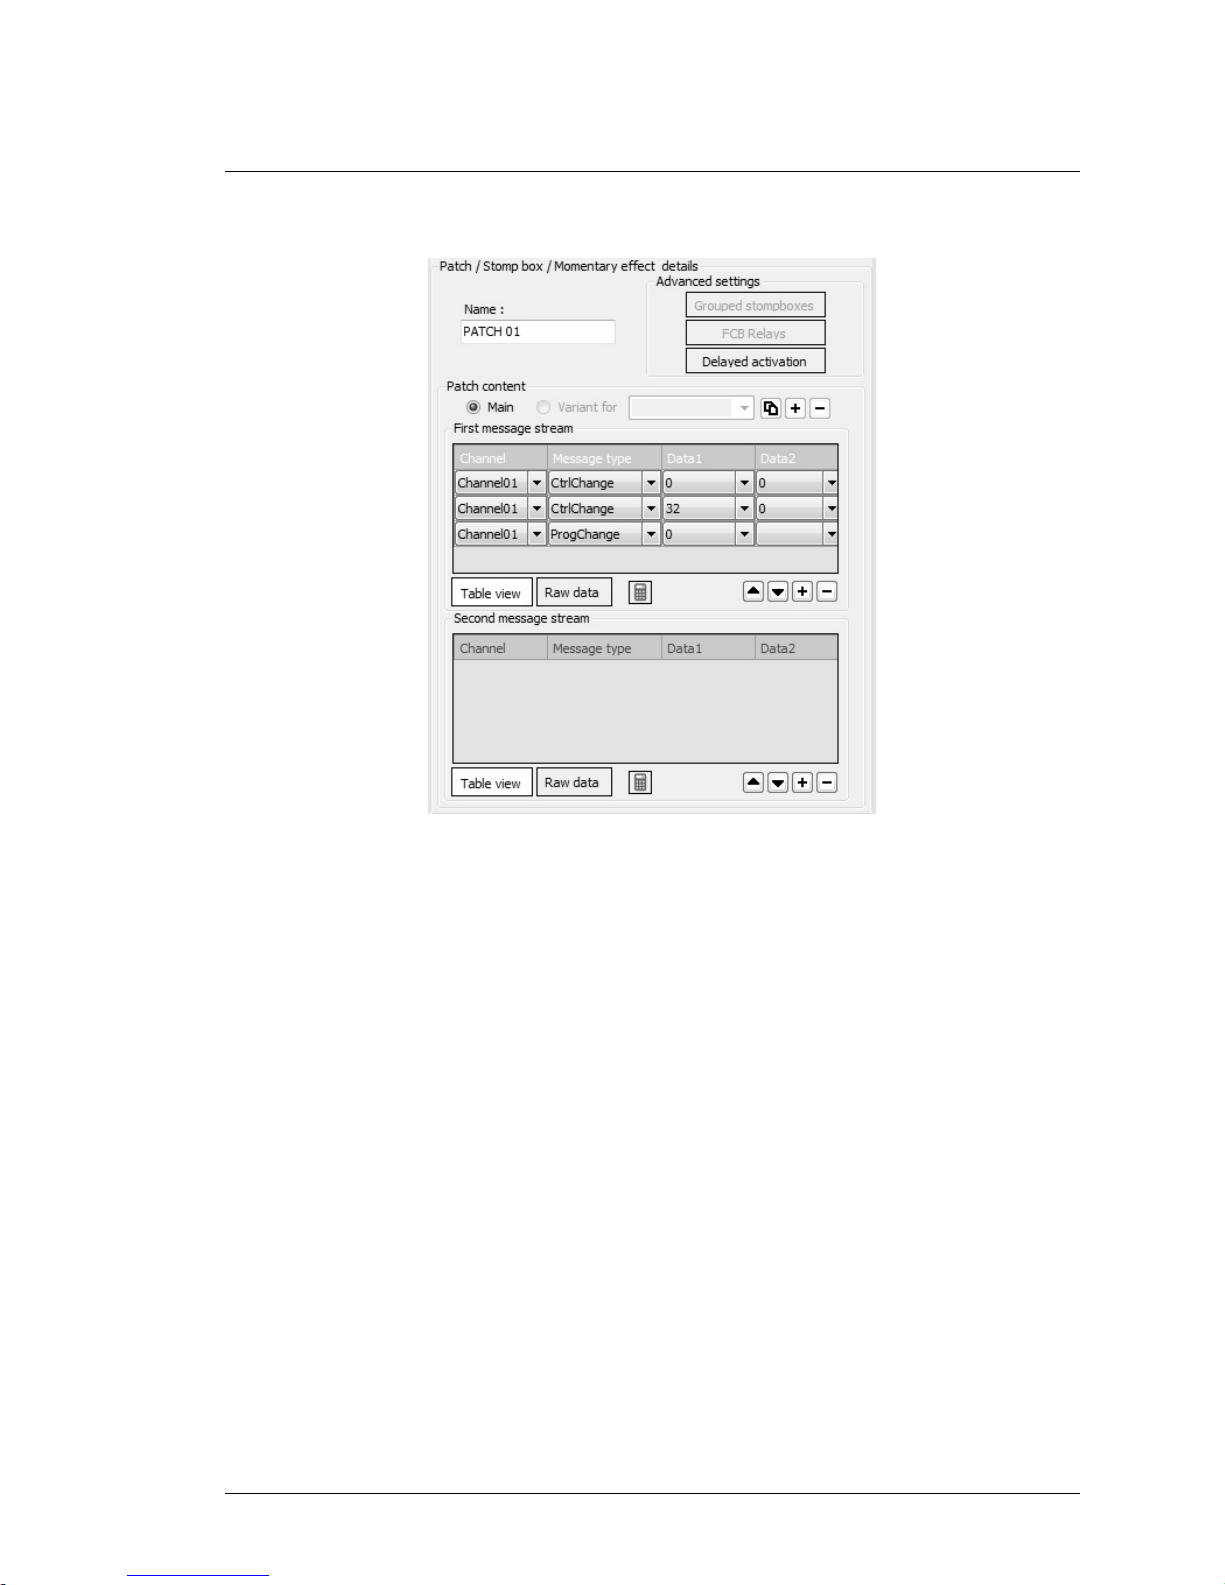
3.8.2 Specifying MIDI messages for each patch
Select “PATCH 01”. As you can see in the patch details pane, there are 2 tables available for defining
2 message streams: each patch can send an arbitrary number of MIDI messages when its switch is
being depressed, and a different set of messages when its switch is being released. For now we will
not send anything on switch release, which means we will keep the “second message stream” table
empty. In the first message stream, we will send 2 bank select messages plus a program change
message, which is the standard way of selecting a sound in an effects processor which supports
multiple banks of sounds.
Ch.01 CC 00 00 : select “coarse” bank 00
Ch.01 CC 32 00 : within this range, select “fine” bank 00
Ch.01 PC 00 : in this bank, select the first sound
“Ch.01” indicates that all messages will be sent on MIDI channel 1. Let’s add these 3 MIDI messages
to the first message stream of our patch :
Click the “+” button below the first message stream table three times. This will add 3 MIDI messages
to the table, they all default to “ProgChange 0”. Now use the different dropdown boxes in order to fill
in the correct message types and data values, as described above. The result should look like the
screenshot shown on the next page.
GGOORRDDIIUUSS LLiittttllee GGiiaanntt
Getting started using Little Giant Control Center 23/180
Details view of the first patch
The MIDI channel dropdown box by default contains 16 entries, named “Channel01” up till
“Channel16”. In one of the global setup tabs (Global -> Variables) you can specify which of the 16
channels you are actually using, and you can give them a more descriptive name (for instance just
name the MIDI channels after the devices which are listening on each channel). When doing so, the
dropdown items are limited to the relevant channels only, and they are displaying more meaningful
names.
Similarly, the Data dropdown boxes, which now just contain the possible data values of 0 .. 127, can
be extended to contain the names of “data variables”, defined in global setup. Definitely an advanced
feature, which we will cover in detail in a later chapter.
The Message type dropdown box contains a list of all possible types of MIDI messages to choose
from, extended with 13 “GORDIUS specific” message types, which are available for advanced
features like customizable delays, message sweeps, message repeat loops, metronome or tap tempo
functionality. Check out the appendices of this manual to see a complete list of all supported
messages. In this simple demo setup, we will limit our example to the most common MIDI messages,
which are the PC (ProgramChange) and CC (ControlChange) messages.
GGOORRDDIIUUSS LLiittttllee GGiiaanntt
Getting started using Little Giant Control Center 24/180
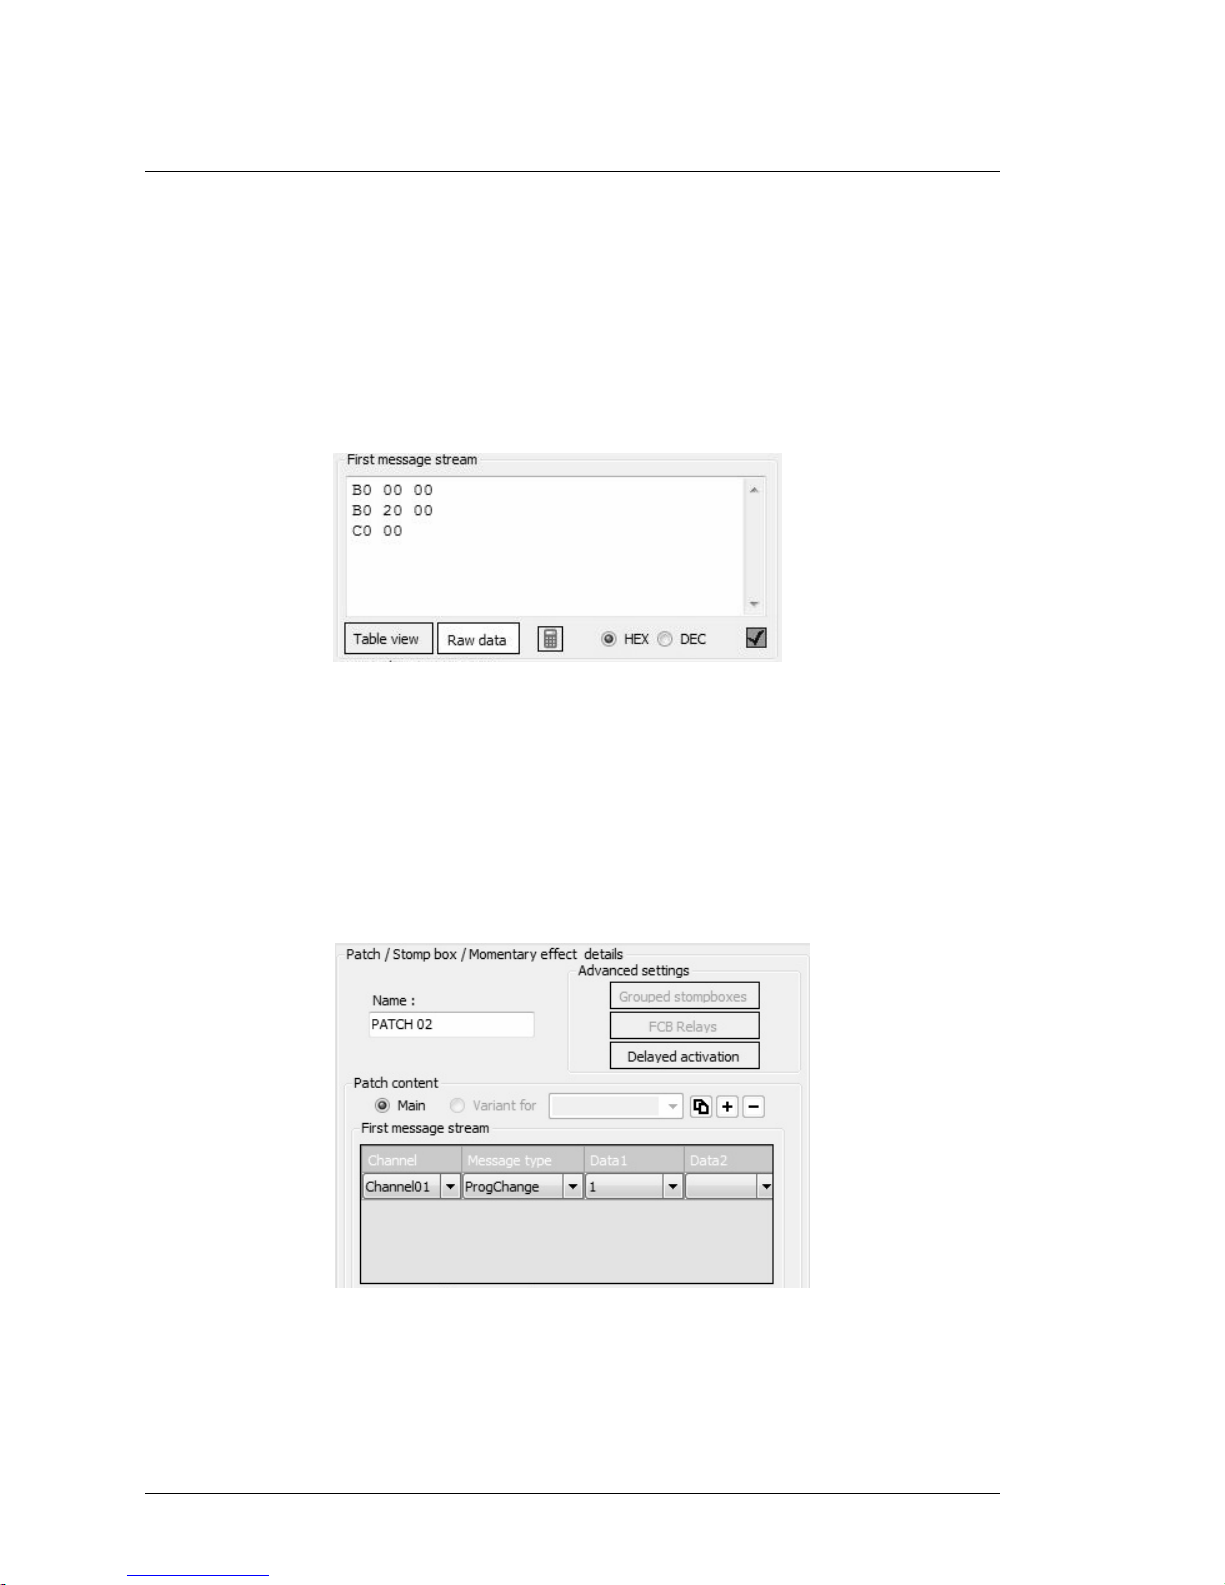
Finally, let us mention here that each MIDI message stream can also be visualized as a series of
bytes. You can do so by clicking the “Raw data” button. This replaces the table, containing a list of
messages, with a multi-line text field. The text field shows you the list of bytes which will be sent, in
hexadecimal or decimal format. For those of you who are really familiar with the technical details of
the MIDI data format, you could as well use this raw data view to enter the MIDI data of a stream
directly. Actually, this is the only way to specify SYSEX data as part of the MIDI stream. A built-in
validator analyzes the entered data as you type, a little symbol in the right lower corner shows at any
time if the data is valid or invalid.
Raw data view of a message stream
Now back to our demo setup. We have specified the 3 MIDI messages which we want to send when
selecting PATCH 01. We will now add messages for the other patches. Let’s keep it simple :
- Add a single ProgramChange message to the first message stream of PATCH02, and give it
ProgramNumber 01 (choose “1” in the Data 1 column) – in short, we call this a PC01 message.
PATCH 02 sends PC01
- Similar for the other patches: add a PC02 message to PATCH03 and a PC03 message to PATCH04

GGOORRDDIIUUSS LLiittttllee GGiiaanntt
Getting started using Little Giant Control Center 25/180
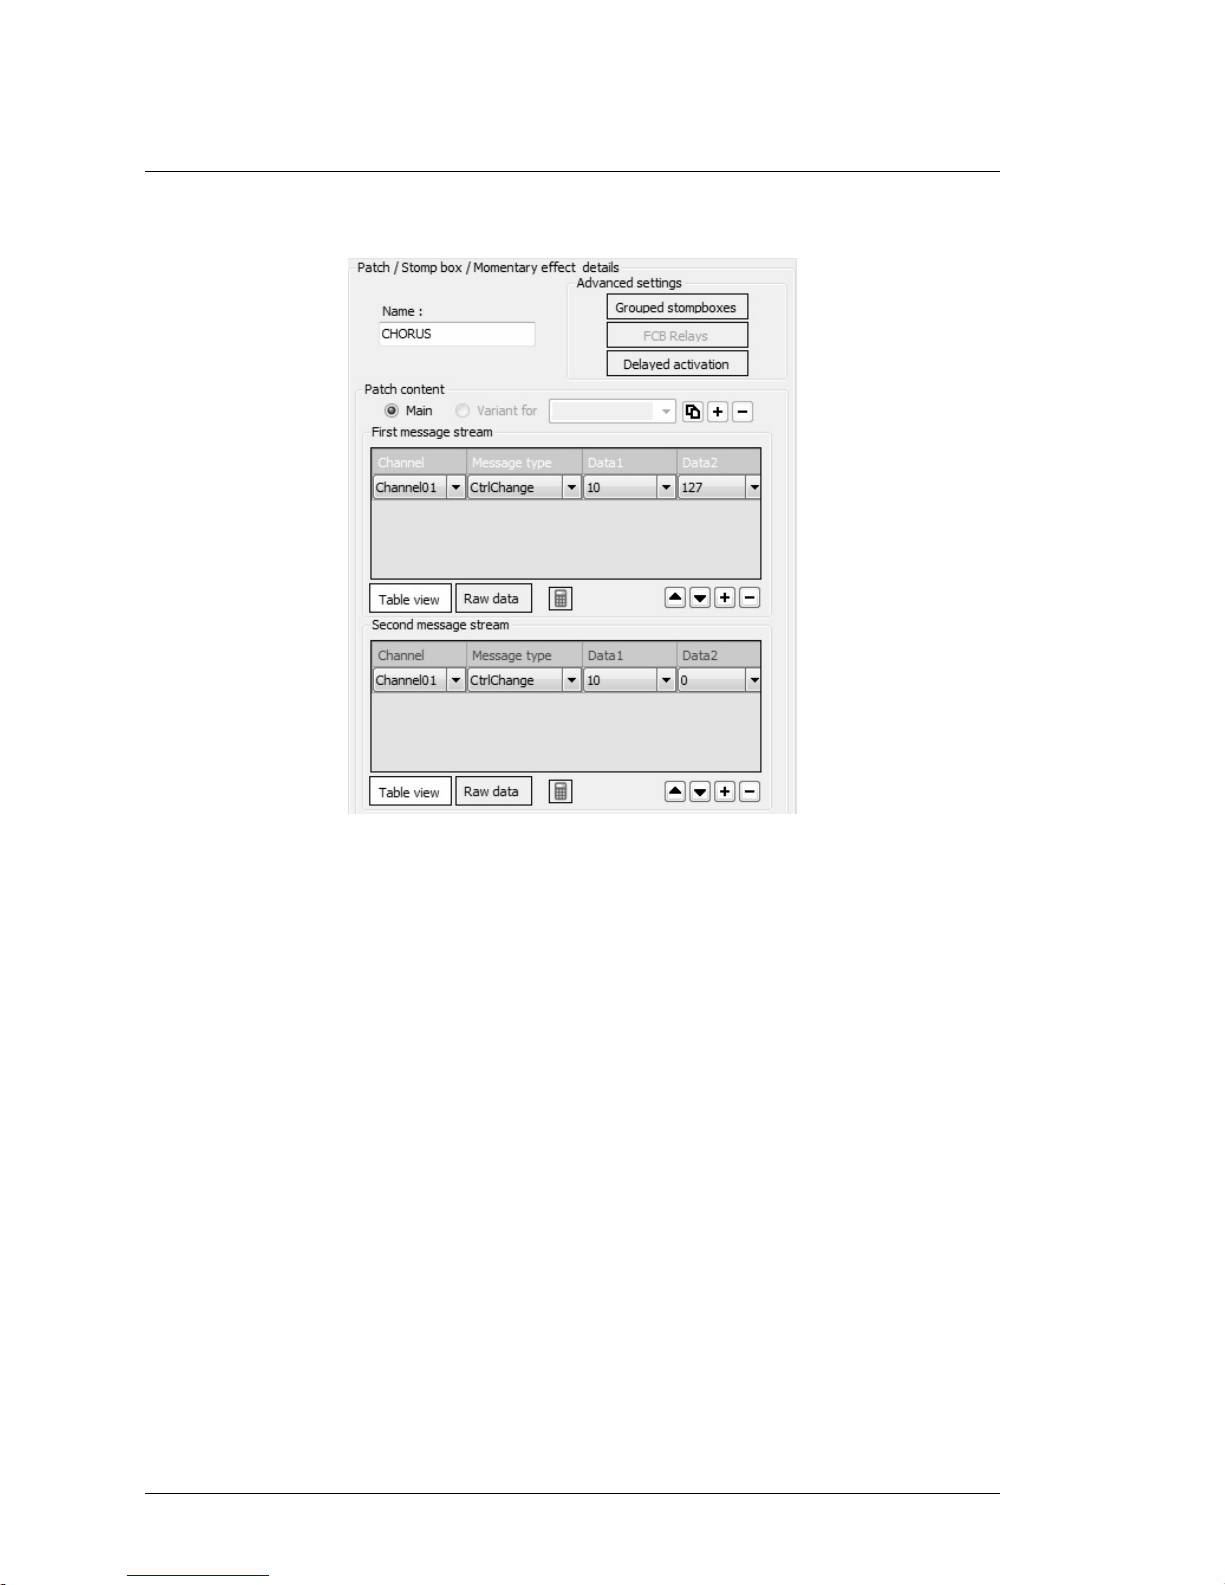
3.8.3 Specifying MIDI messages for stomp boxes and momentary effects
The stomp boxes need to behave differently compared to the “regular” patches: you want them to
send 2 different messages, one for activating the effect, and one for deactivating the effect. The MIDI
message(s) sent for activating the effect need to be stored in the first message stream, while the
message(s) sent for switching the effect off (that is, sent when clicking the stomp box switch for a
second time) need to be stored in the second message stream.
In most cases, a stomp box will use a ControlChange (CC) message to toggle its state. Such a
ControlChange message always has 2 accompanying data values :
- a control number (specified in the “Data1” column of the message stream table)
- a control value (specified in the “Data2” column of the message stream table)
Control values of 127 and 0 are commonly used for “on/off” effects : a value of 127 switches the effect
on, while 0 switches the effect off. The control number to be used depends on the controlled device.
Info about which value to use for each of the controllable effects in a device can be found in the
manual or MIDI implementation chart of that device. Many devices also have a “learn” function, which
enables you to do the setup with arbitrary CC numbers, and then let the device “learn” the used MIDI
message for each effect, by listening to the transmitted messages during a short test procedure.
In our demo setup, select the “CHORUS” stomp box which you created previously, add a
“CtrlChange” message to its first message stream, and another one to its second message stream.
Specify Control Number (that is “Data1”) to be 10 for both messages. Then specify Control Value
(“Data2”) to be 127 in the first message stream, and leave it on 0 in the second message stream. As
explained, this will cause the stompbox activation message to be sent when switching the stompbox
on, and the deactivation message will be sent when switching it off. The Control Number of 10 is just
an arbitrary number we chose for our demo setup.
The result should look like the screenshot on the next page.
GGOORRDDIIUUSS LLiittttllee GGiiaanntt
Getting started using Little Giant Control Center 26/180
Activation and deactivation message for a stomp box
Completely similar to the “CHORUS” messages, now specify 2 ControlChange messages in the
“DISTORTION” message streams, also having value 127 in the first stream and value 0 in the second
stream. This time however, use ControlNumber 11 (again an arbitrary value)
The messages for our “SUSTAIN” momentary effect are almost identical to the stomp box messages:
one ControlChange with value 127 in the first stream, another one with value 0 in the second stream,
and again a different ControlNumber: 12.
Of course the behavior of this momentary effect is different from the stomp boxes: with a stomp box,
the 2 different MIDI message streams are sent alternately, when switching the effect on or off. The
momentary effect on the other hand sends the MIDI message(s) of its first message stream when
depressing its foot switch, and it sends the message(s) of the second message stream when
releasing the foot switch. Indeed, a momentary effect is only activated as long as its foot switch is
being pressed.
GGOORRDDIIUUSS LLiittttllee GGiiaanntt
Getting started using Little Giant Control Center 27/180
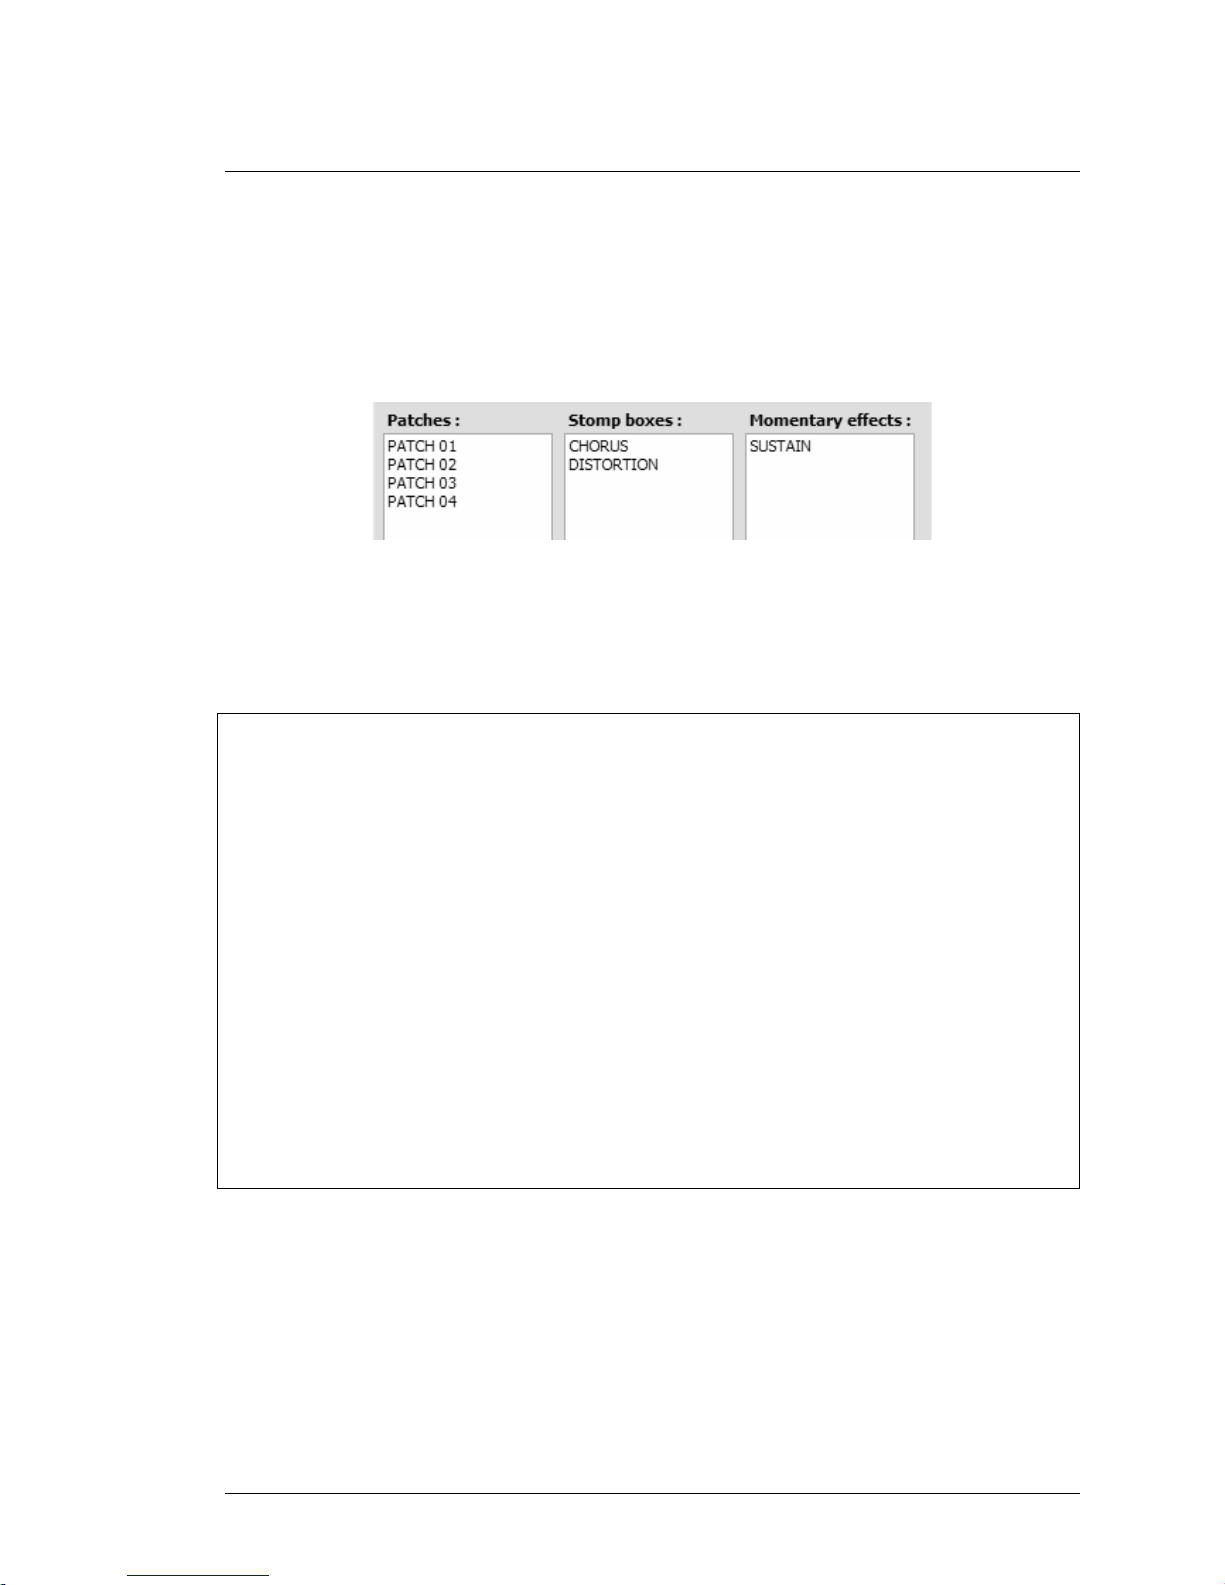
3.8.4 What do we have up till now ?
These are the patches which we just created :
our demo setup so far
and these are the MIDI messages assigned to those patches :
Name Messagestream 1 Messagestream 2
------- --------------------------- --------------------------
PATCH 01 Channel01 CtrlChange 00 00 Channel01 CtrlChange 32 00
Channel01 ProgChange 00
PATCH 02 Channel01 ProgChange 01 -
PATCH 03 Channel01 ProgChange 02 -
PATCH 04 Channel01 ProgChange 03 -
CHORUS Channel01 CtrlChange 10 127 Channel01 CtrlChange 10 0
DISTORTION Channel01 CtrlChange 11 127 Channel01 CtrlChange 11 0
SUSTAIN Channel01 CtrlChange 12 127 Channel01 CtrlChange 12 0
Don’t forget to save your work, selecting “File -> Save setup”
GGOORRDDIIUUSS LLiittttllee GGiiaanntt
Getting started using Little Giant Control Center 28/180
3.9 Preset setup
Next step in our first setup is creating a preset for each patch.
In our example, we will define different combinations of stomp boxes to be activated when selecting
each preset : the preset linked to patch 1 will switch both stomp boxes off, patch 2 will switch on the
chorus, patch 3 will switch on the distortion, and patch 4 will switch on chorus and distortion
simultaneously. Of course, after selecting any preset you can still switch each of the individual effects
on or off, here we are just talking about the initial state of each effect when first selecting a preset.
3.9.1 Creating the presets
Go to the „Preset setup“ tab of Control Center. Here you find a very easy way to create a preset for
each available patch: the „Sync“ buttons below each preset list take care of this.
Simply click the „Sync.“ button below each of the 3 preset lists („Patch presets“, „Stomp box presets“
and „Mom. effect presets“). After these 3 clicks, your preset setup screen should look very similar to
your patch setup screen. Indeed, a preset is created for each available patch, the name of each
preset is identical to the name of the patch it is linked to. When selecting a preset in one of the lists,
its properties are displayed in the right side details panel, completely similar to the Patch setup
screen. When you click any of t he patch presets, the „Main patch“ dropdown box of the preset shows
the patch it is linked to. You will notice that, after clicking the Sync buton, each preset is linked to
another patch. Similarly, each stomp box preset mentions the linked stomp box patch in its detail
panel, and the momentary effect preset mentions the linked mom. effect patch.
At this point, we will not cover all the different options you see in the preset details panel. The only
option we will use here is the „stomp boxes“ list, which will be set up in the next topic.
A preset basically adds some important information to the patch. It defines for each patch
which stomp boxes need to be activated automatically, how the expression pedals need to
behave, etc. At first, the existence of both patches and presets might look like an unnecessary
overkill, complicating the whole setup. But in the end you will notice how it offers a high level of
flexibility, with the possibility to reuse the same patches in different presets, etc. After creating all
needed patches, the creation of a corresponding preset for each patch is just a matter of one
mouse click in Control Center.
GGOORRDDIIUUSS LLiittttllee GGiiaanntt
Getting started using Little Giant Control Center 29/180
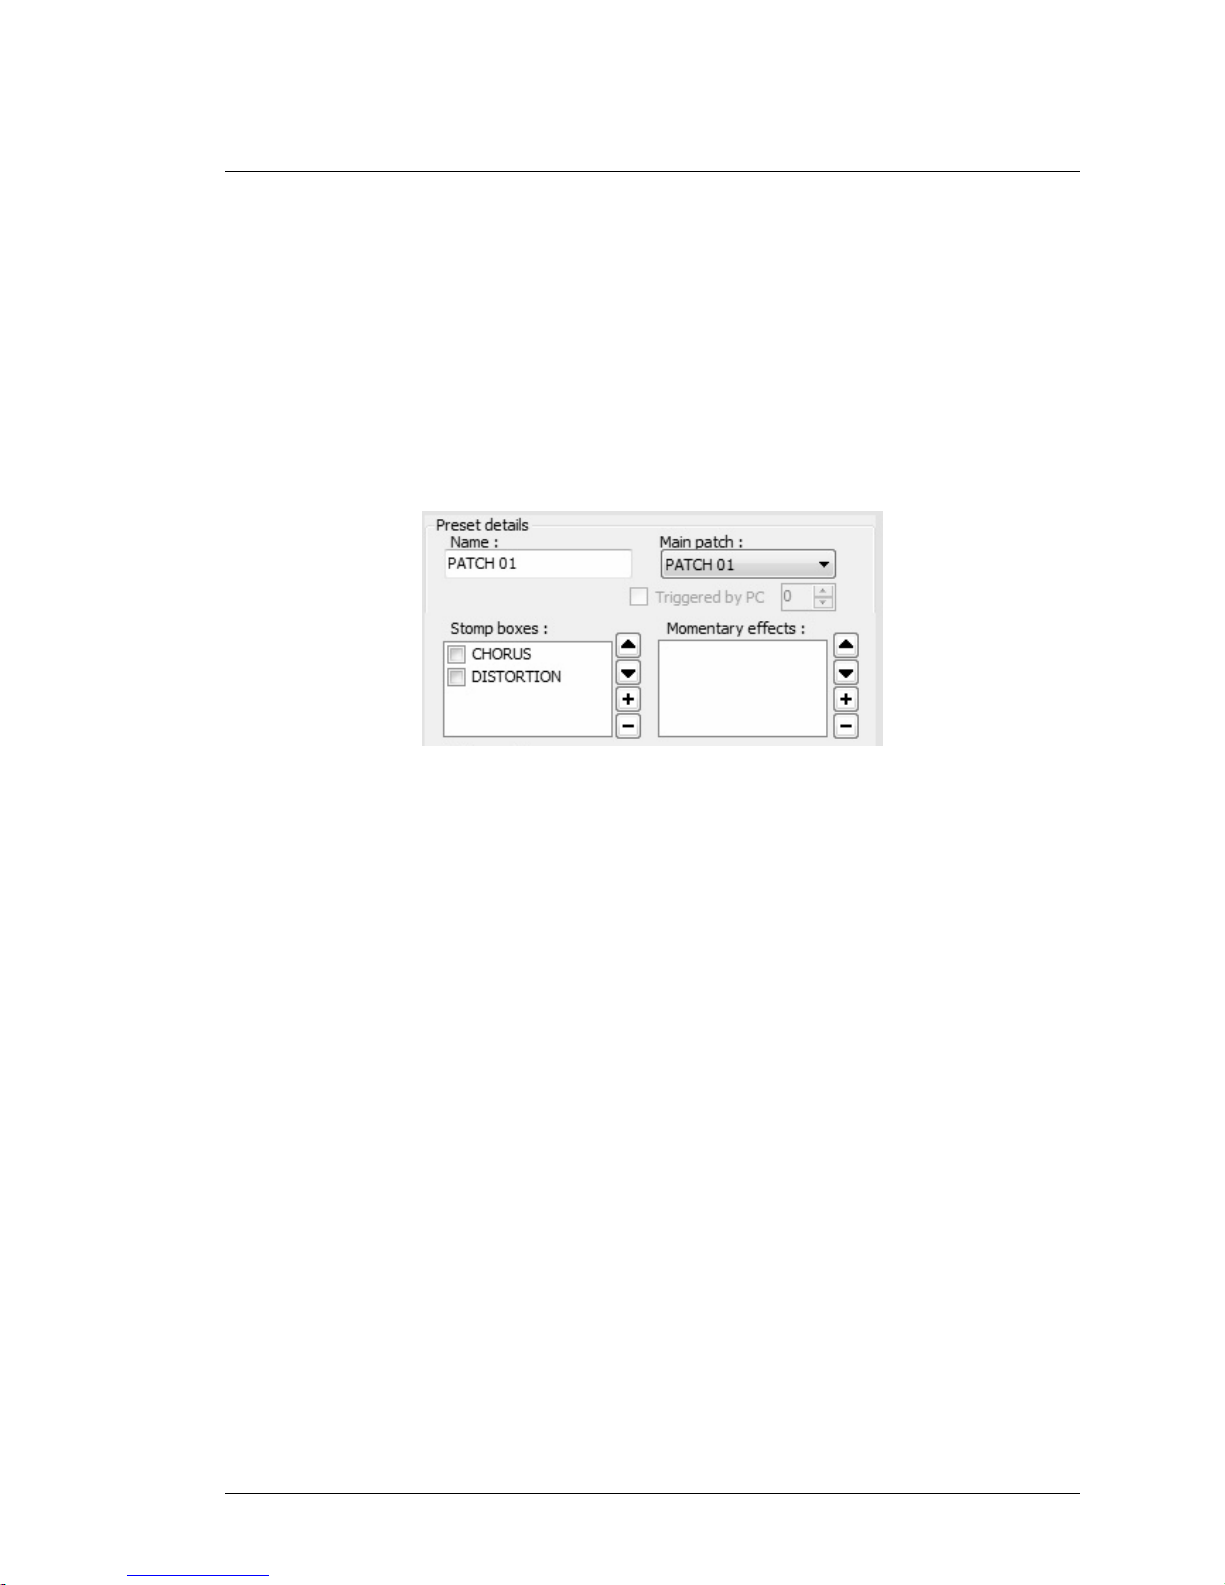
3.9.2 Specifying the initial stomp box states
As mentioned above, we want to define the different initial states for the stomp boxes, when selecting
any of the patches. To do so, we start by selecting the „PATCH 01“ preset. In the right side details
pane, we click the „+“ button next to the „Stomp boxes“ listbox. A popup lets you select one or more
stomp boxes: select both defined stomp boxes and click OK. By adding the 2 stomp boxes, we have
specified that patch 1 will switch on both the CHORUS and DISTORTION effect. Actually, that’s not
what we want: we want both effects to be off instead. All we need to do, is uncheck the 2 checkboxes
which are shown next to the stomp box names. Indeed, this means: switch off both listed effects
whenever PATCH 01 is selected.
PATCH 01 contains 2 deactivated stomp boxes
If we wouln’t add any stomp box to this preset setup, both stomp boxes would simply keep their latest
state when PATCH 01 is selected: an effect that is activated would stay activated, an effect that is not
active, would stay deactivated. So whenever you want to specify the initial state of a stomp box when
selecting a preset, no matter if you want it to be on or off, you first need to add it to the stomp box list
of that preset. After that, use the corresponding check boxes to define the on or off state for each
effect.
Defining the stomp box state for the 3 remaining patch presets is easy: just follow the same
procedure, but make sure the CHORUS checkbox is checked for preset „PATCH 02“, the
DISTORTION checkbox is checked for preset „PATCH 03, and both checkboxes are checked for
preset „PATCH 04“.
3.9.3 Specifying the expression pedal behavior for each preset
In this first demo setup, we will leave all expression pedal settings in the preset details panel to their
default value : „no change“. Remember, in a previous setup step, you have defined the „VOLUME“
expr.pedal setup to be the default setup for your single external expresssion pedal. The pedal will be
used as volume adjustment for all patches. By selecting another option instead of „no change“, you
could override this default behavior, and give the expression pedal a specific function for certain
presets. We won’t do this for now.
GGOORRDDIIUUSS LLiittttllee GGiiaanntt
Getting started using Little Giant Control Center 30/180
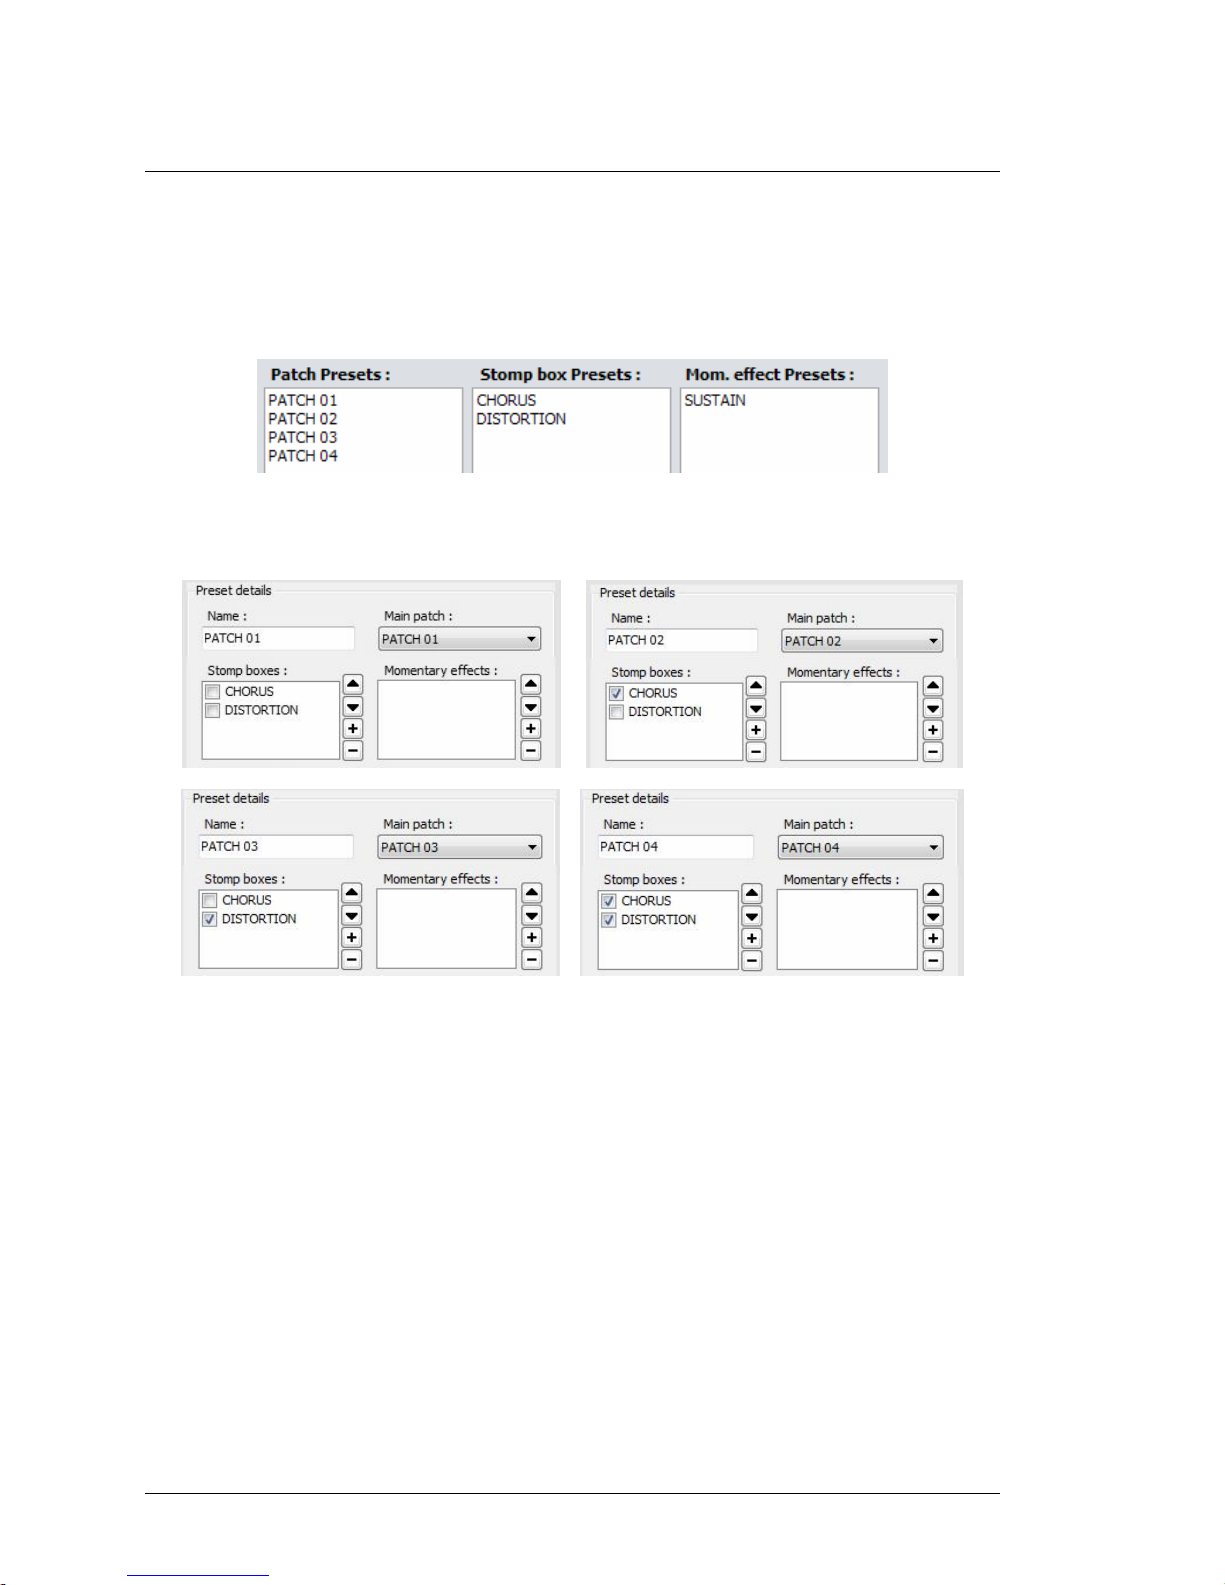
3.9.4 What do we have up till now?
The presets we just created look exactly the same as the patches we created earlier :
and this are the detail panels for the different patch presets :
our demo setup so far
 Loading...