

Instructions for Use

GORBEL MEDICAL
Gorbel Medical
Physical Address: 600 Fishers Run, Victor, NY 14564
Mailing Address: P.O. Box 593, Fishers, NY 14453-0593
Phone: 1-844-846-8744
E-mail: info@safegait.com
www.safegait.com
NOTICE TO USERS
Read the entire Instructions for Use (IFU) before operating the system. It is unsafe to use the system
without reading and comprehending the full contents of this manual
CAUTION: Do not operate this system if you have not been adequately trained in how to
use this device.
ii
SafeGait 360° Balance and Mobility Trainer | Instructions for Use | SG360-IFU-004 Rev B
PREFACE
Preface
Purpose
This manual provides directions to help users safely and eectively operate the SafeGait 360° Balance
and Mobility Trainer. The manual also includes material such as indications for use, contraindications,
and troubleshooting information. It is assumed that the reader has a general knowledge of physical
therapy (PT) and balance and gait rehabilitation.
Help Information
Contact Gorbel Medical at 1-844-846-8744 or via e-mail at info@safegait.com.
Contact Gorbel Medical | Phone: 1-844-846-8744 | E-mail: info@safegait.com
iii

TABLE OF CONTENTS
Table of Contents
Gorbel Medical ii
NOTICE TO USERS ii
Preface iii
Purpose iii
Help Information iii
System Overview 1
System Description 1
Intended Use 1
Contraindications 1
System Components 2
Actuator 2
Ceiling-Mounted Rail 3
Strap 3
Spreader Bar / Spreader Bar Cover 4
Harness 4
Handheld Remote Control 5
Kiosk 5
Facility Power Panel 6
Router 6
NAS Device 6
Terminology 7
Actuator/Spreader Bar Positioning 7
Adjustable BWS 7
Assist 7
Boost 7
Descent Limit 7
Dynamic Fall Protection (DFP) 7
DFP Sensitivity Adjustment 7
Fall Detection 7
Horizontal Lock 7
Stop All 7
General Warnings and Precautions 8
Dangers 8
Precautions 8
Cleaning 10
Strap, Spreader Bar Cover and Harness 10
System Power 11
Overview 11
Power On the System 11
Power O the System 13
iv
SafeGait 360° Balance and Mobility Trainer | Instructions for Use | SG360-IFU-004 Rev B

TABLE OF CONTENTS
Perform an Emergency Stop 13
Patient Harness 14
Patient Harness Fitting 14
Securing the Patient in the Harness 14
Tracking Patient Movement 17
Strap Angle 17
Lateral Patient Movement 17
User Interface 18
Overview 18
Workow Menu 18
Kiosk vs. Handheld Remote 19
Permission Levels 20
Logging In To Windows and SafeGait 20
Patient Setup 22
Create a New Patient Record 22
View or Edit a Patient Record 25
Select a Patient 27
Patient Dashboard: Scheduling 28
Patient Dashboard: Repeat Last Session 29
Patient Dashboard: View Task Trends 30
Plan of Care 31
Overview 31
Create a Plan of Care 31
Edit a Plan of Care 32
Create a Task 34
Edit a Custom Task 35
Positioning and Horizontal Lock 36
Position the Actuator 36
Position the Spreader Bar 37
When the System is in Horizontal Lock 38
Tasks 39
Perform a Task from the Plan of Care 39
Perform a Task without Patient Information (Just Go) 47
Recover from a Prevented Fall 49
Stop the System in Case of Emergency or to Reposition the Patient 50
Resuming an Aborted Task 51
End the Session and Add Notes 52
Historical Data 55
View Patient Performance Measurements by Task 55
View Patient Performance Measurements by Session 58
Contact Gorbel Medical | Phone: 1-844-846-8744 | E-mail: info@safegait.com
v

TABLE OF CONTENTS
Save Patient Data to External Media 61
Settings 62
View a List of Users 62
Create a New User 63
Edit User Information 63
Disable a User 65
Enable a User 66
Edit System Settings 67
Edit Custom Tasks 68
Disable Custom Tasks 69
View Admin Reports 70
Maintenance 71
Overview 71
Before Each Use 71
Annually 73
Troubleshooting 74
Overview 74
Troubleshooting - Quick Reference 74
Troubleshooting - Corrective Action 75
Troubleshooting - Error Codes 76
Appendix 77
Appendix A: LED Status Light Bar 77
Appendix B: List of Symbols 78
Quick Reference Guide 79
Quick Reference - Task Monitoring 79
Index 80
Notations 82
vi
SafeGait 360° Balance and Mobility Trainer | Instructions for Use | SG360-IFU-004 Rev B

SYSTEM OVERVIEW
System Overview
This section provides you with general information about
the SafeGait 360° Balance and Mobility Trainer.
System Description
The SafeGait 360° Balance and Mobility Trainer is an over-ground dynamic body weight support (BWS)
system designed to provide solutions to key challenges in the current physical rehabilitation market.
• Patient and therapist injury risk
• Eciency of care
• Data collection and comparison
Proven fall prevention technology enables you to perform one-on-one treatment without fear of injury
to yourself or the patient. You can create treatment programs that safely challenge patients with gait
or balance impairment. SafeGait allows you to collect and compare meaningful patient performance
measurements through user-friendly software.
Intended Use
This device is used to provide a safe means of treating gait and balance impairment in individuals after
injury or illness. The design incorporates a constant fall arrest feature that allows physical therapists
to work with patients up to 350 lbs of various abilities to practice intensive gait and balance activities
without the fear of falling. By altering the amount of body-weight support the complexity of the gait,
balance or transfer task can be modulated. This exibility will allow patients of diering abilities to
practice walking, perform balance tasks, sit-to stand and oor-to-stand maneuvers, or stairs in a safe and
controlled environment. The unloading mechanism will be mounted to an overhead track and physical
therapist input is controlled via a graphical user interface.
Contraindications
Prior to use, all patients shall be deemed medically stable and appropriate by a healthcare professional
who has been trained on the system. Patients with the following diagnoses or symptoms shall not use
the system:
• Weight greater than 350 lb. (158.8 kg)
• Unstable fractures
• When loading of the hip, pelvic, abdominal and chest regions is prohibited
• Fractured ribs
• Large disc bulge/rupture
• Lower Extremity contractures that preclude ambulation
• Patients who cannot tolerate a standing or upright position
• Severe osteoporosis
• Skin ulcers on the trunk or lower limbs
• Neoplastic, degenerative or vascular disorders of the spine or spinal cord
Contact Gorbel Medical | Phone: 1-844-846-8744 | E-mail: info@safegait.com
1
SYSTEM COMPONENTS
Actuator
Ceiling-Mounted Rail
Strap
Spreader Bar
Harness
(Harness Straps connect
to Spreader Bar)
360° Handheld Device
Other system
components included
(not shown here):
Kiosk, Facility Power
Panel, Router, NAS
device,
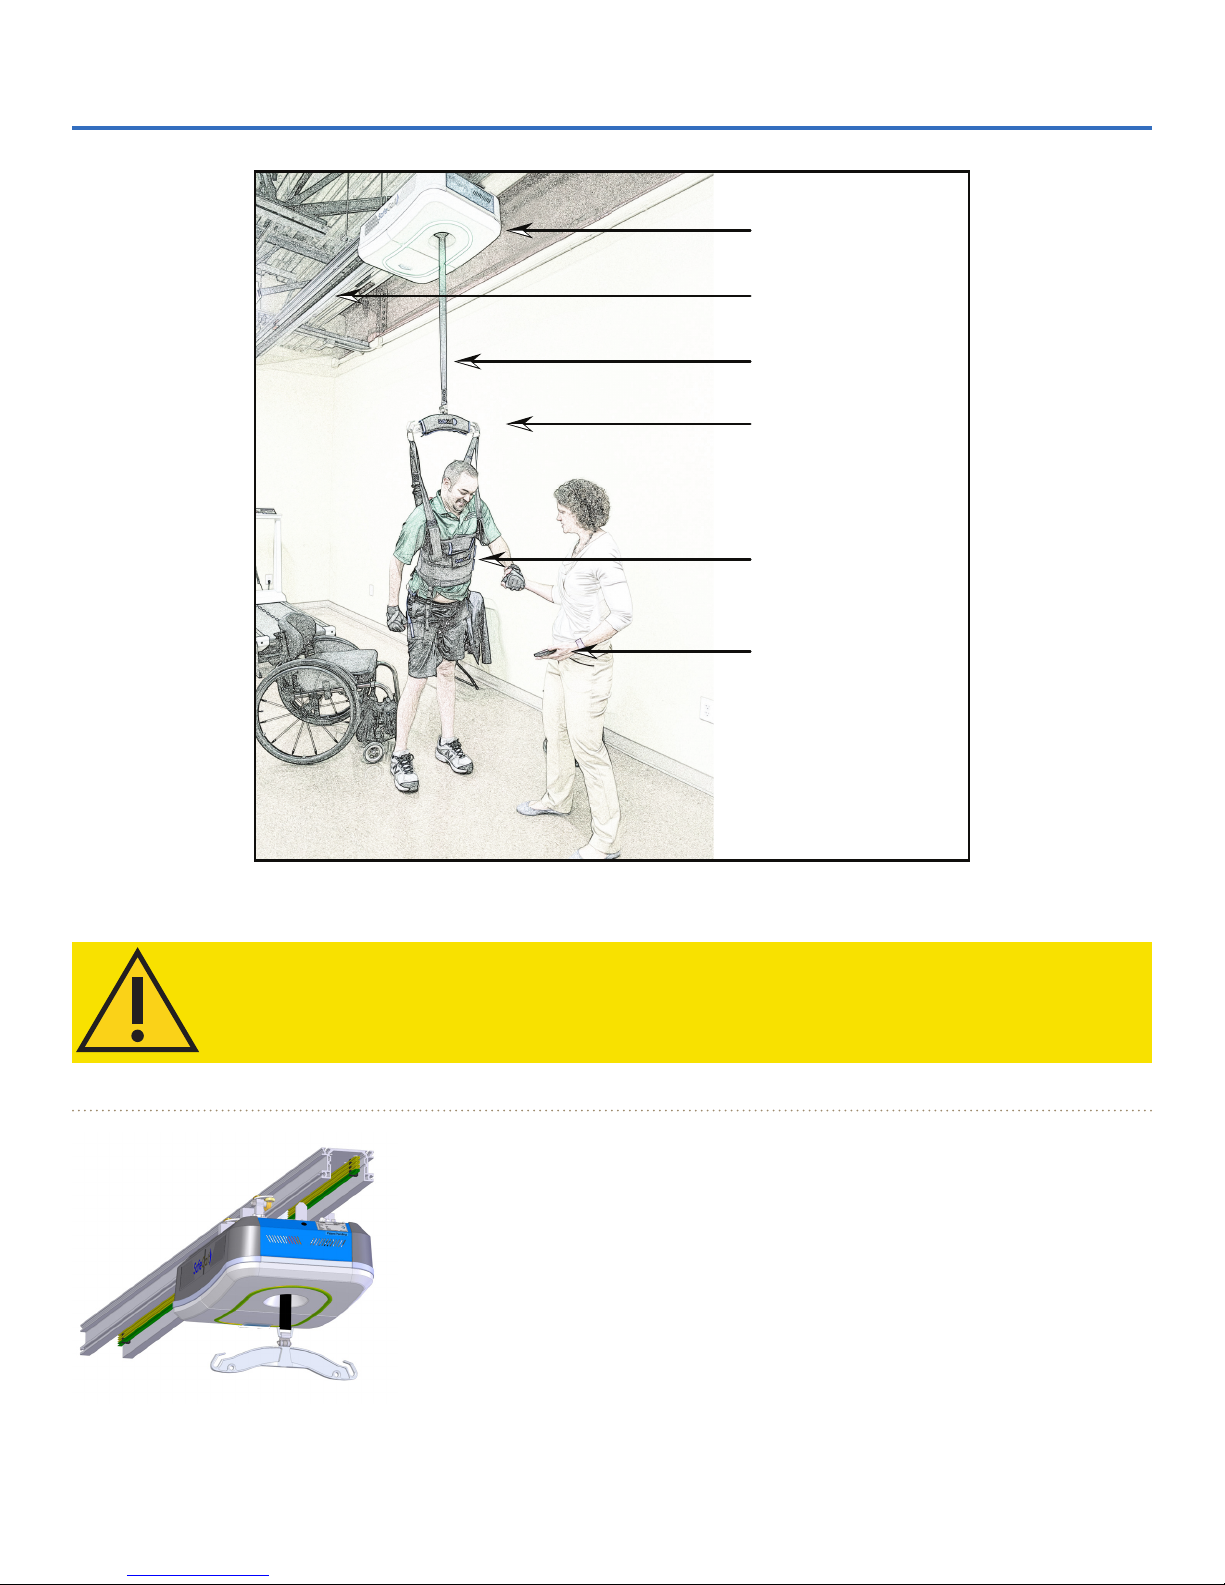
System Components
CAUTION: Using any accessories not provided by Gorbel Medical can result in injury.
Actuator
Actuator
System Components - Fig. 1
The actuator moves along the rail - aligned with the patient -
providing BWS and fall protection while collecting patient data, which
it transmits to the kiosk. A computer-controlled sensor maintains the
actuator’s location relative to the patient. A separate computer-controlled sensor ensures that tension on the strap is kept at a desired
value.
2
SafeGait 360° Balance and Mobility Trainer | Instructions for Use | SG360-IFU-004 Rev B
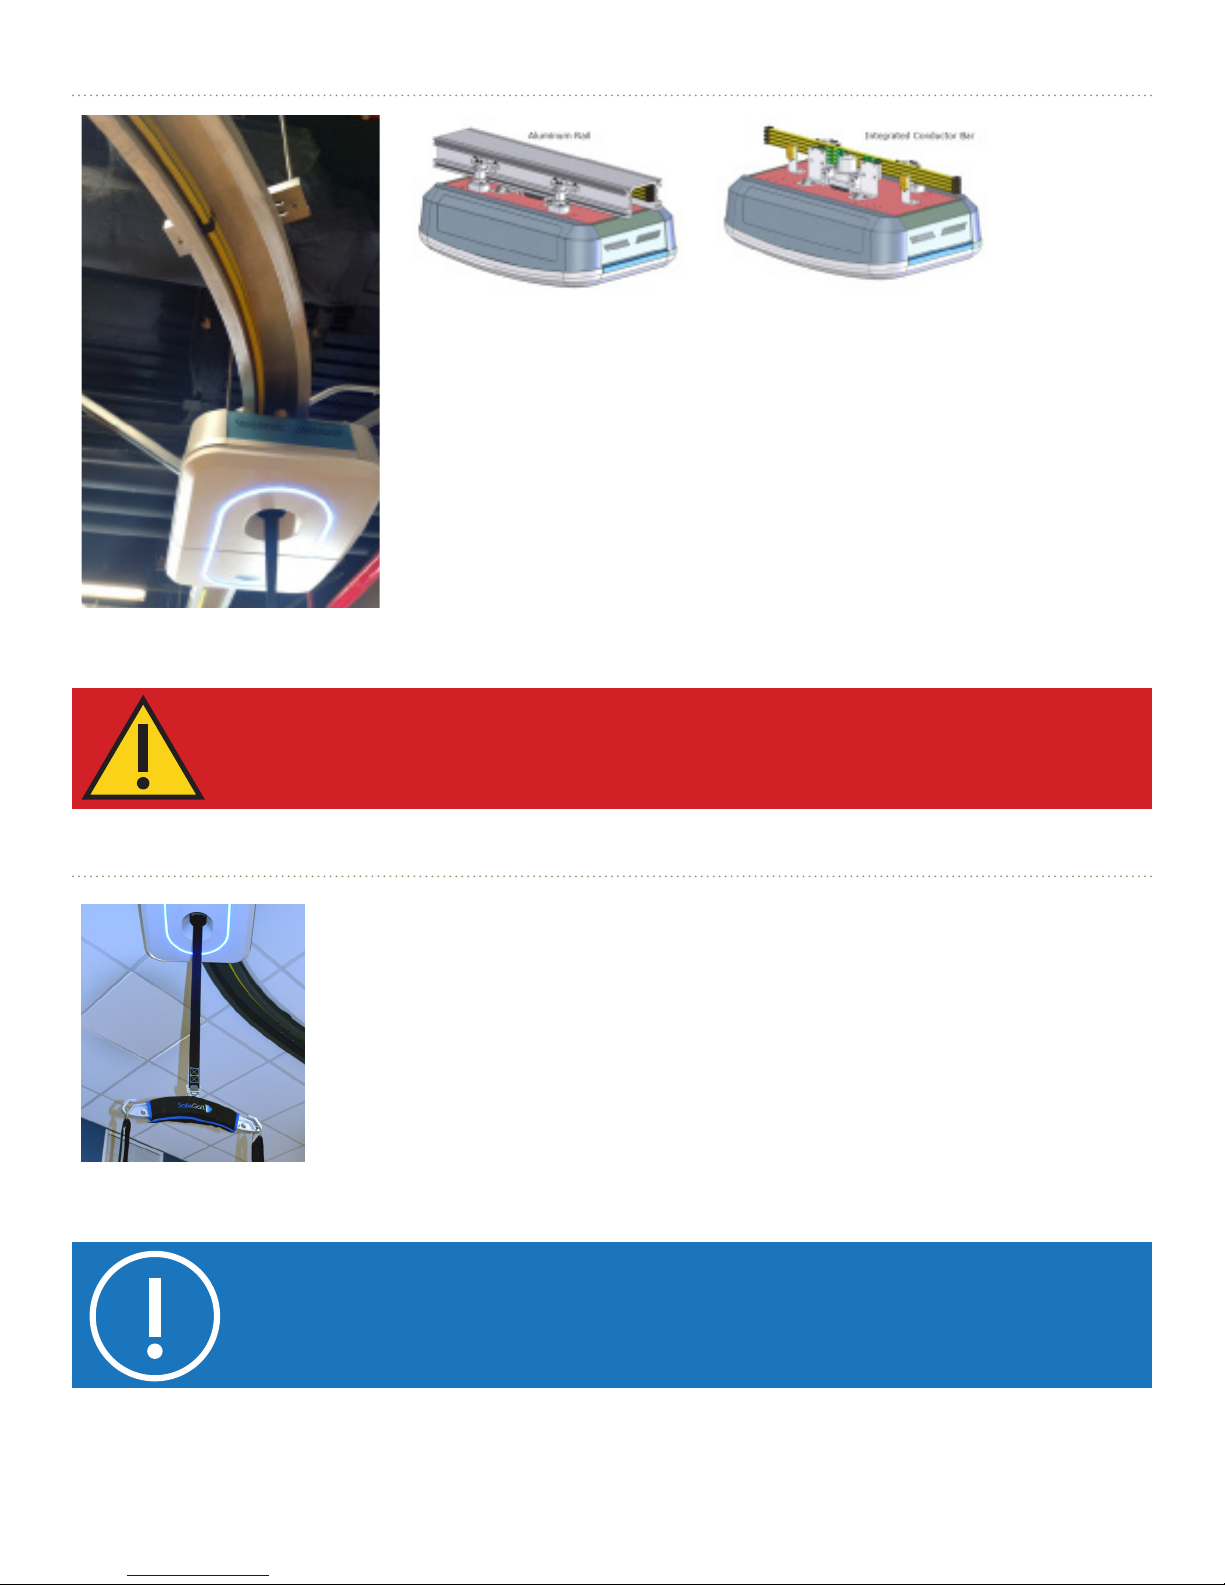
Ceiling-Mounted Rail
SYSTEM COMPONENTS
The ceiling-mounted rail is attached overhead, typically to a support
beam. The rail denes the patient’s horizontal walking path. The track
includes straight and/or curved sections that can form various cong-
urations including straight, J-shaped, and loop (racetrack) shapes. The
actuator runs along the rail on a set of wheels and receives power via
an integrated conductor bar. The rail contains an end stop and a limit
switch that protect the actuator by preventing it from reaching the very
end of the rail. Loop congurations do not contain the end stop and
limit switch.
Ceiling-Mounted Rail
DANGER: Do NOT touch the conductor bar inside the rail. This will result in serious injury
or death.
Strap
Strap
The strap connects the actuator to the spreader bar. The software follows the
position of the strap, maintaining the position of the actuator relative to the
patient. The actuator responds to the load that is placed on the strap.
NOTICE: The system has an upper limit which limits the minimum distance between
the actuator cover and the end of the strap to three (3) inches. Facilities with a minimal
rail mounting height (top of rail, 8’ 8”) may be limited in treating certain taller patients
(maximum 6’ 2”) on the ground or elevated surfaces such as stairs or a treadmill.
Contact Gorbel Medical | Phone: 1-844-846-8744 | E-mail: info@safegait.com
3
SYSTEM COMPONENTS
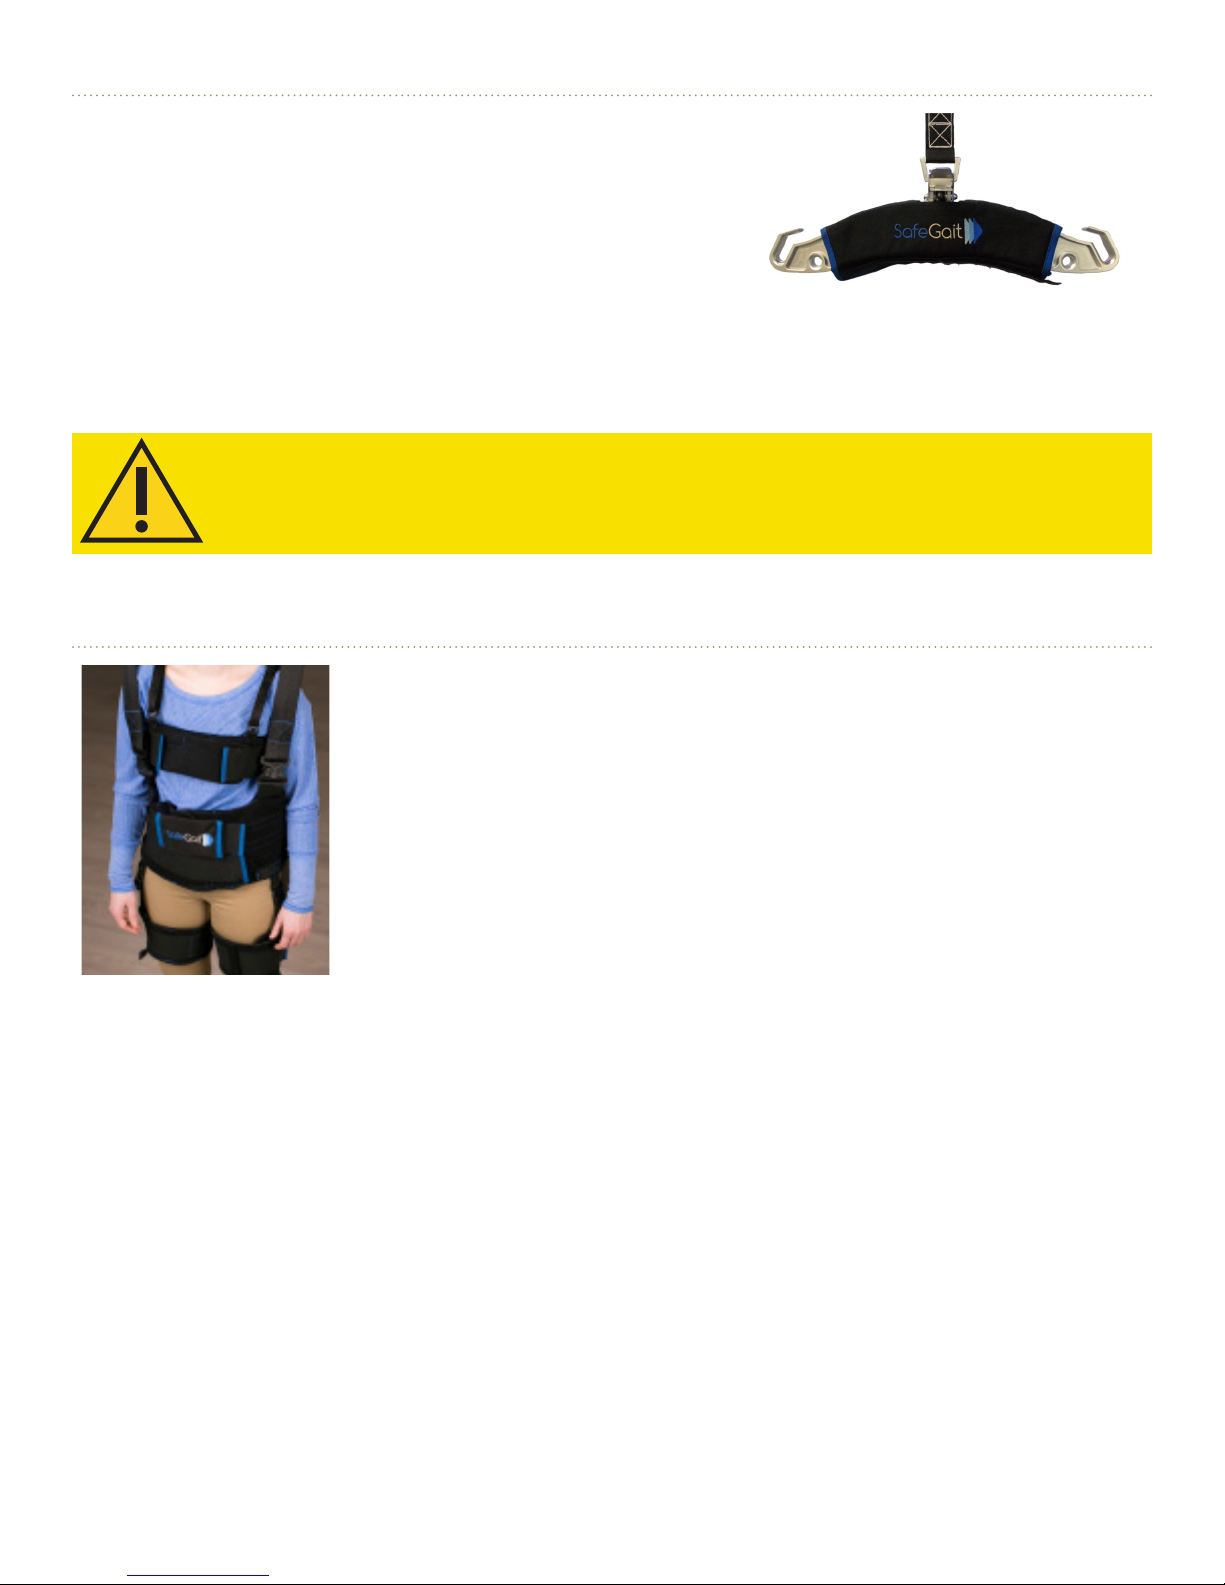
Spreader Bar / Spreader Bar Cover
The spreader bar connects the actuator strap to the patient
harness. The spreader bar has two sets of attachment points
to accommodate patients of varying body types.
The SafeGait 360 Balance and Mobility Trainer must be used
with the SafeGait 360 spreader bar.
Spreader Bar
CAUTION: Using a non-SafeGait spreader bar can result in injury.
Harness
Harness
The SafeGait EMBRACE Rehabilitation Harness is recommended for use with
the SafeGait 360° Balance and Mobility Trainer.
After it is placed onto the patient, the harness is connected to the spreader
bar. For additional information, refer to the SafeGait EMBRACE Rehabilitation Harness Instructions for Use.
4
SafeGait 360° Balance and Mobility Trainer | Instructions for Use | SG360-IFU-004 Rev B
Handheld Remote Control
Handheld Remote Control
Kiosk
SYSTEM COMPONENTS
The handheld remote control can also be used to control the actuator.
It communicates with the actuator via the kiosk through an encrypted wireless signal.
The handheld remote control provides a subset of the controls provided on
the kiosk.
The kiosk contains the proprietary Patient Management Software
that manages patient data and controls the actuator. It provides
a user interface for inputting patient data, performing tasks, and
displaying patient performance measurements. You can interact with
the Patient Management Software via the touchscreen, onscreen
keyboard, or physical keyboard.
It communicates with the actuator, handheld remote control, and
NAS device via an encrypted wireless signal. The kiosk data is backed
up wirelessly to the NAS device.
Kiosk
control.
The kiosk performs the same functions as the handheld remote
Contact Gorbel Medical | Phone: 1-844-846-8744 | E-mail: info@safegait.com
5
SYSTEM COMPONENTS
Facility Power Panel
The facility power panel is mounted on a wall and connects to the
facility’s power system. It supplies 480 VAC to the actuator via the
ceiling-mounted rail. For additional information, refer to the System
Power section.
Facility Power Panel
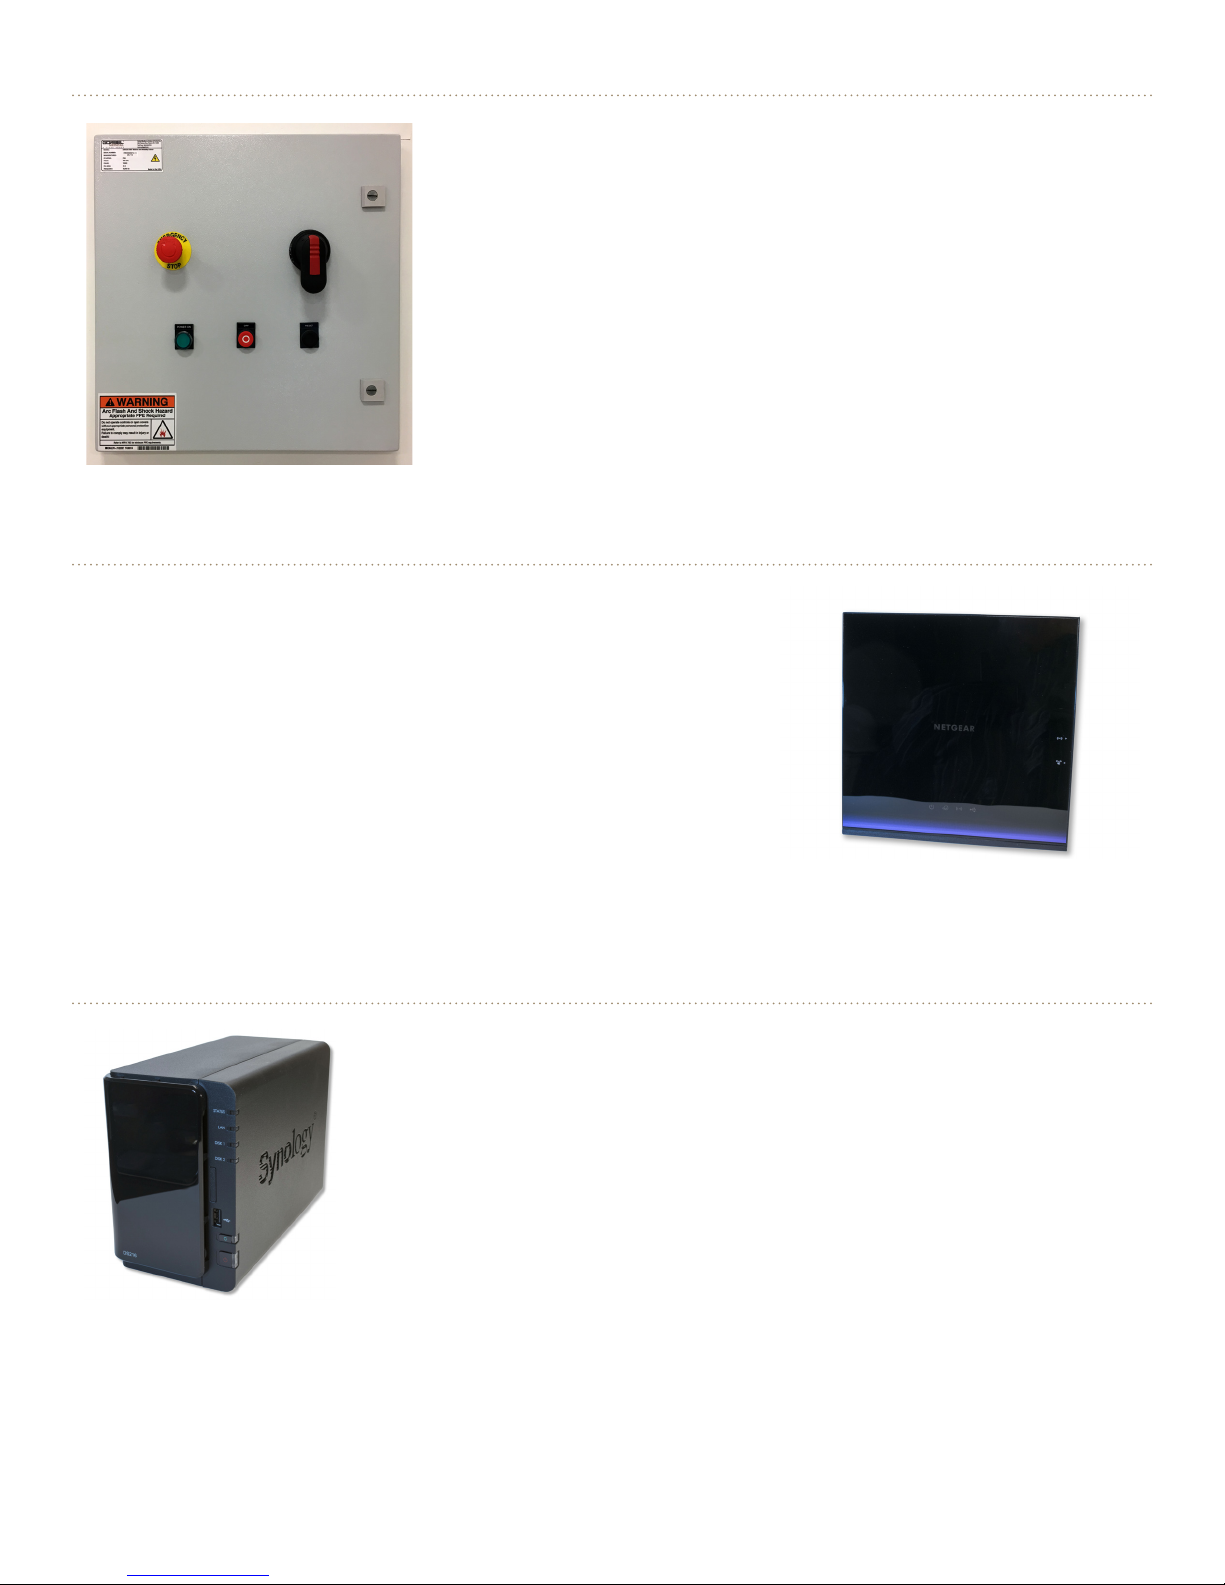
Router
The router acts as the hub for the closed wireless network.
Router
NAS Device
The NAS device contains two hard drives that provide a mirrored backup of
the database.
NAS Device
6
SafeGait 360° Balance and Mobility Trainer | Instructions for Use | SG360-IFU-004 Rev B

TERMINOLOGY
Terminology
Actuator/Spreader Bar Positioning
Remote control of the actuator and spreader bar in order to facilitate connecting and disconnecting the
harness to and from the spreader bar.
Adjustable BWS
Therapist-controlled unloading of up to 50% of the patient’s body weight (175 lb. (79.4 kg) maximum).
Assist
Mode of operation: actuator provides an assistive lift while the patient moves in horizontal / vertical
directions.
Boost
Mode of operation that provides the patient with 10 seconds of 20% additional BWS, up to 50% of the
patient’s weight (175 lb. (79.4 kg) maximum).
Descent Limit
Setting that denes a maximum amount of downward movement (scaled 2-6 inches), based on the
patient’s height.
Dynamic Fall Protection (DFP)
Embedded software in the actuator that distinguishes between the patient’s intentional downward movement (e.g., to sit) and when the patient is falling.
DFP Sensitivity Adjustment
Setting that allows the therapist to adjust fall protection sensitivity in order to accommodate patients
with varying levels of independence.
Fall Detection
Indication that a patient fall has been prevented.
Horizontal Lock
The actuator can be locked in place to prevent forward or backward movement along the rail, while
allowing the patient to move up and down, (vertically).
Stop All
Function that stops all horizontal and vertical movement of the actuator.
Contact Gorbel Medical | Phone: 1-844-846-8744 | E-mail: info@safegait.com
7

GENERAL WARNINGS AND PRECAUTIONS
General Warnings and Precautions
This section lists the general warnings and precautions that provide critical information
that should be reviewed before using the SafeGait 360° Balance and Mobility Trainer.
Dangers
To avoid the possibility of serious injury or death or other serious adverse reaction associated with the
use of the system:
• Do NOT touch the conductor bar inside the rail. This will result in serious injury or death.
Precautions
To avoid the possibility of injury or a problem with the system associated with its use:
• Do not operate this system if you have not been adequately trained in how to use this device.
• Using any accessories not provided by Gorbel Medical can result in injury.
• Do not use the system for any purpose other than the stated intended use.
• Ensure that all personnel using the system have a thorough understanding of the technical princi-
ples, clinical applications, and risks associated with physical rehabilitation procedures.
• Restrict the use of the system to personnel trained in physical rehabilitation procedures with this
system or to usage under the supervision of such personnel.
• Ensure that the patient’s correct weight has been entered before attaching the patient to the
system; an incorrect value may result in the patient receiving a higher or lower amount of BWS than
expected.
• Ensure that the patient’s correct height has been entered before attaching the patient to the system;
an incorrect value may result in the patient receiving a higher or lower amount of downward travel
than expected when the Descent Limit is activated and a fall is detected.
• Do not attach a patient who weighs more than 350 lb. (158.8 kg) to the system.
• Measure and t the harness to the patient carefully; a patient in discomfort might make certain
movements that put them at risk.
• Use care when assisting patients into and out of the harness; the patient can become tangled in the
straps and fall.
• Use care when attaching the patient harness to the spreader bar to reduce the risk of a fall.
• Do not use the system for patient transport (i.e., lifting the patient fully o the ground).
• Do not allow the patient to engage in an activity that (ascend high stairs, jumping) might cause him/
her to come in contact with the actuator.
• Do not touch the rail with your hands or any physical object; the system is powered by 480 VAC.
• Do not touch the actuator while the system is in operation.
• Handle the spreader bar with caution; specically, do not pull down then release the spreader bar.
• In an emergency, such as an electrical outage, immediately discontinue the current task, remove
the patient from the harness, move the patient away from the system, and then turn o the power
switch located on the facility power panel.
8
SafeGait 360° Balance and Mobility Trainer | Instructions for Use | SG360-IFU-004 Rev B

GENERAL WARNINGS AND PRECAUTIONS
• Connect the system to a main power system (general-purpose alternating-current (AC) electric
power supply) with an earthing or grounding system that provides a protective earth (PE) connection
to avoid the risk of electrical shock.
• Do not modify the system; in addition to the risks listed above, doing so voids the warranty.
• Do not attempt to service or repair the system.
• Do not use the system if maintenance is required.
• Do not use the system if the actuator is wet; for example, from a sprinkler system.
• If there is suspicion of electromagnetic interference from other electrical devices, shut down nearby
devices, one-by-one, to locate the source of the interference
• Ensure that the patient harness connected to the spreader bar is neither too narrow nor too wide;
the performance of the load sensors in the actuator might be adversely aected.
• Follow the IFU carefully to prevent movement of the patient with sharp, quick motions.
• Do not manually move the actuator along the track by pulling on the actuator strap.
• Do not perform jumping-based tasks.
◉ Patients might ascend beyond the upper limit of the device and might adversely aect system
functionality.
◉ This can cause the system to detect a fall due to the accelerated speed of the patient’s down-
ward movement.
• Do not use accessories that are not specied by the manufacturer.
• Therapists using the system should always practice standard guidelines for Environmental Infection
Control.
• Using a non-SafeGait spreader bar can result in injury.
• If there is a loss of communication between kiosk and actuator, this will be indicated by a ‘WHITE
LED’ on the status bar and an error message on the kiosk/handheld. If communication loss occurs
during a patient fall it could result in severe discomfort. If communication is not re-established
within two (2) minutes, then follow these steps: 1) Support the patient with assistance from other
sta if needed or other available equipment nearby. 2) Use the Positioning screen to introduce
‘slack’ on the Actuator Strap and Shoulder Straps while continuing to support patient. 3) Disconnect
Shoulder Straps from the Harness while patient is supported. 4) Get patient into safe position such
as chair or mat table. 5) Call Gorbel Medical support.
• Inspect the harness prior to each use. Do not use if the harness straps are torn or show signs of
wear, there is separation in the harness stitching, or the VELCRO® Brand attachments are unable
to adhere. Leg Cus must be attached to the harness torso during use. Contact Gorbel Medical at
1-844-846-8744 to order a replacement harness.
• Positioning the patient outside of the area dened in the Patient Movement Table can result in
premature wear on the strap, increasing the likelihood of injury.
• While positioning the actuator, ensure the patient is not in the path between current and desired
starting location of the actuator.
• Do not detach shoulder straps from the spreader bar while patient is being supported. This can lead
to patient injury.
• If the therapist observes that the applied BWS is noticeably more or less than the desired BWS the
patient may become understandably fatigued. In this situation, contact Gorbel Medical for assis-
tance.
Contact Gorbel Medical | Phone: 1-844-846-8744 | E-mail: info@safegait.com
9

CLEANING
• Improperly setting the Descent Limit can result in injury.
• Use of strap with excessive wear can lead to injury.
• Use of worn components can lead to injury. If any area found, discontinue using and contact Gorbel
Medical.
• Use of spreader bar with excessive play and/or lack of smooth rotation can lead to injury.
• Use of harness with any signs of damage or excessive wear can result in injury. Refer to the SafeGait
EMBRACE Instructions for Use (IFU) manual.
• Operating SafeGait while an error or warning code is indicated may result in injury. Contact Gorbel
Medical with an inquiry if any error or warning cannot be dismissed.
Cleaning
CAUTION: Therapists using the systems should always practice standard for Environmental Infection Control.
Strap, Spreader Bar Cover and Harness
Cleaning Frequency: Facility infection control guidelines.
Cleaning Agent: Ethyl or isopropyl alcohol cleaning agent.
10
SafeGait 360° Balance and Mobility Trainer | Instructions for Use | SG360-IFU-004 Rev B
System Power
This section provides an overview of the SafeGait 360° Balance and
Mobility Trainer power components and procedures for powering the
system on and o under both normal and emergency conditions.
Overview
SYSTEM POWER
The facility power panel provides power to the ceiling-mounted rail,
actuator, router, and NAS device.
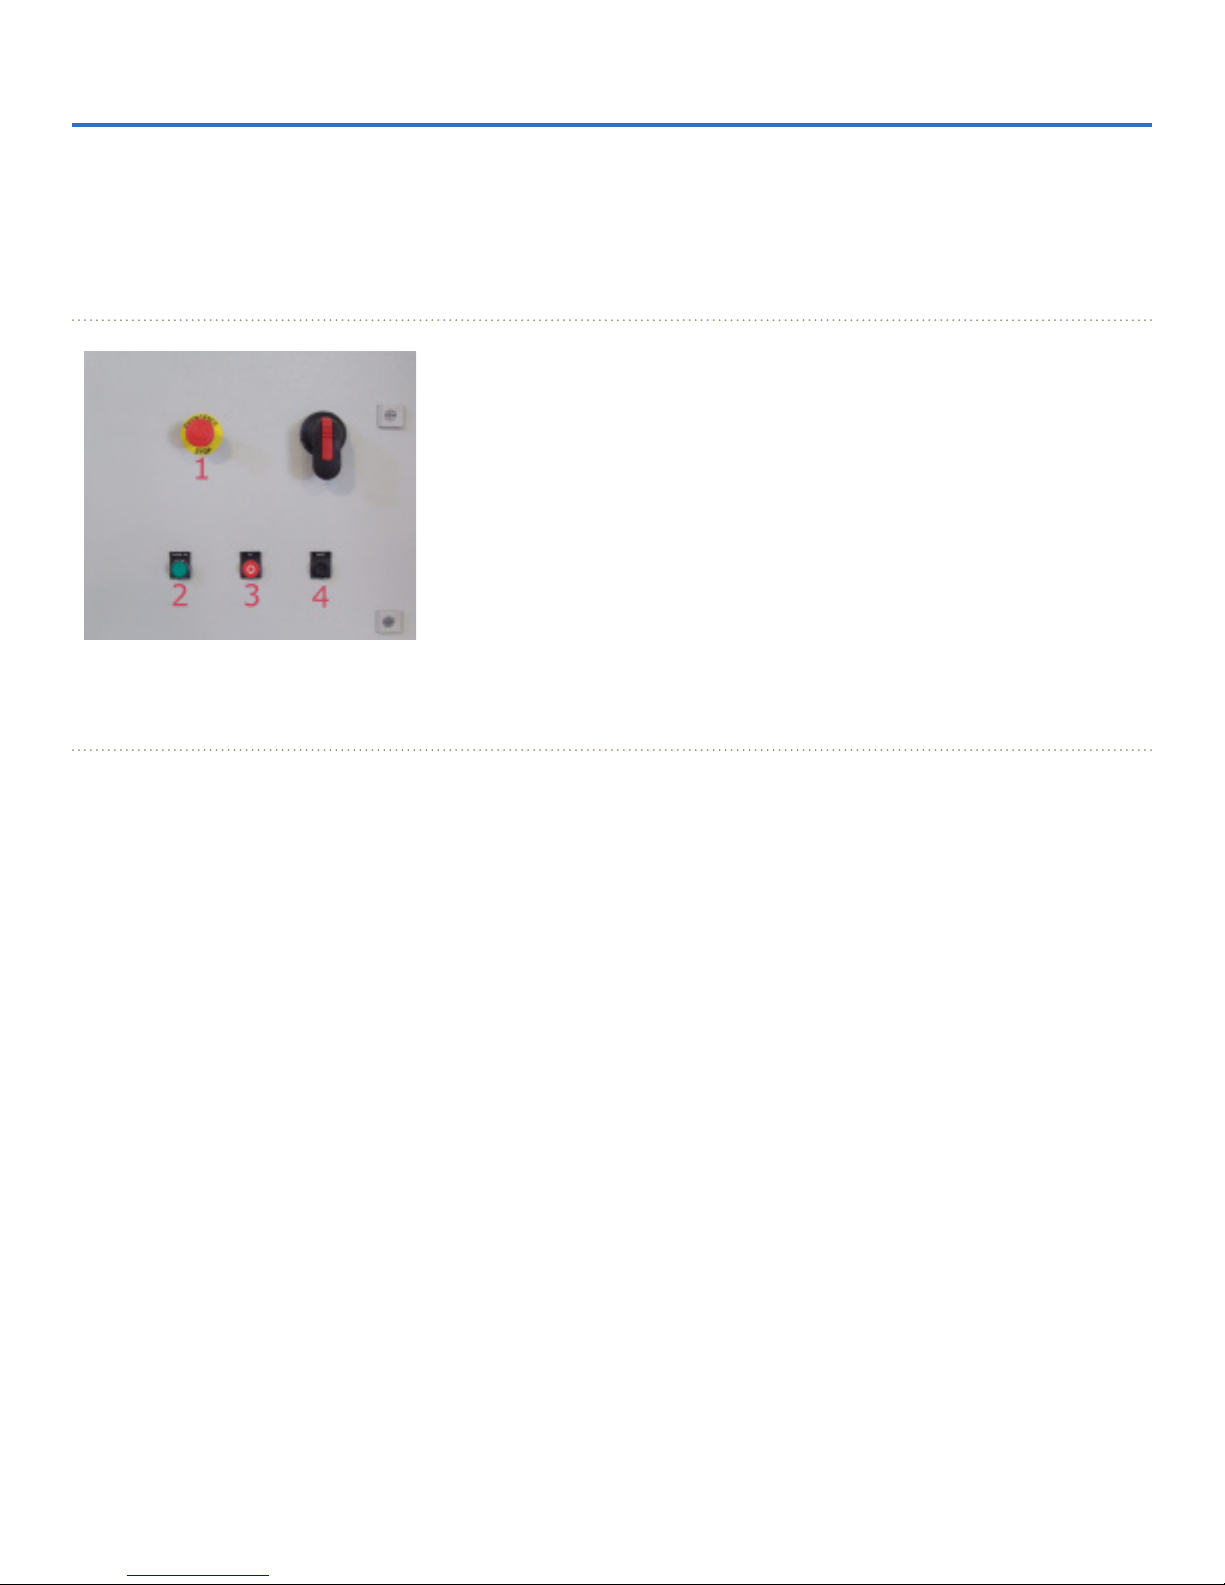
• Controls
1. EMERGENCY STOP
2. POWER ON
3. OFF
4. RESET
Facility Power Panel
• Indicators:
◉ POWER ON (2)
Power On the System
1. At the facility power panel, press the green POWER ON button.
The POWER ON button lights up. After approximately one minute, the LED status light bar on the actuator
blinks white, indicating that the actuator is powering up and performing self-checks. When the LED status
light bar changes to solid white, the system has properly powered up and is in Stop mode, waiting for
network connection to the kiosk. Stop mode prevents the actuator from moving until it is disengaged by a
command from the kiosk or handheld remote control.
Contact Gorbel Medical | Phone: 1-844-846-8744 | E-mail: info@safegait.com
11
SYSTEM POWER
2. If necessary, power on the router by pressing the POWER BUTTON LOCATED AT THE BACK OF THE
ROUTER.
The router powers up and established the closed wireless network. The LEDs (from left to right) are in the
following state:
◉ Power: Green.
◉ DSL (digital subscriber line): O (The router has no DSL connection).
◉ Internet: O (The router has no internet connection).
◉ Wireless: Solid blue.
◉ USB (Universal Serial Bus): O.
3. Power on the kiosk by pressing the power button at the top right of the tablet. Conrm that
the kiosk is charged prior to starting a session. If the kiosk is not fully charged and loses power
during a session, the connection to the actuator will be lost and need to be reestablished by
connecting to an outlet power source and pressing the power button.
The status indicator, located to the right of the touch pad, turns on. After the operating system boots, the
Windows login screen is displayed. Login as the “therapist” user with your provided credentials. After
logging in, the Windows® operating system desktop displays briey until the SafeGait Patient Management
Software starts. After running diagnostics, the LOGIN screen displays.
NOTICE: Use the kiosk to access only the application. Doing so can negatively aect the
SafeGait application.
4. Power on the handheld remote control by pressing the power button located at the top of the
right side of the device. Conrm that the handheld remote control is charged prior to starting a
session. If the handheld remote is not fully charged and loses power during a session, the device
will turn o and control will automatically be transferred to the kiosk.
5. Launch the SafeGait Patient Management Software on the handheld remote control by touching
the SafeGait icon.
CAUTION: If there is a loss of communication between kiosk and actuator, this will be
indicated by a ‘WHITE LED’ on the status bar and an error message on the kiosk/handheld. If communication loss occurs during a patient fall it could result in severe discomfort. If communication is not re-established within two (2) minutes, then follow these
steps: 1) Support the patient with assistance from other sta if needed or other available
equipment nearby. 2) Use the Positioning screen to introduce ‘slack’ on the Actuator
Strap and Shoulder Straps while continuing to support patient. 3) Disconnect Shoulder
Straps from the Harness while patient is supported. 4) Get patient into safe position such
as chair or mat table. 5) Call Gorbel Medical support.
The system can remain powered on between therapy sessions. Depending on the facility’s energy conservation policy, most system components can remain powered on for an extended period of time.
12
SafeGait 360° Balance and Mobility Trainer | Instructions for Use | SG360-IFU-004 Rev B

SYSTEM POWER
Power Off the System
Note: This procedure cannot be performed from the handheld remote control.
1. At the kiosk, touch MENU > Shut Down.
2. When the Shutdown System conrmation screen displays, touch YES.
The actuator LED status light bar changes to white. The kiosk powers o.
3. At the facility power panel, press the red OFF button.
The green POWER ON indicator turns o. The actuator LED status light bar turns o.
In order to conserve energy, turn the power o if the system is not expected to be used for an extended
period of time.
Perform an Emergency Stop
At the facility power panel, or at the remote location, (optional remote Emergency Stop) press the red
EMERGENCY STOP button.
All power is removed from the ceiling-mounted rail and actuator. The actuator is locked into position. If a
patient is attached to the spreader bar, the system continues to provide static BWS.
Release the Emergency Stop by turning the button clockwise until it ‘pops’ out into its original position.
Pressing the Reset Button on the front of the Power Panel will return the safety relay to its ready state.
Press the Power On button then to return power to the system.
NOTICE: In an emergency, such as an electrical outage, immediately discontinue the
current task, remove the patient from the harness, move the patient away from the
system, and then press the OFF button located on the facility power panel.
Contact Gorbel Medical | Phone: 1-844-846-8744 | E-mail: info@safegait.com
13
PATIENT HARNESS
Patient Harness
This section provides information on the harness and spreader bar. It describes the
procedures for placing the patient into the harness and attaching the harness to
the spreader bar, as well as guidelines for maintaining and cleaning the harness.
Patient Harness Fitting
The SafeGait 360° Balance and Mobility Trainer is used with a patient harness. The SafeGait EMBRACE
Rehabilitation Harness is recommended for use with the SafeGait 360° Balance and Mobility Trainer.
Refer to the SafeGait EMBRACE Instructions for Use for a sizing chart and tting instructions.
Securing the Patient in the Harness
CAUTION: Inspect the harness prior to each use. Do not use if the harness straps are
torn or show signs of wear, there is separation in the harness stitching, or the VELCRO®
Brand attachments are unable to adhere. Leg Cus must be attached to the harness
torso during use. Contact Gorbel Medical at 1-844-846-8744 to order a replacement
harness.
1. Attach the Spreader Bar to the Actuator Strap
The spreader bar is the connection point between the actuator strap and the harness. Attach the
spreader bar to the actuator strap rst and then connect the patient harness to the spreader bar.
Once attached to the actuator strap, the spreader bar may remain connected between patient
sessions.
2. Attach the Patient Harness to the Spreader Bar
After the harness has been securely placed on the patient and adjusted, the harness needs to be
attached to the spreader bar.
◉ Ensure that the patient is in a secure position.
14
SafeGait 360° Balance and Mobility Trainer | Instructions for Use | SG360-IFU-004 Rev B
Spreader Bar to Actuator Strap Attachment
PATIENT HARNESS
◉ From the POSITIONING screen, use the Device Position down arrow to lower the strap with
the spreader bar attached. For more information, refer to the Positioning section.
3. The spreader bar provides two attachment points to attach a patient harness.
Choose an attachment point (outer or inner) that provides for the most vertical (straight up and
down) position of the harness straps. Standard connection of the harness is to the outermost
attachment points. Use the innermost points for pediatric or smaller adult patients in order to
bring the spreader bar straps in a more straight alignment, (as opposed to a “V” angle) with their
torso.
Spreader Bar Attachment Points
4. Connect the spreader bar carabiners to the D-rings on the patient harness shoulder straps.
Contact Gorbel Medical | Phone: 1-844-846-8744 | E-mail: info@safegait.com
Patient Harness to Spreader Bar Attachment
15

PATIENT HARNESS
5. Ensure the connection is secure.
6. Raise Spreader Bar to nal position.
From the POSITIONING screen, touch and hold the Spreader Bar Position up arrow to slowly
raise the strap until there is an appropriate amount of tension on the patient harness shoulder
straps.
NOTICE: Ensure that the patient does not hold onto the harness shoulder straps while
attached to the spreader bar. Doing so can aect the system’s response including
triggering a “fall” or reducing reaction speed.
16
SafeGait 360° Balance and Mobility Trainer | Instructions for Use | SG360-IFU-004 Rev B
TRACKING PATIENT MOVEMENT
Tracking Patient Movement
Strap Angle
The SafeGait® 360 Actuator reacts to patient movement with a minimal applied force. During transfer
activities, the Strap maintains a constant tension as the patient moves up and down. As the patient
moves horizontally, the Actuator travels along the rail with them in a neutral overhead position or slightly
behind. A high ceiling height can result in the Actuator tracking slightly behind the patient instead of
directly overhead.
Ceiling-Mounted Rail
set at 15-ft. (maximum)
Actuator
Strap
In this illustration, we show the
SafeGait 360® Actuator at the
maximum installation height of 15 feet.
At this height, the Strap angle between
the patient and Actuator is
exaggerated. This is not generally
perceptible to the patient, nor does it
negatively impact the performance of
Common
tracking
position
Exaggerated
angle
the System. More common rail height
installations range between 9’-12’ and
have a more neutral Strap angle.
Strap Angle
Lateral Patient Movement
The following table represents the maximum recommended distance (perpendicular to the rail), a patient
should be positioned during any and all tasks performed while in the system, from the centerline on the
floor for various rail installation heights.
Patient Movement Table
Rail Height (ft.) Distance (in.) Rail Height (m) Distance (m) Lateral (max.)
9’ 20” 2.75 0.50
10’ 22” 3.00 0.55
11’ 24” 3.25 0.59
12’ 26” 3.50 0.64
13’ 28” 3.75 0.68
14’ 31” 4.00 0.73
15’ 33” 4.25 0.77
4.50 0.82
CAUTION: Positioning the patient outside of the area dened in the Patient Movement
Table can result in premature wear on the strap, increasing the likelihood of injury.
Contact Gorbel Medical | Phone: 1-844-846-8744 | E-mail: info@safegait.com
17
USER INTERFACE
User Interface
This section provides an overview of the user interface and
procedures for logging in to and out of the system.
Overview
User Interface (Create New Patient Screen)
CAUTION: If there is a loss of communication between kiosk and actuator, this will be
indicated by a ‘WHITE LED’ on the status bar and an error message on the kiosk/handheld. If communication loss occurs during a patient fall it could result in severe discomfort. If communication is not re-established within two (2) minutes, then follow these
steps: 1) Support the patient with assistance from other sta if needed or other available
equipment nearby. 2) Use the Positioning screen to introduce ‘slack’ on the Actuator
Strap and Shoulder Straps while continuing to support patient. 3) Disconnect Shoulder
Straps from the Harness while patient is supported. 4) Get patient into safe position such
as chair or mat table. 5) Call Gorbel Medical support.
Workflow Menu
A menu displays along the left side of the screen, presented in workflow order from Step 1: Patient Setup
to Step 6: Review.
An additional option includes HISTORICAL DATA, which may be accessed at different points in the
system workflow as necessary. If you are logged in as an administrative user, a MANAGE option allows
you to manage users and change system settings.
The Patient Management Software restricts you from accessing screens that violate the system workow;
for example, you cannot access the plan of care until you have selected a patient.
18
SafeGait 360° Balance and Mobility Trainer | Instructions for Use | SG360-IFU-004 Rev B

USER INTERFACE
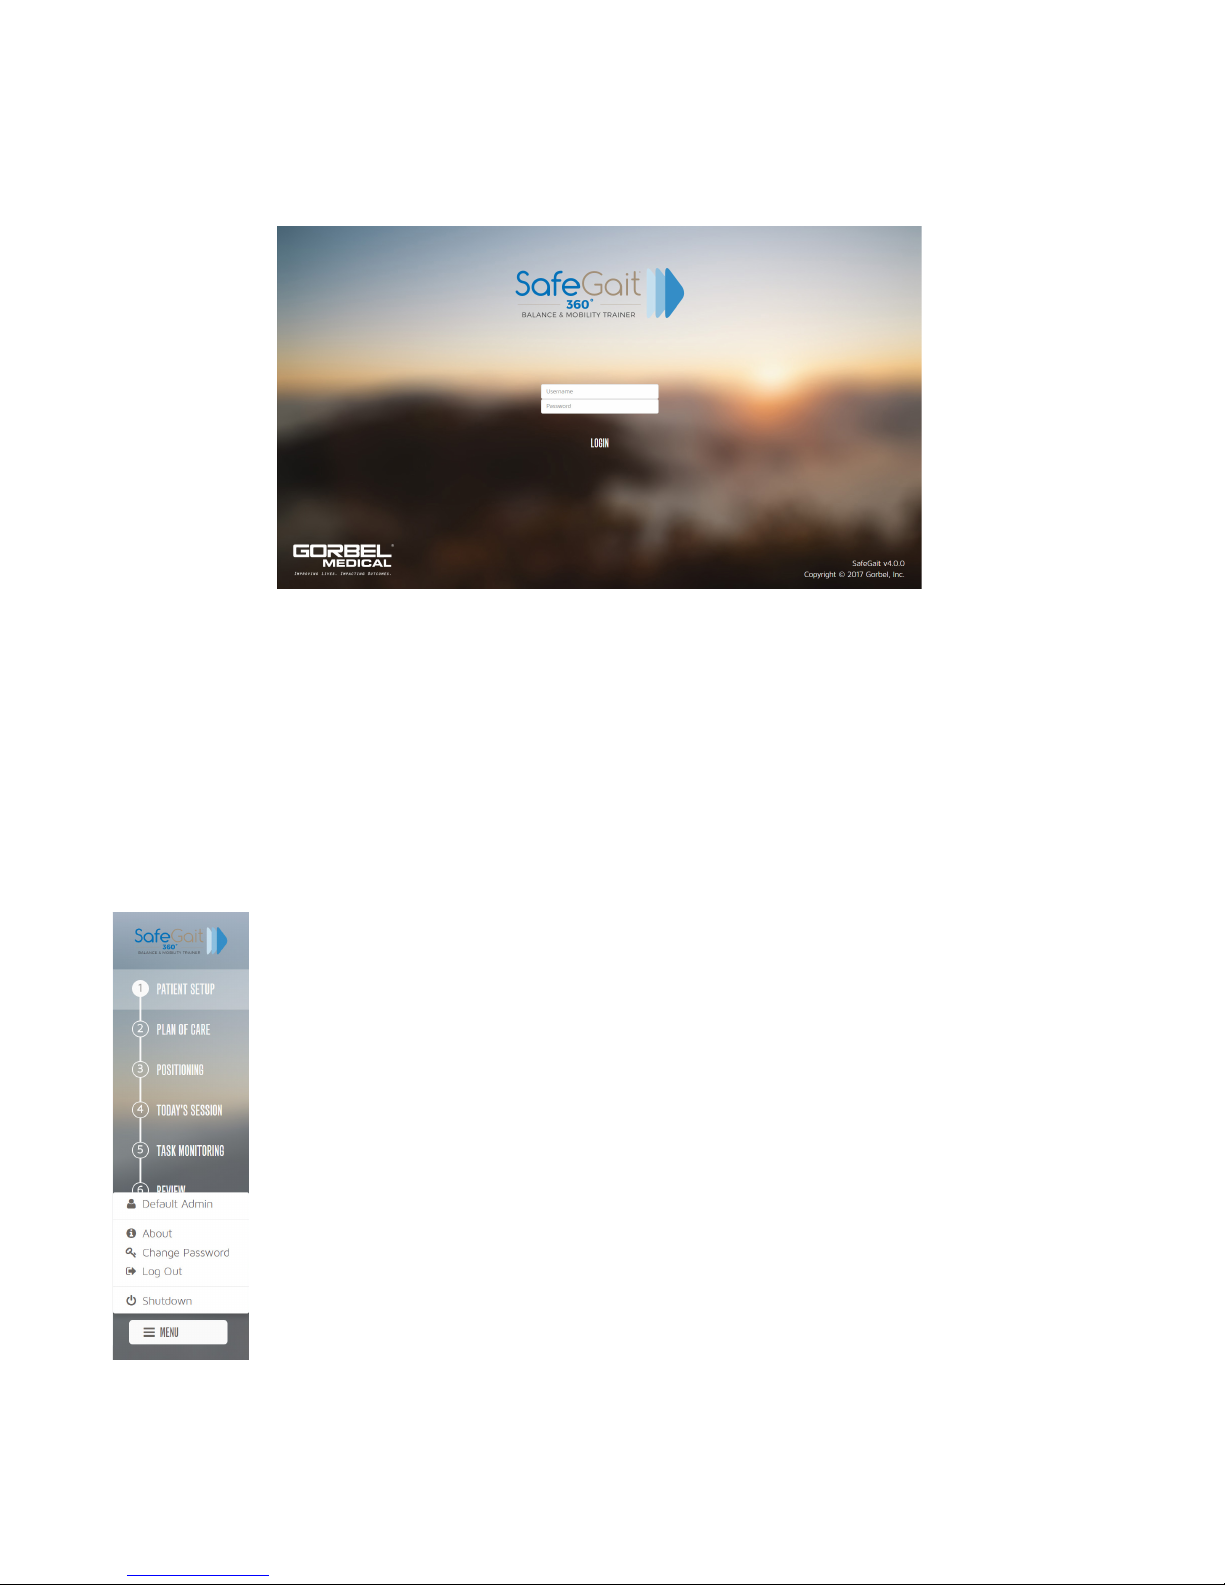
1. MENU
The MENU option at the bottom left of the screen opens a menu that displays the current user’s
name and the following options:
º About: Displays the current Patient Management Software version.
º Change Password: Change your password.
º Log Out: Log out of the system.
º Shutdown: Shut down the kiosk.
2. Data Entry/Device Control Options
The main section of the screen provides options for data entry and device control.
3. Related Operations and Navigation Controls
Operations and navigation controls related to the main section of the screen display along the
bottom of the screen. The BACK button is available on most Patient Management Software
screens and allows you to return to the previous screen.
Kiosk vs. Handheld Remote
• The kiosk and handheld remote control have similar user interfaces.
• The handheld remote control can perform a subset of the operations that can be performed on the
kiosk.
• In general, the handheld remote control performs device control operations vs. data entry operations.
• The procedures are the same for both devices
• While one of the devices is in use, a TAKE CONTROL OF APPLICATION screen displays at the other
device.
• To move control from one device to the other, touch TAKE CONTROL OF APPLICATION.
KIOSK IN USE Screen HANDHELD IN USE Screen
Contact Gorbel Medical | Phone: 1-844-846-8744 | E-mail: info@safegait.com
19
USER INTERFACE
Permission Levels
There are three user permission levels:
• Service (Gorbel Medical or authorized representative, only)
• Admin
• Therapist
Users with Admin permissions can manage system settings and users. For more information, refer to the
Settings section .
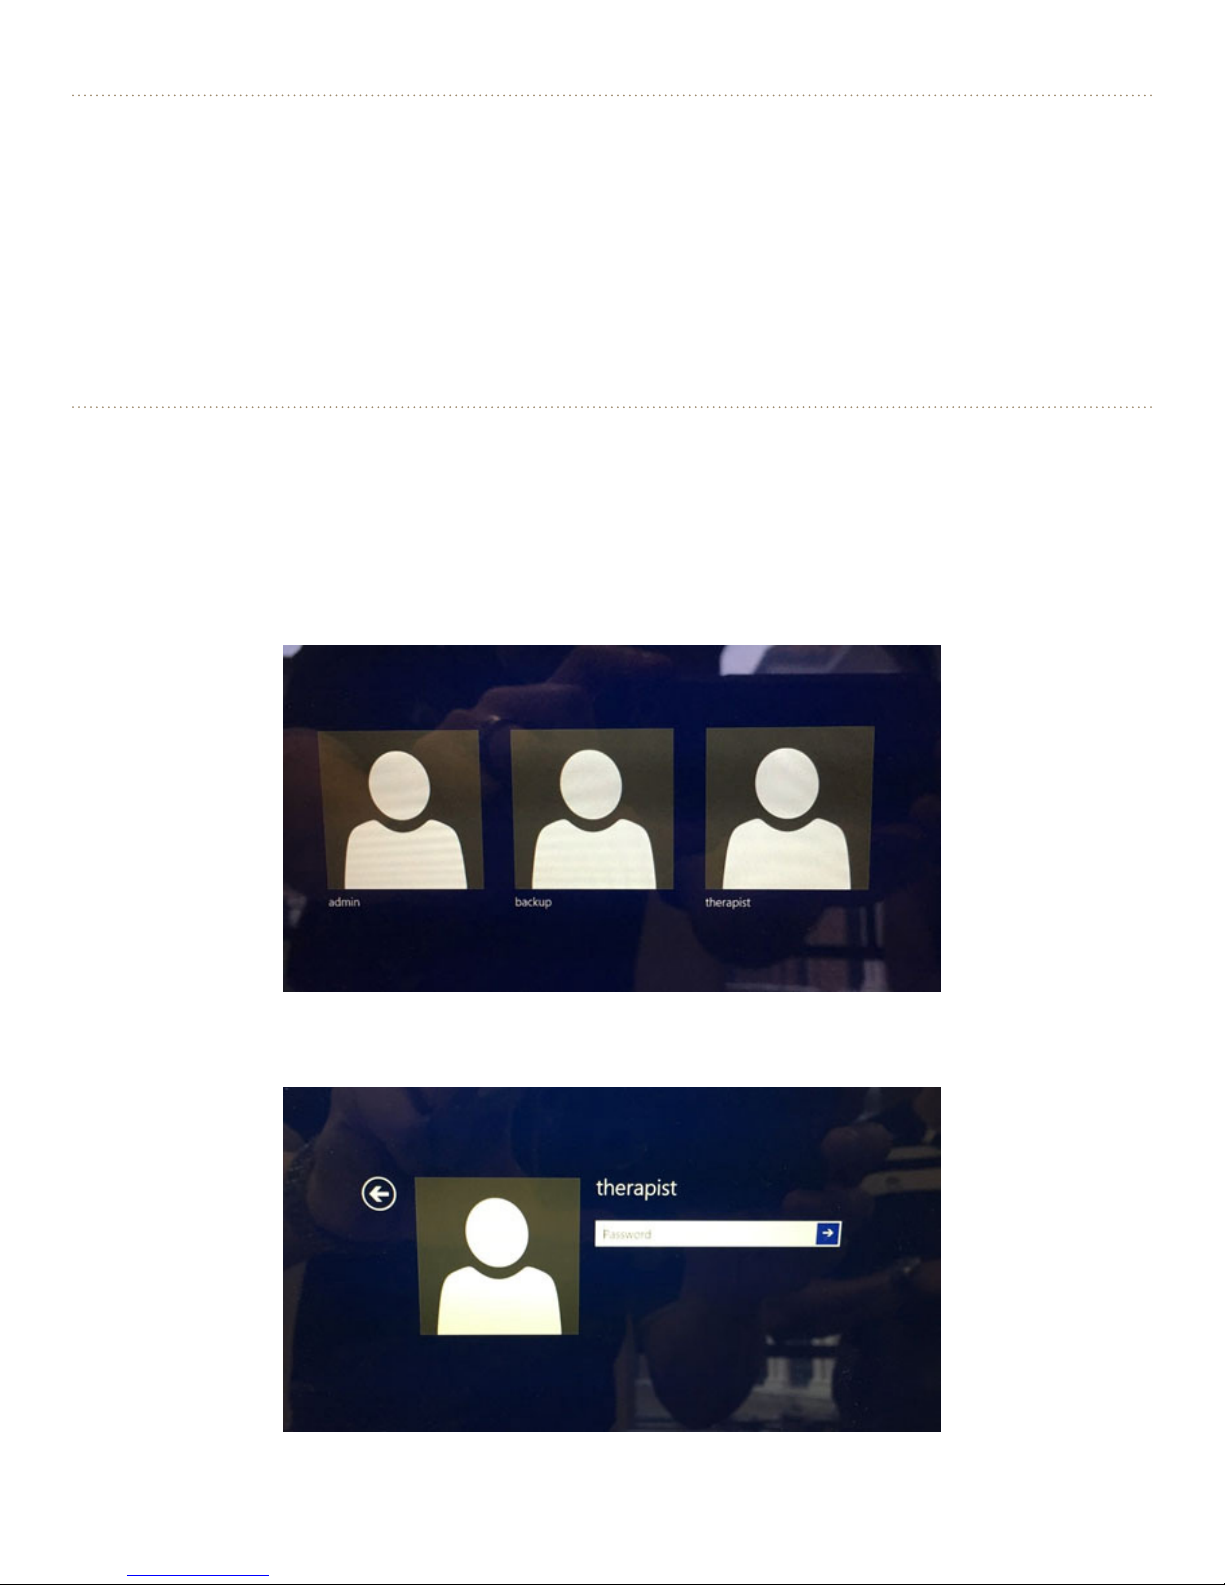
Logging In To Windows and SafeGait
Note: This procedure cannot be performed from the handheld remote control.
When the kiosk laptop is turned on for the rst time, you will be faced with the Windows login screen.
You will see one of two screens:
• Select a user. Your unit will have 3 options: Administrator, Backup, and Therapist. Tap/click on the
Therapist icon.
• Enter your Windows login password.
20
SafeGait 360° Balance and Mobility Trainer | Instructions for Use | SG360-IFU-004 Rev B
Windows® User Selection Screen
Windows® Login Screen
USER INTERFACE
Once you’ve logged into Windows, after 10-15 seconds, the SafeGait application will automatically launch
and you will see the following application login screen.
• From the LOGIN screen, enter your Username and Password.
• Touch LOGIN.
LOGIN Screen
You will need to login as an Administrator to create new administrators and users.
Note: Once a new administrator has been created, log in as this administrator and disable the default
administrator and user accounts. This should be done to address safety and privacy concerns with having
“default” accounts.
Log Out Of the System
Note: This procedure cannot be performed from the handheld remote control.
Touch MENU > Log Out.
The LOGIN screen displays.
MENU
Contact Gorbel Medical | Phone: 1-844-846-8744 | E-mail: info@safegait.com
21

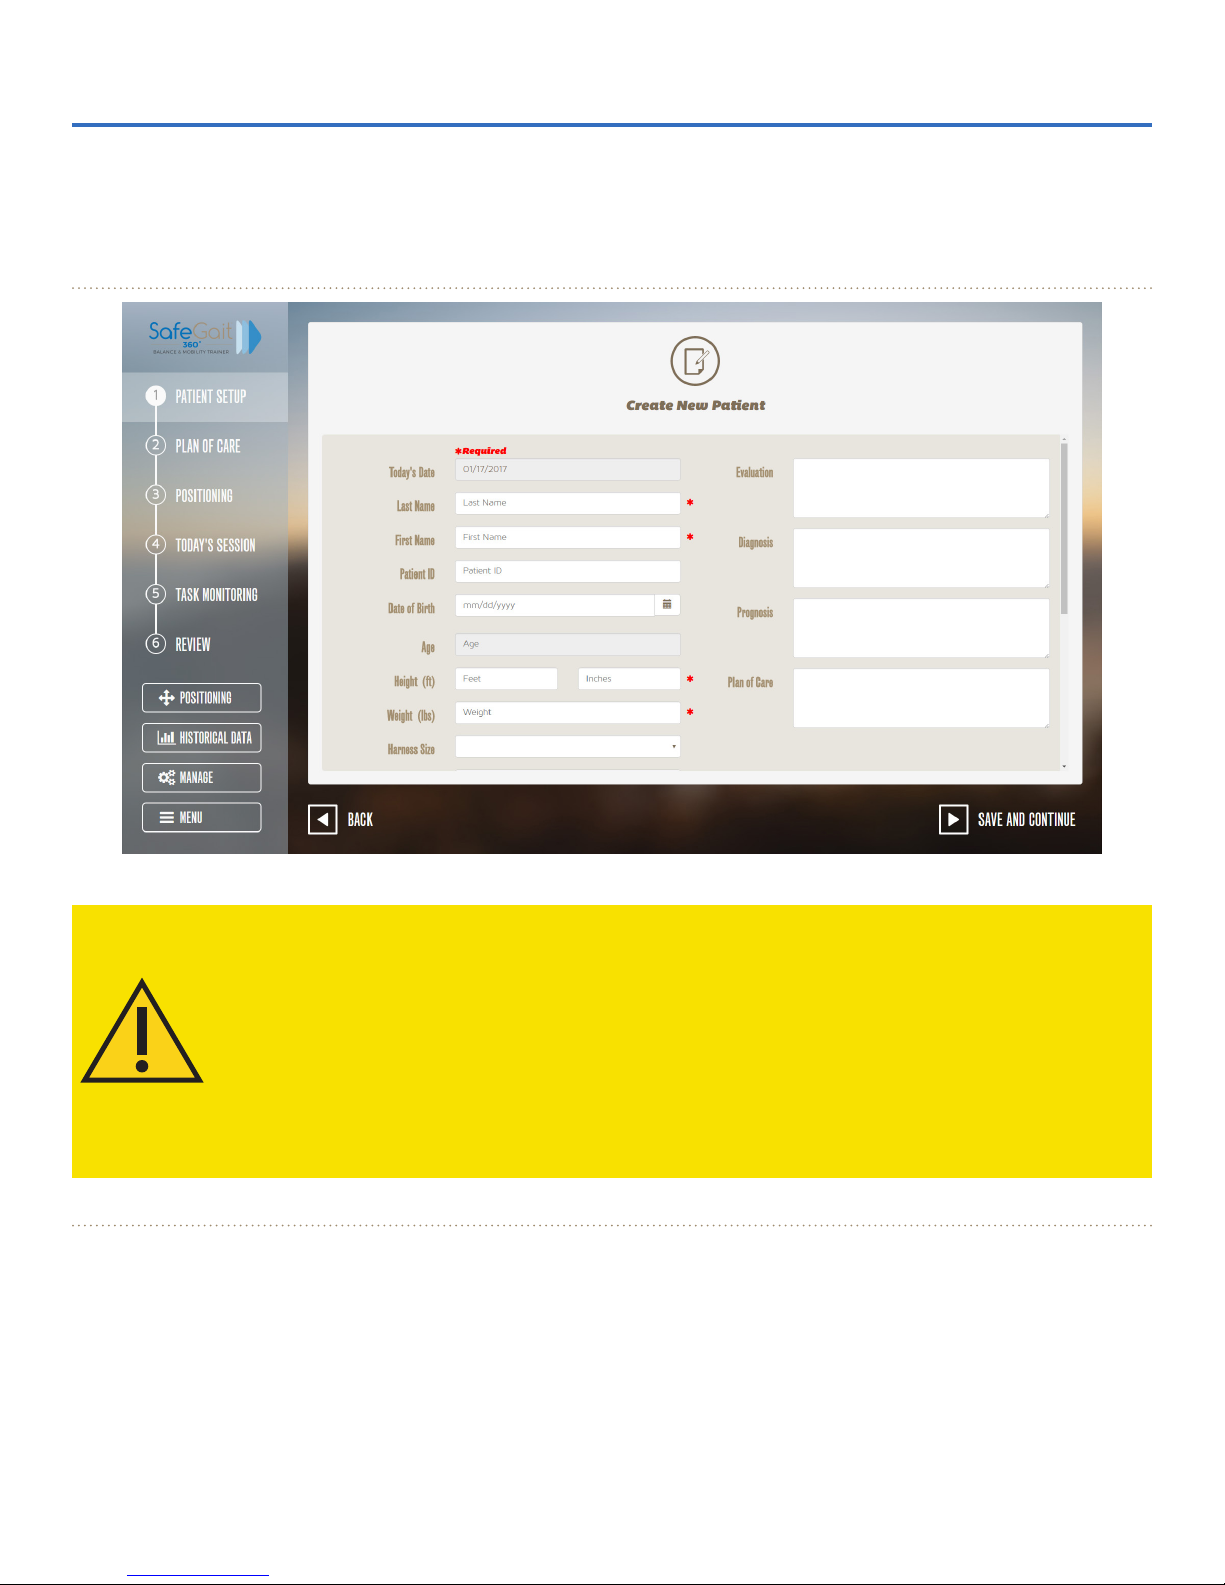
PATIENT SETUP
Patient Setup
This section describes the procedures for managing patient
records and selecting a patient for treatment.
Note: The procedures in this section cannot be performed from the handheld remote control.
Note: For information on how to use the Just Go option, refer to the Tasks section.
Create a New Patient Record
1. If necessary, touch PATIENT SETUP.
22
SafeGait 360° Balance and Mobility Trainer | Instructions for Use | SG360-IFU-004 Rev B
PATIENT SETUP Screen

2. From the PATIENT SETUP screen, touch Create a New Patient.
PATIENT SETUP
Create New Patient Screen
3. On the Create New Patient screen, enter the following information. Fields with an asterisk (*) in
them are required.
◉ Last Name*
◉ First Name*
◉ Patient ID
◉ Date of Birth*
◉ Age
◉ Height*
◉ Weight*
◉ Gender*
◉ Harness Size
◉ Insurance Provider
◉ Date of Injury
◉ External Cause
◉ Progress Notes
◉ Evaluation
◉ Diagnosis
◉ Prognosis
◉ Plan of Care
◉ Past Medical History
◉ Medications
◉ Discharge Notes
◉ Subscriber ID
The Date eld is automatically lled by the patient management software.
Note: A drop-down calendar is provided for the DOB eld; however, it is recommended that you enter
the DOB from either the on-screen or physical keyboard in the format MM/DD/YYYY.
Contact Gorbel Medical | Phone: 1-844-846-8744 | E-mail: info@safegait.com
23

PATIENT SETUP
4. Touch SAVE AND CONTINUE.
Conrm Patient Height and Weight
Screen (Minimum BWS Warning)
Minimum BWS Warning
NOTICE: The minimum BWS allowed is reduced to 10 lbs. but only for patients weighing
less than 100 lbs. If the patient weight is such that 20% of their weight is less than 10
lbs. then the minimum BWS applied will be 10 lbs. (in the example shown above, BWS of
10 lbs. is 25% of body weight - therefore in this example body weight would be 40 lbs.).
24
SafeGait 360° Balance and Mobility Trainer | Instructions for Use | SG360-IFU-004 Rev B

View or Edit a Patient Record
1. If necessary, touch PATIENT SETUP.
2. In the Choose An Existing Patient area
of the PATIENT SETUP screen, type the
patient’s last name.
As you type, a drop-down list of patients
that match your search criteria displays.
Choose an Existing Patient
PATIENT SETUP
3. Select the patient from the drop-down list.
4. On the Patient Dashboard page touch Patient Details.
5. From the Patient Information screen, touch EDIT INFORMATION.
Contact Gorbel Medical | Phone: 1-844-846-8744 | E-mail: info@safegait.com
Patient Information Screen (Editable)
25

PATIENT SETUP
6. On the Patient Information screen, edit the information you wish to change. Fields with an
asterisk (*) in them area required.
7. Touch SAVE AND CONTINUE.
8. Touch CONTINUE on the dashboard
screen. On the Conrm Patient Height
and Weight screen, conrm or reenter
the patient’s Height and Weight.
The patient record is updated, the Date eld
is set to the current day, and the Create a
Plan of Care screen displays.
Conrm Patient Height and Weight Screen
26
SafeGait 360° Balance and Mobility Trainer | Instructions for Use | SG360-IFU-004 Rev B

SELECT A PATIENT
Select a Patient
Before performing this procedure, you must know if the patient’s height or weight has changed since the
last session.
1. If necessary, touch PATIENT SETUP.
2. In the Choose and Existing Patient area
of the PATIENT SETUP screen, type the
patient’s last name.
As you type, a drop-down list of patients that
match your search criteria displays.
3. Select the patient from the drop-down list.
Choose an Existing Patient
4. From the Patient Dashboard
screen, touch CONTINUE.
Patient Dashboard Screen
5. On the Conrm Patient Height and
Weight screen, conrm or reenter the
patient’s Height and Weight.
6. Touch CONTINUE.
If you reentered the patient’s height or weight,
the patient record is updated. The Create a
Plan of Care screen displays.
Conrm Patient Height and Weight Screen
Contact Gorbel Medical | Phone: 1-844-846-8744 | E-mail: info@safegait.com
27

PATIENT DASHBOARD: SCHEDULING
Patient Dashboard: Scheduling
Before performing this procedure, you must know if the patient’s height or weight has changed since the
last session.
1. If necessary, touch PATIENT SETUP.
2. In the Choose An Existing Patient
area of the PATIENT SETUP screen,
type the patient’s last name.
As you type, a drop-down list of patients
that match your search criteria displays.
3. Select the patient from the drop-
down list.
Choose an Existing Patient
4. From the Patient Dashboard screen,
touch the date you want to schedule
from the calendar in the top right.
5. Select the tasks you want to perform
on the selected data and click Save.
The tasks for that date have now been entered.
28
SafeGait 360° Balance and Mobility Trainer | Instructions for Use | SG360-IFU-004 Rev B

PATIENT DASHBOARD: REPEAT LAST SESSION
Patient Dashboard: Repeat Last Session
Before performing this procedure, you must know if the patient’s height or weight has changed since the
last session.
1. If necessary, touch PATIENT SETUP.
2. In the Choose An Existing Patient area
of the PATIENT SETUP screen, type the
patient’s last name.
As you type, a drop-down list of patients
that match your search criteria displays.
3. Select the patient from the drop-down
list.
Choose an Existing Patient
4. From the Patient Dashboard screen, if
the last session is populated click the
turn icon next to the Last Session Label.
5. Touch Yes from the Conrmation pop
up.
6. On the Conrm Patient Height and
Weight screen, conrm or reenter the
patient’s Height and Weight.
7. Touch CONTINUE.
The tasks from the last session will be repeated for the current session.
Contact Gorbel Medical | Phone: 1-844-846-8744 | E-mail: info@safegait.com
29

PATIENT DASHBOARD: VIEW TASK TRENDS
Patient Dashboard: View Task Trends
Before performing this procedure, you must know if the patient’s height or weight has changed since the
last session.
1. If necessary, touch PATIENT SETUP.
2. In the Choose An Existing Patient area
of the PATIENT SETUP screen, type the
patient’s last name.
As you type, a drop-down list of patients that
match your search criteria displays.
3. Select the patient from the drop-down
list.
Choose an Existing Patient
4. Touch the gear icon from the top right of
Task Trends.
5. If more than one task has been
completed you can touch that task to
view the trends. Touch Task Name.
The task trends for a patients tasks are shown
30
SafeGait 360° Balance and Mobility Trainer | Instructions for Use | SG360-IFU-004 Rev B

PLAN OF CARE
Plan of Care
This section describes the procedures for managing the plan of care.
Note: The procedures in this section cannot be performed from the handheld remote control.
Overview
The Patient Management Software contains an extensive list of tasks from which you can create a plan of
care that is specic to individual patient requirements. The plan of care can be used to create a schedule
of tasks for a session.
Create a Plan of Care
1. Select a patient. Refer to the Select a Patient procedure in the Patient Setup section.
2. From the Create a Plan of Care screen, select the tasks you wish to perform during this session.
3. Touch SAVE AND CONTINUE.
The plan of care if created and the POSITIONING screen displays.
Contact Gorbel Medical | Phone: 1-844-846-8744 | E-mail: info@safegait.com
Create a Plan of Care Screen
31

PLAN OF CARE
Edit a Plan of Care
This procedure allows you to edit the plan of care after you have selected a patient, created a plan of
care, and then continued on with the session. At this time, the Today’s Session screen displays.
Today’s Session Screen
1. From the Today’s Session screen, touch MANAGE TASKS.
Create a Plan of Care Screen
32
SafeGait 360° Balance and Mobility Trainer | Instructions for Use | SG360-IFU-004 Rev B

PLAN OF CARE
2. From the Create a Plan of Care screen, select the additional tasks you wish to perform during
this session or deselect the tasks you no longer wish to perform during this session.
3. Touch SAVE AND CONTINUE.
The plan of care is update and the POSITIONING screen displays.
Contact Gorbel Medical | Phone: 1-844-846-8744 | E-mail: info@safegait.com
33

PLAN OF CARE
Create a Task
1. From the Create a Plan of Care screen, touch CREATE NEW TASK.
Create New Task Screen
2. On the Create New Task screen, enter a name for the new task.
3. Select the other measurement.
◉ Distance: Select for gait tasks.
◉ Repetitions: Select for transfer tasks.
Measurements of Time, Speed (average), Falls Prevented, Average BWS, and Number of Boosts are
automatically added to the new task.
4. Touch SAVE AND CONTINUE.
The new task is created and the Create a Plan of Care screen displays, with the new task added to the
Custom column. The custom task becomes a permanent part of the facility’s Plan of Care options and
cannot be deleted.
34
SafeGait 360° Balance and Mobility Trainer | Instructions for Use | SG360-IFU-004 Rev B

Edit a Custom Task
1. From the Create a Plan of Care screen, select one Custom Task.
PLAN OF CARE
Edit Custom Task Screen
2. Select Edit Custom Task.
3. Edit the Custom Task Name or Measurement type.
◉ Distance: Select for gait tasks.
◉ Repetitions: Select for transfer tasks.
Measurements of Time, Speed (average), Falls Prevented, Average BWS, and Number of Boosts are
automatically added to the new task.
4. Touch SAVE.
Contact Gorbel Medical | Phone: 1-844-846-8744 | E-mail: info@safegait.com
35

POSITIONING AND HORIZONTAL LOCK
Positioning and Horizontal Lock
This section describes how to position the actuator and the spreader bar.
Position the Actuator
The actuator should be positioned directly over the patient before connecting the patient harness to the
spreader bar.
1. Depending on which screen you are currently on, touch
POSITIONING from the left-hand menu or the bottom of the
screen.
2. From the Device Position area of the POSITIONING screen,
touch and hold the left or right arrows in order to move the
actuator to the desired position.
The triple-arrow symbol on the screen corresponds to the triplearrow symbol on the bottom of the actuator. This indicates the
direction of movement.
Device Position
NOTICE: Positioning the Actuator either in front of or behind the patient could lead to
discomfort.
CAUTION: While positioning the actuator, ensure the patient is not in the path between
current and desired starting location of the actuator.
36
SafeGait 360° Balance and Mobility Trainer | Instructions for Use | SG360-IFU-004 Rev B

POSITIONING AND HORIZONTAL LOCK
Position the Spreader Bar
The spreader bar should be positioned low enough to attach the patient harness via the spreader bar
straps, without coming into contact with the patient’s head (1”-2”). The therapist should hold the spreader
bar securely to prevent contact with the patient’s head.
1. If necessary, touch POSITIONING.
2. From the Spreader Bar Position area of the POSITIONING
screen, touch and hold the up or down arrows in order to
move the spreader bar to the desired position.
3. After connecting the patient harness to the spreader bar,
tighten the spreader bar straps until there is tension. Ensure
that the straps are symmetrical and that the spreader bar is
parallel with the oor.
NOTE: an error alert will appear if the amount of upward
movement applied during this action creates and uplifting
force on the patient.
Depending on where you accessed the POSITIONING screen from, Select a Patient or press BEGIN
SESSION, EXIT SESSION or JUST GO to continue.
Contact Gorbel Medical | Phone: 1-844-846-8744 | E-mail: info@safegait.com
37

POSITIONING AND HORIZONTAL LOCK
4. A guide used to show the correct distance between the spreader bar and the top of the patient’s
head is attached to the spreader bar cover. Pull the spreader bar guide down in order to check
the distance between the spreader bar and the patient’s head.
NOTICE: It is very important to maintain proper distance between the spreader bar
and the patient’s head. Use the spreader bar guide throughout a therapy session to
check the distance and adjust the harness or spreader bar straps as necessary to
maintain the proper position. A distance greater than dictated by the guide may result
in reduced system reaction to the patient’s horizontal movement.
Spreader Bar Guide
CAUTION: Do not detach shoulder straps from the spreader bar while patient is being
supported. This can lead to patient injury.
When the System is in Horizontal Lock
The actuator can be locked in place to prevent forward or backward movement on the rail. Please note
that even in this Horizontal Locked state, if a fall is prevented, the actuator may move slightly, in order to
protect both the patient (by reducing the impact of their fall) and the system.
38
SafeGait 360° Balance and Mobility Trainer | Instructions for Use | SG360-IFU-004 Rev B

TASKS
Tasks
This section describes the procedures for performing tasks, along
with supporting information on crucial task settings.
Perform a Task from the Plan of Care
This procedure is used to perform a task while collecting and logging performance measurements after
creating a plan of care and positioning the actuator.
Today’s Session Screen
1. From the Today’s Session screen To Do column, select a task.
MANAGE TASKS allows you to return to the Create a Plan of Care screen and adjust the selections.
After making new selections, the POSITIONING screen displays. You can use the MANAGE TASKS
function to reposition without changing tasks. After positioning, you are returned to the Today’s Session
screen.
Contact Gorbel Medical | Phone: 1-844-846-8744 | E-mail: info@safegait.com
39

TASKS
Get Patient Ready Screen
2. Touch BEGIN TASK.
3. From the Get Patient Ready conrmation screen,
touch BEGIN. The purpose of this screen is to alert you
that BWS is about to be applied.
The actuator LED status light bar changes to green. BWS is
applied. The TASK MONITORING screen displays.
40
SafeGait 360° Balance and Mobility Trainer | Instructions for Use | SG360-IFU-004 Rev B
TASK MONITORING Screen

4. If necessary, adjust the BWS for this task.
º From the Body Weight Support area of the TASK
MONITORING screen, touch the +5%, +1%, -1%,
or -5% arrows as needed to adjust the BWS by the
corresponding increment.
º Touch APPLY.
The BWS for this task is updated.
For information on the Boost function, refer to Step 10.
Body Weight Support
TASKS
CAUTION: If the therapist observes that the applied BWS is noticeably more or less than
the desired BWS the patient may become understandably fatigued. In this situation,
contact Gorbel Medical for assistance.
Task
◉ On the Set Patient Goals screen, enter the PATIENT
GOALS for this session. Goals for the LAST SESSION
and FIRST SESSION display directly below the goals
for this session.
5. Set the goals for this task.
◉ From the task area of the TASK MONITORING
screen, touch SET GOALS. The task area is labeled
with the current task; for example, Change in Speed.
◉ Touch SET AND CONTINUE.
Set Paint Goals Screen
Contact Gorbel Medical | Phone: 1-844-846-8744 | E-mail: info@safegait.com
41

TASKS
6. If this is a transfer task, establish the boundaries for
individual patient repetitions by dening an upper and
lower limit.
◉ From the task area of the TASK MONITORING
screen, touch SET LIMITS. This option only displays
for a transfer task.
◉ Position the patient in the upper limit position; for
example, standing fully upright.
◉ From the Repetition Limits screen, touch SET UPPER
LIMIT.
◉ Position the patient in the lower limit position; for
example, sitting in a chair.
◉ Touch SET LOWER LIMIT. The boundaries are now
set.
Repetition Limits Dialog
◉ If you would like to count the patient positioning as a
repetition, touch CONTINUE & COUNT THIS REPETI-
TION.
◉ Otherwise, simply touch CONTINUE.
NOTICE: A transfer task cannot begin unless the repetition limits are set.
7. With DFP, the actuator distinguishes the dierence between the patient’s intentional downward
movements - for example, while transferring from a standing to sitting position - and the unintentional downward movement of a fall by measuring the velocity of the patient’s downward
movement.
◉ DFP SENSITIVITY is the relative level of downward speed on the strap that is required to
trigger fall detection. The sensitivity level is adjustable, allowing you to accommodate patients
with varying levels of independence. A very independent patient might move more quickly
while performing a task than a patient who is more impaired. In the former case, the Medium
or Low sensitivity setting might be appropriate.
◉ DFP SENSITIVITY can be set to a default of High or Medium. For more information, refer to
the Settings section.
◉ If it is necessary to adjust the DFP SENSITIVITY setting for a task, toggle the DFP SENSITIVITY
bar, located at the bottom right of the TASK MONITORING screen, to the desired setting.
High: Fall detection is triggered by a relatively low amount of downward speed on the strap; for
patients with a severe level of impairment.
Medium: Fall detection is triggered by a medium amount of downward speed on the strap; for
patients with a moderate level of impairment.
Low: Fall detection is triggered by a relatively high amount of downward speed on the strap; for
patients with a mild level of impairment.
42
SafeGait 360° Balance and Mobility Trainer | Instructions for Use | SG360-IFU-004 Rev B

NOTICE: A DFP SENSITIVITY of High might trigger false fall detection when performing
oor-based or sit-to-stand tasks.
8. Descent Limit
Descent Limit is a set amount of downward travel that the system allows before registering a
prevented fall. The amount ranges from 2-6 inches and is determined by the patient’s height. The
Descent Limit amount increases incrementally with the patient’s height. The Descent Limit travel
distance remains constant for a patient but the starting position for measuring the travel distance
can be adjusted to accommodate the performance tasks at varying levels (sitting or standing). It
is important to ensure that the starting position for activating the Descent Limit is reset as
needed as you move from one task to the next, (i.e. from sit-to-stand to Stairs or a Gait
task) to prevent the patient from descending too far before fall detection or limiting
desired patient downward movement. Descent Limit is initially engaged when BWS is applied
to the patient. The Descent Limit can be deactivated during a task or reset in order to allow
patients to perform tasks from a lower position, such as the transfer task of sit to stand. Even
when the Descent Limit is deactivated, the proprietary DFP remains active. An example of when
you might choose to deactivate the Descent Limit is when performing a transfer task that
requires the patient to work from the oor, such as supine to sit. When the Descent Limit is
deactivated, extra precautions should be taken by the therapist to ensure that an appropriate
DFP SENSITIVITY level is engaged.
TASKS
CAUTION: Improperly setting the Descent Limit can result in injury.
If it is necessary to disable the Descent Limit, toggle the DESCENT LIMIT bar, located at the
bottom right of the TASK MONITORING screen, to the NONE setting. On the handheld remote
control, the bar is labeled DL.
When the DESCENT LIMIT is active, the DFP SENSITIVITY is reduced slightly to allow for greater
freedom of movement while relying on the DESCENT LIMIT as a redundant means of fall protection.
USAGE TIP: Consider using the Descent Limit feature to safely demonstrate to the
patient the way in which fall protection feels when it is engaged by having the patient
bend at the knees until fall protection is activated.
Contact Gorbel Medical | Phone: 1-844-846-8744 | E-mail: info@safegait.com
43

TASKS
9. Horizontal Lock
HORIZONTAL LOCK can be toggled to prevent the actuator from moving horizontally at any point
during a task. Tap the HORIZONTAL LOCK bar, located at the bottom-right of the TASK MONI-
TORING screen, to the ON or OFF setting (OFF by default). This can otherwise be toggled on the
handheld device by tapping the lock icon on the top-right corner of the screen.
10. RPE Entry
To enable or disable the entry of the patient’s rating of perceived exertion (RPE) upon completion
of the task, slide the RPE ENTRY bar, located at the bottom right of the TASK MONITORING
screen to the ON or OFF setting, respectively.
For more information about RPE, refer to Step 12.
NOTICE: Do not use HORIZONTAL LOCK for resistance as it may damage the System. If
the patient exerts a large horizontal force on the system, the actuator will move slightly
to protect the patient and the device.
Note: DFP SENSITIVITY, DESCENT LIMIT, HORIZONTAL LOCK, and RPE ENTRY can also be set
on the Task Settings screen by touching SETTINGS, located at the bottom right of the TASK
MONITORING screen.
NOTICE: When using the Task Settings screen on the handheld remote control, take
extra care not to inadvertently make an incorrect selection; for example, touching the
RPE ENTRY On/O radio buttons when reaching for the Descent Limit On/O radio
buttons.
44
SafeGait 360° Balance and Mobility Trainer | Instructions for Use | SG360-IFU-004 Rev B

TASKS
11. Once you have made all of our selections, touch START TASK in the top-right corner. Current
task time will start incrementing, conrming that performance metrics are now being recorded.
NOTICE: In order to record performance metrics, you must press START TASK.
The CURRENT TASK performance measurements update in real time as the patient performs the task.
The PATIENT GOALS for this session display directly below the performance measurements. When one of
the PATIENT GOALS for this session is reached, the PATIENT GOALS turn green. The following options are
available while the patient is performing the task.
◉ Adjust BWS.
◉ Touch Boost, located in the Body Weight Support area, to provide the patient with 10
seconds of 20% additional BWS, up to 50% of the patient’s weight.
◉ Touch RESET, located in the task area, to reset the CURRENT TASK performance measure-
ments to zero.
◉ Touch STOP ALL to stop the system, in case of emergency or to reposition the patient.
◉ Adjust DFP SENSITIVITY.
◉ Set or remove DESCENT LIMIT.
◉ Enable or disable RPE ENTRY.
NOTICE: Pressing RESET TASK is NOT akin to repeating a task. If RESET TASK is
pressed, previous performance measurements are not retained. If you wish to repeat a
task, follow steps 12-16 and select the same task.
Contact Gorbel Medical | Phone: 1-844-846-8744 | E-mail: info@safegait.com
45

TASKS
12. Touch FINISH TASK.
Rating of Perceived Exertion (RPE) Scale Screen
13. If RPE ENTRY is enable, from the Rating of Perceived Exertion (RPE) Scale screen, select the
value that corresponds to the patient’s RPE, the touch SAVE AND CONTINUE.
46
SafeGait 360° Balance and Mobility Trainer | Instructions for Use | SG360-IFU-004 Rev B
REVIEW Screen

TASKS
14. From the REVIEW screen therapist Notes may be entered. Press the View Events button to
display a sequenced list of events (for more details refer to the End Session and Add Notes
section). Touch CHOOSE NEXT TASK.
15. The Today’s Session screen displays. The completed task is moved to the Completed column.
16. The same task can be repeated multiple times. The number of times the task has been
repeated is shown in parentheses under the Completed column.
17. Once the next task is selected, press BEGIN TASK to start it.
Today’s Session Screen with Completed Tasks
Perform a Task without Patient Information (Just Go)
This procedure might be used if you choose to use the device without logging performance measurements. You have the option to log performance measurements and assign them to an existing patient
upon completion of the task.
Before performing this procedure, you must know the patient’s height and weight.
Contact Gorbel Medical | Phone: 1-844-846-8744 | E-mail: info@safegait.com
47

TASKS
1. Place the patient in the harness. For more information, refer to the Patient Harness section.
2. Touch PATIENT SETUP.
3. From the PATIENT SETUP screen, touch Just Go.
4. On the Enter Patient Height and Weight screen, enter the patient’s Height and Weight.
5. Touch CONTINUE.
6. Position the actuator and spreader bar. For
more information, refer to the Positioning
section.
7. Attached the harness to the spreader bar.
For more information, refer to the Patient
Harness section.
8. From the POSITIONING screen, touch JUST
GO.
Enter Patient Height and Weight Screen (Just Go)
9. From the Get Patient Ready conrmation screen,
touch CONTINUE. The purpose of this screen is to
alert you that BWS is about to be applied.
The actuator LED status light bar changes to green. BWS is
applied. The TASK MONITORING screen displays.
10. Perform the task. For more information, refer to
Perform a Task from the Plan of Care, Steps 6-12.
Get Patient Ready Screen
48
SafeGait 360° Balance and Mobility Trainer | Instructions for Use | SG360-IFU-004 Rev B

TASKS
REVIEW Screen (Just Go)
11. Review the performance measurements with the patient. You have the option of entering
Notes about the task on this screen.
12. Select one of the following options:
◉ BACK TO PATIENT SETUP: Return to the PATIENT SETUP screen.
◉ ASSIGN TO EXISTING PATIENT: Open the Save Data to Patient Prole screen in order to log
the collected performance measurements to an existing patient.
◉ RETURN TO JUST GO: Return to the Get Patient Ready screen.
Recover from a Prevented Fall
The purpose of this procedure is to reset the system after a prevented fall.
When a patient fall is prevented by the system, the Falls Prevented screen displays and the actuator LED
status light bar changes to either blinking yellow if fall detection was due to exceeding the DFP Sensitivity
setting, or to blinking green if fall detection was due to exceeding the Descent Limit. The actuator does
not allow any further downward motion. In order to allow the patient to correct their position, the system
maintains tension on the strap while allowing for upward movement and horizontal motion at a slower
speed. During a task, the user can choose whether or not to record the prevented fall into the system.
This option is not available during JUST GO.
NOTICE: Ensure that the patient has completely regained his or her balance before
clearing the Falls Prevented alert.
Contact Gorbel Medical | Phone: 1-844-846-8744 | E-mail: info@safegait.com
49

TASKS
1. If necessary, secure the patient.
2. From the Falls Prevented screen, select whether to
Record the fall using the Yes/No radio buttons. By default,
the Yes button is selected.
3. Next, select one of the following RESET ACTUATOR
options:
◉ YES, CONTINUE TASK: Reset the actuator and return
to the TASK MONITORING screen.
◉ NO, RETURN TO SESSION: Reset the actuator and
return to the Today’s Session screen.
Falls Prevented Screen
4. Depending on your selection, resume the task, resume
◉ NO, RETURN TO POSITIONING: Reset the actuator
and return to the POSITIONING screen.
the session, or return to the POSITIONING screen.
Stop the System in Case of Emergency or to Reposition the Patient
The purpose of this procedure is to stop the system, in case of
emergency, patient episode, or to reposition the patient.
STOP ALL is available from the TASK MONITORING screen.
1. Touch STOP ALL.
The system stops. No movement is allowed.
50
SafeGait 360° Balance and Mobility Trainer | Instructions for Use | SG360-IFU-004 Rev B

2. Secure the patient
3. From the STOP ALL screen, select one of the following
RESET ACTUATOR options:
◉ YES, CONTINUE TASK: Reset the actuator and return
to the TASK MONITORING screen.
◉ NO, RETURN TO SESSION: Reset the actuator and
return to the Today’s Session screen.
◉ NO, RETURN TO POSITIONING: Reset the actuator
and return to the POSITIONING screen.
STOP ALL Screen
4. Depending on the resolution of the emergency, patient episode, or repositioning, resume the
task, resume the session, or return to the POSITIONING screen.
TASKS
In the case of an emergency the POSITIONING screen can be used to lower the patient to the
oor by touching and holding the down arrow.
Resuming an Aborted Task
If a task is interrupted by selecting RETURN TO SESSION or RETURN TO POSITIONING following a Fall
Detection or a STOP ALL, the task can be resumed from the Today’s Session screen:
1. At the bottom of the Today’s Session screen, you will notice an alert (!) that the previous task
(Horizontal Head Turns in the following screenshot) was not completed.
2. Click on the alert to resume the task.
3. You will be presented with the Get Patient Ready dialog. Press CONTINUE and the Task Moni-
toring screen will return.
4. Press the RESUME button (where the Start Task button is normally located) to continue the task.
All metrics should resume where they were left o.
NOTICE: Once a dierent task is started, the aborted task cannot be resumed.
Contact Gorbel Medical | Phone: 1-844-846-8744 | E-mail: info@safegait.com
51

TASKS
Resume Task in Current Session
End the Session and Add Notes
1. From the Today’s Session screen, touch FINISH SESSION.
2. From the Finish Session screen, touch REVIEW & SAVE
SESSION.
The session is ended and the Today’s Session screen displays
with the session performance measurements displayed.
If you do not want to save the session data, touch DISCARD
SESSION. This option ends the session and returns you to
the PATIENT SETUP screen.
Finish Session Screen
52
SafeGait 360° Balance and Mobility Trainer | Instructions for Use | SG360-IFU-004 Rev B

TASKS
Today’s Session Screen
3. Touch the Notes eld to enter text related to the session.
Notes cannot be added from the handheld remote control. Notes are automatically saved when you
leave this screen.
4. To view a sequenced summary of events (changes in BWS, falls prevented, and boosts applied)
press the View Events button under the Notes text box. A table of events will be shown.
5. Use the touchscreen to scroll down should the list exceed the screen length.
6. Alternatively, a graphical timeline can be shown. Press the appropriate button to toggle between
the Table view and the Timeline view.
7. In Timeline view, tapping on the dot representing the event (Boost, BWS or Fall) will show addi-
tional details at the bottom of the screen.
8. Use the touchscreen to scroll sideways should the timeline exceed the screen width.
9. Press the BACK button to stop viewing events and return to the Today’s Session screen.
Contact Gorbel Medical | Phone: 1-844-846-8744 | E-mail: info@safegait.com
53

TASKS
Table View of Events
10. If you do not wish to review historical data with the patient, touch SAVE & LOG OUT PATIENT.
The PATIENT SETUP screen displays.
For information on reviewing historical data with the patient, refer to the Historical Data section.
54
SafeGait 360° Balance and Mobility Trainer | Instructions for Use | SG360-IFU-004 Rev B
Timeline View of Events

Historical Data
This section describes the procedures for viewing and comparing the
patient performance measurements that are captured and logged
into the system in real time during the session. These measurements
can be viewed and compared by specic tasks or full session.
View Patient Performance Measurements by Task
1. Touch HISTORICAL DATA.
HISTORICAL DATA
Contact Gorbel Medical | Phone: 1-844-846-8744 | E-mail: info@safegait.com
HISTORICAL DATA Screen
55

HISTORICAL DATA
Select a Patient Screen
2. If no patient is selected:
◉ In the Selected Patient area of the HISTORICAL DATA
screen, touch SELECT PATIENT.
◉ On the Select A Patient screen, type the patient’s last
name.
As you type, a drop-down list of patients that match your
search criteria displays.
◉ Select the patient from the drop-down list.
◉ Touch OK.
3. Select a task:
◉ In the Review Tasks
area of the HISTORICAL
DATA screen tap the
Tasks box to reveal a
drop-down list of tasks
the selected patient has
previously completed.
◉ Select the task from the
drop-down list.
Review Tasks
4. From the task screen, select
the session(s) to include in
the report. The task area is
labeled with the current task;
for example, Fast Speed.
5. Select one of the following
options:
HISTORICAL DATA Screen (Session List)
56
SafeGait 360° Balance and Mobility Trainer | Instructions for Use | SG360-IFU-004 Rev B

HISTORICAL DATA
◉ VIEW SINGLE TASK DATA: Display
the patient goals and other session
data for the selected task, with the
option to view the data for any
selected session.
HISTORICAL DATA Screen (View by Task > Single Task Data)
◉ VIEW DASHBOARD: Display bar
graphs for each performance
measurement associated with the
selected task for each selected
session.
HISTORICAL DATA Screen (View by Task > Dashboard)
◉ From this screen, you can touch a
bar graph to display a full-screen
bar graph for a single performance
measurement.
HISTORICAL DATA Screen (View by Task > Dashboard >
Single Performance Measurement)
Contact Gorbel Medical | Phone: 1-844-846-8744 | E-mail: info@safegait.com
57

HISTORICAL DATA
View Patient Performance Measurements by Session
1. Touch HISTORICAL DATA.
Select a Patient Screen
HISTORICAL DATA Screen
2. If not patient is selected:
◉ In the Select a Patient area of the HISTORICAL
DATA screen, touch SELECT PATIENT.
◉ On the Select a Patient screen, type the patient’s last
name.
As you type, a drop-down list of patients that match your
search criteria displays.
◉ Select the patient from the drop-down list.
◉ Touch OK.
58
SafeGait 360° Balance and Mobility Trainer | Instructions for Use | SG360-IFU-004 Rev B

3. Touch Compare Sessions.
HISTORICAL DATA
Session Select Screen
4. From the Session Select screen, select the session(s) to include in the report.
5. Select one of the following options:
◉ VIEW SESSION
DETAILS: Display the
session data for the
selected task, with
the option to view the
data for any selected
session.
Session Data Screen
Contact Gorbel Medical | Phone: 1-844-846-8744 | E-mail: info@safegait.com
59

HISTORICAL DATA
◉ VIEW DASHBOARD:
Display bar graphs
for each performance
measurement for each
selected session.
Session Comparison Screen
◉ From this screen, you
can touch a bar graph
to display a full-screen
bar graph for a single
performance measurement.
Session Comparison Screen (Single Performance Measurement)
60
SafeGait 360° Balance and Mobility Trainer | Instructions for Use | SG360-IFU-004 Rev B

HISTORICAL DATA
Save Patient Data to External Media
1. Once a patient’s HISTORICAL DATA has been accessed, from Task or Session selection page press
the SAVE TO EXTERNAL DEVICE button at the bottom of the screen.
Historical Session Selection Screen
2. Data can be exported in PDF or CSV format. Dierent options are available depending on the
selection. Any number of sessions/tasks can be exported.
Save to External Device Screen
3. In order to save the data, an external storage device must be inserted (i.e. a USB ash drive).
Once inserted, press Refresh External Storage to view the folders and navigate to the desired
location for saving the le. The lename can be changed by clicking on the Filename box and
editing it.
4. To export, click on SAVE. It will take a few moments for the le to be exported. Wait until
complete to remove the external storage device.
Contact Gorbel Medical | Phone: 1-844-846-8744 | E-mail: info@safegait.com
61

SETTINGS
Settings
This section describes the procedures for managing users and system settings. The
procedures in this section can only be performed by a user with the role of Admin.
Note: These procedures cannot be performed from the handheld remote control.
View a List of Users
1. Touch MANAGE.
A list of management functions appears: Users, Tasks, Settings, Admin Reports, System (Admin role only).
62
SafeGait 360° Balance and Mobility Trainer | Instructions for Use | SG360-IFU-004 Rev B
MANAGE Screen

Create a New User
1. Touch MANAGE.
2. Touch Users.
3. Touch Create New User.
SETTINGS
4. On the Create New User screen, enter the
following information:
◉ Last Name
◉ First Name
◉ Username
◉ Password (6-10 alpha and/or numeric
characters)
5. Reenter the Password in the Conrm Password
eld.
Create a New User Screen
Edit User Information
1. Touch MANAGE.
2. Touch Users.
6. Select a User Role.
◉ Admin: Permission to perform all system
operations and to change settings.
◉ Therapist: Permission to perform all
system operations.
7. Touch SAVE AND CONTINUE.
The new user is added to the system.
Contact Gorbel Medical | Phone: 1-844-846-8744 | E-mail: info@safegait.com
63

SETTINGS
View Users
3. From the View Users area, select a user.
4. Touch EDIT.
5. On the Edit User screen, edit any of the following:
◉ Last Name
◉ First Name
Username and Role display on this screen;
however, you cannot edit from this screen.
6. To reset the user’s password to the default, touch
RESET PASSWORD.
7. Touch SAVE.
The user’s information is updated.
End User Screen
64
SafeGait 360° Balance and Mobility Trainer | Instructions for Use | SG360-IFU-004 Rev B

Disable a User
1. Touch MANAGE.
2. Touch Users.
SETTINGS
3. From the View Users area, select a user.
4. Touch EDIT.
View Users
5. From the Edit User screen, touch DISABLE USER.
6. On the Disable User conrmation screen, touch YES.
7. Touch SAVE.
The user is disabled. The user can no longer log in to the
system but their information is still stored on the system.
In the View Users area of the MANAGE screen, their
username is displayed in strikethrough text.
Edit User Screen
Contact Gorbel Medical | Phone: 1-844-846-8744 | E-mail: info@safegait.com
65

SETTINGS
Enable a User
The purpose of this procedure is to re-enable a user who was previously disabled.
1. Touch MANAGE.
2. Touch Users.
3. From the View Users area, select a user.
4. Touch EDIT.
View Users
5. From the Edit User screen, touch ENABLE USER.
6. On the Enable User conrmation screen, touch YES.
7. Touch SAVE.
The user is enabled. The user can log in to the system. In
the View Users area of the MANAGE screen, their username is no longer displayed in strikethrough text.
Edit User Screen
66
SafeGait 360° Balance and Mobility Trainer | Instructions for Use | SG360-IFU-004 Rev B

Edit System Settings
1. Touch MANAGE.
2. Touch Settings.
3. Touch Edit Settings.
SETTINGS
Edit Settings Screen
4. On the Edit Settings screen, change any of the following display settings:
◉ Weight
◉ Height
◉ Distance
◉ Speed
5. Change the default DFP Sensitivity.
6. Touch SAVE.
The system settings are updated.
Contact Gorbel Medical | Phone: 1-844-846-8744 | E-mail: info@safegait.com
67

SETTINGS
Edit Custom Tasks
1. Touch MANAGE.
2. Touch Settings.
3. Select a Task.
4. Touch Edit.
5. On the Edit Custom Task screen, change any of the following settings:
º Name
º Measurement
§ Distance
§ Repetitions
6. Touch SAVE.
The custom task has been updated.
68
SafeGait 360° Balance and Mobility Trainer | Instructions for Use | SG360-IFU-004 Rev B
Edit Custom Task Screen

Disable Custom Tasks
1. Touch MANAGE.
2. Touch Settings.
3. Select a Task.
4. Touch Edit.
SETTINGS
5. On the Edit Custom Task screen, touch Disable Task.
6. Touch SAVE.
The custom task has been disabled.
Contact Gorbel Medical | Phone: 1-844-846-8744 | E-mail: info@safegait.com
Edit Custom Task Screen
69

SETTINGS
View Admin Reports
1. Touch MANAGE.
2. Touch Admin Reports.
The admin reports are displayed.
Admin Reports Screen
70
SafeGait 360° Balance and Mobility Trainer | Instructions for Use | SG360-IFU-004 Rev B

MAINTENANCE
Maintenance
This section describes the SafeGait 360° Balance and
Mobility Trainer maintenance requirements.
Overview
Annual preventative maintenance should be performed by a certied Gorbel Medical technician. Please
contact Gorbel Medical to schedule this service.
Before Each Use
Inspect the following components for damage or excessive wear. If any is found, discontinue using and
contact Gorbel Medical.
• Actuator Strap - Inspect Strap for fraying, tears, rips, cuts or signs of excessive wear.
Actuator Strap shown with excessive wear
CAUTION: Use of strap with excessive wear can lead to injury.
Contact Gorbel Medical | Phone: 1-844-846-8744 | E-mail: info@safegait.com
71

MAINTENANCE
• Spreader Bar - With one hand holding the body of the spreader bar, push and pull on the clip
assembly (1 and 2) with the other hand to check for excessive “play.” Spacing between the clip
assembly and spreader bar should be virtually imperceptible and the clip assembly should rotate
smoothly.
1 2
Spreader Bar Inspection - twist, push and pull test
CAUTION: Use of worn components can lead to injury. If any area found, discontinue
using and contact Gorbel Medical.
CAUTION: Use of spreader bar with excessive play and/or lack of smooth rotation can
lead to injury.
• Safegait EMBRACE™ Rehabilitation Harness - Please refer to the SafeGait EMBRACE Instructions
for Use (IFU) manual for detailed illustrations to reference component parts listed in the inspection
items below.
◉ All buckle hardware for Leg Cu Straps; Donning Straps; and Spreader Bar Strap Connectors
should be inspected for cracks or defects;
◉ Inspect all harness components for fraying, tears or signs of wear (e.g., stitching). Check all
Chest and AbBand VELCRO® to ensure it provides intended hold when fastened;
◉ Check D-Rings for any cracks, broken welds, putting or scaring. Check Spreader Bar Straps for
wear or fraying.
◉ Harness should not be used if any signs of damage or excessive wear are evident.
CAUTION: Use of harness with any signs of damage or excessive wear can result in
injury. Refer to the SafeGait EMBRACE Instructions for Use (IFU) manual.
72
SafeGait 360° Balance and Mobility Trainer | Instructions for Use | SG360-IFU-004 Rev B

MAINTENANCE
Annually
Contact Gorbel Medical to schedule a preventive maintenance appointment for the following:
• Inspection and cleaning of the ceiling-mounted rail
• Inspection of the SafeGait 360 Actuator
• Replacement of the Actuator Strap
Contact Gorbel Medical | Phone: 1-844-846-8744 | E-mail: info@safegait.com
73

TROUBLESHOOTING
Troubleshooting
This section describes general troubleshooting information,
including solutions to common problems.
Overview
When the system detects a fault, the actuator LED status light bar changes to red and an ERROR screen
displays. The ERROR screen provides the option to reset the actuator.
When the actuator or the Patient Management Software issues a warning, the LED status light bar
changes to yellow and an A Warning Occurred screen displays. The A Warning Occurred screen
provides the option to reset the actuator. A warning is typically a circumstance under which the actuator
can continue to operate in a reduced condition or under which an operation is prevented until the correct
conditions for that operation are met.
When a patient fall is prevented by the system, the Falls Prevented screen displays and the actuator LED
status light bar changes to either blinking yellow if fall detection was due to exceeding the DFP Sensitivity
setting, or to blinking green if fall detection was due to exceeding the Descent Limit.
Troubleshooting - Quick Reference
Emergency Stop, Stop All, and Fall Recovery Procedures
Perform an Emergency Stop Stop the System Recover from a Prevented Fall
At the facility power panel,
press the red EMERGENCY
STOP button.
All power is removed from
the ceiling-mounted rail
and actuator. The actuator
is locked into position. The
system continues to provide
static BWS.
Touch STOP ALL.
Secure the patient.
From the STOP ALL SCREEN, select a
RESET ACTUATOR option.
Depending on the resolution of
the stop, resume the task, resume
the session, or return to the POSITIONING screen.
If necessary, secure the patient.
From the Falls Prevented screen,
select a RESET ACTUATOR option.
Depending on the resolution of
the fall, resume the task, resume
the session, or return to the
POSITIONING screen.
74
SafeGait 360° Balance and Mobility Trainer | Instructions for Use | SG360-IFU-004 Rev B

Troubleshooting - Corrective Action
Situation Symptom Corrective Action
Performing a sidewardoriented task, in which
the patient is moving
perpendicular to the
ceiling-mounted rail.
Performing a sit-to-stand
task.
A false fall is detected.
• The LED status light bar
changes to either blinking
yellow or blinking green.
• The FALLS DETECTED screen
displays.
A false fall is detected.
• The LED status light bar
changes to either blinking
yellow or blinking green.
• The FALLS DETECTED screen
displays.
From the FALLS DETECTED screen,
Record Fall select NO, then YES,
CONTINUE TASK.
Perform the task with the patient
moving parallel to the ceiling-mounted
rail.
Verify that the fall was triggered by the
patient exceeding the Descent Limit.
This condition is indicated by the LED
status light bar blinking green.
From the FALLS DETECTED screen,
Record Fall select NO, then YES,
CONTINUE TASK.
Slide the DESCENT LIMIT bar, located
at the bottom right of the TASK
MONITORING screen, to the REMOVE
setting.
TROUBLESHOOTING
Performing a task with
the patient in a seated
position.
A false fall is detected.
• The LED status light bar
changes to either blinking
yellow or blinking green.
• The FALLS DETECTED screen
displays.
- or -
Reset the task and set the Descent
Limit with the patient in a seated position.
Perform the task.
From the FALLS DETECTED screen,
Record Fall select NO, then YES,
CONTINUE TASK.
Slide the DESCENT LIMIT bar, located
at the bottom right of the TASK
MONITORING screen, to the REMOVE
setting.
- or -
Reset the task and set the Descent
Limit with the patient in a seated position.
Perform the task.
Contact Gorbel Medical | Phone: 1-844-846-8744 | E-mail: info@safegait.com
75

TROUBLESHOOTING
Troubleshooting - Error Codes
Error Code Cause Corrective Action
213 Both the positive and negative
limit switch are engaged.
216 Excessive force on Loadcell
(Negative)
217 Excessive force on Loadcell
(Positive)
10250 Wi Connection fails Call Gorbel® (reset wireless router, kiosk and device)
10116 Changing actuator mode too
quickly
10117 Starting and stopping actuator
suddenly
10118 The horizontal loadcell signal
is not in neutral position when
BWS is applied
10119 The vertical LC signal is nega-
tive when BWS is applied
10151 Overload, underload or no
load detected when entering
BWS mode
Call Gorbel® (both the limit switches horizontal or
vertical are engaged simultaneously)
Call Gorbel® (Loadcell needs to be checked)
Call Gorbel® (Loadcell needs to be checked)
From the ERROR screen, touch RESET. Begin or resume
task. If error persists, call Gorbel®
From the ERROR screen, touch RESET. Begin or resume
task. If error persists, call Gorbel®
Center the patient directly under the actuator. From the
ERROR screen, touch RESET. Begin or resume task. If
error persists, call Gorbel®
Ensure that patient is in the harness and attached to the
actuator via the spreader bar. From the ERROR screen,
touch RESET. Begin or resume task. If error persists, call
Gorbel® (May indicated unpowered or unresponsive
load cell.)
Ensure patient is in the harness and attached to the
spreader bar on the actuator. Center the patient directly
under the actuator. Ensure that no extra load is being
applied on the strap. From the ERROR screen, touch
RESET. Begin or resume task. If error persists, call
Gorbel®
CAUTION: Operating SafeGait while an error or warning code is indicated may result
in injury. Contact Gorbel Medical with an inquiry if any error or warning cannot be
dismissed.
76
SafeGait 360° Balance and Mobility Trainer | Instructions for Use | SG360-IFU-004 Rev B

APPENDIX
Appendix
Appendix A: LED Status Light Bar
The LED status light bar provides a visual indicator about system events.
Color Indication
White Actuator is powered-up and in Stop mode, waiting for network connection to the
kiosk.
Blue System is ready and in a locked mode.
Green System is operational. Actuator is moving during positioning or BWS is applied.
Green
(blinking)
Yellow
(blinking)
Yellow A warning has been issued.
Red A fault in the system has been detected.
A fall has been detected, due to exceeding the Descent Limit.
A fall has been detected, due to exceed the DFP Sensitivity setting.
Contact Gorbel Medical | Phone: 1-844-846-8744 | E-mail: info@safegait.com
77

APPENDIX
Appendix B: List of Symbols
Symbol Meaning Symbol Meaning
Consult IFU Humidity Limitation
DANGER: Symbol on red background. Indicates a hazardous
situation that, if not avoided, will
result in death or serious injury.
Keep Dry
CAUTION: Symbol on yellow background. Indicates a hazardous
situation that, if not avoided,
could result in minor or moderate
injury.
Pinch Point - Keep hands and
ngers clear
Arc Flash and Shock Hazard Protective Earth Ground
Electrical Shock/Electrocution
Hazard
Lead Free RoHS (Restriction of
Hazardous Substances) and WEEE
(Waste from Electric and Electronic Equipment) Compliant
Temperature Limitation
‘Handheld in Use’ notication as
it appears in SafeGait 360 Patient
Management Software
‘Kiosk in Use’ notication as it
appears in SafeGait 360 Patient
Management Software
Minimum BWS Warning as it
appears in SafeGait 360 Patient
Management Software
78
SafeGait 360° Balance and Mobility Trainer | Instructions for Use | SG360-IFU-004 Rev B
Falls Prevented screen as it
appears in SafeGait 360 Patient
Management Software

Quick Reference Guide
Quick Reference - Task Monitoring
QUICK REFERENCE GUIDE
Contact Gorbel Medical | Phone: 1-844-846-8744 | E-mail: info@safegait.com
79

INDEX
Index
A
Actuator, 2-9; 11-14; 16-18; 36, 39-40; 42, 44, 48-51; 71,
73-74; 76-77; 79
Assist, 7-9
B
Boost, 7, 34-35; 41, 45, 53, 79
BWS, 1-2; 7-9; 13, 24, 34-35; 40-41; 43, 45, 48, 53, 74,
76-79
C
Ceiling-mounted rail, 2-3; 6, 11, 13, 73-75
D
Dashboard, 25-30; 57, 60
Descent Limit, 7-8; 10, 43-45; 49, 74-75; 77, 79
DFP, 7, 42-43
DFP Sensitivity, 7, 42-45; 49, 67, 74, 77, 79
J
Just Go, 22, 37, 47-49
K
Kiosk, 2, 5, 9, 11-13; 18-20; 76-78
L
LED status light bar, 11, 13, 40, 48-49; 74-75; 77, 79
Log in, 21, 65-66
Log out, 19, 21, 54
M
Maintenance, 9, 71, 73
N
NAS device, 2, 5-6; 11
Notes, 23, 47, 49, 52-53
E
Emergency, 8, 11, 13, 45, 50-51
EMERGENCY STOP, 11, 13, 74
F
Facility power panel, 2, 6, 8, 11, 13, 74
Falls prevented, 34-35; 49-50; 53. 74, 79
H
Handheld remote control, 2, 5, 11-13; 19-22; 31, 43-44;
53, 62
Harness, 2, 4, 7-10; 12-16; 18, 23, 36-38; 48, 72, 76
Historical data, 18, 54-58; 61
Horizontal Lock, 7, 38, 44, 79
P
Password, 19-21; 63-64
Patient record, 22, 25-27
Performance measurement, 1, 5, 39, 45, 47, 49, 52, 55,
57-58; 60
Permission, 20, 63
Plan of care, 18, 23, 26-27; 31-35; 39, 48
Positioning, 7, 9, 12, 15-18; 31, 33, 36-37; 39, 42, 48,
50-51; 74, 77
Power o, 13
Power on, 11-13
R
Router, 2, 6, 11-12; 76
RPE, 44-46
80
SafeGait 360° Balance and Mobility Trainer | Instructions for Use | SG360-IFU-004 Rev B

S
Settings, 18, 20, 39, 42, 44, 62-63; 67-69; 79
Single task data, 57
Spreader bar, 2-4; 7-10; 13-16; 36-38; 48, 72, 76
Stop all, 7, 45, 50-51; 74, 79
Strap, 2-4; 8-10; 12, 14-18; 37-38; 42, 49, 71-73; 76, 79
T
Task, 1, 5, 8-9; 13, 17, 22, 28-35; 39-52; 55-57; 59, 61-62;
68-69; 74-76; 79
U
User interface, 1, 5, 18-19
User role, 63
INDEX
Contact Gorbel Medical | Phone: 1-844-846-8744 | E-mail: info@safegait.com
81

NOTATIONS
Notations
A place to add notes by the users
82
SafeGait 360° Balance and Mobility Trainer | Instructions for Use | SG360-IFU-004 Rev B

NOTATIONS
Contact Gorbel Medical | Phone: 1-844-846-8744 | E-mail: info@safegait.com
83

Gorbel Medical
A Division of Gorbel, Inc.
600 Fishers Run
Victor, NY 14564 USA
Telephone: 1-844-846-8744
E-mail: info@safegait.com
Website: www.safegait.com
SG360-IFU-004 Rev. B
© Gorbel, Inc. All rights reserved.
SafeGait 360° Balance and Mobility Trainer and Gorbel are registered trademarks of Gorbel Inc.
VELCRO is a registered trademark of Velcro Industries B.V.
SafeGait 360° Balance and Mobility Trainer | Instructions for Use | SG360-IFU-004 Rev B
 Loading...