

Page 1

Wi-Fi Remote
USER MANUAL + WARRANTY INFO
Page 2
FIRMWARE UPDATE S
GoPro releases important updates for the Wi-Fi
Remote through firmware updates.
Visit gopro.com/firmware to download the latest
updates.
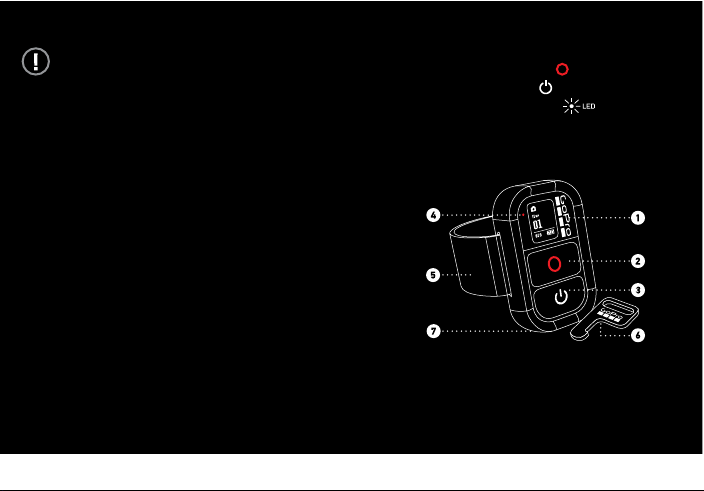
WI!FI REMOTE FEATURES
1. Remote LCD Display
2. SHUTTER/SELECT Button >
3. POWER/MODE Button >
4. Remote LED Recording Light
5. Mini-USB port (cable included)
6. Removeable Wrist Strap
7. Removeable Attachment Key
NOTE: The Wi-Fi Remote works by connecting to a Wi-Fi BacPac
properly assembled to a HD HERO or later camera. For simplicity,
however, this User Manual will refer to the Wi-Fi Remote connecting to
one or more cameras.
2 3
1 WiFi Remote UM ENG.indd 2-3 12/15/11 7:17 PM
Page 3
SETTING UP YOUR WI!FI REMOTE
PAIR ING WI TH YOU R CAME RA
Follow these steps the first time you use your Wi-Fi
Remote with a HD HERO or later camera. It is recommend
that you charge your Wi-Fi Remote for two hours before
first use. ! See BATTERY LEVEL AND CHARGING.
[DEFINE USAGE RULES AROUND WORDS “PAIRING” AND
“CONNECTING” HERE AND IN WI-FI BACPAC MANUAL]
1. Power on the Wi-Fi Remote by pressing .
2. The Remote LCD Display will show the connection
animation. Press to tell the Wi-Fi Remote to begin
pairing with a camera. You can press again to cancel
pairing.
3. Put the camera’s Wi-Fi BacPac into connection mode.
! See the Wi-Fi BacPac User Manual for details.
4. The Wi-Fi Remote will automatically connect to the
camera and display the default status screen.
5. The connection needs to occur within two minutes
or the Wi-Fi Remote will return to the default status
screen. Press again to restart pairing.
A"er this first connection is made, the Wi-Fi Remote will
automatically connect to the camera(s) with which it last
connected, assuming they are within range. To connect
to a camera manually, ! see PAIRING ADDITIONAL
CAMERAS. [double check wording here]
PAIR ING AD DITIO NAL CA MERAS
The Wi-Fi Remote remains in connection mode (! see
PAIR ING YOU R CAM ERA) for two minutes, giving you
time to set up and connect multiple cameras. A single Wi-Fi
Remote can control up to 50 HD HERO or later cameras.
To connect to additional cameras when the Wi-Fi Remote is
no longer in connection mode:
1. Press to scroll through the Wi-Fi Remote modes to
CONNECTION [comfirm screen graphic].
2. Press to begin searching for cameras within range
for two minutes. The Remote LCD Display will show the
connection animation. If no connection is made during
the two minute window, you will need to reactivate
connection mode by pressing .
3. Put each additional camera’s Wi-Fi BacPac into
connection mode. ! See the Wi-Fi BacPac User Manual
for details.
4. The Wi-Fi Remote will automatically connect to the
new camera(s) and display the default status screen
showing the number of cameras currently connected.
[confirm screen image]
PROTIP: Your cameras do not have to be in the same
Camera Mode. Experiment with using a mix of Video and
Photo modes like Time Lapse or Burst.
! See CHANGING CAMERA MODES below for details on
changing camera modes using the Wi-Fi Remote.
4 5
1 WiFi Remote UM ENG.indd 4-5 12/15/11 7:17 PM
Page 4

USING YOUR WI!FI REMOTE
POWERING ON/OFF
When the Wi-Fi Remote is OFF or in power-saving mode,
press to power ON.
Powering OFF the Wi-Fi Remote will also power OFF
the connected cameras. The Wi-Fi BacPacs will remain
powered ON so that you can quickly reconnect the Wi-Fi
Remote when you power ON again.
1. With the remote ON or in power-saving mode, press
and hold for three seconds.
2. All connected cameras will power OFF. Their Wi-Fi
BacPacs will remain powered ON.
3. The Wi-Fi Remote will then power OFF as well.
BATTERY LEVEL AND CHARGING
It is recommended that you charge your Wi-Fi Remote
for two hours before first use. You can check the Wi-Fi
Remote’s battery level on the BATTERY STATUS screen.
! See SELECTING REMOTE MODES below for
instructions.
To charge the Wi-Fi Remote, connect it to a computer or
USB power supply with the included USB cable.
REMOTE LED RECORDING LIGHT
When connected to a single HD HERO2 or later camera, the
Remote LED Recording Light will flash the same patterns
as the camera.
Remote
State
Comments/Questions
Starting Up
x 3
Make duration same as HD1, HD2
Capturing Continuous, 1 flash/sec while capture
is occuring, as on the HD2. If multiple
cameras are controlled by the remote,
the LED continues to flash as long as
at least one camera is capturing. If
cameras are capturing in multimode,
the LED flash is based on the the most
continuous mode in operation; for
example, if one camera is shooting
video, the flash reflects the video
capture. The order of modes from
most continuous to least continuous
is: video, time lapse, burst, still.
Capturing
Stopped
x 3
Same as HD1, HD2.
Error Occurs
x 5
Fast flas hing (as o n HD2). An error
can occur during capturing, this LED
pattern will disrupt the capture pattern.
Shutting
Down
x 6
Make duration same as HD1, HD2
When the Wi-Fi Remote is connected to more than one
camera, the Remote LED Recording Light will remain lit as
long as at least one camera is capturing video or photos.
6 7
1 WiFi Remote UM ENG.indd 6-7 12/15/11 7:17 PM
Page 5

CONTROLLING YOUR CAMERA DIRECTLY
When the Wi-Fi Remote is connected to a single HD HERO2
or later camera, the remote mirrors the controls on the
camera:
pÐÐ2FCÐ0CKMRCÐ*!"Ð"GQNJ?WÐQFMUQÐRFCÐQ?KCÐGLDMPK?RGMLÐ
as the camera’s LCD Display
pÐÐ2FCÐ5G$GÐ0CKMRC¦QÐ and buttons work the same
as those on the camera
! See your camera’s User Manual for instructions.
ACCESSING REMOTE SETTINGS WHEN CONNECTED TO
ONE HD HERO2 OR LATER CAMERA
When the Wi-Fi Remote is connected to a single camera,
a REMOTE SETTINGS menu [screen icon?] is available.
Scroll through camera modes using and select REMOTE
SETTINGS [screen graphic?] using .
Within the REMOTE SETTINGS menus, pres s to scroll
through the settings screens in the following order:
Battery Level Displays the Wi-Fi Remote battery’s
remain ing ch arge.
Connection
Press
to tell the Wi-Fi Remote
to beginning pairing with additional
cameras.
Firmware
Update
Note: Only available when connected to
a computer via USB. See FIRMWARE
UPATES above for details. Need to
review with intern al tea m agai n
Exit Exit REMOTE SETTINGS. The Wi-Fi
Remote will return to mirroring the
camera’s LCD Display.
8 9
1 WiFi Remote UM ENG.indd 8-9 12/15/11 7:17 PM
Page 6

USING YOUR WI!FI REMOTE WITH
MULT IPLE CAMERAS
USING REMOTE MODES WITH A HD HERO OR WITH
MULTIPLE CAMERAS
When the Wi-Fi Remote is connected to a single HD HERO
camera or to multiple cameras, it does not mirror the
controls of a single camera. Instead, use Remote Modes to
control the Wi-Fi Remote and connected camera(s).
Press to advance through the Wi-Fi Remote’s modes in
the following order:
Default
Status
Displays the number of
cameras currently connected
and the MULTI mode icon.
[fact check]
Remote
Camera
Mode
Change the Camera Modes
of connected cameras. See
CHANGING CAMERA
MODES below. This screen will
not appear if no cameras are
connected.
Battery
Level
Displays the Wi-Fi Remote
battery’s remaining charge.
Connection Manually start polling for new
connections. See MANUALLY
CONNECTING ADDITIONAL
CAMERAS below.
Firmware
Update
Update the Wi-Fi Remote
firmware. See FIRMWARE
UPDATES above.
CHANGING CAMERA MODES
When the Wi-Fi Remote is connected to a single HD HERO
or to multiple cameras, use REMOTE CAMERA MODE to
change the camera mode of each connected camera:
1. Press on the Wi-Fi Remote to cycle through mode
screens until REMOTE MODE screen appears.
2. Press to select REMOTE MODE.
3. Press to cycle through camera modes.
4. Press to select the mode.
5. All cameras will now be set to the selected photo or
video mode.
10 11
1 WiFi Remote UM ENG.indd 10-11 12/15/11 7:17 PM
Page 7

USING MULTI MODE
The Wi-Fi Remote remembers each camera’s Camera Mode
when it connects to the remote. MULTI MODE is a quick way
to return each camera to its “startup” mode a"er you have
changed camera modes using the REMOTE MODE menu.
To activate MULTI MODE, follow the directions in
CHANGING CAMERA MODES and select MULTI from the
menu.
MANUALLY CONNECTING ADDITIONAL CAMERAS
You ca n con nec t to ad dit io nal ca me ras a"er the two-minute
connection period ends by manually starting the connection
process.
1. Press to scroll through the Wi-Fi Remote modes to
Connection [screen graphic?].
2. Press to begin searching for cameras
within range. The Remote LCD Display will
show the connection animation.
3. Put each additional camera’s Wi-Fi BacPac into
connection mode. See the Wi-Fi BacPac User Manual
for details.
4. The Wi-Fi Remote will automatically connect to the
new camera(s) and display the default status screen.
"BLANK PAGE#
12 13
1 WiFi Remote UM ENG.indd 13 12/15/11 7:17 PM
Page 8

TROUBLESHOOTING
Visit gopro.com/support for troubleshooting information.
WARRANTY / DISCLAIMERS
This product is guaranteed against manufacturing
defects for one (1) year from the original date of purchase.
GoPro’s sole obligation in the event of such defects during
this period is to repair or replace the defective part or
product with a comparable part or product at GoPro’s sole
discretion. Except for such replacement, the sale, or other
handling of this product is without warranty, condition
or other liability even though the defect or loss is caused
by negligence or other fault. Damage resulting from use,
accident, or normal wear and tear is not covered by this or
any warranty. GoPro assumes no liability for any accident,
injury, death, loss, or other claim related to or resulting
from the use of this product. In no event shall GoPro be
liable for incidental or consequential damages relating to
or resulting from the use of this product or any of its parts.
Because of possible user resealing error, this product is not
warranted against waterhousing leakage or any resulting
damage. Visit gopro.com for more information.
14 15
1 WiFi Remote UM ENG.indd 14-15 12/15/11 7:17 PM
Page 9

Learn about more GoPro products
at: gopro.com
130 -0 04 30- 00 0 REVA
Please Recycle
Page 10

Federal Communication Commission Interference Statement
This equipment has been tested and found to comply with the limits for a Class B dig ital device, pursuant to Part 15 of the
FCC Rules. These limits are designed to provide reasonable protection against harmful interference in a residential
installation. This equipment generates, uses and can radiate radio frequency ener gy and, if not installed and used in
accordance with the instructions, may cause harmful interference to radio communications. However, there is no
guarantee that interference will not occur in a particular installation. If this equipment does cause harmful interference to
radio or television reception, which can be determined by turning the equipment off and on, the user is encouraged to try to
correct the interference by one or more of the following measures:
Reorient or relocate the receiving antenna.
Increase the separation between the equipment and receiver.
Connect the equipment into an outlet on a circuit different from that to which the receiver is connected.
Consult the dealer or an experienced radio/TV technician for help.
This device complies with Part 15 of the FCC Rules. Operation is subject to the following two conditions: (1) This device
may not cause harmful interference, and (2) this device must accept any interference rec eived, including interference t hat
may cause undesired operation.
Any changes or modifications not expressly approved by the party responsible for compliance could void the user's
authority to operate this equipment.
For product available in the USA/Canada market, only cha nnel 1~11 can be operated. Selecti on of other channels is not
possible.
This EUT is compliance with SAR for general population/uncontrolled exposure limits in ANSI/IEEE C95.1-1999 and had
been tested in accordance with the measurement methods and procedures specified in OET Bulletin 65 Supplement C.
This device complies with Industry Canada licence-exempt RSS standard(s). Operation is subject to the following two
conditions: (1) this device may not cause interference, and (2) this device must accept any interferenc e, including
interference that may cause undesired operation of the device.
This EUT is compliance with SAR for general population/uncontrolled exposure limits in ANSI/IEEE C95.1-1999 and had
been tested in accordance with the measurement methods and procedures specified in OET Bulletin 65 Supplement C.
This equipment should be installed and operated with minimum distance 1cm between the radiator & your body.
For body worn operation, this WIFI Remote has been tested and meets FCC RF exposure guidelines when used with an
accessory that contains no metal and that positions the handset a minimum of 1cm from the body. Use of other accessories
may not ensure compliance with FCC RF exposure guidelines.
 Loading...