

Page 1

USER MANUAL
Page 2

/ Join the GoPro Movement
twitter.com/GoPro
youtube.com/GoProfacebook.com/GoPro
instagram.com/GoPro
To download this user ma nual in a different la nguage, visit
gopro.com/support.
Pour télécharger ce manuel de l’utilis ateur dans u ne autre langue,
rend ez-vous sur gopro.com/support.
Wenn Sie d ieses Benutzer handbuch in ein er anderen Spra che
herunterladen möchten, besuchen Sie gopro.com/support.
Per sc aricare questo m anuale utente in un’altr a lingua, vi sita
gopro.com/support.
Para d escargar este ma nual de usua rio en otro idioma, visite
gopro.com/support.
Para b aixar este ma nual do usuá rio em outro id ioma, aces se
gopro.com/support.
このユーザーマニュアルの他言 語版をダウンロードするに
は、 gopro.com/supportにアクセスしてください。
若要下載其他語言版本的使用說明書,請前往:
gopro.com/support。
如需下载本用户手册的其他语言版本,请访问
gopro.com/support。
Page 3

/ Table of Contents
/ Table of Contents
The Ba sics
Getting Started
Camera Displays
Camera Icons
Camera Menus
Camera Modes
Navigating Settings Menus
Video Mode
Photo Mode
Multi-Shot Mode
Playback Mode
Setup Mode
Conn ecting to the GoPro App
Transferring Files to a Computer
™
Protune
Battery
Important Messages
The Frame
4 5
6
8
14
18
20
22
23
25
36
43
52
56
64
65
66
72
77
79
Using the Mounts
Frequently Asked Questions
Customer Support
Trademarks
Regulatory Information
82
86
88
88
88
Page 4
/ The Basic s
/ The Basic s
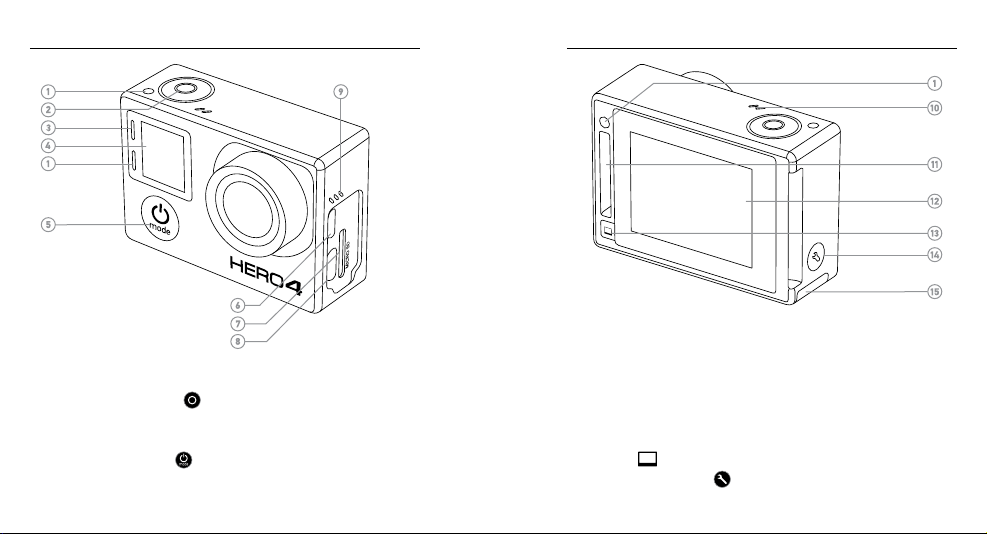
1. Camera Status Light (red)
2. Shutter/Select Button [ ]
3. Wireless Status Light (blue)
4. Camera Status Screen
5. Power/Mode But ton [ ]
6. Micro HDMI Por t
(cable not included)
6 7
7. microSD Card Slot
(microSD card not included)
8. Mini-USB Port
(supp orts composite A /C
cable/ 3.5mm stereo mic
adapter, not included)
9. Audio Alert
10. Microphone
11. HERO Port
12. Touch Display
13. Touch Disp lay Sleep/Wake
Butto n [
14. Settings/Tag Button [ ]
15. Battery Door
]
Page 5
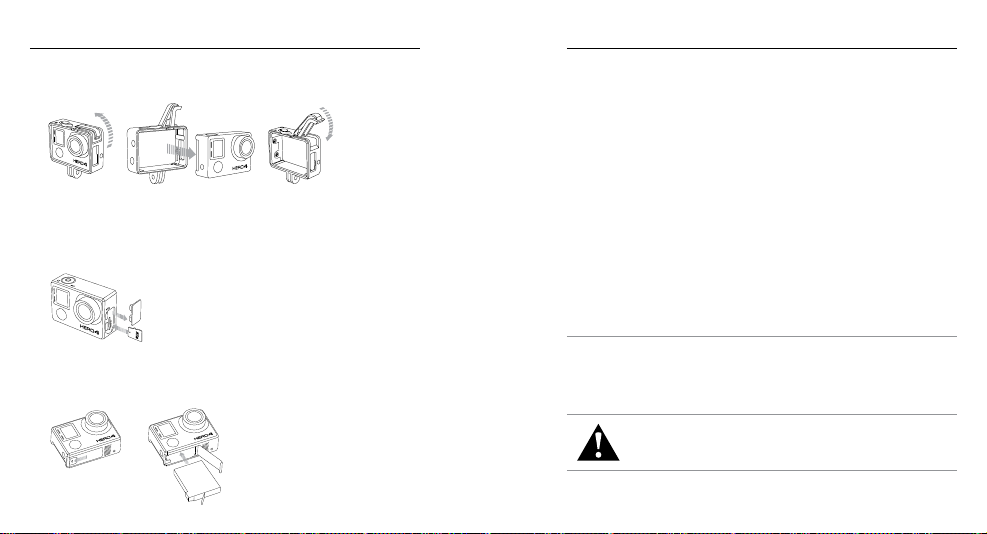
The Frame 2.0 remove camera
The Frame 2.0 PROTIP
The Frame 2.0 insert camera
The Frame 2.0 with a BacPac
Removable instrument mount setting
Quick Release Buckle + Thumb Screw + The Frame = Complete Unit
/ Getting Started/ Getting Started
CHARGING THE BATTERY
1. Remove the cam era from The Frame.
4. Charge the b attery by conne cting the c amera to a com puter or
other USB charging a dapter usin g the includ ed USB cable. The
came ra status light tur ns on durin g charging a nd turns off when
charging is complete.
NOTICE: Using a wall charger other than a GoPro Wa ll Charger c an
damage the GoPro batter y. Only use charger s marked: output 5 V
2. Remove the ca mera side door and i nsert a mic roSD card (so ld
separately). The card must have a C lass 10 or UHS-1 rating and
a capa city up to 64 GB. Visit gopro.com/support for the li st of
recommended SD cards.
1A. If you do n ot know the voltage a nd current o f your charge r, use
the in cluded USB c able to charge the camer a from your com puter.
When c harging with a comp uter, be sure that t he computer i s
connecte d to a power sour ce. If the camera status li ght does not
turn o n, use a different USB po rt.
The in cluded lit hium-ion batter y comes par tially charged. No damage
occurs to the came ra or batter y if used pri or to a full charge.
PRO TIP: With the Dual Battery Charger, you can charge your b attery
3. Open the bottom door, insert the battery and then close the
bo tto m do or.
8 9
outside of the cam era. For details , visit gopro.com.
For more batte ry information, see Battery.
WARNING: Us e cautio n when usin g your GoPr o as part o f your
active l ifest yle. Alway s be aware of yo ur surro undings t o avoid
injury t o yoursel f and other s. Abid e by all loca l laws when u sing
your GoPr o and relat ed mounts a nd access ories.
Page 6
/ Getting Started
CAMERA SOFTWARE UPDATES
To get the latest features and be st perfor mance from your HERO4
came ra, make sure you are using th e most curre nt camera so ware.
You can update your cam era soware via th e GoPro App or GoPro
sow are. For more information , visit gopro.com/getstarted.
CAMER A DEFAULT SET TINGS
The HER O4 Silver ca mera power s up with the followi ng default s ettings:
Video 1080p30 SuperView
Photo 12MP, Wide Field of View (FOV)
Multi-Shot Burs t option (set to 3 0 photos in 1 sec ond)
QuikCapture Off
Wireless Off
PRO TIP: To open th e settings m enu for the current mode, s wipe up
on the touch display or pre ss the Settings/Tag button [
10 11
™
].
POWERING ON + OFF
To Power On:
Press the Power/Mode button [ ] once. T he camera status light s
(red) fl ash three ti mes and the sound indic ator emits three beeps. When
the ca mera statu s screen display s informati on, your cam era is on.
To Power Off:
Press and ho ld the Power/Mode button [ ] for two seconds. The
came ra status lights (r ed) flash several times a nd the sound indicator
emits seven beeps.
PRO TIP: When the camer a is off and QuikC apture is en abled, you c an
turn t he camera on and immediately begin captur ing video or T ime
Laps e photos just by press ing the Shutter/Select but ton [
once for video, press and h old for Time Lapse photos. Press again t o
stop re cording and power off the c amera. For d etails, see QuikCapture
in Setup Mod e.
/ Getting Started
]. Press
Page 7
/ Getting Started / Getting Started
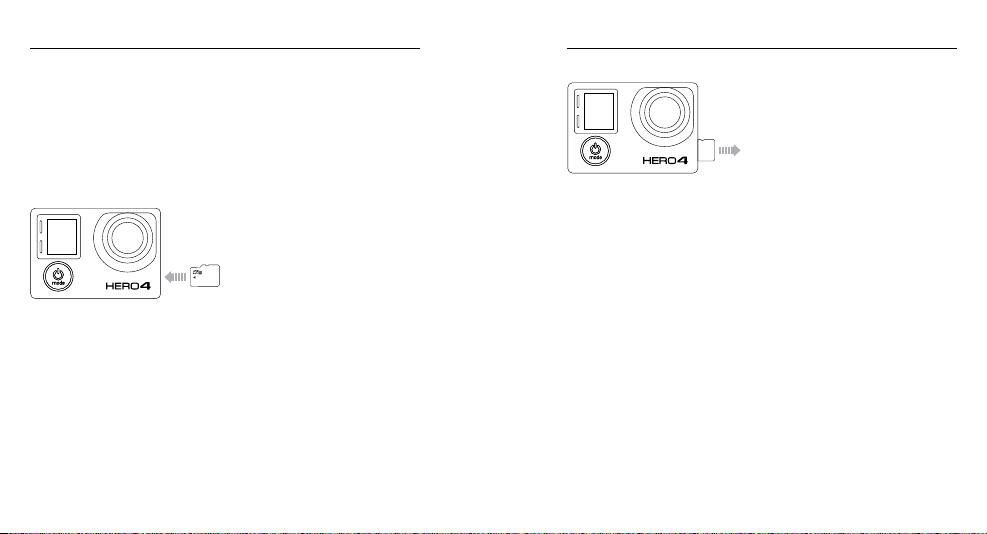
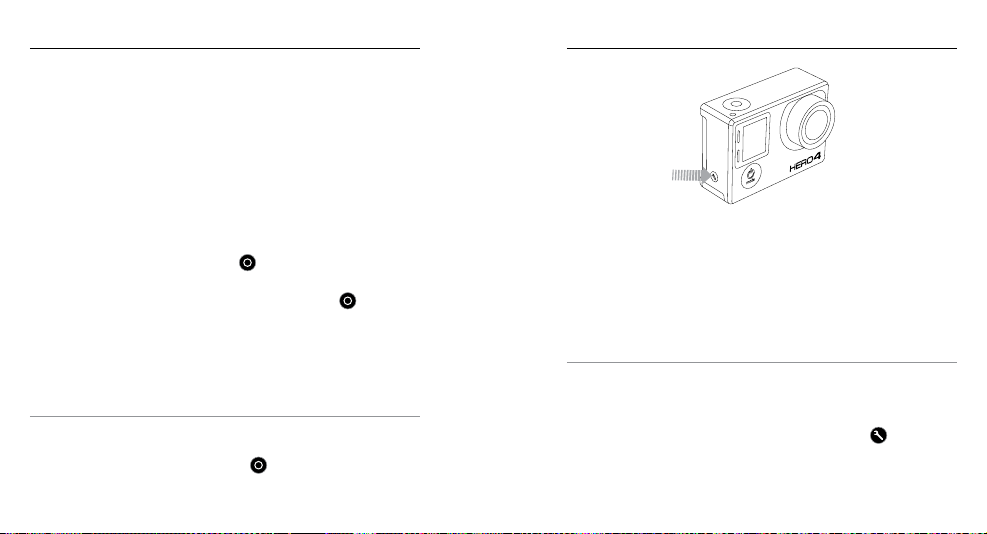
INSERTING + REMOVING MICROSD CARDS
The HER O4 Silver camera is c ompatible w ith 4GB, 8GB, 16GB, 32GB
and 64GB capacity microSD, microSDHC and microSDXC memory
card s (sold separately). You must us e a microSD ca rd with a Class
10 or a UHS-1 ratin g. (For a list of t he recomme nded SD car ds,
visit gopro.com/support.) GoP ro recommends using brand na me
memor y cards fo r maximum rel iability i n high-vibr ation act ivities.
To Insert th e microSD Card:
Slide the memor y card into the
card slot with the la bel facing
the front of the camera.
When fully inserted, the card
clicks into place.
12 13
NOTICE: Use care when ha ndling mem ory card s. Avoid liquid s, dust
and de bris. As a precaution , power off the ca mera before inser ting
or removing the car d. Check ma nufactu rer guideli nes regarding use
in acceptable temperature ranges.
To Remove the microSD C ard:
Place your fingernail ag ainst
the ed ge of the memory card
and lightly press it f urther into
the camera.
The card spr ings out far enoug h
to be rem oved.
Page 8
/ Camera Displays
/ Camera Displays
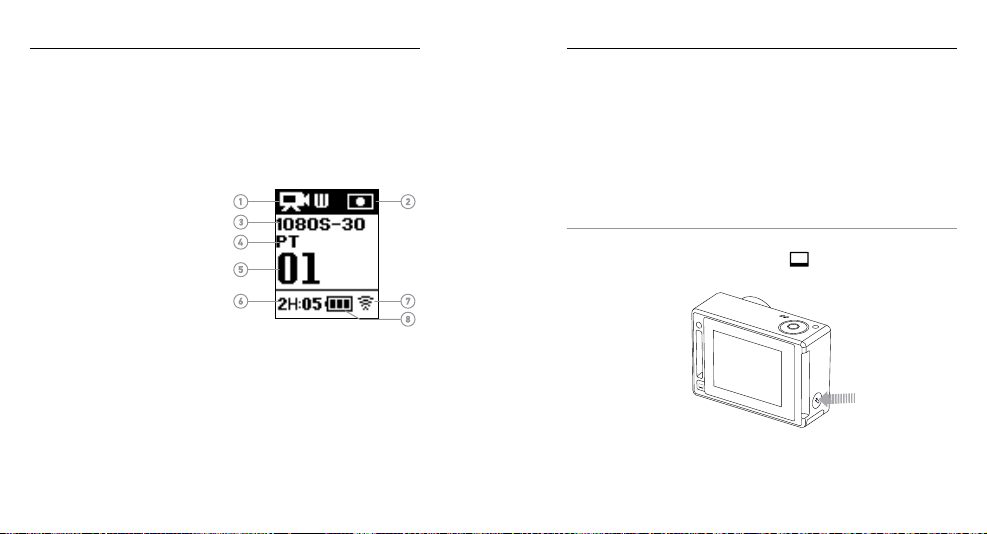
Your HERO4 Silver features a status screen on the front of the c amera
and a la rger touch d isplay on th e back
.
CAMERA STATUS SCREEN
The camera statu s screen on the front of the c amera displays the
following in formation a bout modes and settings:
1. Camera Modes/FOV
(field of view)
2. Camera Settings
3. Resolution/fps
(frames per s econd)
™
4. Protune
5. Number of Files Captured
TOUCH DISPLAY
The integra ted touch display on the back of the cam era lets you control
your ca mera and its settings, and preview and play back videos and
photos. You can also use it as a viewfinder so you ca n see what your
came ra sees for ea sy shot-framing.
Turning the Touch Display On /Off
The touch display automatically turns on/off when you power the
ca me ra o n/off.
PRO TIP: To conse rve battery power while your c amera is on, press
the Touch Display Sleep/Wake button [
] to dim your screen wh en
it is not in use.
6. Time/Storage/Files
7. Wireless
8. Battery Life
Note: The ico ns that appear o n the camera stat us screen var y by mode.
14 15
Page 9
/ Camera Displays
Swipe up/down
Swipe left
Press for 3 sec
Slide down and hold
Swipe down
Swipe up/down
Swipe up from
bottom edge
Swipe left
Press for 3 sec
Slide down and hold
Swipe down
Swipe up/downSwipe from top/bottomSwipe from left edge
Swipe up/downSwipe from top/bottomSwipe from left edge
Swipe up/down
Swipe down
Swipe left/right Double tap Tap Press + hold
Swipe up/downSwipe from top/bottomSwipe from left edge
Swipe up/downSwipe from top/bottomSwipe from left edge
Swipe up/down
Press for 3 sec
Slide down and hold
Swipe down
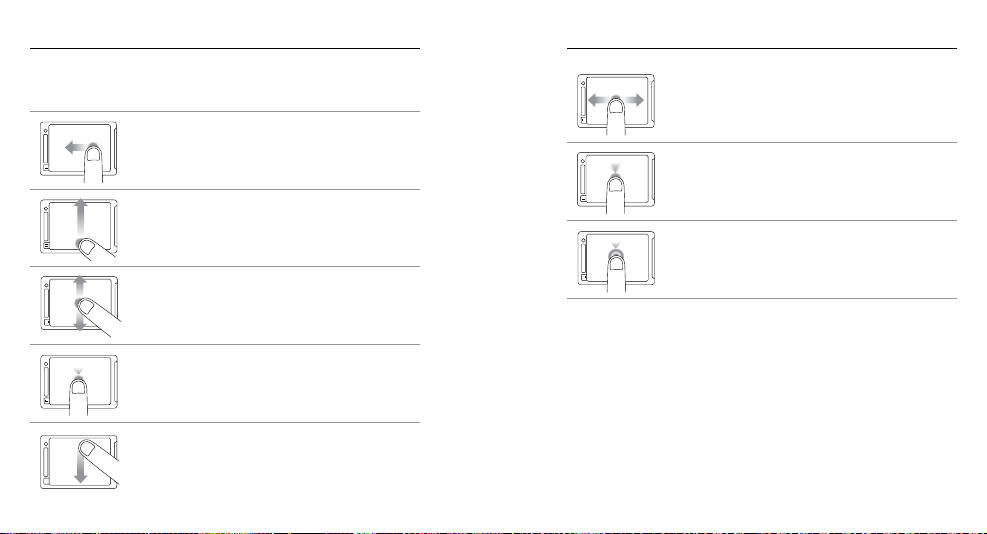
Gestures
Use these ges tures to navi gate the touc h display:
Swipe Le
Displ ay camera modes .
Swipe Up from Bottom Ed ge
Open the settings menu for the current mode.
Swipe Up/Down
Move through s ettings lists.
Tap
Select an item, turn a set ting on/off.
/ Camera Displays
Swipe Le/Right
Displ ay galler y images (Playback mode).
Double Tap
Chan ge FOV in preview mode.
Press for Two Seconds
Lock the touc h display. (Lock setting must be on.)
Swipe Down from Top Edge
Close the settings menu.
16 17
Page 10

/ Camera Icons / Camera Icons
Auto Low L ight
Auto Off
Beeps
Burst Photos
Color
Continuous Photos
Date/Time
Default Mod e
Delete
Exposure Value
Compensation
Field of View
Frame s Per Second
Interval
ISO Limit
18 19
LEDs
Looping
Megapixels
Multi-Shot Mode
Night Lapse
Night Photo
On-Screen Display
Orientation
Photo Mode
Playback Mode
Protune
QuikCapture
Rate
Setup Mode
Sharpness
Shutter
Single Photo
Spot Meter
Time Lapse
Touch Display
Video
Vide o + Photo
Video Format
Video Mode
Video Resolution
White Balance
Wireless
Page 11
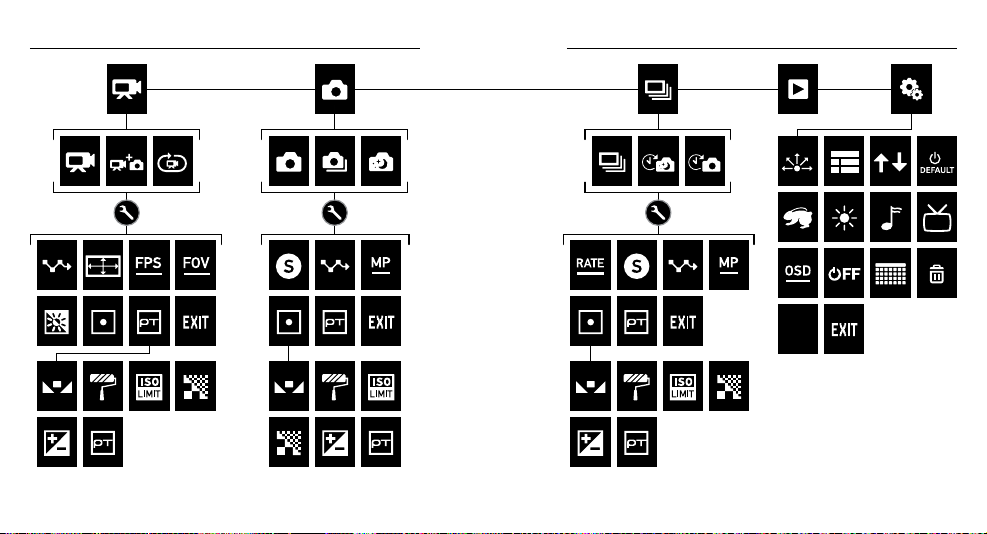
/ Camera Menus / Camera Menus
Camera
Reset
20 21
Page 12
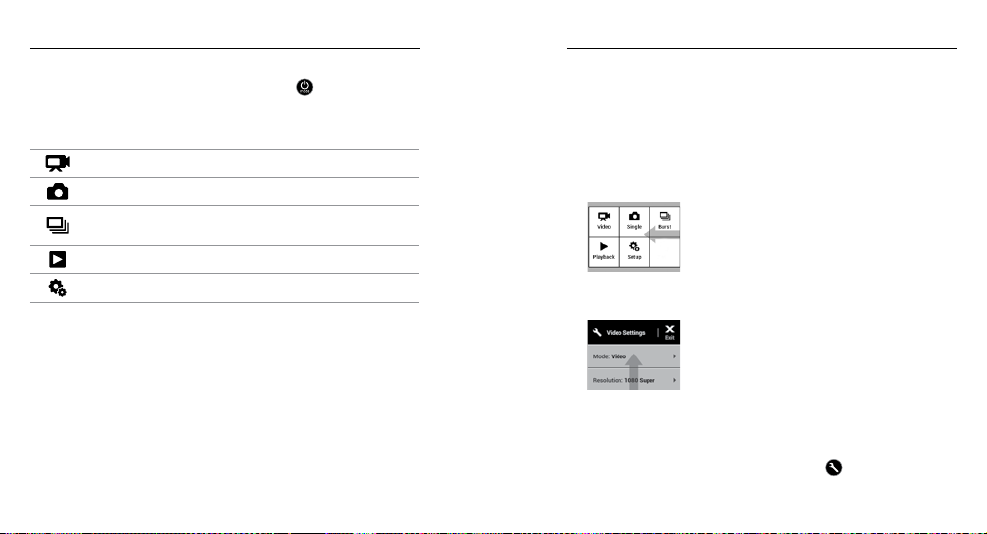
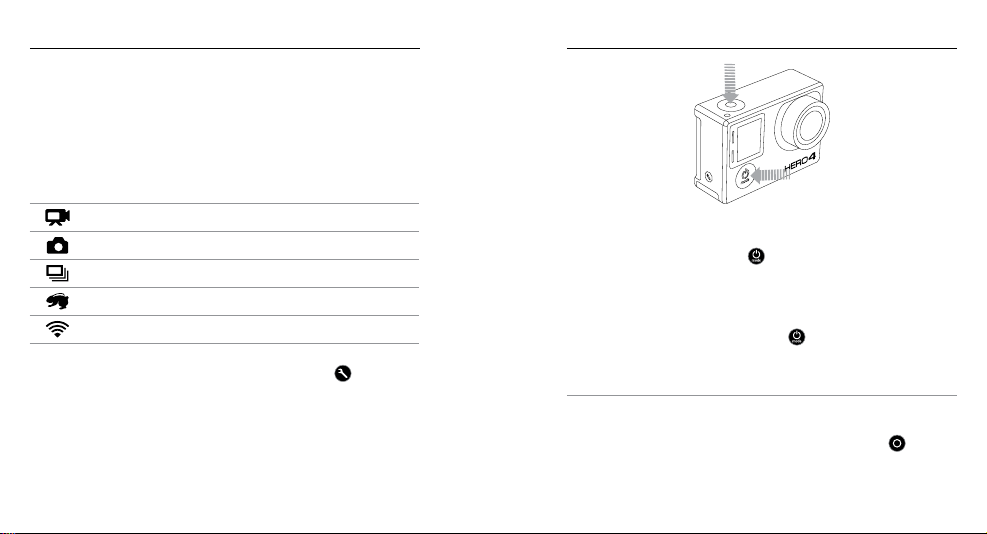
/ Camera Modes
/ Navigating Settings Menus
The HER O4 Silver feat ures severa l camera modes. Swipe le on the
touch displ ay, or press the
cycle through the modes
These modes appear:
Video Record video
Photo Capture a single ph oto
Multi-Shot
Playback Play b ack videos and ph otos
Setup Adjust general camera settings
22 23
Power/Mode button [
.
Capt ure a series of p hotos
(Ti me Lapse, Burst, et c.)
] repeatedly to
Each camera mod e has its own settings menu. Wit h your HERO4
Silver, you c an navigate t he setting s menus using the tou ch display or
the buttons on the camera.
TO NAVIGATE WITH THE TOUCH DI SPL AY:
1. Verif y that the cam era is in the desired came ra mode. If an icon
for that mode d oes not appear in the upper le cor ner of the touch
displ ay, swipe le and the n tap the mod e.
2. From the bottom of the s creen, sw ipe up to open the settings
menu fo r that mode.
3. Swipe up or down to scroll th rough the settings for that mode.
4. Ta p and swipe, as nee ded, to sele ct a new option for th e setting.
5. To exit the s ettings me nu, swipe down from the to p of the screen,
tap Exit, or p ress the Settings/Tag button [
].
Page 13
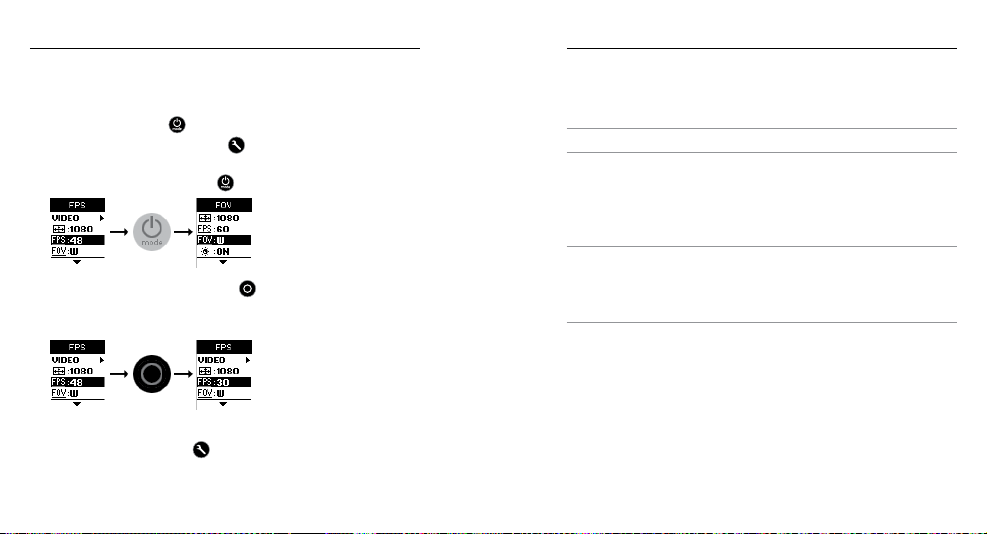
/ Navigating Settings Menus / Video Mode
TO NAVIGATE WITH THE CA MER A BUTTONS:
1. Verif y that the cam era is in the desired came ra mode. If an icon for
that mo de does not appear o n the camer a status scr een, press t he
Power/Mode button [ ] repea tedly until it appears.
2. Press the Settings/Tag button [ ] to open the settings menu for
that mode.
3. Use the Power/Mode button [
] to cyc le through the settings .
4. Press the Shutter/Select button [
] to cyc le through the options
withi n a setting. To select a n option, leave the option hi ghlighted
when you move to a nother screen.
Video mode contains three ca pture modes: Vide o, Video + Photo and
Video Looping.
Capture Mode Description
Video (default) Captures video.
Simultaneously c aptures both vide o and
photos. You can set the camera to capture a
Vide o + Photo
photo at selec ted intervals w hile you record
video. For details, see Video + Photo Intervals
in this section.
Lets yo u continuou sly record and save only
Looping
the be st moments , which hel ps to conser ve
space on your microSD card. Loo ping is
available o nly if Protune
™
is turned off.
PRO TIP: Easily create epic GoP ro-style v ideos usin g free
GoPro soware. Lea rn more and d ownload th is soware a t
gopro.com/getstarted.
5. To g o back to the pr evious screen or ex it the settings menu, pre ss
the Settings/Tag button [
24 25
].
Page 14
/ Video Mode / Video Mode
CAPTURING VIDEO
1. Swipe le to display the cam era modes, and th en tap the upper le
icon ( Video mode).
2. If necessa ry, select a differ ent video ca pture mode ( Video, Video +
Photo, or Video Loop ing):
a. Swipe up to ope n the settin gs menu.
b. Ta p Mode, and then ta p the desire d capture mode.
c. Swipe do wn to close the setti ngs menu. The icon for the
selected c apture mode appears in t he upper le on y our
camera displays.
3. Press the Shutter/Select button [
and th e camera st atus lights flash w hile the cam era is recor ding.
4. To s top captur ing, press t he Shutter/Select button [
came ra status lights fl ash three ti mes and the c amera beeps
three times.
If the memor y card is ful l or the battery is out of power, your camera
autom atically stops re cording. Your v ideo is save d before the camera
pow ers off.
PRO TIP: When the camer a is off and QuikC apture is en abled, you
can tu rn the came ra on and immediately beg in capturi ng video jus t
by pres sing the Shutter/Select bu tton [
recording a nd power off th e camera. Fo r details, see Setu p Mode.
26 27
]. The c amera beeps once
]. The
]. Pres s again to stop
HILIGHT TAGGING
You can mark spe cific moments in your video as th ey happen wi th
HiLight Tags. HiLight Tags make it easy to find th e best highl ights
to share.
You can ad d tags with yo ur camera, the GoP ro App, or the S mart
Remote (s old separa tely). Tags are visi ble during p layback i n the
GoPro A pp or GoPro so ware.
PRO TIP: In the app, tap the s creen during playba ck to displa y the
HiLight Tags on the p rogress bar.
To Add a HiLight Tag with Your Camera:
While recording video, p ress the Settings/Tag button [
].
Page 15

/ Video Mode / Video Mode
VIDEO SETTINGS
Thre e capture modes are avail able for Video mode: Video, Video
+ Photo, and Vi deo Looping. The c apture mode that yo u select
deter mines the Video settin gs that appe ar in the rest of the menu.
For ins tructio ns on how to cha nge the follo wing setti ngs, see
Navigating Settings Menus.
PRO TIP: To open th e settings m enu for the current mode, s wipe up
on the touch display or pre ss the Settings/Tag button [
].
INTERVAL
The Interv al setting a pplies to Video + Ph oto and Looping. Interval
deter mines the amount of time th at passes between eac h captured
frame.
Video + Photo Intervals
Looping Intervals
Availa ble intervals for Looping are 5, 20, 60 and 120 minutes. For
examp le, if you sele ct a 5-minut e interval , only the pr evious 5 minu tes
is save d when you sto p recordin g. If you recor d for 5 minutes and do
not press the Shutter/Select butt on [
] to stop recording a nd save,
the ca mera begin s a new 5-minu te interval by recordin g over your
previ ous 5 minutes of footage.
You can al so selec t max video a s the inter val. Wit h this option , the came ra
records unt il the memor y card is full, then over writes th e content.
Note: To use Loopin g, be sure that you r microSD card has s ufficient space.
PRO TIP: Multiple chapter files are w ritten to your memory card
so that small segments of content c an be overw ritten dur ing loop
recording . When viewing thi s content on a compute r, y ou see separ ate
files for each time seg ment. Use GoP ro soware to comb ine the files
into a longer vi deo.
Availa ble intervals for Vid eo + Photo range from 5-60 se conds. Th e
quality of the photo depe nds on the selected vid eo resolution and FOV.
28 29
Page 16

/ Video Mode / Video Mode
RESOLUTION, F PS AND FOV
The HER O4 Silver inc ludes the video re solutions l isted below.
Video
Resolution
4K 15/12.5 Ultra W ide 38 40x2 160, 16 :9
2.7K
144 0p
108 0p
1080p SuperView
960p
30 31
NTSC/
PAL
30/25
24/24
48/48
30/25
24/24
60/50
48/48
30/25
24/24
60/50
48/48
30/25
24/24
100/100
60/50
FOV Screen Resolution
Ultra W ide,
Medium
Ultra W ide 1920x1440, 4:3
Ultra W ide,
Medium,
Narrow
Ultra W ide 192 0x108 0, 16 :9
Ultra W ide 1280x960, 4:3
2704x1520, 16:9
192 0x1080 , 16:9
Video
Resolution
720p
720p SuperView
WVGA 240/240 Ultra W ide 848x480, 16:9
PRO TIP: To open th e settings m enu for the current mode, s wipe up
on the touch display or pre ss the Settings/Tag button [
NTSC/
PAL
120/120
60/50
30/25
100/100
60/50
FOV Screen Resolution
Ultra W ide,
Medium,
Narrow
Ultra W ide 1280x720, 16:9
1280x720, 16:9
].
Page 17

/ Video Mode / Video Mode
Video Resolution Best Use
Stunning high-resolution video with
4K
2.7K
144 0p
108 0p
1080p SuperView
32 33
professional low-light performance. 8MP
still s availab le from video. Recommended
for tri pod or fixed position shots .
16:9 resolut ion video downs cales to prov ide
stunning, cinem a-qualit y results fo r
professional productions.
Recom mended for b ody-mounted shots.
Larger viewing area and high frame rate yield
the smoothe st, most immersive results for
high-action capture.
1080p60 i s great for al l shots. Hig h resoluti on and
fram e rate yield s tunning re sults. Trip od or fixed
mounting for 1080p48, 1080p30 a nd 1080p24
is ideal for tel evision and film produc tions.
SuperView delivers th e world’s most
immersive field of view. Recommended for
body- or gear-mounted shots. More vertical
4:3 con tent is autom atically s tretc hed to
full-screen 16:9 for stu nning wide screen
play back on your c omputer or T V.
Video Resolution Best Use
Use for b ody-mounted shots and when
960p
720p
720p SuperView
WVGA
slow mot ion is desire d. Provide s large
viewing are a and smooth result s for high
action capture.
Good for hand held shots a nd when slow
motion is desi red.
SuperView delivers th e world’s most
immer sive field of view. Good for bod y-or
gear-mounted shots . More verti cal 4:3
content is automati cally stret ched to
full-screen 16:9 for stu nning wide screen
play back on your c omputer or T V.
Good when super slow motion is desired
and standard definition is acceptable.
Page 18

/ Video Mode / Video Mode
FOV Best Us e
Largest field of view, increased image
Ultra W ide
stab ility. Good fo r action shots wh ere
you want to capture as much a s possible
within the frame.
Medium
Mid-range field of view, moderate
image stability.
Smallest field of view, reduced image
Narrow
stab ility. Reduced distor tion. Good fo r
capturing content at a distance.
LOW LIGHT
Auto Low L ight allows you to shoot in low-light e nvironments or
when q uickly tra nsitioning in and o ut of low-light condition s. The
came ra automati cally adju sts fps to ac hieve the opt imal exposure
and be st results .
Auto Low L ight is not avai lable for 240 fps or 30 f ps and below. T he
options for this set ting are on (default ) and off.
SPOT METER
Spot Meter let s you film from a da rk space wh ile pointing t he camera
into a brighter setting, su ch as when recording the outdoors from
within a car. When Spot Meter is turned on, [
] appears on the
came ra display s. The optio ns for this set ting are off (default ) and on.
Note: Chang es that you make to th e Spot Meter set ting in Video mode a pply only to vide o capture.
To adjust this se tting for phot o capture, adjus t the setting i n Photo mode. To adjust this s etting for
multi-shot ca pture, adjust t he setting in Multi-Shot mode.
PROTUNE
For det ails abou t Protune set tings, see Protune.
Note: Chang es that you make to th e Protune setti ngs in Video mode a pply only to vide o capture.
To adjust this se tting for phot o capture, adjus t the setting i n Photo mode. To adjust this s etting for
multi-shot ca pture, adjust t he setting in Multi-Shot mode.
34 35
Page 19

/ Photo Mode
/ Photo Mode
Photo mode c ontains th ree capture modes: Single, Continuo us
and Nig ht.
Capture Mode Description
Single (default) Captur es a single phot o.
Continuous
Night
PRO TIP: For Night photo, be sure to use t he right Shutter settin g for
the sit uation. For d etails, se e Shutter in Photo Settin gs.
36 37
Capt ures a series of photos continuously
while h olding dow n the Shutter/Select
button [
Capt ures a single photo wit h a customizable
expos ure time up to 30 secon ds. For avail able
expos ure times and examples of wh en to use
them, see Shutter in Photo Settings.
].
CAPTURING A SINGLE OR NIGHT PHOTO
1. Swipe le to display the cam era modes, and th en tap the mid dle
icon in the upper row ( Photo mode).
2. If necessary, se lect a different ph oto capture m ode (Single o r Night):
a. Swipe up to ope n the settin gs menu.
b. Ta p Mode, and then ta p the desire d capture mode.
c. Swipe do wn to close the setti ngs menu. The icon for the
selected c apture mode appears in t he upper le on y our
camera displays.
3. Press the Shutter/Select button [
times , the camer a status lights fla sh and the counter on the
came ra status sc reen incre ases by one.
]. The c amera beeps two
Page 20

/ Photo Mode
/ Photo Mode
CAPTURING CONTINUOUS PHOTOS
1. Select Continuous mode:
a. Swipe le to display t he camera m odes, and t hen tap the
middle icon i n the top row (Photo mode).
b. Swipe up to ope n the settin gs menu.
c. Tap Mode, and then t ap Continu ous.
] to close the settings menu. The C ontinuous icon
d. Ta p [
] appears in t he upper le on y our camera d isplays.
[
2. Press and hold the Shutter/Select butto n [ ]. Th e camera
beeps and th e camera st atus lights flash r epeatedly.
3. To s top captur ing, releas e the Shutter/Select button [
counter on the camera sta tus screen i ncreases b y one for ever y
photo c aptured.
PRO TIP: While capturin g video, you c an manually take a ph oto at
any tim e by pressing the
Power/Mode button [ ] to capt ure a photo ever y 5 second s.
the
38 39
Power/Mode button [ ]. Pres s and hold
]. The
PHOTO SETTINGS
Thre e capture modes are avail able for Photo mode: Single,
Continuou s and Night. T he capture mode that you se lect deter mines
the Photo settin gs that appear in the rest of t he menu.
For ins tructio ns on how to cha nge the follo wing setti ngs, see
Navigating Settings Menus.
PRO TIP: To open th e settings m enu for the current mode, s wipe up
on the touch display or pre ss the Settings/Tag button [
].
Page 21

/ Photo Mode
/ Photo Mode
SHUTTER
Shut ter applies o nly to Night Photo and Night La pse and dete rmines
the am ount of time that the sh utter is ope n. The options for this
INTERVAL
Inter val applies only t o Continuous photo. Availa ble intervals are 3
(default), 5 or 10 photos ever y second .
setting are a uto (up to 2 seconds), 2, 5, 10, 15, 20 or 30 seconds. The
default set ting is auto.
Settings Examples
Auto Sunrise, sunset, dawn, dusk, twilight, night
2 sec, 5 s ec, 10 sec
Dawn , dusk, twi light, traffi c at night, Fer ris
wheel, fireworks, light painting
20 sec Night sk y (with light)
30 sec Night stars , Milky Way (com plete darkness)
40 41
MEGAPIXELS
The HER O4 Silver captures photos a t 12MP, 7MP or 5MP. Smaller
megapixel va lues take up le ss space on the micr oSD card.
Note: Chan ges that you mak e to the Megapixe ls setting in Ph oto mode apply only to ph oto capture.
To adjust this se tting for multi-s hot capture, ad just the setti ng in Multi-Shot mode.
Photo Resolution Field of View (FOV)
12MP Wide (default )
7MP Wide
7MP Medium
5MP Medium
Largest fiel d of view. Good for acti on shots
where you want to capture as much a s
possi ble within the fra me.
Mid-range field of view.
Page 22

/ Photo Mode
/ Multi-Shot Mode
SPOT METER
Spot Meter let s you capture p hotos from a dark spa ce while poin ting
the ca mera into a brighter s etting, such as when recording the
outdoors from within a car. When Spot Meter is turned on, [
]
appears on t he camera displays. T he options fo r this setting are off
(default) an d on.
Note: Chang es that you make to th e Spot Meter set ting in Photo mode ap ply only to photo ca pture.
To adjust this se tting for vid eo capture, adju st the settin g in Video mode. To adjust th is setting for
multi-shot ca pture, adjust t he setting in Multi-Shot mode.
PROTUNE
For det ails abou t Protune set tings, see Protune.
Note: Chang es that you make to th e Protune setti ngs in Photo mode ap ply only to photo ca pture.
To adjust this se tting for vid eo capture, adju st the settin g in Video mode. To adjust th is setting for
multi-shot ca pture, adjust t he setting in Multi-Shot mode.
Multi-Shot mo de contain s three capt ure modes: Burst, Time Lapse
and Nig ht Lapse.
Capture Mode Description
Capt ures up to 30 photos in 1 se cond.
Burst (default)
Perfect f or capturing the d efinitive moment
in fas t-action sp orts.
Capt ures a series of photos at specified
Time Lapse
inter vals. You ca n use Time Lapse to ca pture
photos of any activ ity, so you can c hoose the
best o nes later.
Capt ures a series of photos at specific
inter vals and exposure times. Use Night
Laps e in low light env ironment s, such as
Night Lapse
when c apturing t he night sky over a per iod
of time. For avai lable exposure times an d
examp les of when to us e them, see Shutter
in Multi-Shot Settings.
PRO TIP: For longer exposu re times during the day, use Night La pse.
42 43
Page 23

/ Multi-Shot Mode
/ Multi-Shot Mode
CAPTURING BURST PHOTOS
1. Select Bur st mode:
a. Swipe le to display t he camera m odes, and t hen tap the
upper right i con (Multi-Shot m ode).
b. Swipe up to ope n the settin gs menu.
c. Tap Mode, and then t ap Burst.
d. Swipe down to close t he setting s menu. The Burst icon [
appears in t he upper le on y our camera d isplays.
2. Press the Shutter/Select button [
flash a nd the came ra beeps multiple times.
See Rate in this sectio n for options available fo r Burst photos.
44 45
]. The c amera status lig hts
]
CAPTURING TIME LAPSE OR NIGHT L APSE PHOTOS
1. Select the d esired capture mo de (Time L apse or Night L apse):
a. Swipe le to display t he camera m odes, and t hen tap the
upper right i con (Multi-Shot m ode).
b. Swipe up to ope n the settin gs menu.
c. Tap Mode, and then t ap the desired capture mo de
(Ti me Lapse or Night Lapse).
d. Swipe down to close t he setting s menu. The icon for t he
selected c apture mode appears in t he upper le on y our
camera displays.
2. Press the Shutter/Select button [
countdown a nd the came ra status lights fl ash each time a photo
is captured.
3. To s top captur ing, press Shutter/Select butto n [
status lights fla sh three times and the cam era beeps three ti mes.
PRO TIP: When the camer a is off and QuikC apture is en abled, you
can tu rn the came ra on and immediately beg in capturi ng Time Laps e
photos just by p ressing an d holding the Shutter/Select but ton [
Press again to stop recording and powe r off the camer a. For details,
see Setup M ode.
]. The c amera initiates
]. The c amera
].
Page 24

/ Multi-Shot Mode
MULTI-SHOT SETTINGS
Thre e capture modes are avail able for Multi-Shot mode : Burst, Tim e
Laps e and Night Lapse. Th e capture mo de that you sel ect determines
the Multi-Shot set tings that a ppear in the rest of the menu.
For ins tructio n on how to chan ge the follow ing settings, se e
Navigating Settings Menus.
PRO TIP: To open th e settings m enu for the current mode, s wipe up
on the touch display or pre ss the Settings/Tag button [
46 47
].
Rate ap plies only to B urst. Pho tos can be ca ptured at the f ollowing r ates:
3 photos in 1 second
5 photos in 1 second
10 photos in 1 secon d
10 photos in 2 secon ds
10 photos in 3 secon ds
30 photos in 1 second (default)
30 photos in 2 seconds
30 photos in 3 seconds
PRO TIP: Sometimes 30 photos in 1 second is to o fast. Try a slower
Burst inter val to better match t he action .
/ Multi-Shot Mode
Page 25

/ Multi-Shot Mode / Multi-Shot Mode
SHUTTER
Shut ter applies o nly to Night Photo and Night La pse and dete rmines
the am ount of time that the sh utter is ope n. The options for this
setting are a uto (up to 2 seconds), 2, 5, 10, 15, 20 or 30 seconds. The
default set ting is auto.
Settings Examples
Auto Sunrise, sunset, dawn, dusk, twilight, night
2 sec, 5 s ec, 10 sec
20 sec Night sk y (with light)
30 sec Night stars , Milky Way (com plete darkness)
48 49
Dawn , dusk, twi light, traffi c at night, Fer ris
wheel, fireworks, light painting
INTERVAL
Inter val appl ies only to Tim e Lapse an d Night Laps e. Interval d etermin es
the am ount of time that passes betwee n each captured fr ame.
Time Lapse Intervals
Availa ble intervals for Time Laps e range from 0.5 seco nds (default) to
60 seconds.
Interval Examples
0.5-2 seconds Surfing, biking o r other spor t
2 seconds Busy s treet corner
5-10 seconds Sunset
10-60 seconds
Night Lapse Intervals
Availa ble intervals for Night Lapse rang e from 4 secon ds to 60
minutes. Co ntinuous (default) cau ses the Inter val to match t he Shutter
setting. For examp le, if Shutter i s set to 10 seconds and Int erval is set
to continuou s, your came ra capture s a photo every 10 seconds.
Lengthy activities, such as
construction projects
Page 26

/ Multi-Shot Mode
/ Multi-Shot Mode
MEGAPIXELS
The HER O4 Silver captures photos a t 12MP, 7MP or 5MP. Smaller
megapixel va lues take up le ss space on the micr oSD card.
Note: Chan ges that you mak e to the Megapixe ls setting in Multi-Shot mod e apply only to mult i-shot
capture. To adju st this settin g for photo captu re, adjust the se tting in Photo mod e.
Settings Description
12MP Wide (default )
7MP Wide
7MP Medium
5MP Medium
50 51
Largest fiel d of view. Good for acti on shots
where you want to capture as much a s
possi ble within the fra me.
Mid-range field of view.
SPOT METER
Spot Meter let s you capture p hotos from a dark spa ce while poin ting
the ca mera into a brighter setting, such as when recording the
outdoors from within a car. When Spot Meter is turned on, [
]
appears on t he camera status screen. Th e options for t his setting are
off (defa ult) and on.
Note: Chang es that you make to th e Spot Meter set ting in Multi-Shot mode apply on ly to multi-shot
capture. To adju st this settin g for video capt ure, adjust the s etting in Video mod e. To adjust this set ting
for photo ca pture, adjust th e setting in Photo mo de.
PROTUNE
For det ails abou t Protune set tings, see Protune.
Note: Chang es that you make to th e Protune setti ngs in Multi-Shot mode apply onl y to multi-shot
capture. To adju st this settin g for video capt ure, adjust the s etting in Video mod e. To adjust this set ting
for photo ca pture, adjust th e setting in Photo mo de.
Page 27

/ Playback Mode
/ Playback Mode
You can play bac k your content o n the camer a’s touch displ ay, your
computer, TV or s martpho ne/tablet (usi ng the GoPro A pp).
You can al so play bac k content by inserting the micr oSD card directly
into a device, such as a c omputer or co mpatible T V. With this meth od,
play back resol ution depends on t he resoluti on of the devi ce and its
ability to play ba ck that resol ution.
PLAYING BACK VIDEOS AND PHOTOS ON YOUR HERO4 SILVE R
With the HERO4 Silver touch d isplay, you ca n play back your vid eos
and ph otos directly on your cam era.
To Play Back Content Using the Touch Display:
1. Swipe le, and then t ap Playback.
2. Swipe to scro ll through the thumbnails.
Note: For photo s eries (Burst, Tim e Lapse, Night Lapse a nd Continuous p hotos), the thumbnai l
display s the first photo in th e series.
3. Ta p a video or photo to ope n it in full-sc reen view.
4. For video, ta p [ ].
5. To r eturn to the thumb nails screen, tap [ ].
6. To exit Playback mode, sw ipe down an d then tap [ ].
52 53
To Play Back Content When the Camera is in a Housing:
1. Power on the ca mera.
2. Press the
Power/Mode button [ ] to cyc le to Playback mode.
3. Press the Shutter/Select butto n [ ] to select Playback.
4. Press the
5. In thumbna il preview, use the
Power/Mode button [ ] to cyc le to the thumbnail
].
icon [
Power/Mode button [ ] to cyc le
through the thumbnails.
6. Press the Shutter/Select butto n [
] to view a t humbnail .
PLAYING BACK VIDEOS AND PHOTOS ON A COMP UTER
For bes t results playing back your content on a computer, visit
gopro.com/getstarted to download th e latest GoPro sow are. Be
sure your Mac
®
or Windows® computer meets these minimum
system requirements:
Windows Mac
Operating
System
CPU
Wind ows 7, 8.x OS X
®
Intel
Core 2 Duo™ (Intel
™
Quad Core
i7 or bet ter
recommended)
®
10.8 or later
®
Dual Core™ (Intel
Intel
Quad C ore i7 or better
recommended)
Page 28

/ Playback Mode
/ Playback Mode
Windows Mac
Graphics Card
Screen
Resolution
RAM 4GB 4GB
Hard Dr ive
To Play Back Content on Your Computer:
1. Download th e latest GoPr o soware from gopro.com/getstarted.
2. Connec t the camer a to your compu ter using the inclu ded USB cab le.
3. Copy the files to your co mputer or externa l hard drive.
4. Play back your content with GoPro sow are.
54 55
Card that supports
OpenGL1.2 or later
1280 x800 12 80 x76 8
5400 RPM inter nal
drive (7200 RPM dri ve
or SSD recommended)
If external , use USB 3.0
or e SATA
Card i ncluded with
Intel Du al Core Mac s
or better
5400 RPM inter nal
drive (7200 RPM dri ve
or SSD recommended)
If external , use
Thunderbolt, FireWire
or USB 3.0
PLAYING BACK VIDEOS AND PHOTOS ON YOUR TV
Play ing back videos a nd photos on your TV/HDTV requi res a micro
HDMI, com posite or combo cab le (all sold separately).
To Play Back Content on a TV:
1. Plug th e camera into a TV/HDTV w ith a micro HDMI c able,
composite ca ble or combo c able.
2. Select th e input on your T V that correspo nds to the por t into
whic h you plugged t he cable.
3. Power on the camera.
4. On your came ra’s touch disp lay, swipe le , and then ta p
Playback [
5. Swipe and ta p to navigate a nd select fil es.
Note: HDMI play back depen ds on the resolu tion of the devic e, and is certified u p to 1080p.
PLAYING BACK CONTENT ON A SMARTPHONE/TABLET
1. Connect your camera to t he GoPro App. For det ails, see
Connec ting to the GoPro App.
2. Use the controls on the ap p to play back your footage on your
smartphone/tablet.
].
Page 29

/ Setup Mode
/ Setup Mode
In Setup mode, you can chan ge settings that apply to a ll camera
modes. For in structions on how to ch ange the followin g settings ,
see Navigating Settings Menus.
WIRELESS
When Wireless is on, a Wireless st atus icon appears on the
camera status screen a nd touch display a nd the blue wireles s
lights blink intermittently.
Setting Description
Off (default)
GoPro A pp
WiFi Remote
PRO TIP: If you forgot your camera’s na me or password, yo u
can re set them. With the c amera powered on, press and hold the
Settings/Tag button [
Power/Mode button [ ]. Relea se the Settings/Tag button [ ].
From the Wi-Fi r eset menu, selec t Reset. The d efault password is
goprohero.
56 57
Camera con nects to t he GoPro App. For
instruc tions on con necting to this app, see
Connec ting to the GoPro App.
Camera con nects to t he remote (sol d
separately). For instru ctions on pairing, see
the user manual for the remote.
]. Two seco nds later, pres s and releas e the
TOUCH DISPLAY
Thes e settings let you manage the touc h display to conse rve battery
po wer.
Setting Description
Automatica lly dims the touch d isplay aer a
period of ina ctivity. T he options for this s etting
Sleep
Lock
are 1 min ute (default), 2 minutes, 3 minutes
and Never. To manually dim the scre en or
to wake it , press the Touch Display Sleep/
Wake but ton [
Lets yo u use gestures to loc k and unlock the
touch displ ay. The options for th is setting a re
off and on (defa ult). Turn this set ting on to
prevent accidental input on the touch display.
When t his setting is on, pr ess the touc h
displ ay for two se conds to loc k it. To unlock
the tou ch display, slide down an d hold.
].
Page 30

/ Setup Mode
/ Setup Mode
Setting Description
Deter mines the lev el of light on the touch
Brightness
Touch Display
On/O ff
58 59
displ ay. The options for this set ting are high
(default), medium a nd low.
Turns the touch displ ay on or off when the
came ra is powered o n. The optio ns for this
setting are o n (default) and off.
ORIENTATION
If you mount your came ra upside down, you might have to rotate the
files du ring editi ng. This set ting eliminates th e need to flip your video
or photos aer recording.
Setting Description
Up
Down
DEFAULT MODE
You can select t he capture mode th at appears w hen the camera
power s on. The opti ons are Video, Vid eo + Photo, Vid eo Looping,
Single, Continuous, Nig ht, Burst, T ime Lapse an d Night Lapse.
Camera is al ways assum ed to be
right-side up.
Camera is al ways assum ed to be
upside down.
Page 31

/ Setup Mode
/ Setup Mode
QUIKCAPTURE
With QuikCa pture, you ca n quickly tur n your camera on an d begin
capturing video or Time Laps e photos. The o ptions for th is setting a re
on and off (defa ult).
Note: QuikCa pture is disab led when the cam era is connec ted to the remote or th e GoPro App.
To Capture V ideo with QuikCapture:
With the cam era powered o ff, press and release t he Shutter/Select
button [
]. Your cam era automat ically powers on a nd begins
capturing video.
To Capture Time Lapse Photos with QuikCapture:
With the cam era powered o ff, press and ho ld the Shutter/Select
button [
]. Your cam era automat ically powers on a nd begins
capturing Time Lapse photos.
To Stop Recording:
Press and release the Shutter/Select button [
] to stop recording
and power off th e camera.
60 61
LEDS
This setting determines whi ch camera status light s (red) to activate.
The options for this setting are 4 (top, bot tom, front, b ack), 2 (front and
back ), or off (none). The default setting is 4 .
Note: The Wirel ess status ligh t (blue) is always a ctivated unle ss you selec t off for this settin g.
BEEPS
You can set t he volume for t he sound ind icators to be 100% (defa ult),
70% or off.
VIDEO FORMAT
The Vi deo Format s etting governs frame r ates for recording and
play back when v iewing vid eo on a TV/HDTV.
Setting Description
NTSC (default) Vie wing video in Nor th America
PAL
Viewing video on a PAL T V/HDTV (most
televisions outs ide of North America)
Page 32

/ Setup Mode
/ Setup Mode
ON-SCREEN DISPLAY
The OSD (on-screen display) setting determines whether the
recording i cons and file i nformatio n on video and on the v iewing
scre en appear during play back. The options for th is setting
are on (default) and off.
Note: When thi s setting is on an d you are playi ng back content d irectly on y our camera, you ca n tap
the touch d isplay to quickl y show or hide the r ecording an d file informati on.
AUTO OFF
Your camera ca n be configure d to automati cally power o ff aer a
spec ific period (1 minute - 5 minutes) in whic h no videos or photos
are ca ptured and no buttons are pressed. You can also configure the
came ra to never automati cally power o ff (default).
DATE/TIME
DELETE
This setting lets y ou delete the l ast file, or delete all files and forma t
the memor y card. Deleting al l files is usefu l aer you transfer your
files to yo ur computer a nd want to make room on yo ur memory card
for more content. LED lights blink until the operatio n is complete.
NOTICE: If you select All /Format, the memo ry card is r eformatte d,
whic h deletes ever y file on the c ard.
CAMERA RESET
Camera res et returns all settings to their d efault values. This opt ion
does not reset the Date/Time or your came ra's usernam e and wireless password.
Note: If your ca mera is not respo nding but you d o not want to lose y our settings , press and hol d the
Power/M ode button fo r 8 seconds.
Your camera’s date a nd time are automat ically set w hen you conn ect
your ca mera to the GoPro Ap p or GoPro soware. T his setting lets
you man ually set the date an d time. If the ba ttery is removed f rom the
came ra for an extended p eriod of time, you mus t reset the date and
time (automatically or manually).
62 63
Page 33

/ Connecting to the GoPro App
/ Transferring Files to a Computer
The GoPro App lets yo u control your came ra remotely us ing a
smar tphone or tablet . Features in clude full camera cont rol, live
previ ew, playback and s haring of content, and ca mera sow are
updates.
TO CONNECT YOUR HERO4 SILVER TO THE GOPRO APP:
1. Download th e GoPro App to yo ur smartphone/t ablet from the
Apple App Sto re or Google Pl ay.
2. Open the app.
3. When the app stops s earching for a cam era, tap Co nnect
Your Camera.
4. Follow the on -screen in structi ons to conne ct your cam era to the
app. T he default password for your ca mera is goprohero.
PRO TIP: If the came ra is powered on and ready t o capture videos or
photos, you can pres s and hold the Settings/Tag button [
seco nds to turn Wi reless on/off. You can also do this when the came ra
is powered off.
64 65
] for two
To play bac k your video a nd photos on a co mputer, you must fi rst
tran sfer these files to a compute r.
TO TRANSFER FILES TO A COMPUTER:
1. Download and ins tall the latest GoP ro soware from
gopro.com/getstarted.
2. Connec t the camera to your computer usin g the includ ed
USB cable.
PRO TIP: You can a lso transfer files to a computer u sing a card rea der
(sold s eparately). C onnect t he card reader to your comp uter and ins ert
the microSD c ard into the re ader. You can then t ransfer files to your
computer or delete se lected files on your c ard.
Page 34

/ Protune
/ Protune
PROTUNE BENEFITS
Protune unlocks the camera’s full potential, yielding stunning
image q uality an d cinema-caliber video an d photos optim ized for
profession al productions. Protune gives content creators more
flexibility and workflow efficie ncy than ev er before.
Protune is compati ble with professio nal color cor rection to ols, GoPro
sow are and othe r video and p hoto editing sow are.
Protune ena bles manual control of White Balance, C olor, ISO Limit,
Shar pness and E xposure Value Com pensation for ad vanced con trol
and cu stomization of your video foota ge and photos .
Note: Chang es that you make to th e Protune setti ngs apply only t o the mode in whic h they are
changed . To adjust this sett ing for video ca pture, adjust t he settings in V ideo mode. To adjust this
setting f or photo captur e, adjust the set tings in Photo mode. To adj ust this setti ng for multi-shot
capture, ad just the setti ngs in Multi-Shot mode.
PROTUNE
The options for this setting are off (defa ult) and on. W hen Protune i s
on, PT appears on the c amera disp lays. Protune is availa ble for all
WHITE BALANCE
White b alance ad justs the ov erall color tone of videos a nd photos.
Setting Description
Auto (default)
3000K
5500K
Automatica lly adjust s the color tone bas ed
on the environmental conditions
Warm li ght (incan descent or s unrise/
sunset lighting)
Slightly cool light (cool fluorescent or
average daylight)
6500K Cool light (overcas t conditions)
Native Industry standardized optimized color
PRO TIP: The Native option yields a minimally processed data
file directly from the image sensor that allows for more precis e
adjus tment s to b e made in pos t-produc tion. Recor ding with this
option takes f ull advan tage of the image sensor’s capabilities.
vide o and photo res olutions.
66 67
Page 35

/ Protune
/ Protune
COLOR
Colo r allows you t o adjust the c olor profile o f your video f ootage or ph otos.
Color Setting Resulting Color Profile
GoPro Color
(default)
Flat
68 69
Provides GoPro color-corrected profile (same
great color as w hen Protun e is turned off ).
Provi des neutra l color profile t hat can be
color-corrected to better match footage
captured with other equi pment, offer ing more
flexibility in post- product ion. Due to it s long
cur ve, Flat captures more det ails in shadows
and highlights.
ISO LIMIT
ISO Limit adjusts the ca mera’s sensit ivity in low-ligh t environme nts,
and cr eates a balance bet ween brig htness and resulting image noise.
Image n oise refers to the de gree of grain iness in the i mage.
Protune for Video ISO Limit
Setting Lighting Condition/Resulting Quality
6400 (default)
160 0
400
Brighter video in lo w light, increase d
image noise
Moderately bright video in low light,
moderate image noise
Darke r video in low light, reduc ed
image noise
Page 36

/ Protune
/ Protune
Protune for Photo ISO Limit
Setting Lighting Condition/Resulting Quality
800 (de fault)
400 Darke r photo in low li ght, mode rate image n oise
200
100
SHARPNESS
Shar pness cont rols the sha rpness of your video footage or photos .
Sharpness Setting Resulting Quality
High (default) Ultra-sharp video or photo
Medium Modera tely sharp video or photo
Low Soer vi deo or photo
70 71
Darke r photo in ver y low light, in creased
image noise
Bright photo in indoor lighting, marginal
image noise
Bright photo in outdoor daylight, minimal
image noise
EXPOSURE VALUE COMPENSATION (EV COMP)
Exposure Value Com pensatio n affects t he brightn ess of your vid eo or
photo. A djusting this set ting can improve image qualit y when shooting
in environments with contrasting lighting conditions.
Settings
-2.0 -1.5 -1. 0 -0.5 0 (defa ult) +0.5 +1.0 +1.5 +2.0
PRO TIP: Exposure Value Compensation adjusts brightness
withi n the existing ISO Limit. If brightnes s has already rea ched the
ISO Limit in a low-ligh t environme nt, increa sing the Exposure Value
Comp ensation d oes not have any effec t.
RESET
This o ption reset s all Protune setti ngs to their default value s.
Page 37

/ Battery
/ Battery
MAXIMIZING BATTERY LIFE
The ba ttery ico n on the came ra screen bl inks when t he batter y drops
below 10%. If the batter y reaches 0% while recording, the ca mera
saves t he file and powers off.
To maximize b attery li fe, close the GoPro Ap p. To maximize battery life
when shooting longer-dur ation acti vities, tur n off the touch display.
Extreme cold temperatures can decrease battery life. To maximize
battery life in cold cond itions, keep the c amera in a war m place prior
to use. Shooting at hig her frame rates an d resolutio ns, and shooting
with Protune turn ed on, incre ase power consumption.
PRO TIP: QuikCapture he lps maximize b attery life. For d etails, se e
QuikCapture in Setup Mode.
72 73
The ba ttery cha rges to 80% in approxi mately one hour and 100% i n
approximately two hours when using GoPro’s USB-compatible Wall
or Auto Charger.
You can al so charge the battery outside th e camera usi ng the Dual
Battery Charger (sold separately).
No dama ge occurs to t he camera or battery if used prior to f ull charge.
Spare batteries and additional charging accessor ies are available at
gopro.com.
Page 38

/ Battery
/ Battery
REMOVING THE BATTERY FROM THE CAMERA
The HER O4 Silver bat tery is des igned to have a tight fit to m aximize
reliability in high-vibration activities.
To Remove the Batter y:
1. Open the battery door by placing you r thumb in the i ndentation in
the batter y door (on the b ottom of the camera) and sl iding it to the
le. Allow the d oor to open.
2. Grasp the batter y pull-tab and remove th e battery f rom the cam era.
74 75
BATTE RY STORAGE AND HANDLING
The camera contains sensitive components, including the battery.
Avoid exposing your camera a nd bat tery to ver y cold or very hot
tempe ratures. Low or high temperature condition s may tempora rily
shor ten the bat tery life o r cause the c amera to te mporaril y stop work ing
properly. Avoid dramatic changes in temperature or humidity when
using t he camera , as conden sation may form on or w ithin the ca mera.
The camera housing protects the camera and batter y from water
damage. For more information, see Camera Housing. Do not turn
on your c amera if it is wet. If your camera is alread y on, turn it
off and remove the battery immediately. Allow the camera to dry
thoroughly before using it again. Do not dry the camera or batter y
with an exter nal heat source suc h as a microwave oven or hair dr yer.
Damage to the c amera or bat tery caused by co ntact with liquid is not
covere d under the warra nty.
Do not store your battery with metal object s, such as coins, keys
or necklaces. If the battery terminals come in conta ct with metal
objects, this may cause a fire.
Page 39

/ Battery / Impor tant Messages
BATTERY DISPOSAL
Most rechargeable lithium-ion batteries are classified as non-haza rdous
waste and ar e safe for disp osal in the no rmal munic ipal waste s tream.
Many lo calities have laws in place requiring battery recycling. Che ck
your local laws to make sure that you can dispose of rechargea ble
batteries i n your regul ar trash. To saf ely dispose o f lithium-i on batteries,
protect ter minals from expo sure to other metal wi th packing, mask ing
or elec trical tape so t hey do not cau se a fire while being tr ansported.
Lithium-ion batteries, however, do contain recyclable materials and
are accepted for recycling by the Rechargeable B attery Recycling
MICROSD CARD MESSAGES
No card prese nt. The camera requires a
NO SD
microSD, microSDHC or microSDXC card
(sold s eparatel y) to capture v ideos and p hotos.
FULL Card is f ull. Delete files or sw ap card.
SD ERR
Camera is un able to read c ard format ting.
Reformat the c ard in the ca mera.
PRO TIP: Reformat you r microSD card on a reg ular basis t o ensure
that th e card remai ns in good con dition.
Corporation’s (RBRC) Battery Recycling Program. We encourage
you to visit Call2Recycle at call2recycle.org or call 1-800-BATTERY
in Nor th Americ a to find a convenient re cycling location.
Never dispos e of a batter y in a fire becau se it may explo de.
WARNING: Do n ot drop, di sasse mble, open , crush, b end,
deform , punctu re, shred, m icrowave, i ncinera te or paint t he
camera . Do not ins ert fore ign objec ts into the b atter y opening
on the cam era. Do no t use the ca mera or th e batter y if it has
been dama ged—f or exampl e, if cracke d, punct ured or har med
by water. Disa ssembl ing or punc turing t he batter y can cause
an explos ion or fire.
76 77
Page 40

/ Impor tant Messages
The Frame 2.0 remove camera
The Frame 2.0 PROTIP
The Frame 2.0 insert camera
Quick Release Buckle + Thumb Screw + The Frame = Complete Unit
/ The Frame
FILE REPAIR ICON
If you se e the File Repa ir icon on the c amera disp lays,
your la st video file w as corrupted during record ing.
Press any button to repair the file.
USING THE FRAME
The Frame is the smallest, lightest way to mount your GoP ro. It
provides fu ll-time access to th e microSD ca rd with camera por ts for
live fe ed video, ch arging and t ransfer ring content to your computer.
Inclu ded with Th e Frame is a gla ss Protect ive Lens and a lens cov er
to help g uard the camera le ns from scratches, dir t and debr is.
TEMPERATURE ICON
The Temperature icon appears on the cam era status
scre en when the c amera becomes too hot and need s
to cool d own. Simply let it sit a nd cool before attem pting
to use it a gain. Your camera was designed to i dentify
To Remove the Camera From The Frame:
1. Unhoo k the latch on t he top right si de of The Fram e.
2. Holding the l atch open, slide t he camera out of The Frame.
condition s of overheating an d is designe d to respond
accordingly.
78 79
NOTICE: The Frame does not provide waterproof protection for your
came ra, and is not i ntended for u se in wet, dir ty or extre me conditions.
Page 41

/ The Frame / The Frame
The Frame 2.0 insert camera
The Frame 2.0 with a BacPac
To Secure th e Camera in Th e Frame:
1. Unhoo k the latch on t he top right si de of The Fram e.
2. Holding the l atch open, slide t he camera into The Frame.
3. When the ca mera is flush with The Frame, close t he latch to
secure the camera.
To Use The Frame with the Battery BacPac (sold separately):
1. Unhoo k the latch on t he top right si de of The Fram e.
2. Unhook the metal su pport ar m and extend i t to 90°. The arm mu st
be use d properly to s ecure the BacPa c.
3. Slide the ca mera into Th e Frame until t he BacPac rests again st the
support arm, and then close the latch.
80 81
Page 42

/ Using the Mounts / Using the Mounts
The Frame 2.0 with a BacPac
The Frame 2.0 with a BacPac
ATTACHING YOUR CAMERA TO MOUNTS
To attach your HERO4 Silver camera to a mount, you need a Quick
Releas e Buckle, thumb screw or hardware depending on th e mount
you are u sing. For mo re informa tion on moun ts, visit gopro.com/support.
MIC STAND MOUNT
The Mic Stand Mount lets you capture footage of
your performance or the audience. T he Mic Stand
Mount is compatible with standard U.S. 5/8”-27
mic stands a nd includes an adapter for European
3/8”-16 mic stands.
Quick Release
Buckle
Thumb Screw Housing Complete Unit
USING REMOVABLE INSTRUMENT MOUNTS
With the Removable Instr ument Mount s, you can attach the camera
to your guitar, drums, turntables, keyboards or other instruments.
Thes e temporar y mounts feature n on-dama ging adhesive that is safe
for mos t instru ment surf aces.
NOTICE: Removable Instrument
Mount s are not for use on highly
fragile or ir replacea ble items.
82 83
Page 43

/ Using the Mounts
/ Using the Mounts
MOUNTING GUIDELINES
Follow these guidelines when attaching mounts:
• Attach th e adhesive mount s at least 24 hou rs prior to use. Allow
72 hours for com plete adhesion.
• Adhesive mount s must be mounted onl y on smooth sur faces.
Porou s or textured surf aces do not enable a proper b ond. When
applying the mount, firmly press it into place and en sure full
conta ct over the entire su rface.
• Apply adh esive mount s to clean sur faces onl y. Wax, oil , dirt or
other d ebris red uce adhesi on, which c an result in a weak bon d
and risk of losing the camera should the connecti on fail.
• Attach ad hesive mounts in room tem perature co nditions.
Mount a dhesives d o not bond properly if applied in c old or damp
environme nts to cold or da mp surfa ces, or if the surface is not
LOCKING PLUG
If you are using t he HERO4 Bla ck in high-im pact spor ts such as
surfing or sk iing where significant impac t might occu r, use the lo cking
plug to securely loc k the Quick Rel ease Buckle finger s into place. T he
locking plu g helps to prevent the h ousing from accidentally releasing
from the mount.
To Attach the Locking Plug:
1. Loop th e circular r ing over the thumbscrew. The cir cular ring
act s as a leash to prevent dropping or losing th e locking plug.
2. Slide the Quick Release Buckle into the m ount until it cl icks
into place.
3. Press the U-shaped par t of the plug into the U-shaped space in
the Quick Release Buckle.
room temperature.
For more infor mation on mou nts, visit gopro.com/support.
WARNING: If u sing your c amera wi th a GoPro h elmet moun t or
strap, a lways sel ect a helme t that meet s the appl icable s afety
standa rd. Choos e the rig ht helmet fo r your par ticula r sport o r
activ ity and ma ke sure that i t is the rig ht fit and size f or you.
Inspec t your helm et to ensure t hat it is in go od condit ion and
follow t he helmet ma nufact urer’s ins truct ions on sa fe helmet
use. Any he lmet that ha s sustai ned a major im pact sh ould be
replace d. No helme t can prote ct again st injur y in every accident .
84 85
WARNING: To avoid in jury in t he event of an a ccident, d o not use
the lock ing plug or tether wh en using a mo unting dev ice on a
helmet or o ther pers onal prot ective g ear.
Page 44

/ Frequently Asked Questions
/ Frequently Asked Questions
MY GOPRO WON’T POWER ON
Make sure your Go Pro is charged. To char ge your camera, us e the
included USB cab le and a computer. You can al so use the GoP ro Wall
or Auto Charger.
MY GOPRO WON’T RE SPOND WHEN I PRE SS A BUTTON
Press and ho ld the
your ca mera. Thi s reset saves a ll of your conte nt and settings, a nd
power s off your camera.
MY PLAYBACK IS CHOPPY
Chop py playba ck is typic ally not a prob lem with the file. If your footage
skips , one of these s ituations is likely t he cause:
• Using an incompatible v ideo player. Not all vid eo players s upport
the H.26 4 codec. For best result s, use the latest GoPro so ware,
avail able for fre e at gopro.com/getstarted.
• The computer doe s not meet the mi nimum requi rements for HD
play back. The highe r the resolution an d frame rate of your video,
the harder the computer has to wor k to play it bac k. Make sure
that your computer meets the minimum requirements listed in
Playback Mode.
• Playing a high bit rate HD video file over a low band width USB
connection. Tran sfer the file to t he computer to play b ack.
86 87
Power/Mode button [ ] for 8 seconds to reset
If your computer does not mee t the minimum r equirements, record
at 720p3 0 with Protun e off, and make sure that all other progr ams on
your compute r are closed .
I FORGOT MY CAMERA'S NAME OR PASSWORD
With the cam era powered o n, press an d hold the Settings/Tag button
]. Two seco nds later, pres s and releas e the
[
]. Relea se the Settings/Tag button [ ]. From the Wi-Fi r eset
[
menu, select Rese t. The came ra name is res et, and the pa ssword is
reset to goprohero.
I WANT TO RESET MY GOPRO SETTINGS TO THE DEFAULTS
In Setup mode, select Ca mera Reset. T his option does not reset th e
Date/Time or y our camera’s usern ame and wireless p assword.
I POWERED OFF MY GOPRO, BUT THE BLUE LIGHTS ARE
STILL BLINKING
The bl ue lights in dicate that W ireless is on. With y our camera p owered
off, pres s and hold the Settings/Tag button [
turn off Wireless.
For more answers to commonly aske d question s, see
gopro.com/support.
Power/Mode button
] for four secon ds to
Page 45

/ Customer Support
GoPro is dedicated to providing the best possible
service. To reach GoPro Customer Support, visit
gopro.com/support.
/ Trademarks
GoPro, HERO, the GoPro logo, the GoPro B e a Hero logo, BacPac ,
Protune, Sup erView, and Wear It. Mount It . Love It. are tradem arks or
registered trademarks of GoPro, Inc. in the US and internationally.
Other names and ma rks are the p roperty of their respe ctive own ers.
/ Regulatory Information
To see the co mplete list of countr y certifi cations, r efer to the Important
Product + S afety Infor mation Guid e included with yo ur camera.
88
 Loading...