

Page 1

USER GUIDE
LCD Touch BacPac
REMOVABLE LCD TOUCH SCREEN
FOR YOUR GOPRO.
™
Page 2

To download thi s user guide in a differe nt languag e, visit gopro.com/support.
Pour télécharger ce manuel de l ’utilisateur dan s une autre la ngue, rend ez-vous
sur gopro.com/support.
Wenn Sie dieses Benutzerhandbuch in einer anderen Sprache herunterladen
möchten, besuchen Sie gopro.com/support.
Per sc aricare q uesto manu ale utente in un’alt ra lingua, v isita gopro.com/support.
Para d escarga r este manua l de usuario e n otro idioma , visite gopro.com/support.
Para b aixar este ma nual do usuário e m outro idiom a, acesse gopro.com/support.
このユーザーマニュアルの他言語版をダウンロードするには、
gopro.com/supportにアクセスしてください。
若要下載其他語言版本的使用說明書,請前往:gopro.com/support。
如需下载本用户手册的其他语言版本,请访问 gopro.com/support。
2
Page 3
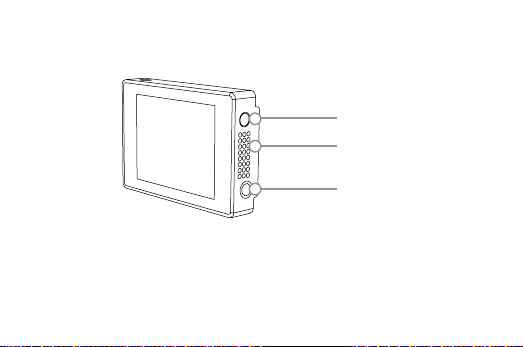
/ The Basics
On/Off Button
Integrated Speaker
3.5mm Headphone Jack
3
Page 4

/ Getting Started
The LCD Touch BacPac a llows for eas y visual control of yo ur GoPro* and its
settings. You can op erate your GoP ro using the BacPa c screen, u sing the
Power/Mode button [
came ra, or using a combinatio n of both metho ds. When touch fu nctionality is
not availab le, use the ca mera butto ns. For infor mation abo ut using the c amera
buttons, s ee the user ma nual for your G oPro.
*Compatible with all HERO4, HERO3+ and HERO3 cameras.
4
] and th e Shutter/Select button [ ] on your G oPro
Page 5

/ Attaching the BacPac to Your GoPro
STEP 1
Slide the hooked en d of the BacPac
into the groove on the r ight side of th e
camera body.
STEP 2
Insert the BacPac connector into the
HERO Por t on the bac k of the camer a.
5
Page 6

/ Removing the BacPac from Your GoPro
STEP 1
Pull back on the le side of the BacPac
marke d with the ar row to discon nect it
from the HERO Port .
6
STEP 2
Slide the hooked en d of the BacPac out
of the camer a groove.
Page 7

/ Turning the BacPac On + Off
The LCD Touch BacPac s creen auto matically t urns on/off whe n the camera is
powered on/off.
To Manually Turn On the B acPac:
Press the On/Off but ton [
To Manually Turn Off the B acPac:
Press and hold the On/Off bu tton [
PRO TIP: To conser ve battery power, tur n off the BacP ac when you are not
using it.
].
] for two seco nds.
7
Page 8

Swipe left Swipe right
Press for 3 sec
Slide down and hold
Swipe down
Swipe up from
bottom edge
Swipe left Swipe right
Press for 3 sec
Slide down and hold
Swipe down
Swipe up/downSwipe from top/bottomSwipe from left edge
Swipe up/downSwipe from top/bottomSwipe from left edge
/ Navigation
HERO4 CAMERAS
Swipe Le Swipe Up from Bottom Edge
Display
camera modes.
Swipe Up/Down Tap
Move through
setting lists.
8
Open the settings
menu for the
current mode.
Select an item, tu rn
a setting on/off.
Page 9

Swipe Down from Top Edge Swipe Right
Swipe up/down
Swipe left/right Double tap Tap Press + hold
Swipe up/down
Swipe down
Close the
settings menu.
Displ ay the last
vide o or photo
captured.
Swipe Le/Right Double Tap
Display
gallery images
(Playback mode).
Change field of
view (FOV) in
preview mode.
9
Page 10

Swipe up/down
Press for 3 sec
Slide down and hold
Swipe down
Swipe up/downSwipe from top/bottomSwipe from left edge
/ Navigation
Press for Two Seconds
Lock the
touch display.
HERO3+ AND HERO3 CAMER AS
Tap
Select an item, tu rn
a setting on/off.
10
Page 11

/ Changing Camera Modes
You can use the LCD Touch BacPac to chan ge camera modes a nd setting s on
your GoPro.
TO CHANGE CAMERA MODES
ON HERO4:
TO CHANGE CAMERA MODES ON
HERO3+ AND HERO3:
Swipe l e to display a ll of the mode s
and th en tap the de sired mode.
Tap the camera mode ic on in the upper
le cor ner, and then ta p the desire d
camera mode.
11
Page 12

/ Playing Back Videos and Photos
Vide o and photo files that are save d on your memory card ap pear as thumbna il
image s on the BacP ac screen.
TO PLAY BACK VIDEOS AND PHOTOS ON HERO4:
1. Swipe le, an d then tap Playback.
2. Swipe to scro ll through the thumbna ils.
Note: For photo s eries (Burst, Ti me Lapse, Night Laps e and Continuou s photos), the thumbn ail displays t he first
photo in the series.
3. Tap a vid eo or photo to open it in full-scree n view.
4. For video, ta p [ ].
5. To retur n to the thumb nails screen, t ap [ ].
6. To exit, tap [ ].
12
Page 13

TO PLAY BACK VIDEOS AND PHOTOS ON HERO3+ AND HERO3:
1. Tap the cam era mode icon in the upper le hand cor ner, and then
tap Playback.
2. Tap a thumbna il to open the video o r photo in full s creen view.
3. To navigate, tap the ic ons, as nee ded.
Note: For photo s eries (Burst, Ti me Lapse, Night Laps e and Continuou s photos), the thumbn ail displays t he first
photo in the series.
4. For video, ta p [ ].
5. To retur n to the thumb nails screen, t ap [ ].
6. To exit, tap [ ].
13
Page 14

/ Changing Camera Settings
Customize yo ur camera’s vi deo and photo capture opt ions using the
settings menu.
TO CHANGE THE SETTINGS ON HERO4:
1. Swipe le to display a ll of the mode s and then ta p the desired mode.
2. From the bottom of the s creen, sw ipe up to open t he setting s menu for
that mode.
3. Swipe up or down to sc roll throug h the settings for that mod e.
4. Tap and s wipe, as needed , to select a new opti on for the setting.
5. To exit the settings menu, s wipe down f rom the top of th e screen,
tap Exit, or press the Settings/Tag button [
PRO TIP: In the settings menu for Setup mode, you can lock the scr een to
prevent tap ping an optio n by accident. For d etails, see your HERO4 u ser manual .
14
].
Page 15

TO CHANGE THE SETTINGS ON HERO3+ OR HERO3:
1. Tap the cam era mode icon in the upper le cor ner, and then selec t [ ]
to enter t he Settings menu.
2. Tap an option to s elect it.
3. To navigate through previo us and next option s, tap [
] and [ ].
4. To navigate through each su b-menu, t ap [ ] and [ ].
5. Tap an ite m to select it .
6. To exit, tap [ ].
15
Page 16

/ Swapping Housing Backdoors
Attachin g the LCD Touch Bac Pac to your GoP ro requires t he use of a deep er
backdoor w hen used wit h the housin g. Three diff erent backd oors are sup plied
with the LCD Touch BacP ac:
• Touch BacPac BackdoorEnab les you to use th e touch screen fu nctionality
of your LC D Touch BacPa c, and delivers w aterproof p rotection t o 10’ (3m).
• Standard BacPac BackdoorMakes your c amera wate rproof to 131’ (40m).
Use when shooting u nderwater or in wet, damp, or di rty cond itions.
• Skeleton BacPac BackdoorNot waterproof. Use in dry, dirt-free
environments only. Enables enhanced audio capture.
The LCD Touch BacPac a lso comes w ith a straig ht-arm exte nsion, whi ch provide s
a full range o f motion when a d eeper bac kdoor is attached to the housing.
16
Page 17

TO SWAP OUT THE BACK DOO R
Step 1
Open the backdoor
of the ho using so it
hangs downward.
Step 2
Gently pull
downward on the
backdoor until it
snaps free from
the hinge.
Step 3
Line up the
replacement
backdoor to t he
hinge opening.
Step 4
Push u pward on
the backdoor until
it clic ks into place.
17
Page 18

/ LCD Touch BacPac Icons
Liste d below are some of the i cons that ap pear on the LCD Touch Ba cPac. For
details about these featur es, see your c amera’s user manual.
Video
Photo
Multi-Shot/Burst
Time Lapse
Playback
Wireless
Battery
18
Spot Meter
Protune
Low Light
Thumbnails
Slideshow
Slow Motion
(in Video pl ayback for HERO3+ a nd HERO3)
Volume
Page 19

/ Important Safety and Handling Information
WARNING: Fai lure to fo llow thes e safet y instr uction s could res ult in fire,
electr ic shock o r other injury or da mage to th e LCD Touch Ba cPac or ot her
pro per ty.
HANDLING
The LCD Touch BacPac c ontains se nsitive com ponents. Do not dr op, disass emble,
open, crush, be nd, deform , puncture, shre d, microwave, incinerate or pa int the
LCD Touch BacPa c. Do not insert foreign o bjects in to the port opening on th e
LCD Touch BacPa c. Do not use th e LCD Touc h BacPac if it has be en damaged —
for example, if c racked, punctured or har med by water. The LCD Touch Ba cPac
scre en is made of glass. Glas s may break if dropped or re ceives a subs tantial
impact, or is cru shed, bent or defo rmed. If glass chips or c racks, do not tou ch
or atte mpt to remove br oken glass . Glass cra cked due to mis use or abuse is
not covered.
19
Page 20

KEEPING T HE LCD S CREEN CLE AN
Clean the LCD s creen imme diately if it co mes in contact with any contaminant
that ma y cause staining, suc h as ink, dye, m akeup, dirt, food , oil or lotion. To clean
the LCD s creen, use a so, sl ightly damp, lint-f ree cloth. Do n ot allow moisture to
enter port openings. D o not use window clea ners, household clea ners, aero sol
sprays, solvent s, alcohol , ammonia or a brasives to clean the LCD Touc h BacPac.
AVOID WATER AND WET LOCATIONS
Do not us e the LCD Touch Bac Pac in rain or near washb asins or other wet
locations without protect ing it. Do not sp ill food or liquid onto the LCD Touc h
BacP ac. If the LCD Touc h BacPac gets wet , turn off the camera and disconnect
the sc reen before c leaning. Allow th e screen to dr y thoroug hly before using it
again . Do not dry the LCD Touch B acPac wit h an external heat s ource such a s
a micro wave oven or hai r dryer. Damage to the LCD Touch Ba cPac caused by
conta ct with liquid is not covered und er the warr anty.
20
Page 21

ALTITUDE AND TEMPERATURE CHANGES
Increases or dec reases in altitud e and temperatur e can cause t he Touc h
Backdoor to bulge s lightly whe n the housin g is sealed clo sed (with or withou t the
came ra inside). Wh ere possibl e, leave the doo r open until yo u are ready to u se it.
USING CONNECTORS AND PORTS
Never fo rce a connec tor into a por t; check for obst ruction s on the port. If the
connector and p ort do not joi n with reasonable ease t here may be a mismatch.
Be sure t he connec tor matches the port an d that conne ctions line up.
TEMPERATURE
Low or high temp erature conditi ons may temporar ily shorte n the batter y life
or cau se the LCD Touch Ba cPac to temp orarily stop working p roperly. Avoid
dram atic chang es in temperature or humidity w hen using the LCD Touch B acPac,
as con densatio n may form on or w ithin LCD Touch Ba cPac. When usin g the LCD
Touch BacPac o r charging battery, the device may get warm. The exter ior of the
LCD Touch BacPa c functio ns as a coolin g surface t hat transfers heat fro m inside
the unit to cooler air o utside.
21
Page 22

/ Regulatory Information
To see the full reg ulatory informatio n section , refer to the Important Produ ct and
Safet y Information Gui de, includ ed with this produ ct.
22
Page 23

Learn more about GoPro
products at gopro.com
Please Recycle
130-07348-000 REVB
 Loading...