


User Operation Manual Of Mars 100 Golf Rangefinder
○
R
1

Contents
Special Announcement .....................................................................................4
Attentions ...........................................................................................................5
About GPS..........................................................................................................6
Thank You for Choosing Mars 100...................................................................7
Using Conditions...............................................................................................7
General Description of Hardware.....................................................................8
1. Screen Display Description.............................................................8
2. Basic Specifications.........................................................................9
3. Accessories List.............................................................................10
4. Charging Description.....................................................................11
Function Description.......................................................................................12
1. Start Menu .......................................................................................12
1) Satellite Position....................................................................12
2) Automatic Course Searching ...............................................13
2. Setting Menu...................................................................................13
1) Select Course.........................................................................14
2) Select Back Tee......................................................................14
3) Delete Course.........................................................................15
4) Unit – Yard/ Meter...................................................................15
5) Clear Time...............................................................................16
6) Backlight Setting....................................................................16
7) Language................................................................................17
8) Set Time..................................................................................17
9) Equipment Information .........................................................18
3. Electronic Score Card....................................................................18
4. Main Menu.......................................................................................19
5. Swing Distance...............................................................................20
2

6. Green Location Correction............................................................21
Download Course ............................................................................................22
1. USB Driver Setup............................................................................22
2. Connect Mars 100 to a computer..................................................23
3. Setup of GOPLANET Mars100 Main Program..............................24
4. Mars100 Software Operation Description....................................25
1) Start Software of GOPLANET Mar100..................................25
2) New Member Registration.....................................................26
3) Certification of Registered E-mail........................................27
4) Becoming Premium Member................................................28
5) Paying Process......................................................................29
6) Mars100 Reconnect Mars 100...............................................31
7) Search Courses......................................................................32
8) Course Information & Zone Selection.................................33
9) Payment Rate Selection........................................................34
10) Download courses into your Mars 100............................35
Add New Course ..............................................................................................36
Questions & Answers......................................................................................37
3

Special Announcement
Compass Systems Corporation
E-mail: service1@goplanetgps.com
The operation manual herein belongs to Compass Systems Corporation and
anyone or any organization shall not duplicate, reprint, photocopy, scan or alter
its whole or part content (including characters and pictures) for the purpose of
use or sale in any kind of way privately unless acquiring a prior written consent
of Compass Systems Corporation.
Compass Systems Corporation is entitled to modify any information in the
operation manual without notifying anyone or any organization (including
persons who have or have not purchased the manual).
4

Attentions
Global Position System (GPS) was developed and is managed by United States
Department of Defense (DOD) that is responsible for its normal operation and
position precision control; the U.S. is entitled to affect function or position
precision of the whole system without prior notification or announcement based
on its political considerations or safety of national defense.
In order to use Mars 100 correctly and safely, you must be aware of some
specific knowledge; please read the following attentions in the manual prior to
operating the device:
• Mars 100 was only designed for the purpose of leisure and recreation and
it isn’t applicable for industrial or special measurement.
• Mars 100 is only an auxiliary device, so we will not take any legal liability of
accidents due to mistaken operation or wrong judgment by using Mars 100
for measurement.
• Please do not try to dissemble Mars 100 or repair any part of the device
discreetly.
• Please do not place Mars 100 in a place exposing to direct sunlight or high
temperature.
• Colors presenting by images in the manual are only for your reference and
actual color combination of the device is decided by the actual
manufacturing.
5

About GPS
Global Position System (GPS) is a satellite system developed by Department of
Defense of US. GPS consists of 32 satellites that encircle the earth and are
11,000 miles away from the ground. These satellites make two circles of the
earth per day and emit signals of extremely low power which will be received
and recorded by 5 ground stations. These ground stations will use precise time
signals to confirm accurate position of each satellite. Your GPS receiver can
“pick” signals sent out by the satellites. And an a ccurate latitude, longitude and
height can be determined through calculation on positions and distances of at
least 4 satellites.
WAAS (Wide Area Augment ation System) can enhance the precision of GPS. It
is designed by Federal Aviation Administration of US and mainly used to
enhance precision of GPS on a plane. WAAS is combined with extra ground
station groups which were set up in the places located precisely. These ground
stations can work together with a master console so as to improve accuracy of
satellite signals and reduce errors to about 3 meters.
6

Thank You for Choosing Mars 100
Compact design and friendly interface allow Mars 100 to be your best electronic
caddie, which can help you to swing more strategically and manage the play
route more easily. As long as you operate it in conformity to the guidance, you
can be clear of the front, middle and back side of the putting green at a glance.
Mars 100 is the easiest GPS special for golf in the world and the operation
manual will explain characters and operation method of the product point by
point to help you to achieve the most outstanding performa nce on the golf
course. In order to ensure the best performance of the product and extend its
service life, please read these instructions before using your Mars 100.
Using Conditions
As Mars 100 uses GPS, it is available only in the places that can receive satellite
signals, excluding places indoor or in water. The device is applicable for golf
distance measurement under the temperature from 0℃ to +60℃.
7
General Description of Hardware
①
y
③
④
y
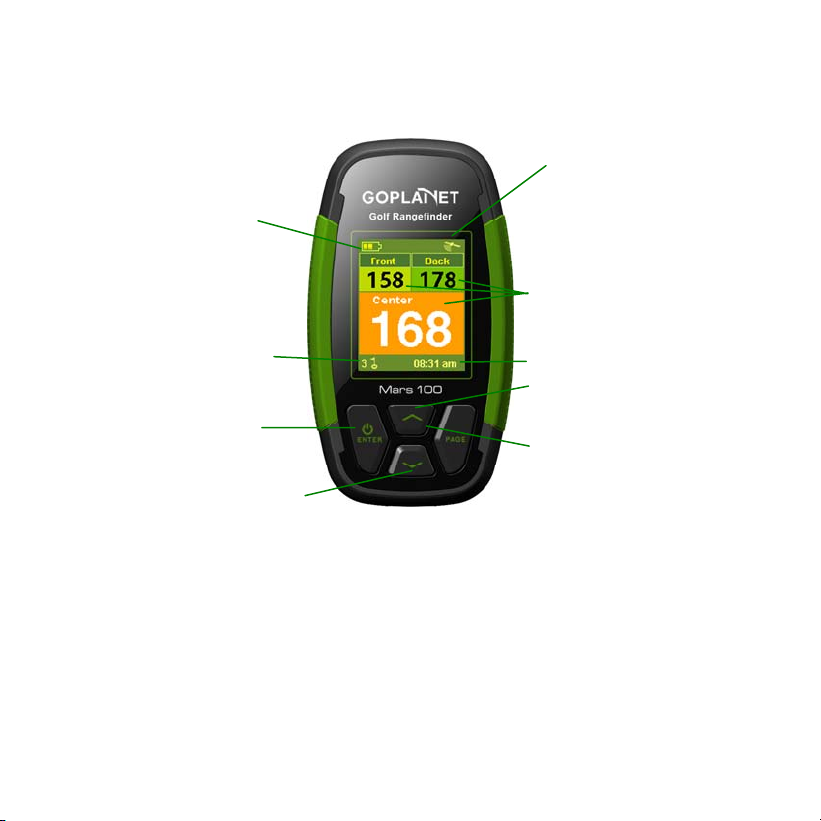
1. Screen Display Description
Battery State Symbol
Hole Number or Timer
Execution/ Power Ke
Satellite Signal
Relative distance
between satellite and
putting green (center,
front and back side of
the putting green)
Time
Upward (forward)
②Page Switching Key
Downward (backward) Ke
Key Description:
①Execution/ Power Key: for power on/ off, putting green/ putting distance
display page and parameter selection and application.
②Page Switching Key: for switching display page, setting start point of swing
distance and correcting course.
③Upward (Forward) Key.
④Downward (Backward) Key.
8

2. Basic Specifications
Number of course information
that can be stored
Receiving chip High sensibility receiving chip
Location Time
Hot Start < 1 second
Warm Start < 38 seconds
Cold Start < 42 seconds
Location Accuracy
Single location accuracy without
SA interference
Antenna Built-in antenna
Power
Battery Type Rechargeable Lithium Battery
Duration About 10-12 hours
Charging Time About 4-5 hours
Interface
USB interface, accessible to
computer
Volume Length 97 x width 53.6 x thickness 22
Weight About 90 Kilograms
Display Size 1.8 inchs
Water Repellent Function IPX6
Operation Temperature Limits
80
< 10 meters
(1100mAh)
Yes
(mm)
0 ℃ to + 60 ℃
9

3. Accessories List
Thank you for purchasing Mars 100. Please confirm whether your Mars 100
contains the following items:
• AC charger
• USB connection line
• Grip Strap Unit
• Protective Case
• CD
PS: Should any item above be neglected, please contact a local distributor or
retail dealer of the product.
10

4. Charging Description
• A rechargeable lithium battery is built in the body of Mars 100.
• Insert one end of the USB connection line into the connection port under
the back rubber cover and insert the other end of the line into the AC
charger; then joint the charger plug with a power outlet.
• Battery symbol on the screen will display battery charging state during
charging.
• It needs 4-5 hours to charge the battery after its power is exhausted.
• A Mars 100 can be used for about 11 hours after charging fully. And it
can be still used for 8 hours when power reduces and the battery
symbol shows two grids. When the battery symbol shows one grid, it
is still available for two-hour use.
• Battery can be charged before exhausting, but please do not charge it
excessively.
• The best and fastest charging method is to charge the battery after the
device is powered off.
• Please keep the USB connection line and charger well af ter charging and
cover the connection port with rubber cover for the convenience of use in
the next time.
• The device is equipped with auto power saving function; if it is not
used for 30 minutes, the power will be off automatically and the menu
of last time use will reappear when it is powered on.
11

Function Description
Please confirm you are staying in an open area without shelter of b uildings and
woods so as to ensure the best reception of GPS satellite signals.
1. Start Menu
Press Enter for 3 seconds until the power is on. Then
three items will show on the start menu: <Play>,
<Settings> and <Power off>. You can move the mark
by pressing <Upward> and <Downward> and enter or
execute the selected item after moving the mark to it
and pressing Enter.
1) Satellite Position
You can enter the main menu after choosing <Play >
on the start menu; you will see a satellite icon on the
top right corner keeps twinkling when you st art your
Mars 100 for the first time, which means the satellite is
still searching for signals. The icon will stop twinkling
after it locates and then you can use full functions of
the device. Location time of the satellite will reduce
when you use the device in the next time as Mars 100
will remember your location of last time.
12

2) Automatic Course Searching
2. Setting Menu
Mars 100 can provide an automatic course searching
service; when you arrive at a course, please stay at
the start menu for a moment after power is to wait for
satellite location, then Mars 100 will ask you whether
to choose the course after location. You can choose
<Yes> to use the course information or choose <Play
Previous> to maintain original course setting or
choose <Select Course> to select the course you
need in the course list. Please note that you need to
download course information in your Mars 100 before
applying the auto course searching function.
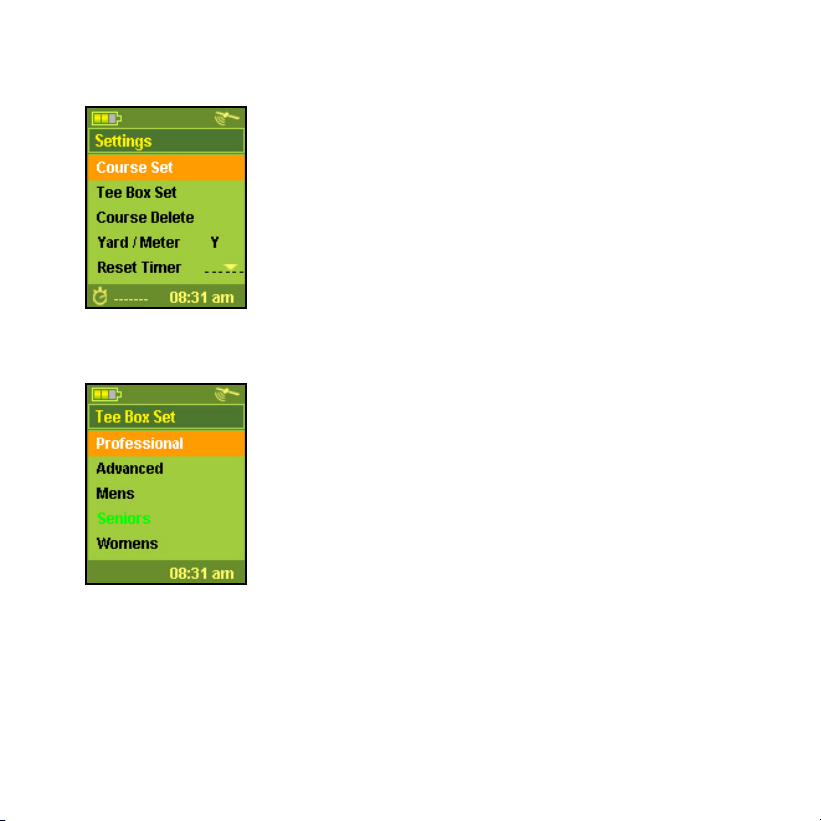
Before using the product, you need to select a course
and back tee at first. The menu also provides other
settings. After you move the mark to item <Settings>
with Downward and press Enter on the start menu,
you will see the following items:
13
1) Select Course
On the setting menu, move the mark to <Course Set>
and press Enter, then you will see a series of course
information stored in the device. Use Upward and
Downward to move the mark to the course name you
want and press Enter , then the selected course name
will turn to red and the menu will return to the setting
menu automatically.
2) Select Back Tee
Mars 100 allows you to choose back tee discretionally.
At first, please confirm you have selected a course,
then move the mark to <Tee Box Set> on the setting
menu and press Enter, no w you can see a series of
back tee choices (back tees not provided by a course
will be displayed in green and you can not select
them); the selected back tee will turn into red and the
menu will return to the setting menu automatically
after you select a back tee by pressing Enter.
14

3) Delete Course
Move the mark to <Course Delete > and press Enter
on the setting menu; then move the mark to the
course name you want to deleted and press Enter, a
menu will pop out to ask you whether you are going to
delete the course, the course selected will be deleted
after choosing <OK>. It is suggested not to delete the
course unless the storage capacity is full as you need
to pay for download the course information again after
deleting it.
4) Unit – Yard/ Meter
Distance unit preset is yard. If you want to change it
into meter, you can choose <Yard/Meter> on the
setting menu and press Enter , the unit will be cha nged
into meter; if you press Enter again, it will be switched
into yard.
15
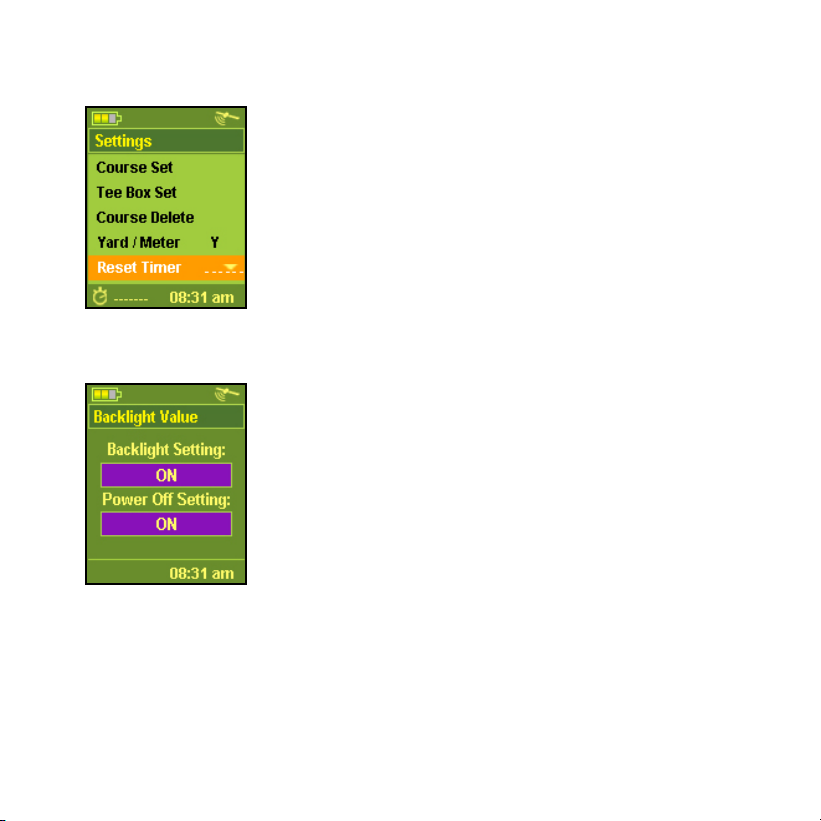
5) Clear Time
Mars 100 provides you a simple timer to help you
record the time spent in the play from play off. You can
return the timer to zero at any time only by selecting
<Reset Timer> and pressing Enter; then the timer will
return to zero and retime. If you want to know present
play time during a play, please go to the score card
menu.
6) Backlight Setting
Mars100 can provide auto backlight off function to
save power; if you don’t touch any key for a specific
time period, screen of Mars 100 will turn to dark
automatically. You set the duration for backlight off
discretionally as long as you use Upward and
Downward to increase or reduce the duration and
press Enter after you choose <Backlight Setting>
and press Enter on the setting menu; the setting menu
will reappear after adjusting.
16

7) Language
You can choose <Language> and press Enter to
select the language you want with Upward and
Downward Key; the language will be switched after
you select it and press Enter.
8) Set Time
Mars 100 will set present time automatically according
to relevant data of GPS satellites; also you can adjust
the daylight saving time of your location. You can
increase and reduce the time with Upward and
Downward Key after choosing <Time zone Set> and
pressing Enter on the setting menu. The setting menu
will reappear after you adjust the time and press
Enter.
17

9) Equipment Information
You can check model, software/ hardware version and
product serial number (S/N) of the product by pressing
Enter after choosing <Unit Info> on the setting menu;
you can go back to the setting menu by pressing Enter
again.
3. Electronic Score Card
Score card will provide information relevant to the fairway. You can go to the
score card menu by pressing Page Key on the main menu. Information
displayed by the score card menu is as following:
• Course Name
• Hole Number (will change according to the hole
number selected on the main menu)
• Par
• Hole Difficulty
• Total Length of the Fairway
18

4. Main Menu
The menu will be used most frequently when you use
Mars 100. You can choose <Play> on the st art menu
and press Enter; alternatively , you can press Enter for 3
seconds to return to the start menu on any menu; then
you can choose <Play> and press Enter.
1) The main menu will display the relative distances between you and the
front, middle and back side of putting green clearly. You can press
Upward and Downward Key to switch the hole number. If current hole
number is <1>, you can press Upward to switch to the second hole and
you will see the hole number in the bottom left corner will change into
<2>; then the main menu will display the relative distances between your
present location and the front, middle and back side of putting green of
the second hole.
2) The menu can not only display the relative distances between your
current location and the front, middle and back side of putting green, it
also can allow you to check battery state, satellite reception state,
current hole number and time.
19
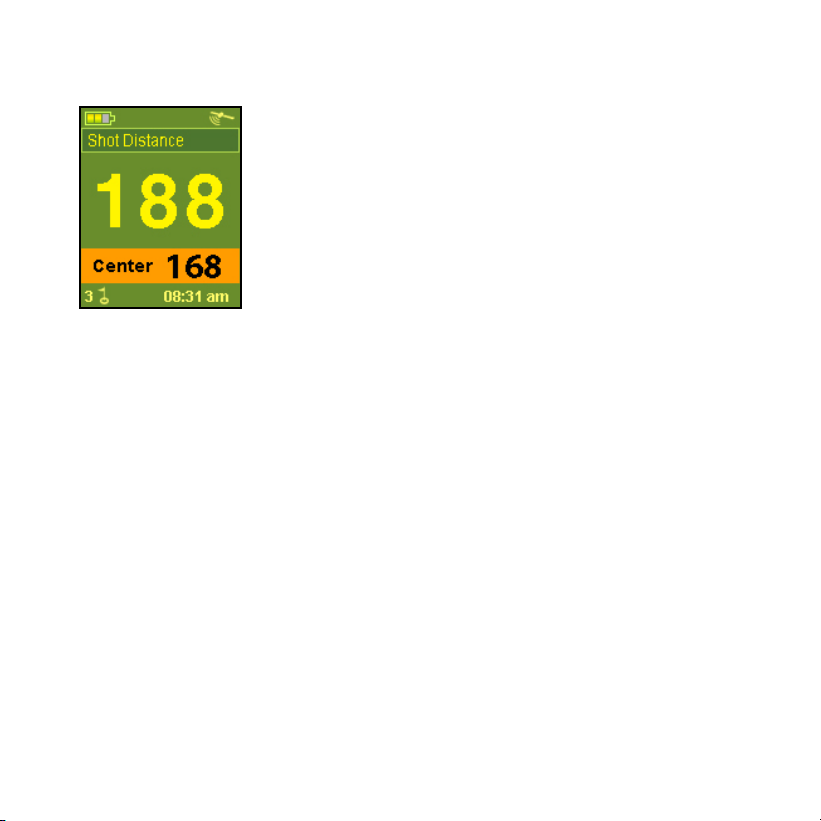
5. Swing Distance
Swing distance function can let you measure your play
distance easily and precisely. You can press Enter to
go to the swing distance menu on the start menu.
1) Press Pag e Key for 3 seconds to reset the distance to 0 when you get to
the playing position. When you go to the placement after playing, the
menu will display the distance between your current positio n and playing
position instantly.
2) Please press Enter when you get to the placement, thus your current
swing distance will be saved. If you want to escape from the swing
distance menu to return to the start menu, please press Page Key.
3) Also you can use the pointer of swing distance function to make an easy
measurement on the distance between any two points on the course.
20

6. Green Location Correction
GPS green location information in the product is
determined on the actual course situation when the
information is collected; in case the green location has
some changes, you can use the function to relocate it.
1) For example, if you are going to correct the distance of the green center
of the third hole on a course today, please press Upward and Downward
to choose the third hole on the start menu after you get to the green
center; then press Page for 3 seconds and you will see the figures are
twinkling, which means the green correction function has been started.
2) Press Upward and Downward to change the twinkling figures into the
green center and press Enter again, then Mars 100 will ask you whether
to correct the green center? The distance will be reset as <0> after you
press <OK>, which means the distance between you and the green
center is 0.
3) You can also use Upward and Downward to choose the front or back
side of the putting green to make corrections continuously af ter finishing
the correction on green center distance.
4) The above m ethod is available when you want to alter or correct the front,
middle and back side of putting green of any course. However you need
to move to the front, middle and back side of putting green prior to
corresponding corrections.
21

Download Course
1. USB Driver Setup
1) Put the setup CD in the CD-ROM. Please remember do not connect
Mars 100 to a computer before the USB driver setup is completed.
2) The setup program will be executed automatically.
22

3) Please choose the language in the bottom left corner and click <USB
Driver> in the bottom right corner on the dialogue box to install the driver
according to instructions.
2. Connect Mars 100 to a computer
1) Plug one en d of USB connection line to the USB interface on the
computer.
2) Plug the oth er end of USB con nection line to the back con nection port on
Mars 100.
3) Press the Enter Key on Mars 100 for 3 seconds till the power is on.
4) The computer will search the identified Mars 100 automatically, which
means the USB Driver has been installed successfully.
23

3. Setup of GOPLANET Mars100 Main Program
1) Please click <Mar s100> to install the program and execute the setup
steps according to the instructions when Mars100 setup wizard appears.
2) Please conduct the setup in conformity to instructions on the menu and
click <Close> to complete the setup after the software is installed.
24

4. Mars100 Software Operation Description
Please confirm the following items before starting the Mars 100 software:
• USB driver and Mars 100 main program both have been in stalled.
• Mars 100 has been connected to the computer a nd has been started.
• Please confirm your co mputer has connected with the internet.
1) Start Software of GOPLANET Mar100
Use the GOPLANET Mars100 icon on the desktop to st art the program by
double clicking.
25

2) New Member Registration
If you are using the software for the first time after starting the program, a
member registration menu will show up; please input your E-mail and
password and choose product name as Mars 100; then press <Joi n Now>.
(The registered E-mail box will be your member account and the blue
characters below the registration menu are your product serial number. And
you will not need to input any data when you start the sof t ware next time after
the registration.)
26

3) Certification of Registered E-mail
The system will send a certification letter to your registered E-mail box after
your data is filled up; please click the linkage on the certification letter.
<Note> if you cannot receive the certification letter , please send a letter with
subject of “Member Registration” to the service box of GOPPLANET
service1@goplanetgps.com
with your registered E-mail box, in which please
indicate the serial number of your Mars 100; your account will be opened after
your letter content is confirmed no mistake.
27

4) Becoming Premium Member
The system will guide you to the webpage that announces your successful
registration after clicking the linkage on the certification letter.
You must become a premium member at first if you want to download course
information to your Mars 100. You can enjoy the complete functions on the
website immediately after clicking <Pay Now!> on the page and paying the
lifelong membership fee of USD 9.99.
28
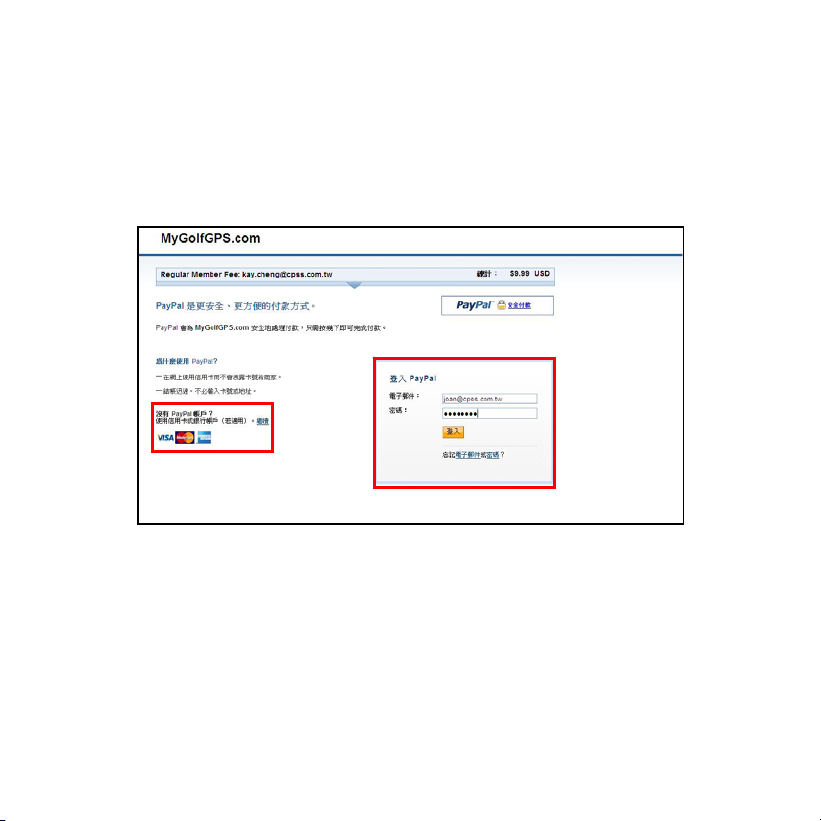
5) Paying Process
After clicking <Pay Now!>, the system will guide you to the PayPal Payment
Page; please enter your account if you have held a PayPal account; you can
choose to pay the fee by online credit card on the lower left side of the page if
you don’t have a PayPal account.
<Note> if you can not see the PayPal payment page, please check
whether your computer can receive Cookie. Go to Tool on the upper side
of your IE Æ Choose <Tool> Æ <Internet Options> Æ <Privacy> Æ
<Advanced> Æ tick up both <Override automatic cookie handling> and
<Always allow session cookies> Æ confirm.
29
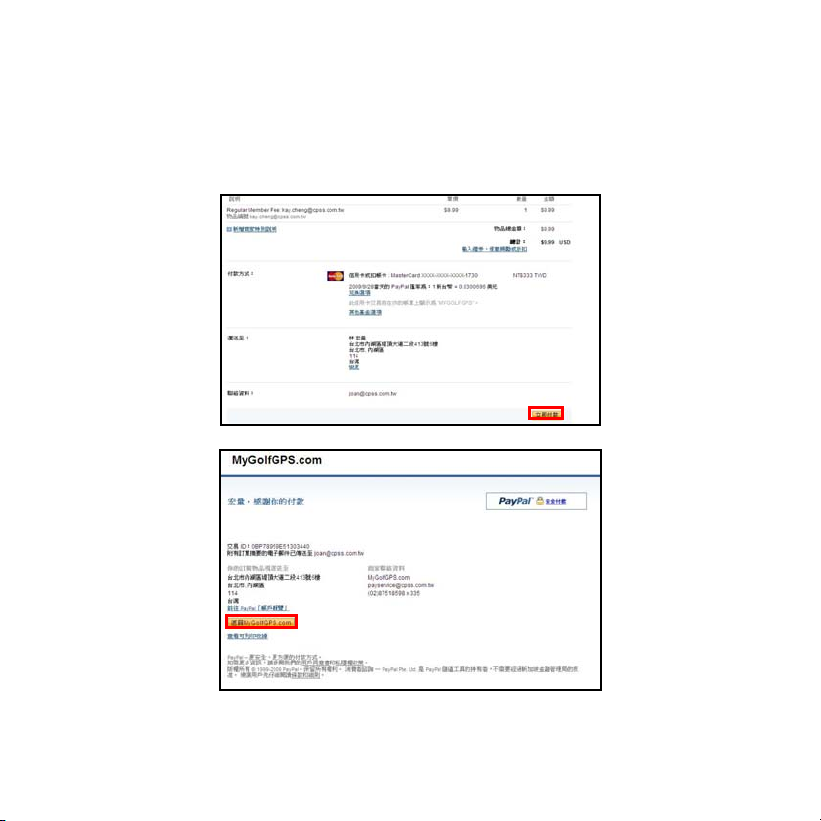
Please confirm the data relevant to articles to be purchased, amount and
payment information is right; then click <Pay Now!> on the lower right side;
PayPal will inform you of payment completion after the information is sent out;
please click <Return to MyGolfGPS.com> to go back to MyGolfGPS website
after payment is completed.
30
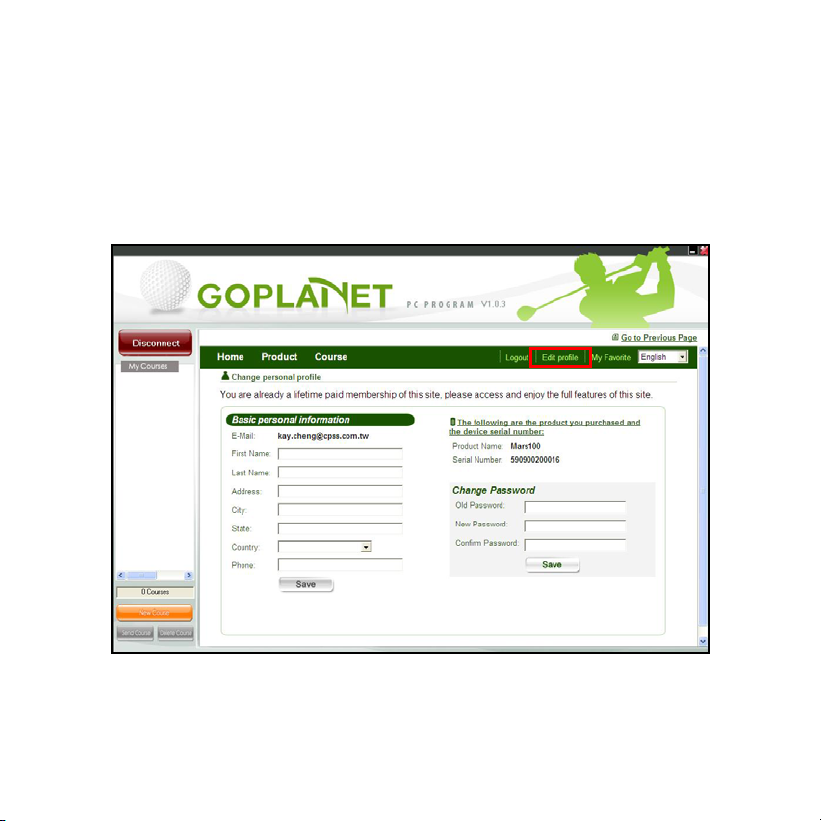
6) Mars100 Reconnect Mars 100
Please go back to the software Mars 100; click <Disconnect> on the upper
left side at first, then click <Connect> to reconnect your Mars 100; after you
choose the language and enter the Homepage, click <Edit Profile> on the
upper right side to check your payment state; if you haven't become a
premium member, you can click <Pay Now!> on the page at any time to pay
the fee.
31

7) Search Courses
You can enter course name, choose nation/ area or click <Course> to choose
the course in your country on Google Map; if you want to download GPS files,
please choose the courses of which GPS fields contain illustrations; these files
have included green distances and sco re cards.
32

8) Course Information & Zone Selection
You will enter the course information page after choosing a course; you can
choose a zone data to download on Download File on the lower side of the
page and the download process will begin after you click any one of the zone
names.
33

9) Payment Rate Selection
If your remaining download time is not enough, the system will guide you to
the payment page; you can acquire preferences by choosing different
payment rate; please refer to 5) Payment Process on Page 29 for the payment
method.
34

10) Download courses into your Mars 100
After the payment is completed, you can go to the download page and click
<Download> to download course into your Mars 100, the downloaded
courses will appear on My Courses List on the left.
<Note> please press <Disconnect> to exit the sof t ware before using your
Mars 100 and do not pullout USB connection line directly so as to avoid
damages on the device.
35
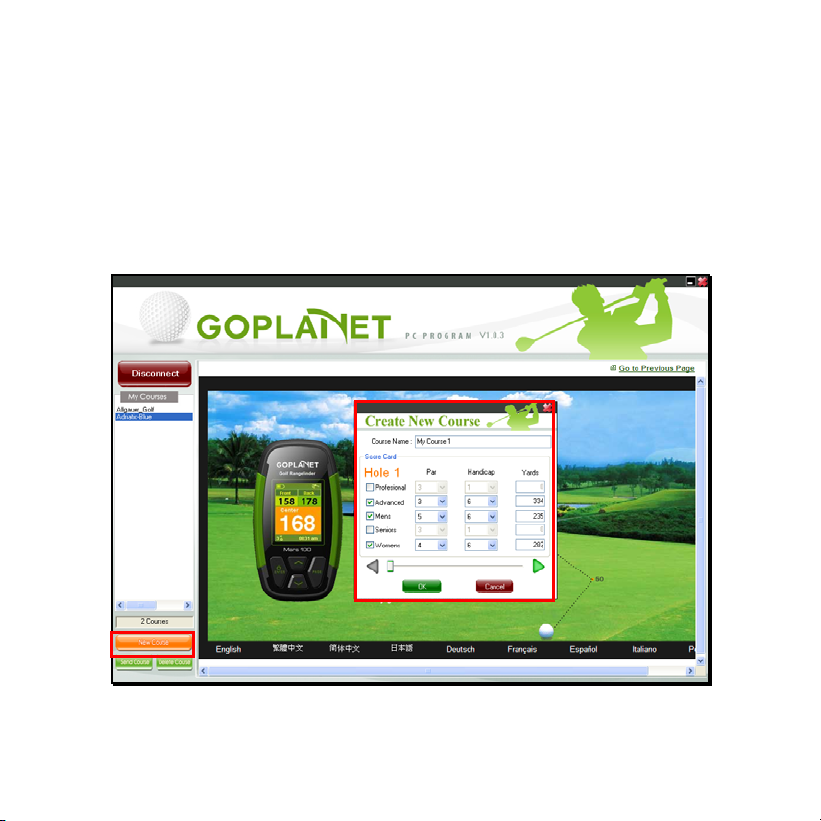
Add New Course
If you can not find the course you want, the software can provide you the
function of creating a new course. Please click <New Course> on the lower left
side, then the following menu will appear, on which you can enter information of
course name (limited to 20 characters) and score card etc.; now you can upload
the information to your Mars 100 after clicking <OK>. Your personal putting
distance information can be defined in reference to the method of green location
correction on Page 21.
36

Questions & Answers
Situations Possible Problems Solutions
The device
cannot be
started
The device
cannot
detect
satellites
The device
cannot
connect with
a computer
You can go to <Customer Support> on www.mygolfgps.com to download the
latest version of user manual or acquire more relevant use information.
1. Battery voltage is
too low.
2. You didn’t press
Enter Key for 3
seconds.
1. Time for
accessing satellite
signal is not
enough.
2. The device is
suffering from the
effect of shelters.
1. The device is not
connected with a
USB connection
line correctly.
2. The driver is not
installed.
1. Charge the battery.
2. Press Enter until the power is
on.
1. Check whether the satellite
icon keeps twinkling; if it stops
twinkling, the satellite location
has finished.
2. Keep the device in an open
space without building shelter.
1. Check whether the USB
connection line has been
connected correctly or change
another USB connection line.
In addition, confirm the device
has been started.
2. Setup the driver correctly
again.
37

R
○
www.mygolfgps.com
Copyright © 2009 Compass Systems Corp. All rights reserved.
 Loading...